Category

Katy Hege

A lot of teams assume an HTML email builder is just a drag-and-drop editor with reusable modules and some brand colors layered on top. In reality, building a production-safe email builder — especially for Salesforce Account Engagement (formerly Pardot) — is far more complicated than most people realize.

Modern page builders are designed for websites. HTML email is an entirely different environment.

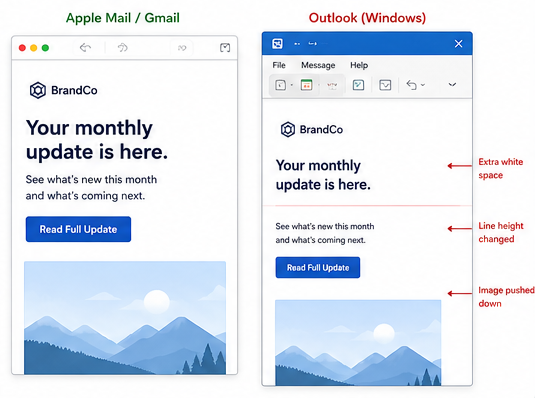
One of the biggest challenges is that Outlook still relies on the Microsoft Word rendering engine. That means many of the layout techniques developers use every day on websites simply do not work in email. Flexbox and CSS Grid are unreliable, modern responsiveness is inconsistent, and something as simple as a background image often requires completely different code for Outlook than it does for Gmail or Apple Mail.

How email layouts render in Outlook vs. Gmail

That disconnect creates problems marketers usually do not discover until campaigns are already in production. A layout that looks perfect in a visual editor can suddenly break when someone duplicates a module, changes copy length, swaps a image, or adjusts spacing.

We ran into this repeatedly while building custom email builders for MCAE teams. The more flexibility marketers wanted, the more important structural guardrails became.

Dynamic modules were one of the biggest hurdles. Unlike websites, email layouts cannot intelligently adapt to changing content. If a section was not coded carefully, adding one extra line of copy could shift alignment in Outlook or create unexpected gaps between sections. Even repeatable modules became complicated because table-based email structures are extremely fragile compared to modern web layouts.
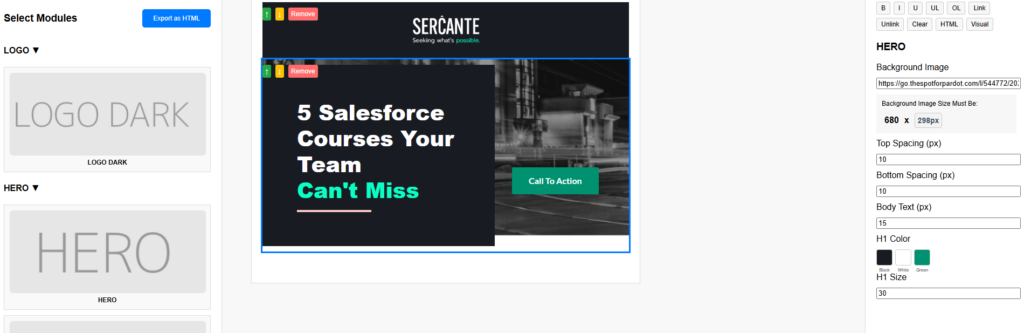
Show repeatable modules, spacing controls, or inline editing tools. This helps demonstrate that these were real usability problems you solved internally.

We also found that many drag-and-drop builders export bloated HTML filled with unnecessary wrappers, duplicated styles, unused classes, and editor-specific attributes. The email may still render, but the output becomes difficult to troubleshoot, maintain, and QA over time. In some cases, excessive markup can even contribute to Gmail clipping or rendering inconsistencies across clients.

Instead of treating the visual editor and the exported email as the same thing, we separated them entirely. Inside the builder, marketers could still use visual controls and editing tools, but during export we stripped out unnecessary editor markup so the final output stayed cleaner and more production-safe.

A cropped code comparison showing “typical repeatable removable sections in Pardot” versus your cleaner exported HTML. Even non-developers visually understand the difference when one side looks dramatically more bloated.

Background images became another major challenge. Supporting them properly in Outlook still requires VML, which means the visible HTML version and the Outlook fallback version both have to stay synchronized. We found that even small adjustments — like changing the height of a content area or replacing a hero image — could create rendering issues if those values drifted apart.

Eventually we built custom controls that updated both the HTML and VML automatically so marketers never had to touch the underlying code.

Website builder

Accessibility was another area we wanted to improve because many visual email builders unintentionally generate inaccessible markup. It is easy for editors to produce emails with poor color contrast, image-heavy content, missing structure, or mobile text that becomes difficult to read. We started building more controlled editing systems that preserved brand consistency while still allowing enough flexibility for marketers to make updates safely.

Mobile responsiveness introduced its own set of problems. Websites can rely on modern responsive frameworks, but email clients support media queries inconsistently. That forces developers to use hybrid table structures, controlled stacking patterns, and Outlook-specific fallbacks just to achieve reliable mobile behavior.

Even something as simple as centering content conditionally can become surprisingly difficult in email.

A mobile before-and-after showing a broken stacked layout compared to the corrected responsive version. (Outlook)

Over time, our approach shifted away from trying to replicate website builders and toward building tools specifically for the realities of HTML email. That included custom inline color pickers for branded text, repeatable content sections, controlled spacing tools, background image swapping, automatic Outlook height syncing, and cleaner export handling that removed unnecessary builder code before deployment.

The goal was never unlimited flexibility. In email, too much freedom usually creates instability.

The real goal was giving marketers enough control to work efficiently without accidentally breaking rendering, accessibility, responsiveness, or brand consistency in the process.

A streamlined email builder for marketers

For teams using Salesforce MCAE, custom email builders can dramatically improve scalability while reducing QA issues and production risk. The right builder does not just make emails easier to edit — it helps protect deliverability, maintain consistency across campaigns, and reduce the amount of development cleanup required after every send.

Custom email builders can give marketers flexibility without sacrificing deliverability or brand consistency.

If you’re looking for a more flexible and scalable email builder solution that works with your marketing automation platform, reach out to the Sercante l Trilliad team. We’ll help you streamline your email workflows and accelerate time-to-launch for your campaigns.

If your campaign attribution feels unreliable lately, you are not imagining it.

Over the past few years, websites have become significantly more complicated from a tracking perspective. Cookie consent platforms are stricter, browsers are limiting third-party tracking behavior, iframe forms are increasingly common, and many organizations are unknowingly blocking the very scripts responsible for preserving attribution data.

The result is a frustratingly common problem: marketing teams are still generating leads, but the reporting behind those leads is becoming harder to trust.

You may already be seeing symptoms of this without realizing where the problem originates. Paid traffic suddenly appears as Direct Traffic in Salesforce. Campaign reporting in Salesforce Marketing Cloud Account Engagement (MCAE) does not align with GA4. Hidden fields occasionally come through blank. Referrer values disappear entirely between the landing page and form submission. Everything appears functional on the surface, yet attribution becomes increasingly inconsistent underneath.

The difficult part is that these issues rarely break the user experience completely. Forms still submit successfully. Leads still sync into Salesforce. Campaigns still launch. But somewhere between the website, GTM, MCAE, and Salesforce, pieces of attribution data quietly disappear.

Why UTMs Disappear Between Landing Pages and Forms

One of the biggest attribution issues we encounter is the silent loss of UTM parameters during the user journey.

A visitor may arrive on your website through a paid campaign with perfectly structured UTMs attached to the URL. After browsing a few pages, they eventually convert through a form on another page or inside a modal. By the time the form submits, the original attribution data is gone. What should have been reported as Paid Search or LinkedIn Ads suddenly becomes Direct Traffic.

This usually happens because the website is not actually persisting attribution data across the session. Many implementations only read UTMs from the landing page URL itself and never properly store them for later use. Once the visitor navigates away from that first page, the attribution values disappear unless custom persistence logic exists to preserve them.

In other cases, timing becomes the issue. GTM may load after the form renders, hidden fields may populate too late, or the scripts responsible for storing attribution values may never execute because cookie consent settings prevented them from loading altogether.

The frustrating part is that none of this is immediately obvious. The form still works. The lead still appears in Salesforce. It often takes weeks or months before someone notices reporting inconsistencies across systems.

iframe Forms Create Attribution Blind Spots

Iframe forms introduce another major challenge that many marketing teams underestimate.

When a form is embedded through an iframe, browsers frequently treat the iframe source itself as the referrer instead of the actual page the user visited. This creates a disconnect between the website experience and the form experience. If your website lives on one domain while the form is hosted on another, the form may never properly inherit the original traffic source.

This becomes especially problematic for organizations using MCAE forms embedded into CMS platforms like WordPress or landing pages that rely on multiple subdomains. Without additional handling, important session and attribution details often fail to pass cleanly between the parent page and the embedded form.

Iframe forms also complicate cookie sharing, session continuity, analytics tracking, and hidden field population. Many companies assume embedded forms are essentially plug-and-play solutions, but reliable attribution almost always requires additional development work beyond the default embed code.

Why Blocking GTM Entirely Can Hurt Attribution

Cookie consent compliance has become increasingly important, but many implementations unintentionally break attribution in the process.

One of the most common mistakes we see is blocking Google Tag Manager entirely until a user explicitly accepts cookies. While the goal is usually privacy compliance, the side effect is that critical attribution logic never executes at all.

In many environments, GTM is responsible for storing UTM parameters, capturing referrer values, populating hidden fields, managing session data, and coordinating analytics events across platforms. If GTM itself never loads, those processes simply do not happen.

Organizations often believe they are only preventing marketing pixels from firing, when in reality they are disabling the entire mechanism responsible for preserving attribution data.

A more modern approach is typically to allow GTM to load while using consent controls inside GTM to selectively block non-essential tracking tags until consent is granted. This preserves important functionality without immediately firing advertising or analytics cookies.

That distinction matters far more than most teams realize.

Organic and Paid Attribution Should Not Be Treated the Same

Another common problem is treating all traffic attribution identically.

Paid traffic usually arrives with explicit identifiers attached, such as UTM parameters or advertising click IDs. Organic traffic behaves very differently and often depends on browser referrer information and session-level persistence instead.

When both attribution methods rely on the same cookie structure or overwrite each other too aggressively, reporting quickly becomes unreliable.

For example, a visitor may first discover your company organically through search before later returning through a paid retargeting campaign. Depending on how attribution persistence is configured, the paid visit may overwrite the original source entirely, making it difficult to understand the true customer journey.

Separating paid attribution logic from organic and referral attribution often creates much cleaner reporting and helps reduce conflicts between Salesforce, MCAE, and analytics platforms.

Hidden Fields Are Often the Weakest Link

Hidden fields are one of the most important connections between your website and Salesforce reporting, but they are also one of the most fragile parts of the entire process.

Many organizations assume hidden fields are functioning correctly simply because the fields exist on the form. In reality, those fields may populate inconsistently, overwrite each other during navigation, or fail silently because of timing issues and consent restrictions.

We frequently encounter situations where attribution fields populate after the form submission has already fired, meaning the lead enters Salesforce without the proper campaign data attached. In other cases, iframe communication issues prevent the parent page from ever passing values into the form itself.

This is why attribution testing should go far beyond a single successful form submission in a staging environment. Reliable testing requires evaluating multi-page journeys, iframe behavior, returning visitors, consent acceptance scenarios, mobile browsers, and cross-domain navigation paths. The edge cases are usually where attribution breaks first.

MCAE Tracker Domain Misconfigurations Are More Common Than Most Teams Think

Tracker domain configuration is another surprisingly common source of attribution problems.

As websites evolve over time, organizations often accumulate multiple tracking scripts, legacy MCAE configurations, outdated tracker domains, and inconsistent implementations across subdomains. Everything may appear operational on the surface while attribution quietly becomes fragmented underneath.

We regularly encounter environments where old pi.pardot.com scripts still exist alongside newer tracker domains, or where landing pages and forms load from domains that no longer align with the primary website experience. These inconsistencies can create duplicate visitor records, cross-domain warnings, broken session continuity, and unreliable campaign reporting.

Cleaning up tracker domains and standardizing first-party tracking behavior is often one of the fastest ways to improve attribution reliability across the entire marketing ecosystem.

Attribution Problems Are Rarely Caused by One Single Issue

The biggest misconception around attribution troubleshooting is the idea that there is usually one root cause.

In reality, attribution failures are typically the result of several smaller problems happening simultaneously. Cookie consent settings interfere with GTM execution. iframe forms lose referrer information. Hidden fields fail during navigation. Browser privacy restrictions interrupt session persistence. Tracker domains become fragmented over time.

Individually, each issue may seem minor. Together, they create reporting environments that become increasingly difficult to trust.

That is why many organizations struggle to reconcile differences between Salesforce, MCAE, GA4, and advertising platforms. Each system is capturing only part of the customer journey.

Closing the Gaps Between MCAE, GTM, Forms, and Salesforce

Reliable attribution now requires far more than simply placing a tracking script on a website.

Modern marketing ecosystems demand intentional coordination between GTM, cookie consent platforms, forms, hidden fields, analytics tools, MCAE, and Salesforce. Without that coordination, attribution gaps become almost inevitable.

If your campaign attribution feels inconsistent, unreliable, or incomplete, reach out to the Sercante l Trilliad team. Our custom development services can help close the gaps between Marketing Cloud Account Engagement, GTM, forms, and Salesforce so your reporting reflects how prospects are actually finding and engaging with your business.

If your Marketing Cloud Account Engagement (Pardot) email looks broken and you can’t figure out why, then you’re in the right place. In this post, we’ll look at common errors you may uncover when coding your email in Marketing Cloud Account Engagement.

Things to look for when your Account Engagement email looks broken

You may be struggling with these common problems in HTML email code within your Marketing Cloud Account Engagement. But don’t worry, we’re here to guide you through resolving these issues step by step.

Images appear broken

One common issue that marketers face is broken images in their email campaigns. It can be frustrating when images don’t load properly, especially on different devices and email clients. To address this, ensure that your image URLs are correct and properly linked in your HTML code. Additionally, optimize your images for faster loading times and consider using alternative text to provide context if an image fails to load.

Here’s a checklist of things to look for:

Is your image too big? 

Large image file sizes can cause slow loading times or may not display at all. Optimize your images for the web by compressing them without compromising quality. 

Is your image in the correct format? 

Additionally, confirm that the image is in the correct format (e.g., JPEG, PNG, GIF). At the date of this blog, not all email clients will support .webp format.

Are there SSL/HTTPS issues? 

If your Account Engagement account or website is using SSL (Secure Sockets Layer) or HTTPS, ensure that the image URLs are also updated to use HTTPS. Browsers may block or display broken images if there are mixed content warnings due to insecure (HTTP) image URLs on secure (HTTPS) pages.

Is the “pardot-region” inserted in the code correctly? 

When customizing or replacing images in Account Engagement using the WYSIWYG editor, it’s crucial to be mindful of the “pardot-regions” in the HTML code. These regions define editable sections that allow you to modify the content, including images.

When updating your HTML code, it’s important to pay attention to the “pardot-width” and “pardot-height” attributes within the code that correspond to your image holder. By explicitly matching these attributes with your image holder dimensions, you ensure that Account Engagement doesn’t automatically adjust the size, potentially distorting or exceeding the intended size of the image holder. In the example below, by setting the “pardot-height” to be auto will allow the image to automatically adjust and not stretch on a mobile device.

My image appears cut off when adding it using the text editor? 

The template may use an attribute mso-line-height-rule:exactly that controls the line-height of text in Outlook. This can crop the image to be that size. Change the attribute to mso-line-height-rule:at-least to give it more flexibility. It is okay to change all of the attributes to at-least.

Darkmode

Dark mode compatibility is another challenge to consider. With the increasing popularity of dark mode, it’s important to ensure that your emails display correctly in this setting. Test your emails in both light and dark mode to identify any color or readability issues. Use CSS media queries to adjust the styling specifically for dark mode, ensuring a seamless experience for your subscribers.

Here’s a checklist of things to look for:

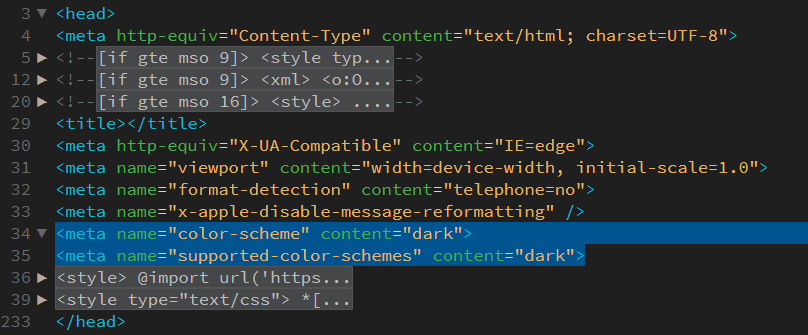
Do you have dark mode meta tags? 

Dark mode (or light mode) meta tags offer an opportunity to enhance the visual presentation and user experience of your website. These tags provide hints to the browser or email client about how the content should be displayed when the user is in dark mode.

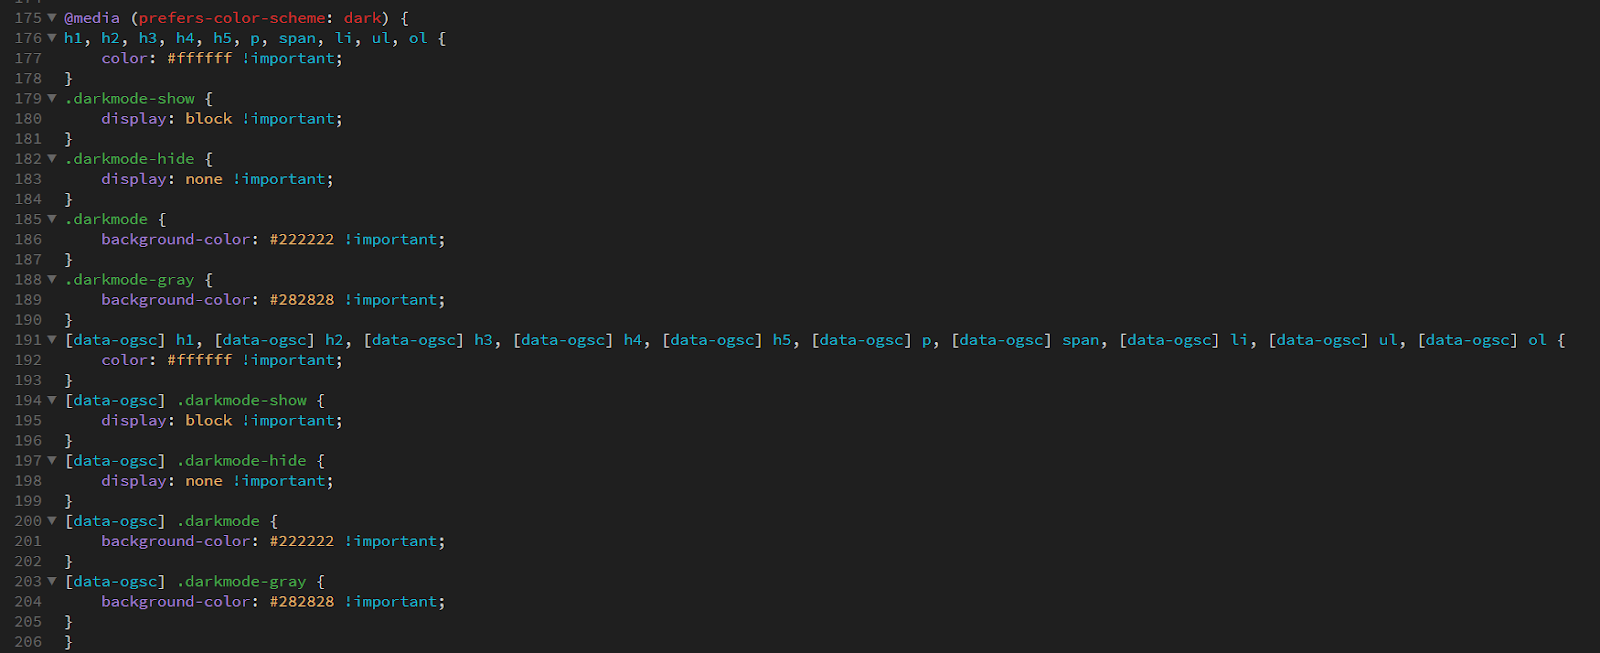
Do you have CSS media queries? 

Dark mode-specific CSS media queries are similar to mobile responsive media queries in the sense that they allow you to target specific conditions and apply different styles accordingly. While mobile responsive media queries focus on adjusting layouts and styles based on screen sizes, dark mode-specific media queries target the user’s preference for dark mode and enable you to modify the appearance of your content accordingly.

When using dark mode-specific media queries, such as (prefers-color-scheme: dark) or @media (prefers-color-scheme: dark), you can detect whether the user has enabled dark mode in their browser or operating system settings. This information helps you adapt the colors, backgrounds, and text within your HTML and CSS code to provide a more suitable and visually appealing experience for users in dark mode. See example code.

Are you swapping your image between dark and light mode? 

Certain images may rely heavily on specific colors or color combinations that work well in light mode but might not be as effective or visually appealing in dark mode. By swapping images, you can create alternative versions that are optimized for each color scheme, enhancing the overall aesthetic and cohesiveness of your email design. See example code.

Is your white text turning black in Outlook? 

Outlook’s dark mode implementation may override the color styles you’ve set for your text, resulting in white text appearing as black. In dark mode, Outlook attempts to adjust the color scheme for better visibility, which can cause unexpected changes to your email’s appearance. You can add the below code to the head tag that will target the Microsoft Outlook email only.

By utilizing this code, you can apply specific CSS styles that will only affect Microsoft Outlook emails. Adjust your desired styles within the provided <style> block.

Here’s an example of how to use a class within an element:

Here is the full tutorial by Nicole Merlin that addresses Outlook emails in dark mode.

Access a complete list of email clients that support dark mode, along with additional tips for optimizing dark mode in your emails, by referring to the following resource.

Preheader text

The preheader text, also known as a preview snippet, is essential for enticing recipients to open your emails. However, it can sometimes get cut off or displayed incorrectly. To avoid this, keep your preheader text concise and within the recommended character limit. Test it across different email clients to ensure it appears as intended.

Here’s a checklist of things to look for:

Do you need this hidden? 

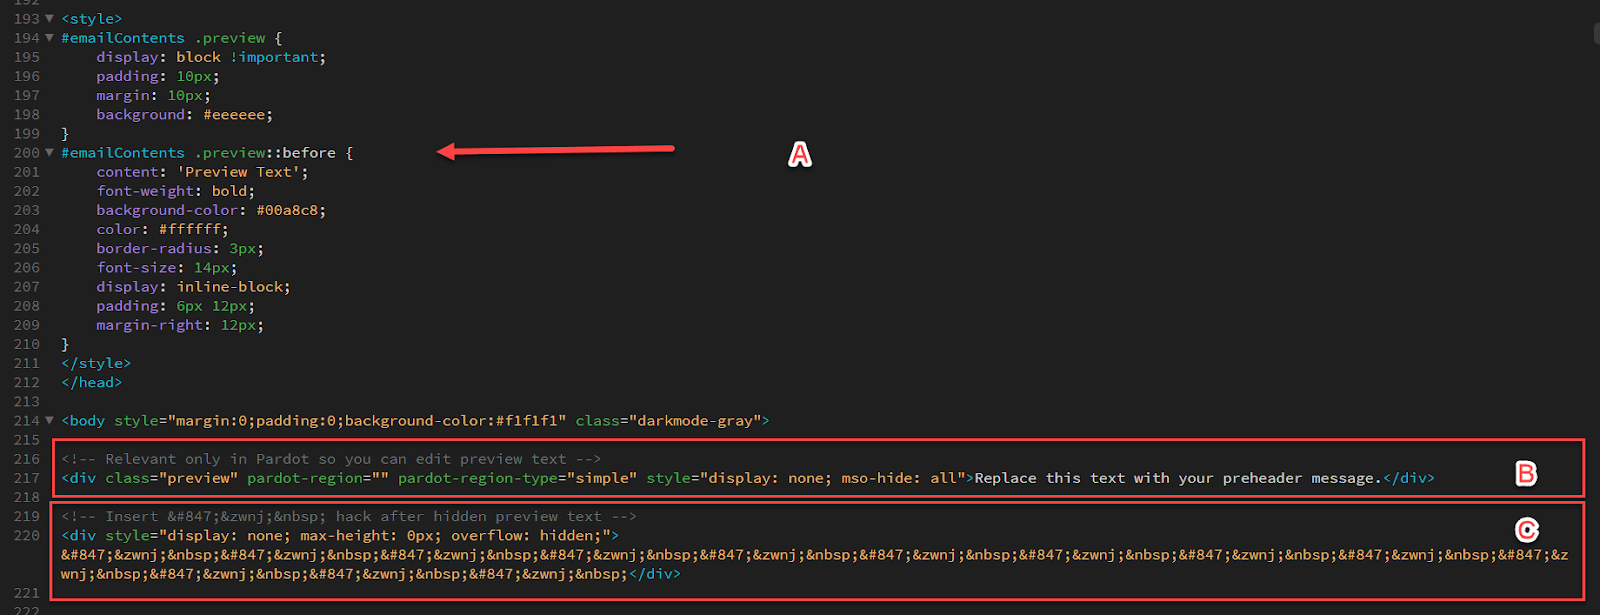
The decision to hide or display preheader text in emails can vary based on several factors, including design preferences, marketing strategies, and the specific goals of the email campaign. If you decide this needs to be hidden on the overall look of the email, you can include a <style> tag within the <head> section of your HTML code. Use CSS selectors to target the desired element and apply the appropriate styling to hide it. See example ‘A’ below.

In this example, the CSS code targets the element with the class name .preview within  the #emailContents container and applies specific styles when the screen width is at least 600 pixels. The #emailContents id is specific to Account Engagement and should allow the editor to edit the content using the WYSIWYG editor. The content within the element is otherwise hidden with the style=”display: none; mso-hide: all” inline style sets the display property to none


Remove unwanted characters from the preheader text

Preheader text should be brief and concise, ideally within the range of 80 to 100 characters. Focus on delivering a clear and compelling message that entices recipients to open your email.

If you prefer not to display any preheader text, you can simply leave the preheader content empty. However, be aware that some email clients may automatically populate the preheader with default content, such as the first line of text from the email body. To mitigate this, consider adding a space or non-breaking space (&nbsp;) in the preheader to override any auto-populated text. See example ‘C’ above.

My link’s not working

Broken links can be frustrating for subscribers and can negatively impact your click-through rates. To avoid this, thoroughly check and test all the links in your email. Double-check the URLs for accuracy and ensure they are properly formatted.

Here’s a checklist of things to look for:

Did you write the correct format? 

Double-check that the URL of the link is accurate and properly formatted. Ensure that the link includes the necessary protocols (e.g., “http://” or “https://”) and does not contain any typographical errors or missing characters.

Is your link broken? 

If the destination page of the link is no longer available or has been moved or removed, the link will not work. Verify that the target webpage is active and accessible.

URL encoding issues 

URLs with special characters or spaces may encounter encoding problems. 

Make sure that the link is correctly encoded using URL encoding standards (e.g., replacing spaces with “%20” or special characters with their corresponding encoded values).

Non-clickable link

If the link is not properly coded as an anchor <a> tag with the appropriate href attribute, it will not function as a clickable link. Ensure that the link is wrapped within the <a> tag and that the href attribute contains the correct URL.

Blocked or filtered by email client

Some email clients may block or filter certain links for security reasons. If the link appears to be working when tested in other environments, it could be due to the specific email client’s settings or policies.

Incompatibility with mobile devices

Links that are designed or formatted in a way that is not mobile-friendly may not work properly on mobile devices or within certain email clients. Optimize your links for mobile responsiveness to ensure they function as intended.

URL redirection issues

If the link involves URL redirection, make sure that the redirection configuration is correct and functioning properly. Incorrect redirection settings can cause the link to fail.

I want to use a custom font

While Account Engagement does not provide font hosting, you can still incorporate custom fonts in your email campaigns by using web-safe fonts or linking to externally hosted font files. You can host the font files on your own server or utilize third-party font hosting services, then reference them in your email’s CSS using @font-face rules. This way, you have more control over the font selection while still working within Account Engagement’s limitations.

Here’s a checklist of things to look for:

Choose a web-safe font or a font that supports email clients

Email clients have limited font support, so it’s best to use web-safe fonts or custom fonts specifically designed for email use. Select a font that is available on most operating systems and widely supported by email clients to ensure consistent rendering.

Host the font files

Upload the font files to your web server or a font hosting service. You’ll typically need the font files in different formats like WOFF, WOFF2, TTF, or EOT to maximize compatibility across email clients. 

Define font-face rules in the CSS

In your CSS code, use the @font-face rule to declare the font family and specify the font file URLs. Include the different font formats to cover a broader range of email clients.

Replace ‘YourCustomFont’ with the desired font name and adjust the file paths in the url() function to reflect the location of your font files.

My font link is being counted as a click

In Account Engagement, links are typically tracked and counted as clicks to provide valuable engagement metrics and insights for your email campaigns. However, when you include a font link in your email, it may unintentionally be counted as a click due to the way Account Engagement tracks link interactions.

This can happen because Account Engagement’s tracking mechanism treats all links as clickable elements by default. When recipients open your email and the email client fetches the font file from the linked source, Account Engagement’s tracking system registers this as a click event.

Here’s a checklist of things to look for:

How are you using custom fonts?

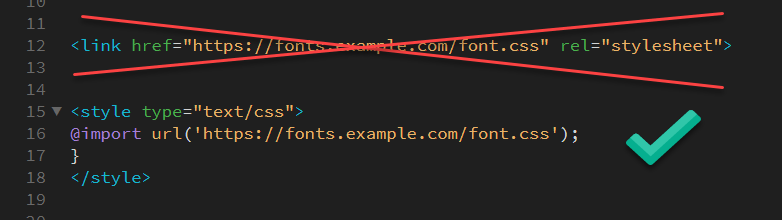
To avoid font links being counted as clicks in Account Engagement, you can use the @import method instead of the traditional <link> method to include custom fonts in your email.

Here’s an example of how to use the @import method:

Background images

Background images in HTML email templates offer creative possibilities for crafting distinctive layouts, adding depth, and showcasing products. They have gained popularity as a design element. However, it is important to consider certain factors when incorporating background images in your Account Engagement email design.

Here’s a checklist of things to look for:

Not all email clients support background images

Some clients may block or ignore background images, resulting in an email that doesn’t display the intended design. Test your email across different email clients to ensure consistent rendering. 

Inline CSS

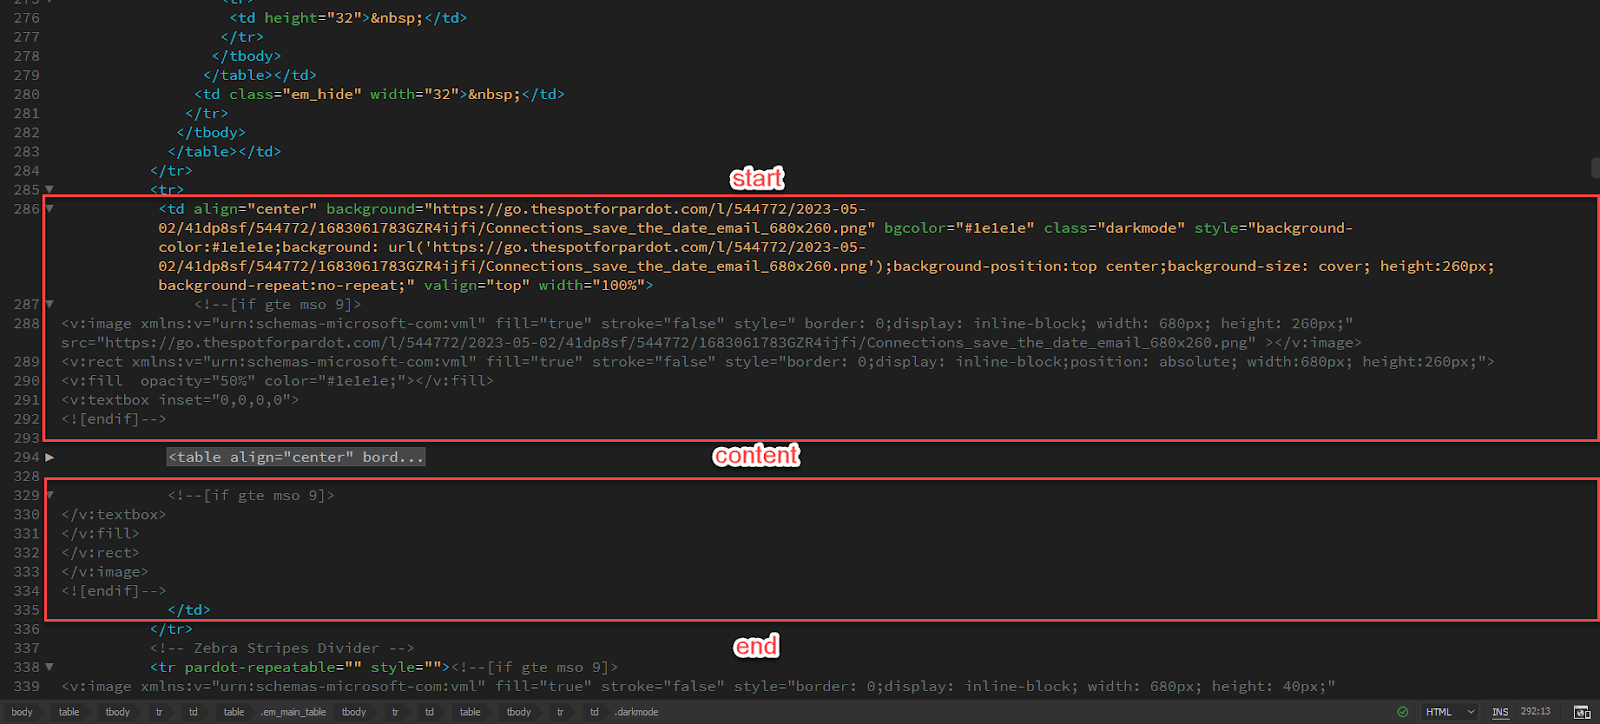
To maximize compatibility, inline CSS is typically recommended for background images in HTML emails. Use the style attribute directly within HTML elements to define the background image and related properties.

The example includes the necessary code to make the background image show in Microsoft Outlook, as well as most popular email clients.

Image size and optimization

Optimize your background image by compressing it to reduce file size while maintaining acceptable quality. Large image files can increase email size and load time, negatively impacting the recipient’s experience. Aim for an optimized image that doesn’t exceed the recommended file size for emails.

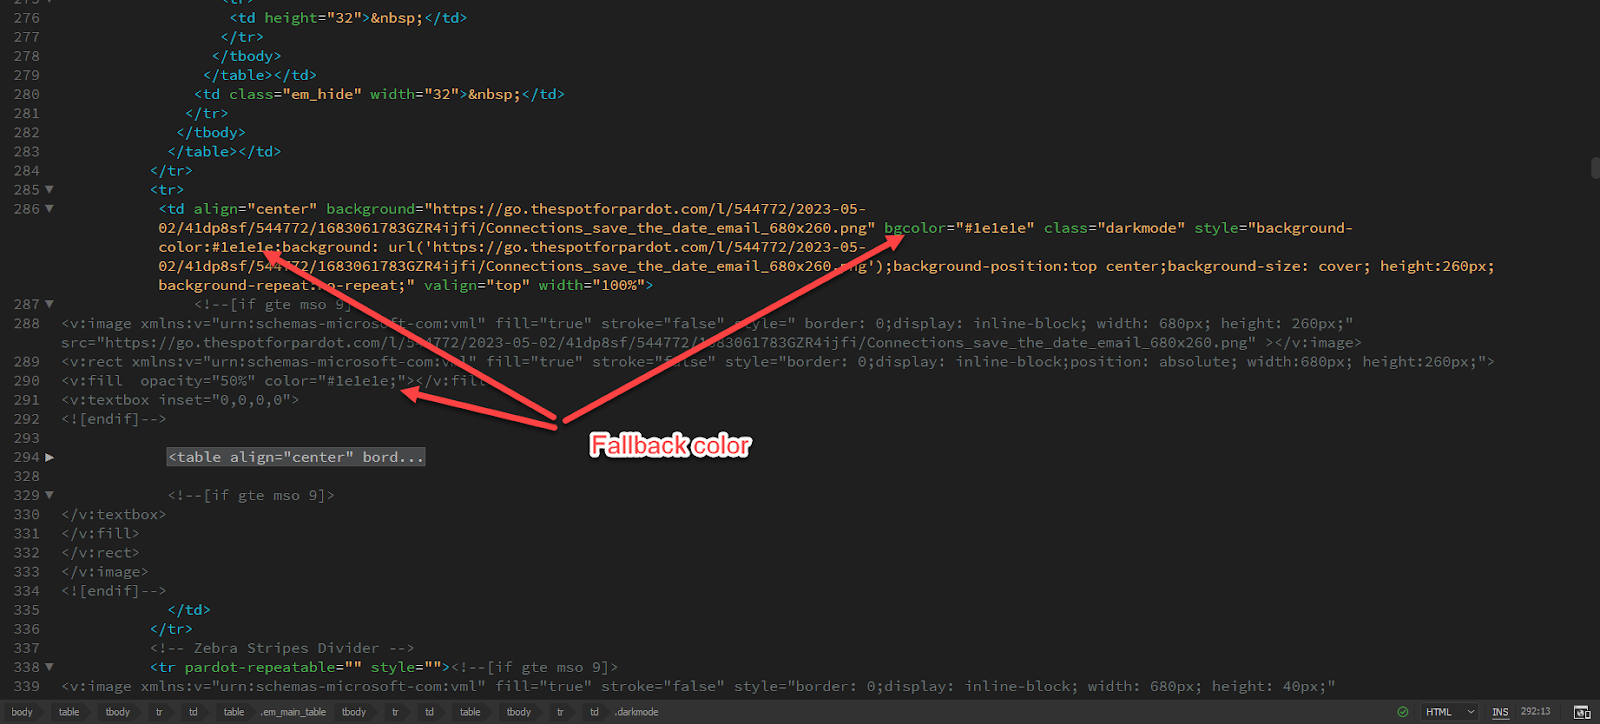
Fallback background color

In case the background image doesn’t load or isn’t supported, provide a fallback background color that complements your design. This ensures that the email still looks visually appealing even without the background image.

Accessibility

Consider accessibility guidelines when using background images. Include alt text for background images so that users with screen readers or email clients that don’t display background images can still understand the context of the email. And of course, it is not recommended or best practice to use text in background images.

Buttons in Outlook

Buttons collapsing or not displaying correctly is another challenge in HTML email coding. To avoid this, use table-based layouts for buttons and set explicit width and height values. Test your buttons across different email clients to ensure they remain consistent and clickable.

Here’s a checklist of things to look for:

I want rounded corners in Outlook. 

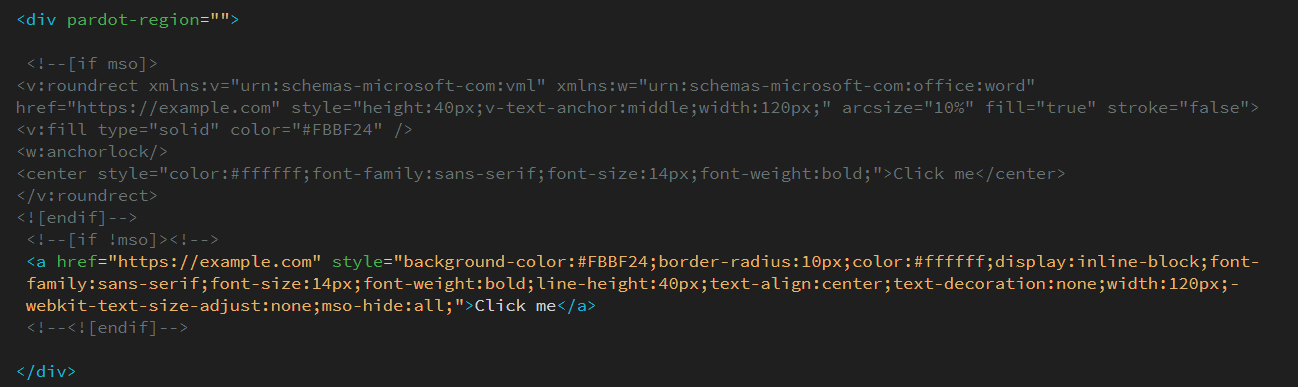
VML (Vector Markup Language) can be used to create buttons with rounded corners, especially in older versions of Outlook that don’t fully support modern CSS features like rounded borders (border-radius). VML allows you to make custom shapes and apply rounded corners to elements. 

Check out this example of an HTML button with rounded corners using VML:

We strongly advise against using this method in HTML email templates within Account Engagement, as it requires replacing the link in two separate locations, which can be easily overlooked if not approached with caution.

Why did my button padding get stripped? 

If you’re facing a situation where the padding of your button appears to be removed or stripped, it is likely because of a collapsing issue in Outlook. To troubleshoot this problem, ensure that the link you are testing is an active and valid link, rather than just using a placeholder like “#” or a dummy link. Using inactive or placeholder links can be the root cause of the problem and result in the unexpected removal of padding from your button.

Create error-free Account Engagement emails

At Sercante, we understand the common pitfalls of HTML email code in Account Engagement, and we’re dedicated to solving them for you. 

With our technical expertise and attention to detail, you can rest assured that your email campaigns will be visually appealing, engaging, and seamless across all platforms and devices. 

Hey there! So, I wanted to chat with you about something that can be a bit tricky but super important in the world of marketing: capturing UTM parameters. 

You know those little bits of code you see at the end of URLs? They help marketers track where their website traffic is coming from and measure the success of their campaigns. 

Well, capturing and using UTM parameters can sometimes be a real challenge — especially when you’re dealing with UTM capture on Marketing Cloud Account Engagement (Pardot) landing pages. 

But don’t worry. we’ve got your back!

In this post, we’ll cover four ways to use UTMs for capturing the first and last touchpoints on Account Engagement landing pages. If you’re also looking for information on capturing UTM parameters in Salesforce, then check out this post.

4 methods for capturing UTM parameters on landing pages

Let’s dive into four different ways you can script your way to capturing first and last touch UTM parameters on Account Engagement landing pages. This solution works even if the form fields don’t match the UTM exactly or if you need to use cookies. 

Trust me, it’s not as complicated as it sounds!

1. Map the URL to hidden form fields

Option 1 is all about handling those pesky form field variations. Imagine the form fields on your Pardot landing page don’t exactly match the UTM parameters. No worries! 

With some JavaScript magic, you can extract the UTM values from the URL and map them to the right hidden form fields. It’s like connecting the dots, making sure you capture those first and last touch UTM parameters accurately.

See example and steps to setting this up in the video below.

2. Store UTM values in a session cookie

Now, let’s talk about Option 2. Sometimes you need session-based tracking, and that’s where scripting with session cookies comes in. 

Using JavaScript, you can grab the UTM values from the URL and store them in a session cookie. 

This cookie will keep the UTM data available as the user navigates through different Pardot landing pages. You can then map these UTM values to hidden form fields, ensuring you capture the first and last touch UTM parameters consistently during the session.

See example and steps to setting this up in the video below.

3. Pass UTM parameters to forms embedded in iFrames

Option 3 is for web landing pages that have an Account Engagement (Pardot) iFrame. Here, you can use scripting to set a cookie value that passes the UTM parameter to the iFrame. 

JavaScript to the rescue again — it helps you extract the UTM values from the URL and store them in a cookie. The Pardot iFrame can then grab the cookie value and fill in the hidden form fields. 

Voilà! You’ve captured the first and last touch UTM parameters and can use them in Pardot form submissions.

See example and steps to setting this up in the video below.

4. Capture UTM parameters across multiple website visits

Last but not least, Option 4 involves persistent cookies and hidden form fields. If you want to capture UTM parameters across multiple sessions or visits, this is the way to go. With some clever scripting using JavaScript, you can store the UTM values in a persistent cookie. 

So, even if your visitors come back later, the cookie remembers the UTM data. When they submit a form, the hidden form fields get populated with the UTM values, ensuring you capture the first and last touch UTM parameters consistently.

Get instructions for this method in this blog post.

Go forth and track all the things through UTM capture

So, my friend, there you have it! These four scripting paths will help you capture first and last touch UTM parameters on Account Engagement landing pages like a pro. Whether you’re dealing with form field variations, session-based tracking, iframes, or multiple visits, these options have got you covered. You’ll be able to gather accurate UTM data for analyzing your campaigns and making data-driven marketing decisions within Pardot.

Now go ahead and rock those UTM captures with confidence!
Not sure what to do with the information you’re tracking? Reach out to the team at Sercante for help building a marketing campaign strategy that gets results.

Looking for a way to capture lead source data from across pages on your website and pull that data into your CRM? 

Since we use Marketing Cloud Account Engagement (Pardot), we figured out how to do that by transferring UTM parameters across webpages and capturing them in a Pardot custom field. 

Using a magical mixture of UTM parameters and Google Tag Manager with a Pardot custom field and third-party forms, here’s our solution for capturing pre-form fill visitor data in Pardot. 

However, you can use your imagination to take this solution further and send the data to any CRM that allows you to capture data in a custom field.

What is a lead source?

A lead source establishes how a prospective customer first engaged with your business. That can be through your website, by phone, by email or even visiting your location in person. 

Most lead sources originate through advertising, social channels, word-of-mouth, referrals, or even location signage.

Why does the lead source matter?

Understanding how buyers find your business serves two purposes:

  1. It improves the buyer’s journey. You can use the information to be more relevant and responsive  with highly tailored content, interactions, and communications, leveraging the channels and sources your audience prefers. 
  2. It reveals the most effective channels and methods. Having insights into lead sources helps you build awareness, connect and engage with buyers by focusing on what works.

How to track marketing parameters via UTM

The best way to gain digital lead source insight is to use UTM (Urchin Tracking Module) parameters. UTMs are variables that are passed to your website via the link a buyer clicks to get to your website or landing page. 

As the standard for tracking lead sources, UTMs play an integral role in providing data to Google Analytics and other marketing analytics platforms. 

Setting up UTM parameters is super easy by using a handy tool provided by Google Analytics. Remember to create a consistent naming convention so when you add them to your links you’ll be able to easily identify key data points when viewing your reporting.

Why do I need source cookies?

Capturing a UTM parameter on your web form can be tricky. If a user visits a page with a form through a UTM URL and submits the form, the UTM parameters get captured. However, if a user visits a page through a UTM URL and navigates to another page on the website, the form submission is unable to capture the UTM parameter values. 

To solve this dilemma, we used Google Tag Manager (GTM) to implement a cookie on the first page visit and then populate the hidden fields with the stored UTM values.

How to capture lead source via a Marketing Cloud Account Engagement (Pardot) form handler

The steps to capturing your lead source data in Pardot are as follows:

Step 1. Set up Pardot Form Handler

Create a new form handler in Pardot. Magic Wand > Marketing > Forms > Form Handlers.
  • Add information about your form:
    • Name – This will not be seen by the visitor, so use a naming convention that will help you understand the form’s purpose.
    • Folder
    • Tags
    • Campaign
    • Tracker Domain
      • Do NOT check kiosk/data entry mode
      • Check “Enable data forwarding to the success location” only if pushing data to a location other than Pardot.
      • Only check “Disable Activity throttling” if you wish to send auto-responder emails after every submission. A time buffer is set by Pardot to prevent a visitor from duplicating completion actions or emails if they repeat a form submission too quickly. Still not sure? Read more here.
    • Add Success Location URL – Either add a new URL ‘Thank You’ page or send them back to the referring URL.
    • Add Error Location URL – Either add a new URL ‘Error’ page or send them back to the referring URL.
  • Add Completion Actions
  • Add Form Fields
    • Set up your fields in Pardot if not already there
    • Map fields to third-party form by field “name” not the label. These must match exactly or the form handler will not work.
      • e.g.,  <input type=”text” id=”fname” name=”fname”>
      • Do NOT make them “required”
  • Copy the endpoint URL of your newly created form handler and add that to the third-party form.

Step 2. Configure your third-party form

To capture the UTM parameters we determined we want to use, we have to include the following eight HIDDEN fields on the third-party form and do NOT set as required:

  1. utm_source 
  2. utm_medium 
  3. utm_campaign 
  4. utm_content 
  5. last_utm_source 
  6. last_utm_medium   
  7. last_utm_campaign 
  8. last_utm_content

In our example, we are using a Gravity Form. But this should work with most forms. 

To minimize our efforts, if there are many forms on your site, I recommend adding a class like ‘utm_source’, ‘utm_medium’, etc., to the fields you are creating on the form. This way, we can target the class names and their containing inputs in the script later.

Step 3. Capturing a cookie using Google Tag Manager (GTM)

UTM information is only visible on the page it first lands on. If the user goes from one page to the next on the website, the UTM information disappears. 

Add Persist Campaign Data (3rd Party) Template 

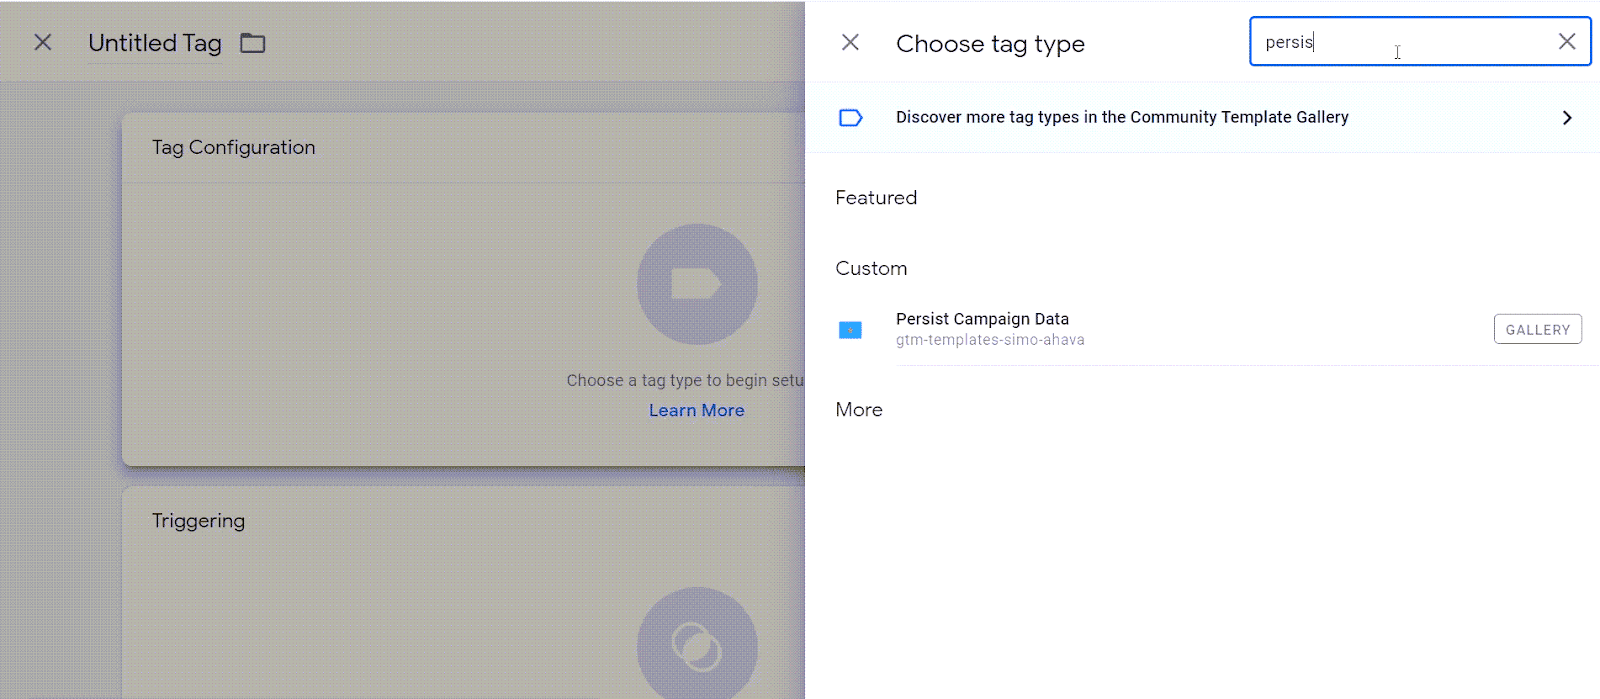
There’s no need to reinvent the wheel. Use the 3rd party template, Persist Campaign Data.

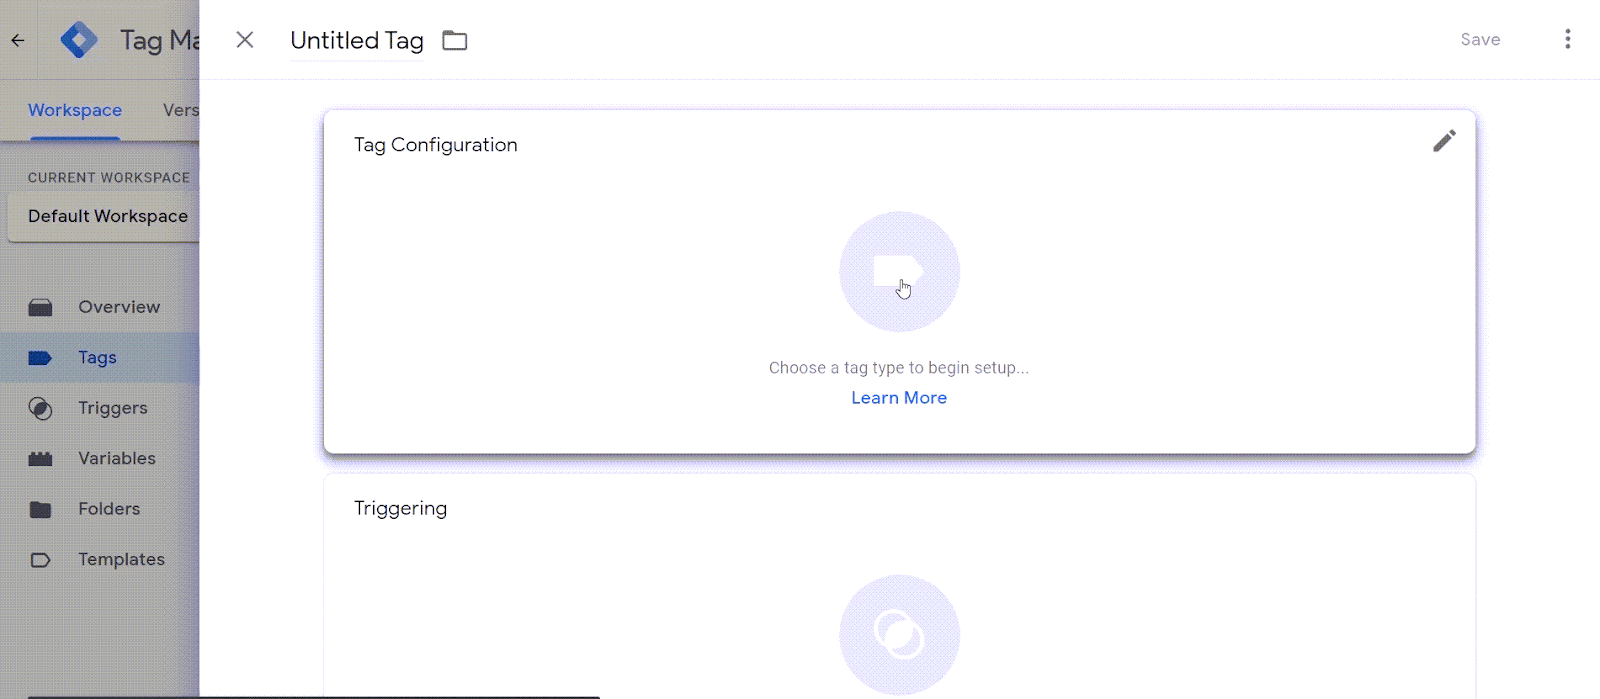
  • Click the Tags tab > New
  • Click inside “Tag Configuration” box
  • Search for Persist Campaign Data

What does this container do? It will first look for URL parameters that can be edited. But out of the box, it is looking for anything with utm_source, utm_medium, utm_campaign, utm_term, utm_content, utm_it, gclid. 

This container will store a 2 cookies:

  1. __gtm_campaign_url
  2. __gtm_referrer
  • Click Triggering and select ‘All Pages’ – This will ensure your tag will fire no matter what page a user enters from.

Add a Cookie Variable

We now need to be sure the web tracking cookie we are grabbing is in the correct format.

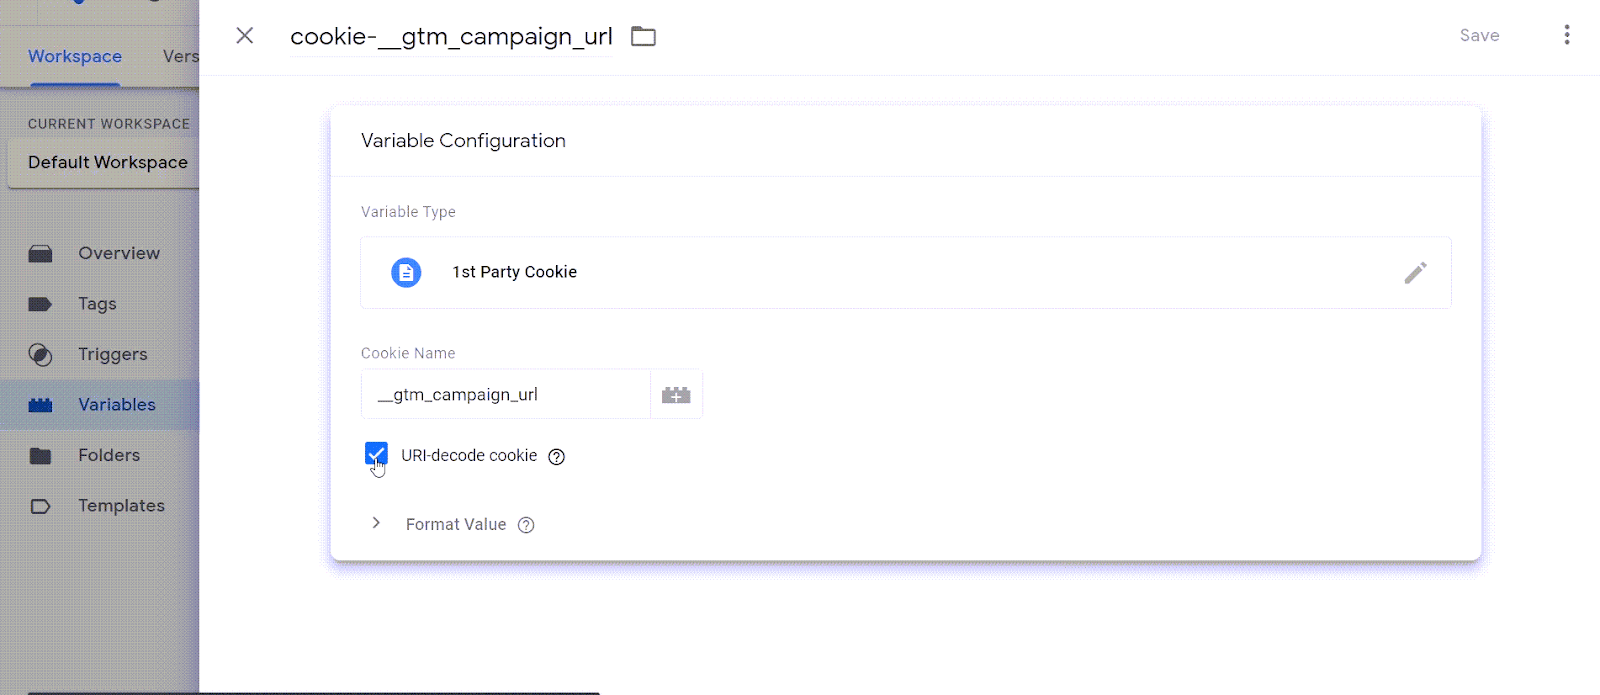
  • Click Variables
  • Name Variable: cookie-__gtm_campaign_url
  • Variable Type: 1st Party Cookie
  • Cookie Name: __gtm_campaign_url

Check the box: URI-decode cookie

If you preview in debug mode you should now be able to see the cookie set. 

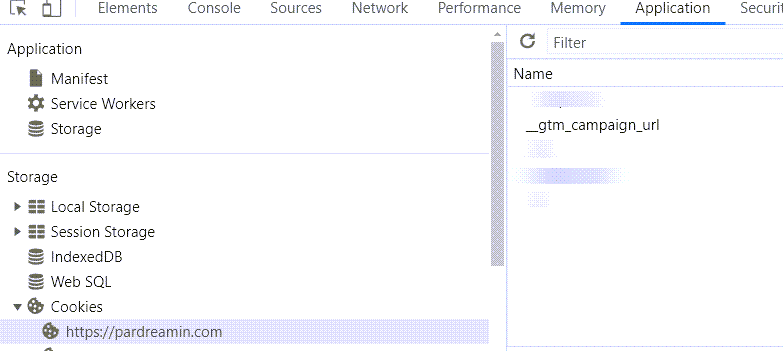
How do you see tracking cookies in Google Chrome? 

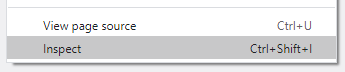
  1. Right click on browser window
  2. Choose ‘Inspect’
  3. Choose ‘Inspect’
  4. Choose the Applications tab
  5. Check installed cookies

Add UTM parameters to your form

Now that the cookie is set and working, let’s add the important parts to the form we already created.

  • Click Tags
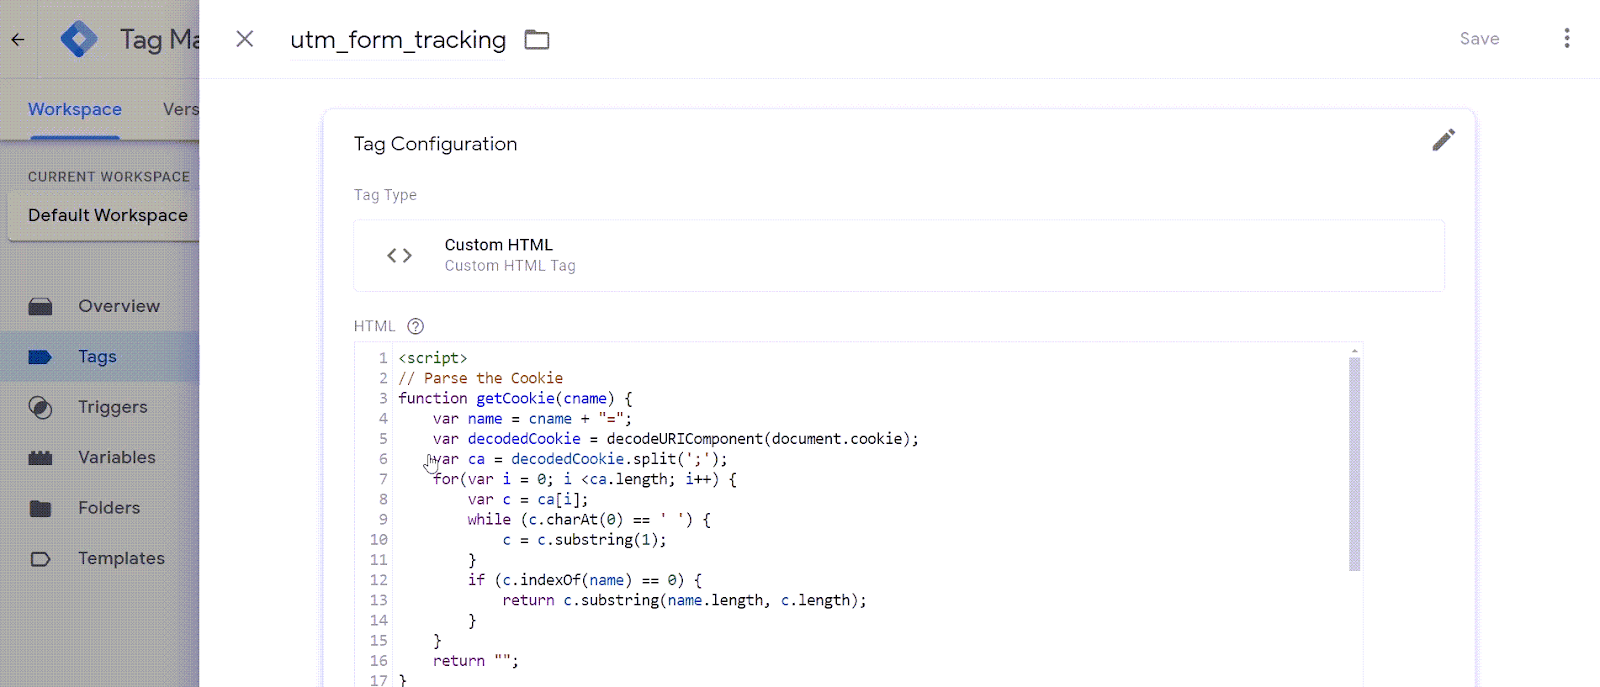
  • Name the new tag:  utm_form_tracking
  • Tag Type: Custom HTML 
  • Drop in the HTML Script:
<script>
// Parse the Cookie
function getCookie(cname) {
	var name = cname + "=";
	var decodedCookie = decodeURIComponent(document.cookie);
	var ca = decodedCookie.split(';');
	for(var i = 0; i <ca.length; i++) {
		var c = ca[i];
		while (c.charAt(0) == ' ') {
			c = c.substring(1);
		}
		if (c.indexOf(name) == 0) {
			return c.substring(name.length, c.length);
		}
	}
	return "";
}
// Parse the URL inside Cookie
function getParameterByName(name) {
    name = name.replace(/[\[]/, "\\[").replace(/[\]]/, "\\]");
    var regex = new RegExp("[\\?&]" + name + "=([^&#]*)");
    results = regex.exec(getCookie("__gtm_campaign_url"));
    return results === null ? "" : decodeURIComponent(results[1].replace(/\+/g, " "));
}
// Pass the values to hidden field 
document.querySelector(".utm_source input").value = 
getParameterByName('utm_source');  	document.querySelector(".utm_medium input").value = getParameterByName('utm_medium');  	document.querySelector(".utm_campaign input").value = getParameterByName('utm_campaign');  	document.querySelector(".utm_content input").value = getParameterByName('utm_content');
</script>

Change the JavaScript to match the gravity form field values.

  • Set up a Trigger – This will fire the HTML JavaScript code when the cookie fires
    • Name Trigger: trigger_utm_script
    • Trigger Type: Page View – DOM Ready
    • References to this Trigger: utm_form_tracking 

Test your results

You can change the Field Type to text or not hidden while testing your form. Just be sure to flip it back. 

Here is a handy tool that will allow you to easily add campaign parameters.

Watch the full tutorial video

Limitations to capturing lead source data

A caveat — this solution will work for unique visits. However, since it uses cookies, it doesn’t track accurate visitor data across multiple visits. So, if the person visits your website many times before completing a conversion form, then you’ll only have data from the last cookied visit. 

We’re still cooking up that solution, but we’ll share it when it’s ready. 

We’d love to hear suggestions from the community for solving that problem. Or let us know how you did in the comments.