
If your Marketing Cloud Account Engagement (Pardot) email looks broken and you can’t figure out why, then you’re in the right place. In this post, we’ll look at common errors you may uncover when coding your email in Marketing Cloud Account Engagement.
Things to look for when your Account Engagement email looks broken
You may be struggling with these common problems in HTML email code within your Marketing Cloud Account Engagement. But don’t worry, we’re here to guide you through resolving these issues step by step.
Images appear broken
One common issue that marketers face is broken images in their email campaigns. It can be frustrating when images don’t load properly, especially on different devices and email clients. To address this, ensure that your image URLs are correct and properly linked in your HTML code. Additionally, optimize your images for faster loading times and consider using alternative text to provide context if an image fails to load.
Here’s a checklist of things to look for:
Is your image too big?
Large image file sizes can cause slow loading times or may not display at all. Optimize your images for the web by compressing them without compromising quality.
Is your image in the correct format?
Additionally, confirm that the image is in the correct format (e.g., JPEG, PNG, GIF). At the date of this blog, not all email clients will support .webp format.
Are there SSL/HTTPS issues?
If your Account Engagement account or website is using SSL (Secure Sockets Layer) or HTTPS, ensure that the image URLs are also updated to use HTTPS. Browsers may block or display broken images if there are mixed content warnings due to insecure (HTTP) image URLs on secure (HTTPS) pages.
Is the “pardot-region” inserted in the code correctly?
When customizing or replacing images in Account Engagement using the WYSIWYG editor, it’s crucial to be mindful of the “pardot-regions” in the HTML code. These regions define editable sections that allow you to modify the content, including images.
When updating your HTML code, it’s important to pay attention to the “pardot-width” and “pardot-height” attributes within the code that correspond to your image holder. By explicitly matching these attributes with your image holder dimensions, you ensure that Account Engagement doesn’t automatically adjust the size, potentially distorting or exceeding the intended size of the image holder. In the example below, by setting the “pardot-height” to be auto will allow the image to automatically adjust and not stretch on a mobile device.
My image appears cut off when adding it using the text editor?
The template may use an attribute mso-line-height-rule:exactly that controls the line-height of text in Outlook. This can crop the image to be that size. Change the attribute to mso-line-height-rule:at-least to give it more flexibility. It is okay to change all of the attributes to at-least.
Darkmode
Dark mode compatibility is another challenge to consider. With the increasing popularity of dark mode, it’s important to ensure that your emails display correctly in this setting. Test your emails in both light and dark mode to identify any color or readability issues. Use CSS media queries to adjust the styling specifically for dark mode, ensuring a seamless experience for your subscribers.
Here’s a checklist of things to look for:
Do you have dark mode meta tags?
Dark mode (or light mode) meta tags offer an opportunity to enhance the visual presentation and user experience of your website. These tags provide hints to the browser or email client about how the content should be displayed when the user is in dark mode.
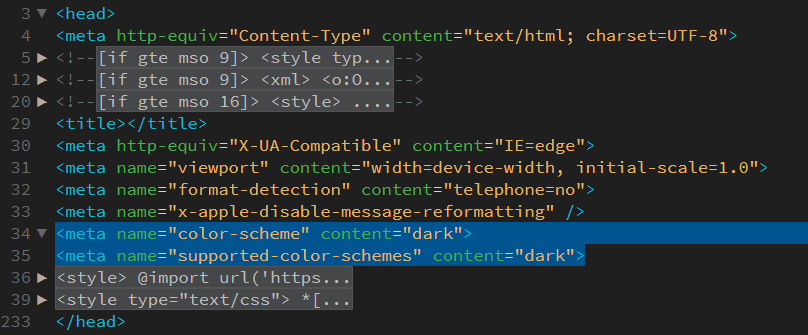
Do you have CSS media queries?
Dark mode-specific CSS media queries are similar to mobile responsive media queries in the sense that they allow you to target specific conditions and apply different styles accordingly. While mobile responsive media queries focus on adjusting layouts and styles based on screen sizes, dark mode-specific media queries target the user’s preference for dark mode and enable you to modify the appearance of your content accordingly.
When using dark mode-specific media queries, such as (prefers-color-scheme: dark) or @media (prefers-color-scheme: dark), you can detect whether the user has enabled dark mode in their browser or operating system settings. This information helps you adapt the colors, backgrounds, and text within your HTML and CSS code to provide a more suitable and visually appealing experience for users in dark mode. See example code.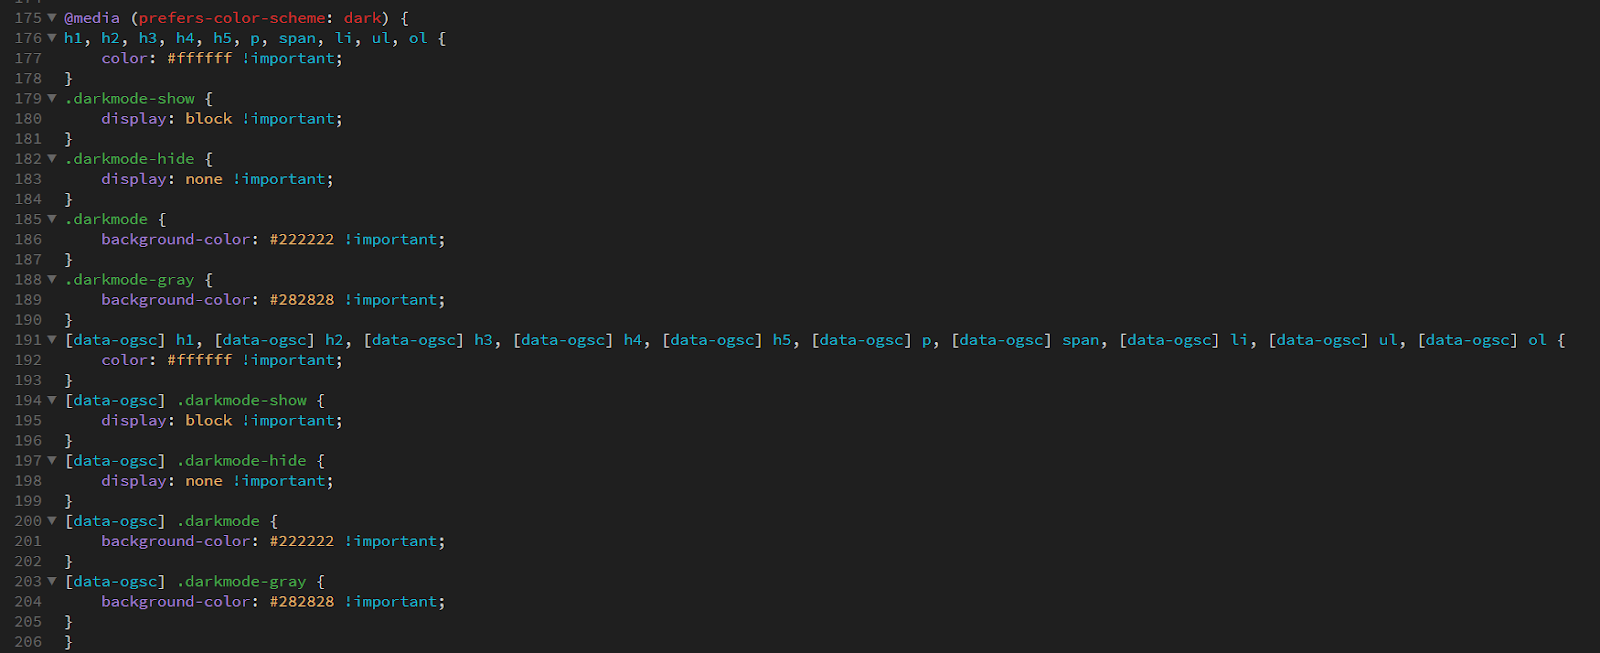
Are you swapping your image between dark and light mode?
Certain images may rely heavily on specific colors or color combinations that work well in light mode but might not be as effective or visually appealing in dark mode. By swapping images, you can create alternative versions that are optimized for each color scheme, enhancing the overall aesthetic and cohesiveness of your email design. See example code.
Is your white text turning black in Outlook?
Outlook’s dark mode implementation may override the color styles you’ve set for your text, resulting in white text appearing as black. In dark mode, Outlook attempts to adjust the color scheme for better visibility, which can cause unexpected changes to your email’s appearance. You can add the below code to the head tag that will target the Microsoft Outlook email only.
By utilizing this code, you can apply specific CSS styles that will only affect Microsoft Outlook emails. Adjust your desired styles within the provided <style> block.
Here’s an example of how to use a class within an element:
Here is the full tutorial by Nicole Merlin that addresses Outlook emails in dark mode.
Access a complete list of email clients that support dark mode, along with additional tips for optimizing dark mode in your emails, by referring to the following resource.
Preheader text
The preheader text, also known as a preview snippet, is essential for enticing recipients to open your emails. However, it can sometimes get cut off or displayed incorrectly. To avoid this, keep your preheader text concise and within the recommended character limit. Test it across different email clients to ensure it appears as intended.
Here’s a checklist of things to look for:
Do you need this hidden?
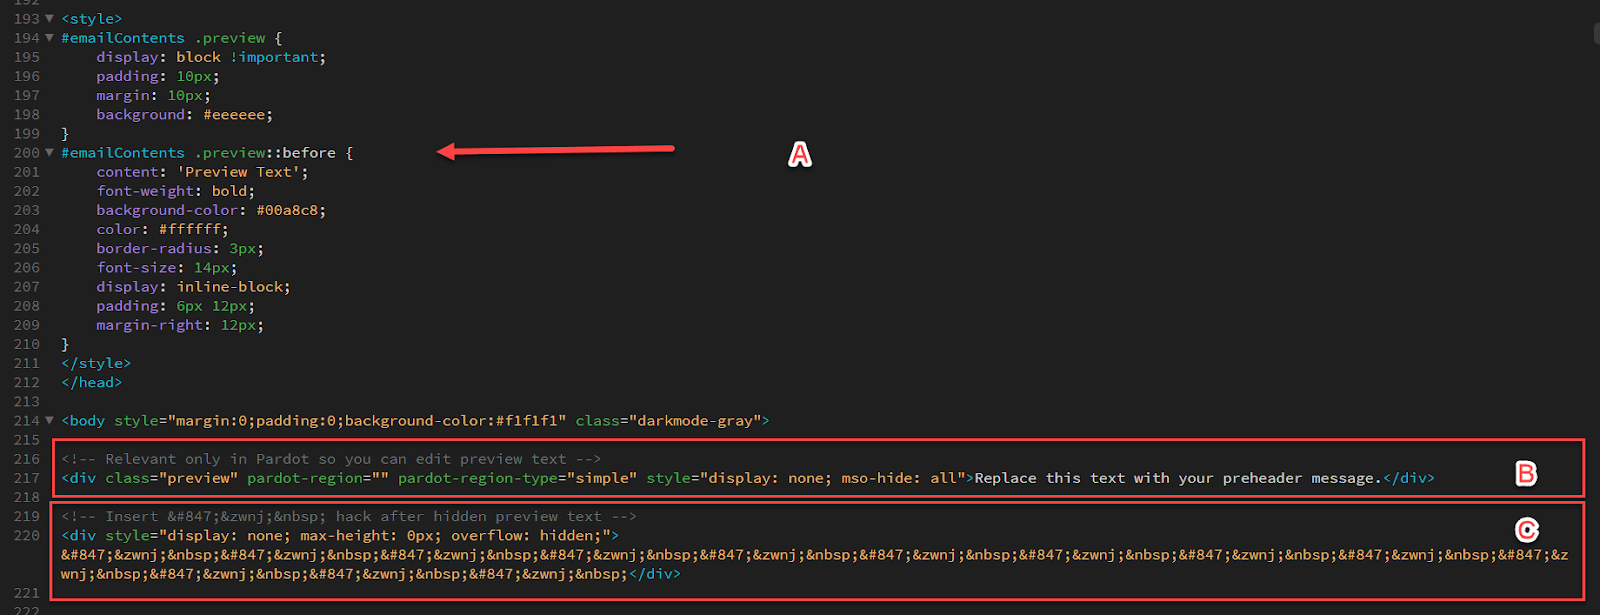
The decision to hide or display preheader text in emails can vary based on several factors, including design preferences, marketing strategies, and the specific goals of the email campaign. If you decide this needs to be hidden on the overall look of the email, you can include a <style> tag within the <head> section of your HTML code. Use CSS selectors to target the desired element and apply the appropriate styling to hide it. See example ‘A’ below.
In this example, the CSS code targets the element with the class name .preview within the #emailContents container and applies specific styles when the screen width is at least 600 pixels. The #emailContents id is specific to Account Engagement and should allow the editor to edit the content using the WYSIWYG editor. The content within the element is otherwise hidden with the style=”display: none; mso-hide: all” inline style sets the display property to none
Remove unwanted characters from the preheader text
Preheader text should be brief and concise, ideally within the range of 80 to 100 characters. Focus on delivering a clear and compelling message that entices recipients to open your email.
If you prefer not to display any preheader text, you can simply leave the preheader content empty. However, be aware that some email clients may automatically populate the preheader with default content, such as the first line of text from the email body. To mitigate this, consider adding a space or non-breaking space ( ) in the preheader to override any auto-populated text. See example ‘C’ above.
My link’s not working
Broken links can be frustrating for subscribers and can negatively impact your click-through rates. To avoid this, thoroughly check and test all the links in your email. Double-check the URLs for accuracy and ensure they are properly formatted.
Here’s a checklist of things to look for:
Did you write the correct format?
Double-check that the URL of the link is accurate and properly formatted. Ensure that the link includes the necessary protocols (e.g., “http://” or “https://”) and does not contain any typographical errors or missing characters.
Is your link broken?
If the destination page of the link is no longer available or has been moved or removed, the link will not work. Verify that the target webpage is active and accessible.
URL encoding issues
URLs with special characters or spaces may encounter encoding problems.
Make sure that the link is correctly encoded using URL encoding standards (e.g., replacing spaces with “%20” or special characters with their corresponding encoded values).
Non-clickable link
If the link is not properly coded as an anchor <a> tag with the appropriate href attribute, it will not function as a clickable link. Ensure that the link is wrapped within the <a> tag and that the href attribute contains the correct URL.
Blocked or filtered by email client
Some email clients may block or filter certain links for security reasons. If the link appears to be working when tested in other environments, it could be due to the specific email client’s settings or policies.
Incompatibility with mobile devices
Links that are designed or formatted in a way that is not mobile-friendly may not work properly on mobile devices or within certain email clients. Optimize your links for mobile responsiveness to ensure they function as intended.
URL redirection issues
If the link involves URL redirection, make sure that the redirection configuration is correct and functioning properly. Incorrect redirection settings can cause the link to fail.
I want to use a custom font
While Account Engagement does not provide font hosting, you can still incorporate custom fonts in your email campaigns by using web-safe fonts or linking to externally hosted font files. You can host the font files on your own server or utilize third-party font hosting services, then reference them in your email’s CSS using @font-face rules. This way, you have more control over the font selection while still working within Account Engagement’s limitations.
Here’s a checklist of things to look for:
Choose a web-safe font or a font that supports email clients
Email clients have limited font support, so it’s best to use web-safe fonts or custom fonts specifically designed for email use. Select a font that is available on most operating systems and widely supported by email clients to ensure consistent rendering.
Host the font files
Upload the font files to your web server or a font hosting service. You’ll typically need the font files in different formats like WOFF, WOFF2, TTF, or EOT to maximize compatibility across email clients.
Define font-face rules in the CSS
In your CSS code, use the @font-face rule to declare the font family and specify the font file URLs. Include the different font formats to cover a broader range of email clients.
Replace ‘YourCustomFont’ with the desired font name and adjust the file paths in the url() function to reflect the location of your font files.
My font link is being counted as a click
In Account Engagement, links are typically tracked and counted as clicks to provide valuable engagement metrics and insights for your email campaigns. However, when you include a font link in your email, it may unintentionally be counted as a click due to the way Account Engagement tracks link interactions.
This can happen because Account Engagement’s tracking mechanism treats all links as clickable elements by default. When recipients open your email and the email client fetches the font file from the linked source, Account Engagement’s tracking system registers this as a click event.
Here’s a checklist of things to look for:
How are you using custom fonts?
To avoid font links being counted as clicks in Account Engagement, you can use the @import method instead of the traditional <link> method to include custom fonts in your email.
Here’s an example of how to use the @import method: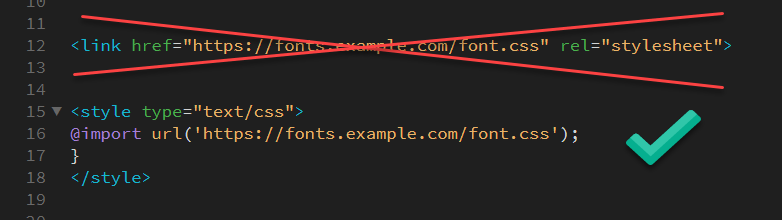
Background images
Background images in HTML email templates offer creative possibilities for crafting distinctive layouts, adding depth, and showcasing products. They have gained popularity as a design element. However, it is important to consider certain factors when incorporating background images in your Account Engagement email design.
Here’s a checklist of things to look for:
Not all email clients support background images
Some clients may block or ignore background images, resulting in an email that doesn’t display the intended design. Test your email across different email clients to ensure consistent rendering.
Inline CSS
To maximize compatibility, inline CSS is typically recommended for background images in HTML emails. Use the style attribute directly within HTML elements to define the background image and related properties.
The example includes the necessary code to make the background image show in Microsoft Outlook, as well as most popular email clients.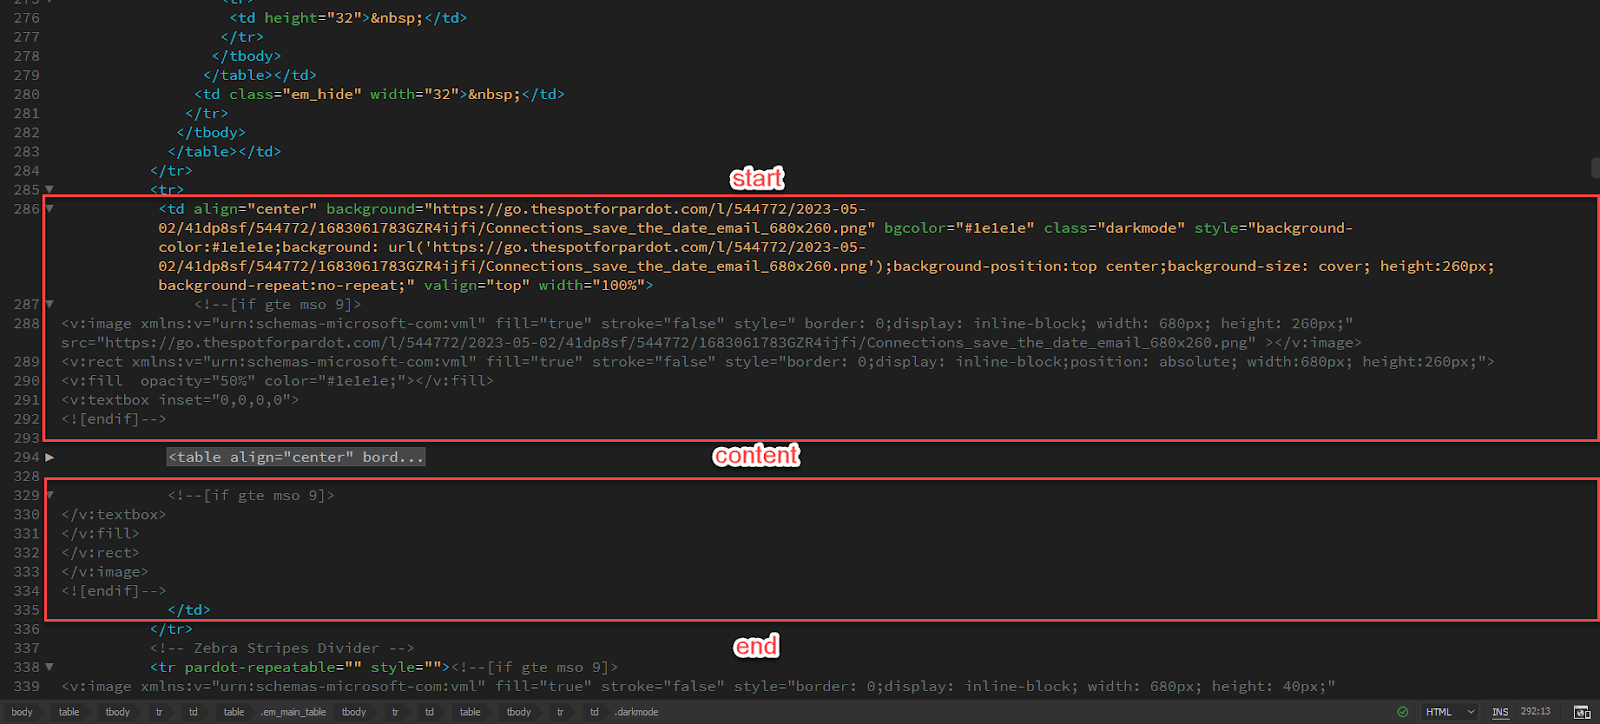
Image size and optimization
Optimize your background image by compressing it to reduce file size while maintaining acceptable quality. Large image files can increase email size and load time, negatively impacting the recipient’s experience. Aim for an optimized image that doesn’t exceed the recommended file size for emails.
Fallback background color
In case the background image doesn’t load or isn’t supported, provide a fallback background color that complements your design. This ensures that the email still looks visually appealing even without the background image.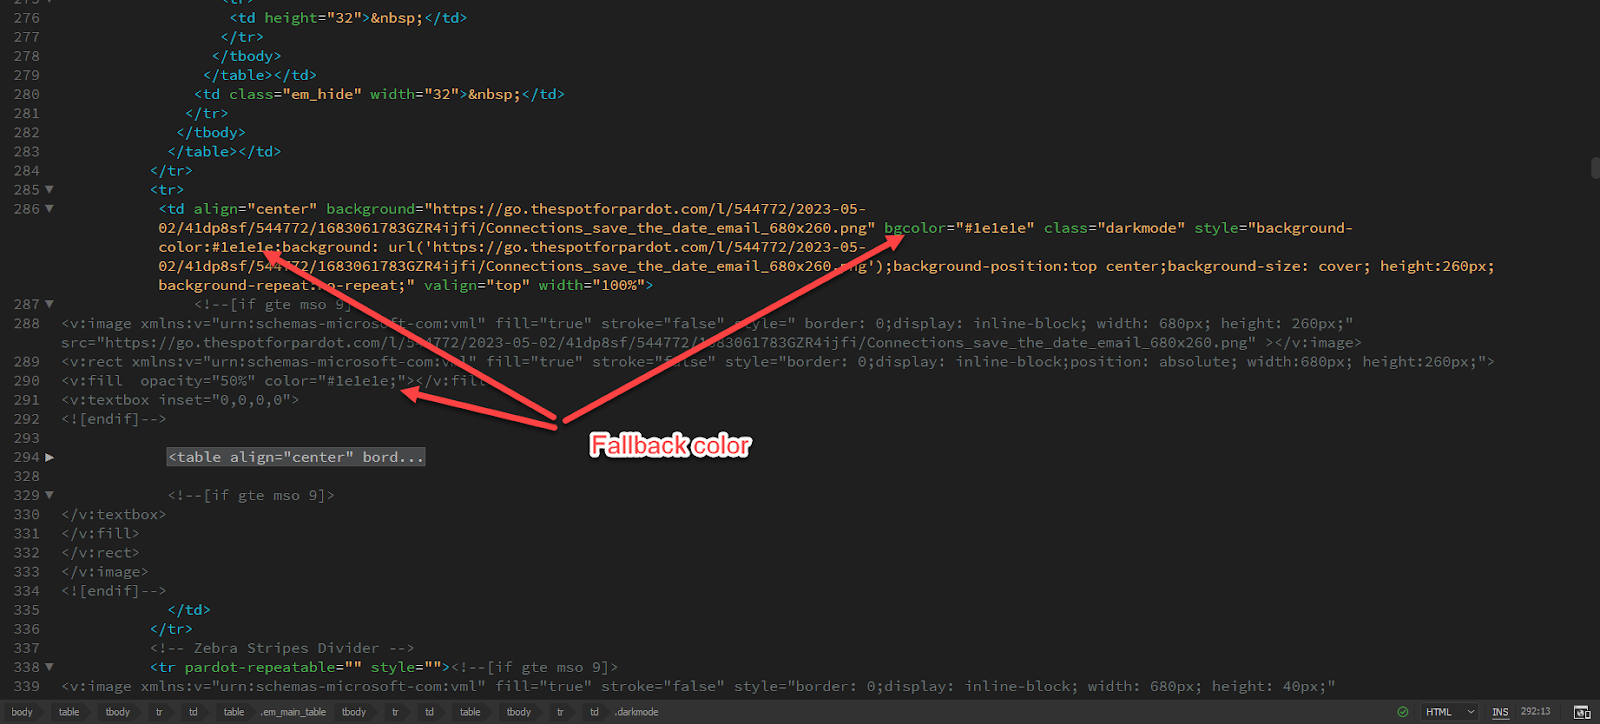
Accessibility
Consider accessibility guidelines when using background images. Include alt text for background images so that users with screen readers or email clients that don’t display background images can still understand the context of the email. And of course, it is not recommended or best practice to use text in background images.
Buttons in Outlook
Buttons collapsing or not displaying correctly is another challenge in HTML email coding. To avoid this, use table-based layouts for buttons and set explicit width and height values. Test your buttons across different email clients to ensure they remain consistent and clickable.
Here’s a checklist of things to look for:
I want rounded corners in Outlook.
VML (Vector Markup Language) can be used to create buttons with rounded corners, especially in older versions of Outlook that don’t fully support modern CSS features like rounded borders (border-radius). VML allows you to make custom shapes and apply rounded corners to elements.
Check out this example of an HTML button with rounded corners using VML: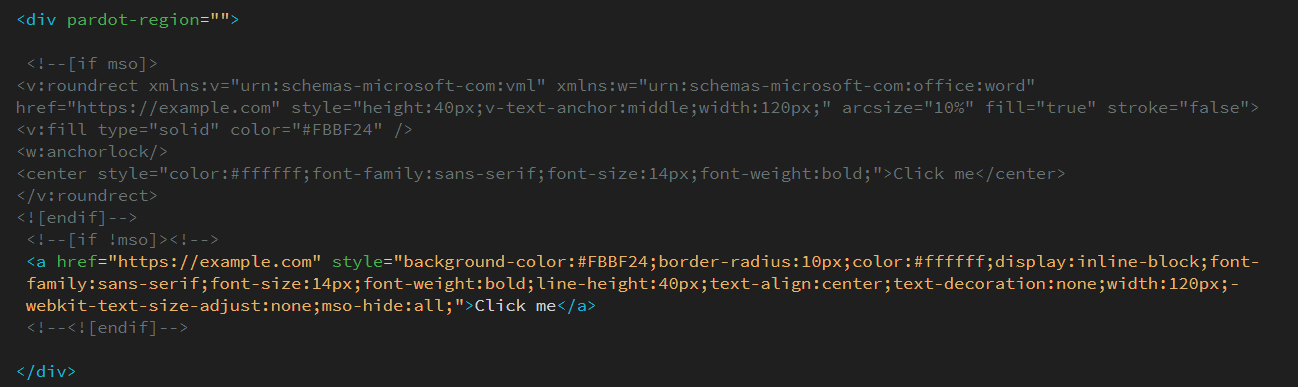
We strongly advise against using this method in HTML email templates within Account Engagement, as it requires replacing the link in two separate locations, which can be easily overlooked if not approached with caution.
Why did my button padding get stripped?
If you’re facing a situation where the padding of your button appears to be removed or stripped, it is likely because of a collapsing issue in Outlook. To troubleshoot this problem, ensure that the link you are testing is an active and valid link, rather than just using a placeholder like “#” or a dummy link. Using inactive or placeholder links can be the root cause of the problem and result in the unexpected removal of padding from your button.
Create error-free Account Engagement emails
At Sercante, we understand the common pitfalls of HTML email code in Account Engagement, and we’re dedicated to solving them for you.
With our technical expertise and attention to detail, you can rest assured that your email campaigns will be visually appealing, engaging, and seamless across all platforms and devices.
