Category

Emails & Forms

Balancing all the emails your teams want to send to Prospects versus how many emails the Prospects want to receive is difficult. 

Email your Prospects too often and they may opt out. Email them too little and they may miss the important updates they subscribed for. 

Also, determining when to email your Prospects is always a struggle. Should you split your sends by time zones? Is there a sweet spot that covers most time zones? Does anyone actually read emails on Mondays?! 

Up until now, the best way to tackle these decisions is Dynamic Frequency and Recency lists coupled with the numerous studies concerning which days and times are the best to send emails. However, with Pardot and Einstein, you can let machine learning do this analysis for you and have one less thing to think about.

Note: The 2 Einstein Solutions below are only available to Advanced and Premium Editions of Pardot. 

Optimize your email send times

Pardot Einstein Send Time Optimization analyzes the timestamp of sends, opens, clicks, unsubscribes, and spam complaints to determine the optimal time to send a Prospect an email. 

Keep in mind, Einstein Send Time Optimization includes List emails, Engagement Studio Program emails, and Salesforce Engage sends in its analysis. It does not include Operational emails or Autoresponders. 

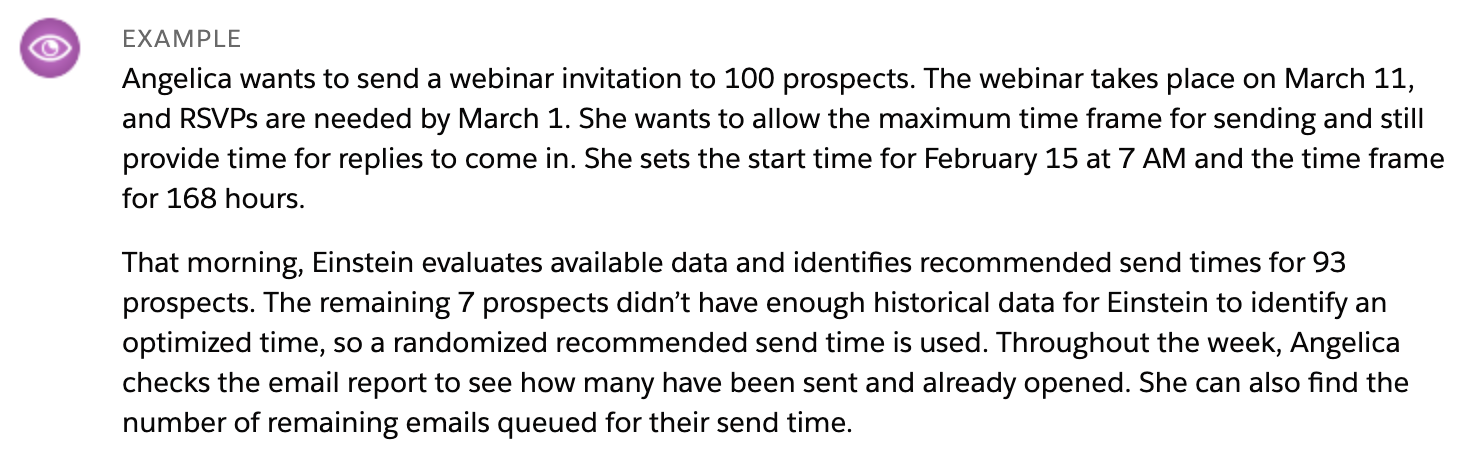
How Send Time Optimization works in the abstract is a little confusing, but this example from Salesforce’s help doc is great: 

example

Send Time Optimization is only available in emails sent from the new MCAE (Pardot) Lightning Email Builder

When sending a list email from the Lightning Builder, three Send Time options appear:

  1. Einstein Optimized (choose this option)
  2. Send Now
  3. Send Later
Einstein Optimized
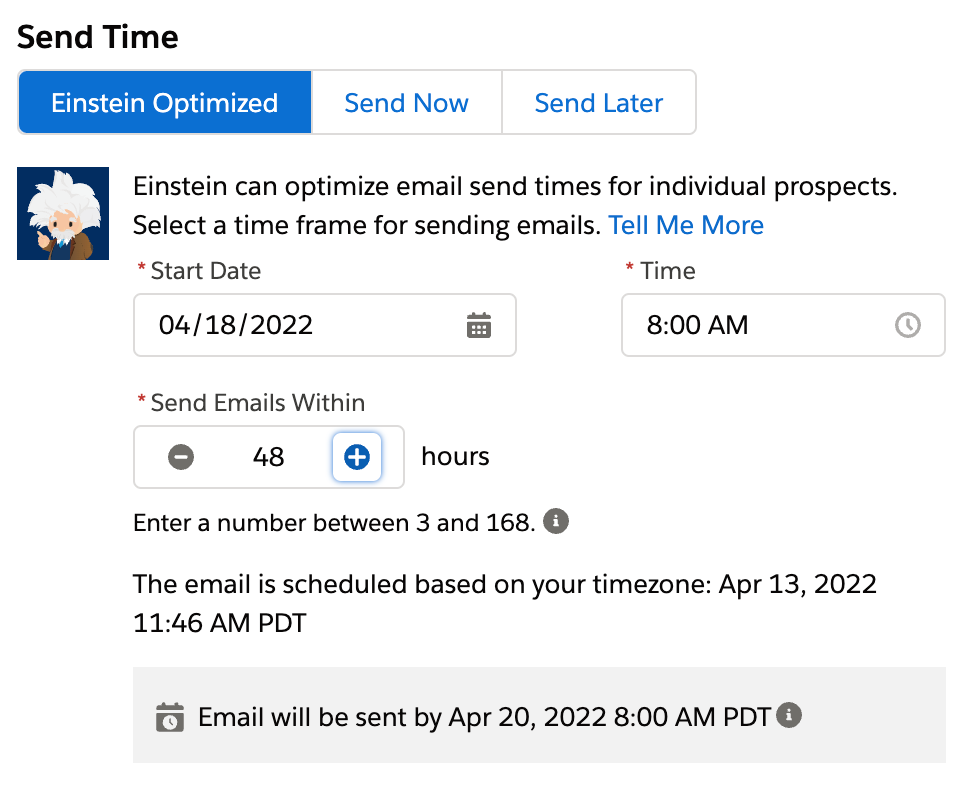
  • For “Start Date” enter the earliest day you want the emails to go out. 
  • For “Time,” it takes about an hour for Einstein to analyze the prospects, so set this one hour before the earliest time your email should go out (i.e. If I want the emails to start sending at 9AM, I’ll select 8AM). 
  • Then set your “Send Emails Within” value (up to 168 hours which is 7 days). The gray box at the bottom of the Send Time section will show the latest time your email can go out and will update as you change your “Send Emails Within” value. 

Once your email starts sending, you can monitor how many emails have gone out anytime during the Send Time window by going to Pardot Email > Scheduled > All Scheduled Emails.

What data do you need?

Each Prospect needs to have engaged with an email in the last 90 days. If a Prospect is new or has not engaged within this window, Einstein will recommend an aggregate of your email engagement data. 

Enabling Einstein Send Time Optimization

You’ll enable Einstein Send Time Optimization by going to Setup > Einstein Pardot > Send Time Optimization

Once enabled, it will take up to 72 hours to analyze your data and create your custom model.  

Use Einstein Send Time Optimization to customize email frequency 

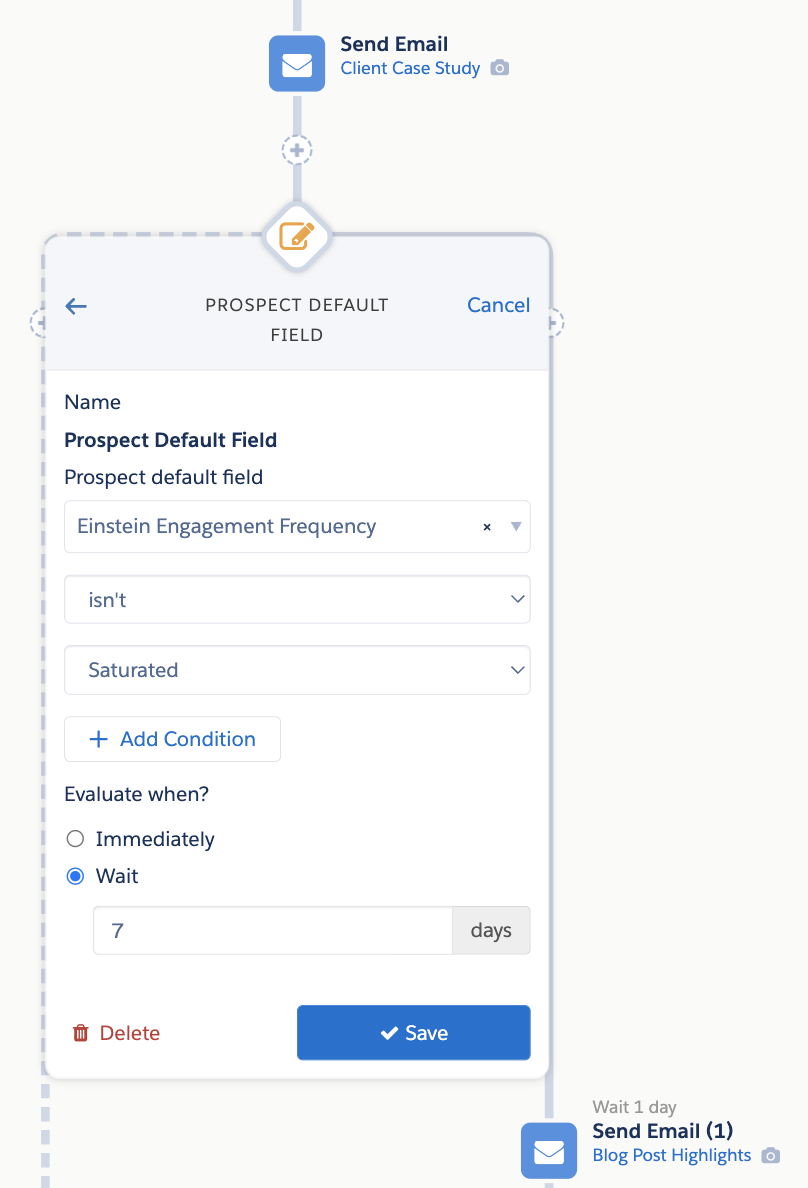
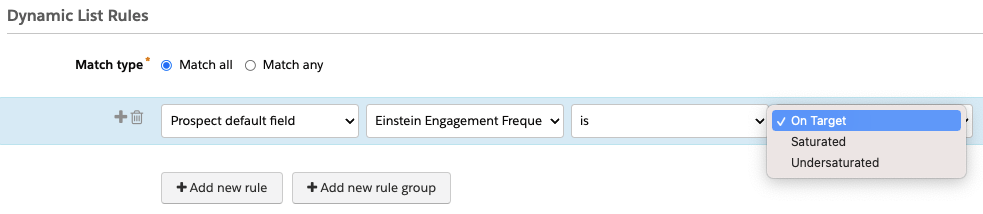
Einstein Engagement Frequency (EEF) analyzes Prospect’s email engagement over the last 90 days plus their overall engagement data in the past 28 days to determine if the Prospect is Undersaturated, On Target, or Saturated. 

Similar to Einstein Send Time Optimization, EEF analyses List emails, Engagement Studio Program emails, and Salesforce Engage sends. It does not include Operational emails or Autoresponders. 

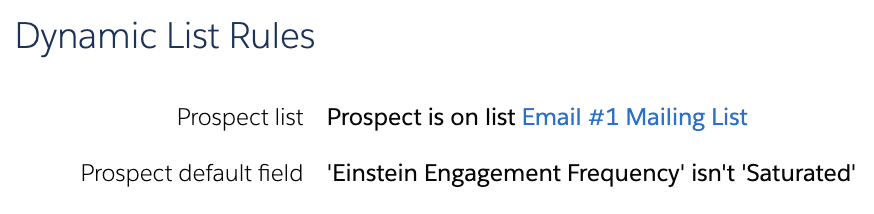
So, say for example you have a list of 100 Prospects who all received an email two days ago. You need to send all 100 another email, but you are worried about over emailing them. With EEF, you can run a dynamic list looking at your Recipient list from your first email and see which Prospects are Undersaturated or On Target and could be emailed again. 

Dynamic list rules

Or, even better, you could set up an Engagement Studio Program for the second email, and any future communications, to wait for the Prospect’s EEF status to change from Saturated. 

Engagement studio program

What data do you need?

Each Prospect needs to have engaged in at least the last 28 days, but 90 days is recommended. EEF also requires 5+ variations of emails be sent to at least 10 Prospects within the last 28 days.

Enabling EEF

You’ll enable Einstein Send Time Optimization by going to Setup > Einstein Pardot > Einstein Engagement Frequency

Once enabled, it will take up to 72 hours to analyze your data and create your custom model, a new Prospect default field, Einstein Engagement Frequency, will also be created. 

dynamic list rules

Lean on the machines with Einstein Send Time Optimization

With Einstein Send Time Optimization and Einstein Email Frequency, we can begin leaning on machine learning to make some of the email sending decisions for us.

 If you’ve already started using these two Einstein tools with Pardot, please share your tips, tricks, and findings in the comments!

Looking for a way to capture lead source data from across pages on your website and pull that data into your CRM? 

Since we use Marketing Cloud Account Engagement (Pardot), we figured out how to do that by transferring UTM parameters across webpages and capturing them in a Pardot custom field. 

Using a magical mixture of UTM parameters and Google Tag Manager with a Pardot custom field and third-party forms, here’s our solution for capturing pre-form fill visitor data in Pardot. 

However, you can use your imagination to take this solution further and send the data to any CRM that allows you to capture data in a custom field.

What is a lead source?

A lead source establishes how a prospective customer first engaged with your business. That can be through your website, by phone, by email or even visiting your location in person. 

Most lead sources originate through advertising, social channels, word-of-mouth, referrals, or even location signage.

Why does the lead source matter?

Understanding how buyers find your business serves two purposes:

  1. It improves the buyer’s journey. You can use the information to be more relevant and responsive  with highly tailored content, interactions, and communications, leveraging the channels and sources your audience prefers. 
  2. It reveals the most effective channels and methods. Having insights into lead sources helps you build awareness, connect and engage with buyers by focusing on what works.

How to track marketing parameters via UTM

The best way to gain digital lead source insight is to use UTM (Urchin Tracking Module) parameters. UTMs are variables that are passed to your website via the link a buyer clicks to get to your website or landing page. 

As the standard for tracking lead sources, UTMs play an integral role in providing data to Google Analytics and other marketing analytics platforms. 

Setting up UTM parameters is super easy by using a handy tool provided by Google Analytics. Remember to create a consistent naming convention so when you add them to your links you’ll be able to easily identify key data points when viewing your reporting.

Why do I need source cookies?

Capturing a UTM parameter on your web form can be tricky. If a user visits a page with a form through a UTM URL and submits the form, the UTM parameters get captured. However, if a user visits a page through a UTM URL and navigates to another page on the website, the form submission is unable to capture the UTM parameter values. 

To solve this dilemma, we used Google Tag Manager (GTM) to implement a cookie on the first page visit and then populate the hidden fields with the stored UTM values.

How to capture lead source via a Marketing Cloud Account Engagement (Pardot) form handler

The steps to capturing your lead source data in Pardot are as follows:

Step 1. Set up Pardot Form Handler

Create a new form handler in Pardot. Magic Wand > Marketing > Forms > Form Handlers.

  • Add information about your form:
    • Name – This will not be seen by the visitor, so use a naming convention that will help you understand the form’s purpose.
    • Folder
    • Tags
    • Campaign
    • Tracker Domain
      • Do NOT check kiosk/data entry mode
      • Check “Enable data forwarding to the success location” only if pushing data to a location other than Pardot.
      • Only check “Disable Activity throttling” if you wish to send auto-responder emails after every submission. A time buffer is set by Pardot to prevent a visitor from duplicating completion actions or emails if they repeat a form submission too quickly. Still not sure? Read more here.
    • Add Success Location URL – Either add a new URL ‘Thank You’ page or send them back to the referring URL.
    • Add Error Location URL – Either add a new URL ‘Error’ page or send them back to the referring URL.
  • Add Completion Actions
  • Add Form Fields
    • Set up your fields in Pardot if not already there
    • Map fields to third-party form by field “name” not the label. These must match exactly or the form handler will not work.
      • e.g.,  <input type=”text” id=”fname” name=”fname”>
      • Do NOT make them “required”
  • Copy the endpoint URL of your newly created form handler and add that to the third-party form.

Step 2. Configure your third-party form

To capture the UTM parameters we determined we want to use, we have to include the following eight HIDDEN fields on the third-party form and do NOT set as required:

  1. utm_source 
  2. utm_medium 
  3. utm_campaign 
  4. utm_content 
  5. last_utm_source 
  6. last_utm_medium   
  7. last_utm_campaign 
  8. last_utm_content

In our example, we are using a Gravity Form. But this should work with most forms. 

To minimize our efforts, if there are many forms on your site, I recommend adding a class like ‘utm_source’, ‘utm_medium’, etc., to the fields you are creating on the form. This way, we can target the class names and their containing inputs in the script later.

Step 3. Capturing a cookie using Google Tag Manager (GTM)

UTM information is only visible on the page it first lands on. If the user goes from one page to the next on the website, the UTM information disappears. 

Add Persist Campaign Data (3rd Party) Template 

There’s no need to reinvent the wheel. Use the 3rd party template, Persist Campaign Data.

  • Click the Tags tab > New
  • Click inside “Tag Configuration” box
  • Search for Persist Campaign Data

What does this container do? It will first look for URL parameters that can be edited. But out of the box, it is looking for anything with utm_source, utm_medium, utm_campaign, utm_term, utm_content, utm_it, gclid. 

This container will store a 2 cookies:

  1. __gtm_campaign_url
  2. __gtm_referrer
  • Click Triggering and select ‘All Pages’ – This will ensure your tag will fire no matter what page a user enters from.

Add a Cookie Variable

We now need to be sure the web tracking cookie we are grabbing is in the correct format.

  • Click Variables
  • Name Variable: cookie-__gtm_campaign_url
  • Variable Type: 1st Party Cookie
  • Cookie Name: __gtm_campaign_url

Check the box: URI-decode cookie

If you preview in debug mode you should now be able to see the cookie set. 

How do you see tracking cookies in Google Chrome? 

  1. Right click on browser window
  2. Choose ‘Inspect’
  3. Choose ‘Inspect’
  4. Choose the Applications tab
  5. Check installed cookies

Add UTM parameters to your form

Now that the cookie is set and working, let’s add the important parts to the form we already created.

  • Click Tags
  • Name the new tag:  utm_form_tracking
  • Tag Type: Custom HTML 
  • Drop in the HTML Script:
<script>
// Parse the Cookie
function getCookie(cname) {
	var name = cname + "=";
	var decodedCookie = decodeURIComponent(document.cookie);
	var ca = decodedCookie.split(';');
	for(var i = 0; i <ca.length; i++) {
		var c = ca[i];
		while (c.charAt(0) == ' ') {
			c = c.substring(1);
		}
		if (c.indexOf(name) == 0) {
			return c.substring(name.length, c.length);
		}
	}
	return "";
}
// Parse the URL inside Cookie
function getParameterByName(name) {
    name = name.replace(/[\[]/, "\\[").replace(/[\]]/, "\\]");
    var regex = new RegExp("[\\?&]" + name + "=([^&#]*)");
    results = regex.exec(getCookie("__gtm_campaign_url"));
    return results === null ? "" : decodeURIComponent(results[1].replace(/\+/g, " "));
}
// Pass the values to hidden field 
document.querySelector(".utm_source input").value = 
getParameterByName('utm_source');  	document.querySelector(".utm_medium input").value = getParameterByName('utm_medium');  	document.querySelector(".utm_campaign input").value = getParameterByName('utm_campaign');  	document.querySelector(".utm_content input").value = getParameterByName('utm_content');
</script>

Change the JavaScript to match the gravity form field values.

  • Set up a Trigger – This will fire the HTML JavaScript code when the cookie fires
    • Name Trigger: trigger_utm_script
    • Trigger Type: Page View – DOM Ready
    • References to this Trigger: utm_form_tracking 

Test your results

You can change the Field Type to text or not hidden while testing your form. Just be sure to flip it back. 

Here is a handy tool that will allow you to easily add campaign parameters.

Watch the full tutorial video

Limitations to capturing lead source data

A caveat — this solution will work for unique visits. However, since it uses cookies, it doesn’t track accurate visitor data across multiple visits. So, if the person visits your website many times before completing a conversion form, then you’ll only have data from the last cookied visit. 

We’re still cooking up that solution, but we’ll share it when it’s ready. 

We’d love to hear suggestions from the community for solving that problem. Or let us know how you did in the comments.

In early March, Salesforce announced changes to how it serves content via go.pardot.com. In short, this impacts your Pardot content that might be placed on your website through iFrames. 

We’ll walk you through how to find where the go.pardot.com domain is in use. Then we’ll show you how to fix it across your website.

A bit of detail on the Pardot domain challenge

Pardot is making security enhancements that can affect users of the go.pardot.com domain who use this domain for iFrames. That means you’ll have to take action by April 22, 2022, to update your website forms that meet the criteria outlined in this blog post.

UPDATE: Salesforce announced they’re extending the deadline. After April 22, 2022, you can choose to turn on the security update. And Salesforce will automatically enable the security update for everyone after August 12, 2022. (See message from Salesforce)

Website forms with iFrames + default Pardot domain + JavaScript = pay attention

Specifically, you should pay attention to the enhancements if your website forms:

  1. Embed Pardot forms or other content inside iFrames
  2. Include JavaScript in that content
  3. Serve this content over the default Pardot domain (go.pardot.com)

The main impact will be to any Pardot form served standalone or in an iFrame using the go.pardot.com domain.

Also included are forms that make use of included JavaScript to make external calls. This includes JavaScript that:

  • Communicates from within the iFrame to the pages that contain the iFrame
  • Makes an AJAX call to a server

Examples of these kinds of calls are:

  • JavaScript that resizes the iFrame on the page to better fit the form
  • Submission of forms using reCAPTCHA
  • Changing form behavior based on changes to the email address field, such as showing a message to a prospect if they previously unsubscribed

Other impacts with assets using iFrames are possible. For example, with these new changes you will no longer be able to embed a landing page within another webpage. This change also affects JavaScript callouts on form handlers and dynamic content when served directly via an iFrame.

Preparing for the fix

There are a few preparatory steps you can do before going and making (or requesting) changes to your website.

Step 1. Set up Pardot tracker domain

If you don’t already have a Pardot tracker domain, we will need to create one. If you aren’t sure, here are steps to follow:

  1. Log in to Salesforce & Pardot
  2. Go to your Pardot Settings > Domain Management page
  3. Look for a tracker domain that is custom. It should be one that’s similar to your website address (similar to the screenshot below)

If you don’t have a custom tracker domain set up yet, our friends at Nebula Consulting have a great set of instructions here.

If you have multiple tracker domains, you will need to know which one to use.

Step 2. Enable first-party cookie tracking

While not necessarily needed for this fix, it is best to set yourself up for success for the future of cookie tracking within Pardot.

To enable first-party web tracking cookies:

  1. Log in to Salesforce & Pardot
  2. Go to your Pardot Settings, Account Settings page and click Edit
  3. Scroll down to “First-Party Tracking” and make sure all 3 checkboxes are checked
  4. Save account

Step 3. Find website pages using the go.pardot.com domain in iFrames

I mean this is the whole reason you are here right? You have a challenge and want actionable steps on how to actually solve it instead of some blogger babbling.

We’ve created a tool that can leverage your website sitemap .xml file (the same sitemap Google crawls) to look for web pages that have embedded iFrames that also use go.pardot.com as the iFrame source.

Use the form below to find the forms on your website you’ll need to update. After submitting, we’ll gather some results and email them to you after a few minutes.

This field is for validation purposes and should be left unchanged.
Name
This field is hidden when viewing the form

Make changes to the website

With your list of pages in hand, you can begin the work of editing each page, swapping the go.pardot.com part of the iFrame “src” attribute with your new tracker domain. Try this out on one or two pages, testing out the forms to make sure nothing has broken. Then, roll it out across your site.

But… what if I can’t add a custom tracker domain?

You might ask yourself, “What if I can’t add a custom domain?” If this is you, you’re gonna be okay. 

Because of the change being made, you won’t be able to use iFrames with the default go.pardot.com domain to host standalone or embedded forms. If you plan on using a form, you’ll need to use the form on a landing page. If you have JavaScript needed for the form, it can be included in the landing page to keep the form functioning as it did before. 

If you have other assets you need in an iFrame, unfortunately you won’t be able to continue using the default domain to display them. You’ll need to get creative with these assets. Maybe convert the information into a downloadable PDF or display it as an image on a landing page.

It’s going to be okay

With new Pardot security enhancements comes a more stable marketing automation platform. But it also brings new complications — and we have your back. 


If you need further assistance with setting up a custom tracker domain, finding and fixing the use of go.pardot.com, or just a refresher on best practices, get in touch or tell us in the comments. We’re always happy to help.

Incorporating dynamic content and variable tags is an excellent way to personalize your emails, forms, and landing pages. But viewing where dynamic content and variable tags are in use is a proverbial black hole. 

Not knowing where these items are used makes updating or deleting dynamic content and fields risky. You don’t want to leave a big blank space in an email template or send a prospect an email that says “We would like to offer you              for a limited time.”

Completing an audit can reveal all the places Pardot Variable Tags and Dynamic Content are in use. So, where do you start?

How we completed the Pardot Dynamic Content and Variable Tag audit

To solve this issue, I teamed up with the Pardot API Wizard Mike Creuzer to see what information we can pull via the API. With the API, Creuzer pulled the asset IDs and the full HTML (and TEXT for email templates) from the assets. We then took the raw data and looked for anything containing “%%” (or “{{“ if you are using HML). The end result being a giant Excel sheet like this:

Pardot Dynamic Content and Variable Tag audit

Using skills from the Excel for Pardot Admins mini-series, we then split this list out into one master list of all Pardot Dynamic Content and Variable Tags present in any assets. This allowed us to not only view which dynamic content assets are more frequently used, but also ensure we would not break any personalization in our assets while altering or deleting fields and content.

Getting technical with ad hoc reporting in Pardot

To get the data in the format above, we used the typical computer science ETL (Extract, Transform, Load) pattern at a smaller scale.

Extract

In this scenario, we had to go beyond what a typical Pardot export would get us, so we turned to the Pardot API. Using the API we pulled the full HTML and TEXT from all unarchived email templates in the Pardot instance. 

If you are new to using the Pardot API, you can shorten your ramp-up time with the Postman Collection for the Pardot API from Sercante Labs.

Transform

We used a regular expression to pull only the HML, PML, and dynamic content merge fields. This allows us to quickly skim the HTML and TEXT of our email templates and identify where dynamic content and/or variable tags are in use. We effectively tossed away all the other ‘stuff’ in the emails to focus on just the needed bits.


Load

“Load” means getting the data to its final destination. In our case, the destination is a shareable and usable spreadsheet. 

We included useful fields within our spreadsheet for people who are doing the dynamic content and variable tag review (i.e. template name, Pardot business unit, etc.). And there are seemingly useless bits like the template ID, which anyone can easily use to create a direct link to the template for editing. 

We also built in additional features, such as flagging when a TEXT version of an email is blank or where an @ symbol was used before %%current_year)yyyy% instead of ©. Finally, we pulled this process together in a programmed script to allow us to easily re-pull the data after dynamic content and fields were deleted, thus ensuring no tags were missed.

Audit your Pardot Dynamic Content and Variable Tags, and tell us how you did

With toolsets like this at your disposal, you can quickly and accurately get more work done. It’s easy to expand this process into other use cases after you’ve completed the process once or twice. For example, you can look for variable tags within dynamic content. 

What Pardot data would you like to audit with a process like this? Tell us in the comments!And remember to reach out to the Sercante team when the challenge calls for Pardot experts.

Dynamic Content is the built-in way to use Pardot to personalize marketing assets like emails. You can improve your email marketing performance, including click-through rates (CTRs), by providing the right content based on known (or unknown) prospect information. 

However, throughout the process, many Pardot users run into limitations of Pardot Dynamic Content. They wonder how they can actually achieve personalization within their Pardot emails and newsletters.

This post will walk you through solutions to overcome common challenges with Pardot Dynamic Content. You’ll also get strategies to expand your personalization options far beyond what it can achieve. 

If you’d like to dive deeper into these strategies, you can catch a session on the topic at ParDreamin’ this year.

Overcoming Limitations of Pardot Dynamic Content

Limitation #1: Only one field criteria

One of the primary limitations of Pardot Dynamic Content is that the criteria can only be based on one field. This can make users feel frustrated when they need to use more complex criteria or multiple fields to determine which piece of content an audience member sees. 

One way around this is to use an automation rule (that embodies multiple criteria) and have it change one field you can then use for dynamic content. 

For example, you might want to send different content to these three audiences:

  • East Coast people who aren’t registered for your webinar (send an invite to your East Coast presentation)
  • West Coast people who aren’t registered for your webinar (send an invite to your West Coast presentation)
  • People who are registered for you webinar (send an eBook)

Because these audiences use multiple criteria (location and registration status in this example), you aren’t able to achieve the goal with dynamic content without some finesse. 

To achieve this, you would need to create a new field. Then you could use an automation rule so that everyone who is on the East Coast and is registered has that prospect field filled with a value that reflects “East Coast + Registered” and then do the same with your other variations.

At the end, you would have one prospect field that takes into account multiple criteria to base dynamic content on. 

Limitation #2: No “is empty” criteria option exists

Another limitation Pardot users run up against with Dynamic Content is the fact that there is no “is empty” option when creating criteria. 

The standard criteria include:

  • Is
  • Is between
  • Is greater than
  • “Contains” (for dropdowns)

Luckily this one is fairly easy to solve. If you go into the Admin section for that specific Dropdown field, you can make sure the blank value is also selected. This will allow you to use “blank” as a criteria option.

Keep in mind that this only works for dropdown field types, so it does not work for all prospect fields. 

Limitation #3: 25 Variation limit 

This limitation is not the most common one for users to come up against, especially when they first start using dynamic content. However, you might see this if you are regularly creating new options for one dropdown field that you then use as a base for your dynamic content.

You can only have 25 variations per dynamic content piece. 

You can work around this a bit by combining Handlebars Merge Language (HML) with your dynamic content. We will discuss HML as another tool for personalization later in the blog post, but it is an option (even if it comes with its own challenges.) 

Other challenges with Pardot Dynamic Content

However, despite the tricks and tips to get around some of these common limitations, many users still feel that true personalization cannot actually be realized.

Even when criteria options are sufficient, Pardot Dynamic Content has other challenges, such as:

It’s time intensive. 

It takes a while to properly strategize and then set up the custom fields and automations you need to make dynamic content a success. Even once the framework exists, you’ll still need to take the time to reformat your dynamic content modules for each email. 

Once you’ve practiced editing these modules, it probably won’t take as long as it would have to create an entirely separate email, but it is still something to be mindful of.

It’s also prone to errors. 

Dynamic content can be difficult to test, especially if you have a lot of variations. Because it is harder to test, spotting errors can be tricky. 

You also have to keep diligent track of what Pardot Dynamic Content module is the correct one because you insert it with its numeric code — not as an actual block of content. 

Overall, many of the clients I’ve worked with have found Pardot Dynamic Content limiting from the start or they have outgrown it over time. But there are other ways to achieve personalization that are less time intensive, more user-friendly, and more automated. This includes Handlebars Merge Language, Pardot Snippets, and integrations with other software. 

Handlebars Merge Language (HML)

HML was originally the Salesforce version of variable tags. But in 2019, it was brought to Pardot as well. HML allows you to use conditional logic statements in emails and email templates to change what a user sees in an email based on fields. 

HML uses

The benefits to using HML over Pardot Dynamic Content are that you can write the condition you need directly in the email itself. Then you don’t have to recall which specific module you need. It is simply based on your field information, and you can change details within a block of content instead of creating a new block of content for each category.

HML language requires you to code everything, but this does open up design and style options in addition to changing text. With HML, you aren’t limited to what you can paste into Pardot’s Dynamic Content boxes.

The limitations to using HML are:

Technical coding and setup required

Email templates that use HML conditional statements need careful coding of the IF statements. Unlike Pardot Dynamic Content, there is not a simple way to insert conditionals. Everything must be written in HTML and HML code. If you aren’t experienced with writing code in these languages, then you may need outside help. 

Prone to errors

It can be easy to accidentally break the IF conditions or underlying code if you are updating content directly in the Pardot email builder. And as is true with Pardot Dynamic Content, conditional emails are difficult to test before release.

Limited logic

HML logic is not as robust as Pardot Dynamic Content. You can only use “field = true” logic. Most use cases will require the creation of new custom fields and workflows that map preferences to custom fields which you can use in the HML email. However, that is also true of complex Pardot Dynamic Content criteria. 

Pardot Snippets 

Pardot Snippets are static and reusable blocks of text, dates, or links you can use in emails, forms, and landing pages. You will need access to Salesforce (and/or Pardot Lightning) to create them. They are especially useful for helping marketers keep track of information they would normally copy/paste across multiple Pardot assets. Pardot Snippets are most helpful when it comes to updating event information or footers across your various assets. 

There are a few limitations to Pardot Snippets, such as:

They don’t support HTML/CSS

This means you can’t use Pardot Snippets to stylize your email. You can only use them as blocks of text. While this certainly has a time and place, I haven’t seen my consulting clients use this method to achieve advanced personalization. 

Criteria is very limited

The Pardot Snippet criteria is very limited. It is only based on Business Unit or Campaign Ownership. If you need any other logic (which you likely will if you really want to personalize your prospect’s email and newsletter content), then you’ll have to use a different method. 

Emailing personalized content still takes time in 2021

No matter which of the Pardot-native personalization methods you choose, you still have to manually copy and paste content into the Pardot builder or Dynamic Content blocks. This pain point is the biggest reason companies shy away from personalizing these days.

If you’ve made it through this post and still want to pursue personalized Pardot emails, then I highly recommend looking for a Pardot add-on that can help you automate the email creation process using RSS or a curation process. Pardot automation add-ons can reduce errors, save you time, and make personalization a more realistic possibility.

You can learn more about personalization that goes beyond Pardot Dynamic Content at ParDreamin’ 2021. We’ll present a session to teach you how to overcome the limitations of dynamic content using powerful Pardot integrations.

View ParDreamin’ session description for Beyond Dynamic Content: How to Create REAL Content Personalization in Pardot

Collecting accurate data is essential to your marketing strategy so you can continually optimize it to fit your goals. In most cases, companies capture data through form submissions and keep this data in-house. But what if the data collected needs to be shared?

Marketing is ever-growing, so it isn’t uncommon for two companies to collaborate on a campaign or event. But when these companies work together, sharing data can get messy. 

Traditionally, most marketing teams use spreadsheets to pass data back and forth between partners. This begs the question: is it possible to automate the transferring of data when users submit forms? Well, with Pardot, it’s not only possible, it’s simple— and with no spreadsheets necessary.

There are two ways to trigger this kind of automation. In our first post, we walked you through transferring data from a Pardot Form to a Pardot Form Handler. In this post, we’ll walk you through transferring data from a Pardot Form Handler to another Pardot Form Handler.

  1. The initial submission is captured via a Pardot Form then data is passed directly to a Pardot Form Handler.
    Two fictitious companies, Utica Paper and Printers Rock are co-marketing an event. Utica Paper is the main host of the event and they leverage a Pardot form for registrations. In the Pardot form’s completion actions, they have added JavaScript code to forward submission data to a form handler. This Pardot form handler is tied to Printers Rock Pardot org. To simplify, this process is a Pardot Form (Utica Paper) > Pardot Form Handler (Printers Rock).

  2. A Pardot Form Handler captures the initial submission and the data is forwarded to a second Pardot Form Handler.
    In this scenario, The Halpert Company, uses their website to host a registration page for an upcoming event. After a form is submitted, they capture data in Pardot via a form handler. The Halpert Company has partnered with Utica Paper on this campaign. They leverage the data forwarding option on Pardot form handlers to send submission data over to Utica Paper immediately after a form is submitted. To simplify, this solution is Pardot form handler (Halpert Industries) to Pardot form handler (Utica Paper).

Scenario: Pardot Form Handler to Pardot Form Handler

  1. Create Pardot Form Handler in the primary org
    Under this scenario, The Halper Company created a Pardot form handler to capture event registrations from their website form. Their web team has configured the site to post data to this form handler after someone submits. This form handler contains all the information their team wants to track within Pardot.

    Pro Tip: only mark the email field as required. Leave all other fields optional on the form handler. Let the website form handle which fields are required when the user completes the form.


  2. Create the Pardot form handler in the secondary org
    The second company in our scenario is Utica Paper. They would create a form handler with identical fields to capture data in their instance. The secondary company will send the form handler endpoint URL to the primary company.

    Pro Tip 1: The external fields names must match exactly to how they’re defined on the primary company’s Pardot form handler. 

    Pro Tip 2: Use the HTTPS encoded URL to capture data. (see screenshot below)


  3. On the primary company’s Pardot form handler, do these things:

    a. Check the ‘enable data forwarding to the success location’ box. (see A in screenshot)

    b. Change the Success Location dropdown to ‘specific url. (see B in screenshot)

    c. Paste the endpoint URL from step 1 in the field (see C in screenshot)


  4. (optional) Update the secondary org’s Pardot form handler with a success location.
    This step depends on if the Thank You page a user sees is controlled by the form handler or the original source. In many cases, the thank you page an end user sees is controlled by the website form (outside of Pardot) which is why most form handler’s are in the kiosk mode.

    If the form handler controls the thank you page, that page will be ultimately controlled by the secondary companies Pardot form handler. With the Success Location set to ‘specific url’, the secondary company would input the thank you page link into the ‘success location’ url box.

    Pro Tip: Set up a custom redirect in the primary company’s Pardot for the thank-you page. That way if the link needs to change, the primary company’s admin can easily update it.

Final step: TEST EVERYTHING! Don’t skip this step – trust us, your future self will thank you. Testing will ensure that data is being captured and passed between the two Pardot instances.

The last thing you want is to launch a shiny new campaign to find out a week later your data was not captured properly.

Check out our post on how to use the format above to pass conditional completion actions through a Pardot form. If you need Pardot help or training, check out some of our mini-courses and bootcamps, or contact us to speak with a consultant. Sercante can help you maximize the investment of your Pardot instance.

No more posts to show