Category

Emails & Templates

The life of a marketing and sales consultant is never boring at Sercante, working with companies of all shapes and sizes on tasks both large and small.

The days flow along in a sensible cadence … until …

Are you a Halloween horror story fan?

Marketing has its own kind of terror — not in the chainsaw/demonic way, but on the topics of spam, user roles, missing form follow-up, sync mishaps — you get the picture.

Read on — if you dare! (But really, you should — you’ll learn a few tricks.)

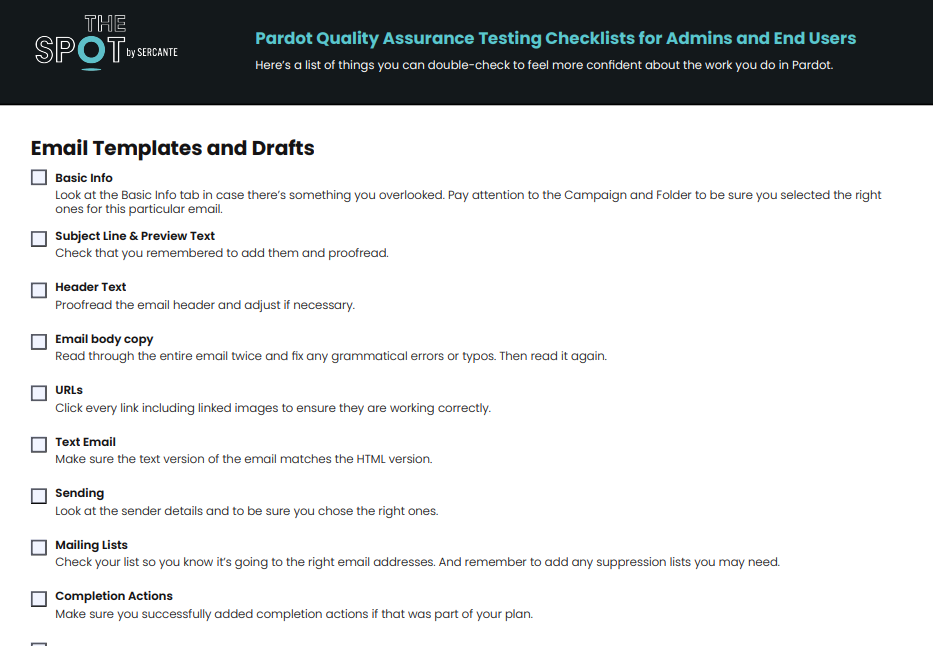
Avoid these 6 Pardot horror stories

marketing horror story no completion actions

Soothsayer Sales Team?

Picture this: You’ve placed a clean and crisp “contact us” form on your website. It’s nice and trim (not too many fields) and has prominent placement on a main page. The sales team is rubbing their hands together in anticipation of ALL of the leads.

Your worst fears come true: The sales team gets nothing, zilch, nada, zero — NO leads.  ????

You frantically look around for the culprit. Finally, the ugly truth bubbles to the surface: The beautiful “contact us” form is missing a critical step. (Are you hearing the “Psycho” sound? I am.)

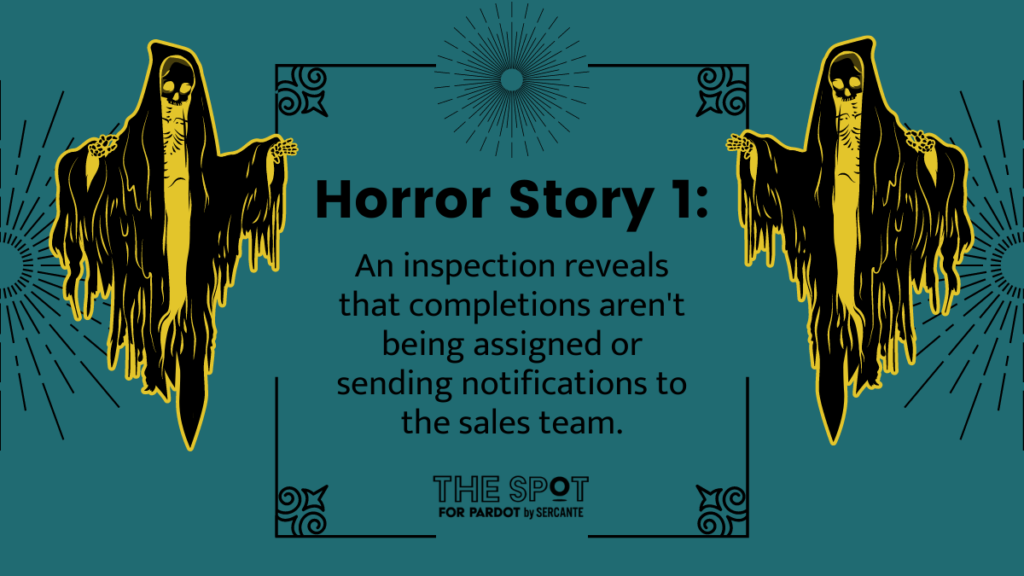
Pardot Horror Story 1: An inspection reveals that form completions aren’t being assigned or sending notifications to the sales team.

???? Of course. The sales team doesn’t have a crystal ball and can’t “see” the leads without a little form-based action.

It’s time for you to optimize your form setup so leads make it to the right people.

Read this post for more details »

marketing horror story dead link

Your day starts with an urgent note from your boss: “An email must be sent asap on ProductX because sales numbers aren’t as expected.”

Between back-to-back calls and a multitude of Slack messages, you prep the email, to get it ready for the final copy you are not-so-patiently awaiting. The copy arrives,and you review it while on yet another call, then drop it into the email you already started. Cool. Looks good ????.

You send a test to the boss, copywriter and your own inbox, and review the test email while still on a call (you are crushing the multi-tasking game ????).

You wait for approvals, then wait some more, and finally message your boss (“Please respond so I can get the email out!”). He comes back with a not-so-convincing “Yeah, it’s fine — send it” (and you never hear back from the copywriter).

You hit the “send” button — “asap” as requested — unaware of the horror to come.

Ding! The email hits your inbox. Ding! Ding! Emails from coworkers: “The button doesn’t work.” Uh-oh.

While distractedly rushing to get the email done, the link in the CTA button was forgotten.

Pardot Horror Story 2: Everyone’s messaging you to say your CTA button leads nowhere because it’s a dead link ????.

Anyone in charge of sending emails has been there — I feel you. It’s easy to miss test-clicking a link. And, as we all know, a rushed task is an invitation for errors.

Implementing a better quality assurance process can help you feel confident the next time you hit the ‘send’ button.

Read this post for more details »

marketing horror story purchased lists

The WitchWhich List Mystery

One day your database size is X, the next day it is X+5000! Where did the extra records come from? Magic? Sorcery? ????

You dig around, looking at new records trying to find the answer.

Hmmm — you see a few imports that you did not perform. Only one other user has import access — your boss. You message her: “Hey, I see you imported some lists into Pardot. Can you tell me where they are from?” She proudly comes back with, “We purchased a few small opt-in lists!”

Oh boy.

Pardot Horror Story 3: You find out that the zombie prospects in your Pardot org came from purchased lists.

Say it with me now: “Purchased lists are noncompliant with Pardot.”

Seriously, Pardot will put a hex on your account if you use those purchased prospects. Don’t do it. Just don’t.

(Learn more about Pardot’s Permission-Based Marketing Policy – which, by the way, you must agree to EVERY time you import a list!)

Read this post for more details »

marketing horror story admin user roles

Zombie Admins

There are four default Pardot user roles defined by their level of access/ability (Administrator, Marketing, Sales Manager, and Sales).

Salesforce user profiles are mapped to Pardot user roles.

You’re with me, right? Great.

According to the Thesaurus, “administrator” is also authority, commander, head, official, head honcho. You would probably agree that this would be a title reserved for the very top-most spots (I’m thinking 1-5, depending on how large the organization is).

How about 31,634 users with the Administrator role ????.

Yes, we’ve actually seen that IRL (this sounds like a Farmers Insurance® ad).

Pardot Horror Story 4: You discover that most of the users in a Pardot org have Administrator user roles.

????‍♂️ Keep the zombies at bay: Be selective with assignments to the Pardot Administrator role!

With admin access comes great power. Determine who really needs full access to everything in Pardot when assigning this role.

marketing horror story operational emails

Marketing-Killer Troll

Once upon a time, ABC Company sent out emails marketing its products and services to an opt-in list. People on the list were not a match for ABC Company, so they opted OUT of receiving emails.

Seeing this made ABC Company very angry, so they consulted the Troll living in the basement. Smashing his club into the ground, Troll decided these people MUST receive the emails ????.

Every email was then sent as an operational email. Every. Single. One.

Who knows where this story is going? ????‍♀️

An operational email is just that: operational. As in: service announcements, transactional messages, legal notices. As in: NOT marketing.

If you send an operational email and it does contain marketing information, then it is SPAM.

Pardot Horror Story 5: A quick check reveals that all emails are being sent as operational emails.

Don’t be a marketing killer, don’t send unsolicited messages and get shut down (or worse).

Read this post for more details »

marketing horror story MDS criteria mismatch

The Prospect Sync Coffin

Something is killing your synced information. Leads and contacts are dropping like flies directly into the Pardot Recycle Bin ⚰️.

No, it’s not the work of a serial killer, but it could be the work of a Marketing Data Sharing mismatch.

Pardot Horror Story 6: You realize prospects are being sent to the recycle bin because of a Marketing Data Sharing (MDS) criteria mismatch.

If you rely on specific data values to control information that syncs from Salesforce to Pardot (leads, contacts, opportunities, custom objects), then you are likely using Marketing Data Sharing (MDS).

When data values change in the field that the MDS criteria is using, the match won’t happen and prospects will be archived. If you import prospects that don’t match the MDS criteria, they’ll automatically be stuffed into the recycle bin too.

Explore the gotchas and learn how to set up MDS in this post »

Marketing Shouldn’t Spark Fear

Your daily life in marketing shouldn’t rival ghost stories or legends of monsters. With proper planning and constant education, it can be a quite happy tale. 

Here are 4 ways to start:

  1. Market with morality.
    • Make sure you understand Pardot’s stance on permission-based marketing.
    • Build a good base of GDPR knowledge.
    • Put yourself in the shoes of your recipients and send helpful email messaging, not spam.
  2. Stay on top of updates and new features.
  3. Always be learning.
    • There is a TON of free content for you to discover, from Trailhead to blogs (like this one!), and more.
    • Bookmark your favorites — or add them as startup tabs in your browser — for easy access.
    • Get certified — Salesforce offers a lengthy list of options.
  4. Join a community

Reach out to the team at Sercante if you need help along the way. Or tells us about your biggest marketing horror story in the comments section… if you dare.

Feel more confident as a budding admin or end user by kicking ass at Pardot quality assurance testing. (includes downloadable PDF checklist)

We’ve all been there before. Everything is set up in Pardot for an email or engagement studio program. But the fear hits before clicking the button to launch it. Is everything set up so it tracks correctly? Could there be a typo or broken link somewhere? This is where checklists and quality assurance (QA) testing are helpful.

The term ‘quality assurance testing’ makes the process seem more complicated than it needs to be. What you’re essentially doing is checking the details to be sure everything looks and behaves the way it should before you finalize and launch whatever it is you’re doing in Pardot.

While checklists give us a certain level of assurance real confidence comes from experience and learning, if you are interested in learning from our seasoned experts then why not check out these Pardot training courses Sercante offers to immerse yourself in the topics you aren’t totally confident about yet.

What types of Pardot quality assurance testing should admins do?

Lots of quality assurance testing needs to be completed to be sure that any Pardot instance works as expected. Pardot advanced users and admins can complete quality assurance in a Pardot sandbox environment. But most of the day-to-day Pardot QA testing tasks happen in production orgs. Typically, QA tasks related to the flow of data between Pardot and Salesforce are completed in a sandbox environment to prevent the potential loss of data.

Get a PDF checklist to use for QA testing in Pardot

You can view and download a handy PDF checklist to use every time you’re launching Pardot admin campaign materials here.

You should complete quality assurance testing in a Pardot production environment (that’s a fancy term for your regular ol’ Pardot instance) when you create or launch the following:

  • Engagement studio program
  • List email
  • Pardot form or form handler
  • Static list
  • Dynamic list
  • Social media post
  • Custom redirects
  • Page actions
  • Dynamic content
  • Email preference centers
  • Scoring
  • Grading

Seasoned Pardot admins likely have lists in their heads to double-check each of these items before sending, saving, or launching them. But admins and end users who are newer to Pardot lack the experience of knowing what can go wrong without proper QA testing. 

If you’re in the latter category, then you’re in the right place! These checklists are for Pardot admins and end-users who are in the beginning stages of learning to use Pardot.

You can find information about more advanced types of Pardot quality assurance testing & the Pardot Sandbox in this blog from Mike Fazio.

Pardot quality assurance testing checklists for admins and end users

As you build your confidence in Pardot, you’ll feel less apprehensive about sending your marketing efforts out into the world. You’ll also get less and less of those “please fix it” messages from your team.

Here’s a checklist of things you can double-check to feel more confident about the work you do in Pardot. Or, download the PDF version of the checklist here.

Email templates and drafts

You can perform basic quality assurance checks on Pardot email templates and list email drafts. But you may need to invest in a more advanced tool, like Litmus, to be sure your email will render correctly and pass through email spam filters. 

When you’ve finished building your email, click on the ‘Testing’ tab in Pardot to send yourself and any other reviewers test emails. This list may be longer depending on the complexities of the email itself. But we’re going to assume it’s a simple email for the purposes of this checklist.

  • Basic info
    Look at the Basic Info tab in case there’s something you overlooked. Pay attention to the Campaign and Folder to be sure you selected the right ones for this particular email.
  • Subject line & preview text
    Check that you remembered to add them and proofread.
  • Header text
    Proofread the email header and adjust if necessary.
  • Email body copy
    Read through the entire email twice and fix any grammatical errors or typos. Then read it again.
  • URLs
    Click every link including linked images to ensure they are working correctly.
  • Text email
    Make sure the text version of the email matches the HTML version.
  • Sending
    Look at the sender details and to be sure you chose the right ones. 
  • Mailing lists
    Check your list so you know it’s going to the right email addresses. And remember to add any suppression lists you may need.
  • Completion actions
    Make sure you successfully added completion actions if that was part of your plan.

Pardot form or form handler

  • Complete the form to test
    Using incognito mode in your browser, complete the form or form handler. You can add the word “test” as you’re completing the form so other Pardot users know your form data is from a test.
  • Find your test data
    Verify data from your test entry made it into Pardot and Salesforce, if applicable, as expected. Pay attention to every field.
  • Check completion actions
    Verify completion actions are carried out as expected.
  • Cause form errors
    Repeat testing the form by trying to “break” it. Fill out the form again, and mess up your entry (use an incomplete email address, leave required fields blank, etc.)
  • Test in other browsers
    You can use a tool like Browserling (free and paid versions) to mimic different types of browsers and operating systems for further testing.

Segmentation lists 

Static list

  • Spot-check the list to ensure the correct prospects are present.

Dynamic list

  • Click the Preview button. Spot-check the prospects on the list to ensure the correct prospects are present.

Engagement studio program

  • Test every path
    Click on ‘Testing.’ Run the test several times until you’ve tested every possible path.
  • Check your dates
    Double check all of your dates to be sure they align with your goals and best practices.
  • Add test prospects
    Create test prospects and add them to your program first when you want to test more complex programs (make sure your test prospects fit your rules). You may have to shorten your wait times to complete the test in a reasonable amount of time.

Automation rules 

  • Check the preview
    Preview automation rule to be sure it matches your expectations.

Social media post

  • Review post copy
    Proofread your text. Then read it again.
  • Verify @ mentions
    Go to the social media channel and search for actual profiles to verify any @ mentions you include in the post. Keep in mind that @ mentions on one social media channel probably won’t work on other channels. You’ll have to duplicate tje post and change the @ mentions for other social media channels.
  • Check hashtags
    Look up any new hashtags you want to include on the social media channel you want to use it on. This is so you know you’re using something that’s related to your post and not already in use or irrelevant.
  • Link to something
    Remember to include a call-to-action URL if applicable. Click ‘Insert Link’ if you’re sending people to something that’s in Pardot or a custom redirect.
  • Check the link
    Copy the URL and paste it into a separate tab to check the link.
  • Include a graphic
    Make sure you include a graphic (if applicable). Also, check that the graphic size is appropriate for the social media channel.
  • Check the profile
    Double check that you selected the correct social media profile for the post.
  • Proofread again
    Read the text one last time.

Custom redirects

  • Click the link
    Access the link from your usual web browser. Then, look for your prospect record in the custom redirect prospect list.
  • Test in incognito
    Test the link again from a web browser that’s in incognito mode and look for your click on the custom redirect.
  • Check completion actions
    Verify any completion actions are carried out as expected.

Page actions

You can check that your page actions are working properly after you add tracking code to your website.

  • Configure page actions
    Set up your desired page actions.
  • Go to the pages
    Visit those pages as a cookied prospect.
  • Look for results
    Verify that your page actions worked as expected.

Be fearless with your Pardot quality assurance testing skills

It’s totally normal to feel uneasiness before completing tasks in Pardot. I mean, you’re sending things out into the world that hundreds or thousands of people might see. Sorry to startle you. But that’s also the cool part about working in marketing. The stuff you’re marketing is going to solve problems for people. And you’re going to help them find out about it!

Confidence will come to you in time after you click around in Pardot and test all the things you’re building. 

Build confidence faster through Pardot training courses

You can fast-track yourself to feeling confident in Pardot by attending structured training sessions. There is so much to learn about Pardot with a seemingly endless list of resources. But nothing beats the real-life applications you learn through talking to people who understand Pardot and use it every day.

Check out the training courses and workshops Sercante offers for Pardot users and admins. You can find specific courses for deep-dives into a topic or beginner-level overviews for people who are new to Pardot.

Click here to view all Sercante training workshops and courses.

Looking for a way to spice up your Pardot email preferences page? Try using toggles instead of checkboxes. In this tutorial, I’ll show you how to create a preferences page that uses toggles instead of checkboxes. With a bit of HTML and some CSS, you can transform your preferences page in four easy steps.

Demo: Creating toggles for Pardot Email Preference Center

Here’s an example of what we’ll be creating in this tutorial.


Select which lists you would like to receive email communications from.

  1.   The latest updates on our events including webinars and our annual conference.
  2.   Get the best content right in your inbox.
  3.   Occasional emails about product releases and updates.
  4.   Our latest blog posts delivered weekly to your inbox.
  5. Opt out from all email communications

Step 1: Style your preference page

This post does not cover the basics of styling your Pardot preferences page. Click here to learn how to customize your page from scratch.

Step 2: Update the preferences page template

To make the toggles work, you will need to edit the form section of your layout template. Navigate to the layout template and click on the form tab. Replace the content with this HTML.


<!DOCTYPE html>
<html>
<head>
  <base href="http://go.pardot.com">
  <meta charset="utf-8">
  <meta content="text/html; charset=utf-8" http-equiv="Content-Type">
  <meta content="%%description%%" name="description">
  <title>Preferences Page</title>
  <link crossorigin="anonymous" href="https://stackpath.bootstrapcdn.com/bootstrap/4.1.1/css/bootstrap.min.css" integrity="sha384-WskhaSGFgHYWDcbwN70/dfYBj47jz9qbsMId/iRN3ewGhXQFZCSftd1LZCfmhktB" rel="stylesheet">
  <meta content="noindex, nofollow" name="robots">
  <link href="https://go.pardot.com/css/form.css?ver=2020-10-19" rel="stylesheet" type="text/css">
</head>
<body>
  <div>
    <div>
      <div>
        <img alt="" src="https://via.placeholder.com/220x65.png?text=LOGO" width="250">
        <div>
          <div>
            <form accept-charset="UTF-8" action="xx" id="pardot-form" method="post" name="pardot-form">
              <p>Select which lists you would like to receive email communications from.</p>
              <ol>
                <li>
                  <label for="piEmailPrefEmail">Email Address</label> <input id="piEmailPrefEmail" name="piEmailPrefEmail" readonly="readonly" type="text" value="j******1@g*******l.com">
                  <div id="error_for_piEmailPrefEmail" style="display:none">
                  </div>
                </li>
                <li>
                  <input id="piEmToken" name="piEmToken" readonly="readonly" type="hidden" value=""">
                  <div id="error_for_piEmToken" style="display:none">
                  </div>
                </li>
                <li>
                  <input id="list_111694" name="list[]" type="checkbox" value="111694" checked="checked">&nbsp;<label for="list_111694">Conferences & Events</label> <span>The latest updates on our events including webinars and our annual conference.</span>
                  <div id="error_for_list_111694" style="display:none">
                  </div>
                </li>
                <li>
                  <input id="list_111688" name="list[]" type="checkbox" value="111688">&nbsp;<label for="list_111688">News & Updates</label> <span>Get the best content right in your inbox.</span>
                  <div id="error_for_list_111688" style="display:none">
                  </div>
                </li>
                <li>
                  <input id="list_111692" name="list[]" type="checkbox" value="111692">&nbsp;<label for="list_111692">Product Updates</label> <span>Occasional emails about product releases and updates.</span>
                  <div id="error_for_list_111692" style="display:none">
                  </div>
                </li>
                <li>
                  <input id="list_111690" name="list[]" type="checkbox" value="111690" checked="checked">&nbsp;<label for="list_111690">Weekly Blog Digest</label> <span>Our latest blog posts delivered weekly to your inbox.</span>
                  <div id="error_for_list_111690" style="display:none">
                  </div>
                </li>
                <li>
                  <a data-confirm="Are you sure you want to opt out from all future email communications?" href="">Opt out from all email communications</a>
                  <div id="error_for_gUnsub" style="display:none">
                  </div>
                </li>
              </ol>
              <p style="position:absolute; width:190px; left:-9999px; top: -9999px;visibility:hidden;"><label for="pi_extra_field">Comments</label> <input id="pi_extra_field" name="pi_extra_field" type="text"></p>
              <!-- forces IE5-8 to correctly submit UTF8 content  -->
              <input name="_utf8" type="hidden" value="&#9731;">
              <p><input accesskey="s" type="submit" value="Save Preferences">
              </p>
              <script type="text/javascript">
              //<![CDATA[
              var anchors = document.getElementsByTagName("a");
              for (var i=0; i<anchors.length; i++) {
               var anchor = anchors[i];
               if(anchor.getAttribute("href")&&!anchor.getAttribute("target")) {
                   anchor.target = "_top";
               }
              }
              //]]>
              </script>
            </form>
          </div>
        </div>
      </div>
    </div>
  </div>
  <script src="https://code.jquery.com/jquery-latest.min.js"></script> 
      <script type="text/javascript">
      $( document ).ready(function() {
         $('label').contents().each(function() {
       if (this.nodeType == 3 && $.trim(this.nodeValue) != '') {
          $(this).wrap('<span></span>');
       }
      });
      $('.label-wrapper').after('<span></span>');
      });
      </script> 
</body>
</html>

What’s changed?

  1. Instead of placing the form fields in a paragraph, the form fields are placed in an ordered list with a class named “switches”.
  2. Some jQuery is added to update the HTML markup of the preferences form.

Step 3: Upload icons into Pardot

There are two icons that will need to be uploaded in Pardot, a checkmark icon and a “x” icon. Download the images and then upload the images into the content library within Pardot.

Step 4: Add the CSS for the toggles

Add this CSS to your layout template. Update the first couple of lines to include the image paths to the icons you uploaded in step 4.

/* Update this line with the URL of your checkbox image */
.switches .pd-checkbox [type="checkbox"]:checked + label span:last-child::after {
  background-image: url(https://);
}
/* Update this line with the URL of your "X" image */
.switches .pd-checkbox span:last-child::after {
  background: url(https://);
}
* {
  padding: 0;
  margin: 0;
  box-sizing: border-box;
}
ol {
  list-style: none;
}
label {
  cursor: pointer;
}
#pardot-form p {
  margin-left:0;
  padding-left:0;
}
/* hide the checkbox */ 
[type="checkbox"] {
  position: absolute;
  left: -9999px;
}
/* Position the checkbox label */
.switches .pd-checkbox label {
  display: flex;
  align-items: center;
  justify-content: space-between;
}
/* Style the switch */
.switches .pd-checkbox label.inline span:last-child {
  position: relative;
  width: 50px;
  height: 26px;
  border-radius: 15px;
  box-shadow: inset 0 0 5px rgba(0, 0, 0, 0.4);
  background: #434257;
  transition: all 0.3s;
}
.switches .pd-checkbox label.inline span:last-child::before,
.switches .pd-checkbox label.inline span:last-child::after {
  content: "";
  position: absolute;
}
.switches .pd-checkbox span:last-child::before {
  left: 1px;
  top: 1px;
  width: 24px;
  height: 24px;
  background: #FFF;
  border-radius: 50%;
  z-index: 1;
  transition: transform 0.3s;
}
/* Style the "X" switch */
.switches .pd-checkbox span:last-child::after {
  top: 50%;
  right: 8px;
  width: 12px;
  height: 12px;
  transform: translateY(-50%);
  background-size: 12px 12px;
}
/* Style the "ON" switch */
.switches .pd-checkbox [type="checkbox"]:checked + label span:last-child {
  background: #00d084;
}
.switches .pd-checkbox [type="checkbox"]:checked + label span:last-child::before {
  transform: translateX(24px);
}
.switches .pd-checkbox [type="checkbox"]:checked + label span:last-child::after {
  width: 14px;
  height: 14px;
  left: 8px;
  background-size: 14px 14px;
}

Now your page would look something like this, with the checkboxes turned into toggles.

Optional: Add any additional CSS

I added some additional CSS to my page to style the labels, list descriptions and options for my page. Here’s the CSS I added.

#pardot-form .no-label{
  text-align:center;
   margin-top:35px;
}
#pardot-form .no-label a {
 text-decoration:underline;
}
#pardot-form label {
  font-weight:500;
  font-size:15px;
}
.pd-email {
  margin:20px 0;
}
#pardot-form .description {
  text-align:left;
  display:block;
}
#pardot-form li.pd-checkbox {
  background-color:#FFF;
  margin-bottom:5px;
  border:solid 1px #ebebeb;
  padding:0px 20px 20px 20px;
  border-radius:5px;
  -moz-border-radius:5px;
  -webkit-border-radius:5px;
}
#pardot-form .label-wrapper {
  color:#444444;
}
#pardot-form {
  color:#737373;
}
#pardot-form .form-field {
  text-align:left;
}
#pardot-form input.text {
   border:solid 1px #ebebeb;
  padding:10px;
  border-radius:5px;
  -moz-border-radius:5px;
  -webkit-border-radius:5px;
  color:#737373;
}
#pardot-form .no-label {
  text-align:center;
}
#pardot-form .no-label a {
    color:#737373;
}

The final result

Here’s what my final page looks like.


Select which lists you would like to receive email communications from.

  1.   The latest updates on our events including webinars and our annual conference.
  2.   Get the best content right in your inbox.
  3.   Occasional emails about product releases and updates.
  4.   Our latest blog posts delivered weekly to your inbox.
  5. Opt out from all email communications

Questions?

Send me a tweet @jennamolby, or contact the Sercante team for help.

Prospects now more than ever are demanding personalized content. For the last 4 years, adding the first name for personalization in emails has been the default. Unfortunately, that alone isn’t going to cut it anymore. To keep their attention, you have to make sure they know you’re thinking of them— no matter how long your list becomes.

In Pardot, the options to provide these experiences differ depending on your account tier and how you intend to use them.

If you’re a veteran to Pardot, it’s likely you know that there are several ways to accomplish the personalization you need. That’s why we’ve broken down some of the most common use cases that call for Pardot HML, Pardot Snippets, or Pardot Dynamic Content. Understanding how each of these work best in different scenarios will help you save time in your creation process. 

Content personalization using Dynamic Content 

Dynamic content allows you to display custom content, via Javascript, on your company’s website or within Pardot. Think about displaying different content on forms, landing pages, layout templates, and emails based on prospect criteria.

When a prospect matches the criteria for your dynamic content, the content variation corresponding to that field value will display. With this feature, it is possible to display up to 25 variations of content. If there are no matches or that person has no data, then they see the default option.

The instant benefit is that you can use one email template to showcase different pieces of content per Dynamic Content block. This feature is available both in Pardot Classic and Lightning that have a Plus or higher edition.

Popular Use Case: Showing different images or text based on the values found in the country field within an email. See our post about use cases for Dynamic Content here.


Content personalization using Handlebar Merge Language (HML)

HML is a new merge language for personalizing email in Pardot. Basically it’s the representation of a field value that you can showcase anywhere you have access to the WYSIWYG editor. Think of displaying prospects data on landing pages, forms, emails, etc. based on the data found within a prospects record in Pardot.

The benefits of Pardot HML almost immediate:

  • Easy to upgrade your content.
  • Ability to search for the fields you need.
  • The same language is shared across Salesforce Lightning Templates, laying the foundation for more email compatibility down the road. 
  • HML can also be used within Dynamic Content, but not Snippets. 
  • Allows you to do IF/ELSE statements to further expand its uses.
  • HML is available across all editions of Pardot Classic and Lightning (if enabled).


How do you know you’re using HML?

The easiest way to know is to look at your tokens. Do they look like this %%first_name%% or like this {{Recipient.FirstName}}? The option with the curly brackets ({}) is the appropriate one. New accounts from 2020 (or more recent) should have HML activated already, however, if you have an older account and need help migrating over from PML to HML, just follow our guide.

Popular Use Case: Updating email signatures for both sales and marketing emails to quickly create a connection with prospects based on CRM ownership. We also wrote about use cases for HML here.


Content personalization using Pardot Snippets

A Snippet is a reusable block of text, date, or links that can be pulled into multiple Pardot emails, forms and landing pages. These blocks are static, meaning you select the one you want and the values don’t change unless you change them. They’re best for strict text purposes as they do not support HTML/CSS. 

Snippets cannot be used with Dynamic Content. However, you can insert HML into Snippets, you just have to do it manually because there’s no HML option in the Snippet wizard. You must have Connected Campaigns and HML enabled to use them within your instance. 

Snippets are based on Business Unit or Campaign ownership. Although you can use Snippets in Pardot Classic, you cannot create them without access to Salesforce (Pardot Lightning is preferred if you intend to use this feature). Snippets are available for all versions of Pardot.

Popular Use Case: Updating event or footer information across multiple assets. We recently wrote about Snippets and answered a few frequently asked questions on this blog!


Comparing HML, Snippets, and Dynamic Content

The bottom line is that people don’t want to go through a million forms. They want personalized content and they want it now.

This begs the question, when is it appropriate to use each Pardot personalization feature? If you have used Pardot for a while , you know that Pardot allows you to do similar things in several different ways. To help the decision making process, we put together this chart to help you decide when to choose each of these options.

Dynamic Content – Used for personalizing different variations of content blocks based on prospect record informationHandlebar Mail Language (HML) – Used as values from a prospect record for personalizing content across assetsSnippets – Used to personalize assets with static content.
Pardot Lightning required NoNoYes
Available in All Pardot TiersNoYesYes
Created/updated in SalesforceNoYesYes
Association to a Salesforce campaignNoNoYes, or Business Unit
Created/Updated in PardotYesYesNo
Limited by Pardot TierYes, Plus tier or higherNoNo
Updated by changes to Pardot-Salesforce dataYesYesNo
Allows HTML/CSS for customizing contentYesNoNo
Used to personalize Pardot formsYesYes, content regions onlyYes, content regions only
Cross Business Unit SupportNoYesYes


Example Use Cases for Pardot Personalization 

Below are some scenarios you may find useful to differentiate between uses.

Scenario: You need to set up a completion action on a form that sends out an autoresponder email with specific content based on a picklist option for a field called “Area of Interest”. The picklist field on the form has four options. You don’t want to build multiple email templates. You are on the Plus edition of Pardot.

Solution: Dynamic Content shows specific content in relation to the data on the record of the prospect. This would allow you to use one email template but showcase different content based on which option the prospect chose while completing the form.


Scenario: You need to send a prospect an email receipt of the information they just submitted via a form or form handler to confirm their participation in your program. You are on the Growth edition of Pardot.

Solution: HML only shows what lies within the record of a prospect, nothing more, nothing less. You can customize the rows and order of the data in the email template to look however you want.


Scenario: Your team needs to be able to update and use a content block (with webinar information) across multiple Business Units. The information for this comes from the field marketing team and they do not have access to Pardot.

Solution: Snippets show information that is static that can be shared across different business units or locked down by campaigns. Snippets can be updated by Flows or manually by a person with the right permissions within Salesforce.


Personalization and delivering value are key to moving prospects quickly through the pipeline. Pardot provides you with a variety of features to allow you to leverage the data you already have in your CRM to your benefit.

Are you looking for ways to take your email marketing strategy to the next level with Pardot? With the guidance of our strategists, we can help you identify the fields which are and aren’t actively used by your team — it could be key to qualifying leads faster!

If you are ready to maximize your use of Pardot, give us a shout!

Create beautiful, responsive landing pages in Pardot by using one of these 3 free Pardot layout templates. These landing page templates are designed specifically for gated assets such as white papers and eBooks, but they will work well with any landing page that contains a form.

Terms

These templates are free for both commercial and personal projects. No attribution is required, however, if you use them I would love to see how you customize them. Share your templates with me through Twitteremail, or in the comments below.

Preview the Templates

Template 1

View Demo

Template 2

View Demo

Template 3

View Demo

How to Use the Templates

1. Create a new layout template in Pardot (Marketing > Landing Pages > Layout Template > Add Layout Template). Give your layout template a descriptive name and add your desired tags.

create-pardot-landing-page-template

2. Copy the link to the template by clicking on one of the ‘copy link’ buttons below. This will copy the URL to your clipboard.

Template #1
https://thespotforpardot.com/Pardot-Templates/2021/Asset-Template-1/pardot-template.html
Template #2
https://thespotforpardot.com/Pardot-Templates/2021/Asset-Template-2/pardot-template.html
Template #3
https://thespotforpardot.com/Pardot-Templates/2021/Asset-Template-3/pardot-template.html

3. Navigate to the import layout drop down and select from URL. Paste the URL to the template into the text field and click import now.

Customizing Basics

All templates use the Bootstrap Framework and use SVGs from Flat Icon for the social media icons. The CSS is directly in the template (no external CSS files are referenced other than the Bootstrap library). You can easily modify the template to meet your branding requirements by modifying the hex codes directly in the template which are commented clearly within the template file.

Questions?

Send me a tweet @jennamolby, or leave a comment below.

Looking for more Pardot Landing Page templates?

Check out my free event templates while you’re at it.

Refreshed and republished on April 13, 2021

These templates were originally published on September 21, 2017 and have been refreshed.

Nearly 90% of marketers are using email (think tools like Pardot) to reach their audiences on a weekly basis, according to Oberlo. And people get roughly ~120 emails a day on average, according to Radicati.

Whoa! That’s a lot of emails. For many organizations in sectors like manufacturing, the switch to digital channels has become a race against time. One could infer that this number has increased due to the shift to digital channels (such as email) in 2020 due to the COVID-19 pandemic.

The shift is probably affecting businesses who perhaps did not depend on email marketing to generate sales, or depended more on brick-and-mortar stores for sales. In any case, these metrics are alarming (to say the least). This begs the question, what are you doing to stand out and make your brand memorable?

In Pardot, there are several ways to send emails. However, the way you organize and set up your email campaigns can differ from team to team.

Roadblocks that affect email marketing efforts

As a marketing team, here are challenges you may be facing in 2021:

  • Planning and executing Pardot email campaigns that scale
  • Creating email banners and graphics (with no designer on staff) 
  • Checking for mobile responsiveness across templates (with little HTML knowledge)
  • Testing your email content (lack of feedback on subject lines, copy, A/B testing, etc)
  • Customizing email templates and trying to stay consistent with branding guidelines
  • Navigating through ambiguous IT documentation around email domains

Regardless if you are a team of one or 15+, this Pardot email guide can help you take your email templates to the next level.

21 resources to help your Pardot emails stand out in 2021

Some of these resources do require that you have basic HTML/CSS understanding to be able to use them properly (we always advise you to work with an email developer). Most of the resources below are free unless otherwise noted. Additionally, you should test everything you decide to implement as it will not look or act the same across devices and email clients (particularly Outlook) and could affect your email KPI’s.

Email building basics

1. Email Brief and Planning Worksheet (Litmus)

Are you new to email marketing? This worksheet (by the team at Litmus) will help you get your process in order. This outline can work for both individuals and teams looking to improve their email campaign creation processes by focusing on efficiency and better quality control in the new year!

2. Email Content Regions Guide (Pardot) 

Pardot Content Regions give you flexibility to lock down content controls to users creating emails and landing pages. Need the footer content to be restricted to edits? There’s a tag for that. Need the ability simply update the text and link of a button without editing code? There’s a tag for that as well!

3. Fonts (Google)

Google Fonts is an easy way to pull additional web fonts for your landing pages and email and use them within Pardot. Note that not all email clients allow the use of other web fonts and you would need to set up a default font (in Pardot it’s Arial) for email clients like Outlook. To use these custom fonts you can find a guide on how to implement this on the Pardot Knowledge Base or work with an email developer to leverage more web fonts properly.

4. Preview & Preheader Text Guide (Sercante)

Many email marketers underestimate or completely ignore the power of Preview Text. A survey conducted by Litmus and Fluent found that about 24% of email readers decided to open an email purely based on the preview text. This guide walks you the fundamentals of using it and how it can impact your email opens. Just remember to keep your preview text close to 40 characters so it doesn’t get cut off (different devices have different cutoff parameters).

Design with your audience in mind

5. Bulletproof Email Backgrounds (Campaign Monitor)

Tired of boring white email backgrounds? This generator allows you to add images and backup colors (especially for Outlook) with a few simple clicks. You can then add this code to the HTML tab of your Pardot email for testing.

6. Color Kits (Scheme Color)

Color Schemes is a great tool to create color palettes especially if you don’t have a designer on staff and you’re just starting to develop your branding guidelines. To use this tool, simply add your HEX or RGB codes from your logo and out goes the color series. Don’t know the color codes? Try the image to color generator on their site and it will generate them for you.

7. Dark Mode Email Design Guide (Litmus)

Designing emails and websites for dark mode is becoming more and more popular. According to a survey from Medium, over 80% of mobile Users prefer dark mode when using their device. This informative guide will walk you through simple tips and tricks you can do to make sure you stand out. 


8. Email Banners (Canva)

Designing banners for email templates and social media posting? Canvas provides you with a series of predefined templates, stock imagery and even video clips (read more about using GIFs in your email campaigns). Remember to use the proper dimensions in your emails to make the banners easier to use.

9. Stock Images (Pexels)

Using images in emails can help spice up your content and promote click throughs. To use Pexels, simply search terms for your specific campaign needs and select the best image, most are free for personal and/or commercial use. Remember to think about considerations of using images in email, especially if the majority of your audience are on Outlook.

10. Social Media Icons (Hootsuite)

There are many social media icons you can find online. You may even have your design create some for you that are branded using your colors. Did you know that social media icons are actually trademarked? This guide will walk you through how to play it safe and access the correct branding and icons for your email marketing campaigns.

Delight your audience

11. Bulletproof Email Button Generator (Campaign Monitor)

Want to add buttons to your email templates but don’t know how? Use this simple generator to add buttons to your emails and landing pages. Simply input the URL link location and text you want on the button and then it will give you a code you can add to the right section to your email template. Guess what? They also work on Outlook. 

12. Calendar Invite Sharing Buttons for Emails (Eventable)

Want to create buttons for webinar registrants to add the event to their calendar? No problem, use this tool to create Add-To calendar buttons, which can be added to your emails with a few clicks!

13. Countdown Timers for Emails (NiftyImages)

Add a little flair and excitement to your emails, landing pages, and website with these countdown timers. To use this tool, add your timing, and then add the code to your email. If you registered for ParDreamin’ this year you will know exactly what it looks like. Similar to other animated images, some email clients only display the first frame of the image and may not work properly (especially in older Outlook accounts)


14. RSS Feed (FeedOtter)

Do you produce a lot of blog, public relations or news content on your website? It’s time to put FeedOtter to work! Although this tool is paid, it can be well worth it, if your organization is producing significant content month to month. Keep your audience engaged by and save on time by automating your newsletters with content from your website using this tool.

15. Video in Emails (Wistia)

You’ve seen the name Wistia before, you can’t remember where though right? It is actually one of the video native connectors you have access to when you buy Pardot. Although Wistia is a separate service to Pardot, they have great insights into how you can make video work for your brand and audience. Just in case you didn’t know, video doesn’t work across all email clients. This article walks you through your options to help your provide the best experience for your audience.

Testing your content

16. A/B Testing Case Studies (GuessTheTest?)

Need ideas of what to A/B test? Learn from other enterprise and B2B customers through their own A/B email testing experiences, you can even search by industry, the item that was tested and by conversion goals.

17. A/B Testing for Emails (Pardot)

Did you know that earlier this year Pardot made A/B testing available to all editions of Pardot? This help document will walk you through the steps on how to do it. It’s a great feature to leverage especially if you are trying to pinpoint what variety of preview text, subject line, or content works best for your audience. Need a little more help setting up A/B tests? Check out our blog post on A/B testing do’s and don’t here.

18. Gmail Email Tab Check (Gmail/Litmus)

Are you curious to see where your emails end up? With this tool you can test it for yourself. Currently it only supports tabs found within Gmail but if you are in the B2C/NGO/HigherEdu/Non-Profit side of email marketing that may be exactly what you need!

19. Subject Line Rater (Subjectline)

When writing copy, do you test subject lines? If you aren’t getting any feedback from your team, you are missing out. This tool gives you a score (scale from 0 – 100) AND feedback on how you can improve your subject lines before they go out the door. A good alternative is Omnisend.

Spam and DKIM Checkers

20. Blacklist Checker (MX Toolbox)

Are your emails even making it to your prospects Spam or Inbox folders? The answer is no if you have been blacklisted. For Pardot customers sharing an IP, this could happen even if you follow all the best email marketing practices. In short, being blacklisted means some of your emails you have sent may not be delivered (to reduce what is perceived email spam by the email clients).

21. Spam Checker (MailTester)

The spam checker checks for spam, DNS/DKIM validation, blacklists, broken links and ways to improve your content all in one! This is an amazing tool for anyone who is a team of one or working in a small team.


BONUS: Avoid these email marketing mistakes outlined by the team at Zapier and several marketing executives across industries.

Conclusion

Although Pardot does provide out of the box email templates that are ready to use, sometimes we crave a little more personalization for our templates to really communicate our message to our audiences.

The resources we covered today can help both novice and veteran email marketers alike improve the way they execute email marketing campaigns. In the world of email marketing, things are constantly changing and we must adapt otherwise our brands can look out of date. In the words of our fellow dragon, Mike Creuzer, “test all the things”.

As your team meets to set Q1 priorities for 2021 ask yourselves, “do we need support building our own customized email templates?” If the answer is yes, our development team is ready to invigorate your designs and add the functionality you need for your 2021 email campaigns. Don’t start 2021 on the wrong foot. Simply reach out to us to get started

No more posts to show