Category

Setup & Admin

Salesforce Marketing Cloud is a platform brought into the Salesforce ecosystem in 2013 when Salesforce acquired ExactTarget (a company that previously acquired Pardot). It can be considered a one-stop shop for all things digital marketing. That includes email marketing, social media, mobile marketing, website building, and more through various studios and builders. 

When Salesforce made the announcement that Pardot was being brought under the Marketing Cloud umbrella and rebranded as “Account Engagement,” marketers throughout the ecosystem were shocked and confused. 

We were always trained to view Marketing Cloud and Pardot are two separate entities that solved separate problems for companies, but the rebrand challenged that notion. I highly recommend checking out Andrea Tarrell’s post on the matter. 

This article is going to give a “hi, how are you” the main tools on the platform previously called Marketing Cloud and now known as Marketing Cloud Engagement. 

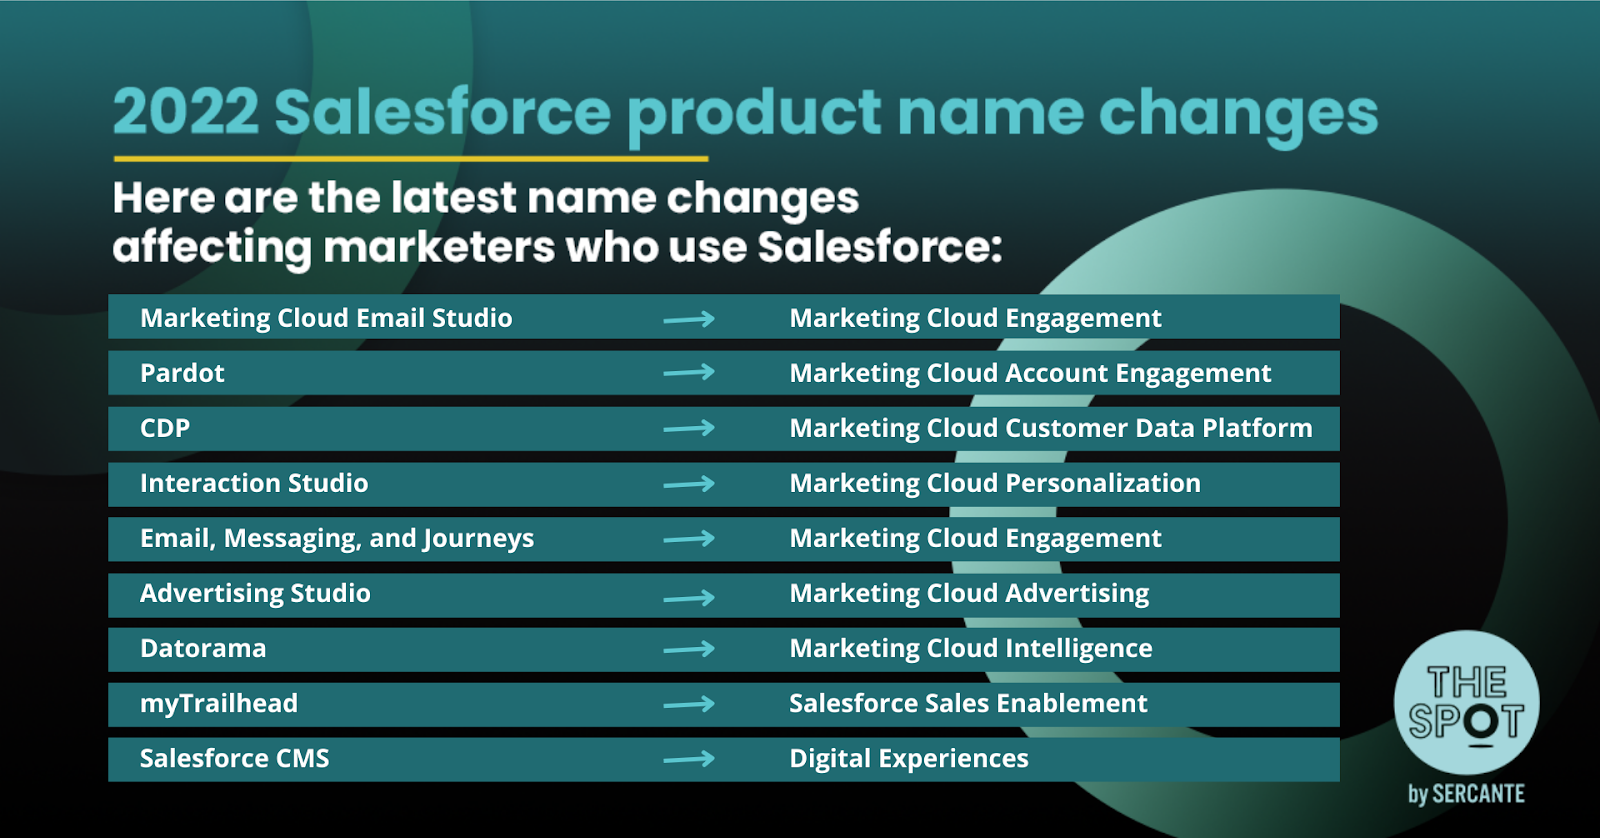
Before we do a deep dive into each Marketing Cloud Engagement product, it’s important to remind us of all of the recent Salesforce Marketing Cloud product rebrands. Check out the infographic below for a refresher.
Email Studio (Marketing Cloud Engagement)

Email Studio is the primary product in the Marketing Cloud suite and typically what most people think of when they hear “Marketing Cloud.” 

This studio focuses on email marketing and is complemented by Content Builder (discussed below) in ensuring that your team can construct the perfect email template for sending. Marketers will use the product to preview, test, and send one-off emails that can be highly customized through template elements and Marketing Cloud’s scripting language: AMPscript. 

Content Builder

 As mentioned above, Content Builder complements Email Studio as it is the backbone of personalizing your email templates. Marketers not only work on building out their emails through Content Builder, but can also build out landing page templates, and text message content. 

One great feature of this product is that you can build content blocks to use across all Marketing Cloud Studios that keep your brand consistent across all platforms.

Journey Builder (Marketing Cloud Engagement)

If you have ever used Pardot, then you know how powerful of a tool Engagement Studio is. Think of Journey Builder as a similar product that will help automate marketing campaigns across multiple channels. 

Due to its powerful features and connection to Email Studio, the Marketing Cloud rebrand brought Journey Builder and Email Studio together as Marketing Cloud Engagement. The journeys that are built through this tool can contain multiple paths for customers, use Einstein features, and send tasks and data to Salesforce through Marketing Cloud Connect.

Advertising Studio (Marketing Cloud Advertising)

Advertising Studio works tremendously well with Journey Builder to help your organization connect with customers beyond email, text, and social messages. 

The tool will give you access to produce ads across multiple digital platforms, including social media: Instagram, Twitter, Facebook, LinkedIn, and other platforms such as Google and YouTube. Using your Salesforce data, along with lookalike data from Facebook and other audiences, you can target new prospects who are most likely to become a customer in the future.

Social Studio

Poor one out for Social Studio. Salesforce’s newest soon-to-be-retired product (November 2024) was my first introduction to Marketing Cloud and definitely one of my favorite tools to use – I started using it right when they retired the Marketing Cloud Social Specialist Certification and I’m so sad I never achieved it. 

Previously known as radian6, Social Studio was focused on social listening, measurement, and engagement. Marketers could schedule social posts, monitor their social accounts, and listen for keywords and hashtags through the Social Studio platform. It was complemented with Social Studio Automate, a tool that would process and sort social media content in an automated fashion and could send data over to Salesforce. 

Check out the following blog to learn more about other Social Listening products you can explore for your company: Social Studio Sails into the Sunset.

Mobile Studio

Similar to the other studios, Mobile Studio is a one-stop-shop for sending messages to a consumer’s Mobile Device. These messages can be crafted within Mobile Studio and can be delivered via SMS, MMS, or Push Notifications via an app. 

You are even able to monitor opens and clicks on your SMS messages like you can do with your email messages. When considering this product it is best to start small with unidirectional messages before you implement a full-scale messaging channel that could offer support via mobile. 

Web Studio

Web Studio is a lesser known studio within the Marketing Cloud suite, but it’s a great tool for building out your organization’s web experiences. 

Using the CloudPages application, you are able to create dynamic web pages with personalized content and provide a seamless experience for your customers. Companies can collect data from website visits and form completion to further personalize the experiences provided to customers online.

Datorama (Marketing Cloud Intelligence)

Datorama is an amazing marketing analytics tool that unifies your company’s data from each marketing platform you use so you can report on all data at once. 

Platforms that you can connect include Google, Instagram, Youtube, and various other platforms through out-of-the-box connections available on the Datorama platform. Using data from your Marketing Cloud instance, you can track ROI and growth across all of our email, social, advertising, web, and sales channels.

Do you consider yourself a Datorama expert? Sercante is expanding our team and looking for a Datorama Architect to join our analytics practice and implement Datorama across multiple clients and business needs.

Interaction Studio (Marketing Cloud Personalization)

Interaction Studio has many use cases, but as the new rebrand states, it is the perfect tool for providing an amazing level of personalization for your customers across your web experiences. 

As your customers/prospects complete actions on your website, Interaction Studio will take this behavior to dynamically update messaging across web pages to tailor the experience to that individual customer. The tool will update their experience again to ensure messaging correlates with the new product interest — given that a customer’s behavior is the best indication they are interested in a new product.

Salesforce CDP (Marketing Cloud Customer Data Platform)

Another product that’s been through the rebrand treatment is Salesforce CDP. It’s a tool that can compile every data point across multiple platforms for each customer in your database. 

This tool compliments your other Marketing Cloud products as you can use this data from all of your platforms to create very specific segmentation lists. This enables companies to ensure the right prospects are being contacted at the right time about the perfect product/solution for them to help increase ROl across the business.

Pay attention to the big picture

Marketing Cloud can definitely seem like a daunting product if you don’t understand too much about the products/tools within it. It’s important to not overwhelm yourself with all of the features each product has to offer. Instead, focus on the tools that would benefit your organization if you decide to implement Marketing Cloud. 

These are just basic overviews of the most popular Marketing Cloud topics so our team advises that you fully investigate and learn about a product before you make any purchasing decisions.

If you are looking to implement Marketing Cloud for your business and are looking for a partner to assist you with it, please reach out to us to find out more on how we can help you through the implementation process.

I’ll admit, I’ve been neglecting looking into Einstein for Pardot (us admins have enough to do!). And I was somehow under the impression Einstein for Pardot came with an additional cost per tool (spoiler: they don’t). 

However, recently I dug into all the Einstein tools that work with Pardot and was blown away by how far they’ve come. These tools enable marketers to do really cool things and access even cooler insights! 

This blog goes in depth into the Pardot Einstein solutions that affect Lead identification and scoring, as well as how to use them in your everyday marketing.

Note: The three Einstein solutions below are only available to Advanced and Premium Editions of Pardot. 

Predict purchase intent with Einstein Behavior Scoring

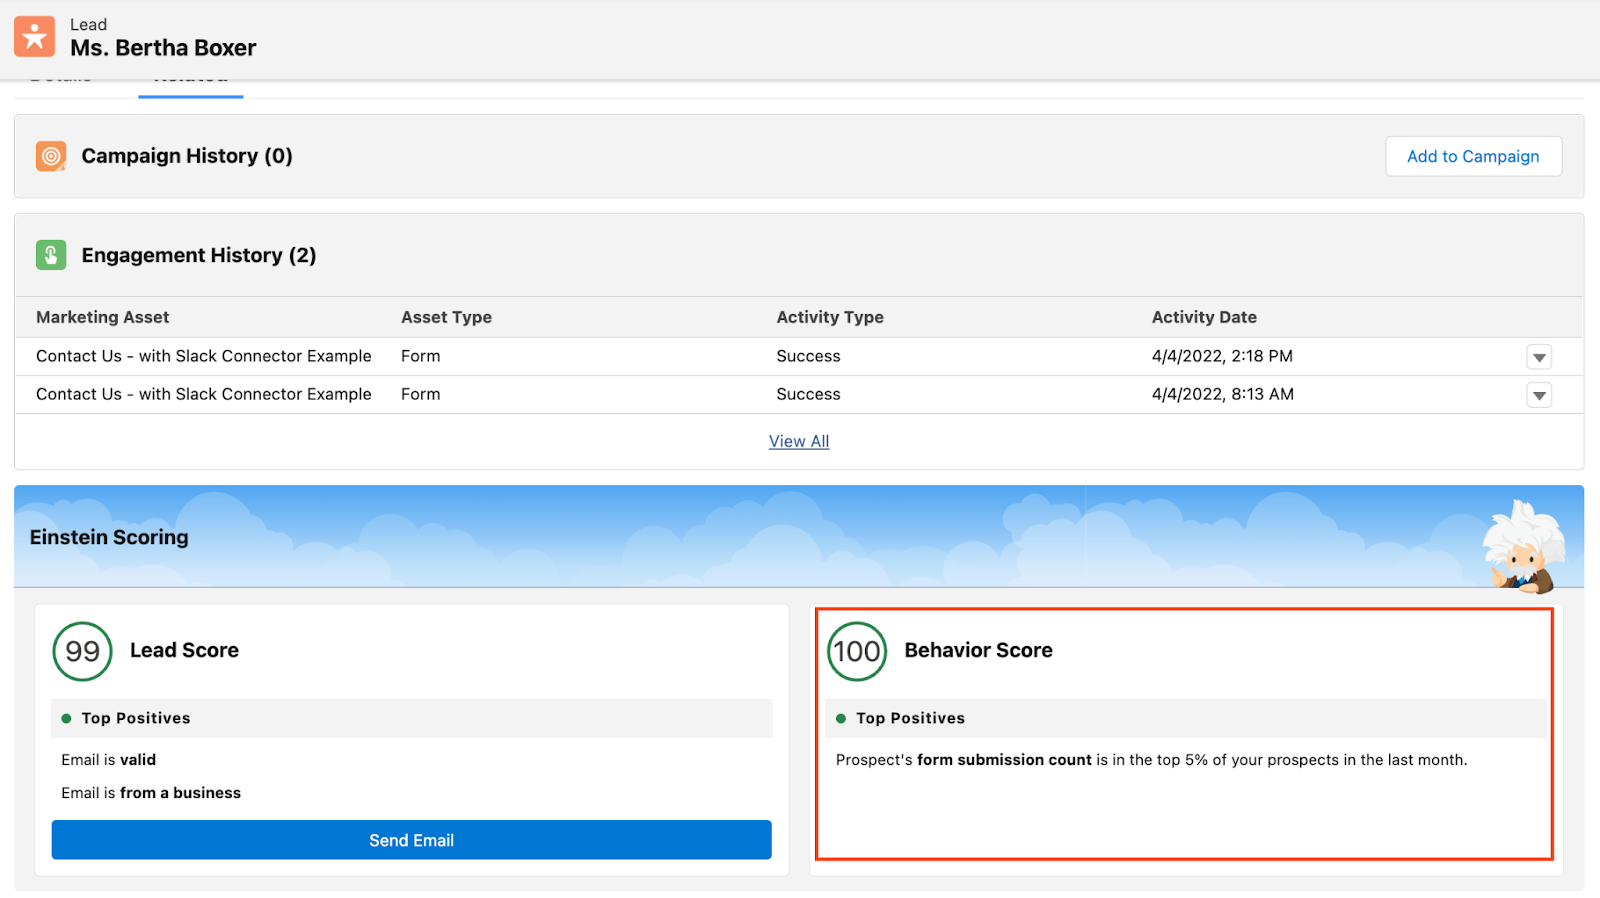
Einstein Behavior Scoring uses machine learning to predict which Prospects are ready to purchase by analyzing how they engage with your marketing efforts. 

Unlike standard Pardot Scoring, the Einstein Behavior Scoring model changes over time as it learns to more accurately score Prospects. 

If you’re using Einstein Behavior Scoring, I wouldn’t scrap your Pardot Scoring model. It’s still a great indicator of how engaged a Prospect is with your marketing efforts overall, and it also has the added benefit of Scoring Categories. 

Einstein Behavior Scoring zeros in Prospects who are specifically ready to buy, and it takes into consideration how much they’ve engaged recently. However, I recommend reviewing your Pardot Lead qualification automations to see how Einstein Behavior Score can be incorporated to send better Leads to Sales. 

Note: Einstein Behavior Scoring does not currently work with Person Accounts or Cross Business Unit implementations (where a Lead/Contact is synced to multiple Prospects in multiple Pardot Business Units. 

What data do you need to use Einstein Behavior Scoring?

Salesforce recommends at least 6 months of Prospect engagement data and at least 20 Prospects linked to Opportunities (via Contact Roles). 

This gives Einstein Behavior Scoring enough data to start analyzing which behaviors indicate a Prospect is ready to buy. An individual Prospect needs to have engagement activity within the past year in order to be scored. 

Enabling Einstein Behavior Scoring

Enable Einstein Behavior Scoring by going to Setup > Einstein Pardot > Einstein Behavior Scoring. 

Once enabled, add “Einstein Scoring” to your Lead and Contact Lightning Pages. 

To use this feature in Pardot, ensure your Salesforce Connector user is assigned either the CRM User, Sales User, or Service User permission set. 

Within Pardot, you can view the Behavior Score on the Prospect page:

You can also use this information in Automations and within Engagement Studio Programs. 

Pinpoint ideal prospects with Einstein Lead Scoring

Einstein Lead Scoring uses machine learning to analyze patterns in your Lead conversion process and prioritize Leads. So, if Einstein Behavior Score determines how much a Prospect likes you, then Einstein Lead Scoring determines how much you like the Prospect (similar to Pardot Grading). 

Every 10 days, Einstein Lead Scoring reanalyzes your Lead data to identify new trends and determine which Leads have the most in common with those that have previously converted. 

My only drawback with Einstein Lead Scoring is that it doesn’t connect with Pardot. It only gives Leads a score once they sync with Salesforce. 

However, you can use Lead Scoring as a way to prioritize all the amazing Leads you just sent over with Einstein Behavior Scoring. Talk to your sales team about what Einstein Behavior Scoring and Einstein Lead Scoring mean, where to view these measures, and how this information will help them convert better Leads faster. 

What data do you need for Einstein Lead Scoring?

To use Einstein Lead Scoring, you need at least 1,000 Leads created in the last 200 days and at least 120 of the Leads need to have been converted. 

If you don’t have enough data, Einstein Lead Scoring will use a global model until you accumulate enough converted Leads for a customized model. 

How to enable Einstein Lead Scoring

You’ll enable Einstein Behavior Scoring by going to Setup > Einstein Pardot > Einstein Lead Scoring. 

Here you can enable Lead Scoring as well as customize your settings. You may want to customize your settings if there are specific Lead types or Lead fields that you want to exclude from the model.

Once enabled, a Prospect’s Lead Score can be viewed in the same “Einstein Scoring” section mentioned above. 

Note: Lead Score is only available on Leads, but Behavior Score is on both Leads and Contacts. 

Support account-based marketing with Einstein Key Accounts Identification

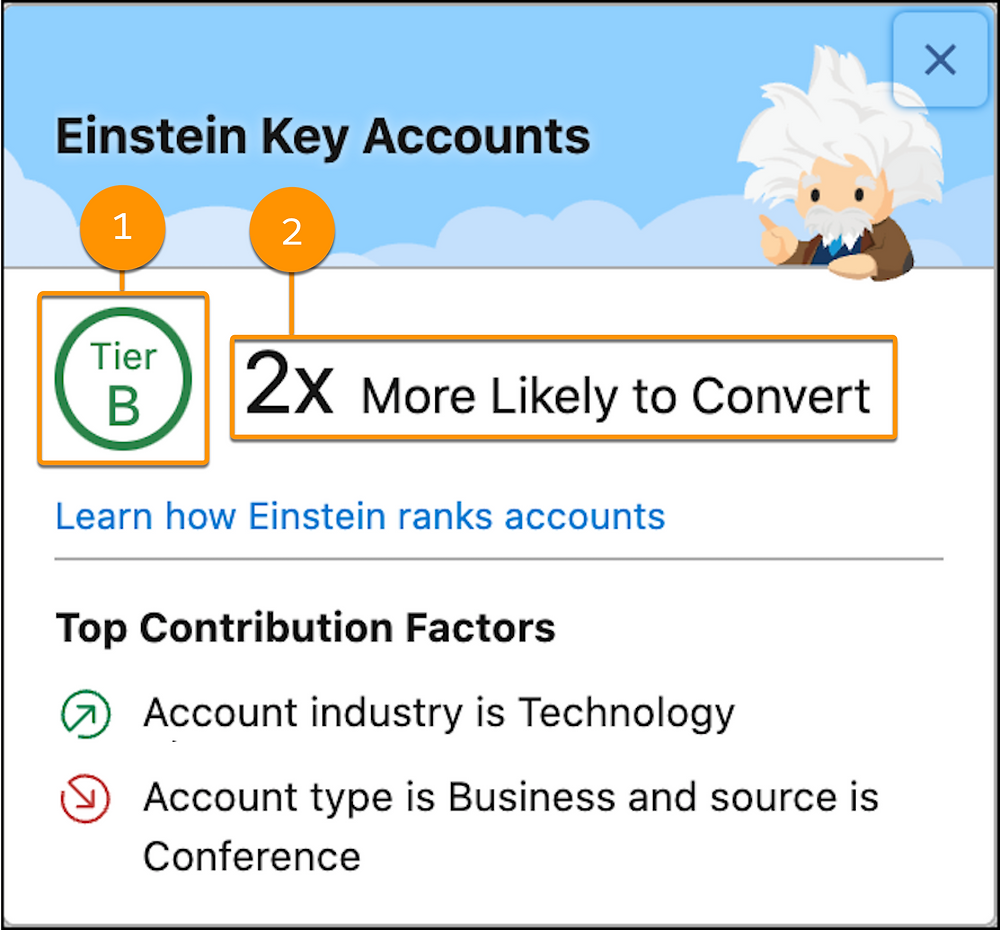
Einstein Key Account Identification supports your account-based marketing efforts by analyzing which Accounts are most likely purchase ready. Einstein Key Account Identification analyzes your accounts and the opportunities associated with them to identify trends and key factors. 

Einstein Key Account Identification has two parts:

  1. Account Tier: Account tiers range from A to D (A being the most likely to convert) and are based on your Account data and the custom model Einstein builds for you. 
  2. Uplift Value: An uplift value is assigned per Account Tier and indicates the likelihood to have an opportunity opened in the next 6 months for Accounts in this tier.

Note: Einstein Key Account Identification does not currently work with Person Accounts

The Account Tier can be connected with Pardot (more details below) and be used to support your account-based marketing efforts. 

For example, say you’re holding a swanky event and your sales team needs to know which Accounts would be most advantageous to invite and which Contacts at those Accounts they should send the invites to. 

What data do you need?

Salesforce recommends having 200 Accounts with won opportunities and 200 Accounts with lost opportunities within the last 2 years. 

Enabling Einstein Key Account Identification

Enable Einstein Key Account Identification by going to Setup > Einstein Pardot > Einstein Key Account Identification. Once enabled, it can take up to 72 hours to analyze your data and create your initial custom model. You’ll also want to add the Einstein Key Accounts component to your Lightning record page. 

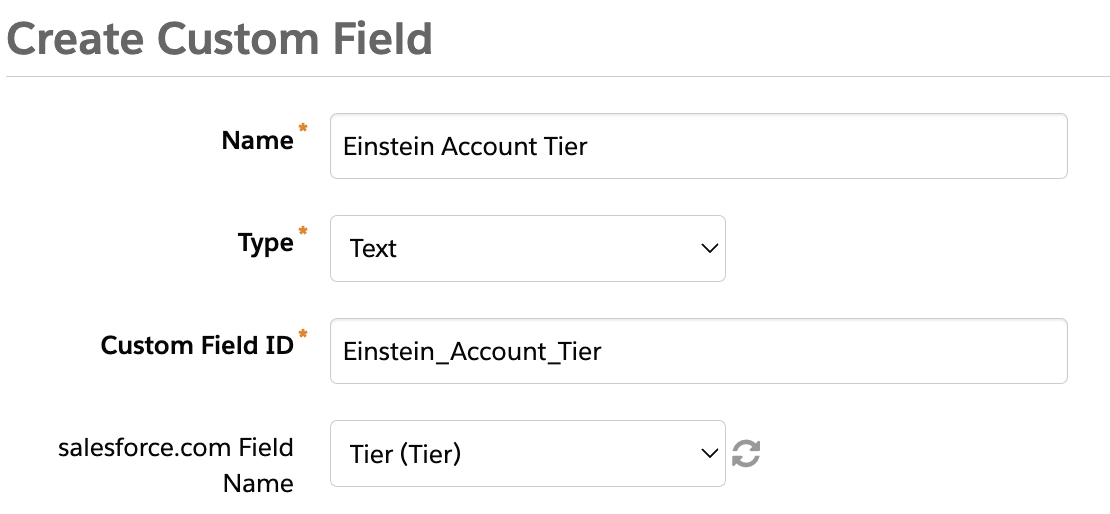
Account Tier can be pulled into Pardot to be used in Engagement Studio Programs, Automation Rules, and Dynamic Lists. To pull in this field, add a new custom Account field in Pardot and sync it with the Salesforce field “Tier.”

Einstein + Pardot = ultimate pipeline power

When used by both your sales and marketing teams, Einstein Lead Scoring, Einstein Behavior Scoring, and Einstein Key Account Identification can easily increase the quality and number of Leads to supercharge your pipeline. 

What other use cases can you think of for these three tools? Let us know in the comments!

An email preference center creates a happy medium for you and your audience. 

It’s a place where your people can let you know what interests them so you can work with them to deliver relevant content. And it also fulfills that all-important duty you have to provide a way for your readers to opt out from all non-operational email communications.

Here are the basics you should know when building your email preference center in Pardot.

Why should you build an email preference center?

In Pardot, any email you send must include either an option to unsubscribe or manage preferences via PML or HML tags (%%unsubscribe%% or %%email_preference_center%% for PML or {{Unsubscribe}} or {{EmailPreferenceCenter}} for HML). Read this post for more on that.

While an option to simply unsubscribe will get the job done, an email preference center will give your prospects the option to limit (or potentially even increase) correspondence from your marketing team rather than opting out entirely. An email preference center allows prospects to select just the correspondence they want to receive.

Depending on whether your company is only getting started with Pardot, you’ve been sending Pardot emails for a while, or you’ve inherited a hot mess of a Pardot org (been there, done that), the process of setting up an email preference center will vary in complexity, but once you see those opt-outs decrease, it will be worth it!  

How Pardot email preference centers work

Let’s go through the basics of a Pardot email preference center and some tips to get you started.

Add subscribe list to existing email preference center

To add a list to an existing email preference center, create or edit a static or dynamic list in Pardot. When creating or editing a list, select the “Public List” checkbox to display said list in your email preference center. 

You can then give your list a label, which is the option that prospects will see on your email preference center, and an optional description that will appear underneath the label. (Prospects will not see the Pardot name for the list; they will only see the label and the description.)

Here is a list’s basic information in Pardot: 

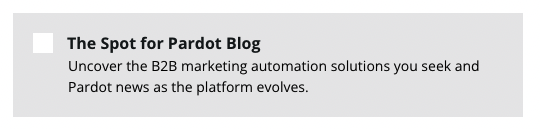
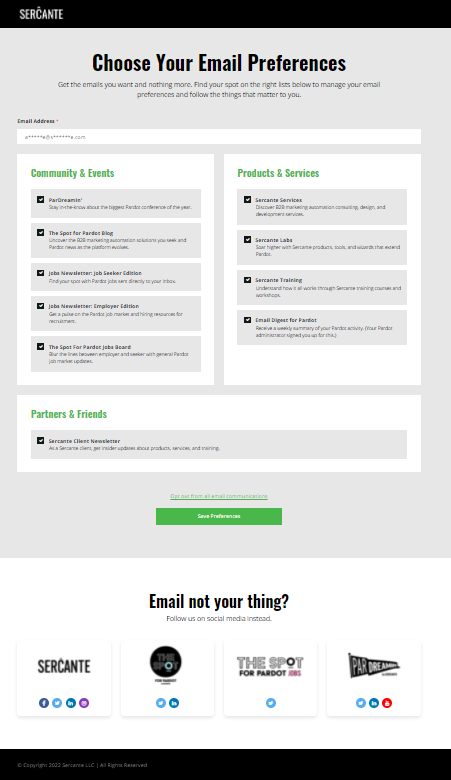
And here is how it appears on the Sercante email preference center: 

Using static and dynamic lists in email preference centers

You can use both static and dynamic lists for email preference centers. But there’s a catch. 

Any prospect will be able to see a static list and opt into or out of that list by checking the box next to that list. Only prospects who are already members of a dynamic list will be able to see a dynamic list on an email preference center. 

If a prospect is a member of a public dynamic list, the prospect will be able to opt out of communication from that list by unchecking the box associated with that list on the email preference center. Prospects cannot opt themselves into a public dynamic list, only opt out. 

When you view a public list in Pardot, you’ll be able to see the opt-in status for each prospect: 

Dynamic list use case for email preference center

Personally, I prefer using static lists on email preference centers, but there are valid use cases for dynamic lists. 

For instance, let’s say you have specific communications, like a newsletter, that you want to send to current clients. You could have a prospect field for “persona” on the prospect record, and then create a dynamic list that looks for everyone with a persona of “current client.” 

You can then use that dynamic list on your email preference center and as your distribution list for client communications. Only those with the persona of “current client” would see the list option on the email preference center and be able to opt out of that specific dynamic list. 

Always follow privacy laws

Of course, regardless of whether you use static or dynamic lists, you must abide by opt-in and privacy laws. 

This is the part where I tell you I am not a lawyer and this blog post is not legal advice. Consult your lawyer on who you have the right to email, folks.

What preferences should prospects have? 

Now that we understand the basics of list membership, let’s talk about what list options we can provide for prospects. Consider how you typically segment your audiences for email marketing. Do you have blog subscription options? Do you email certain people about certain products? 

Here are a few options you to consider: 

  • Lists by product category (ex., chocolate, cookies, candy)
  • Lists by service offering (ex., private chef, cooking classes, private cooking lessons) 
  • Lists by type of event (webinars, conferences, etc.) 

When you’ve settled on the options you want to include on your email preference center, start building your lists. 

If prospects have opted into specific contact previously, be sure to honor those preferences and only include prospects on lists that respect those preferences. 

How do you honor prospect preferences? 

Once your email preference center is up and running, you need to be sure you can abide by the preferences that a prospect has expressed. That means if they’ve opted out of receiving blog communications, you need to exclude them for all future blog sends. 

The easiest way to do this is to use an EPC list as the send list for your email. If someone is opted out of the list, they will not receive an email. 

However, let’s say you are creating a different send list based on other, more specific prospect criteria because you want to send an email to blog subscribers who have expressed interest in a particular topic. 

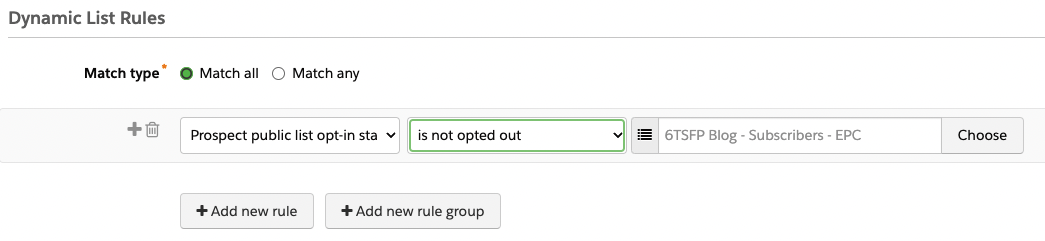
You have two options: 1) look for public list opted-in status when creating your send list or 2) create a dynamic suppression list that looks for public list opted-out status. 

Option 1: Look for public list opted-in status when creating your send list

When creating a send list for an email, include the following parameter: 

Prospect public opt-in status > is not opted out > [EPC LIST NAME]

Option 2: Create a dynamic suppression list that looks for public list opted-out status

For this option, create a dynamic suppression list for the relevant EPC list using a single criteria:

Prospect public opt-in status > is opted out > [EPC LIST NAME]

Then, use this list as your suppression list for your email. 

Staying organized and documenting everything 

There are a lot of moving pieces when you stand up an email preference center. If you are not the only person in your Pardot org, or if you just want to do your future self a favor, stay organized and document everything. 

Here are my favorite tips.

Create a spreadsheet to track your list decisions

When working on email preference centers, create a spreadsheet that documents all of the details for every public list. 

Here are the columns I typically include on my own personal tracking spreadsheet: 

  • Internal List Name
  • List Label
  • List Type (static or dynamic) 
  • List Description
  • List URL
  • Notes (Typically, this includes how you decided which prospects to include on this list when initially creating the list)
  • Completion Actions & Automations that Populate List
  • How is consent for list membership handled? 

Make it easy to find your EPC lists 

If your Pardot org is anything like mine, you have a lot of lists. It can be difficult to weed through and find the lists that are included in your email preference center. 

When looking at all current lists, you can quickly sort by “public list” to see any public lists that are included on an EPC: 

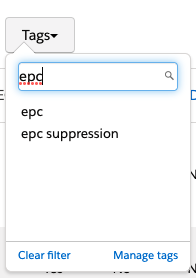
However, I like tagging all of my public lists “epc” and all of the dynamic suppression lists mentioned above “epc suppression” so I can quickly see all lists related to my email preference center. 

Create a how-to guide for your Pardot users

Be sure anyone who sends emails in Pardot knows how to honor prospect preferences. If filling out a form or form handler should add a prospect to a public list, instruct your team on the appropriate completion action to use. 

I created an eight-page guide for my team. It’s located in our Google Drive, on our team Asana board, and pinned in our team Slack channel. Is that overkill? Probably. Does it help me sleep at night to know everyone knows the ins and outs of emailing from our Pardot org? Absolutely. 

Email preference center example

We used several elements of the Sercante email preference center in this blog post. To help you pull our examples together, here’s what the Sercante email preference center looks like.

Email preference center example

Get help with your email preference center

Setting up an email preference center can be daunting. There are a lot of considerations, both in terms of marketing strategy (how will I segment my database?) and legal compliance (how do I avoid a lawsuit?). 

Ultimately, by providing prospects with the option to select the communication they want, you’ll limit the amount of prospects that get frustrated by yet another email they’re not interested in and unsubscribe. If you’re thinking about taking the plunge and want support from a team of experts who can also guide you through compliance questions, getting more list subscribers, and designing something on-brand, drop us a line.

When you have a ton of users in Pardot, controlling who has access to what they can view or edit takes time. But no one wants to spend a whole day setting up Pardot user role details and permissions.

Thankfully, Pardot comes with default user roles to quickly set up which users can view and edit certain types of content and data. 

Each Pardot user role comes with a predefined set of permissions. This allows you to quickly assign users and saves you time to grab a cup of coffee.

Default Pardot user roles = More time for coffee

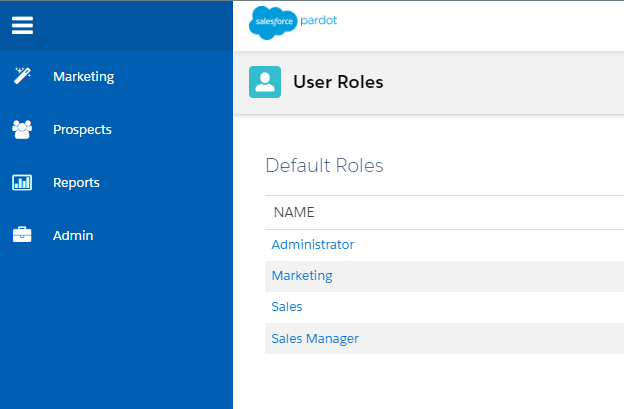
Having trouble understanding the difference between the four default Pardot user roles? We’ve got you covered. 

Choosing Pardot default user roles is similar to how I determine which type of coffee to drink. 

Perhaps I need to control all of the coffee for everyone in addition to my own. So, I’d be the admin by making a big ol’ pot for my team. Or, I may need to get a straight shot of caffeine from espresso like a Pardot Sales user needs a lightning path to prospect records and 1-1 email sends.

Either way, the default Pardot user roles offer a straightforward method of doling out permissions and access to your Pardot users.

A Pardot user role for everyone

Here are the four default Pardot user roles.

1. Administrators

Need access to everything in Pardot? Pardot Administrator user roles let you view, create, edit, and even delete anything and everything. 

Think of the Pardot Admin user role as your highest authority on what stays and goes — they adjust Pardot settings and control your general Pardot structure.

Admin users are granted full access to all data and assets. So, avoid a Pardot horror story and assess which team members really need to see and adjust everything.

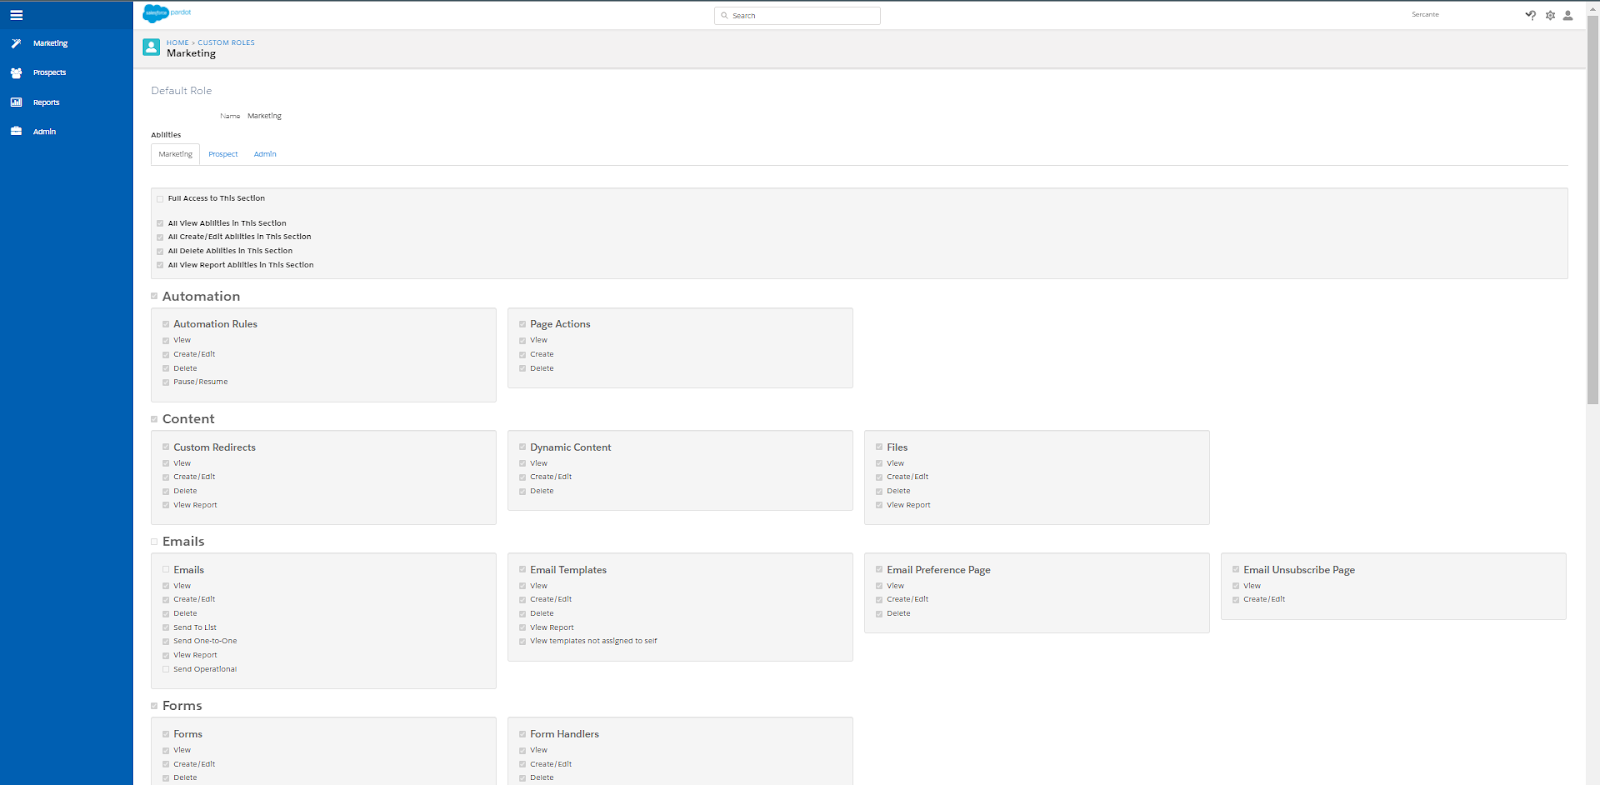
2. Marketing

Marketers are gods of creation. The Pardot Marketing user role lets them create all of the marketing assets they need to effectively convert prospects and nurture leads with content.

Inside Pardot, they can create lists, forms, landing pages, email templates and view prospect data. And they avoid technical setups or integrations to focus on building the tools their team uses to get messages out.

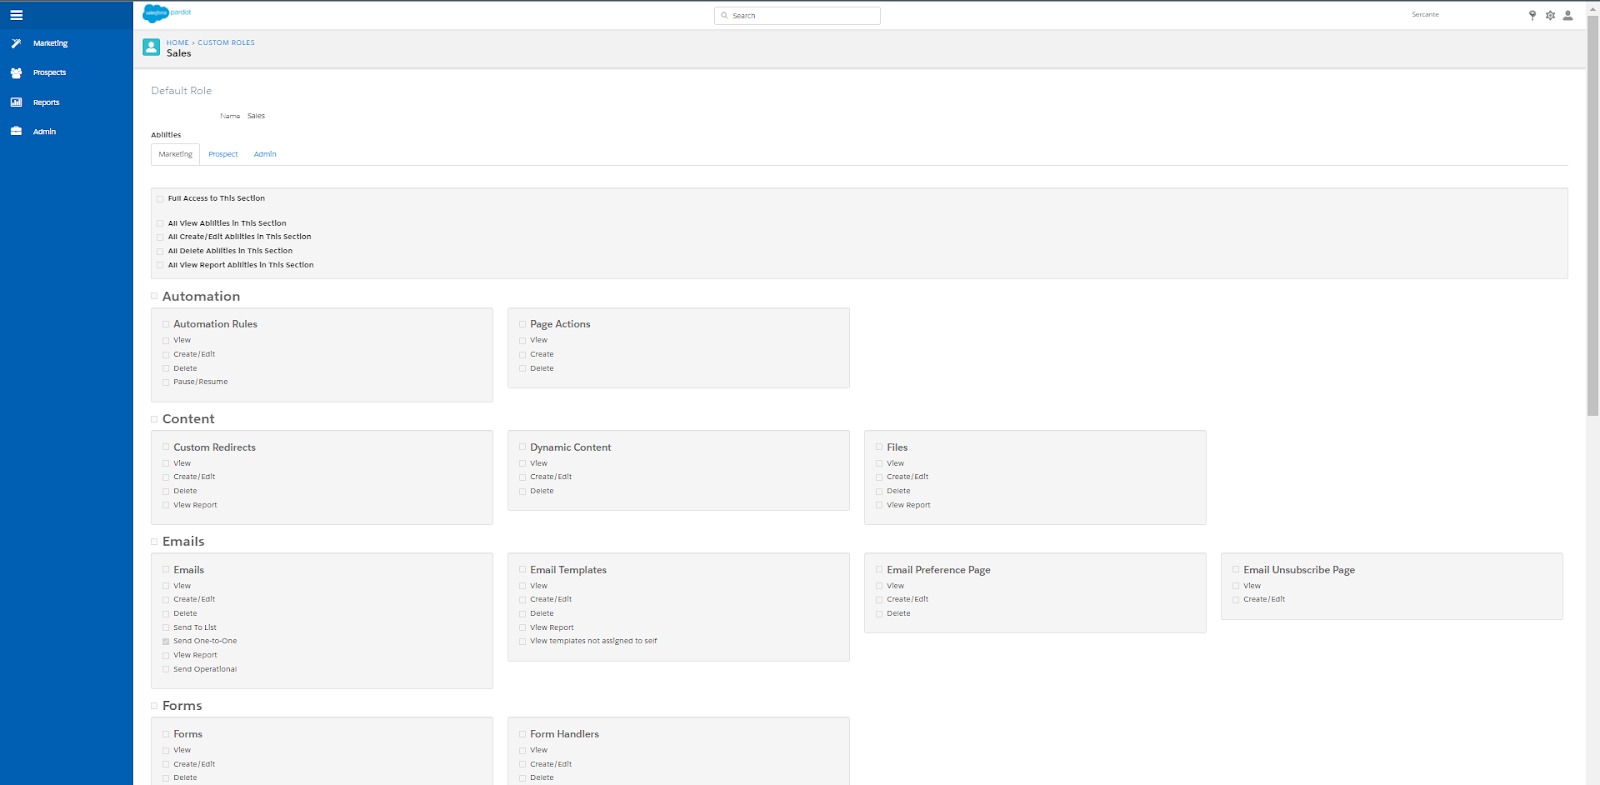
3. Sales

Sales teams need to be able to view prospect data and make changes to individual prospect records. But that’s basically it.

The Pardot Sales user role gives them everything they need to send one-to-one emails and view, edit, or export information for their assigned prospects. It’s a “read only” user role in terms of having the ability to make major changes to the Pardot instance or manage marketing assets.

This way, sales teams don’t get overwhelmed by Pardot’s numerous features. They can focus on what they do best — talking to prospects and closing opportunities.

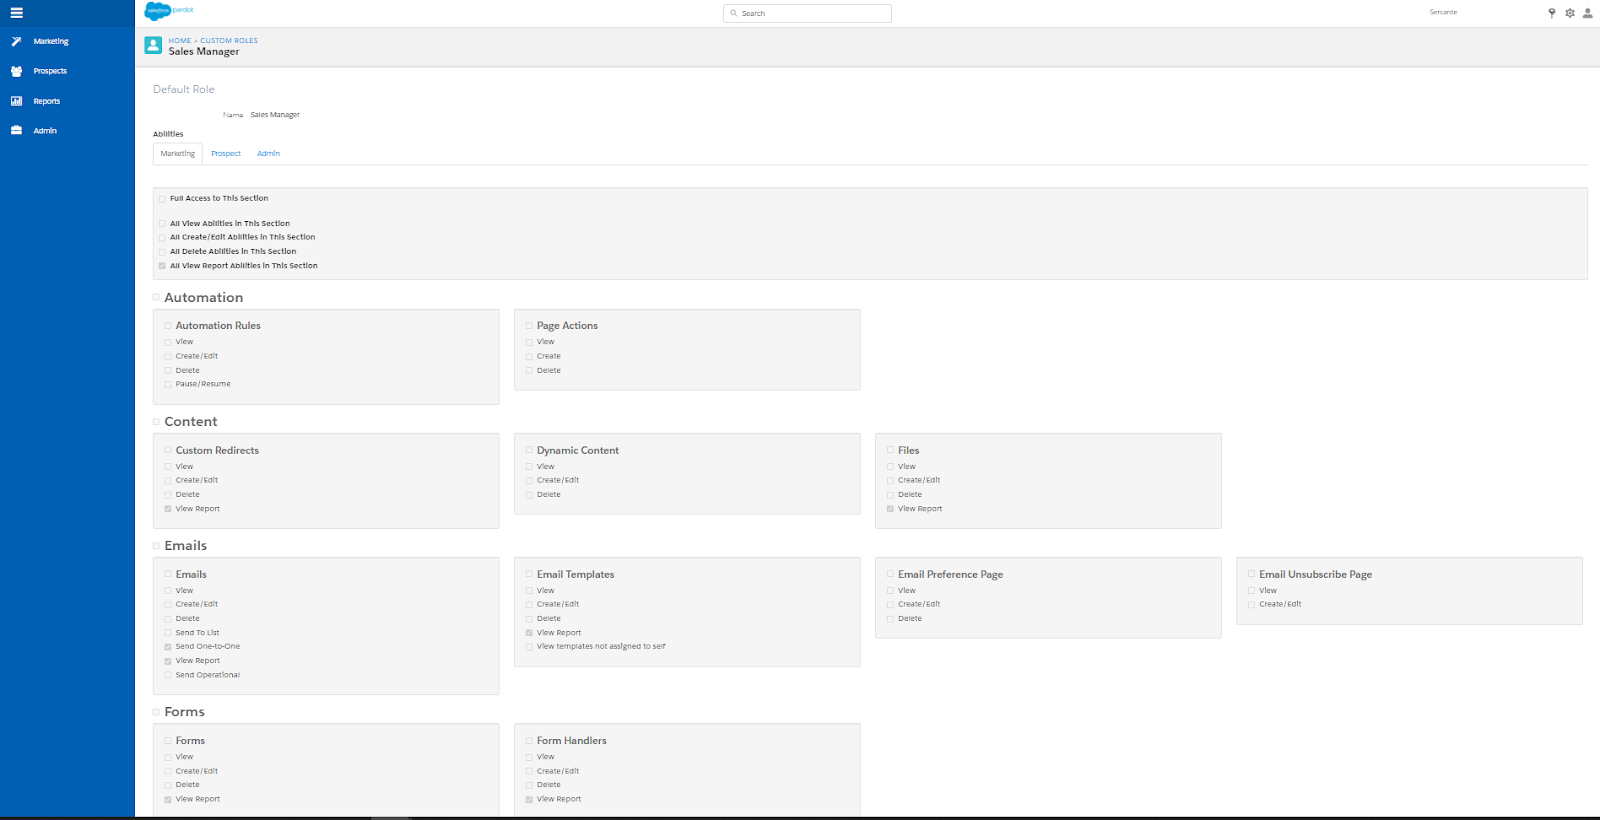
4. Sales Manager

Someone with a Pardot Sales Manager user role keeps a high-level eye on the sales pipeline and checks in on their team’s progress. While a Sales user in Pardot only sees prospects assigned to them, a Sales Manager can see all prospects and visitors.
They can assign prospects and send one-to-one emails to better support their team sales wizards.

How to assign default Pardot user roles

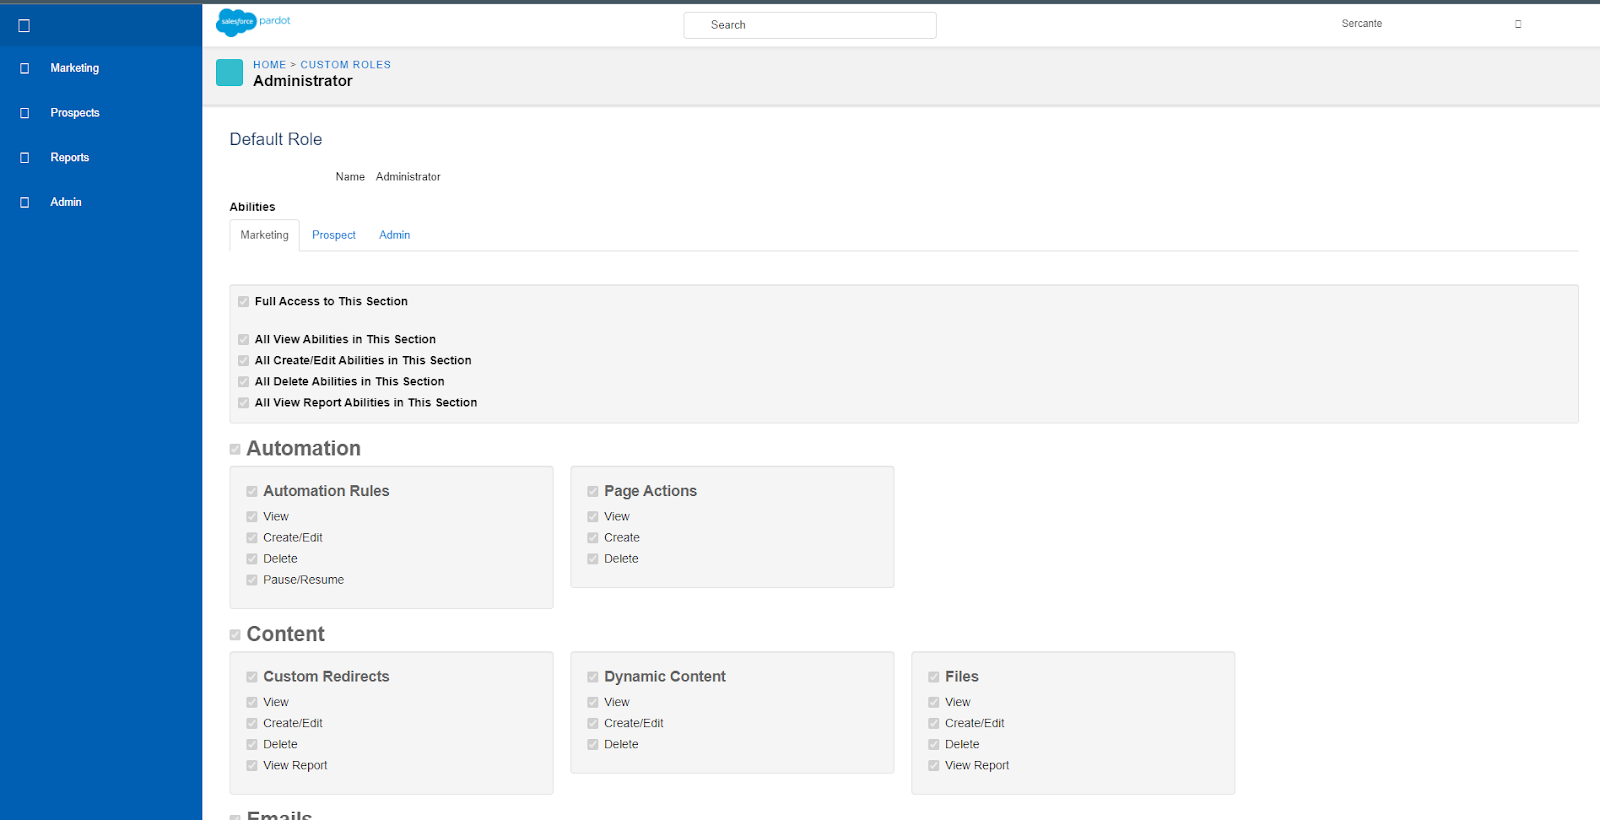
In many cases, determining which roles to assign your Pardot users should be straightforward with the default user roles available. You can click through the user role profiles to see exactly which features are available to users with those roles. 

You’ll see that the user role profiles have checkboxes, which you can use to create custom Pardot user roles. Custom Pardot user roles are available with Pardot Advanced Edition Available or for an additional cost in Pardot Plus Edition.

While Pardot user roles are simple, defining the best role for a user is sometimes not easy. Certain use cases call for certain types of user roles. But there are questions you can ask yourself while adding users to your Pardot instance and determining their user roles to be sure you’re assigning the right roles.

Ask yourself these 4 questions to determine the best default Pardot user roles

1. Does this user need to adjust any settings in Pardot?

They should be an Administrator. Your power users can take care of your Pardot instance with an admin role.

2. Does this Pardot user also have a Salesforce user license?

It’s best practice to make sure that your Salesforce users are set up with the Sales or Sales Manager roles. Even if they likely will never log in to Pardot, you can create a user with one of these roles in case they need access in the future.

3. Does this user need to create or edit Pardot forms, email templates, or landing pages?

Make sure they have a Marketing user role, which lets them edit, view, and create marketing assets.

4. Should this user only be able to access data for their assigned prospects?

Sales users can only see prospects that are assigned to them, unlike Sales Managers who can view all prospects in Pardot.

You can also check out the full list of each default Pardot user role permission set on Salesforce Help.

Now you’re the Pardot user role assignment barista extraordinaire

As the Pardot admin, you control whether your users help you pour for the team as another admin, or if they just need a round of espresso shots to focus on day to day sales tasks. But deciding which type of coffee you give your users doesn’t have to be difficult.

Pardot’s default user roles are a great starter set to stock in your coffee bar. While you can mix and match pieces of them to create custom user roles, sometimes a user just needs a classic cup of coffee.

Have a fun story to tell about your experiences with assigning Pardot user roles? Tell us about it in the comments. Or, reach out to Sercante if your situation calls for the professional-grade coffee beans.

I’ve seen a lot of information about implementing the new Lightning Email Builder, but I wanted to get into the nitty gritty details of how to build Lightning Email Templates and Content, the current limitations, and when the new builder should be used over the classic builder. 

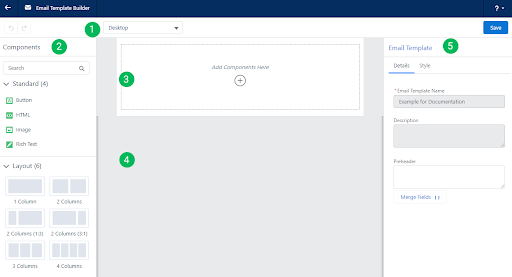
Before we dive in, here is a quick overview of the Lighting Email Builder and its different sections:

Features you’ll use while editing in the builder

Email Template Builder
  1. Preview Mode – Use this to preview the email template so you can adjust for desktop or mobile.
  2. Components Panel – Available components for the email template. This section will include standard components, pre-designed layouts, and any custom components installed in the org.
  3. Row – All Components are placed in rows. These are the editable sections of your email template.
  4. Canvas – Add drag-and-drop Components to the canvas to build your email template.
  5. Property Panel – Displays what can be changed in the email template or currently selected row. When no row is selected, use this panel to set your email preheader. 

Note: We updated this post for the Salesforce Spring ’22 release.

Pardot Lightning Email Builder Overview

When working with the Lightning Email Builder you have the option to create Email Templates or Email Content.

  • Email Content are emails built within the Lightning Email Builder and can be used to send a list email or, once “Activated for Automation,” be used in an Engagement Studio Program (ESP), as an autoresponder, or within Salesforce Engage.

In this post we will cover creating Email Content. Email Templates are similar, but Email Content has a few additional options.

Designing an email in the Lightning Email Builder

If you have not yet enabled the new Lightning Email Builder in your org, this is a great blog post to walk you through it. 

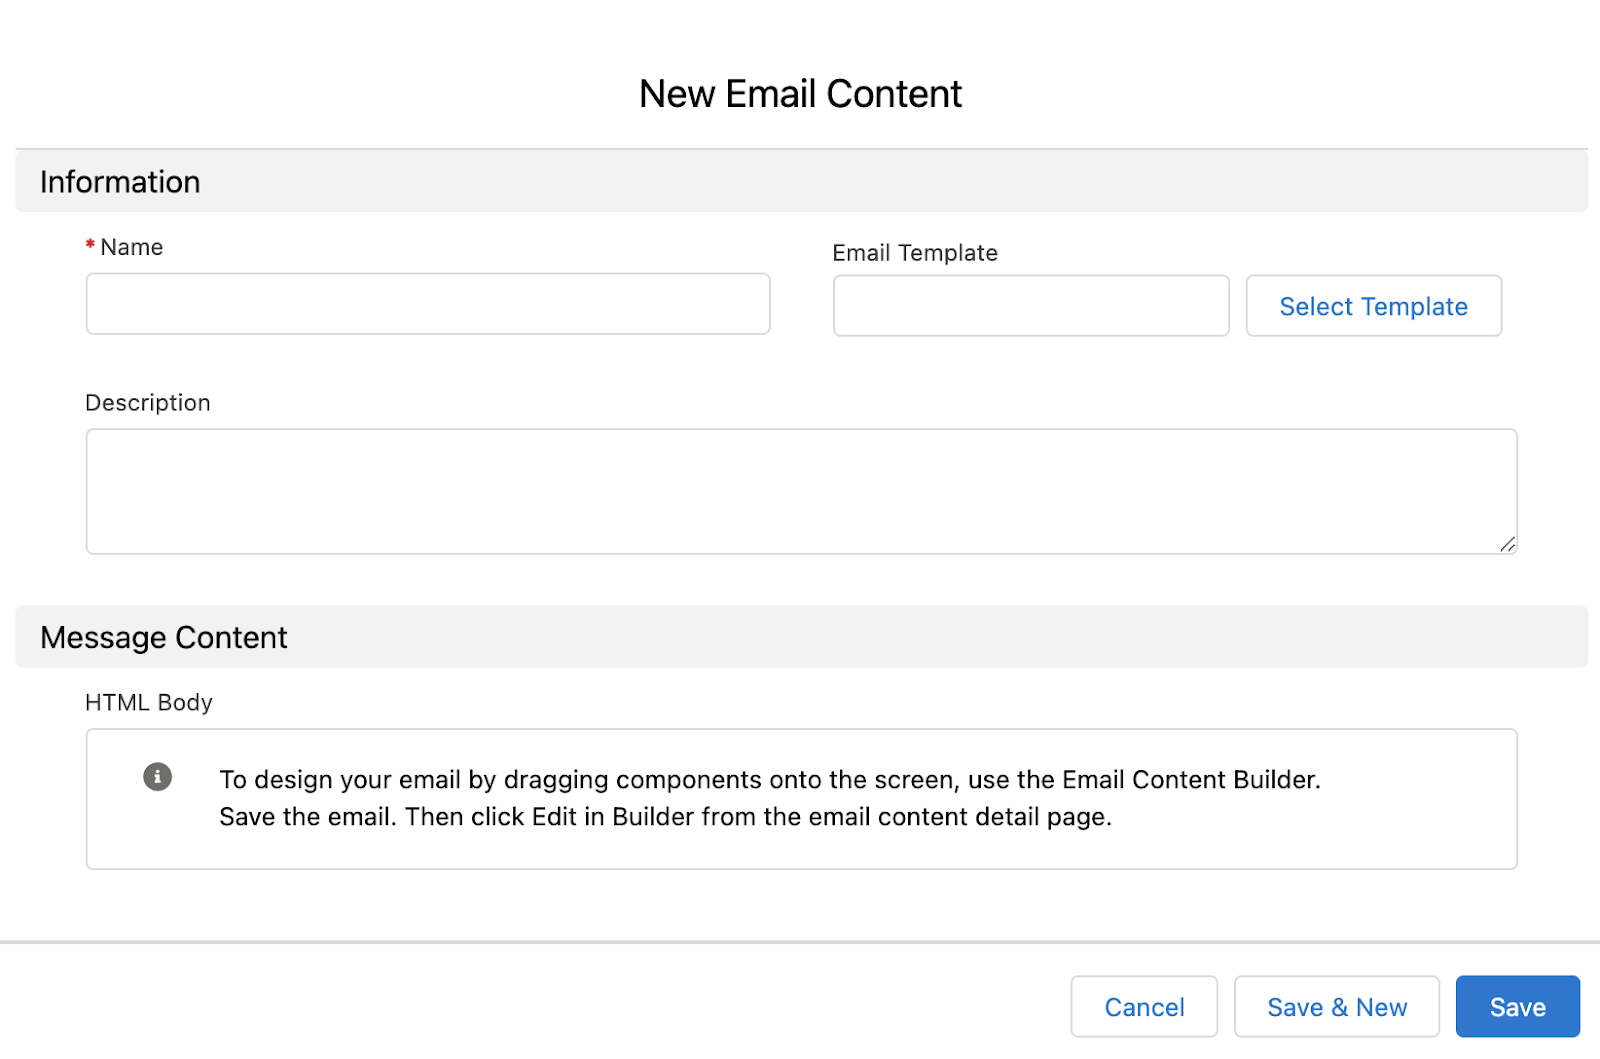
To start building email content, navigate to the Email Content tab in Salesforce and click New. Here you can name your Email Content and add an Email Template to start from and/or a description, if desired. 

Unlike the classic builder, Email Templates and Email Content in the Lightning Email Builder can have the exact same name as other templates/content. Ensure you use naming conventions to avoid having templates/content with the same name, which can cause confusion or errors for your users. 

Once saved, click Edit in Builder from the top right hand side to open the Lightning Email Builder. 

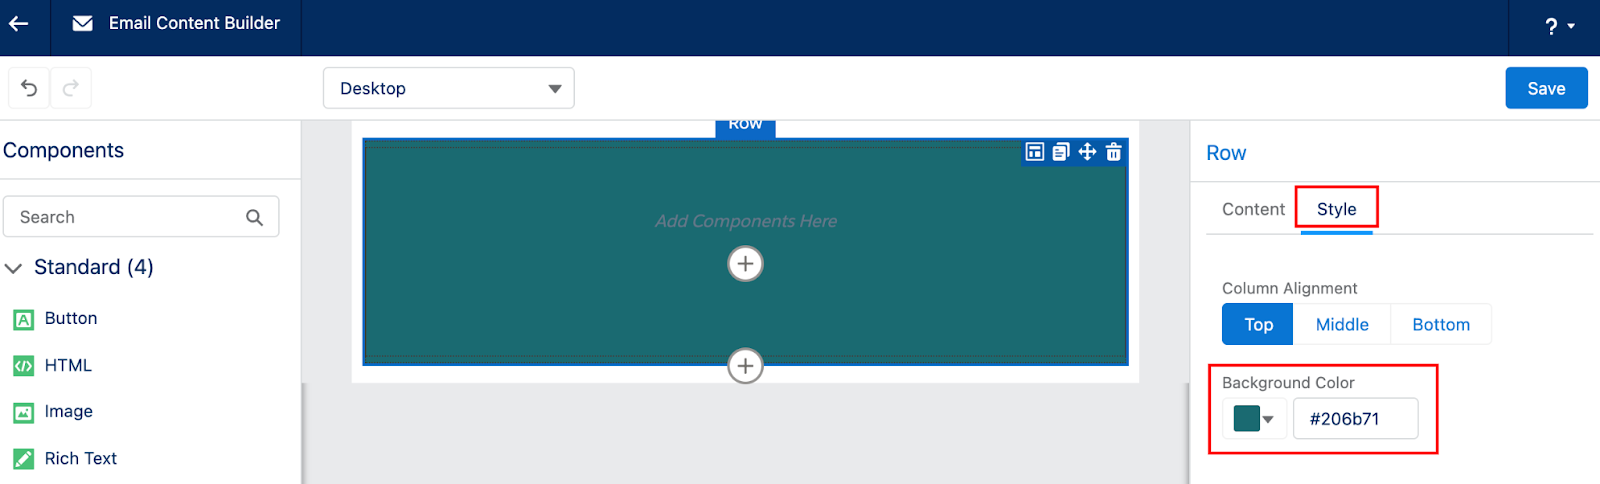
To start building an email, drag a component from the left side menu to a row. If you want your row to have a pre-set background color, I’d recommend doing this first, it’s a little tricky to select the row behind a component once added. 

Adding a background color

Select a row within your email or drag and drop one from the Layout components. Once the row is selected, click the Style tab from the Property Panel to set your background color. 

Adding content

To start adding content to your email, drag a component from the left side menu and drop it within the row. The right side Property panel will change depending on what type of component you selected. Below is what you will see for a Rich Text component.

Similar to the classic builder, you can enter content directly into the editor or switch to the source code if you prefer editing the HTML. The classic builder will allow you to set the font face, but it is currently limited to the fonts available in this dropdown list. Custom fonts are not yet supported (as of the Spring ‘22 release), but this should be coming in a future release. 

The Merge Fields button is at the bottom of the Property Panel in the Lightning Builder and works slightly differently from the classic builder. In the Lightning Builder, the Merge Fields picker displays fields by Recipient, Sender, Organization, and Other. It will also list whether or not the field is on the Lead and/or Contact object in Salesforce. Fields that only exist in Pardot are not shown in the Lightning Email Builder Merge Fields picker, but you can manually write in the merge tags. The “Other” section of the Merge Field picker is also very limited in the Lightning Email Builder, but you can manually write in the merge tags you are used to using, such as {{CURRENT_YEAR}}. Dynamic Content and Snippets are not currently supported by the Lightning Email Builder, so there is no option to insert those values.

Keep dragging in components until you’ve finished building your email, then select Save. The Lightning Email Builder does not have list email or email template drafts like the classic builder, so if you walk away from or close an editing session without saving your changes may be lost.

Unlike the Pardot Classic builder, you can save an Email Template or Email Content without an unsubscribe or email preference center link, so ensure you’ve completed this step. You will still get an error message if you try to send or activate your email and it is missing this info. 

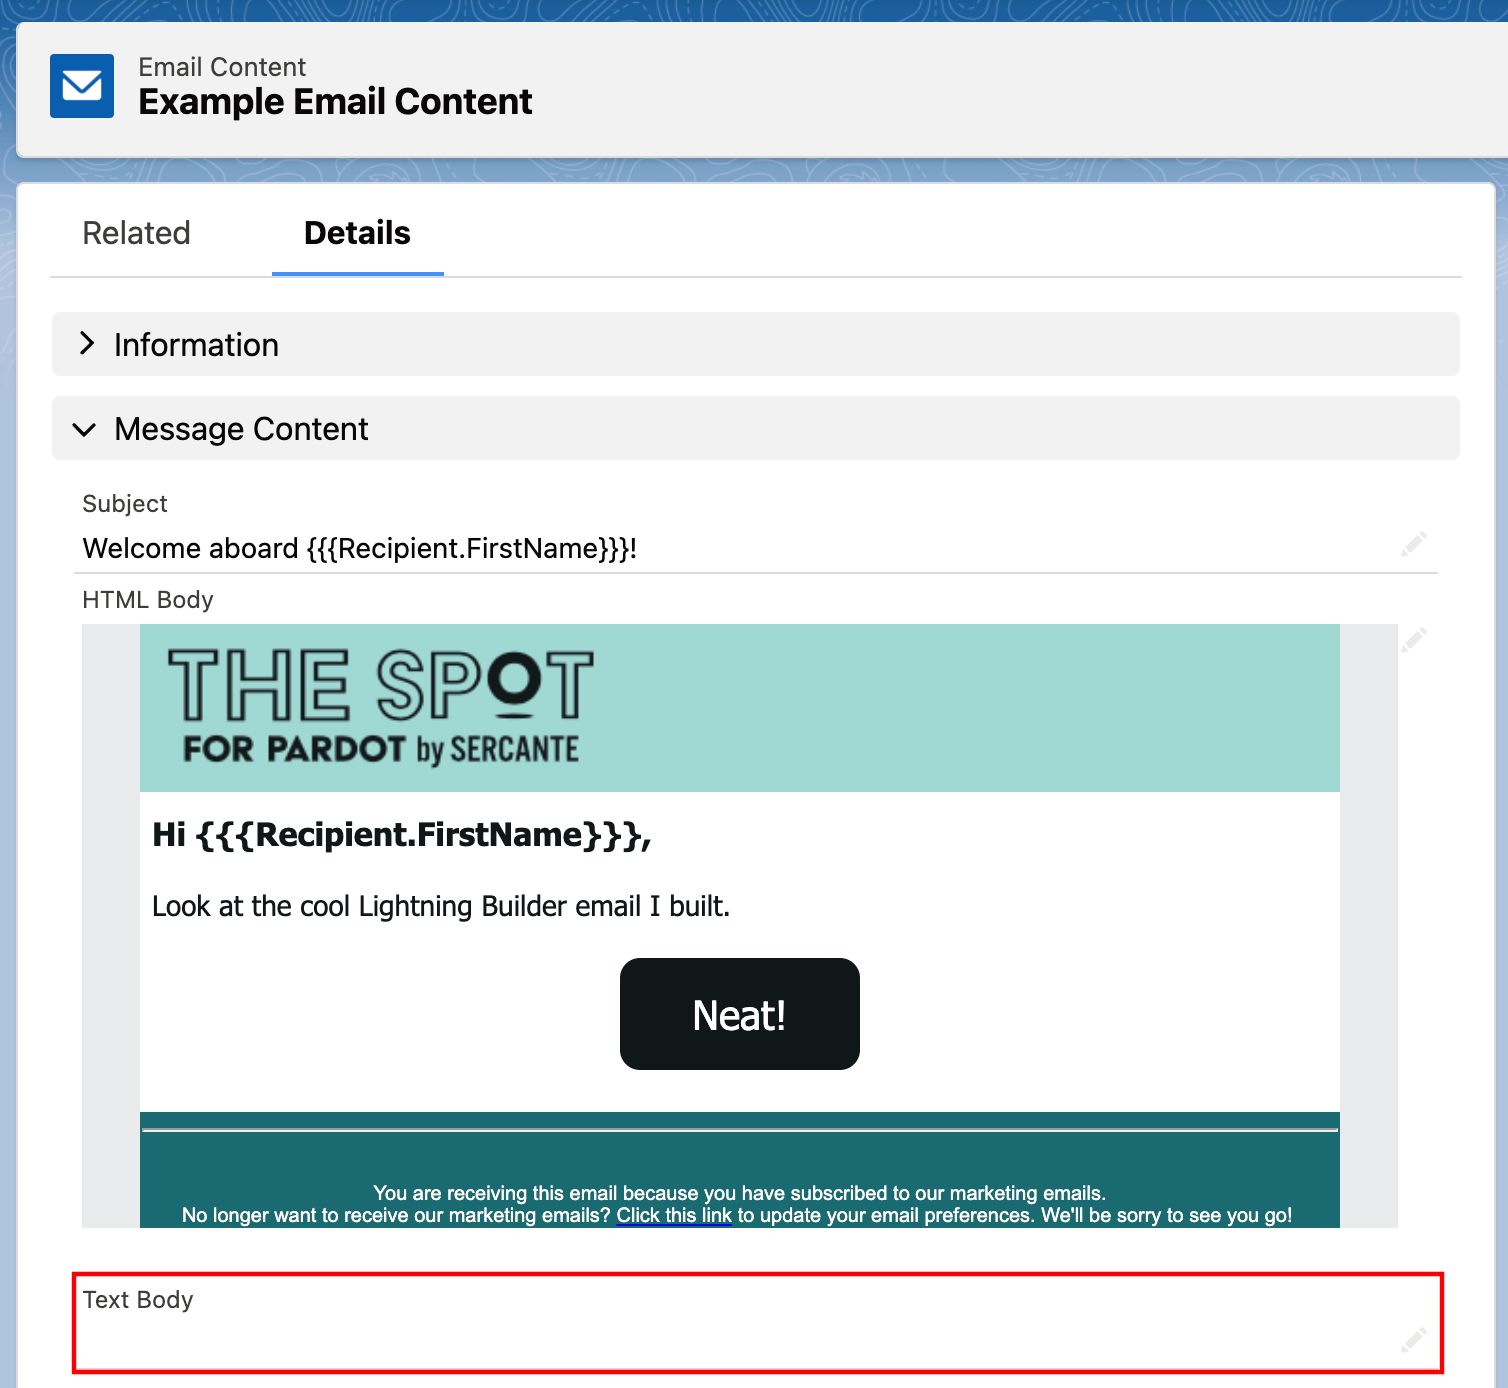
Adding the text version

Once you’ve saved your Email, go back to the Email Content view. Double click the Text Body field within the Message Content section to build the text version of your email. 

Testing your email

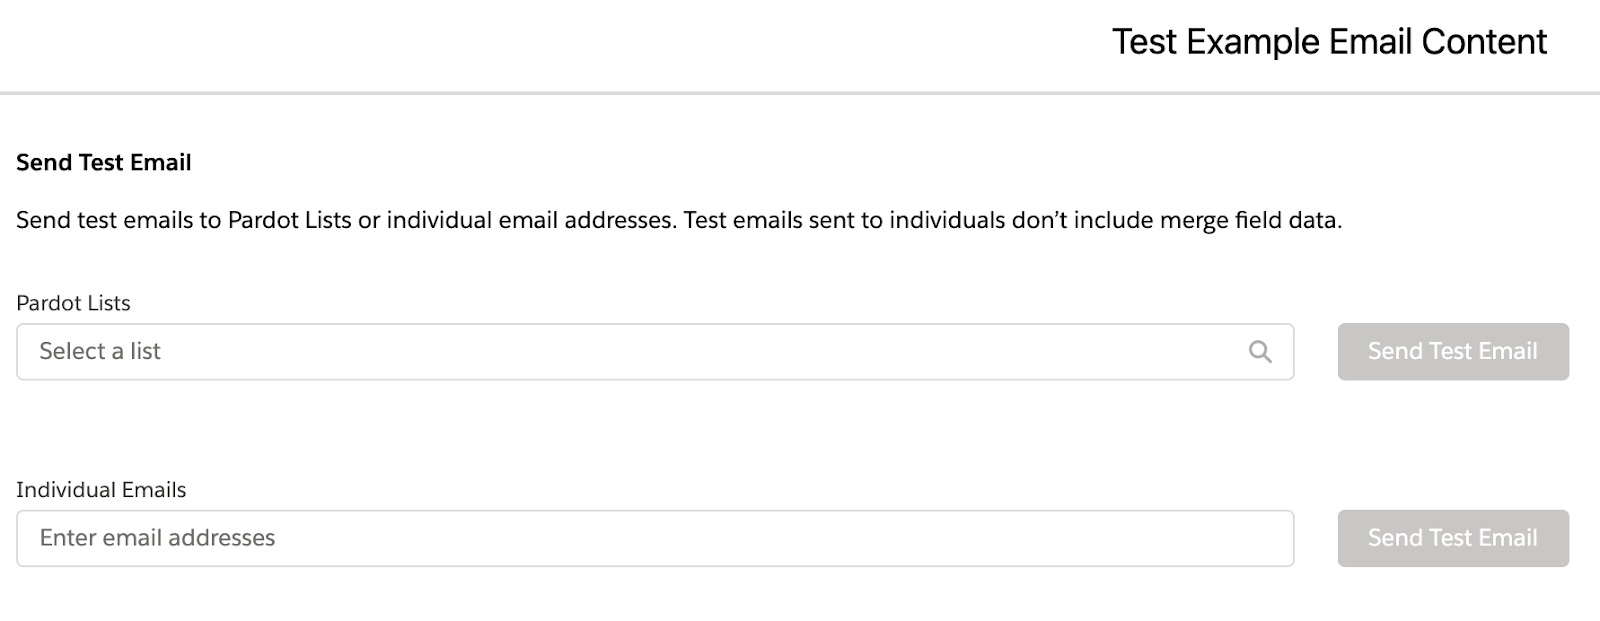
Testing your Email Content needs to be done from the Email Content view after your email is saved. The Test option will be in the top right corner, it may be under the dropdown depending on your page layout.

Sending an email test won’t actually check your email for issues or errors, so I typically recommend clicking Send first. When you click Send the builder will check your email for issues and display an error window (example below) if it finds anything wrong. Then you can cancel out of the Send view and proceed with testing. 

Similar to the classic builder, tests can be sent to a test List (renamed to “Pardot List”) or individual emails separated by a comma. 

Rendering Tests are not currently supported by the Lightning Email Builder. However, you can still run rendering tests outside of Salesforce and Pardot using Email on Acid (paid) or Litmus (paid, but there is a free trial option). MailNinja also offers a free service to preview and test your emails. 

Sending your email

Once your Email Content is built, tested, and ready for prime time, it can be sent from the Email Content view.

If your email has errors, you will see a similar screen after you click Send.

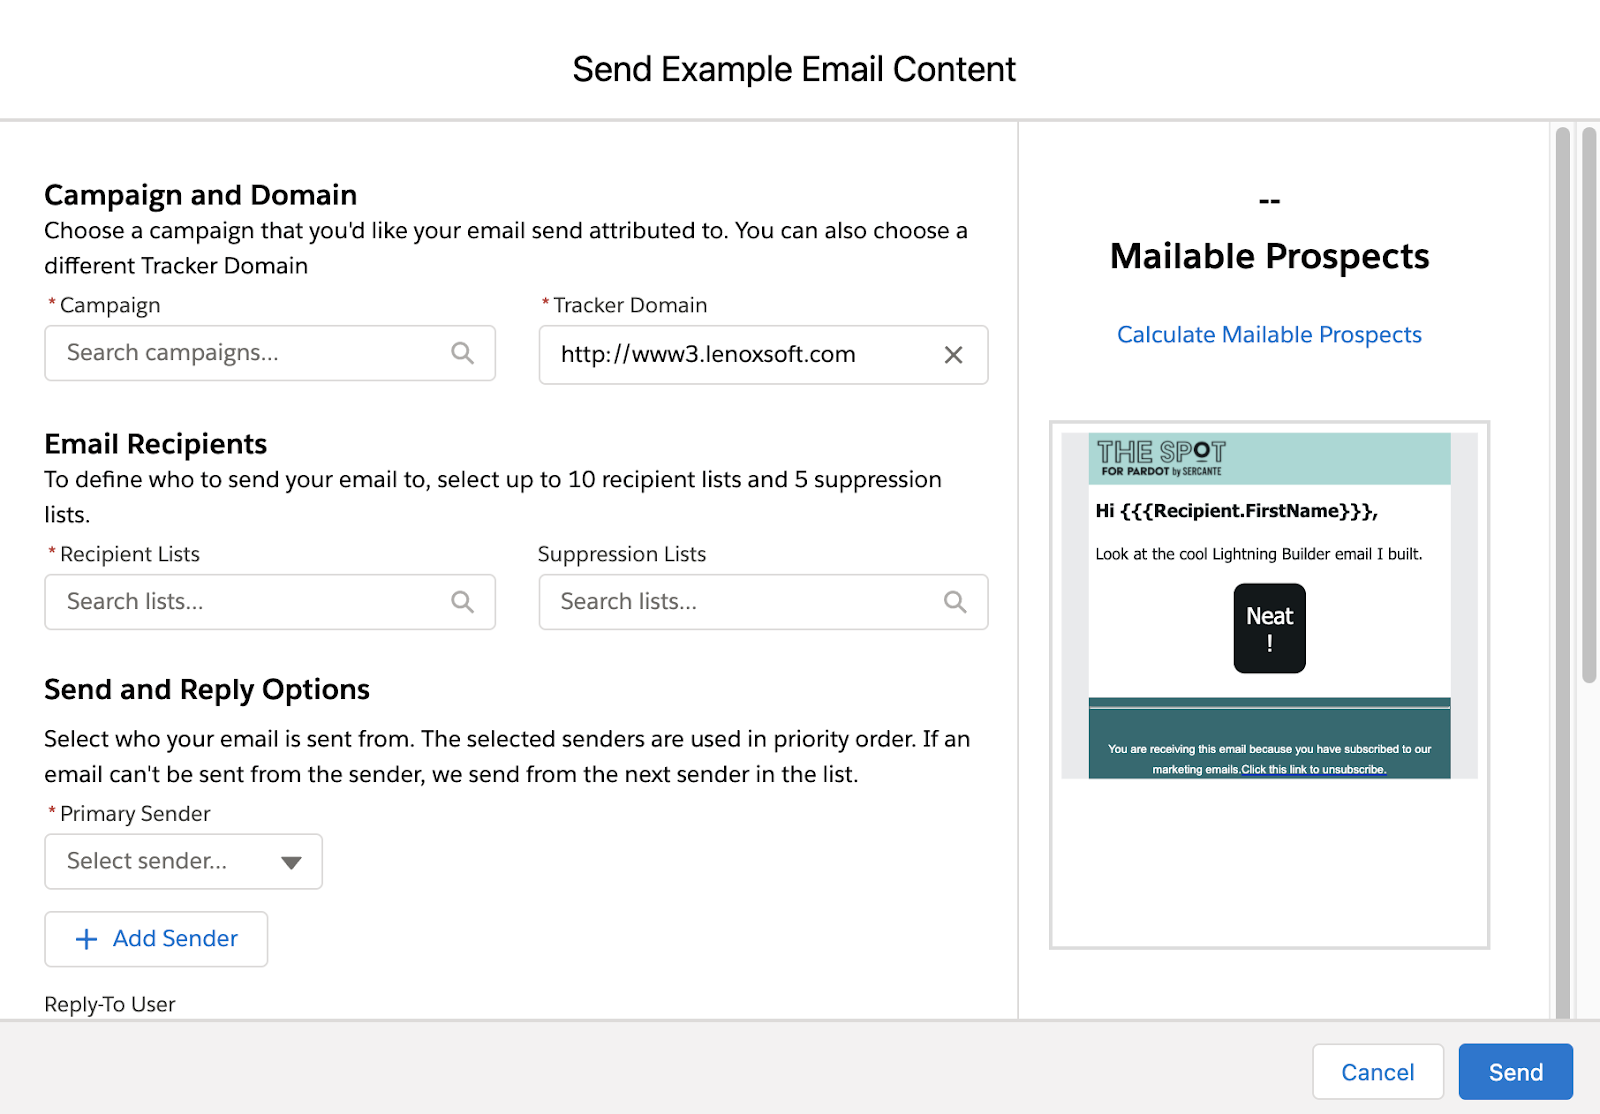
If your email does not have any errors, the sending options will appear. Unlike the classic builder, this is where you set your Campaign and toggle between the available Tracker Domains within your Pardot account. 

If you are using multiple Pardot Business units, make sure you are logged into the correct business unit before clicking the Send option. The business unit you are logged into will affect the Campaigns and Tracker Domains available on this screen. 

After you select your recipient list(s) and (optional) suppression list(s), click Calculate Mailable Prospects to get a count of how many Prospects match your Email Recipient selections.

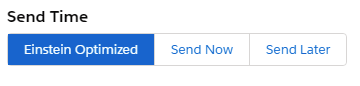
If Einstein Send Time Optimization is enabled, this option will appear under Send Time. If this is not enabled, you will only see Send Now and Send Later. 

Or

Activating for automation

If you’d like to use your Email Content in an ESP, select Activate for Automation. This is also found within the Email Content view on the upper right-hand side. 

Once activated, your Email Content will be available to add to a Send Email action in an ESP (example below), as an autoresponder in a completion action, or as a Salesforce Engage template.

If you later update the Email Content, you must re-activate it for automation to apply the changes. When doing so, Salesforce will list anywhere the Email Content is in use and confirm you would like to overwrite it with the changes.

Should you start using the Lightning Email Builder now?

Well, it depends. While the Lightning Email Builder has a lot of great features that make it easy to build beautiful emails, there are still a few missing features that may hold some users back. One of my personal drawbacks to the Lightning Email Builder is the inability to enforce or pre-populate brand standards. You can build Custom Components that are properly branded so users don’t have to start from scratch, but there is nothing stopping them from changing the styling (however, a more uniform way to style Lightning Builder emails is rumored to be on the current roadmap). Email Content and Email Templates also cannot be used as “true” templates in the classic builder or as autoresponder emails, so the Lightning Email Builder cannot entirely replace the classic builder quite yet. 

If your org is brand new to Pardot and/or you have a smaller team of HTML and design savvy users building your emails, you’re probably better suited to start using the Lightning Builder now. If you have a large team with strict brand standards and users with a wide variety of HTML and design skills, you’ll likely need to take a slower approach to start. However, I’d recommend rolling the Lightning Builder out to your power users and have them start getting familiar with the intricacies of the builder. The Lightning Email Builder is only going to get better from here, so you will absolutely want to use it, eventually.

Let us know what you think about the Lightning Email Builder and your plans for using the new builder in the comments!

Undoubtedly, you’ve heard the conversations in the Pardot community about web browsers no longer supporting third-party web tracking cookies. If you haven’t, are you hiding in a cookie jar? If you have, you may be wondering how this abandonment of third-party cookies affects your use of Pardot.

We’ll start with the basics before diving into enabling first-party web tracking cookies in your Pardot instance. You’ll also find solutions to overcome challenges related to having multiple websites that do not share the same domain name.

This post was updated in January 2023.

What are web cookies? 

A web browser cookie is a small bit of text that a website leaves with the browser so the website can ‘remember’ who you are. They are the most common method used to identify users online and provide a personalized browsing experience. 

Cookies remember things like your language preference, login details, and products added to the shopping cart. They even remember these details after you leave the website. 

Because cookies have the ability to collect certain pieces of information, they are also used for advertising processes like behavioral profiling and retargeting.

First-party cookies

A first-party web tracking cookie is created and stored directly by the website you are visiting. They help provide a good user experience on the website for you while collecting analytics data for the website owner to understand your behavior. These first-party cookies can only be read when you are actively visiting the website. 

Third-party cookies

Third-party web tracking cookies are created by another domain that is interacting with the website you are visiting. If a website uses online ads to monetize content, the ads will create a cookie (third-party) and save it to your computer. 

So, now you have a first-party cookie from the website itself and a third-party cookie from the advertiser. These third-party cookies collect information such as your location, device type, content you view, products you click on, and more. 

When you visit another website that also uses this ad server’s code, you’ll see ads for content you interacted with on the first website (yes, they ARE following you!). 

So what’s the big deal and why all of the hubbub? 

Not all cookies are bad. In fact, marketers use cookies to understand their website visitors’ behaviors so they can create better experiences. And browsers actually need cookies for websites to function properly. BUT, potential security risks come from the use of certain tracking cookies and web browsers are ending support for third-party cookies. 

Browsers are dropping support for third-party cookies to strengthen security and privacy for users. That’s because third-party cookies are easier to slip into a website without the website owner’s knowledge or permission. 

You might be wondering when browsers will stop supporting third-party cookies so you can plan accordingly. The answer is NOW. 

It’s already happening in these ways: 

  • With the release of Apple Safari 13.1, third-party cookies are blocked by default.
  • Mozilla Firefox launched its Total Cookie Protection in February 2021 to “ensure that no cookies can be used to track you from site to site as you browse the web.”
  • Google Chrome has also started the process to disallow the use of third-party tracking cookies. Originally planned to take effect this year, Chrome has now pushed the final step out to 2023. Currently, third-party cookies are allowed under HTTPS if a certain flag is set on the server. Pardot sets this flag, so we can continue to use third-party cookies — for now.

The big ‘AHA’ – What it means for Pardot users

Your Pardot instance tracks visitor and prospect activities on your website and landing pages by setting web tracking cookies on their browsers. And, Pardot can pull data from tracking cookies for a long time. 

This means if someone visits your website (with a Pardot tracking code in place, of course) and then comes back months later to make a purchase, you have a rich history of data on that person throughout the sales cycle. 

Later, you can analyze that data to determine what influenced the purchase. For example, their prospect record will show the web pages they visited first, which campaign converted them to a prospect, and what content engaged them enough to ultimately choose to do business with your company.

This is helpful for B2B companies with a long sales cycle where buyers may pick up or put down the buying process, consider vendors seasonally, or take their sweet time to make a purchasing decision.  

Length of time Pardot can track prospects

The default (and maximum) duration of Pardot tracking cookies is 3650 days — 10 years!  That means Pardot can continue to track data from cookied prospects for ten years as long as they haven’t cleared their browser history or deleted their cookies. 

You can manually adjust the duration of this tracking window, but the minimum number Pardot allows is 180 days.

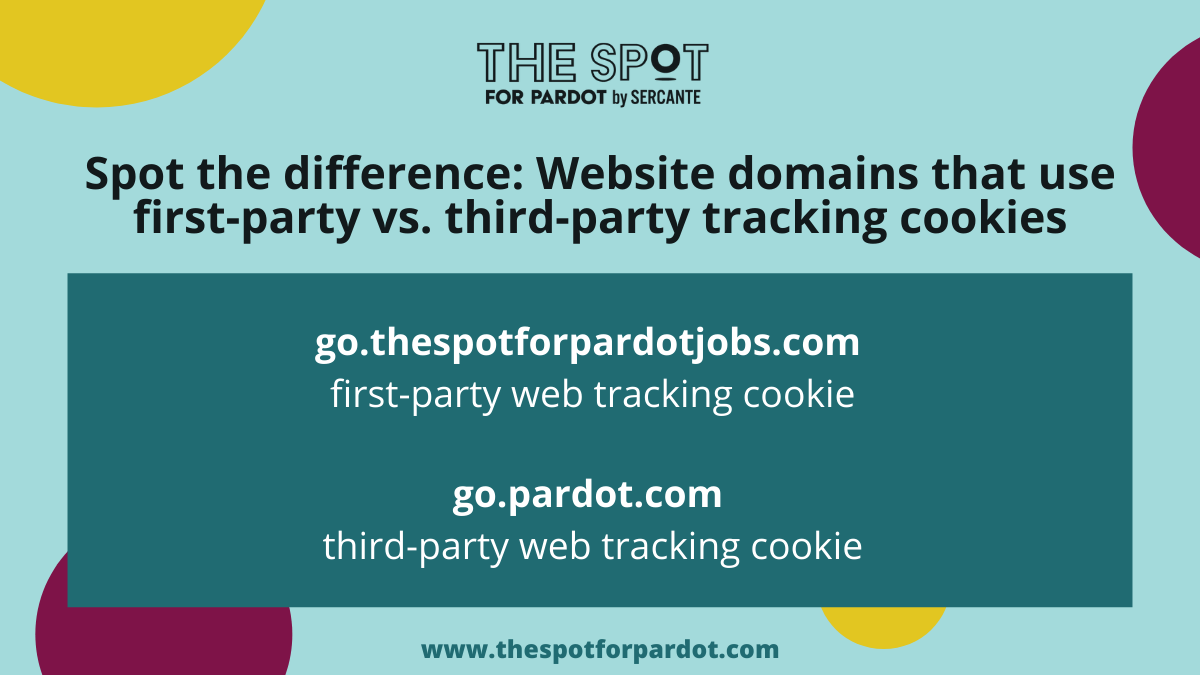
Spot the difference: Website domains that use first-party vs. third-party tracking cookies

Using the standard method of website tracking, Pardot operates as a third party. That means Pardot tracks users who visit your website with a cookie from go.pardot.com. This tracking cookie is attached to the Pardot domain. From the website’s point of view, this is a third-party cookie (because it’s a Pardot-branded cookie).

If third-party cookies go away, our website interaction with Pardot is GONE. Poof! Unless you make the switch and enable first-party web tracking cookies. 

When you make the switch to enable first-party tracking in Pardot, the tracker domain name aligns with your website. 

For example:

  • go.mywebsite.com uses a first-party web tracking cookie.
  • go.pardot.com uses a third-party web tracking cookie.

If you have only one website connected to Pardot, then this is really simple. 

But, what if your company manages multiple websites while pulling tracking information into a single Pardot instance? Again, it’s all about the website domain — and it can get tricky.

You’re in luck if your websites use the same website domain — no tricks for you. A same-domain example is mywebsite.com and blog.mywebsite.com. 

Utilizing the same ‘mywebsite.com’ domain, Pardot first-party tracking covers both websites and connects visitor tracking on both websites. 

How to enable first-party web tracking cookies for disconnected domains

If your websites have disconnected domains, then you’ll need to work a bit harder. Let’s take a look at Sercante as a company for a disconnected-domain example. 

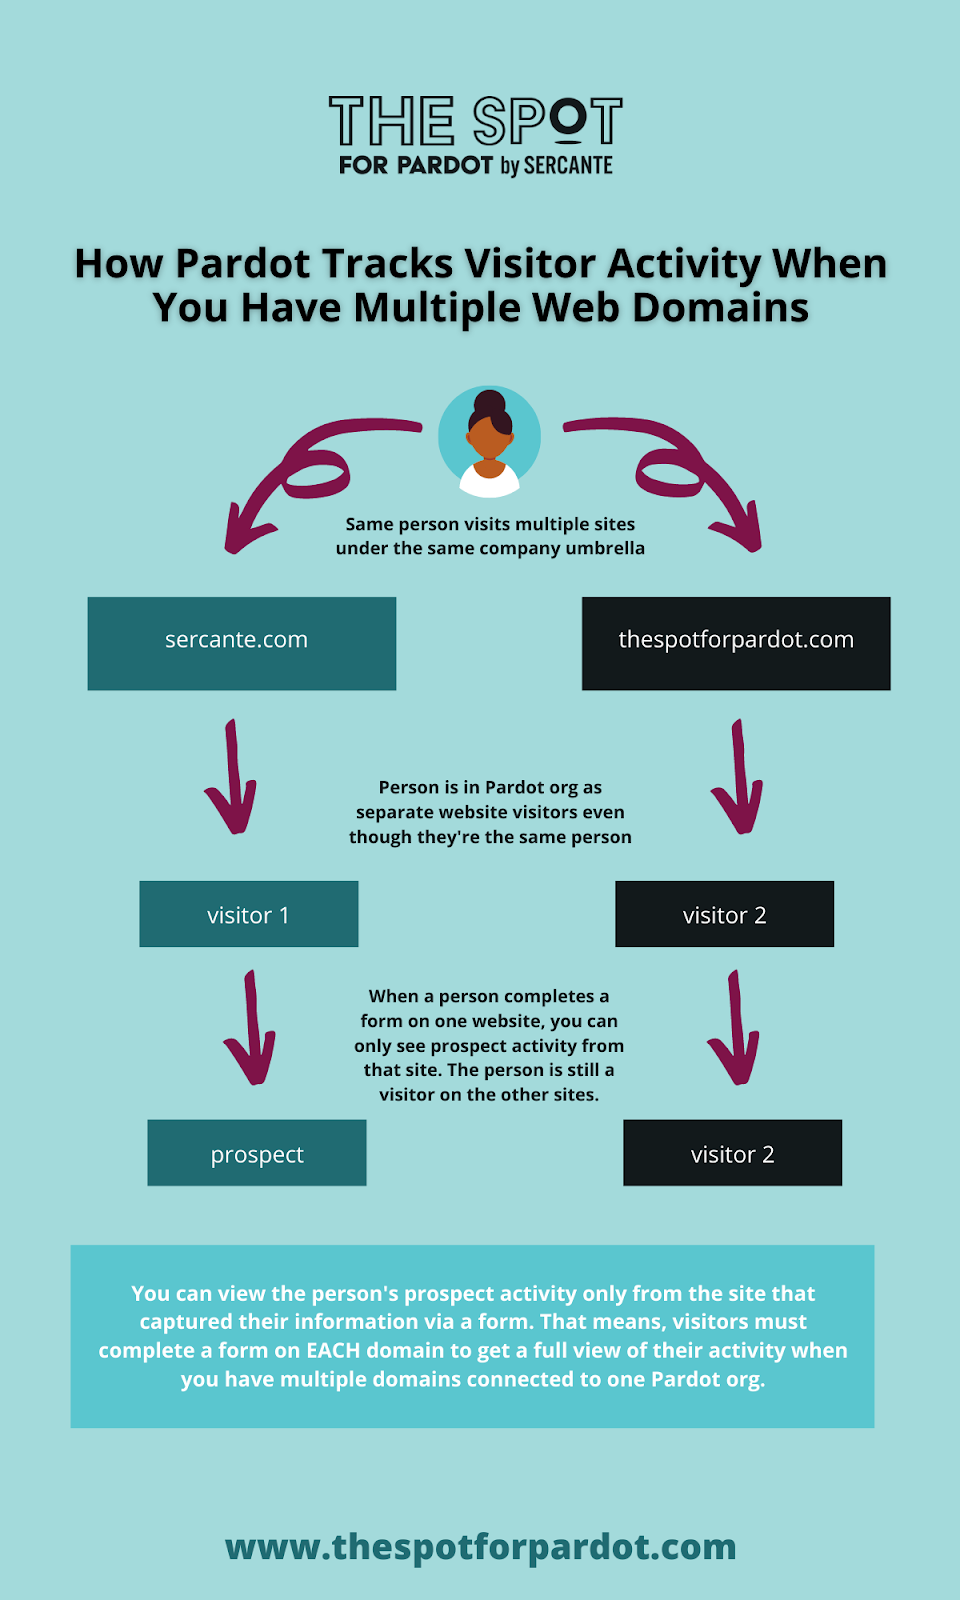
Sercante websites/tracker domains include sercante.com and thespotforpardot.com. They both use Pardot first-party tracking and collect visitor interaction. BUT, because the domains are different, visitor activity is not connected from one to the other. 

The people using your website must create a connection between their activity on the two websites by completing a form on each website for you to properly track visitor and prospect activity. 

That means three things:

  1. You’ll need to adjust your marketing strategy to encourage website visitors to convert to prospects on ALL of your websites if you want to track their interaction with all of your brands. 
  2. You’ll also want to ensure the data is flowing from each domain that’s connected to your Pardot instance by testing using the “Verify the Change” methods below. 
  3. And finally, you’ll have to use the same domain for all call-to-action links to properly track all assets within a particular marketing campaign.
How Pardot tracks visitor activity when you have multiple web domains

Now is the time to enable first-party tracking cookies (well, at least soon)

While this is not in the panic zone, it is something that should be at the top of your list. Why procrastinate and have to scramble when the Google Chrome deadline is upon us? And other web browsers have already dropped support for third-party web tracking cookies.

That means, it’s a good idea to enable first-party cookies in your Pardot instance sooner rather than later. 

Enable first-party cookies in your Pardot account

There are two steps:

STEP #1: Enable first-party cookies in your Pardot Account Settings.

Pardot Classic: Use the gear icon at the top right of your Pardot account, select ‘Settings,’ then click ‘Edit’

Pardot Lightning: Click on the ‘Pardot Settings’ tab, then click ‘Edit’

  • Check the “Use first-party tracking” box
  • Once checked, two more boxes will appear (and will be checked by default)
  • Keep all of these boxes checked for now. The third-party boxes can be unchecked once you are ready to make the full switch to first-party.

STEP #2: Replace the tracking code on your website.

Remember the part above where ‘go.pardot.com’ equals third-party? Well, that is included in your website tracking code and needs to be replaced. 

  • Open the Domain Management page.
    • Pardot Classic: Select Admin and then Domain Management.
    • Pardot Lightning: Select Pardot Settings and then Domain Management.
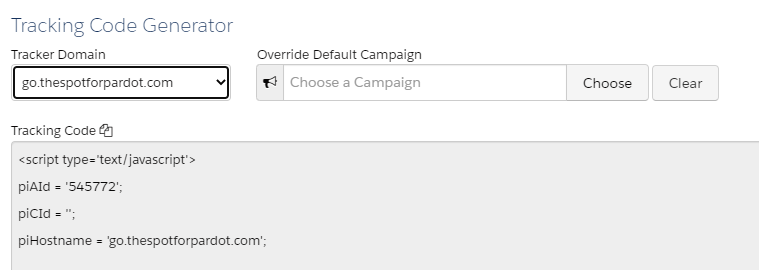
  • Scroll to the Tracking Code Generator at the bottom of the page and and select the Tracker Domain you want to generate code for.
    • Optional: Override the default campaign with the selection box (perhaps you have a specific ‘website tracking new’ campaign to use). 
  • Copy the code in the grey Tracking Code box.
  • In your website HTML, replace the current Pardot tracking code with this new code (add it before the close body tag </body>). You probably need to enlist the help of your website developer for this step.

VERIFY THE CHANGE: How do you know if the correct tracking code is in place? 

Make sure the ‘piHostname’ in the tracking code is now aligned with your Tracker Domain name. If you still see ‘go.pardot.com,’ then the new code is not in place.

Tracking code generator

VERIFY THE CHANGE: How do you know if it’s working? 

Open an incognito window in Chrome and toggle ‘Block third-party cookies’ on.

Block third party cookies

Visit your website and click around on pages that have the first-party tracking code in place. 

Open your Pardot Visitors page (Prospects > Visitors). You should see visitor activity at the time you tested clicking on your website. 

Resources and next steps

If you use more than one web tracker domain,then review your Pardot assets (files, forms, landing pages, email templates, etc.). During your review, check tracker domains you use in your email/form/landing pages to be sure they are consistent with the associated tracking strategy. 

You can send compelling, useful emails that prospects will open and click and watch the data flow into your Pardot instance. When working with a cross-domain strategy, keep in mind that CTA clicks will set tracking not only for the domain being used but also for the device used.

Here are resources you can use to learn more about web tracking cookies:

Still confused about the whole thing? Tell us about it in the comments below or contact us for your most complex cookie conundrums.

No more posts to show