The Marketing Cloud Account Engagement (Pardot) and Salesforce integration can be used to pass data back and forth between Pardot and Salesforce. In this article, learn everything about the Salesforce connector including what objects are synced, what happens if the prospect already exists in Pardot and how Pardot, and how to map Salesforce users to Pardot users.
Custom Objects (Available in: Pardot Advanced Edition and Available for an additional cost in: Pardot Plus Edition)
Synced but requires mapping in Pardot
Users
Custom Fields
Syncing prospects from Pardot to Salesforce
A prospect is synced to Salesforce when the record has been assigned to a user. A user can be assigned using a completion action or by using an automation rule.
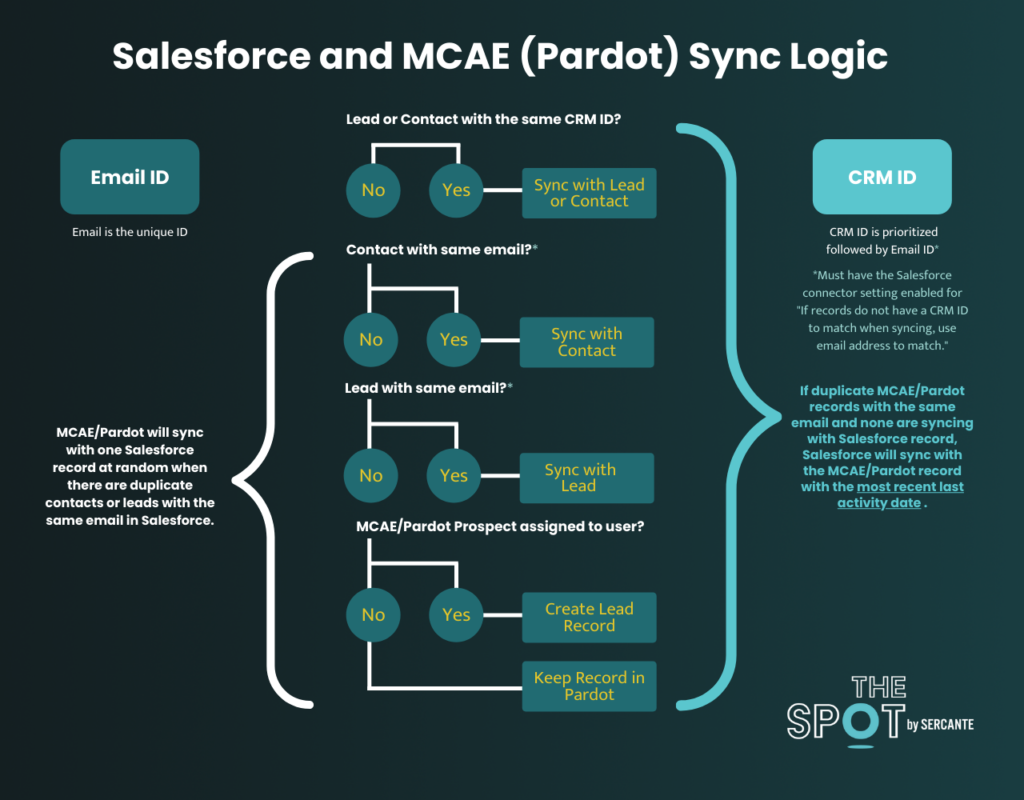
Since Pardot uses email address as its unique identifier**, Pardot will check to see if there’s a contact in Salesforce with the same email address and then check if there’s a lead with the same email address. If there’s no email address that matches the prospect in Salesforce, Pardot will create a new lead in Salesforce. This can be illustrated with this flow chart.
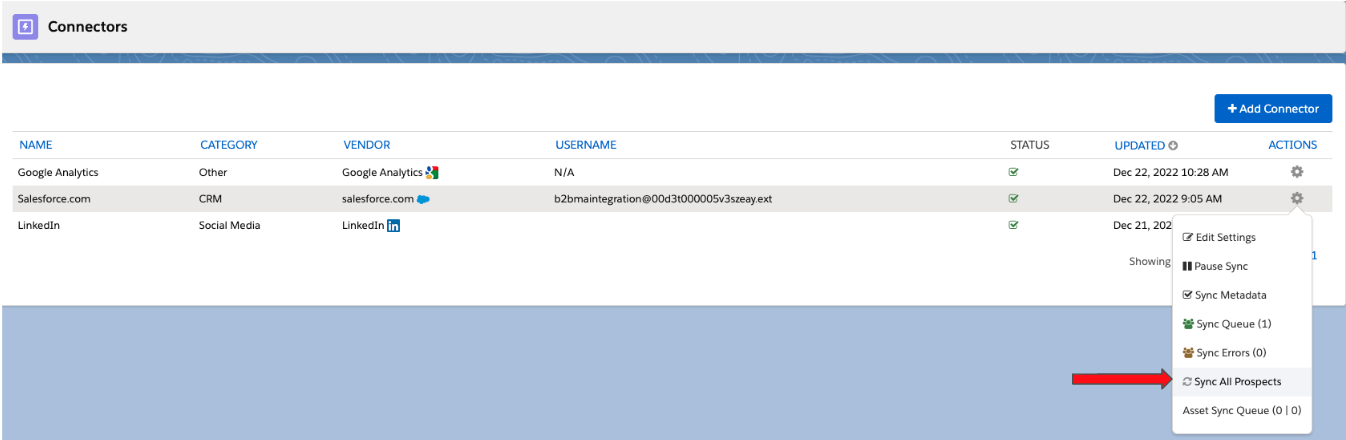
You can also navigate to the connector settings and run a full sync. Learn more about what causes a prospect to sync from Pardot to Salesforce here.
By default new leads and contacts within Salesforce will not sync over to Pardot automatically. There are 3 ways to sync new leads and contacts from Salesforce to Pardot:
By clicking the send to Pardot button on the lead or the contact record in Salesforce.
By manually uploading the lead or contact’s email address into Pardot.
Enable the option in the Salesforce connector to ‘automatically create prospects if they are created as a lead or contact in Salesforce.com’. This feature is not retroactive so you will need to upload a CSV into Pardot that includes the CRM ID and email address to trigger Salesforce records to sync.
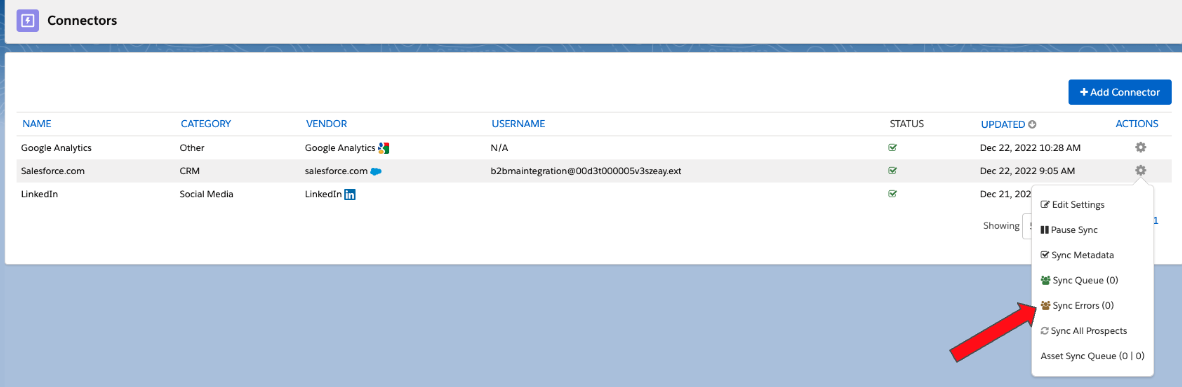
Run a full sync (Pardot Settings > Connectors > Gear Icon > Sync All Prospects)
Once the Pardot prospect and the Salesforce lead/contact are connected, Pardot will check for changes in Salesforce every 2-4 minutes.
Hot Tip: Learn more about Salesforce and Pardot sync behavior in this blog post.
Connected Campaigns: Salesforce Campaigns and Pardot Campaigns
The launch of Connected Campaigns in 2019 streamlined how Salesforce and Pardot campaigns are used, allowing management of campaigns to be managed within Salesforce. Plus, if you enable Campaign Member Sync your prospects will be added to campaigns as campaign members.
Prospects can be added to a Salesforce campaign using the following methods:
When you set up a rule using one of these methods you will be able to see the action criteria to add to Salesforce campaign.
Mapping Fields Salesforce Fields to Pardot Fields
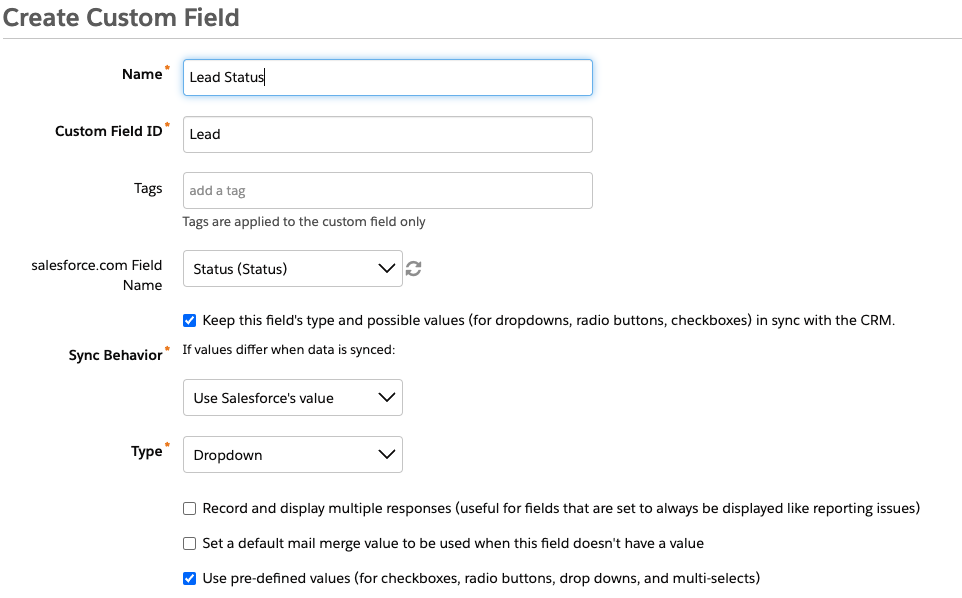
When you verify your Salesforce connector with Pardot, the default fields for leads/contacts and accounts are set up automatically. Any custom fields will need to be created in Pardot and mapped to the corresponding Salesforce field.
Mapping Salesforce Users to Pardot Users
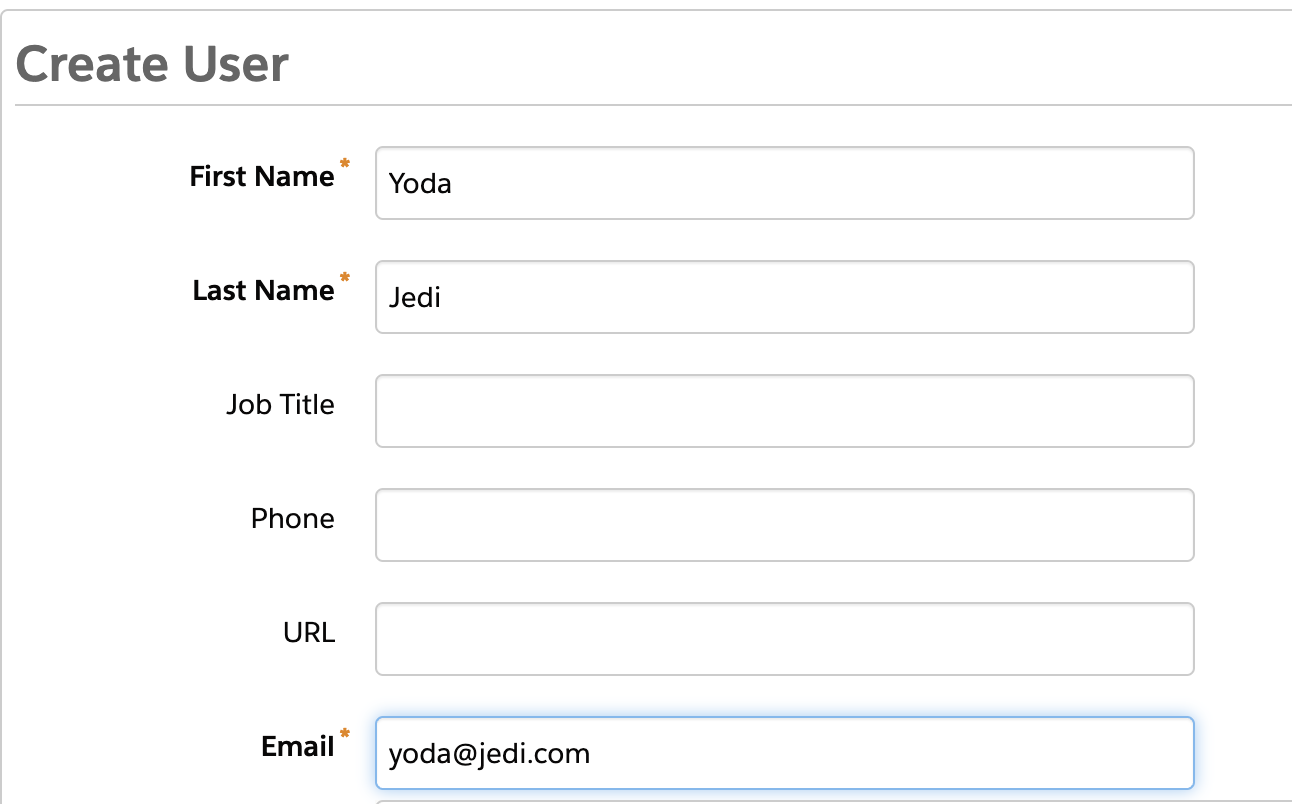
Each Salesforce user will need to be created in Pardot as well, so you can assign Pardot prospects to a sales rep. You can create users in 4 ways:
Manage User Sync In Pardot (Pardot Settings > Connectors > User Sync) by mapping Salesforce Profiles to Pardot Roles
I changed a contact’s email address in Salesforce, but the change isn’t syncing to Pardot.
This is the expected behavior of the Salesforce connector unless you have the setting Automatically change email addresses in Pardot to reflect changes in Salesforce.com enabled under the Salesforce connector settings.
My Prospects aren’t syncing to Salesforce.
First, check to see that there wasn’t an error while syncing the prospects to Salesforce. You can view sync errors by navigating to Pardot Settings > Connectors > Sync Errors
Fix any errors and try syncing the record with Salesforce again.
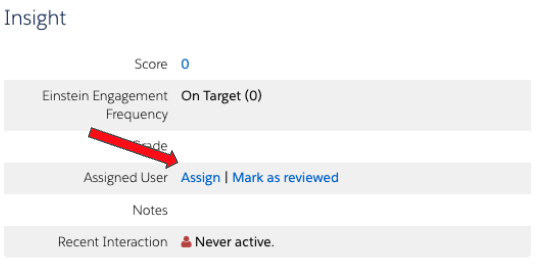
If you have no errors, make sure the record is assigned to a user. You can check this by clicking into the prospect in Pardot and looking for an assigned user under the Insight table.
Have other questions about the Pardot and Salesforce Integration? Ask in the comments!
Are you spending hours upon hours curating engaging, click-worthy content, only to notice that you have low engagement, high unsubscribes and spam complaints? A list of opted-in prospects is great, but what happens when they input false or incorrect contact information, or sign up on a whim. By setting up Confirmed Opt-In (also known as Double Opt-In), you can be at ease knowing you’re collecting email addresses from a valid and monitored inbox, and of prospects who want to receive and read your content.
What is Confirmed Opt-In?
A Confirmed Opt-In (COI) is a process where a marketer obtains explicit consent from prospects to receive marketing emails.
Setting it up adds a few more steps to the Single Opt-in process but is generally easy:
A contact fills out your form and selects the consent check-box (single opt-in)
They receive the opt-in confirmation email, open it and click the button to confirm.
Their record is updated as an opted-in contact, along with other important details like when they confirmed their opt-in.
It may be a regulatory requirement in certain regions, so make sure you do your research to understand whether your prospects require a COI. It’s currently required in Austria, Germany, Greece, Switzerland, Luxembourg and Norway (source).
Benefits of COI for Email Marketing
While it can take more time to set up, the payoff is worth the effort:
Higher email engagement rates (opens/clicks): Prospects are interested in receiving your marketing emails and are more likely to purchase your products/services.
Lower bounce rates/spam complaints and a better sending reputation: No fake emails entering your database and causing high bounce rates or spam traps that end up harming your sending reputation.
A well-documented record of opt-in: With this auditable trail, if a recipient reports the email as spam, you will have proof to support your list’s opt-in integrity.
And generally a good, clean database.
Setting up Confirmed Opt-In
There are a number of ways to set up COI. Here’s a basic overview of how to set it up in Marketing Cloud Account Engagement (Pardot) instance.
Create two lists to capture opt-ins
Confirmed Opt-in
Not confirmed Opt-in
Create a landing page that a prospect is directed to once they confirm their opt-in.
Add the following completion actions to the custom redirect:
Remove prospect from Not confirmed Opt-in list
Add prospect to Confirmed Opt-in list
Set up an auto-responder email to capture COI
Add the custom redirect link (identified in the above step) to the call to action button to capture the COI
Add the following completion actions to the form/form handler that captures consent to receive Marketing Communications:
Add prospects to the Not confirmed Opt-in list
Send auto-responder email to capture their COI
Quality or Quantity
COI is a great way to level up your email marketing strategy; ensuring a healthy database full of ‘real’ and engaged prospects. And with sales and marketing always looking for quality over quantity, COI will ensure it gets you there.
What questions do you have about Confirmed Opt-in? Let’s hear it in the comments below.
Your website is one of your most important demand generation assets and a blog is a great way to increase your online presence by making you more visible on Google. It’s also a great way to bring prospects into your database to expand the top of your funnel.
In this tutorial, I’ll show you how to set up your blog with a Marketing Cloud Account Engagement (Pardot) form, how to create a blog welcome email, and tips to automate blog digest emails.
How do you want your blog readers to subscribe?
There are many ways you can get your readers to subscribe to your blog. Some companies use a popup form when you visit a blog post, which has proven to be effective and other companies make it more subtle. Here are some different methods which will give you inspiration on how you should add the form to your blog.
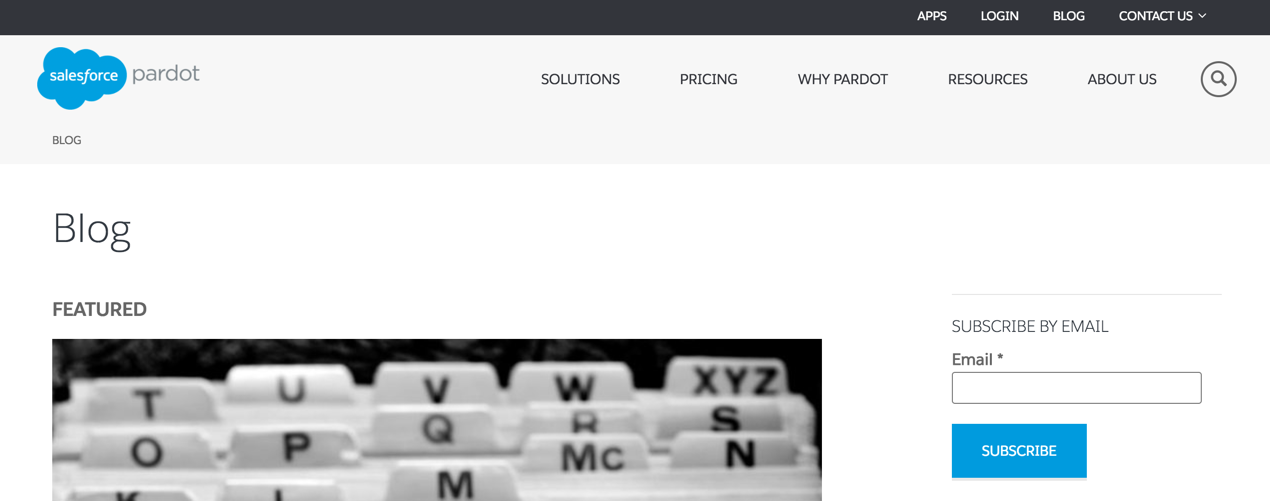
Example 1: In a sidebar
Pardot lets you subscribe to their blog by entering in your email address in the sidebar.
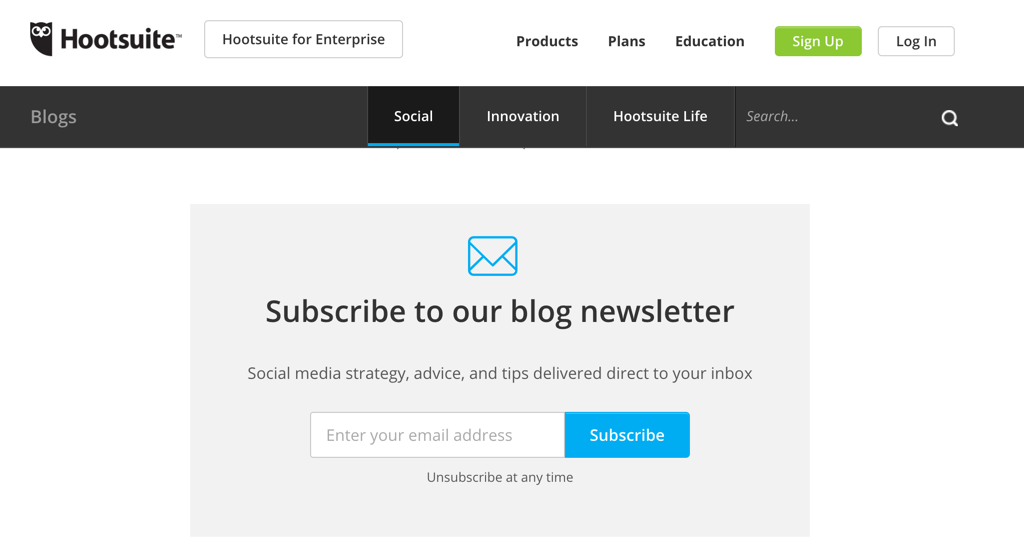
Example 2: At the end of each blog
Hootsuite adds their blog subscription form to the bottom of each blog post. They also only ask for your email address and have some nice icons, so it’s clear what you’re signing up for.
Example 3: In the footer
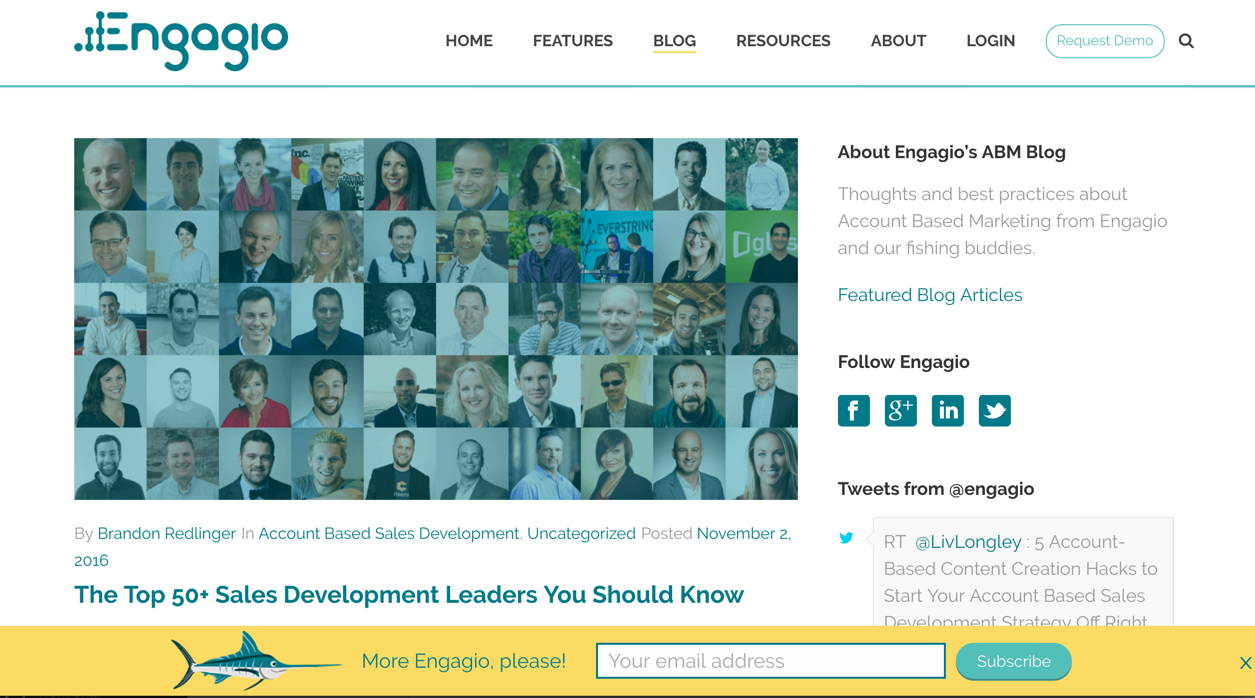
Engagio has a “sticky footer” at the bottom of their blog page, as well as on each blog post to get readers to subscribe. The bold yellow color also draws your attention to the subscription form without being too invasive and they provide you with a close button to hide the form.
Example 4: With an automation
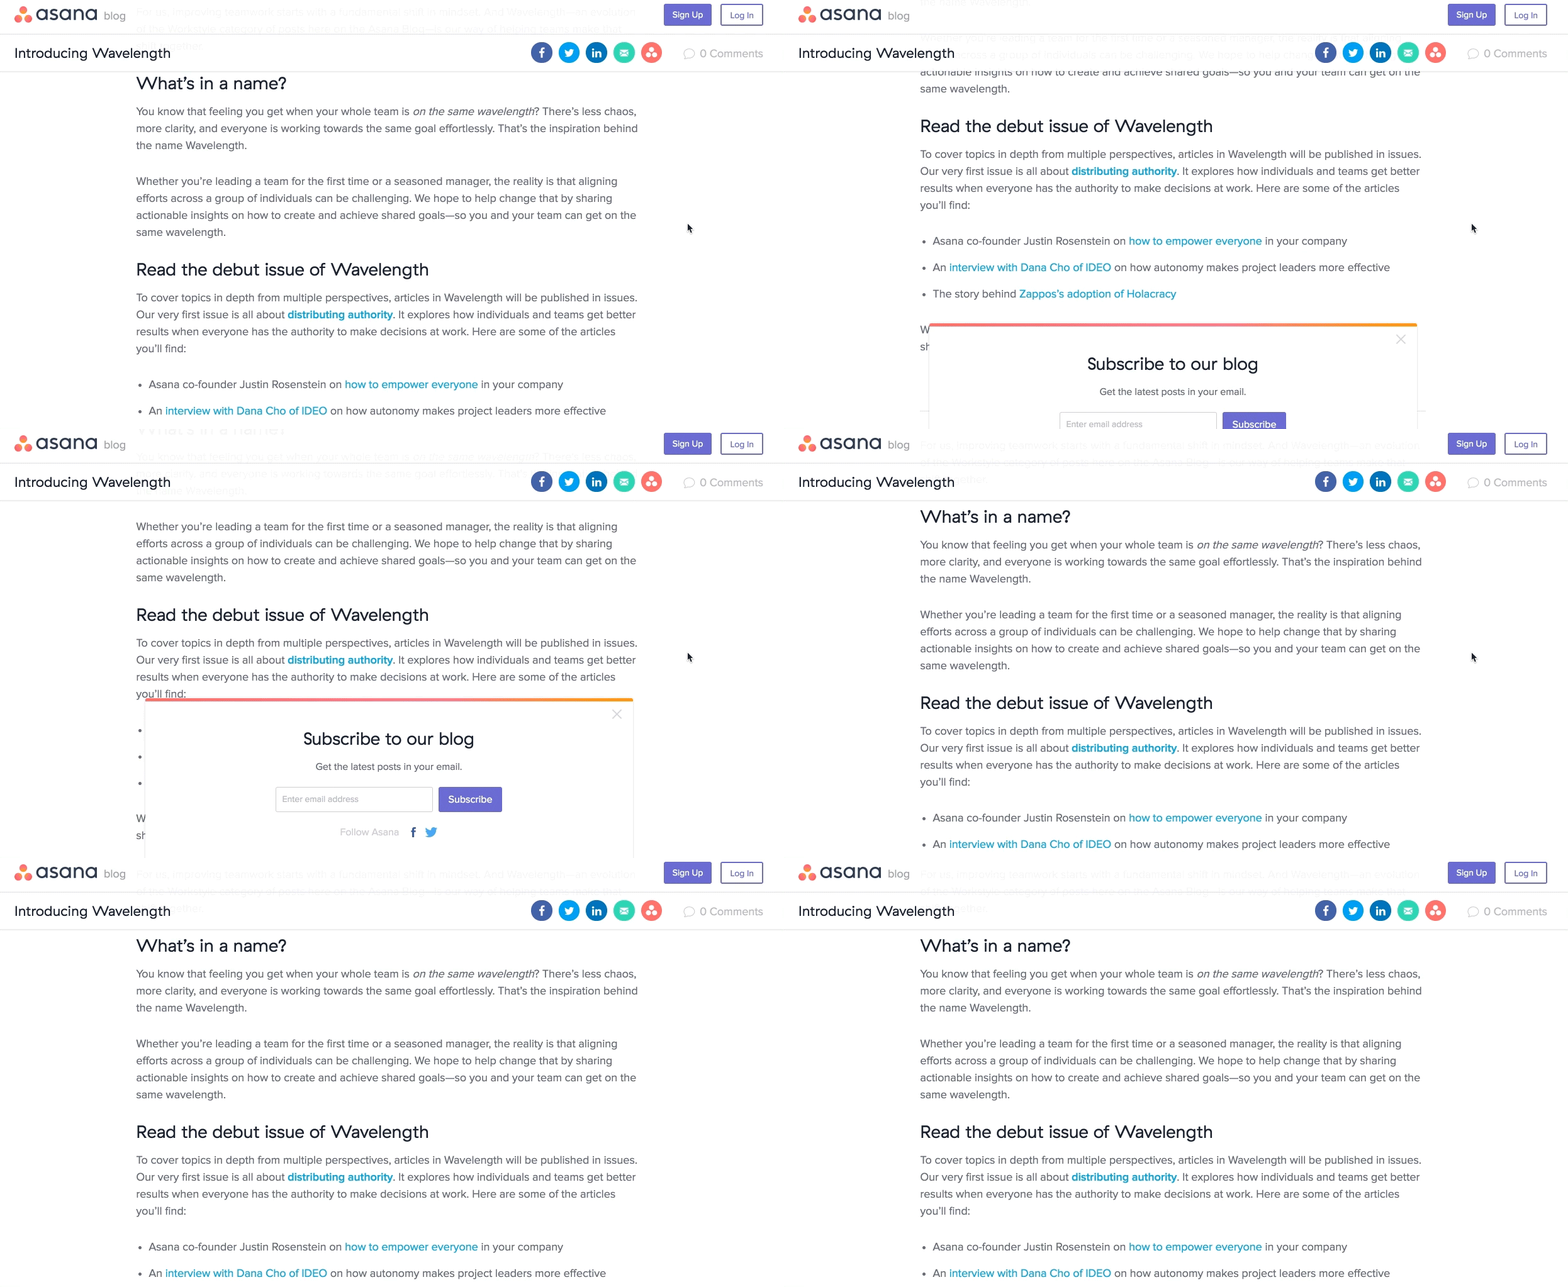
Asana uses a subscription form that slides out at the bottom when you scroll down about 80%. I like how the animation captures the attention of the readers and how they incorporate Facebook and Twitter buttons beneath the email sign up.
Example 5: In multiple spots
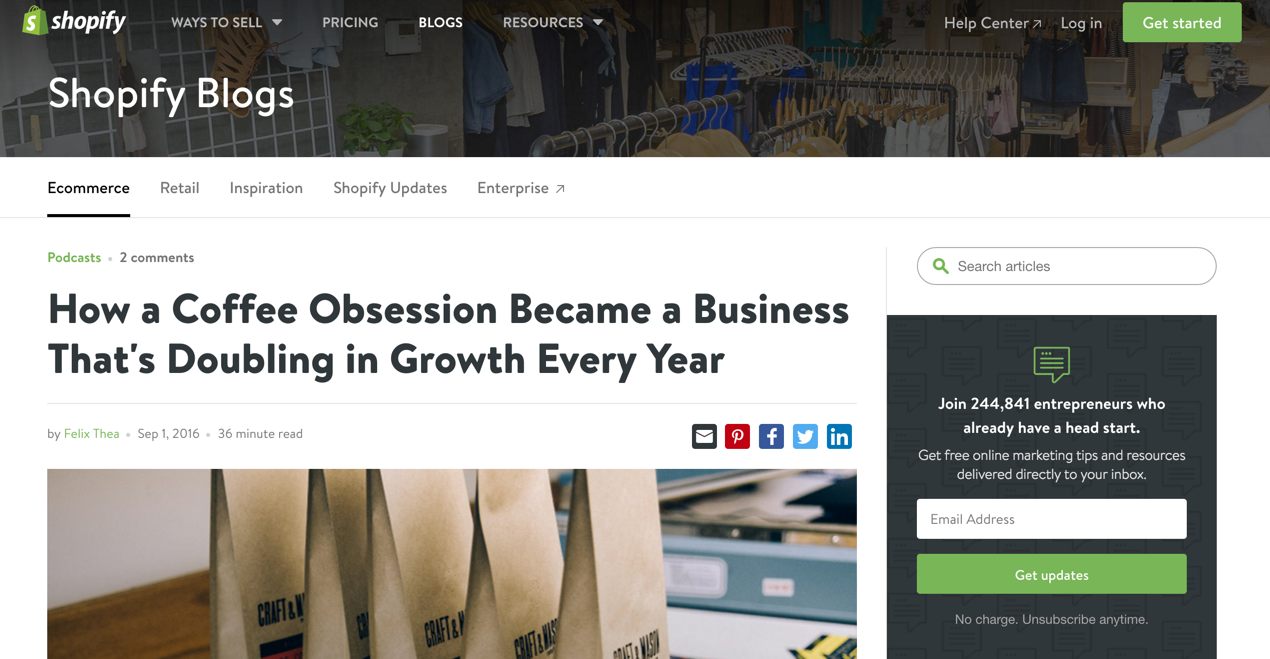
Shopify uses two slightly different methods for capturing their blog subscribers. When you visit their main blog page you can subscribe right from their header.
They also have a subscription form in the sidebar of each post. I like that they include some social proof in the subscription form in the sidebar and it’s clear what I can expect them to send me if I give them my email address.
What fields should you capture?
Standard fields
The shorter the form the more likely you will get your readers to subscribe to your blog. Most blogs only ask for an email address, but some also will ask you for your first and last name for more personalized blog digest emails.
Hidden fields
Your standard source fields should be on your blog subscription form, just like every Pardot form you create.
If you opt to have a subscription form on every blog post, I also like to add hidden fields for blog post title and blog post category. With my blog, for example, I have a subscription form at the bottom of each post and I use custom code in WordPress to automatically populate the hidden fields with the post title and post category. This way I can pull reports in Pardot to see what type of content is generating more blog subscribers and what posts have generated the most blog subscribers.
Here’s an example of populating hidden fields with WordPress blog information. Note: This method is only possible while using Pardot Form Handlers.
Now that I’ve given you some examples of what form fields to include in your form and some methods for blog subscription forms, it’s time to show you how to build it out in Pardot.
Pardot Form Handlers vs. Pardot Form embed
There are some advantages and disadvantages for each form method. Embedded Pardot forms allow you to update the form directly in the Pardot form editor and the changes are live on your site as soon as you save the form. However, they also are embedded on your site using an iFrame, which means that certain functionality might not be available. Pardot form handlers are much more flexible and allow you to use your own HTML code to send data to Pardot.
When integrating your blog with Pardot the best form method to use, in my opinion, is Pardot form handlers, for a couple of reasons:
Changes don’t need to be made to the blog form regularly
It’s easier to have the form match your website/blog
Many blogging platforms have plugins you can use for blog subscription forms that will work well with Pardot form handlers
Create a campaign dedicated to blog subscribers
Create a campaign to attribute your blog as a lead source for any new subscribers. Your form and new subscribers should be assigned to the campaign in Pardot and/or Salesforce, depending on your lead attribution processes.
Create a Pardot Form or a Form Handler
In this tutorial, I will be using a Pardot form handler. You can also use a regular Pardot form if you prefer.
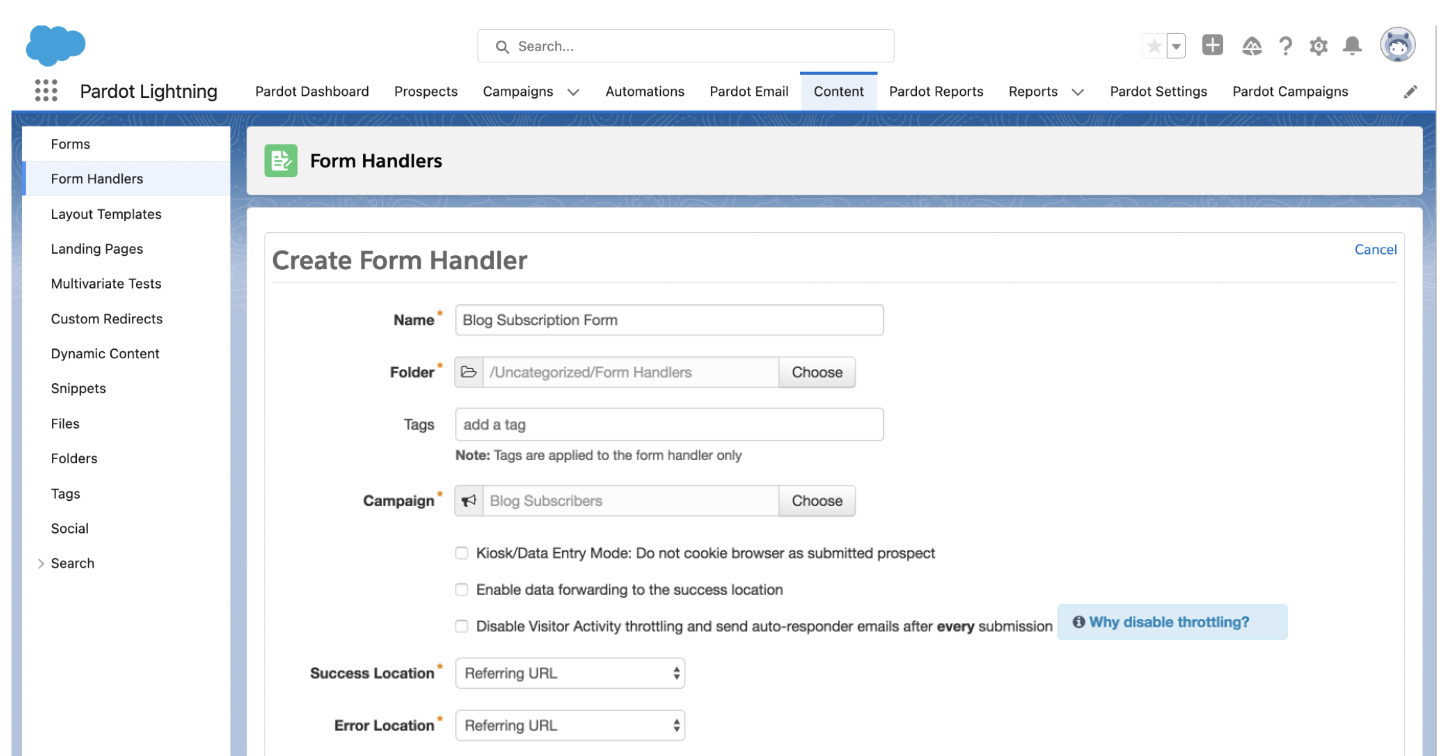
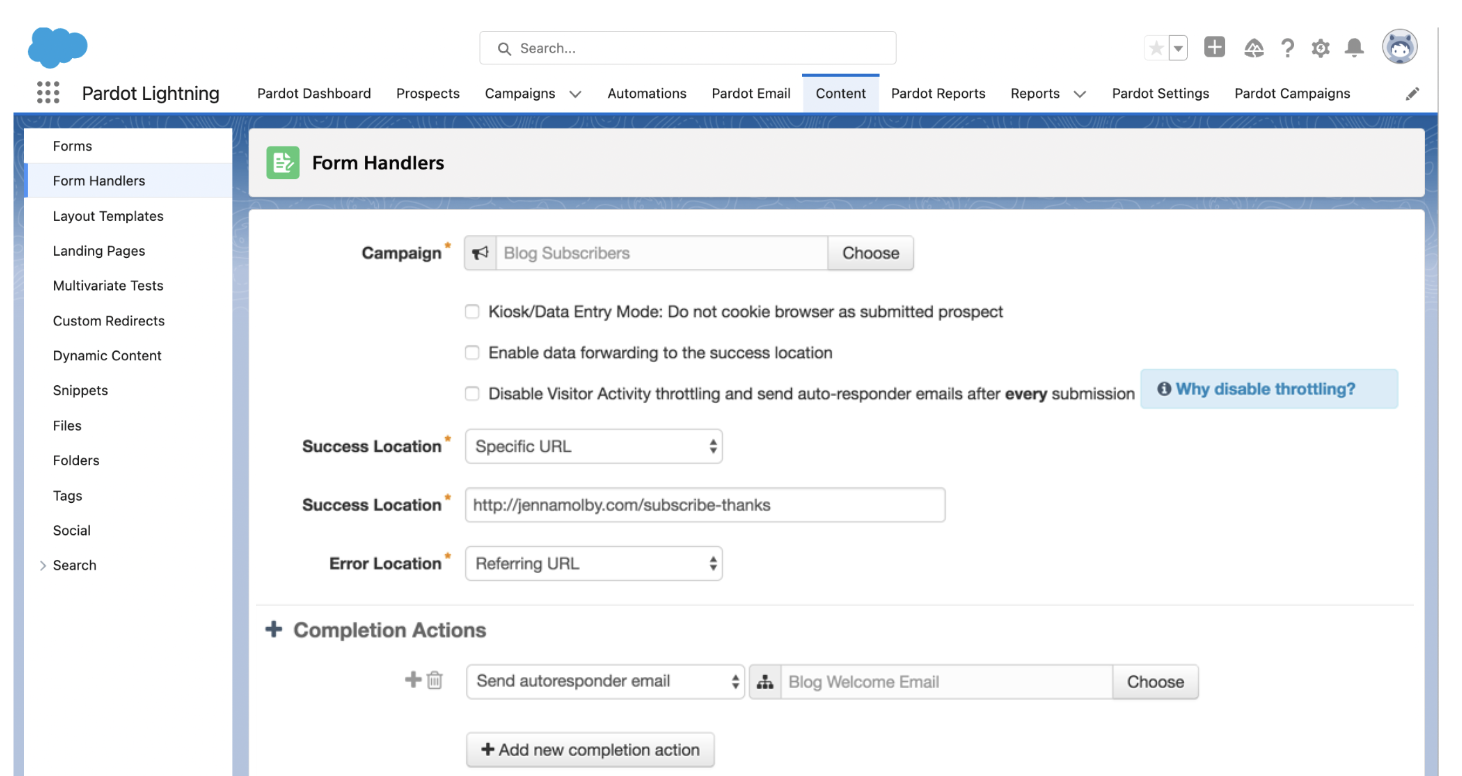
Create a Pardot form handler with a descriptive name. I called mine “Blog Subscription Form.” Select your new campaign, map the fields that you want to add to the form and click save. Note: Completion Actions and some other settings will be updated later on.
Add the form to your blog
There are many tools that allow you to add forms to your blog, but it depends what platform you use. Here’s a list of some popular plugins that will help you add your Pardot form to your blog.
PopUp Domination can be used to create a popup subscription form on your blog. You can use any HTML you want, which means it will work perfectly with your Pardot form handler.
Sumo is another option that will work on any type of blog platform. They also offer many different ways to display the subscription form on your blog.
While I’m a big fan of these tools, if you have a developer available the best option is to get them to implement your Pardot form on your blog using custom code. Depending on the method you choose it should be pretty easy for a developer to implement your form and it means you don’t have to pay a monthly subscription fee for using these tools.
Create a Thank You page
The next step is to create a Thank You page that the form will direct to when someone subscribes to the blog. I recommend that you create it on your website (instead of a Pardot landing page), to ensure it has the same look as your blog.
Once your Thank You page is created, copy and paste the URL into the Success location in the Pardot form handler.
Create a blog welcome email
A blog welcome email is a great way to promote more of your blog content. Choose a couple of your popular posts or create a digest of curated content your readers might be interested in.
When a reader subscribes to my blog, I send them a welcome email with some of my top Pardot blog posts. Click here to see what it looks like (and feel free to copy and paste the HTML to create your own welcome email).
Once you have your blog welcome email created add a completion action to your Pardot form to send an autoresponder email.
Emailing subscribers: Automated vs. Manual
Now that your form is set up on your site and your welcome email is ready, it’s time to figure out how you’re going to send notification emails when there’s a new blog post. There are two ways you can send out blog posts:
Automatically using a third-party application, or
Manually, since Pardot doesn’t have an RSS feed integration.
For my blog, I send out all my blog digest emails manually, since I like to have control over what’s sent. However, I only post about once or twice a week, so it’s pretty manageable.
Automated blog posts using Feed Otter
If you opt to go with the automated route, Feed Otter provides a full RSS integration with Pardot. You can quickly build, schedule, and email your blog subscribers notifying them of a new post, a weekly digest, or a monthly newsletter.
Manual blog post emails
Manual blog post emails require you to create an email each time there is a new blog post, or if you post a lot during the week, you can do a digest of all the new posts, once a week. It can be time-consuming, but if you have a good email template setup and a defined process the whole thing doesn’t take very long. If you’re going to go the manual route, here are some tips:
Create a simple, one-column email template, so you don’t have to spend time messing with formatting. This is the template I use for my blog posts.
Create an email that you can copy each time you need to send a blog email. This will contain all the settings (from address, list, etc.) you need to send the blog email.
Questions?
Send me a tweet @jennamolby or leave a comment below.
Note: This post was originally written in November 2016 and updated January 2023.
Recently, I was challenged with creating a landing page for event registration using Marketing Cloud Account Engagement (Pardot). The event had 15+ roundtable sessions in the morning (within 2-time slots) and an option to register for the afternoon session (keynote, happy hour etc). Here’s a sneak peek into how I built it along with some code if you want to try building something similar for your next event.
Before we get into the details, here’s a high-level breakdown of how the page works.
A user clicks on the ‘register’ button to sign up for a roundtable, the roundtable name is populated in a hidden form field.
A user clicks on the ‘register’ button to sign up for the conference, a hidden form field is set to TRUE
A user then enters their information into a form. The data is sent to Pardot using a form handler.
Users who signed up for at least one roundtable are sent a Pardot email that contains a “thanks for registering” message, the name(s) of the selected roundtable(s) and a calendar invite.
Users who didn’t sign up for any roundtables, but signed up to attend the conference, are sent a “thank you” email with a calendar invite.
Pardot Setup
Field Creation
First, I needed to create a couple of new fields in Pardot:
Roundtable Name 1: This field will contain the name of the roundtable the attendee selects for the first time slot.
Roundtable Name 2: This field will contain the name of the roundtable the attendee selects for the second time slot.
Registered For Conference: This field is a checkbox (true or false) which will indicate that the attendee has selected to attend the conference.
Form Handler Setup
I opted to use a form handler instead of a Pardot form, so I could easily customize my form.
Field Mappings
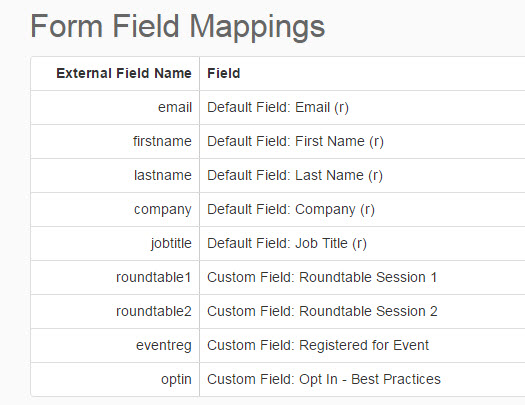
I added all the standard fields to the form handler (first name, last name, company name, job title, opt-in, and email address). I also added the 3 new custom fields (roundtable name 1, roundtable name 2, registered for conference) and marked them as not required since the attendee doesn’t have to go to all 3 events.
Completion Actions
I added 2 completion actions, the first one is to sync the prospect to an SFDC campaign with the status of “registered”, the second completion action is to send me an email alert when someone registers. The email notification helped me easily determine which roundtables are most popular.
Thanks for registering email confirmation
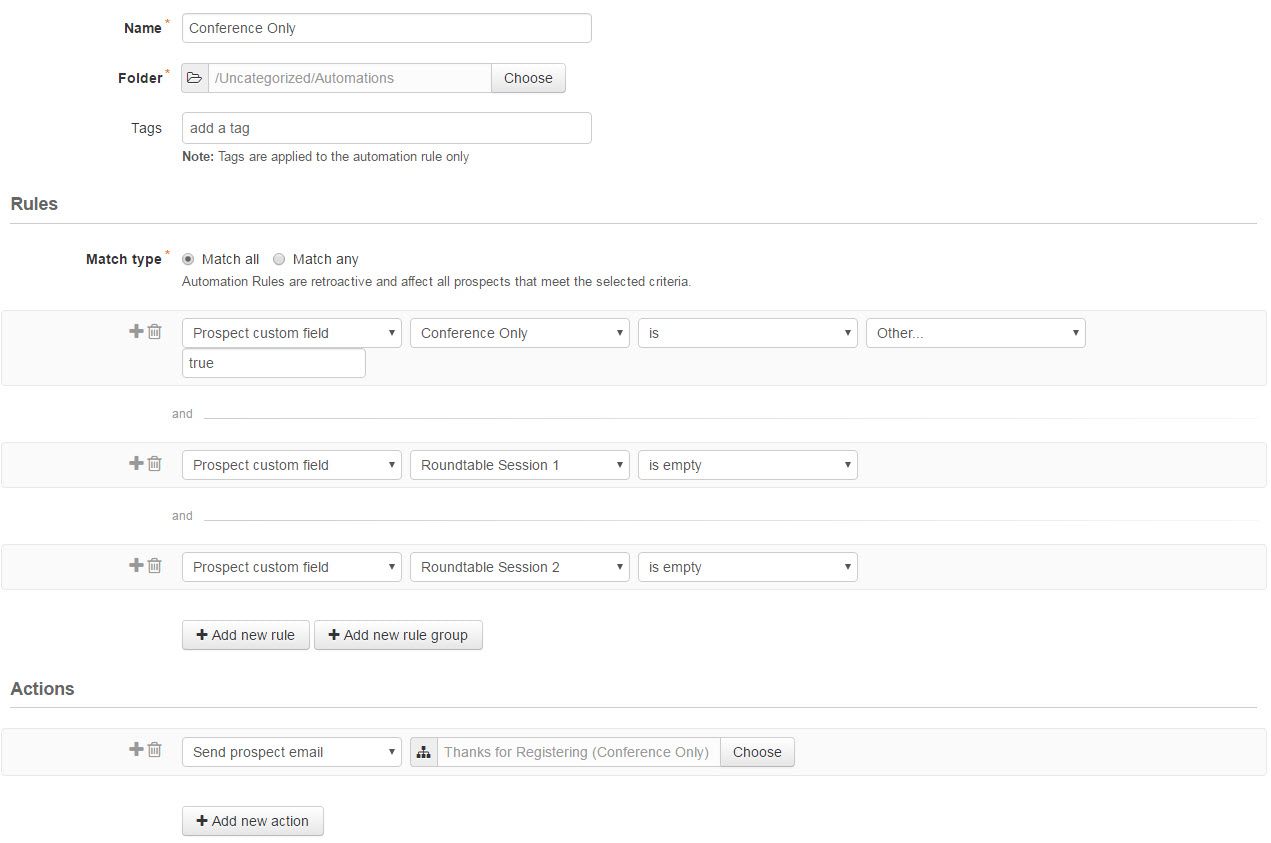
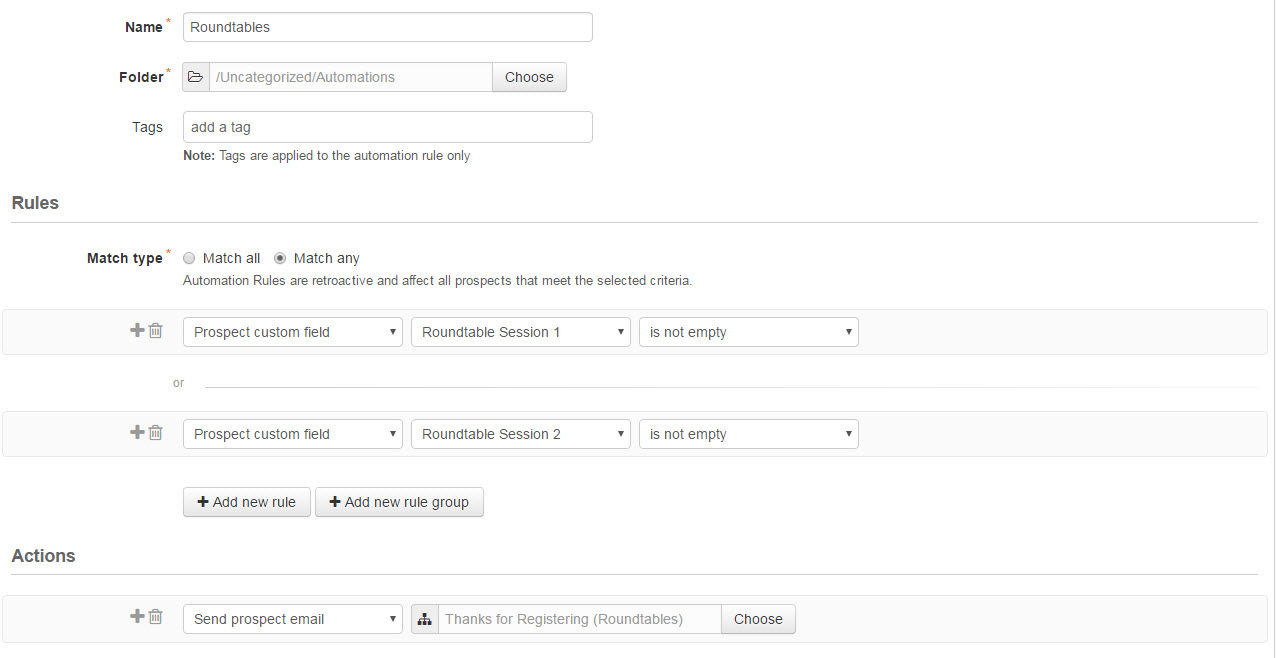
I created 2 ‘thanks for registering emails’ and set them up to be sent via an automation rule.
Conference Only: This email is sent out to everyone who didn’t select to participate in any of the roundtables.
Roundtables: This email is sent out to everyone who registered for at least one roundtable session.
Conference Only Email
The conference only email was pretty simple. It contained a thank you message along with calendar invites.
The email was sent using an automation rule that checks if “conference only” is true and if both roundtable fields are empty.
Roundtable Email
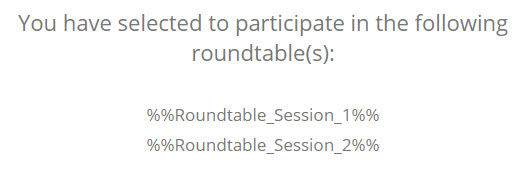
The roundtable email contains a thank you message as well as the name(s) of the roundtables the user has selected to attend. The names of the roundtables are dynamically added to the email using a variable tag.
The email was sent using an automation rule that checks if the roundtable 1 field is not empty OR the roundtable 2 field is not empty.
Building the Landing Page
Building the landing page was the difficult part. I didn’t want to include the roundtable names in a drop down menu in a form, so I came up with the idea to make the registration process like a shopping cart.
I used Bootstrap as my framework for the landing page and used Bootstrap Panels for a clean way to display the roundtable names and descriptions.
<div class="panel panel-default">
    <div class="panel-heading">
      <h3 class="panel-title"><span class="rountable-name">Session 1</span></h3>
    </div>
    <div class="panel-body">
      <div class="row">
        <div class="col-md-9">
          Pellentesque tempus aliquet nisi in sollicitudin. Aliquam tempor ligula vel mattis cursus. Cras lacus est, facilisis feugiat rhoncus ac, condimentum a ex. Aliquam elementum, nisi non dapibus dapibus, neque mi mattis libero, nec mattis tortor elit ut sapien. Donec nisi nulla, feugiat non dignissim aliquet, efficitur eget lorem. Proin id pellentesque ante.
        </div>
        <div class="col-md-3 btn-row">
            <a href="#" class="btn btn-register btn-select">Select</a>
        </div>
      </div>
    </div>
  </div>
Since there were 2 time slots for the roundtables, I wrapped each of the sections in a DIV with a class of first-session and second-session.
<div class="sessions first-session">
  <div class="panel panel-default">
    <div class="panel-heading">
      <h3 class="panel-title"><span class="rountable-name">Session 1</span></h3>
    </div>
    <div class="panel-body">
      <div class="row">
        <div class="col-md-9">
          Pellentesque tempus aliquet nisi in sollicitudin. Aliquam tempor ligula vel mattis cursus. Cras lacus est, facilisis feugiat rhoncus ac, condimentum a ex. Aliquam elementum, nisi non dapibus dapibus, neque mi mattis libero, nec mattis tortor elit ut sapien. Donec nisi nulla, feugiat non dignissim aliquet, efficitur eget lorem. Proin id pellentesque ante.
        </div>
        <div class="col-md-3 btn-row">
            <a href="#" class="btn btn-register btn-select">Select</a>
        </div>
      </div>

    </div>
  </div>
  <div class="panel panel-default">
    <div class="panel-heading">
      <h3 class="panel-title"><span class="rountable-name">Session 2</span></h3>
    </div>
    <div class="panel-body">
 	<div class="row">
        <div class="col-md-9">
     	Lorem ipsum dolor sit amet, consectetur adipiscing elit. Maecenas lacinia, dolor scelerisque commodo sodales, augue lectus luctus turpis, id pharetra mauris libero at urna. Vestibulum in magna aliquam, interdum diam eu, pretium odio. Curabitur a porta metus, eget porttitor nibh. Maecenas porta condimentum lacus, in bibendum augue euismod sit amet.
        </div>
        <div class="col-md-3 btn-row">
            <a href="#" class="btn btn-register btn-select">Select</a>
        </div>
      </div>

    </div>
  </div>
  <div class="panel panel-default">
    <div class="panel-heading">
      <h3 class="panel-title"><span class="rountable-name">Session 3</span></h3>
    </div>
    <div class="panel-body">
 	<div class="row">
        <div class="col-md-9">
          Phasellus nec neque scelerisque, semper odio a, fringilla leo. Sed cursus lectus non purus cursus tempus. Cras eu blandit lectus. Proin sodales justo et felis consectetur, sed ultrices nibh imperdiet. Vestibulum ante ipsum primis in faucibus orci luctus et ultrices posuere cubilia Curae; Sed aliquam congue feugiat. Nam elit orci, congue et maximus sed, commodo quis arcu. Suspendisse iaculis eros viverra consectetur pretium.
        </div>
        <div class="col-md-3 btn-row">
            <a href="#" class="btn btn-register btn-select">Select</a>
        </div>
      </div>

    </div>
  </div>
  <div class="panel panel-default">
    <div class="panel-heading">
      <h3 class="panel-title"><span class="rountable-name">Session 4</span></h3>
    </div>
    <div class="panel-body">
      <div class="row">
        <div class="col-md-9">
          Cras sapien leo, sodales vitae congue quis, semper ac ligula. Integer molestie fermentum suscipit. Cum sociis natoque penatibus et magnis dis parturient montes, nascetur ridiculus mus. Nulla odio ligula, aliquam eget leo eget, sollicitudin fringilla ante.
        </div>
        <div class="col-md-3 btn-row">
            <a href="#" class="btn btn-register btn-select">Select</a>
        </div>
      </div>
    </div>
  </div>
</div>
Sticking with the ‘add to shopping cart’ feel, I wanted to add a “your agenda” section to the bottom left corner of the page that populates based on the sessions you select. This can be done using my slide out lead generation form with a couple modifications.
Finally, I added the form to the bottom of the page, which uses a Pardot form handler and hidden fields for roundtable name and conference registration.
I created a new landing page in Account Engagement to host the registration page. All the CSS, JavaScript and Bootstrap files were also uploaded in Account Engagement to keep everything in one place.
<!DOCTYPE html PUBLIC "-//W3C//DTD HTML 4.0 Transitional//EN" "http://www.w3.org/TR/REC-html40/loose.dtd">
<html>
<head>
<meta charset="utf-8">
<meta content="IE=edge" http-equiv="X-UA-Compatible"><meta content="width=device-width, initial-scale=1" name="viewport">
<link rel="shortcut icon" href="https://jennamolby.com/wp-content/uploads/2015/10/favicon.ico" />
<!-- The above 3 meta tags *must* come first in the head; any other head content must come *after* these tags -->
<title>Pardot Event Registration Inspiration</title>
<!-- Bootstrap -->
<link href="bootstrap.min.css" rel="stylesheet">
<link href="pardot-registration-inspiration-styles.css" rel="stylesheet">
<!-- HTML5 shim and Respond.js for IE8 support of HTML5 elements and media queries --><!--[if lt IE 9]>
<script src="https://oss.maxcdn.com/html5shiv/3.7.2/html5shiv.min.js"></script>
<script src="https://oss.maxcdn.com/respond/1.4.2/respond.min.js"></script>
<![endif]-->
</head>
<body>
<div class="header">
<div class="container">
<div class="row">
<div class="col-sm-12 text-center">
Example Pardot Registration Page
</div>
</div>
</div>
</div>
<div class="container">
<div class="row">
<div class="col-md-9 centered-columns">
<h2> 9:00am - 10:00am</h2>
<div class="sessions first-session">
<div class="panel panel-default">
<div class="panel-heading">
<h3 class="panel-title"><span class="rountable-name">Session 1</span></h3>
</div>
<div class="panel-body">
<div class="row">
<div class="col-md-9">
Pellentesque tempus aliquet nisi in sollicitudin. Aliquam tempor ligula vel mattis cursus. Cras lacus est, facilisis feugiat rhoncus ac, condimentum a ex. Aliquam elementum, nisi non dapibus dapibus, neque mi mattis libero, nec mattis tortor elit ut sapien. Donec nisi nulla, feugiat non dignissim aliquet, efficitur eget lorem. Proin id pellentesque ante.
</div>
<div class="col-md-3 btn-row">
<a href="#" class="btn btn-register btn-select">Select</a>
</div>
</div>
</div>
</div>
<div class="panel panel-default">
<div class="panel-heading">
<h3 class="panel-title"><span class="rountable-name">Session 2</span></h3>
</div>
<div class="panel-body">
<div class="row">
<div class="col-md-9">
Lorem ipsum dolor sit amet, consectetur adipiscing elit. Maecenas lacinia, dolor scelerisque commodo sodales, augue lectus luctus turpis, id pharetra mauris libero at urna. Vestibulum in magna aliquam, interdum diam eu, pretium odio. Curabitur a porta metus, eget porttitor nibh. Maecenas porta condimentum lacus, in bibendum augue euismod sit amet.
</div>
<div class="col-md-3 btn-row">
<a href="#" class="btn btn-register btn-select">Select</a>
</div>
</div>
</div>
</div>
<div class="panel panel-default">
<div class="panel-heading">
<h3 class="panel-title"><span class="rountable-name">Session 3</span></h3>
</div>
<div class="panel-body">
<div class="row">
<div class="col-md-9">
Phasellus nec neque scelerisque, semper odio a, fringilla leo. Sed cursus lectus non purus cursus tempus. Cras eu blandit lectus. Proin sodales justo et felis consectetur, sed ultrices nibh imperdiet. Vestibulum ante ipsum primis in faucibus orci luctus et ultrices posuere cubilia Curae; Sed aliquam congue feugiat. Nam elit orci, congue et maximus sed, commodo quis arcu. Suspendisse iaculis eros viverra consectetur pretium.
</div>
<div class="col-md-3 btn-row">
<a href="#" class="btn btn-register btn-select">Select</a>
</div>
</div>
</div>
</div>
<div class="panel panel-default">
<div class="panel-heading">
<h3 class="panel-title"><span class="rountable-name">Session 4</span></h3>
</div>
<div class="panel-body">
<div class="row">
<div class="col-md-9">
Cras sapien leo, sodales vitae congue quis, semper ac ligula. Integer molestie fermentum suscipit. Cum sociis natoque penatibus et magnis dis parturient montes, nascetur ridiculus mus. Nulla odio ligula, aliquam eget leo eget, sollicitudin fringilla ante.
</div>
<div class="col-md-3 btn-row">
<a href="#" class="btn btn-register btn-select">Select</a>
</div>
</div>
</div>
</div>
</div>
<h2>11:00am - Noon</h2>
<div class="sessions second-session">
<div class="panel panel-default">
<div class="panel-heading">
<h3 class="panel-title"><span class="rountable-name">Session 5</span></h3>
</div>
<div class="panel-body">
<div class="row">
<div class="col-md-9">
Donec aliquet arcu at risus consequat mollis. Morbi suscipit ipsum commodo posuere faucibus. Mauris dui lacus, accumsan sed sollicitudin eget, placerat a velit.
</div>
<div class="col-md-3 btn-row">
<a href="#" class="btn btn-register btn-select">Select</a>
</div>
</div>
</div>
</div>
<div class="panel panel-default">
<div class="panel-heading">
<h3 class="panel-title">Session 6</h3>
</div>
<div class="panel-body">
<div class="row">
<div class="col-md-9">
Nam congue quam non elementum placerat. Vivamus egestas, ante sed imperdiet fermentum, tortor libero fermentum magna, nec bibendum mauris lacus vitae ante. Donec eu leo volutpat, consectetur libero eu, porttitor dui. Mauris nec ornare ligula. Morbi et massa viverra, malesuada velit id, faucibus metus. Duis consequat tincidunt blandit.
</div>
<div class="col-md-3 btn-row">
<a href="#" class="btn btn-register btn-select">Select</a>
</div>
</div>
</div>
</div>
<div class="panel panel-default">
<div class="panel-heading">
<h3 class="panel-title"><span class="rountable-name">Session 7</span></h3>
</div>
<div class="panel-body">
<div class="row">
<div class="col-md-9">
Sed turpis nisl, efficitur pharetra hendrerit ac, gravida id mi. Duis elementum velit nec risus aliquet congue et non dolor.
</div>
<div class="col-md-3 btn-row">
<a href="#" class="btn btn-register btn-select">Select</a>
</div>
</div>
</div>
</div>
</div>
<div class="slideout-form">
  <div class="slideoutform-header">
    <h3>Your Agenda</h3>
    <div class="close">X</div>
  </div>
  <div class="slideout-content">
      <div class="session-name-1"></div>
      <div class="session-name-2"></div>
      <div class="text-center">
      <a href="#registration" class="btn btn-white">Register</a>
      </div>
  </div>
</div>
<h2 style="background-color:#49c5c8;">Register</h2>
<div class="sessions conf" id="registration">
<div class="panel panel-default">
<form action="" method="post" id="regForm">
<div class="row">
<div class="col-sm-6">
<label>First Name <span class="required">*</span></label>
<input class="form-control" name="firstname" required/>
</div>
<div class="col-sm-6">
<label>Last Name <span class="required">*</span></label>
<input class="form-control" name="lastname" required/>
</div>
</div>
<div class="row">
<div class="col-sm-6">
<label>Email Address <span class="required">*</span></label>
<input class="form-control" name="email" required/>
</div>
<div class="col-sm-6">
<label>Company <span class="required">*</span></label>
<input class="form-control" name="company" required/>
</div>
</div>
<div class="row">
<div class="col-sm-6">
<label>Job Title <span class="required">*</span></label>
<input class="form-control" name="jobtitle" required/>
</div>
</div>
<div class="row">
<div class="col-md-12 optin-container">
<input type="checkbox" name="optin" /> Opt-in to receive communications from Sample Company including exclusive event invites, product and company updates and more
</div>
</div>
<input type="hidden" name="session1" />
<input type="hidden" name="session2" />
<input type="hidden" name="tractionforcereg" />
<div class="footer-reg text-center">
<input type="submit" class="btn btn-register btn-large" value="Register" />
</div>
<div class="required required-msg">
</div>
</form>
</div>
</div>
</div>
</div>
</div>
</div>
<script src="http://code.jquery.com/jquery-latest.min.js" type="text/javascript"></script>
<script src="pardot-registration-inspiration.js" type="text/javascript"></script>
</body>
</html>
Congratulations and welcome to Salesforce Marketing Cloud Account Engagement (Pardot) family! Not sure where to start? We promise it is not as scary as you think it might be. We have created this Pardot implementation plan and checklist to help get you started. After reviewing the official Pardot Implementation Guide, we created a project plan Google Sheet to keep track of tasks, notes, and documentation.
Get the Pardot Implementation Checklist Template
Look for the method you’ll use to open the Pardot implementation checklist template below. You’ll also find instructions for using the template.
Note: This is for a standard implementation and does not include any of the Lightning builders or B2B Marketing Analytics. Reach out to the team at Sercante for guidance with those implementations.
Google Users
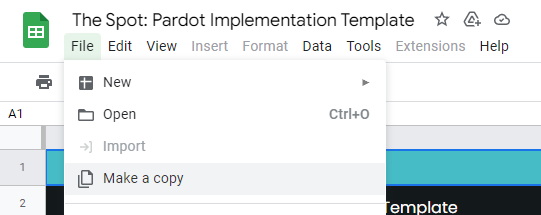
If you have a Google Account:Click here to open the template in your browser and make a copy. Navigate to File > Make a copy > Update the document name and save to your drive.
Microsoft Excel Users
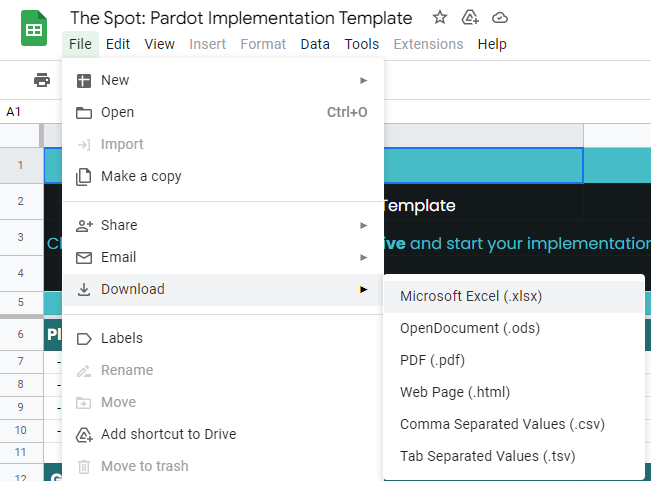
If you don’t have a Google account, you can download to an Excel file instead. To do that, open the template in your browser and make a copy. Navigate to File > Download > Microsoft Excel.
Using the template
We have organized the templates into 3 different tabs:
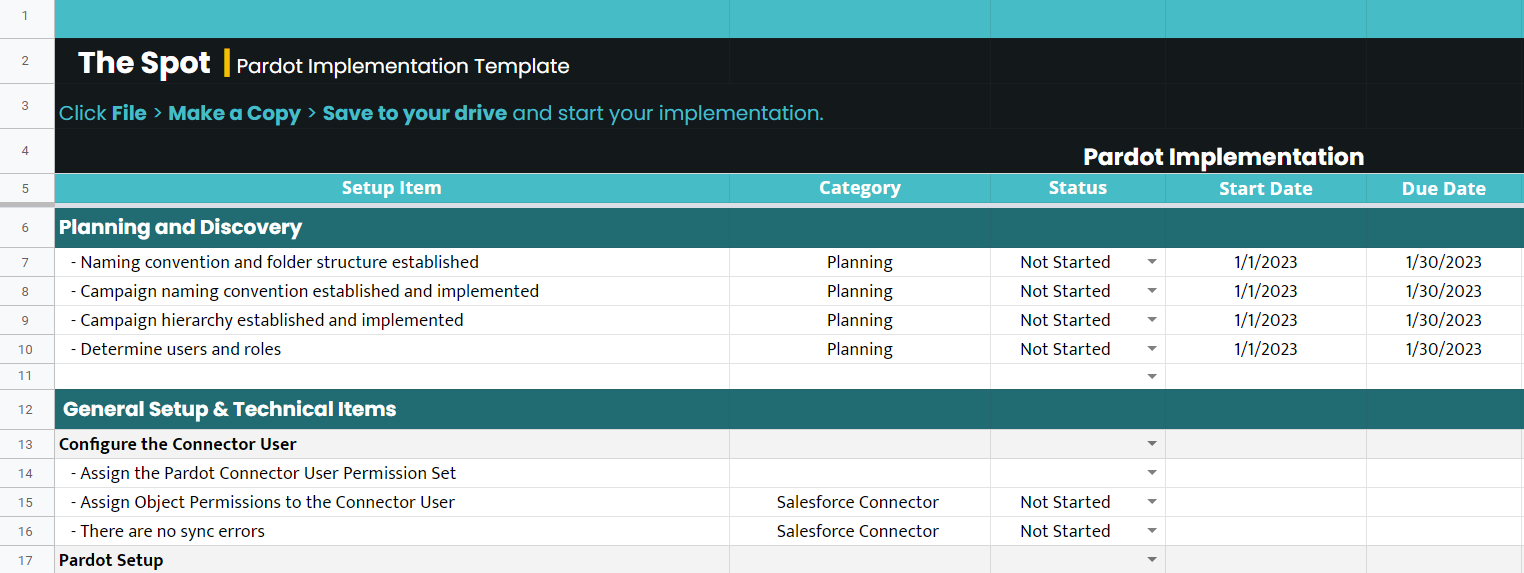
Tasks
Timeline
Key Documents
Task lists
The task list is broken into 5 sections: Planning, General Set up & Technical Items, Salesforce Connector, Marketing Assets, and Integrations. The setup tasks include all the tasks listed in the official Pardot Implementation Guide.
Timeline
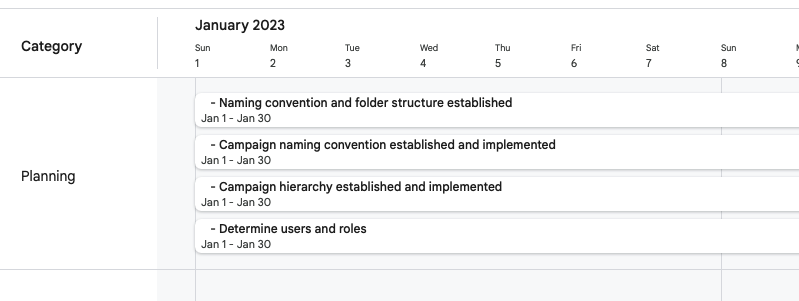
Sometimes it is good to see all the tasks visualized in a timeline, and you know someone is going to ask for it, so I added in a timeline tab just for that. Just update the start and due dates for your project and the timeline will also update.
Key Documents
There are lots of planning discussions that happen when implementing Pardot, so you will want to document final decisions and make sure that everyone can easily access the documentation.
For example, did you finalize your naming convention and folder structure? Make sure to put it in a document on a shared drive and add the link to this tab.
Hot Tip! The more documentation you create about processes the better. You never know when someone will ask for it and you can save yourself time later by documenting as you go.
Get Pardot Implementation Guidance
Still feeling overwhelmed with your implementation? Or have questions about Lightning builders or B2BMA setup? Don’t hesitate to reach out. The team at Sercante is here to help.
Pardot account audits: You know you need to do one, but somehow this daunting task keeps getting relegated to the bottom of your to-do list. With the new year on the horizon, do future-you a favor and carve out time soon to conduct an audit of your Marketing Cloud Account Engagement (Pardot) instance. You’ll feel better kicking off 2023 knowing your account is in order!
So where do you start? Audits can certainly be overwhelming, with long checklists of components and settings to review. But, a bit of reflection up front can help you identify and prioritize the areas to audit with the highest need or greatest potential to benefit your business.
Key questions to consider before a Pardot account audit
Make the most of your time by asking yourself these seven questions before diving into your Pardot account audit:
1. Are the essential building blocks in place to ensure Pardot is working properly?
This is square one — you’ll need to confirm the foundation of your account is set before moving forward. Yup, this means going through the Pardot Settings tab and checking that there are no surprises. Must-dos include your account limits, Salesforce connector, user set-up, and tracker domains.
This is also a good time to step back and think about the big picture: How is data moving in and out of Pardot and where are the weak spots? Besides checking your Salesforce sync settings, review your lead forms, import processes, opt-out processes and integrations to make sure the data is flowing as you intend and that there aren’t any issues causing downstream impacts.
2. What haven’t we checked in a while?
As much as we want to “set it and forget it,” even the best marketing automations need check-ups. Take a minute and list out the areas in Pardot you haven’t paid as much attention to recently. Common culprits could be:
During your audit, run through this list to ensure everything is running as you expect, and clean up whatever you can.
3. Where could a little work go a long way to fix something or improve efficiency?
We’ve all been there: You build a work-around or take on a manual process in order to get something done, then poof — it’s months later and you’re still doing it!
Now’s the time to figure out if there’s a better way that frees up your time and energy. This might mean addressing bigger issues that require multi-step solutions, but the upfront work now will pay off in the long run.
For your audit, prioritize figuring out ways that you can leverage automations to carry some of the load. Besides Pardot’s Automation Rules, explore these other key tools:
For help with any of these automations, feel free to reach out!
4. Does our marketing work align with best practices and industry standards?
When it comes to marketing practices, it can be helpful to compare yourself to others (within reason of course!). For example: Comparing your email engagement metrics and deliverability practices to industry standards can highlight areas that need improvement, like your template design, segmentation practices to engaged prospects, or personalization strategies.
Identifying the big-picture improvements needed to align with best practices will help you drill down on the specifics of what it will take to execute — and, as a result, which components in Pardot should be audited and updated to make it happen.
5. Can we showcase the ROI of our marketing efforts?
Connecting the dots between your marketing work and sales is truly the holy grail for marketing teams, but it can be tricky to get up and running.
With Pardot and Salesforce, you can unlock the marketing attribution magic through a combination of consistent processes and technical tools. Consider these questions and add related items to your audit checklist accordingly.
Are you using campaigns consistently to record and organize marketing initiatives?
If you’re using Campaign Influence reporting in Salesforce, does the attribution model fit your needs?
If you have more robust reporting and dashboard needs, could you benefit from using additional data integrations and/or B2B Marketing Analytics?
Getting a handle on where you are in the process of ROI reporting can crystalize your next steps. Making a commitment to shore up your marketing attribution once and for all in 2023 could pay dividends for you in the long run!
6. What’s coming up that will impact our Pardot system or usage?
Looking ahead, think about how new initiatives, goals or changes at your company will have trickle-down impacts on your Pardot account. What parts of your audit need to adapt accordingly?
Maybe your customer base is expanding and you’d benefit from setting up multiple Pardot Business Units. Or you’ll be creating lots of new automation programs and want to install a Pardot sandbox environment for testing. Maybe Einstein features in Pardot would alleviate some of your workload?
Conversely, try to identify some aspects of a typical account review to deprioritize or cross off your audit checklist entirely because of upcoming changes.
Are there unused automation, lists, files, or email or form templates that you can clean up, consolidate or archive?
Where could you establish naming conventions to better organize assets going forward?
Are you identifying junk prospects and recycling them regularly?
Addressing built-up clutter in your account will help you reset and clear the way for more strategic work!
Account audits can feel intimidating, but they’re worth it
With these considerations in mind, you’re ready to tackle an audit of your Pardot account that focuses on what matters most to your business.
If it still feels overwhelming or you want some support, please reach out for help — the Sercante team routinely conducts account audits, looking for ways clients can better leverage both the strategic and technical aspects of marketing with Pardot. Plus, you’ll get the advantage of an impartial expert reviewing your account with fresh eyes. Contact us about audit services or fill out this form to get started!