Category

Data Management

LinkedIn Lead Gen forms are definitely a favorite for those creating LinkedIn Ads, but what happens after people fill out the form? Ideally, you continue to market to LinkedIn leads by sending them your newsletters or adding them to a nurture program. If you are like me, you don’t want to manually export leads from LinkedIn and import them into your marketing platform. This is where Zapier comes in. 

Zapier is a user-friendly platform that allows you to automate a wide variety of workflows. With over 5,000 apps available, you can easily set up integrations without coding, including Marketing Cloud Account Engagement (f.k.a Pardot) and LinkedIn Ads. In this blog post, we’ll show you how you can automate the flow of leads from your LinkedIn Ads to Account Engagement in under five minutes.  

Deciding between two ways to automatically create Account Engagement leads from LinkedIn using Zapier

There are two ways that you can use Zapier to automatically create Account Engagement leads:

  1. Use Zapier Apps LinkedIn Ad to Webhook, which uses an Account Engagement form handler
  2. Use Zapier Apps Linkedin Ad to Pardot 

Here are the key things to consider when deciding which method to use:

API Call vs. Webhooks

The Pardot App within Zapier operates like an API call so there are some specific considerations:

  • API calls are not supported with basic editions of Account Engagement, so you can only use webhooks.
  • Records created by API calls will create a duplicate, so it would require additional steps in the Zap to prevent this if you’re using the Pardot App.

Duplicates from personal email addresses

  • Leads from LinkedIn Lead Gen forms usually come in with personal email addresses, so you might have duplicates with different email addresses. 
  • However, the webhook approach does allow for more control to ensure that a record is updated to reduce the risk of duplicates that can be created via API calls.

Webhooks Require a Zapier Paid Account

Account Engagement, LinkedIn Ads, and Webhook apps are considered Premium Apps and will require a paid Zapier account. Learn more about Zapier pricing here

LinkedIn Access Considerations

The LinkedIn Account used for the integration will need access to the LinkedIn Ads account, specifically the lead gen forms. 

Setup needed for each business unit

Have multiple Account Engagement business units? You will need to set up the Pardot integration for each business unit. 

Approach 1: Using Zapier Apps LinkedIn Ad to Webhook 

Step 1: Create Lead Gen Forms in LinkedIn Ads

First, you’ll create your LinkedIn Lead Gen form. To help make testing easier, submit a test submission. 

Step 2: Create Assets In Salesforce and Account Engagement

1. Create Salesforce Campaign 

  • Update campaign member status as needed

2. Create Form Handler

Next, you’ll create your form handler in Account Engagement

Settings to configure:

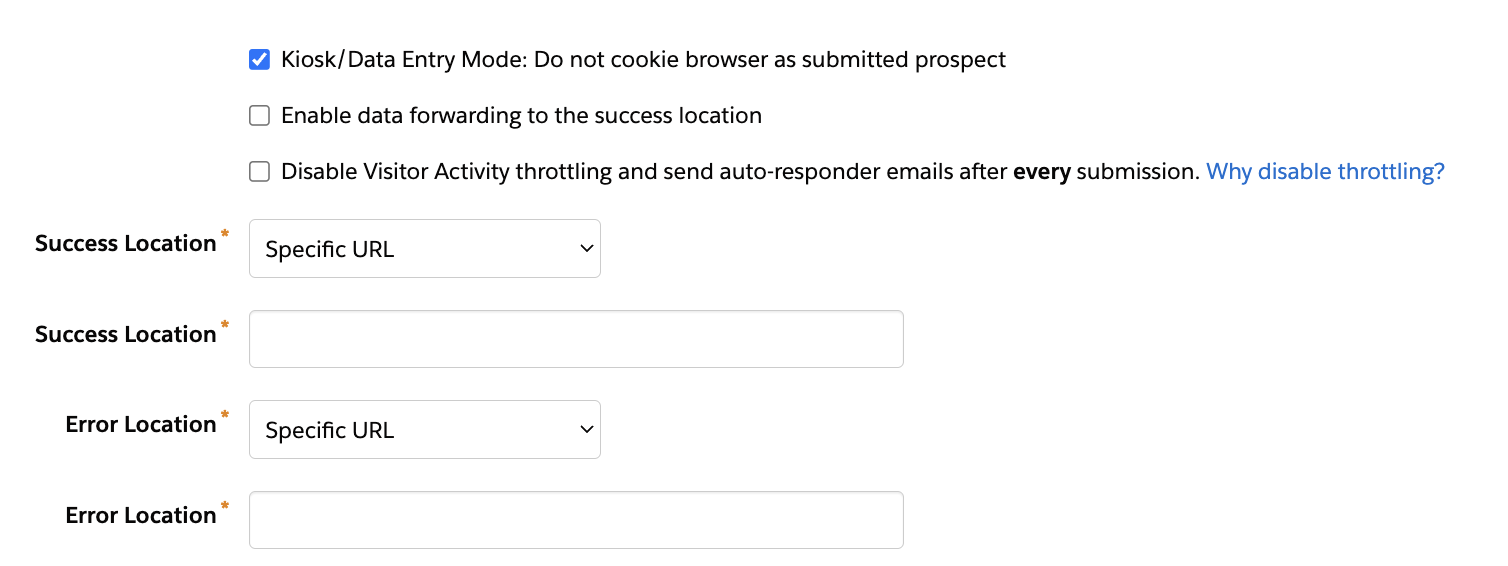
  1. Use Kiosk/Data Entry Mode –  so that we don’t cookie Zapier!
  2. Set Success and Error Locations
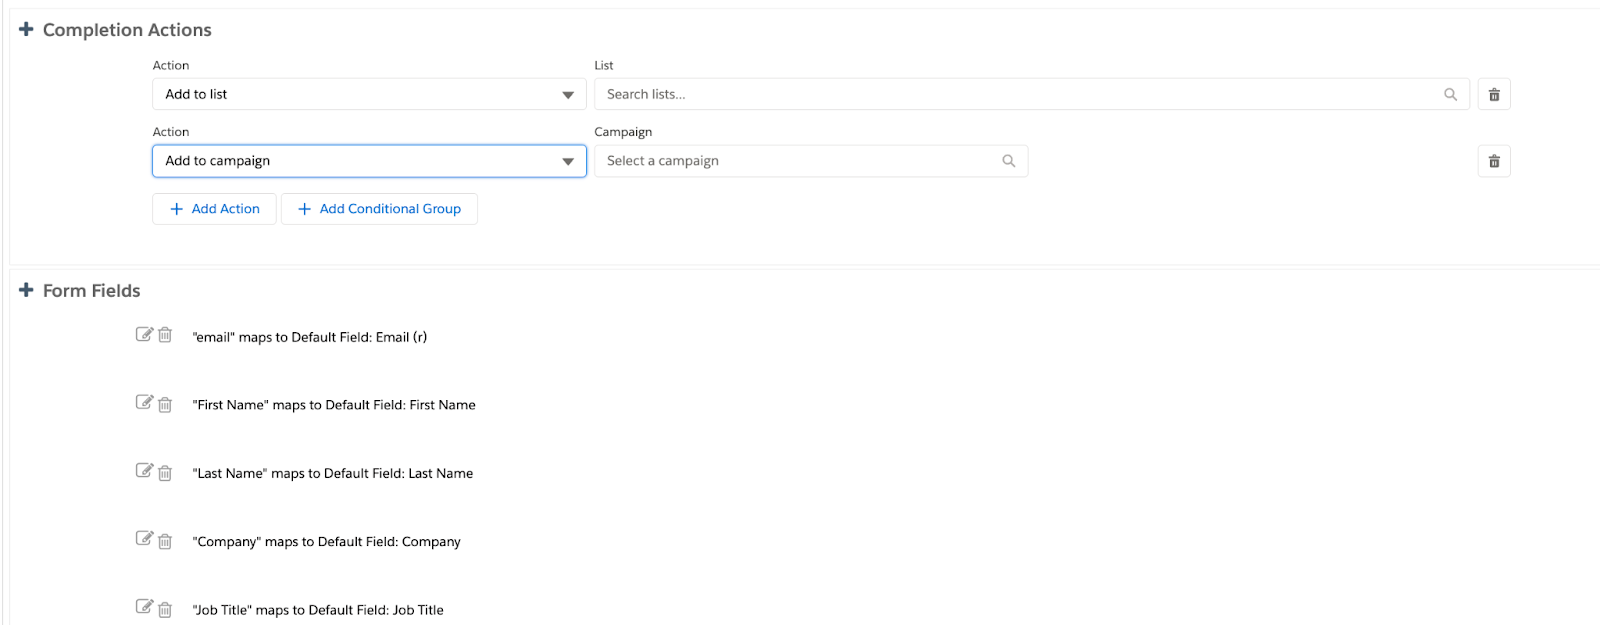
  • Add any completion actions needed, examples include:
    • Add to list
    • Add to campaign
    • Send Autoresponder email
  • Add/map fields
    • Only make the email address required

Step 3: Create a Zap in Zapier for LinkedIn Registration

Step 1: New Form Response in LinkedIn Lead Gen Forms

  1. Choose app & event as “LinkedIn Lead Gen Forms”
  2. Trigger event as “New Lead Gen Form Response Response”
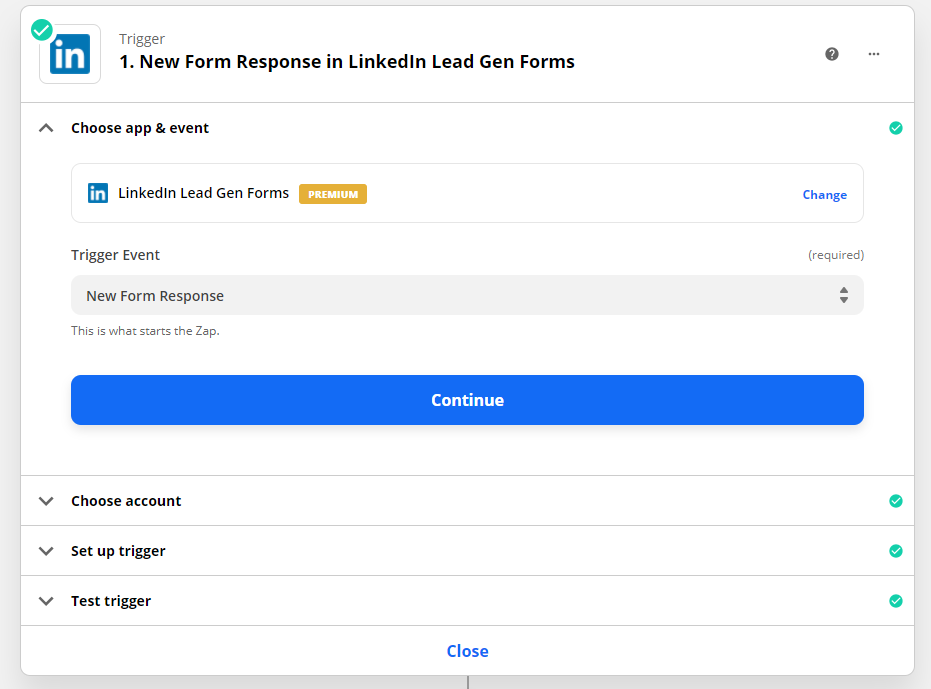
  1. Choose Account as “LinkedIn Lead Gen Forms”
  2. In the setup trigger, choose LinkedIn Account and select the respective Lead Gen Form
  3. Test trigger for this action by submitting a test lead on the LinkedIn Lead Gen form

Step 2: Action Post In Webhooks by Zapier

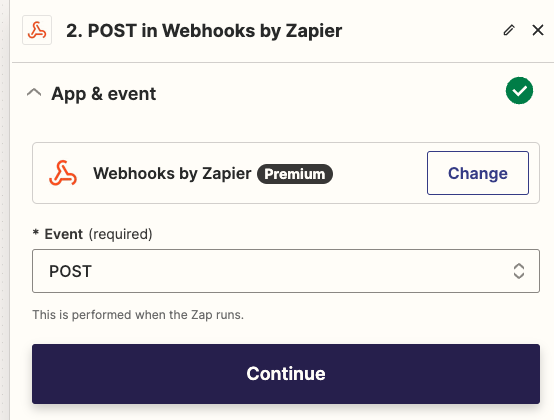
  1. Search “Webhooks by Zapier”  and select Action “Post” 
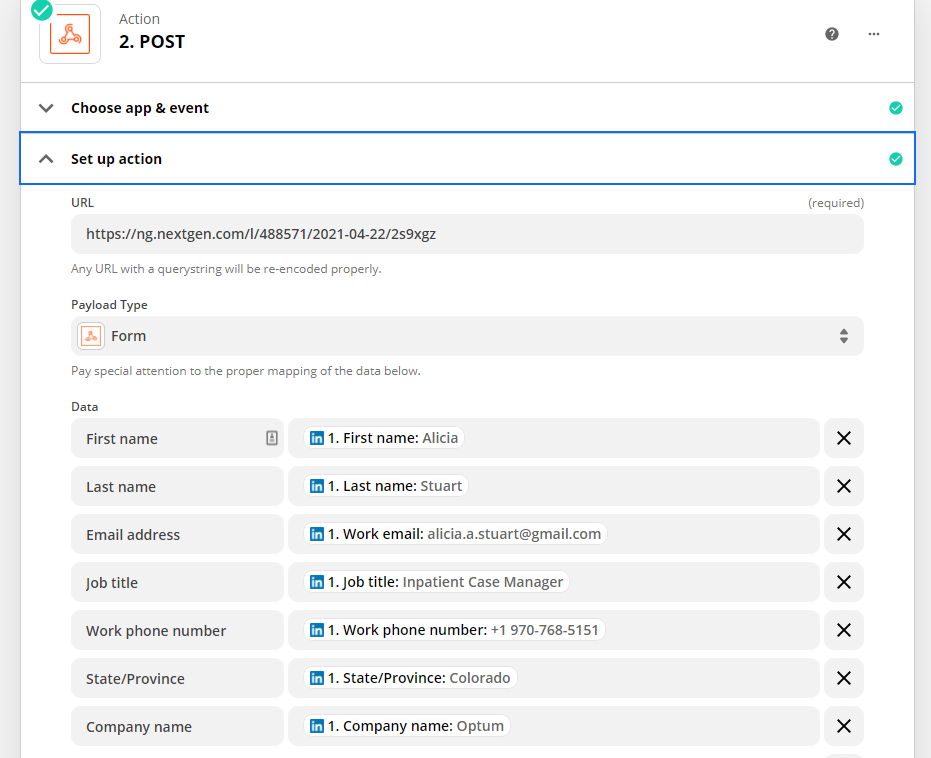
  1. Configure Actions by updating URL and mapping data fields with the External Field Name in the Form Handler. 
  1. Test the webhook

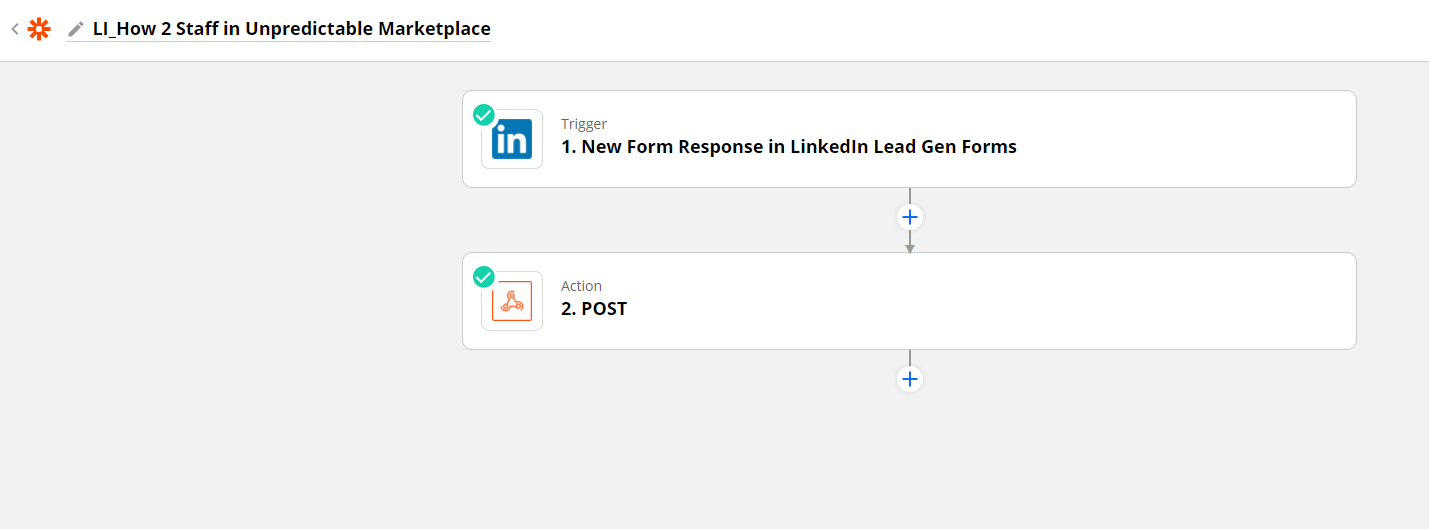
The final zap will look like this:
Step 3: Verify Submission in Account Engagement

Navigate to the form handler to confirm that the test submission appears

Step 4: Activate the Zap and LinkedIn Ad

Don’t forget to turn on your zap and your ad!

Approach 2: Using Zapier Apps Linkedin Ad to Pardot 

Step 1: Create Lead Gen Forms in LinkedIn Ads

Step 2: Create Assets In Salesforce and Account Engagement

  1. Create Salesforce Campaign 
  • Update campaign member status as needed
  1. Create List
  2. Create other marketing assets as needed, examples include:
    • Autoresponder email
    • Add list to any engagement studio programs 
  3. Create an Automation Rule

Rule: 

  • Prospect List is a member of the LinkedIn Lead Gen List

Actions – add as many as necessary but here are a few recommendations: 

  • Assign Prospect
  • Add to CRM Campaign xxx with “Responded” status
  • Adjust Prospect score 
  • Update any field values

Step 3: Create a Zap in Zapier for LinkedIn Registration

Step 1: New Form Response in LinkedIn Lead Gen Forms

  1. Choose app & event as “LinkedIn Lead Gen Forms”
  2. Trigger event as “New Lead Gen Form Response Response”
  3. Choose Account as “LinkedIn Lead Gen Forms”
  4. In the setup trigger, choose LinkedIn Account and select the respective Lead Gen Form
  5. Test trigger for this action by submitting a test lead on the LinkedIn Lead Gen form

Step 2: Find or Create Prospect in Pardot

  1. Choose app & event as “Pardot” and Action Event as “Find Prospect”
  2. Choose your Pardot account
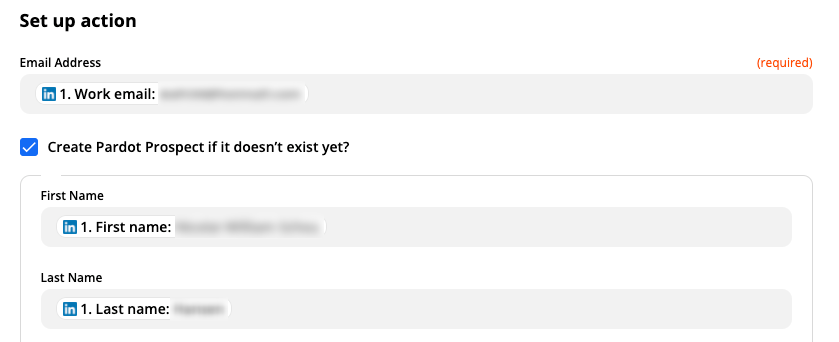
  3. Update set-up actions to map fields, and add all fields gathered in your lead gen form:
    • Email Address
    • First Name
    • Last Name
  4. Test your step

Step 3: Add Prospects to List in Pardot

  1. Choose app & event as “Pardot” and Action Event as “Add Prospect to List”
  2. Choose your Pardot account in the next step
  3. Update set-up action with the following fields
    • List – Choose the list you have created in Pardot for this campaign
    • Prospect – Update this field with Prospect ID
  4. Test your step

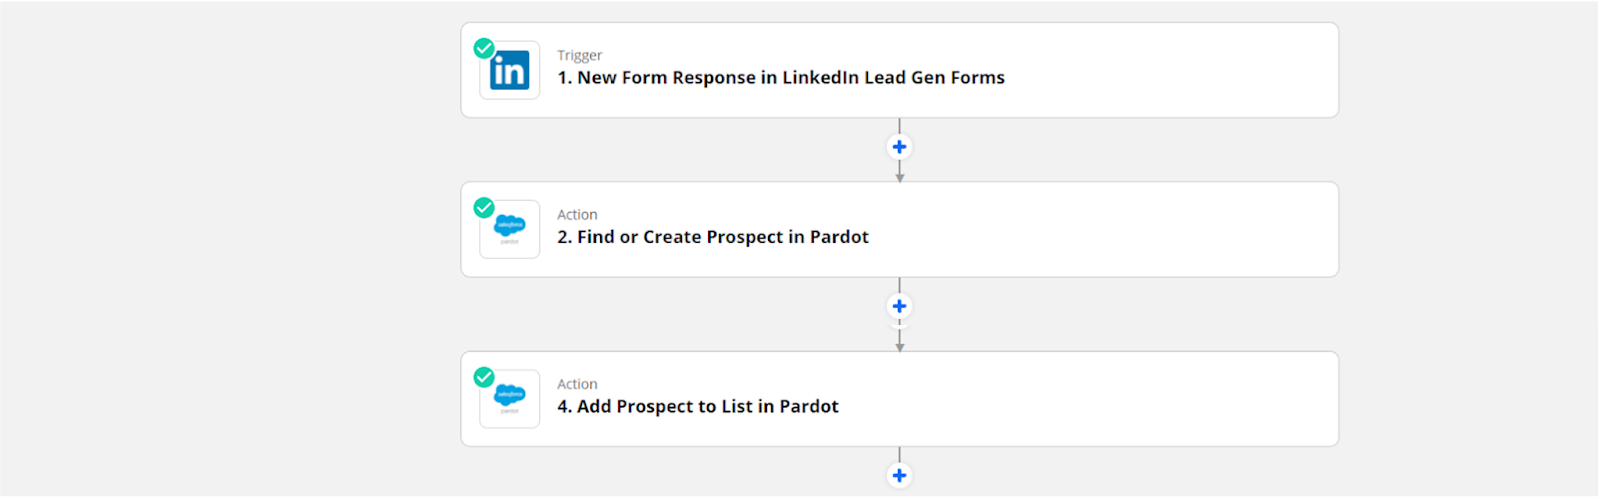
Your final zap will look like this: 
Step 4: Verify Submission in Account Engagement

Navigate to the list that you created and confirm the test lead submission is showing on the list. 

Step 5: Turn on the Zap and Automation Rule in Account Engagement

Once you have finished testing your Zap and know that the leads are flowing with the data as expected, you can turn on your Zap.  Avoid technical debt by pausing your automation rule when your LinkedIn Ad is no longer active. 

Now that Zapier is configured, what’s next?

Go forth and build more Zaps!  Remember, you have to create a new Zap for each LinkedIn Lead Gen form. 

Need help with other integrations? Reach out to the team at Sercante to get the conversation going.

We get it. With all the reporting tools out there it is hard to know which one is correct (or what a tool is named this week). In this blog, we will guide you with four questions to help you decide which Salesforce reporting tool fits best with your goals. 

 4 Things to help you choose which Salesforce reporting tool to go with

To help you figure out what Salesforce reporting tool fits your situation, we are comparing these tools:

  • CRM Analytics (Formerly Tableau CRM, Einstein CRM, and Wave)
  • Salesforce Marketing Cloud Intelligence (Formerly Datorama)
  • Tableau
  • Salesforce Reports
CRM Analytics (Formerly Tableau CRM, Einstein CRM, and Wave)Salesforce Marketing Cloud Intelligence (Formerly Datorama)TableauSalesforce Reports
Data InputSalesforce, Data Warehouses, Data Lakes, CSV150+ APIs out of the box and numerous flat file optionsOver 50 standard data connectors If it’s a field in Salesforce, it is available to report on
Audience: Where does it live, and who needs to see it?Lives in Analytics Studio or native in the app under the Analytics Tab. You can also embed it on Salesforce Lightning pages. Most users will access via platform.datorama.com. You can embed dashboards for anyone you want to view. Tableau has desktop and cloud-based versions, and you can buy licenses that include full data control or just view accessNatively in the Salesforce Org
Staffing considerations: Who will build it?This can be done by someone who has an intimate knowledge of salesforce schema and object relations. If you can create a custom report type, you can be proficient in CRMAMarketers can take Trailhead training and try to self-implement, or marketing agencies and consultants can also implementTableau is a widely adopted tool with knowledgeable users in many organizations, and there is a consultant marketplace on Tableau’s websiteWhoever has a permission set that gives access in Salesforce
Licensing CostsAdditional Cost by how many seats and licenses you purchase. Licensing is mainly determined by data row usage, with user licensing costs as wellLicensing is heavily user and enablement subscription-centric, with a pricing calculator found hereComes out of the box with your Salesforce Edition. Wouldn’t count toward data storage, but they do have configuration limits

Data input

“Where is my data coming from, and how should I harmonize it?”

CRM Analytics

When it comes to CRM Analytics… it is all about Salesforce data. Think of it like Salesforce reports on steroids. If it is in Salesforce, you can easily pull it into CRM Analytics. That doesn’t mean there aren’t connectors for additional insight, (Hello Data Cloud!), but generally are limited to data lakes and warehouses. 

Unlike Salesforce reporting, which imposes significant restrictions on the data sources (objects) you can include in a single report, CRM Analytics overcomes this limitation and lets you get pretty creative with joins. The downside is that you have to know your data really well so when you are joining you are confident what you report on is accurate.

Marketing Cloud Intelligence

When it comes to Marketing Cloud Intelligence… this is where Marketing Cloud Intelligence shines. If you have numerous marketing sources you need to report on — for instance, site data from Google Analytics, CRM data from Salesforce, and engagement data from Google AdWords — this is a marketer’s delight in terms of tools to work with.

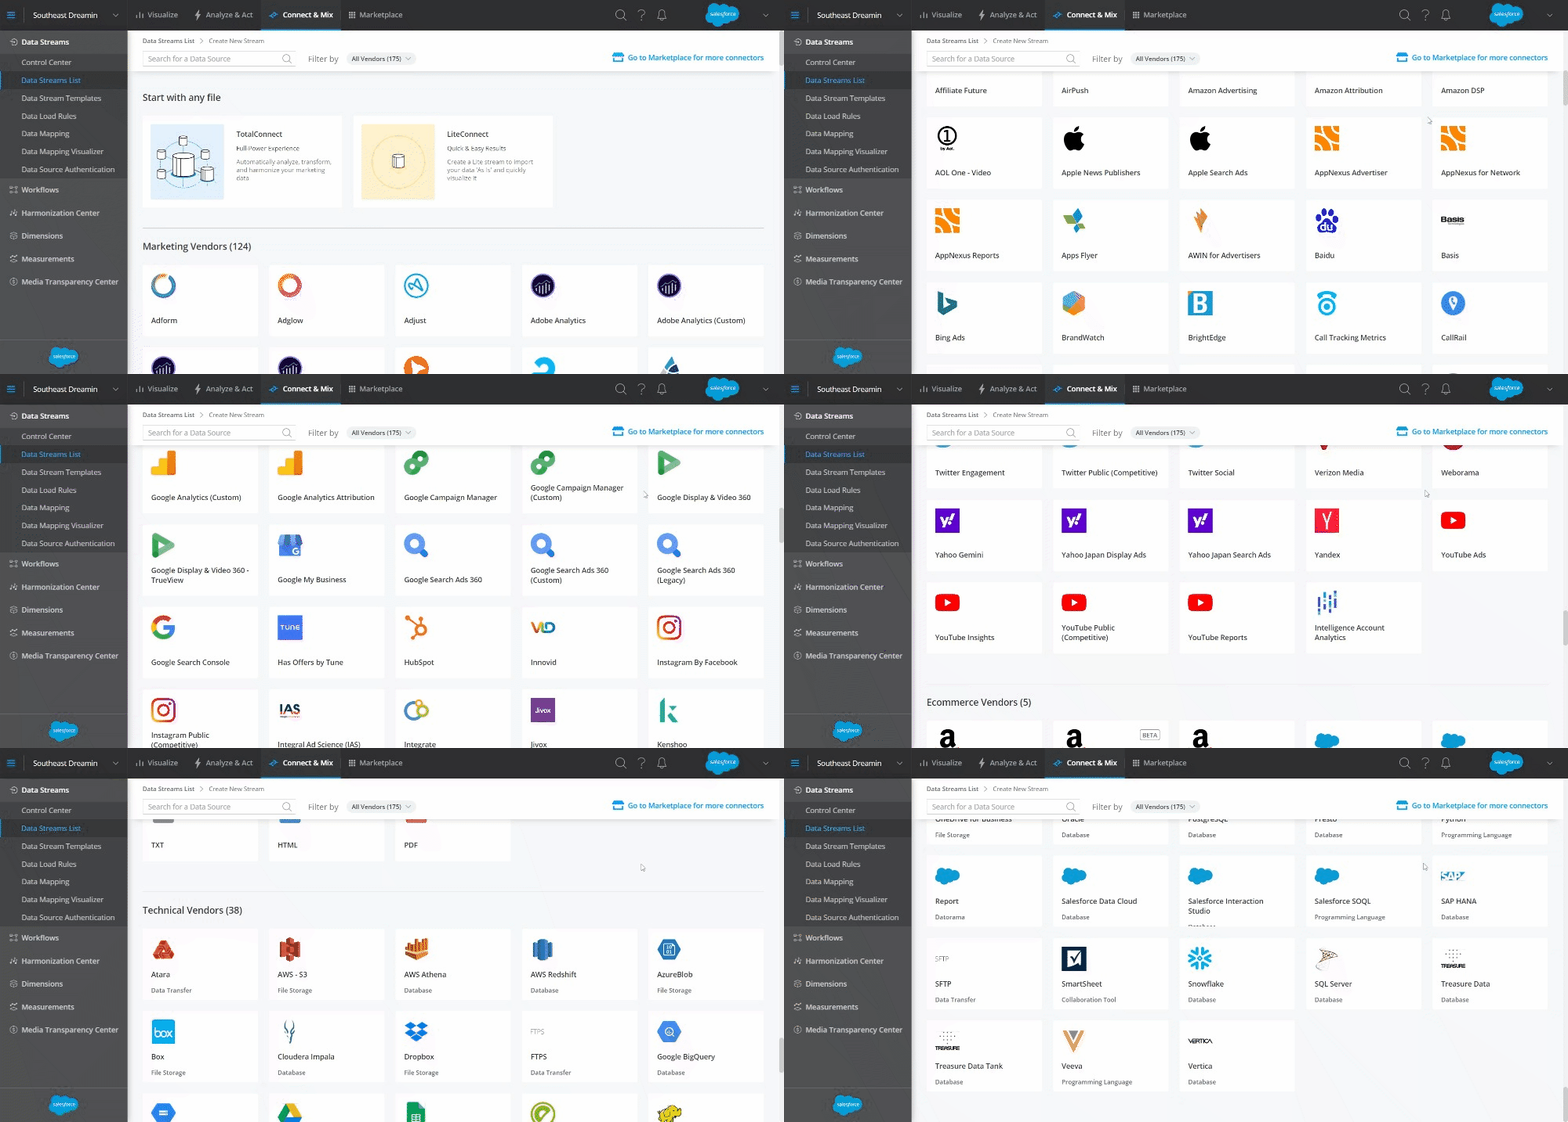
You can see the breadth of out-of-the-box marketing-centric connectors below — from Facebook, Adobe Analytics, or any other tool you have credentials to as simply as logging in, or simply uploading any data file you can imagine using the TotalConnect function. Intelligence also has a set of recommended data models for each type of connector with variation allowed upon ingestion and after the fact as well.

Tableau

When it comes to Tableau… you can find a holistic source list here (including numerous Salesforce connectors, among them Marketing Cloud Intelligence). Like Intelligence, you can upload raw files to Tableau and visualize the data accordingly with flexibility.

There are no standard data models, however, so you will need to set these up upon ingestion for your data sources (they will often mirror source data models).

Salesforce Reports

When it comes to Salesforce Reports… The adage “if it’s not in Salesforce it doesn’t count” is a phrase in the ecosystem for a reason!

Whatever data is physically available in Salesforce, generally a standard or custom Salesforce report can see it. This one is pretty easy and probably the piece you are most comfortable with, but don’t count it out.

Sometimes you need something quick and visible to a multitude of people. Let’s just say… if it was a horse, its name would be Ole Faithful. There is no limitation on company size per se, but be cognizant of data storage limits, data fatigue, and how clean that data is in your Salesforce org.

Final Thoughts 

  • If you are an Enterprise customer, really think through different departments that need analytics and if there are data row limits for your products. Processing power can mean all the world when trying to load a report that takes 20 minutes. 
  • What are you already paying for? There might be a way to reach your goal without purchasing an additional tool- this can help guide you to what your pain points are and to decide on a new tool if necessary.

Audience

Where does this report/dashboard live, and who needs to see it?

CRM Analytics

When it comes to CRMA… there are two answers. Most people view this in Analytics Studio,  which opens a new browser window when you click on it from the app launcher in Salesforce. However, you can have a tab right in your Salesforce app that points to Analytics or embed the dashboard on objects in Salesforce. The caveat is that to view those reports you would need a license and permission set.

A great silver lining is that you can give the correct permissions to users even where they cannot edit or mess with anything just like you can in Salesforce. Based on the cost, that it requires licenses could limit who in your organization can engage with those dashboards. Another silver lining is that you can always download the dashboard as an image and include it in presentations or post in chatter.

Marketing Cloud Intelligence

When it comes to Marketing Cloud Intelligence… You need credentials to get into the Intelligence platform, and that can come in the form of admins (who can see everything and upload new data sets), power users (who can do reports and dashboard maintenance but not update data sources), and viewers who can, to certainly much surprise, view dashboards. You can also freely send out embedded versions of dashboard pages or activate reports to send to tools like Google Drive, Slack, or email regardless of platform access.

Tableau

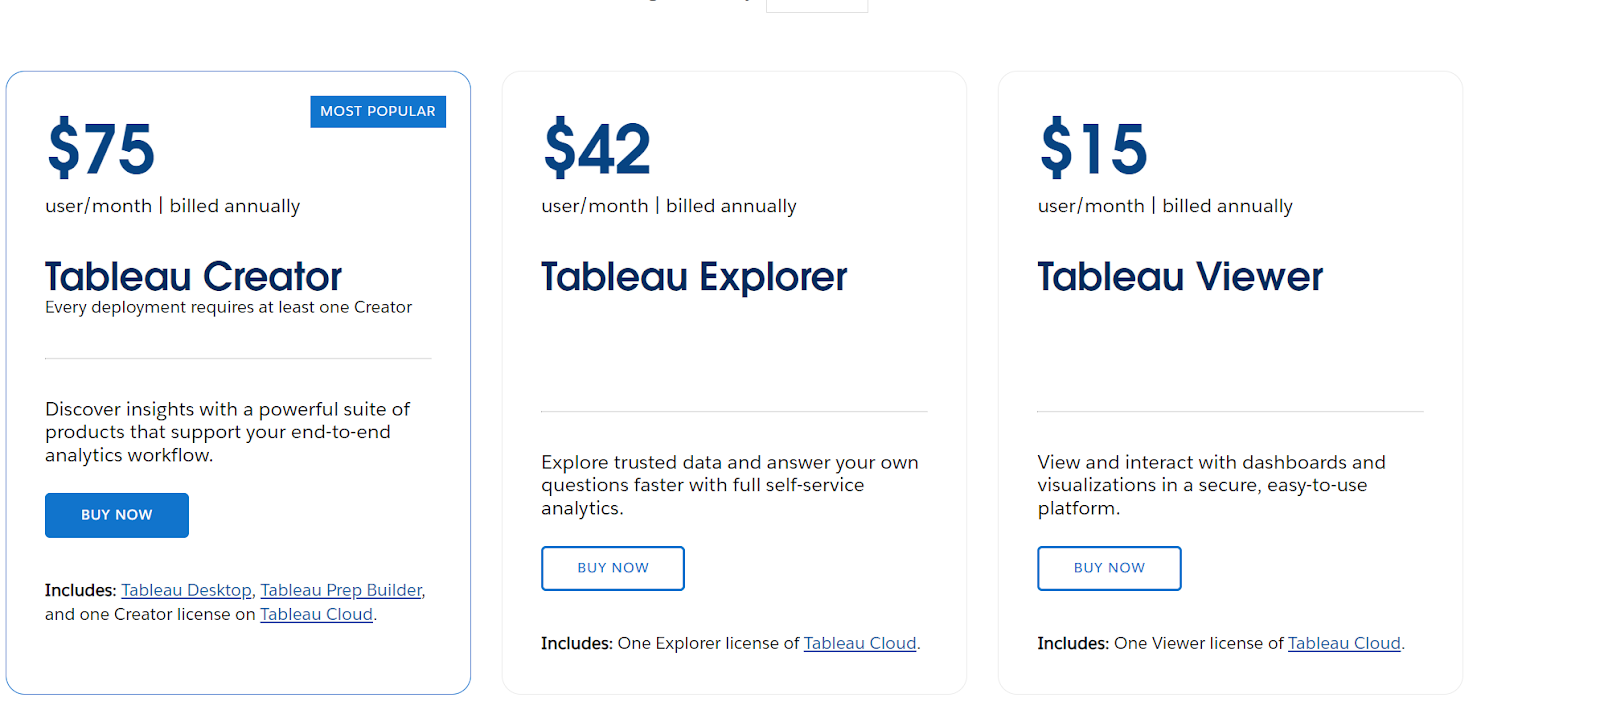
When it comes to Tableau… Tableau has numerous views and versions of the tool. There is a desktop version of the tool as well as web versions that allow users to freely access data views as they would like. Recently, Salesforce has allowed users to embed Tableau dashboards into Salesforce Lightning pages as a simple way to broaden their viewer base. Otherwise, you will be paying for different types of licenses in the form of Creators, Explorers, and Viewers.

Salesforce Reports

When it comes to Salesforce Reports…Locking down sensitive data is really easy in Salesforce and a great way to make sure you are being cognizant of data security internally. On the opposite end, Salesforce reports also let you be very open and transparent across your organization leading to the breaking down of silos.  Whether you need to get super granular for one individual or macro for company reporting, Salesforce reports can get the job done for your internal teams. 

Final Thoughts

  • Some tools can host an online dashboard through a URL that your customers can see and engage with. (Great for certain industries like the public sector). 
  • A lot of these tools are integrating or have integrated with Slack. Be aware of any gotchas or limitations if that is a priority.
  • Breaking down of silos can really be achieved with most of these tools. Just try and meet your audience where they live day to day. Make it easily accessible for them.

Staffing considerations 

Who will build it? What do people on your team know how to use?

CRM Analytics

When it comes to CRMA… This is easy to learn if you have Salesforce experience. The interface is very user-friendly and once you get over the initial learning curve you can move pretty quickly. 

But being transparent, if you haven’t really had experience with building report types on Salesforce or how objects interact in Salesforce it might be a challenge. There are also coding with SAQL and JSON that add an additional layer of flexibility and creativity that isn’t required, but really helpful. 

Generally, you want someone who has a few years of Salesforce Report building experience or SQL/ JSON experience/ data modeling. To gain experience, there are great Trailhead Resources as well as getting your Salesforce Admin Certification to help get you started.

Marketing Cloud Intelligence

When it comes to Marketing Cloud Intelligence… There was previously a set of free certifications, but those have transitioned into Trailhead learning modules, found here. The tool is based on a very user-friendly UI for modeling and building out views of your data is relatively easy to learn, and is made even easier by the access to standard API connections. 

This tool is also used heavily in marketing agencies and well known for marketing data. Some Salesforce Marketing Cloud users may also be familiar with Intelligence Reports for Engagement, which has some light versions of the full-fledged Intelligence platform’s features.

Tableau

When it comes to Tableau… Tableau is one of the most widely adopted visualization tools on the market right now. While the back-end processes may be a bit of a deep dive for newer users, familiarity with data mapping and formula creation in other tools will go a long way.  You can also get certified or find Tableau knowledgeable on Tableau’s certification page at https://www.tableau.com/learn/certification.

Salesforce Reports

When it comes to Salesforce Reports… Salesforce reporting and who has access to build is dependent on permission sets. This means you can give the ability to users as you, the admin, see fit. The ability to create custom report types is also customizable through a permission set but should be thought of as to who would best serve to manage because that can get out of hand. (Too many cooks in the kitchen if you catch our drift).

Final Thoughts:

  • Who is going to build it might not be who is going to use it. Can you imagine your manager trying to piece together a Tableau report? Let’s let them spend time on other things :] 

Licensing costs for users and data 

CRM Analytics

When it comes to CRMA… CRM Analytics is generally an additional cost for licensing. However, some clouds have app templates in Analytics Studio that give you a degree of access. Be on the lookout for tools that have app templates (B2B Marketing Analytics) or can be added on at an additional cost (Sales Cloud Analytics). 

Another thing to note, you aren’t charged for creating dashboards, transformations, or filtering, but your org has a limit on how much data is being processed called a data row limit (basically how much data you bring in). Just something to keep an eye on home data you are bringing in.

Get the pricing list here

Marketing Cloud Intelligence

When it comes to Marketing Cloud Intelligence… You can read the full pricing breakdown here-the main difference between these options is best captured in row usage (though users also scale according to package), which is best determined by the breadth and depth of the data you are pulling (for instance, keyword level data across ten sources will be more row-heavy than campaign and media buy data across four or five sources). 

Tableau

When it comes to Tableau… You can find the pricing here, which breaks down on a user-by-user basis depending on the type of user license, all of which come with different features and permissions (ranging from viewer-level permissions to interact with already built dashboards to Tableau Creators, who have the full tableau suite of features available to them). There is even a pricing calculator on Tableau’s website if you want to get a clear sense of what it would look like for your organization.

Salesforce Reports

When it comes to Salesforce Reports… Thankfully this is fairly easy! Reports and dashboards are considered metadata and are native out of the box with your Salesforce edition and wouldn’t count toward data storage. They do have configuration limits that you might want to consider when looking at your Salesforce Licensing and Cost. 

No wrong answers for Salesforce reporting tools 

In conclusion, there isn’t a wrong answer when it comes to which reporting tool to use. Many of them overlap and have similar functionality. But to make heads or tails of which reporting tool fits your goals best, you can start with these 4 simple questions:

  1. Data input. “Where is my data coming from and how should I harmonize it?”
  2. Audience. Where does this report/dashboard live, and who needs to see it?
  3. Staffing considerations. Who will build it? What do people on your team know how to use?
  4. Cost of use. What are Licensing costs for users and data?

We hope that the tidbits we’ve given in service of these questions are helpful, and welcome you to reach out to our team if you have any further questions on these topics or other reporting tool questions.  

Keep it going

Here are a few resources to get you started as you figure out which reporting tool works best for you and what it takes to manage those tools.

Marketing Cloud Intelligence (formerly known, and forever in my heart, as Datorama) is a deep platform for marketers who have Salesforce in their tech stack. It’s a robust tool for optimizing data across various channels, enabling you to track spend, engagement, and conversion data, among other options. If you’ve landed on this page, I assume that you already have a working knowledge of the Intelligence platform. Now, let’s take your skills to the next level with insights you didn’t even know you needed to unlock greater insights through Intelligence formulas. 

We also recommend you check out this blog post to understand how you can get more from your Intelligence implementation through an audit.

Let’s dive in.

What’s on the Horizon?

In this blog post, we’re going beyond the basics of your standard Trailhead module. Our journey will uncover hidden Intelligence formula secrets in the following areas:

  • Formula Syntax with JavaScript
  • Parsing Dates
  • Referencing CSV/Data Model Fields and When to Use Each Syntax
  • Formula Fears – Goodbye!

Intelligence Formula Syntax with JavaScript

Let’s start on some behind-the-scenes basics to give everyone a little bit more working knowledge, and then we’ll hit some deep cuts.

You’ve probably wondered what governs the formulas in the Intelligence platform that somehow you can write Excel-esque statements but also do JavaScript work (more on this in a moment).  Basically, the platform was programmed to contain Excel-like formulas while also allowing for MVEL, a Java-based language, to do some variations of formula work that can work a little differently in processing and possibility than Excel formulas. 

You can read more of an overview here directly from Salesforce on the governance of formulas and the basics to fiddle with, and below you’ll get my deeper cuts that don’t really get elaborated on anywhere I can find, officially. 

The Writer’s Strike did not affect this (Java) Script 

There are two common experiences I’ve had for the last five years when it comes to if statements:

  1. Someone implemented the platform and used JavaScript language, and no one still on the team understands how to read or manipulate the formula.
  2. Someone made an unruly Excel-like IF(condition, true, false) statement and it’s become unwieldy.

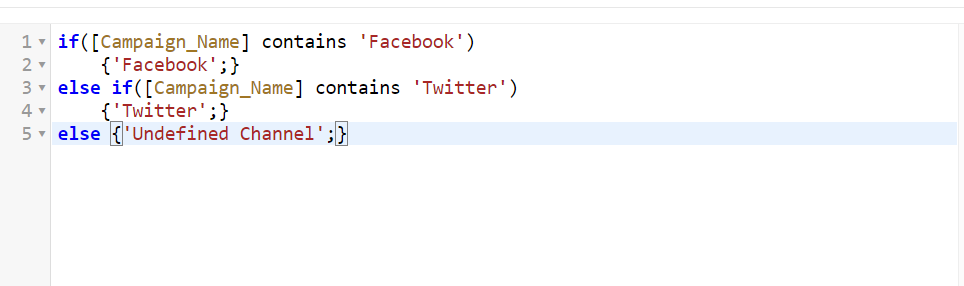
Luckily, I have your fix, and I’ll give a brief why on this too, beyond the notes above — I want to introduce everyone to using lowercase ‘ifs.’ Let’s take the below-calculated dimension (there would be no difference if this was setup in mapping of a data stream, to be clear).

  1. We define our first if statement — in a lowercase if context, you just do if() for the first line. Unlike in EXCEL IFs (henceforth capital IFs), you do not need to define a false condition, just a true condition (in this case, if the campaign name contains ‘Facebook’). 
  2. If our first condition is true, ‘Facebook’ will be the value returned, as defined by line 2. This is defined by the squiggly brackets {} and the defined value is ended with a semicolon {‘Facebook;’}

*This is an exciting performance element that adds up across large statements, and especially if the value is in a calculated field, which loads in real time, not before a page is loaded. If the statement finds a true match, it doesn’t run through every line of the code, it just stops and computes the next value. An uppercase IF statement, on the other hand, would check through every true/false possibility and then load the next row, which en masse could make a performance difference. 

  1. Else if defines some other condition to check for specifically. If you wanted a simple true/false, you could skip straight to the else statement on line five. But for example’s sake, we will assume there’s an else if. This is effectively how you can nest ifs. As noted, the platform stops checking as soon as it hits a true value, so you want to be mindful that you stack this accordingly in your checking if multiple conditions could be true.
  2. Once again, you return a value if true on line 4, no variation in formatting to the first true value.
  3. Finally, we close by doing a return value with the word “else”, indicating for all other conditions we close off here.

This is about as far as you need to know for JavaScript usage in Intelligence. But if you’re making deeply complex conditional formatting, this will hopefully make the process much cleaner and decipherable for you!

Parsing Parsedates

Magic letters you should write down, and yes this probably looks nonsensical before my description, but roll with it: “EEE MMM dd hh:mm:ss zzz yyyy

This is your fix to one of two likely parsedate situations I have seen regularly. It’s a string that dates frequently get passed into Intelligence as, and you inexplicably get a “cannot parse data” error in your mapping. This is infuriating. The formula in full that you are probably looking for is PARSEDATE(csv[insert field name here], EEE MMM dd hh:mm:ss zzz yyyy”). 

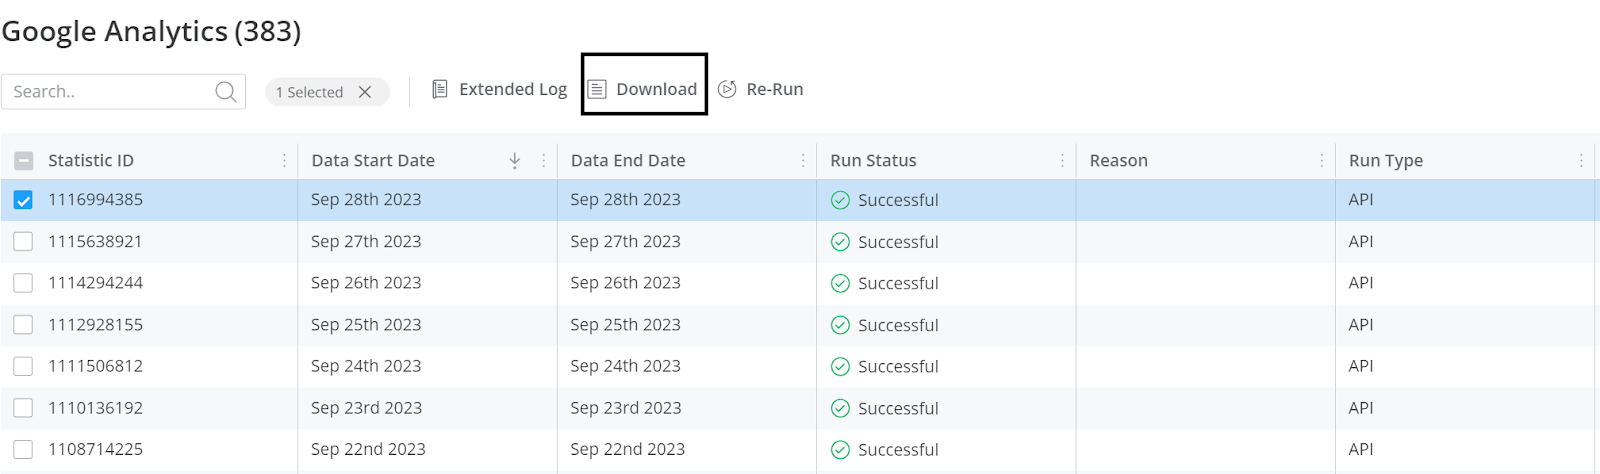
I’ll also note here that this is likely what is being pushed into the platform, even if you see something different in your Excel file/csv file from an Intelligence log (highlighted below from the data streams list in Connect & Mix, in case you need guidance on how to find your log files). You should, anytime you get this error, open your log files using a note program (Sublime Text was my go-to for years as a Windows user for bigger files, though for most people programs like notepad will work just fine). Even if not the above format, you can see definitively (with your columns instead separated and broken out by commas, hence the term csv, comma-separated values) what format your dates come in as (and the magic of a program like Excel to just know how a human reads this data cleanly).

There’s also an error I’ve gotten numerous times in platform and have helped people with but have not been unfortunate enough to encounter recently myself, so I am approximating here with a known fix instead. This happens entirely in calculated dimensions, and it effectively amounts to “Unparseable date: 1234”. This will fully stop you from saving a calculated dimension and it’s infuriating. My fix:

At the top of your formula, set a condition: if([insert field here, likely day but whatever the error tells you] == 1234 ) 

{‘error’}

else if… and continue on with your calculated dimension as planned

*note: if this does not work, you may also want to try “1234” instead of 1234, as a string of text instead of as a number, depending how the platform is reading the problematic value.  

csv verses Dat

Through the course of the above pieces of guidance, you may have noticed something: in my calculated if example, there were yellow highlighted fields simply called “Campaign_Name,” and in my examples referring to mapping, I surrounded fields with the language of “csv[field name]”. Why would I do that to you (the answer is not that I am cruel and seek to confuse you further as I write this blog, I promise)?!?! Well, it’s because there are three variations of referencing fields in Intelligence.

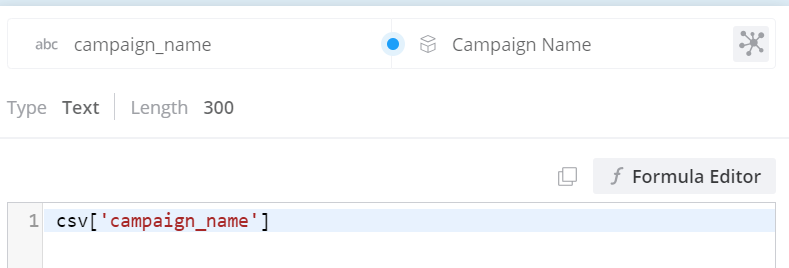
  1. When you map data, the csv syntax is needed to establish we expect a column from the inbound file. Even if you use Excel format, tsvs, pdfs, etc., this context will always be referred to as csv in your mapping formulas to establish a recurring column. Commonly this looks like the below, and is probably not something you’ve thought about a lot.
  2. So you may be wondering, if this is so commonplace, why even explain it? Surely the easy explanation is that csv appears in mapping, and the highlighted field appears in calculated dimensions. Well, kind of, yes. There’s a twist coming below, but yes in calculated dimensions, because you are operating outside of a data stream and inclusive of your whole workspace, you get the highlighted yellow names, showcased again below, to indicate this is a field in the platform.
  3. It’s important to understand those two variations because the third is a marriage of them: referencing data stream fields, not source file columns, in data stream mapping. I have very rarely seen any use of this outside of Vlookups, but for that case alone I’ll highlight what this does: it notes that a value is meant to reference an already existing data point in platform. In the context of a vlookup below, you can see the reason for differentiating these items. 

We have a csv field we reference at every ingestion of data, which we then use to look into first our campaign advertiser data already in the platform, and return us the associated campaign name, also already in the platform. You can see the data model section of the formula editor below, where these existing data model fields can be referenced in mapping.

Else…

Hopefully, these tips have been helpful and can act as an easy cheat sheet as you use Intelligence going forward. Whether it’s using if statements, parsing dates,  or understanding how to reference different types of fields, you hopefully found some new information today to help make you better at the platform (I won’t call you a Dato-dork yet, but I happily will wear that cap and keep trying to take more of you with me)!

Keep an eye out for more in this series. We look forward to growing your Intelligence!

Remember to drop us a line when you’re ready to realize the full potential of your Intelligence implementation and how it fits in with your overall marketing strategy.

Recently I was perusing the Salesforce IdeaExchange for interesting features to upvote and came across a common issue with over 4k upvotes, “Automate contact owner update when account owner changes.” 

Now, I would LOVE for this to be a native Salesforce feature of course, but there is a simple solution to this that I couldn’t find documented anywhere. 

So let’s get to it!

The problem with Account and Contact Owner mismatches 

Depending on how your sales team manages Account and Contacts, Account and Contact Owner mismatches can cause a lot of headaches. 

In most Salesforce orgs I’ve worked with, the Account Owner is responsible for nurturing all Contacts within the Account, but if Sales Rep A owns the Account and Sales Rep B owns half of the Contacts under the Account it can cause issues.

Those issues include:

  • Sales Rep A missing Contacts when viewing reports
  • Account Engagement “Create Salesforce Task” completion actions get assigned to the wrong user
  • Contact Activities get missed by the Salesperson who needs to act on them
  • Multiple Sales reps nurturing the same Contact at the same time

To solve for this common issue we’re going to build two items:

  1. Formula Field on the Contact
  2. Schedule-Triggered Flow for Contacts

Identify Owner Mismatches

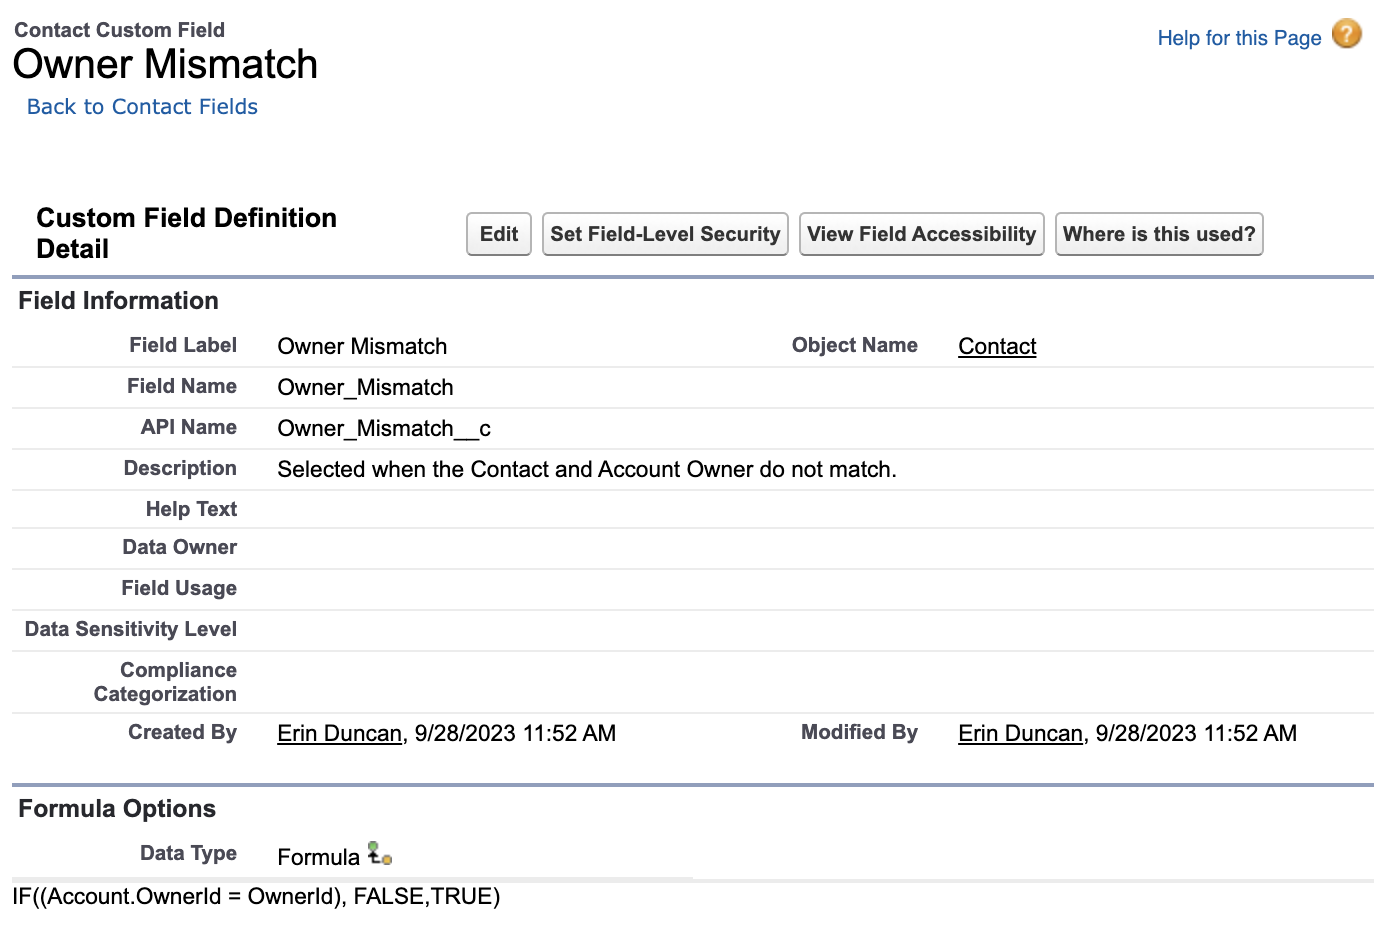
The first step is identifying records with an Account and Contact Owner mismatch. To do so, we want to build a Formula Checkbox field.

  1. Navigate to Setup > Object Manager > Contact > Fields & Relationships
  2. Select New
  3. Choose Formula, then Next
  4. Name the field “Owner Mismatch”
  5. Select Checkbox, then Next
  6. For the Formula, enter “IF((Account.OwnerId = OwnerId), FALSE,TRUE)”
    • If you are not familiar with Salesforce formulas, what this essentially says is if the Account Owner’s ID equals the Contact Owner’s ID the checkbox should be False, or unchecked. If the two Owner IDs do not match, the checkbox should be True, or checked. 
  7. Enter an Description so other users know what this field is for, and select Next
  8. Select the users who should have access to this field and the page layouts you’d like the fields added to, then select Save

Automatically Update Contact Owners

Next, we’ll create a flow to automatically update your Contact Owner to match your Account Owner. This flow is very simple, so don’t abandon ship if you are not yet a Flow super user!

  1. Navigate to Setup > Flows
  2. Select New Flow
  3. Select Schedule-Triggered Flow
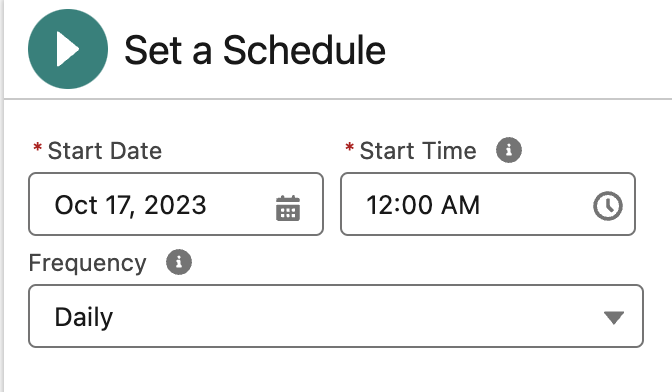
  4. Fill in the “Set a Schedule” details as below
    • Start Date: Today’s date
    • Start Time: I recommend you set this flow to run outside of business hours. For my flow, I chose 12:00 AM
    • Frequency: Daily
  1. Next, select + Choose Object
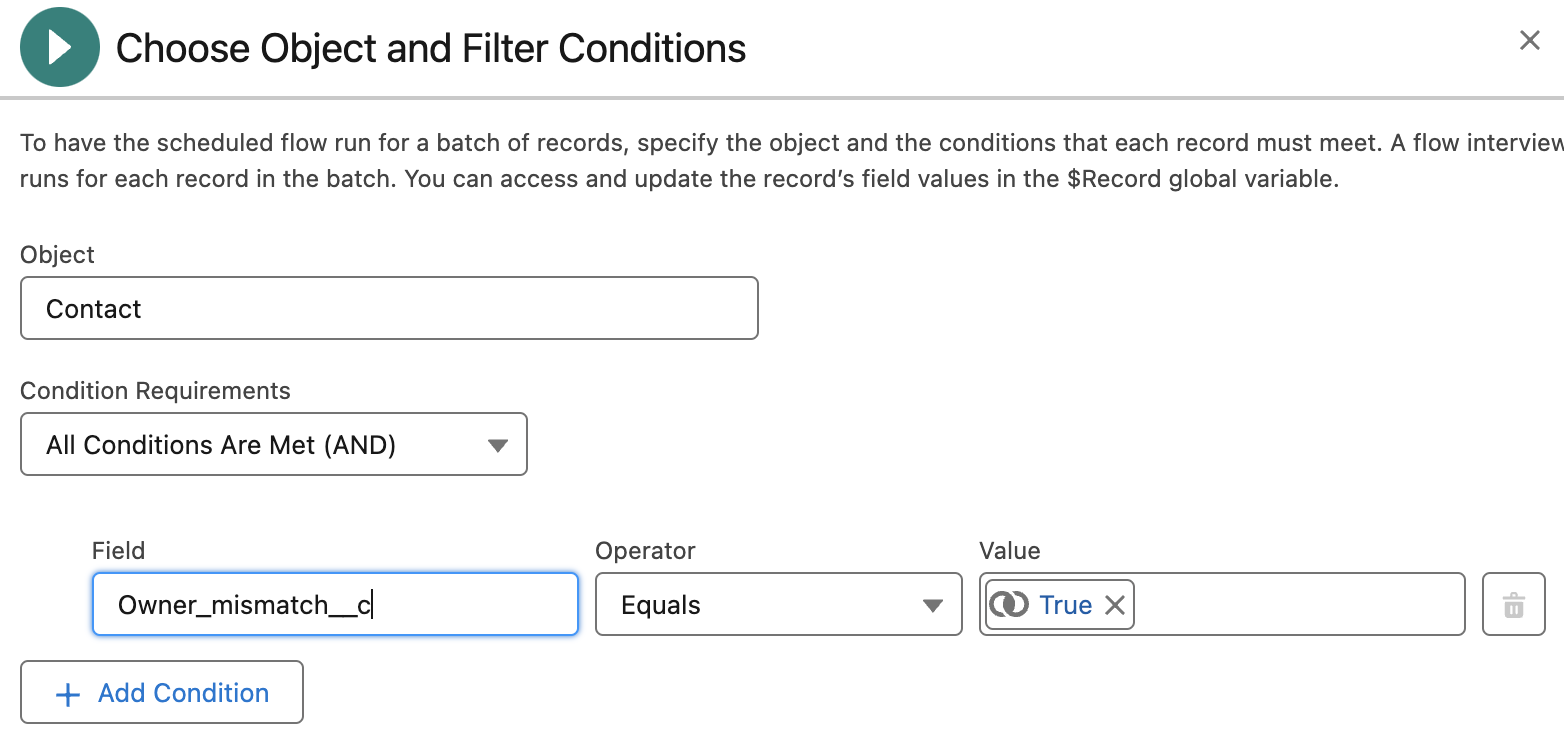
  2. Fill in the Configure Start details outlined below
  3. Select Contact
  4. Enter the condition as below
    • Field: Owner_Mismatch__c
    • Operator: Equals
    • Value: True
  1. Under your Start element, select the plus symbol to add a new element
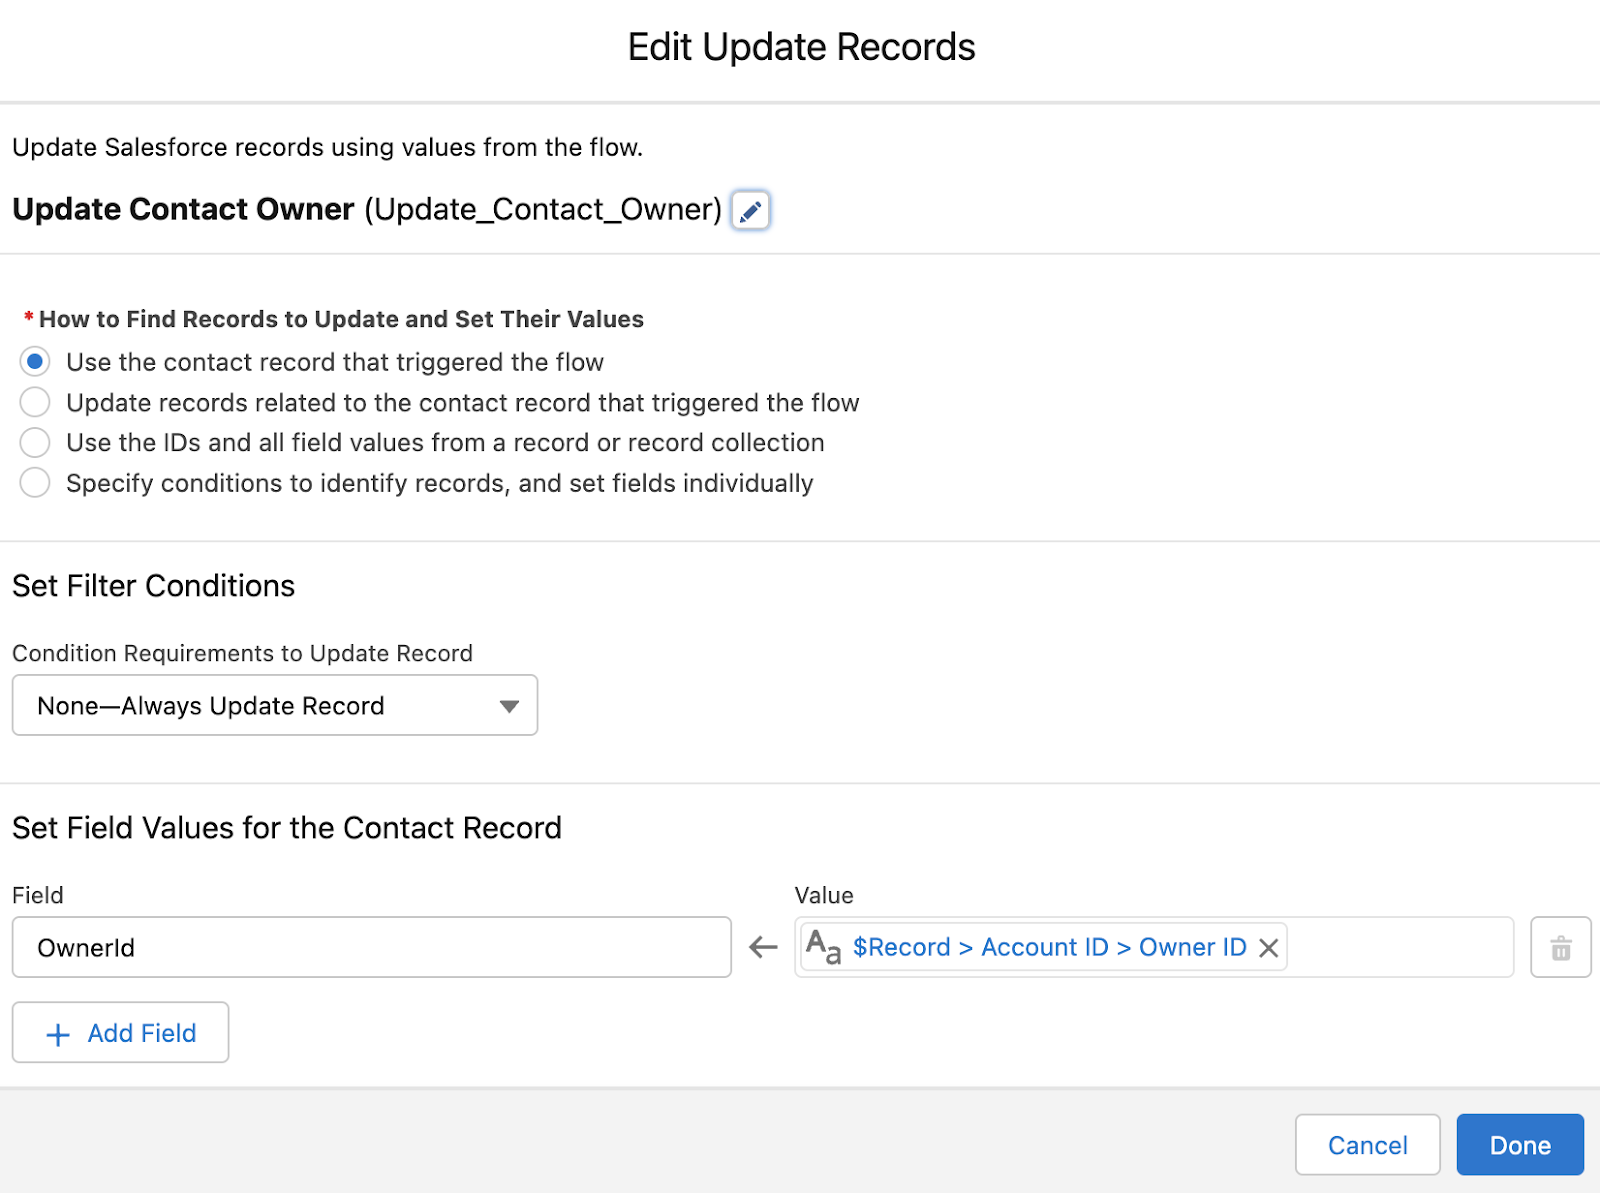
  2. Select Update Records
  3. Label the Element “Update Contact Owner”
  4. Under “Set Field Values for the Contact Record” set the Field to OwnerID and set the Value to {!$Record.Account.OwnerId}
  1. Select Done
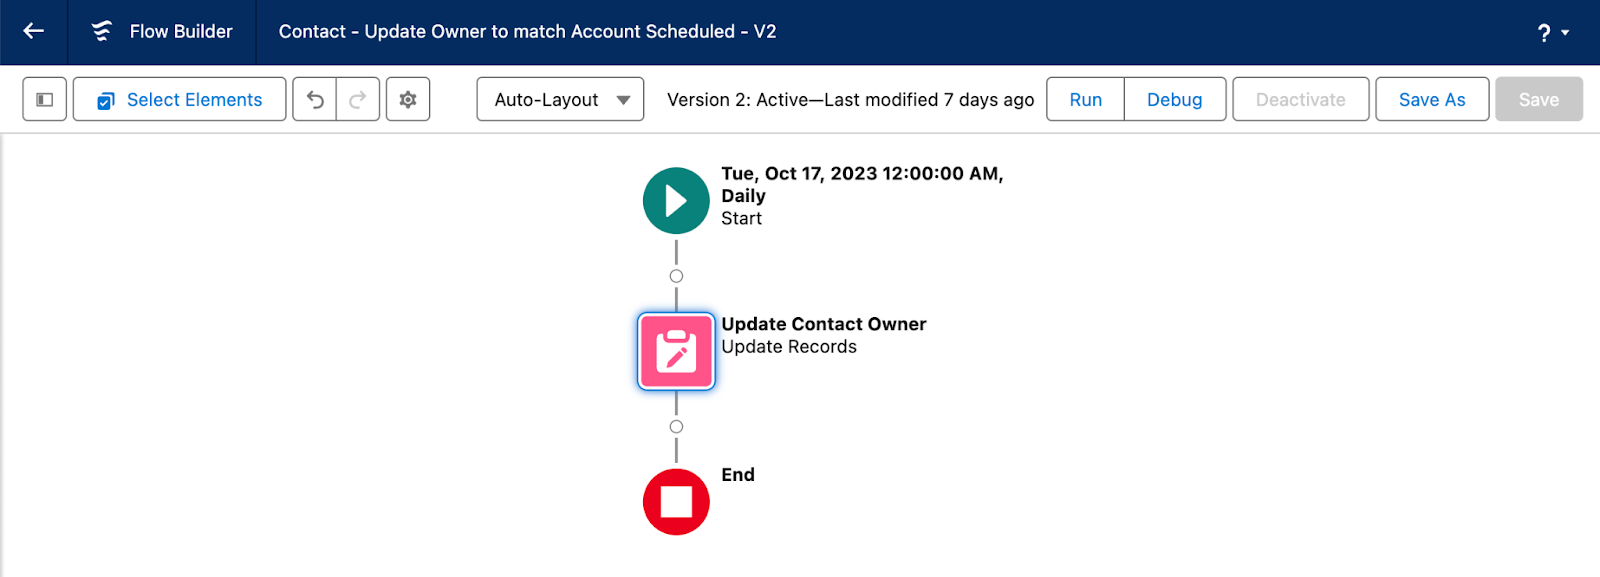
  2. Select Save from the top right hand corner and name your Flow “Contact – Update Owner to Match Account”
  1. Select Save
  2. Finally, Debug your Flow to ensure it works as expected, then Activate it! 

Now sit back and let everyone marvel at how clean Account and Contact owners are in the org. 

Get more solutions like this from Sercante

Need help figuring it all out? Reach out to the team at Sercante to get a conversation going.

Marketing Cloud Intelligence  (previously known as Datorama) is a tool that offers many potential uses. But with those uses comes the uncertainty that you are using the tool to its maximum potential or even correctly. That’s where a Marketing Cloud Intelligence audit can help.

In this blog post, we’ll cover the reasons you should audit your Marketing Cloud Intelligence instance, the steps to take during your audit, and what you should do with the information you gain.

Why would I need a Marketing Cloud Intelligence audit?

There are several reasons you could need an audit, including but not limited to the following topics.

 Reason #1. You want to validate the effectiveness of your work within the platform

Having worked with this tool for years, we have seen it all. An Intelligence audit serves as a second set of eyes to ensure your performance is not being stretched or that you are governing your field usage effectively. It can make a serious difference.

Reason #2. You want to explore if you are missing value adds in the platform

Suppose you are already using Marketing Cloud Intelligence for one set use case and not the full suite of features. In that case, an Intelligence audit will review options based on your needs and ask the right questions to ensure you are maximizing value. As a constantly evolving tool, there is always a new data connector, app, or feature to utilize and build value for your team from a few clicks.

Reason #3. API connectors show inaccurate data in reporting/dashboards

It can be discouraging to set up a data flow into Marketing Cloud Intelligence only to find your output from the platform, whether it be reports or visualizations, look off. An audit can guide you on everything from filtering your data to managing redundancies in setup.

Reason #4. Your Marketing Cloud Intelligence instance has mostly sat idle

You can do so much with Marketing Cloud Intelligence, and even automate processes you may not expect. But that is not of help if the platform is sitting empty or unused. An audit will take what you currently have and guide you toward possible uses you may not have explored.

Reason #5. A key admin has recently left your company or organization

Want to understand what your admin was working on and how data flowed before disaster strikes (or perhaps after)? An audit can help put it into clean process flows and documentation that you may be missing, or even help break down existing documentation into usable guidance.

What does our audit look like in practical steps?

After going through lots of Intelligence audits, we’ve come up with a straightforward process that works in most cases.

Every audit will be a bit different (a series of 3,000+ data streams is more complex than a workspace with five streams). But these are the core processes we review during an Intelligence audit.

Step 1. Having a conversation to discover your goals with marketing analytics

With minimal dialogue, we help clients route to what steps are needed to get the most out of Marketing Cloud Intelligence and their larger tech stack.

Step 2. Combining your priorities and our standard template

We center our solutions around clients’ needs, using our standard process as a springboard to ensure there is always something to explore.

Step 3. We share a detailed breakdown of the usage of platform features

We recommend various features to explore such as Einstein Marketing Insights, Reporting, and Dashboards, and how you can maximize their functionalities for the client’s needs.

Step 4. Reviewing premium features, such as Sandbox and Granular Data Center

When you buy into the more complex and pricier features of Marketing Cloud Intelligence, it may be frustrating to find new learning accompanying these tools. We break it all down so those learnings are succinct and easy to follow.

Step 5. Breaking down the impact and effort of platform features 

We showcase what tasks are high impact and low effort (and of course other levels of impact and effort) to make sure you get the most out of the platform in a swiftly actionable manner.

What will a Marketing Cloud Intelligence audit provide?

We know that an audit can unlock a powerful set of tools for you, such as the following.

Recommended platform features to utilize

We tailor our audit to your specific needs and make high-level and in-the-weeds recommendations that are centric to your business needs.

A clearer sense of data challenges to explore and recommended fixes

We showcase any glaring issues for you to skip the puzzle-solving and instead work with our tailored guidance to have a steady QA process.

Reducing redundancies for simpler data flow

We make it easy for clients to organize their data streams and remove reporting duplications so they have a clear roadmap to avoid data duplication and increase ease of navigation.

A path forward for using the platform to its full potential

At the end of our audit, you have a simple must-hit checklist based on your needs and a whole set of status updates on platform features and guidance on how to maximize their use when time allows, making a complex journey into a series of steps to explore.

How can I explore an audit with the Sercante team?

We are here to help. Our team includes Marketing Cloud Intelligence system administrator experts and readiness to explore your data to maximum effect. 

You can contact our team to explore what your audit could look like and how we can best work together!

It’s very common for sales and marketing teams to leverage title-based “personas” to influence their activities. Knowing who you are speaking to can radically alter the message content, type, and frequency needed to progress the buying process. In this post, we’ll address why and how to update marketing persona fields in Salesforce using Flow to assist sales and marketing.

Why Use Flow to Update Marketing Personas?

Let’s start with a very simple question. Why flow? The answer is really based on where your data lives and who needs access to it. I’ve used Engagement Studio in Account Engagement to update persona values in the past, but what happens if the prospect is not in Account Engagement? That’s right — no persona will be updated.

This solution accounts for the fact that all Salesforce data might not be syncing to Account Engagement (or Marketing Cloud Engagement) and that sales still needs persona values. 

Step 1 – Understand Your Buyers and Influencers

Before we can classify records, we first need to understand who is buying from us, who is influential in the purchase decision, and who is not (this is just as important). This is best achieved by analyzing data and speaking to your sales team.

Analyze the data

Create reports based on closed won opportunities and look at the contact roles for job titles that stand out. Odds are there will be clear winners – titles that appear with greater frequency. It’s also likely that you’ll see a mix of the people who actually use your product and a level above them (based on the purchasing authority needed to complete the transaction).

Talk to sales

Chat with some of the top sales representatives to find out where they are having success. Are there certain leads that they cherry-pick based on job titles? Are there certain leads that they deprioritize based on the same criteria? 

Step 2 – Group your data

Now that we know what titles we should be going after (and those that we should avoid), we need to group them into “Personas” (think of these as containers that hold records with similar/related titles). These are the values that we will be populating from our flow and will be used in future segmentation.

It’s important to create values for those that you want to target and those that you do not. An exclusion persona can be just as valuable as a target persona.

Target Personas

Records that are buying from you or are key influencers in the purchase process.

Exclusion Personas

Records that are in your system that do not buy from you and should not be included in campaigns.

  • Examples could include: Marketing, Sales, Students, and Human Resources to name a few.  

Once you have your target and exclusion persona values defined, create custom “Persona” fields (picklist) on the lead and contact objects. I like using global picklists when creating picklists with the same values between objects. Global picklists speed the setup, are great for ensuring consistency, and make maintenance a breeze (should more values need to be added in the future).

Don’t forget to: 

  • Use the same API name on both objects when creating custom fields (this is critical if you want to map the fields back to Account Engagement).
  • Map the lead field to the contact field on conversion.

Example: Global Picklist Value Set

Step 3 – Determine Keywords

Now that we know what titles we should be going after (and those that we should avoid), and we’ve defined the groups that we would like to use for categorization, we need to identify keywords that can be used to query the records (actually – we’ll be using them in formulas). It would be great if titles were standardized, but they are not. Based on this, we are going to look for common factors.

Example: Marketing

Here are some common marketing titles. It would be great if “marketing” was included in all of them, but it’s not. Therefore, we’re going to use keywords like: marketing, brand manager, campaign, content, media relations, product research, SEM, and SEO in our formula to make sure that we properly tag our records.

  • Brand manager
  • Campaign manager
  • Channel marketing director
  • Chief marketing officer
  • Content marketing manager
  • Content specialist
  • Digital marketing manager
  • Director of email marketing
  • Internet marketing specialist
  • Media relations coordinator
  • Product research analyst
  • SEM manager
  • SEO specialist
  • Web marketing manager

Step 4 – Create the Flow (In Sandbox)

We’re going to use a record-triggered flow to update our persona values. The flow will automatically update the persona value when the title field is updated. Since contacts and leads are distinct objects, a flow will need to be created for each object.

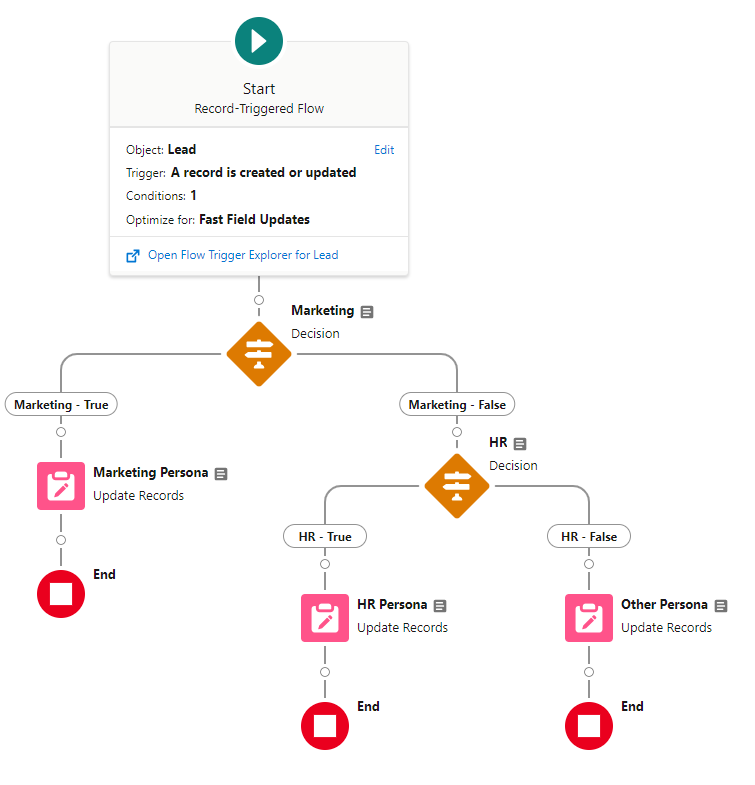
Here’s an example of what a very basic flow would look like. This flow is just updating the value to be Marketing, Human Resources, or Other. A full version of this flow would contain many more paths. 


Configure Start

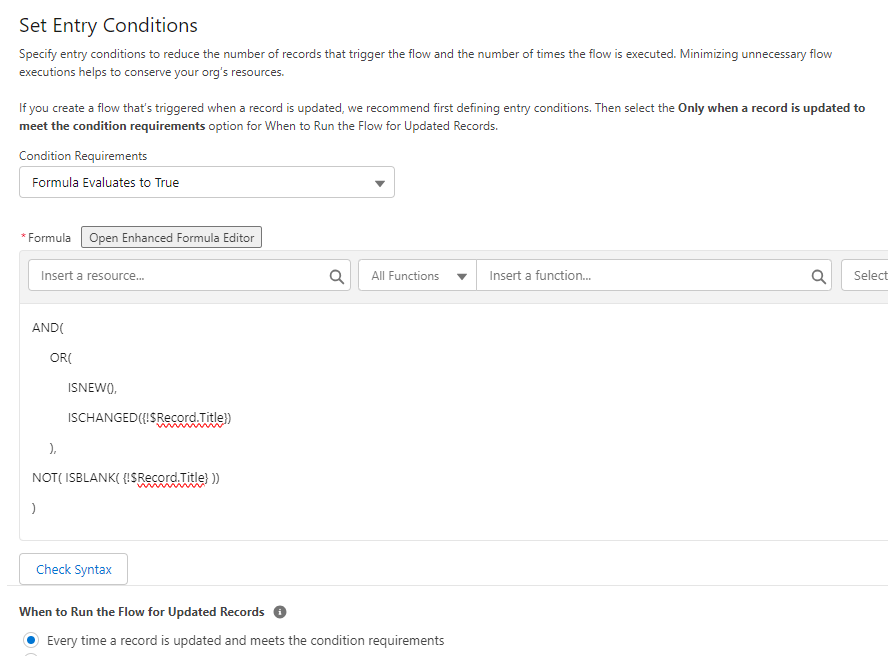
This flow is based on the lead object and is triggered when a record is created or updated. Since we don’t want to trigger the flow whenever a lead is updated, we’re using a formula to set the entry conditions. We want the flow to run only when new leads are created (and the title is not blank) or the title field of existing leads is updated to a non-blank value.


Finally, the flow will be optimized for Fast Field Updates, since we are updating fields on the same object.

Create Persona Formulas

This is probably the hardest part of this process. We are going to need to create formulas for each of our persona groups using the keywords that we’ve already defined. It’s important to note that formulas are case-sensitive by default. This is good in some cases but could cause records to be missed in other situations. Fortunately, we can address this as well.

Sample Formula 1 

This formula selects the marketing keywords that we identified, but it’s case-sensitive. It would evaluate “True” for a lead with the title “digital marketing manager”, but would not for the title “Digital Marketing Manager”.

OR( 

  /* Title contains any of these title strings */ 

  CONTAINS({!$Record.Title}, “marketing”), 

  CONTAINS({!$Record.Title}, “brand manager”), 

  CONTAINS({!$Record.Title}, “campaign”), 

  CONTAINS({!$Record.Title}, “content”), 

  CONTAINS({!$Record.Title}, “Content marketing manager”), 

  CONTAINS({!$Record.Title}, “media relations”), 

  CONTAINS({!$Record.Title}, “product research”), 

  CONTAINS({!$Record.Title}, “SEM”), 

  CONTAINS({!$Record.Title}, “SEO”) 

)

Sample Formula 2 

This updated formula evaluates the same keywords that were identified but addresses the case sensitivity issue. Here, we’ve used a function to convert the titles to lowercase and then compared them to a lowercase value. This formula would evaluate “True” for the titles “digital marketing manager”, “Digital Marketing Manager”, or “DIGITAL MARKETING MANAGER”.


OR(

    /* Title contains any of these title strings */

    CONTAINS(LOWER({!$Record.Title}), “marketing”),

    CONTAINS(LOWER({!$Record.Title}), “brand manager”),

    CONTAINS(LOWER({!$Record.Title}), “campaign”),

    CONTAINS(LOWER({!$Record.Title}), “content”),

    CONTAINS(LOWER({!$Record.Title}), “content marketing manager”),

    CONTAINS(LOWER({!$Record.Title}), “media relations”),

    CONTAINS(LOWER({!$Record.Title}), “product research”),

    CONTAINS(LOWER({!$Record.Title}), “sem”),

    CONTAINS(LOWER({!$Record.Title}), “seo”)

)

Sample Formula 3

Sometimes, you are going to need a mix of case sensitivity and case insensitivity. As an example, we would not want to update any job title that contains “hr” to Human Resources. This could lead to a lot of false matches. In this case, only titles that contain “HR” in all capitals will evaluate “True”.

OR(

  /* Title contains any of these title strings */

    CONTAINS(LOWER({!$Record.Title}), “human resources”),

    CONTAINS({!$Record.Title}, “HR”)

)

Sample Formula 4

There are also going to be times when you need to look for a specific value, like CEO, and also look for title strings. We can do that too! 


OR(

    /* Title is any of these values */

    {!$Record.Title} = “CEO”,

    /* Title contains any of these title strings */

    CONTAINS(LOWER($Record.Title), “chief executive”),

    CONTAINS(LOWER($Record.Title), “president”)

)


As you can see, there’s a fair bit of work involved in creating and testing the formulas. That’s why working in a sandbox is critical. If you can get all the formulas to update all the values exactly as you would like on the first try, I encourage you to check out our careers page!

Configure Flow Elements

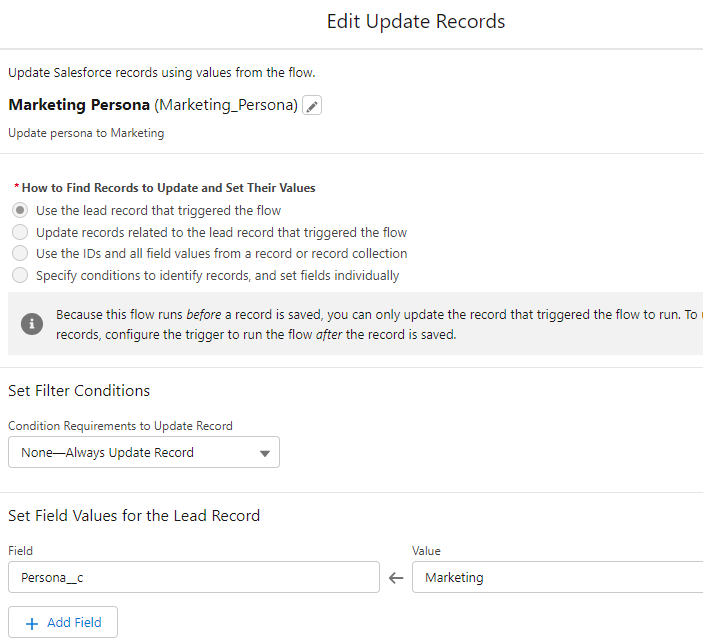
Each path includes a Decision and an Update Records element (learn more about Flow Elements). We’ll walk through the marketing paths and the same logic can be applied to additional paths. The only difference is that the “No” outcome for the final decision should update the persona value to “Other”. We want to add a value to leads that don’t match any of our formulas for two reasons.

  1. We want to verify that they were processed by the flow.
  2. We want to be able to identify the leads that were not matched by our formulas so we can evaluate and improve. This is VERY important.

Decision Element 

The element is pretty straightforward. The “True” outcome looks for leads where the marketing formula evaluates to “True”. Leads that do not evaluate true progress down the “False” outcome and move to the next decision element.


Update Records 

Leads that match the “True” outcome conditions then proceed to the Update Records element. This is where the magic happens and the record is updated in Salesforce.

Debug

The final step before activating your flow is to do some debugging. Test by updating the titles of a few leads to make sure that they progress down the correct path, Be sure to vary the case of the titles to make sure that upper, lower, and mixed cases work as expected.

Step 5 – Rinse and Repeat

Once deployed into production, your flow is not going to be perfect. There are going to be some records that are classified as “Other” that should fall into other categories. That’s OK!

The final step is to do regular reviews and updates of the records that have the “Other” persona. It’s possible that we missed a keyword on our first pass or that a new hot title has emerged. I compare this a lot to scores in Account Engagement. You don’t quit once you define your scoring model, you evaluate and refine it. The same process applies here. 

Give it a Shot! 

We’ve done a lot in a short post. I encourage you to give this a shot in your sandbox. You’ll be surprised by the number of records that you’ll be able to update and the value that it will bring to your sales and marketing teams. If you get stuck, let us know. That’s why we are here! 

Shout out to Heather Rinke and Jason Ventura for their collaboration in building this process!

No more posts to show