Do you have connected campaigns with Pardot and would like to see email engagement data in one place? In this blog, we are able to see how easy it is to build a Pardot Email Engagement in Salesforce
Reasons for a marketing email dashboard in Salesforce:
Your team does not have access to B2BMA or Analytics Studio.
You need more transparency and shareability cross-departmentally
We usually find common asks for customers to further personalize Pardot emails, specific account-based messaging on their website, and where sales reps can take the next step to drive the conversation.
Interaction Studio helps answer all the queries with its account-based website experience, Next Best Action and Content Recommendations, and personalization of marketing content.
Common customer concerns and asks
Customers often come to us with these concerns
We want to personalize Pardot emails further
We want specific account-based messaging on our website
Our content is out of date on occasion by the time the email is opened
How can we align the experience of those who are still unknown to us?
Our sales reps often don’t know where to drive the conversation next
And statics say that today’s buyers expect account-centric personalization
87% of marketers that measure ROI say that ABM outperforms every other marketing investment
37% of marketers claim creating content and personalized is their biggest ABM challenge
How Interaction Studio helps solve the problem
Account-Based Website Experience – Automatically tailor website for top accounts and buyers based on in-depth behavioral insights and accounts profiles
Provide Next Best Action & Content Recommendations – Surface the optimal next step to engage prospects and guide them through the conversion funnel
Personalize Marketing Content – Present dynamic emails, forms and landing pages
Account-Based Website Experience
With interaction studio, you can engage and convert qualified prospects with more relevant experiences. By starting reverse IP lookup, you’ll be able to understand customers from specific target accounts even if they’re unknown to you. From this, it can be used to create dynamic content for targeted offers on your website that can be available anywhere using a responsive design. The account intent data is tied directly to the account record which means all your account-based marketing tools can be plugged in. In addition, it’s also connected with the leading contact record inside Sales Cloud and Service Cloud.
Next Best Action & Content Recommendations
Interaction Studio can provide specific calls to action with a heavy focus on the buying persona and the stage of the buyer’s journey. This approach leads us more to drive higher conversion. Furthermore, the sales reps are going to be able to leverage these content recommendations and enable them to execute them.
Personalize Marketing Content
Using Interaction Studio enables the creation of dynamic emails for multiple audiences. The automation enables a decision at a time when users email open or when a website is pulled up to be able to choose what content to display. The unique content for each segment makes use of increasing engagement leading to conversions.
What content to choose and display within emails?
Whether your questions would be – what to offer? Or what content? Or are they saturated? What should I do? All of these queries are answered by Einstein inside Interaction Studio with its customer priority, eligibility, and saturation.
How Marketing Cloud Interaction Studio differs fromPardot Engagement Studio
Interaction Studio
Engagement Studio
Customer centric
Brand centric
Reactive and real-time personalization
Proactively drive customers to engage
Seemless transition of Next Best Offers to Sales Reps
Deep Sales Visibility
Decision engine for orchestration
Deploy a single journey
Behavioral reporting
Revenue Based Campaign Reporting
Uknown and known consumers
Known prospects and customers
Conclusion
As we learned, Interaction Studio has strong capabilities of driving account-based website experiences tailored to the unique segment. It can also provide the Next Best Action and content recommendations with a heavy focus on the buying persona, and the personalization of marketing content is integrated seamlessly.
Have you ever wondered why sales and marketing teams combine Salesforce Marketing Cloud Engagement and Account Engagement (formerly Pardot), with Sales Cloud to reach their goals?
Thinking about how these platforms can work together likely makes your head spin like a twister in Kansas.
But, fear not! In this edition, we’ll provide more clarity than confusion.
We’ll go through a high-level overview of how Salesforce Marketing Cloud Account Engagement (formerly Pardot) and Marketing Cloud Engagement compare. But, this isn’t a versus and when to choose which (c’mon we’re all family!).
We’ll devote the majority of this blog highlighting three use cases that unlock success using both Salesforce marketing automation platforms integrated with Sales Cloud.
How do Marketing Cloud Engagement and Account Engagement compare?
If you’re familiar with these platforms, then you know they’ve traditionally been focused on industry (B2B vs B2C) and platform-specific features. While a lot of the unique needs of these industries remain true, the lines and approaches of how to communicate digital across these audiences (which are sometimes shared across a business) continue to blur.
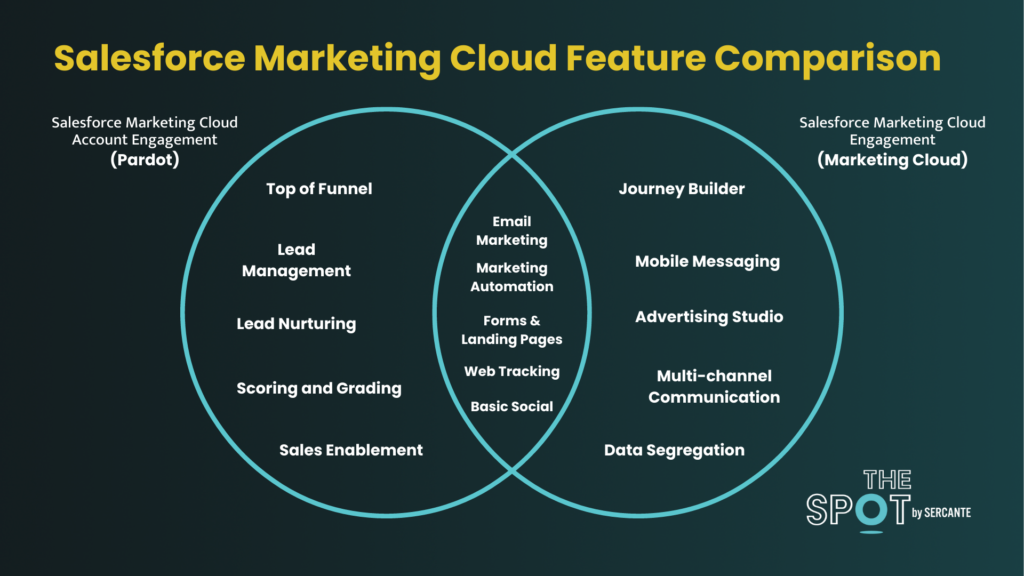
Below is a tried-and-true Venn diagram that shows the overlap as well as their differences.
Features that are unique to each, such as scoring & grading from Account Engagement (Pardot) and mobile messaging in Engagement are the key differentiators.
Why do marketing teams use both MCAE and MCE?
B2B marketers are now looking to execute more complex multi-channel messaging once a prospect converts to a customer, for example, and therefore justifies the need for both solutions.
There are also more and more instances of B2C or D2C driven organizations that serve two very unique personas and different contacts — tne that focuses on the traditional multi-channel messaging approach and one that would benefit from lead scoring, nurturing, and more 1:1 guided selling. In this case, also, the argument for both platforms can make sense.
And lastly, there’s the more complex instance where an organization serves two very unique personas, yet the personas apply to a single, shared contact.
Today, we’ll focus on the following:
A traditional B2B org looking to execute more complex multi-channel messaging post-conversion
A multi-business model organization with two unique personas
A multi-business model organization with two unique personas that share a contact
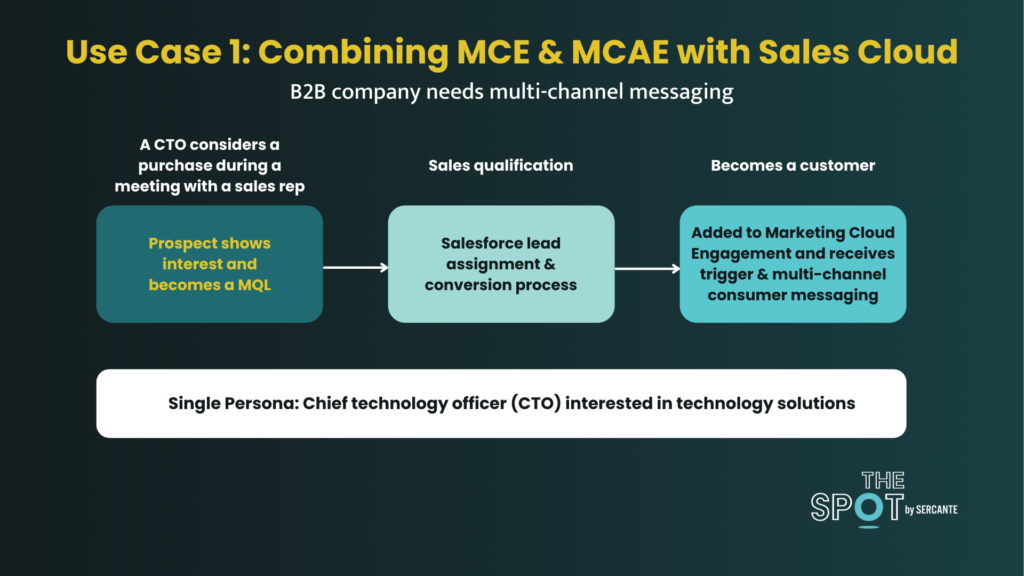
Use Case #1: A traditional B2B org looking to execute more complex multi-channel messaging post-conversion
As described above, we’ve got a traditional B2B tech organization focused on a single persona that typically only applies to one contact record type. They’re looking to adopt more complex multi-channel messaging once their prospects become a customer.
The ability to acquire leads, score and nurture until an MQL threshold is reached and sales can step in is still critical and at the heart of this organization’s business model. However, the ability to retain and engage with their customers in a competitive marketplace is of ever-growing importance.
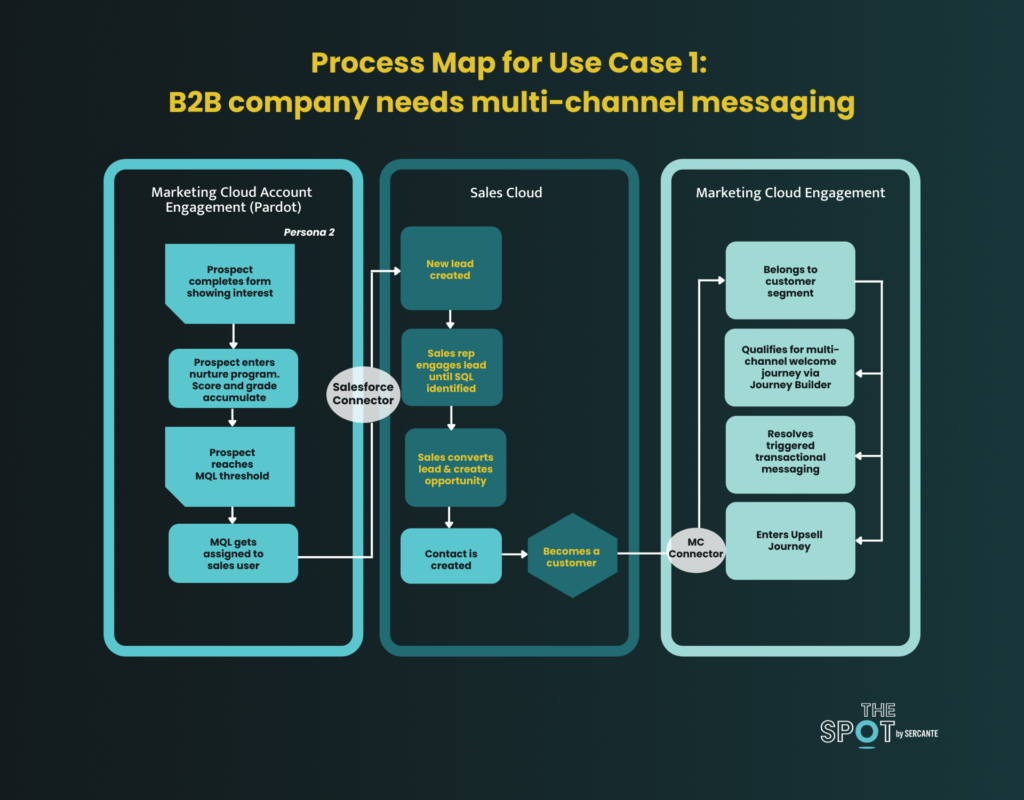
In this scenario, the prospect will be acquired via an Account Engagement form.
They’ll be nurtured through email, forms, and landing pages powered by Pardot until their MQL threshold is reached.
Upon reaching, the MQL will be assigned to a Sales user and created as a new lead in Sales Cloud.
The Rep will work the lead until SQL status and from there will convert the lead and create an opportunity thereby also triggering the contact creation process.
Once the opportunity is closed won, the contact is now eligible for customer marketing in Journey Builder via the Marketing Cloud Connector.
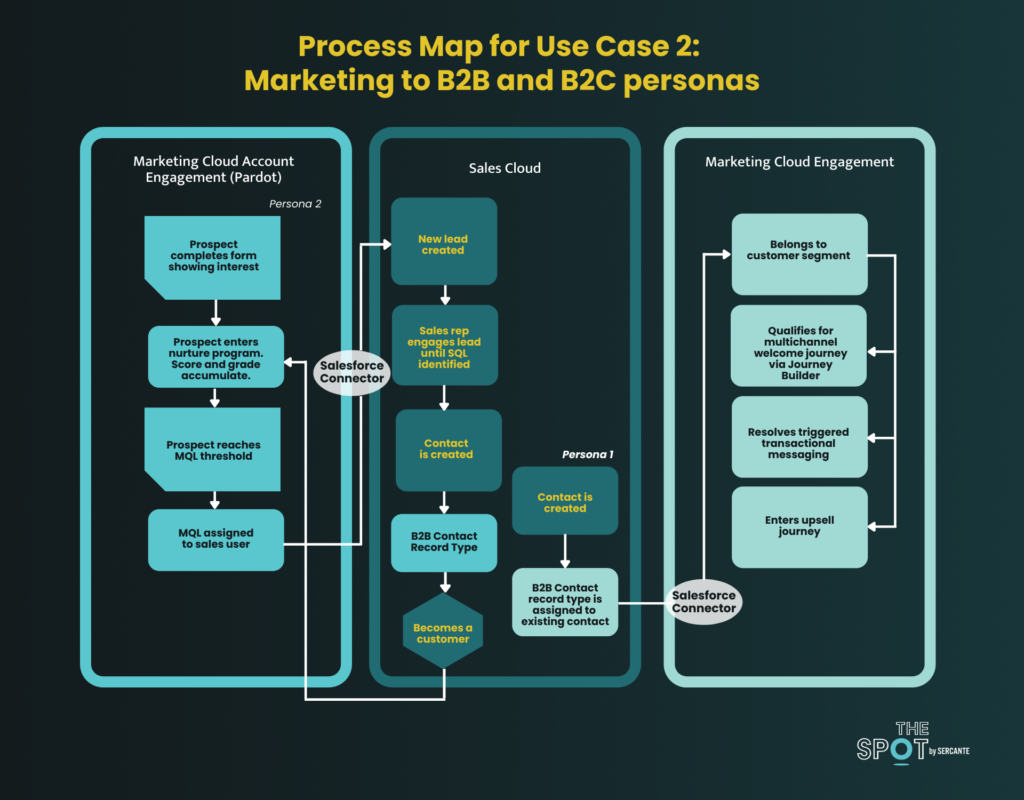
Use Case # 2: A multi-business model organization with two unique personas
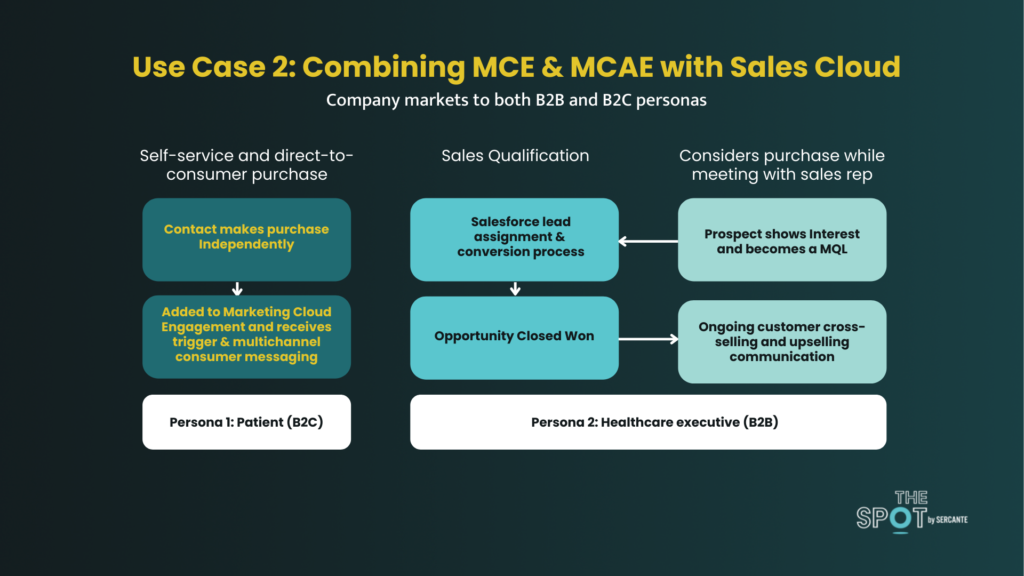
A hospital technology organization has two business models that support two separate personas that do not overlap. In this scenario, because of the way the organization is structured a single persona and contact is messaged only from Engagement or Account Engagement (Pardot). There is no sharing of contact and messaging between these solutions, and it’s therefore more straightforward.
The emphasis for this use case is on how you can use both platforms to support the unique needs of your personas and overall business.
For Persona 1
A buyer makes a purchase and becomes a customer; a salesperson isn’t involved in this transaction.
As a new customer, a contact is created as a person account record in Sales Cloud.
Now the person account is available in Engagement via Marketing Cloud Connect and customer marketing can begin in Journey Builder.
For the Persona 2
The prospect will be acquired via an Account Engagement (Pardot) form.
They’ll be nurtured through email, forms and landing pages powered by Pardot until their MQL threshold is reached
Upon reaching, the MQL will be assigned to a Sales user and created as a new lead in Sales Cloud.
The Rep will work the lead until SQL status and from there will convert the lead and create an opportunity thereby also triggering the contact creation process and the contact is created with a specific record type: B2B Contact.
Marketing Data Sharing rules in Pardot are configured to ensure that only those contacts with the B2B record type sync with Pardot.
The prospect in Pardot has a bidirectional syncing relationship with the contact in Sales Cloud.
And when the existing customer, still syncing to Pardot, expresses interest in another product or service, the B2B marketing team continues marketing to this customer using features in Pardot like email nurturing, scoring, grading, and sales team alignment.
As it progresses from MQL to SQL, another opportunity can be created on the existing contact record.
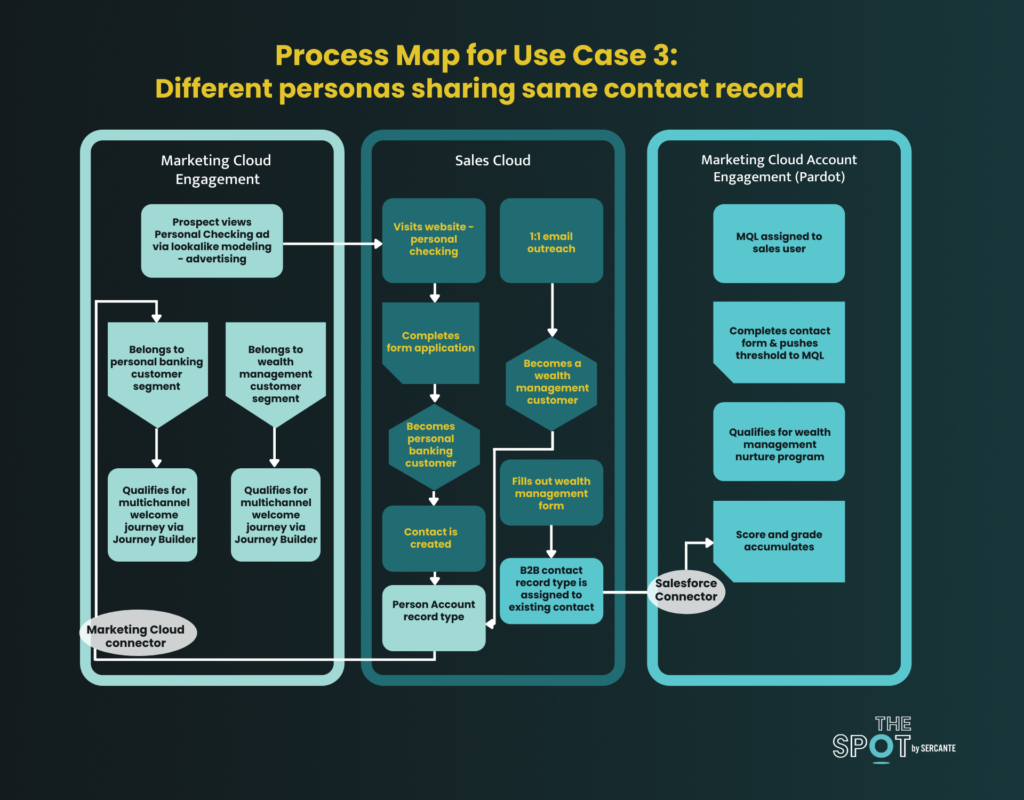
Use Case #3: A multi-business model organization with two unique personas that share a contact
Now this scenario is a bit tricky and is really where all the magic needs to happen – we’re tackling not only different personas that leverage both platforms but also share the contact.
Take a financial institution, for example, that has 2 lines of business: Personal Checking/Savings and Wealth Management. The Personal LOB (line of business) is very much a self-service model, while theWealth Management LOB is exactly the opposite of self-service, yet they both have a common, shared customer/prospect.
You may ask yourself, ‘do they really have the same target audience/segment?’ While your first gut reaction may say, ‘No, ’ which is true, it’s also partly true that these different buyer personas can have crossover and can in all actuality apply to the same single individual.
Furthermore, the ability to convert and increase the CLV (customer lifetime value) by taking a Personal Checking/Savings customer and upselling your institution’s Wealth Management services is a very strategic and much-desired result in the banking world. The key to successfully achieving this is all in your approach.
Let’s think through this from a basic customer journey perspective.
In this case above, the potential customer gains initial awareness and exposure of the Personal Checking/Savings product through lookalike audience modeling fueled by Marketing Cloud Engagement & Advertising.
They then visit the website to apply for an account, receive approval, and have now converted to a Personal Checking/Savings customer.
Upon conversion, they become a contact (and Person Account record type) in Sales Cloud which is bi-directionally synced to Marketing Cloud Engagement via MC Connector. They are now eligible to be enrolled in various customer journeys — the first obvious one being a Welcome Onboarding Journey.
Throughout their relationship based on their activity and inactivity, they will qualify for other journeys such as Upsell and Cross-sell. For argument’s sake, let’s say as part of one of these journeys they click on a cross-sell content piece focused on wealth management.
They visit the website and fill out a wealth management form. They are then also marked as a B2B Contact Record type, and they’ll be nurtured by Pardot until their MQL threshold is reached
Marketing Data Sharing rules in Pardot are configured to ensure that only those contacts with the B2B record type sync with Pardot.
Upon reaching the MQL, they will be assigned to a Sales user for 1:1 outreach. As it progresses from MQL to SQL, another opportunity can be created on the existing contact record.
Once the Sales user converts this prospect and opportunity to Closed Won, they will now become part of the wealth management customer segment in Marketing Cloud Engagement and will likely enroll in one more many customer relationship journeys across the tenure of their relationship.
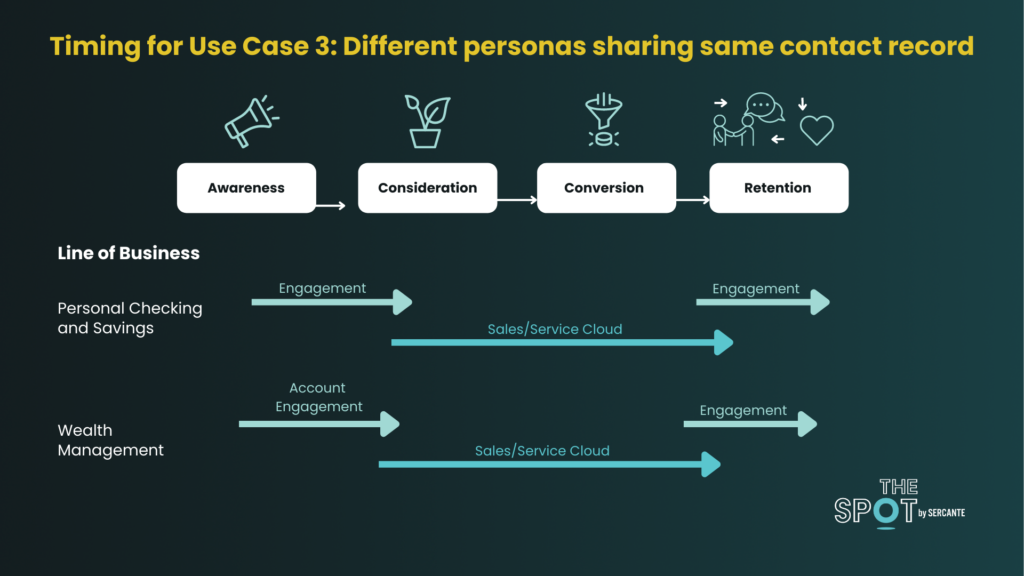
In summary, the banking institution is leveraging Salesforce Marketing Cloud Engagement for full lifecycle management including awareness of its self-service line of business. For its more considered purchase model line of business, Account Engagement (Pardot) is used. However, once these prospects convert to customers, the ongoing customer relationship communications, like SMS messaging, will occur through Marketing Cloud Engagement.
Closing Thoughts
As you can see, the potential use cases can range from simple to complex. Therefore it’s important to understand the long-term plan of what you’re trying to achieve to ensure what you’re building today can scale and grow for the future.
A partner who has breadth and depth of experience in both platforms as well as the know-how to be future-proof, especially for organizations that have more than one business model, is an ideal next step.
What other use cases can you think of for these platforms? Let us know in the comments!
Nothing is more frustrating than when you experience a slowdown in your Marketing Cloud Account Engagement (Pardot) org.
I just need this one Dynamic List to run, why is it taking so long!?!
These slow downs are frustrating. But they’re typically a sign that you need to archive old, continuously running, processes and/or optimize how you are using the platform.
The following best practices will help keep your Pardot org running efficiently. Many of these strategies are going to be more relevant to large orgs with 1 million+ prospects. But this information can be used to help increase processing times in Pardot orgs of any size.
1. Clean your Dynamic Lists
Dynamic lists are constantly running, matching and unmatching prospects as they fit or do not fit criteria. Old Dynamic Lists that are no longer matching prospects, or Dynamic Lists that are not actively being used can be a big strain on your system.
Salesforce recommends a limit of 1,000 Dynamic Lists per Pardot org. Also, if you have millions of Prospects, consider reviewing Dynamic Lists matching over 5 million prospects to see if these lists can be broken into smaller pieces.
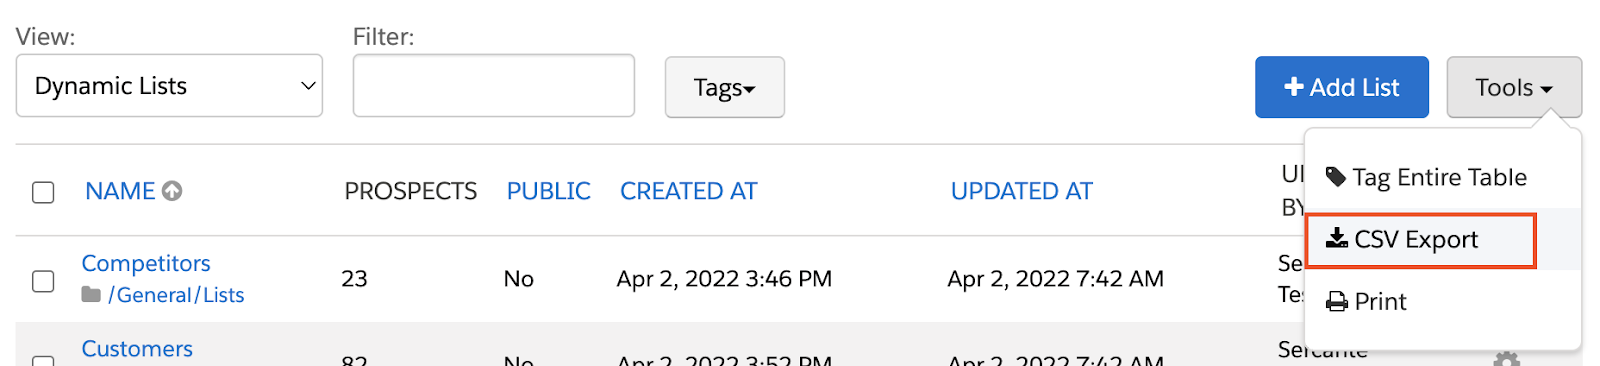
I like to CSV export my Dynamic Lists so I can sort them by Updated Date and look at the oldest ones first. You can also sort by number of Prospects to tackle your biggest Dynamic Lists.
2. Check those Automation Rules
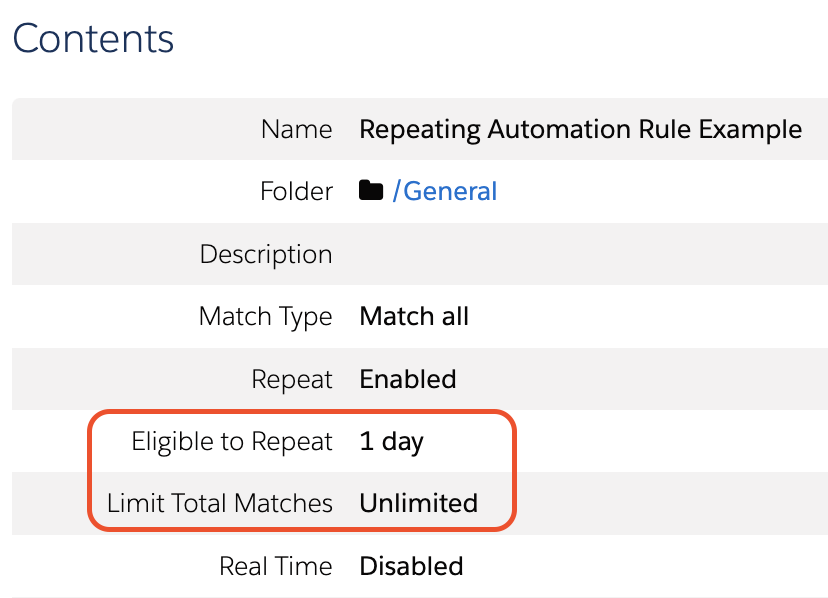
To keep things running smoothly, limit your automation rules to 5 million actions per day. This is a lot more than I see most Pardot orgs needing or using, but it doesn’t hurt to review your repeating automation rules and ensure the “Repeat Rule” settings are set appropriately to your needs.
I also recommend reviewing which Automation Rules are set to run in real time. Although Pardot can handle this, it is still not recommended to use this for every rule. I find most of the time a Real Time Automation Rule can instead be replaced by a Completion Action.
3. Only keep the best Prospects
The more Prospects you have in your Pardot Org, the more processing your org needs to do. Cleaning up unwanted or unneeded Prospects is a great way to cut down the number of processing requests quickly and our Junk Data in Your Pardot Org and 7 Ways to Clean Your Mailable List in Pardot blog posts have some great tips on how to do so.
Dynamic Lists and Automation Rules are also going to look at every Prospect in your org to see if they match criteria. If you can’t cut down on the number of Prospects in your org, consider adding criteria that will exclude Prospects from recurring automations.
For example, if I am creating a dynamic list for an email send, I don’t have to include the criteria “Prospect email status isn’t Opted Out” because any Prospects who have Opted Out won’t be sent the email anyway. However, including this in my Dynamic List criteria means Pardot can rule out that chunk of Prospects and process by request faster.
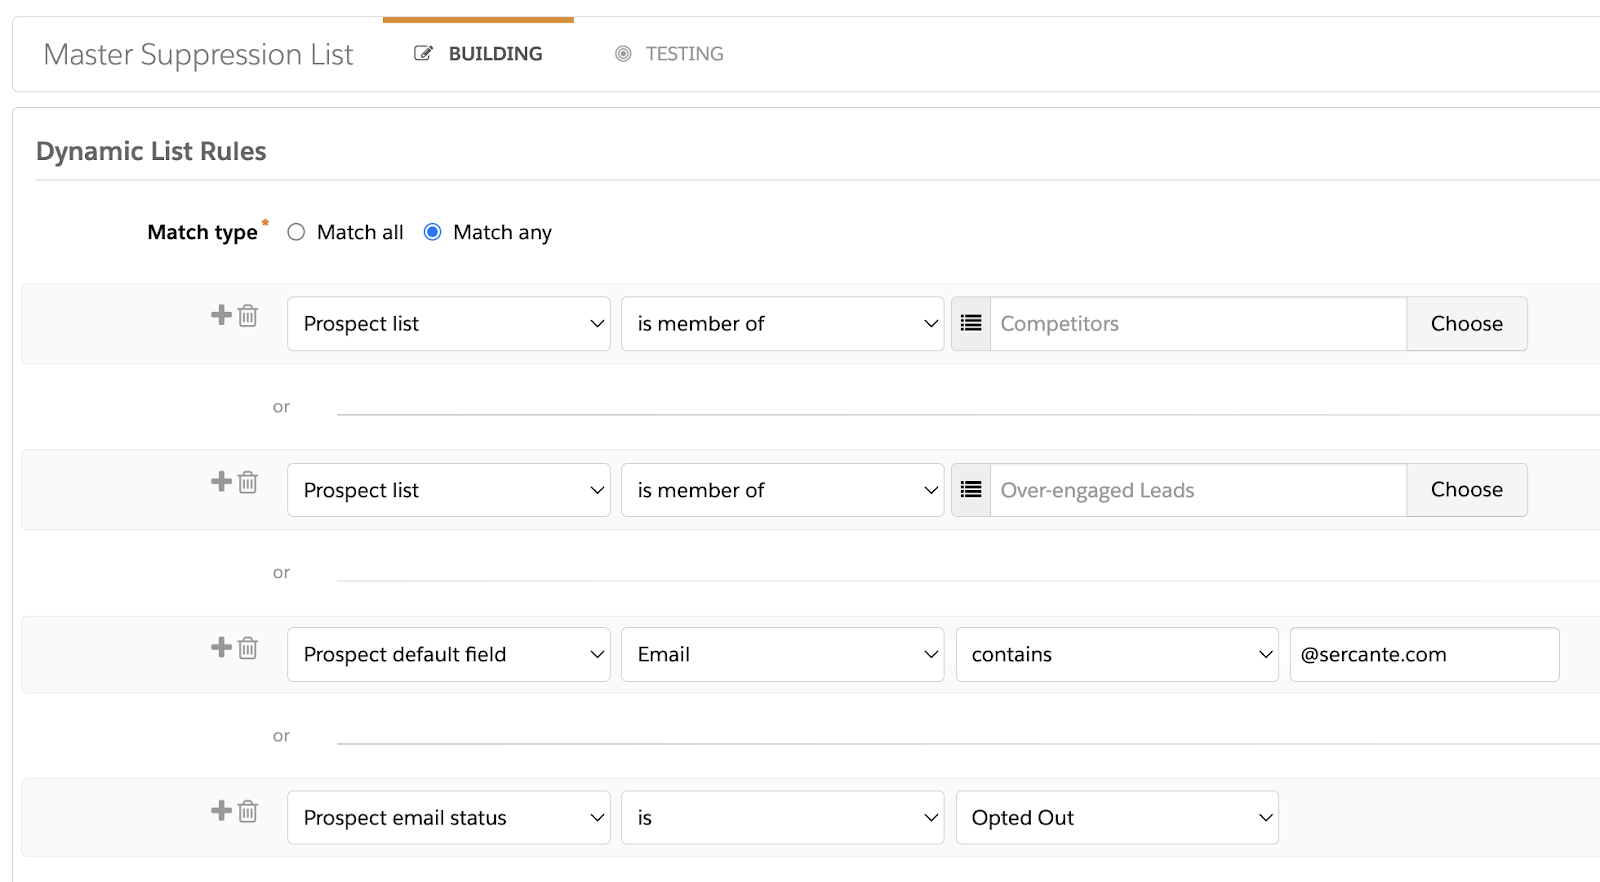
If you exclude the same set of Prospects from most of your emails and/or automations, consider creating a “Master Suppression List” that can easily be referenced.
4. Optimize your Engagement Studio Programs (ESPs)
Spread out your wait steps
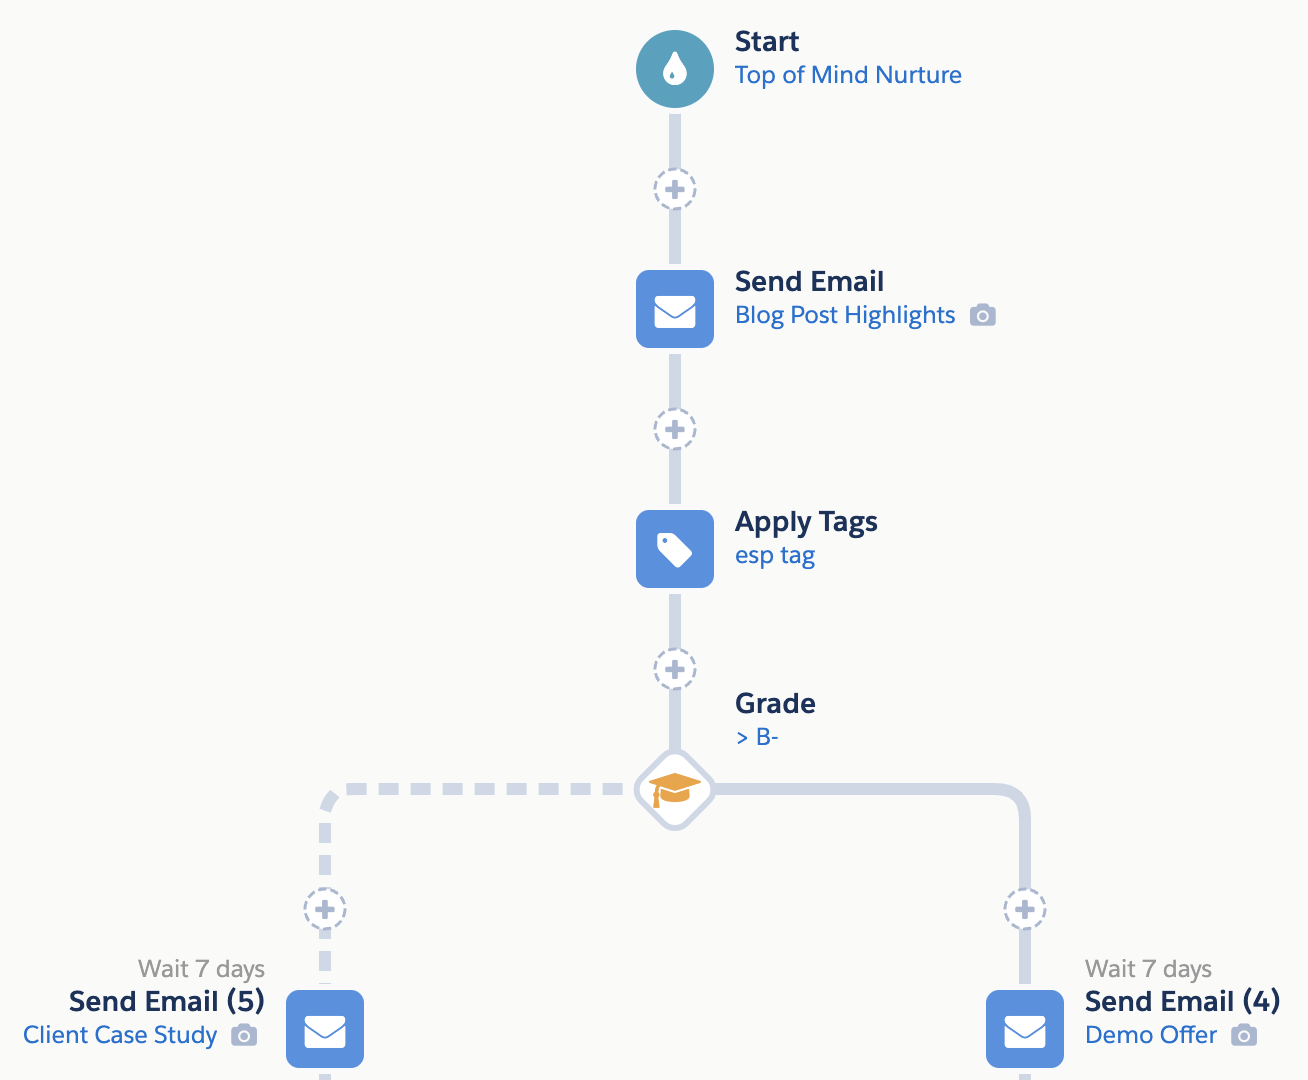
ESPs can perform a ton of actions on a ton of prospects. Keep in mind that an ESP performs an action per node per prospect. For example, if my ESP starts with
Send Email
Apply Tag
Check if Grade is B- or above
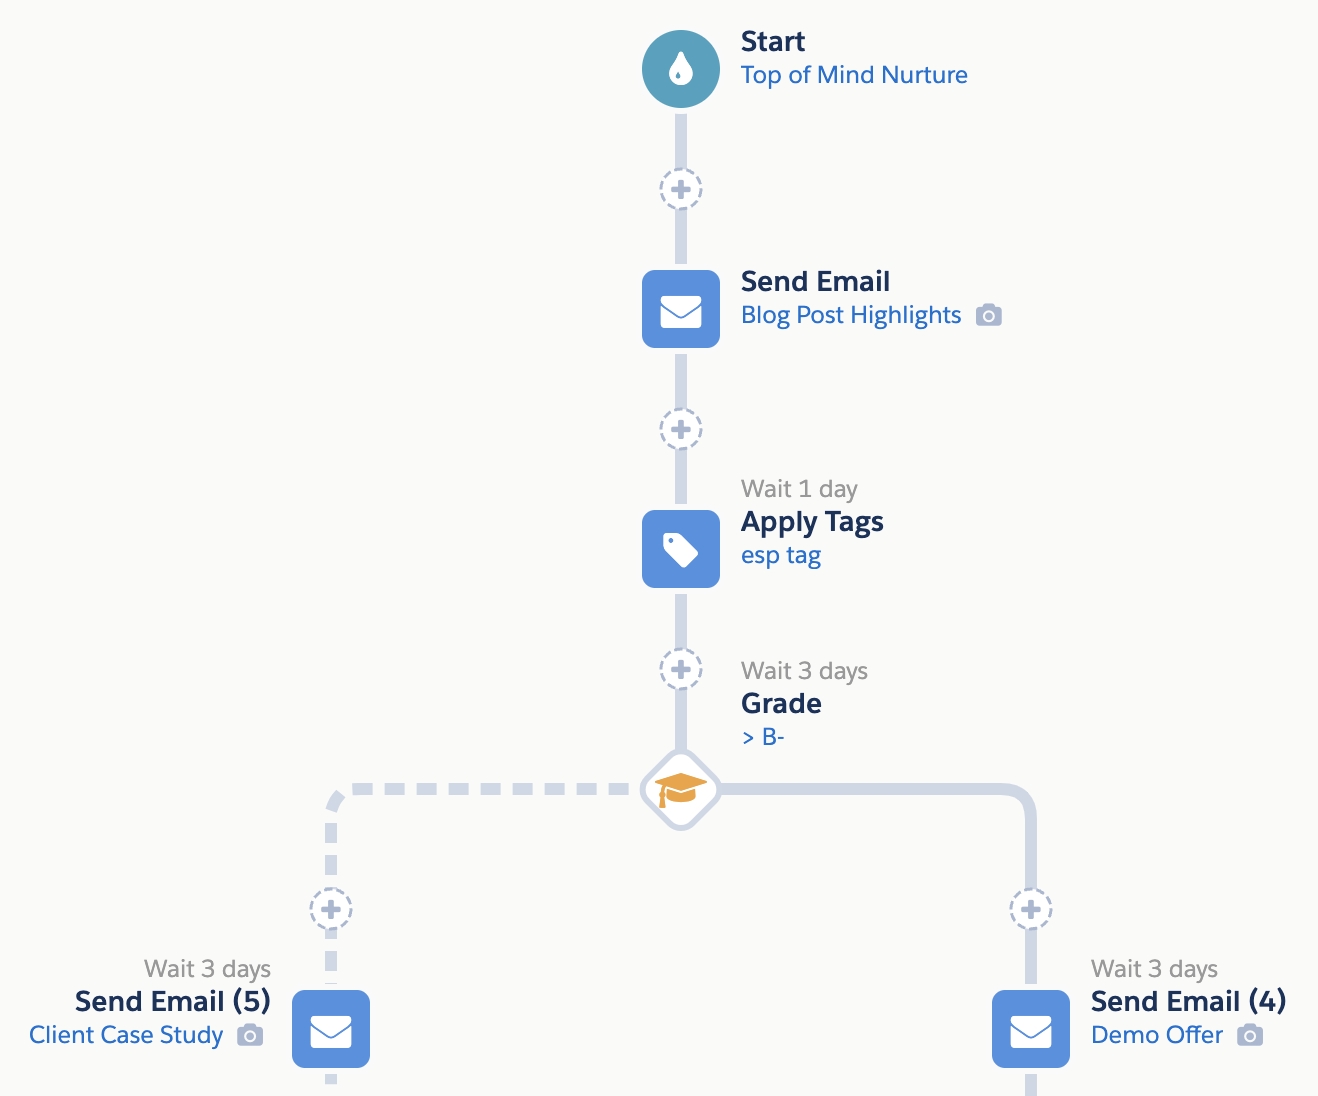
And I’m sending 5,000 Prospects through this ESP, that is 15,000 processing requests right off the bat. Wait steps can be used to space out the amount of processing one ESP needs to do per day.
For example, going from this:
To this:
There are still 7 days between the 1st and 2nd email sends, but the processing requests are spread out over the wait period rather than happening all at once.
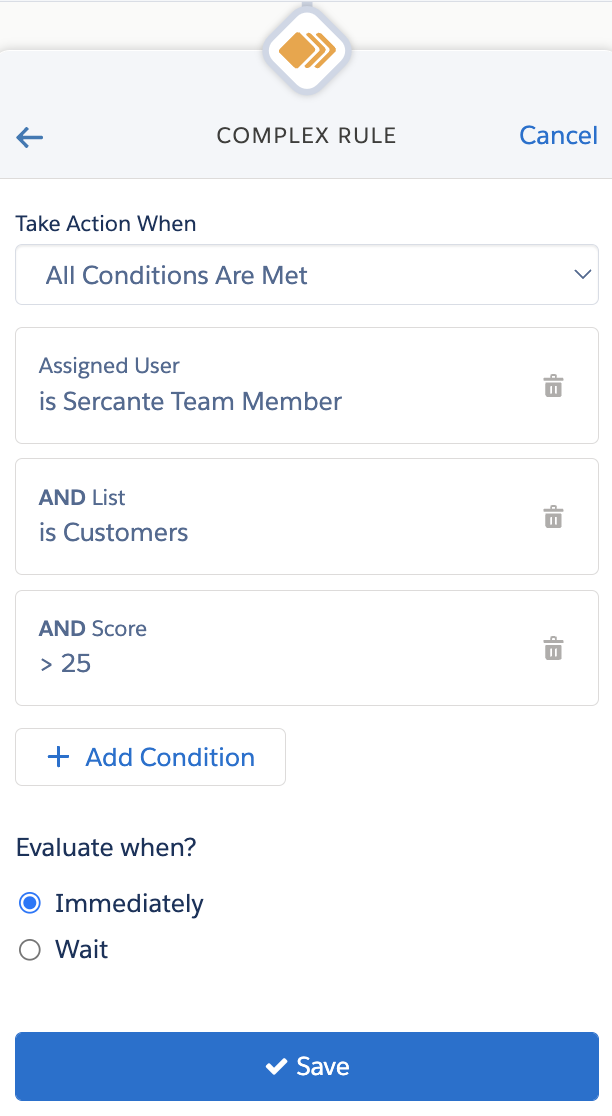
Use Complex Rules
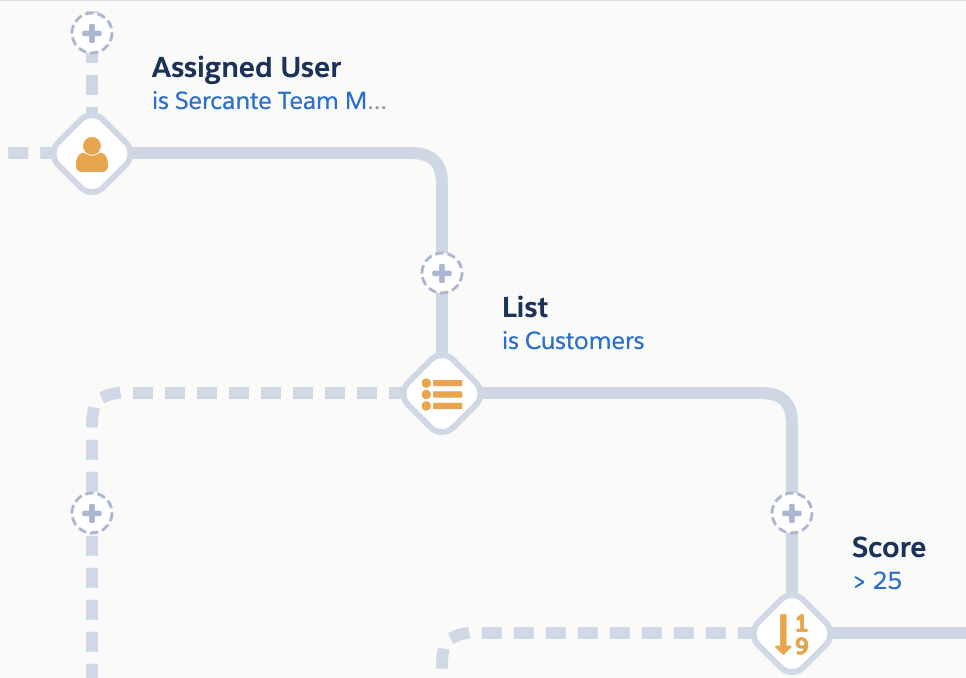
Complex Rules are another great way to streamline your ESPs. Rather than have multiple Rule nodes
Combine your rules into one Complex Rule node to simplify your ESP.
Consolidate Branches
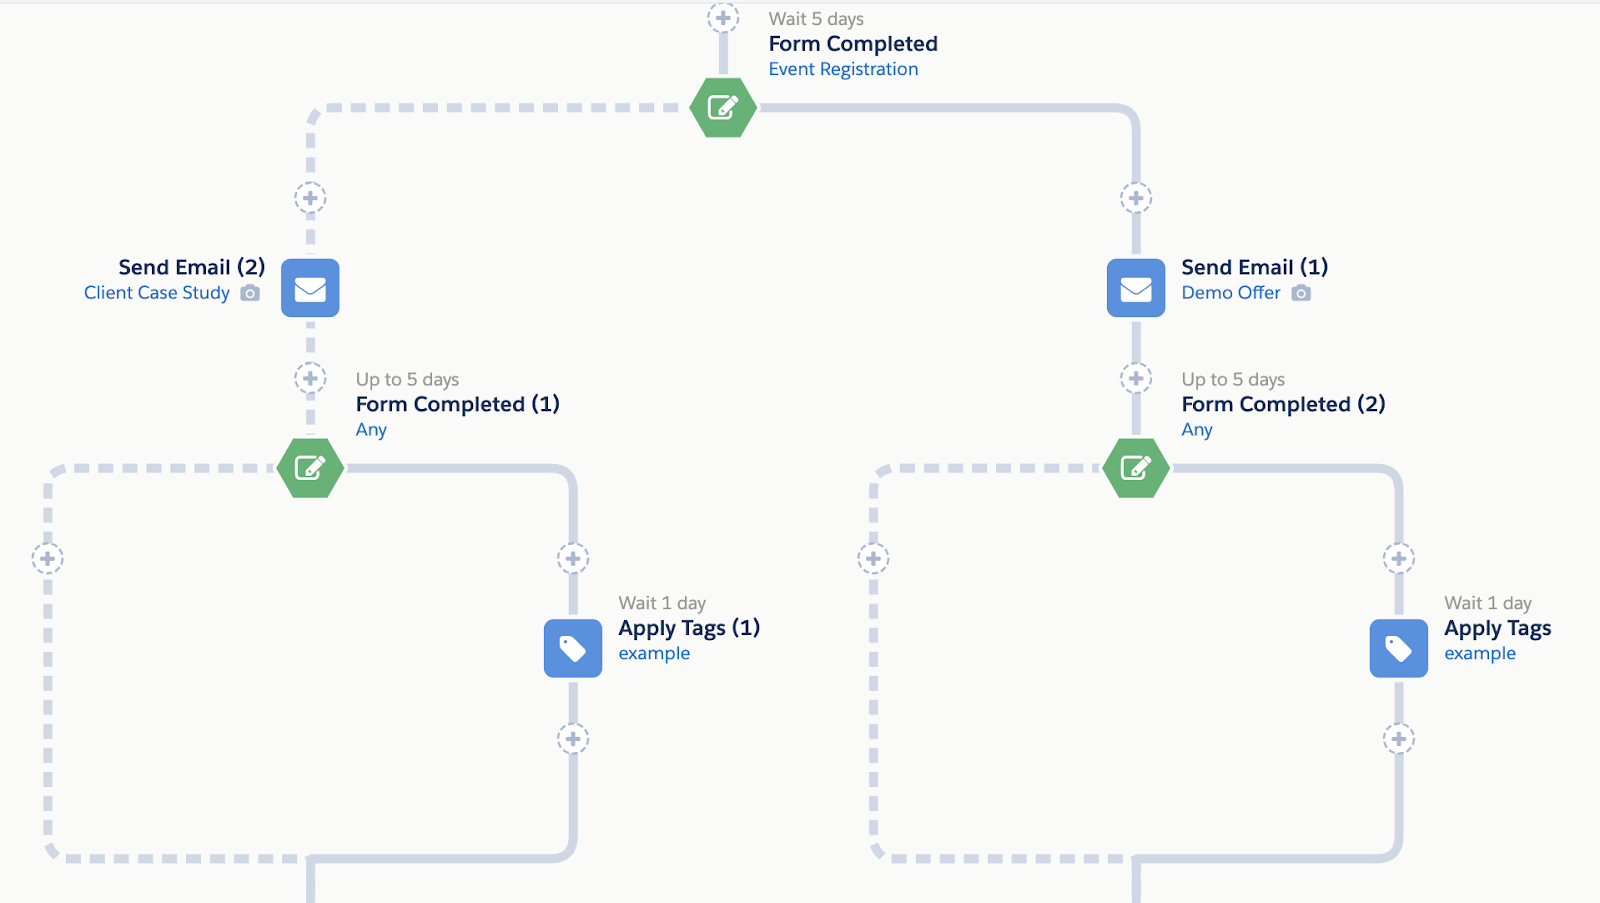
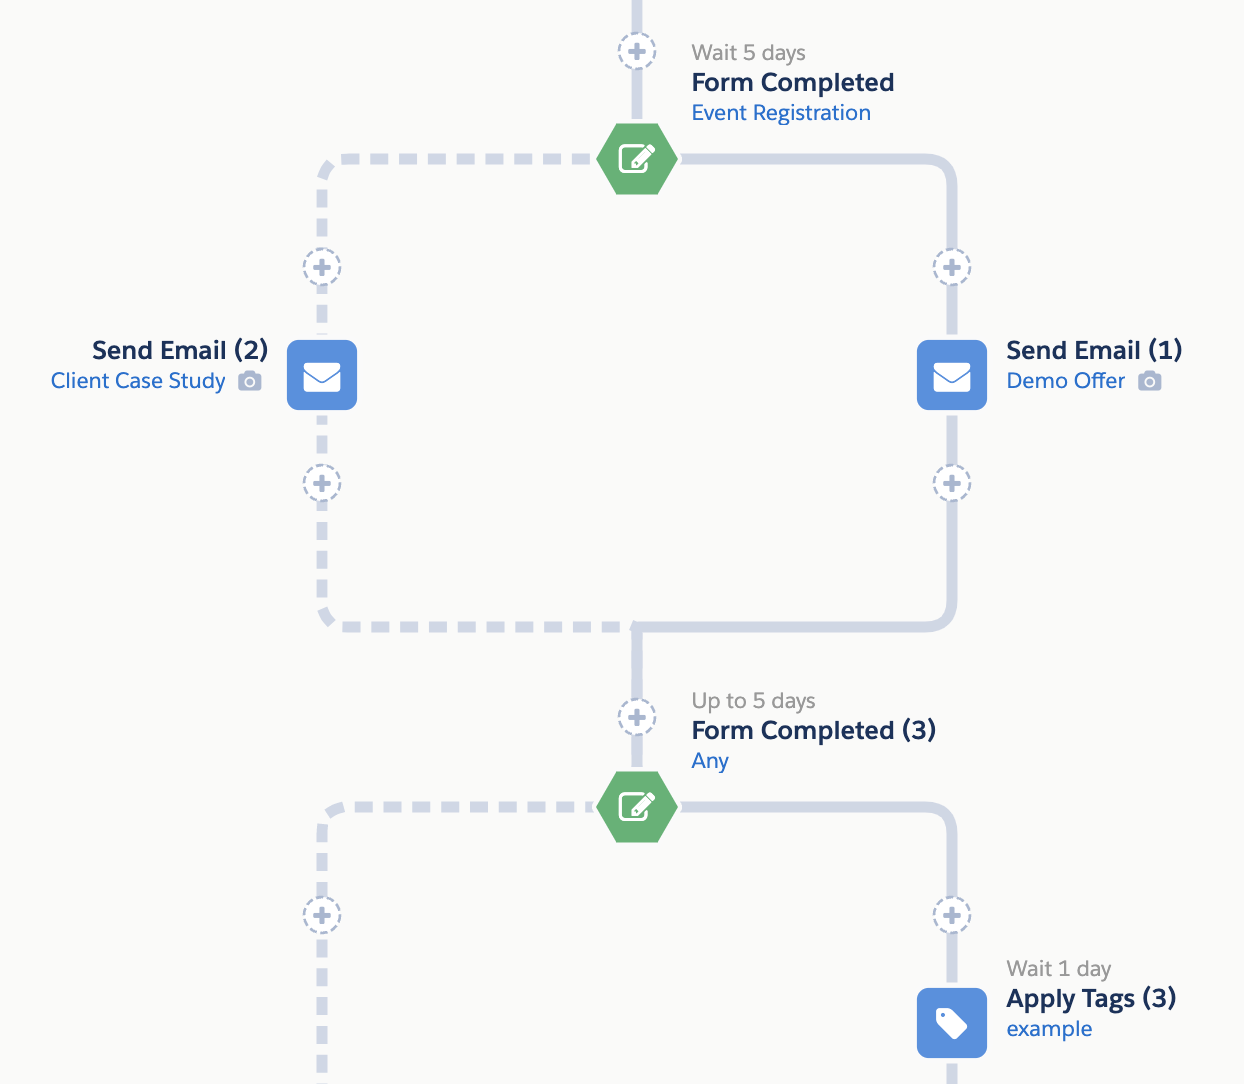
Consolidating ESP branches is another great way to cut down on the number of nodes an ESP has and therefore the number of requests it has to process. I find a lot of times users forget that ESPs can branch out, then back in, then back out again etc. When you don’t consolidate branches, your ESP will get very wide and updating them can be a big headache.
For example, moving from this:
To this:
A little Pardot org cleanup goes a long way
These are just some of the strategies you can employ to keep your Pardot org running smoothly, especially if you have a large org that is tackling numerous processes everyday.
Regularly auditing your org and Pardot processes is not only going to improve processing times, but it will make the system easier to use overall.
What other tactics do you use to keep your org clean? Tell us in the comments!
Twice in the span of less than a week, two different clients had questions or issues related to Salesforce campaign activation. I had my fair share of questions and assumptions about that little checkbox when I was in a marketing role and it seems like I’m not the only one.
With the help of a very simple Salesforce flow (that we’ll build in this post), we can automate the Salesforce campaign activation (and deactivation) process for Marketing Cloud Account Engagement (formerly Pardot), and let the marketing folks get back to marketing!
What does that “active” checkbox even do?
When creating a Salesforce campaign, we’ve all robotically checked that standard “Active” checkbox and never given it a second thought (because that’s what we were told to do). Well, for every good marketer who “checks the box,” there are plenty who don’t — and it does matter.
Campaign activation implications in Marketing Cloud Account Engagement (Pardot)
Just about all MCAE (Pardot) assets REQUIRE a campaign to be selected upon creation including:
Custom redirects
Emails
Forms
Form handlers
When the Active box is checked, you’ll be able to see your campaign and correctly associate it with your MCAE (Pardot) asset. If it’s not checked, then you are out of luck!
Additionally, imports into MCAE (Pardot) also require a campaign and play by the same rules. And completion actions? You guessed it. Only active campaigns can be selected and used.
Campaign deactivation implications in Marketing Cloud Account Engagement (Pardot)
Scrolling through long lists of campaigns in MCAE (Pardot) is not one of my favorite things. Deactivating campaigns helps by limiting visibility and shortening lists.
However, deactivating a campaign will NOT remove associations to assets that were made when the campaign was active.
If there’s an Add to CRM Campaign completion action set, it will continue to add members after the campaign has been deactivated. However, you will not be able to create new completion actions that reference the deactivated campaign.
I thought that box was automatically checked
I’ve been there too! Seems like a logical assumption.
If you’re going to ask me for the campaign start date and end date, then why the hell don’t you put it to use!
We’re going to do just that with a simple flow.
Enter Salesforce Flows
For MCAE (Pardot) Admins, think of Flow Builder as the Salesforce equivalent of Engagement Studio. With Flow Builder, just about anything in Salesforce can be automated using a graphical user interface and no code.
Let’s build our Flow to automate Salesforce campaign activation
Prerequisite Requirements
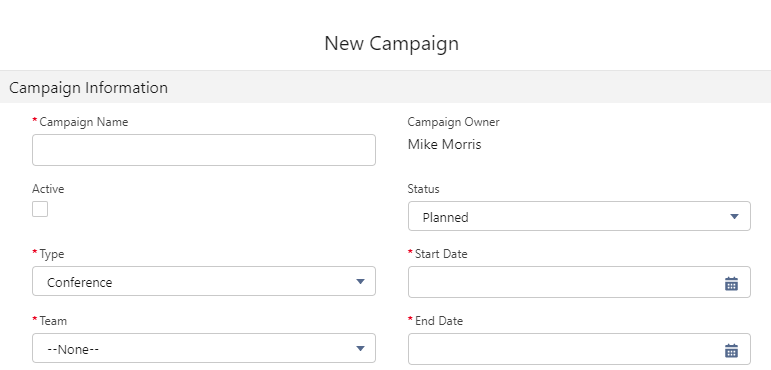
Before we start building, we need to ensure that we have all the necessary data to power the flow. Take a moment to look at your campaign page layout and make sure the following fields are present and required.
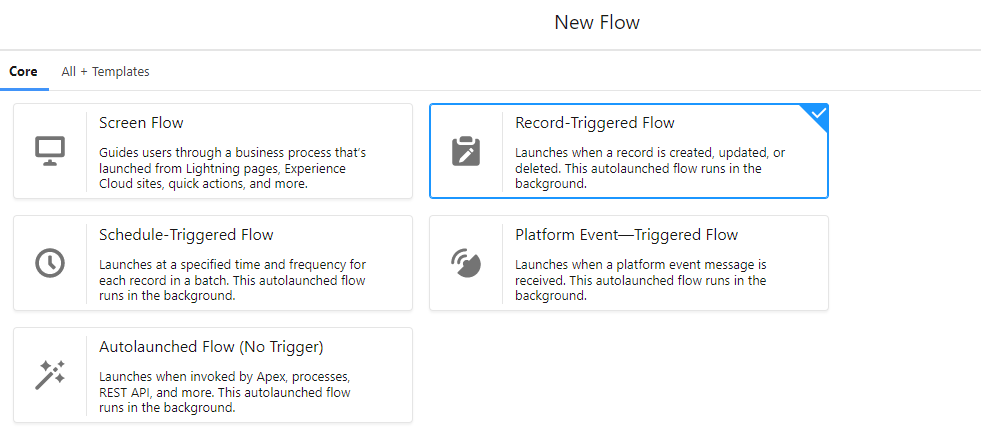
We will be using a Record-Triggered Flow for this use case. The flow will launch when a record is created, updated, or deleted.
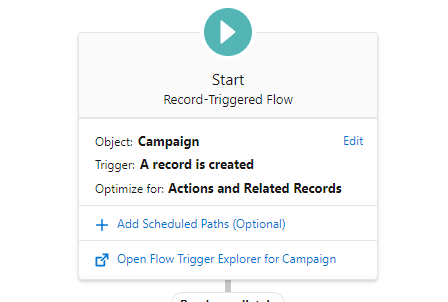
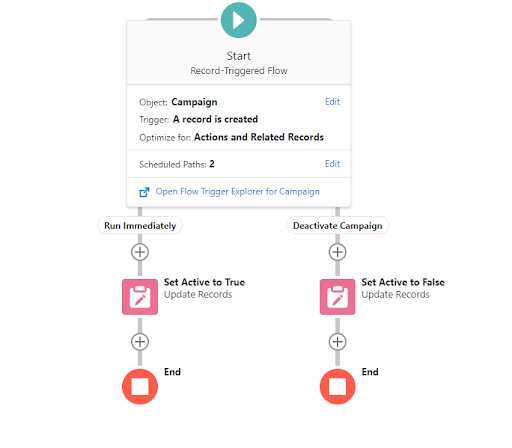
Step 2: Configure start
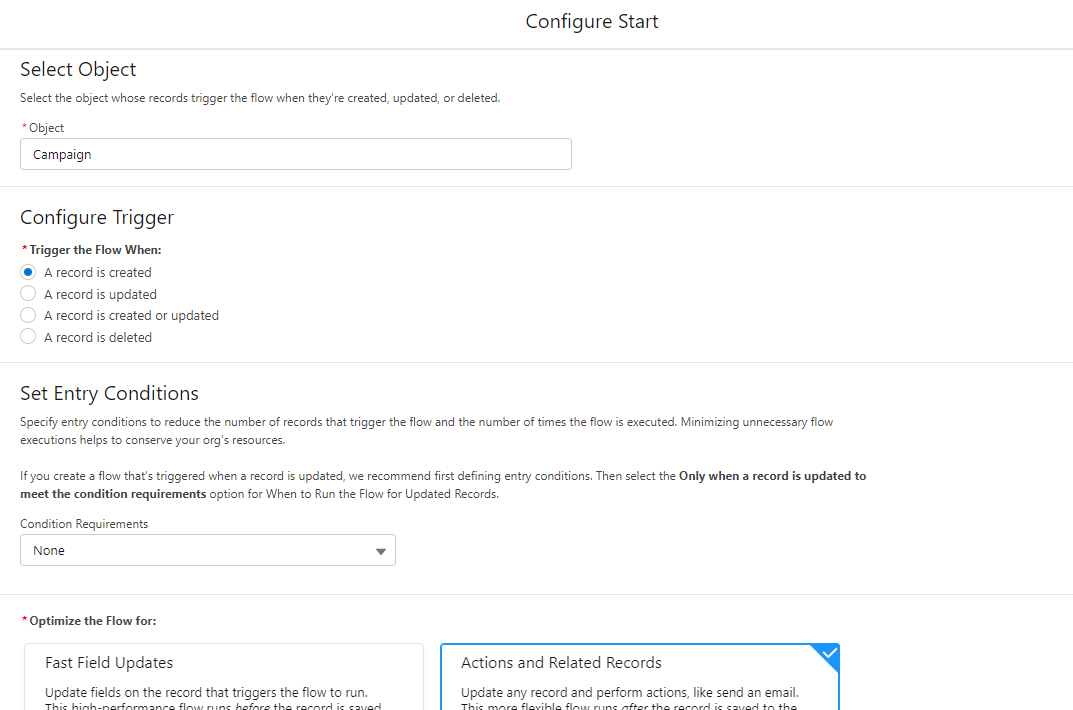
In this step, you’ll be selecting the object and configuring the trigger. We’ll be using the Campaign object in this example and we’ll be triggering the flow when a record is created.
We won’t be adding any entry conditions, but you might want to based on how your organization is set up. For example, you could set the Flow to only trigger for marketing record types.
Step 3: Configure the immediate path
We’ll be using two paths in this flow. We’re going to address the first path in this step and we’ll tackle the second path later.
The first path will run immediately (hence the “Run Immediately”) label. All we need this path to do is check the active box once our campaign is created.
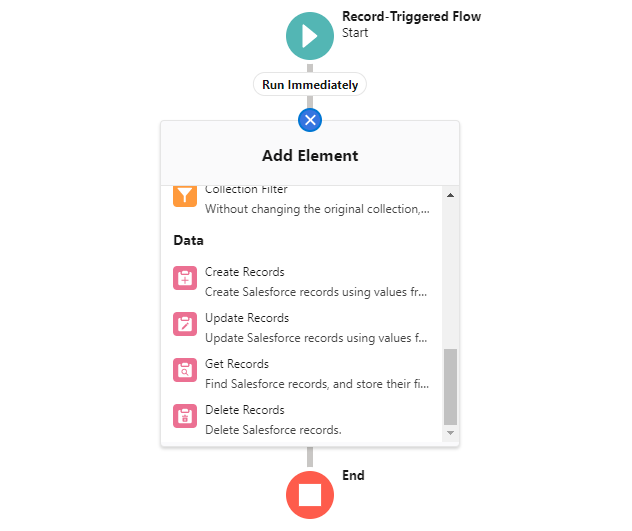
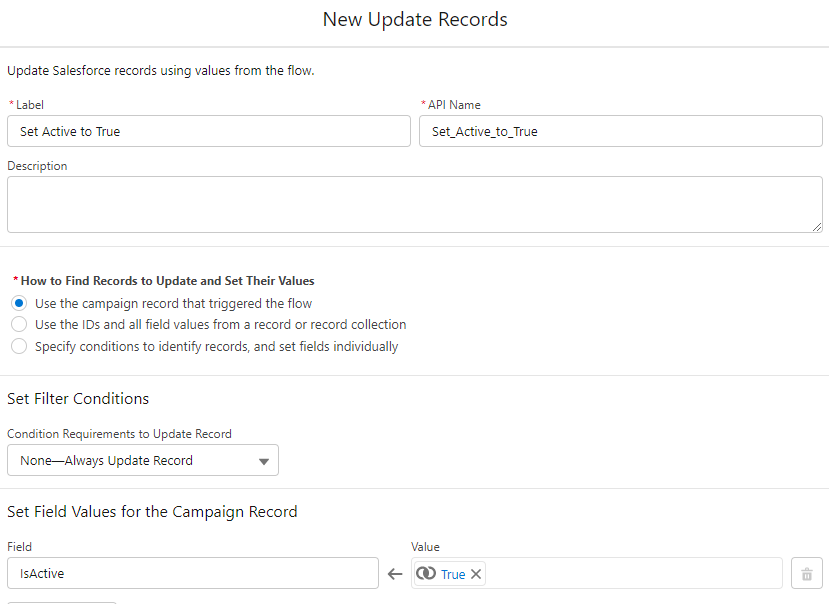
To do this, we’ll be using the Update Records element. Add this by clicking the + sign under the Run Immediately label and selecting Update Records.
You’ll then want to add a descriptive label and set the field values. In this case, a good label is “Set Active to True.”
The field that we’ll be updating is the IsActive field. Since this is a checkbox, we’ll be using the $GlobalConstant.True to “check the box.”
Step 4: Configure the second path
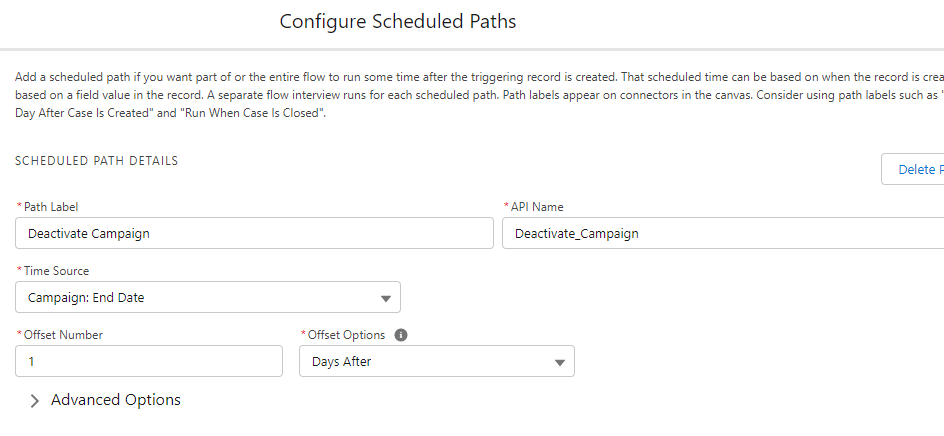
To add a second path to your flow, select the “Add Scheduled Paths” option. If you don’t see this, you’ll need to click on the “Start” trigger to open the editing section.
After adding the scheduled path, we’ll need to configure it. Below are the key elements:
Path Label – Name/description of the path
Time Source – The time element that will trigger the path
Offset Number – The length of the delay
Offset Option – Specify the measure of time (minutes, hours, or days) and if the path should activate before or after the Time Source
In this example, the scheduled path will run one day after the campaign end date. If you would prefer to have your campaigns visible for a longer period of time, you can increase the Offset Number.
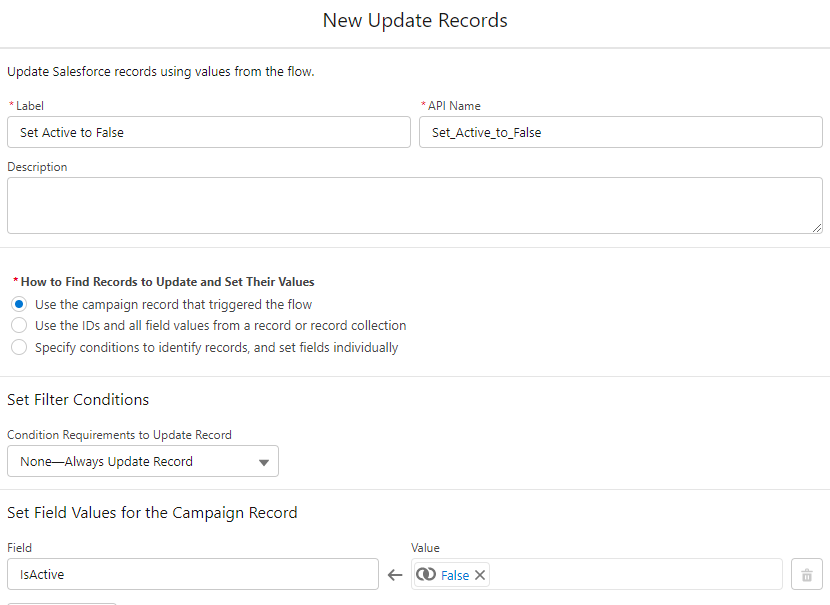
After configuring our scheduled path, we’ll need to add another Update Records element. This will look very familiar from the Run Immediately path. The only difference is that we will be using the $GlobalConstant.False value to uncheck the Active box.
Step 5: Save, Activate and Test
Your flow should look like the image below at this point.
If you are anything like me, you don’t want to sit around waiting days to see if your flow works as expected. To speed up your testing, simply update the setting in your scheduled path.
You can set the Time Source to Campaign: Created Date, Offset Number to 5, and Offset Options to Minutes After. With this configuration, your campaign will be deactivated 5 minutes after it’s created.
You can test your flow by creating a campaign (be sure the flow has been saved and activated), verifying that the Active box has been checked, and then checking the campaign again in 5 minutes to confirm that the Active box has been unchecked.
Once your testing is complete, don’t forget to update your scheduled path options back to the original settings.
Step 6: Deploy to Production
Once your flow has been tested, deploy to production using a change set, and sit back and relax!
Full Salesforce campaign management
The flow we built today was very basic and served a single purpose — to automate the activation of campaigns. However, it does not need to end there.
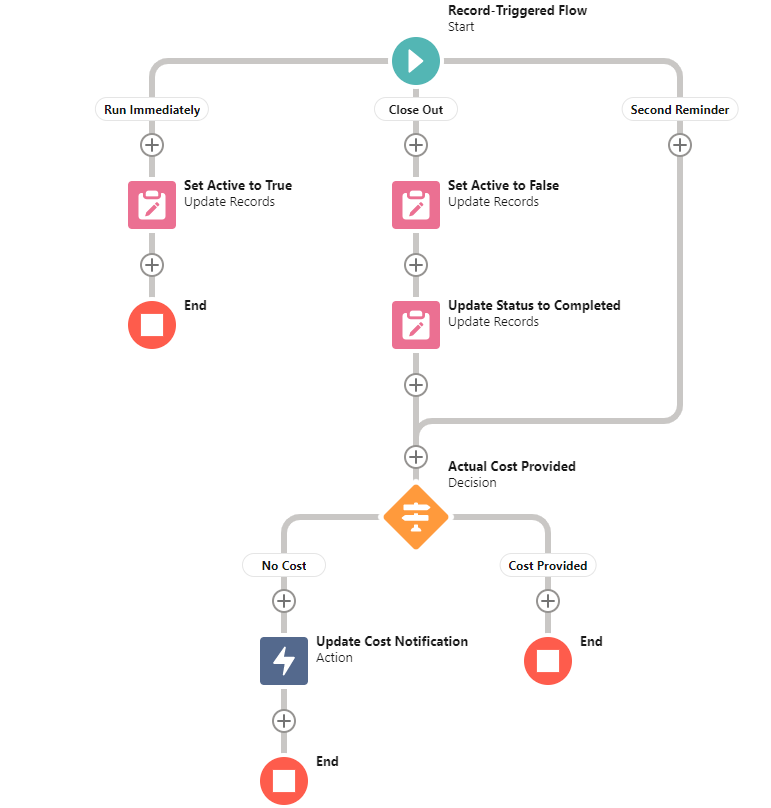
This flow can be enhanced to automatically update campaigns to “Completed” when they end and to send reminder emails to the campaign owner if they fail to enter the Actual Cost in Campaign.
Automate your Salesforce campaigns with Flow
Campaign management does not need to be manual. And it’s an essential piece when reporting on your efforts as a marketer. With the help of a simple Salesforce Flow, automation can be used to simplify the process and make things easier for your marketing team.
If you have questions about the simple flow detailed in this post or would like to look under the hood of the full campaign management solution, drop us a note in the comments section or reach out to the team at Sercante.
As a Pardot admin, I try to stay up to date on all the new features and functionality coming to the Pardot platform. Some new features are announced way in advance (looking at you Conditional Completion Actions) and other features seem to squeak by unnoticed.
In Spring ‘21, Salesforce expanded the “Clone with Related” functionality on campaigns to include Pardot marketing assets and no one really talked about it.
Yes, I know we have always been able to clone Pardot assets within Pardot, so the feature at face value doesn’t seem super fancy. However, when used correctly, it can allow you to streamline and templatize campaigns for your users.
But, before we get into that, let’s talk about how this feature works.
What can be cloned?
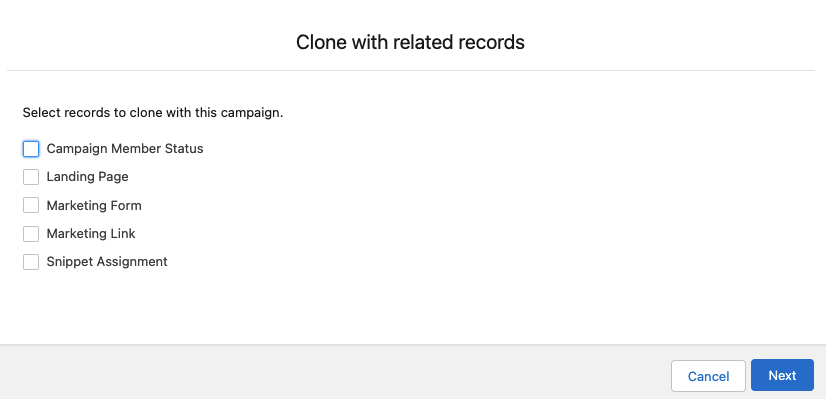
When cloning a Salesforce campaign, you can also clone:
Campaign Member Statuses
Landing Pages (Pardot Classic experience only)
Marketing Forms (Both Pardot Forms and Form Handlers)
Marketing Links (Custom Redirects & Files)
Snippet Assignments
These are the options within a Salesforce campaign:
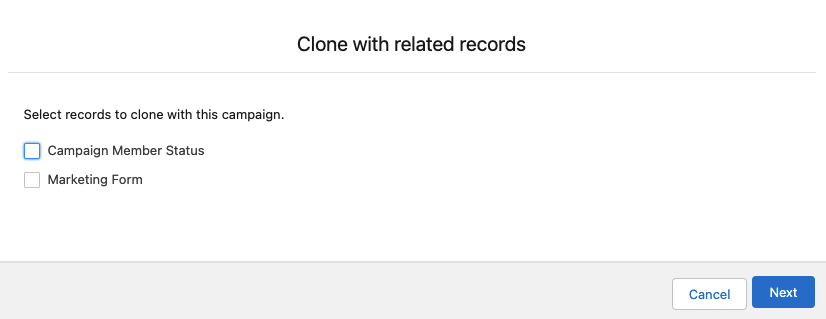
This view will change depending on the assets that are associated with the campaign when cloned. For example, if your campaign only has a Form associated, “Clone with Related” will display:
When selected, all assets of a specific type will be cloned. If your campaign has 2 Pardot Forms and 1 Pardot Form Handler associated with it, all three assets will be cloned if “Marketing Form” is selected. You cannot pick and choose which of the 3 Forms/Form Handlers will be cloned.
When cloned, the new asset will have the Date (YYYYMMDD) _ Time (HHMMSS) appended to the asset name.
“Clone with Related” also has a maximum number it can clone for each asset type. The limitations for each type are outlined here.
The limitations I ran into most are concerning the form fields, Pardot Forms are limited to 50 fields and Form Handlers are limited to 25. If a campaign has multiple Forms/Form Handlers and one is over the fields limit, none of them can be cloned.
What isn’t cloned?
When an asset is cloned, all fields and customizations are copied except:
Archive Date (available on Landing Pages)
Vanity URL (available on Landing Pages, Custom Redirects, and Files)
Bitly URL (aka Short URL, available on Landing Pages, Custom Redirects, and Files)
For Tracker Domains, the Salesforce documentation states that the cloned asset will use the Pardot account’s primary domain.
However, when testing in an org with multiple verified tracker domains I found that the cloned asset maintained the same tracker domain as the original asset, even if the original asset was using a domain that is notset as the primary.
Finally, Snippets themselves are not cloned, just their assignment. Since Snippets can be attached to multiple Campaigns the “Clone with related” action just associates the new Campaign to the existing Snippet.
So, does this help with Multiple Pardot Business Units
[long sigh]….no. When you have multiple Pardot Business Units (PBUs) you need to employ Campaign Record Types and specify which Record Type syncs to which PBU. Campaign Record Types and PBUs have a one to one relationship.
The “Clone with Related” functionality will create a campaign of the same record type, it does not allow you to change the clone’s Campaign Record Type before creating the clone. But, maybe this is laying the groundwork for this functionality in the future (Please!)?
Well, then why is this a big deal?
This functionality can be used to templatize your campaigns.
For instance, if for every webinar users need to:
Set up a Salesforce Campaign
Create a registration Form
Create a registration Landing Page
Put the form on said Landing Page
Create a Custom Redirect
How the feature templatizes your campaigns
Users could create a new Salesforce campaign, find the form template (or an up-to-date form if there is no template), copy it, find the landing page template, copy it, edit the Landing Page to include the correct form…so on and so forth.
However, each user is going to tackle the process differently and the more steps a user has to take, the more steps that have the potential to be skipped or done incorrectly. With the “Clone with Related” functionality you could instead create a Campaign called something like “Template_Marketing_Webinar” and make templates of all those standard assets you need for each webinar.
You can configure the assets just as you like, with custom fields, specific completion actions, fancy design aspects, and the works. Then when a marketer needs to set up a new webinar all they really need to do is click “Clone with Related,” name their new campaign, configure their vanity domains, bitlys, and archive dates and viola, DONE!
Not groundbreaking, but helpful nonetheless
This feature likely snuck by many Pardot admin’s noses because, at face value, it’s not entirely groundbreaking. However, used the right way this is one of those great additions that can make your life as a Pardot admin or marketer so much easier.
What other uses do you have for “Clone with Related”? Let us know in the comments!








 When selected, all assets of a specific type will be cloned. If your campaign has 2 Pardot Forms and 1 Pardot Form Handler associated with it, all three assets will be cloned if “Marketing Form” is selected. You cannot pick and choose which of the 3 Forms/Form Handlers will be cloned.
