Category

Pro Tips

Product Note: Marketing Cloud Growth and Advanced are editions of Marketing Cloud Next and have also been referred to as Agentforce Marketing.

I’m not going to be the guy who says “I told you so,” but Flow Builder has officially expanded from being an automation tool used exclusively by Salesforce Admins into the realm of marketing. Flow Builder is the engine used by Marketing Cloud Growth Edition to send emails and SMS messages and perform other automated tasks. If you’re not familiar with Flow, that’s OK. In this post, we’ll walk you through the process of building a message series with Flow in Marketing Cloud Growth Edition.

Getting Started

If you are new to flow, I would encourage you to take a moment to read Heather Rinke’s post An Introductory Guide to Salesforce Flow for Marketers before going any further. This is a great overview of flows and will provide context to the topics that we’ll be discussing.

If you have questions about Marketing Cloud Growth Edition, I’ve got you covered there too. Check out Erin Duncan’s post All the FAQs on Marketing Cloud Growth Edition for all your answers.

Building a Message Series

Confirm User Access

Marketing Cloud Growth (aka MCG) includes two permission sets out of the box. It also requires that users be added as a contributors to the CMS workspace and the Marketing Landing Pages site (see the Implementation Guide: Marketing Cloud Growth for more details).

NameDescription
Marketing Cloud AdminAccess to Salesforce Setup, Data Cloud Setup, and full control on campaigns, segments, and flows. Access to MCG’s setup assistant is also being added as part of the Winter ‘25 release.
Marketing Cloud ManagerFull control to manage campaigns, segments, and campaign (non-admin) flows.

User Permissions in Marketing Cloud Growth

It All Starts With A Campaign

One of the things that I really like about Marketing Cloud Growth is the campaign-centric approach. This is very logical and easy to use.

To get started navigate to the Campaigns tab in the Marketing App and click the New button. After completing the fields on the campaign page layout, you’ll be presented with the screen below. This is where the fun begins!

We’re going to select the Message Series option as that’s our goal for today.

Pro Tip: If you see this message when clicking one of the “Where do you want to start?” options, go back up and confirm your user access. Chances are you have not been added to the CMS as a contributor.

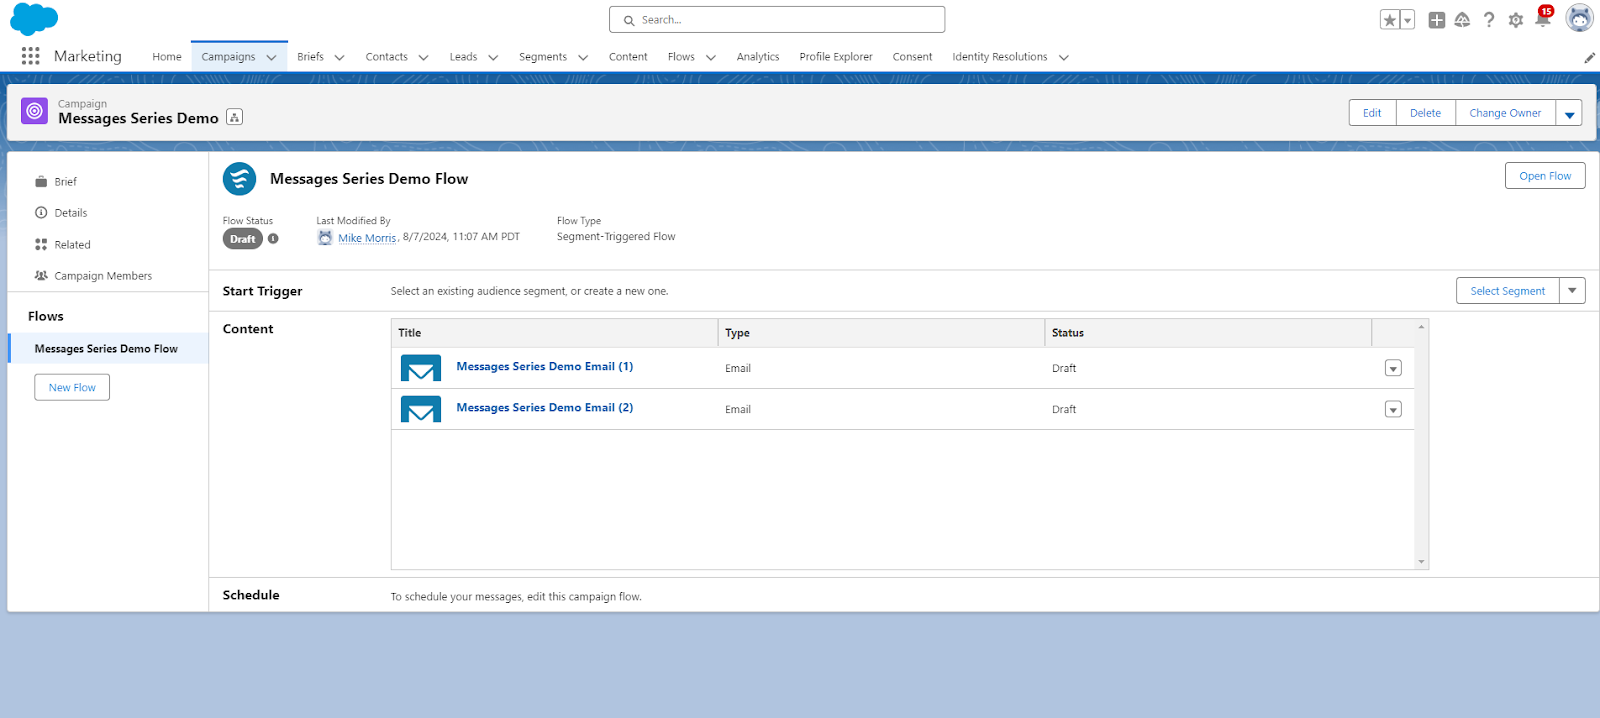
After selecting the Message Series option, you’ll notice that Marketing Cloud Growth has created your campaign, email templates, and a basic flow. This automation is a real time-saver and provides a great starting point for marketers.
  

Flow Access

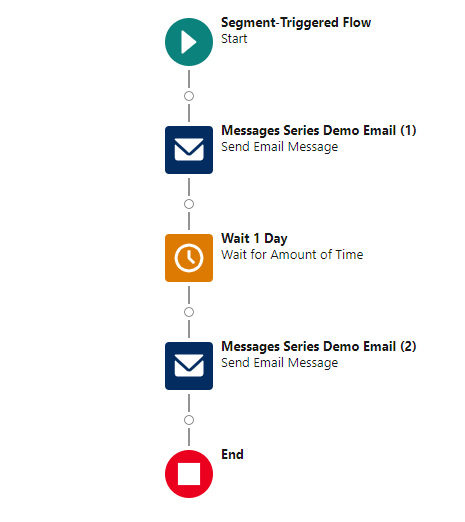
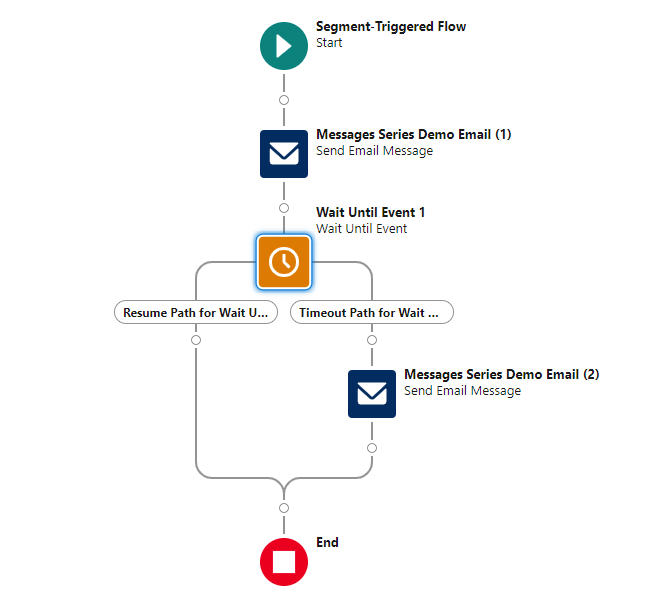
You can access the pre-built flow by clicking the “Open Flow” button within the campaign or by searching for “flow” in the App Launcher. This is a basic Segment-Triggered flow that sends an initial email, waits a specified period, and then sends a follow-up message. It’s a good starting point, but you’ll likely need to customize it to meet your specific requirements.

Customizing Your Flow

Flow Capabilities

If you are a Salesforce Admin who has experience with flows, you’ll immediately notice that this is not the same version of flow that you are accustomed to. Marketing Cloud Growth uses a streamlined version of Flow Builder and different trigger methods (Segment-Triggered and Form-Triggered). Most elements are available, but there are some limitations. See Marketing Cloud Growth Campaign Flows vs. Salesforce Flows by Lucy Mazalon for a great overview. Some limitations that stood out to me were the inability to access the Toolbox or create formulas, but don’t stress too much as this is a new product and capabilities will be expanded in future releases.

Pro Tip: Marketing Cloud Managers can access and edit flows, but their permissions are limited compared to Marketing Cloud Admins. Key missing elements include assignment, get records, and loop functions.

Current Capabilities

Set Schedule 

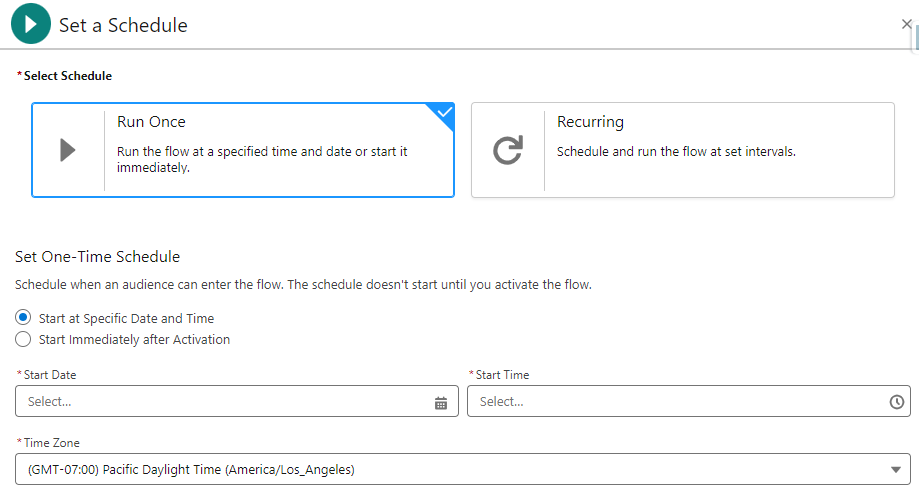
Unlike Record-Triggered flows, Segment-Triggered flows run on set schedules. This is due to the linkage with Data Cloud and its consumption-based pricing model. Credits are used when segments are processed so it’s recommended that segments only be refreshed prior to sending a communication or at intervals relevant to data updates (if data is added weekly, don’t refresh daily).

The schedule can be set by clicking + Set Schedule in the Start element. From there you’ll have the option to run once or set a recurring schedule.

Select Segment 

Speaking of segments, they can be added to the flow from the Start element by clicking + Select Element or directly from the campaign page by clicking Select Segment. I prefer adding the segment from the flow start element as it provides some additional features that I find very handy. 

After selecting a segment from the Segment dropdown, a summary of the segment is provided. The population, description, last publish date, and publish schedule are also displayed. If the segment population seems too large or too small, you can access and edit the segment rules. Keep in mind, any edits to the segment will be applied wherever the segment is used.

The final consideration is the republishing schedule. You can immediately publish the segment before running the flow (to make sure the most recently added individuals are included) or default to the publishing schedule defined in the segment. The interface design helps make the decision very easy by clearly displaying the segment publish schedule so you can make an informed decision.

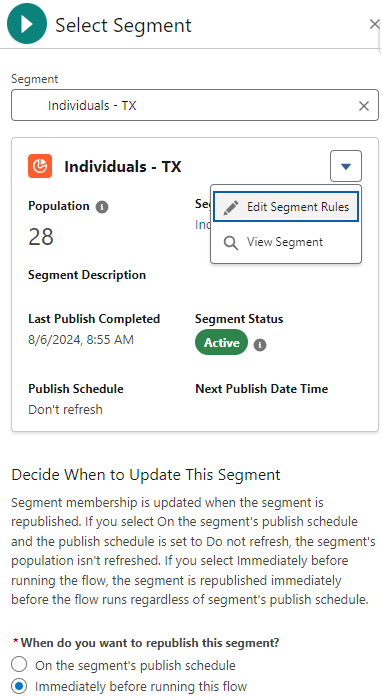
Pro Tip: If you see that your segment is not set to refresh, it’s important that you select the “immediately before running the flow” option. If this option is not selected, you risk missing newly added individuals.

Update Wait Elements 

Flow includes three wait elements that provide a lot of flexibility. These elements can easily be added to your flow by hovering over the circle between elements, clicking the + sign, and then entering “Wait” as the search criteria.

One big advantage over Account Engagement’s Engagement Studio is the ability to have wait times down to the minute in the Wait for Amount of Time and Wait Until Event elements.

Apply Branch Logic

Branch logic can be added using the Wait Until Event or a Decision element. Let’s look at both.
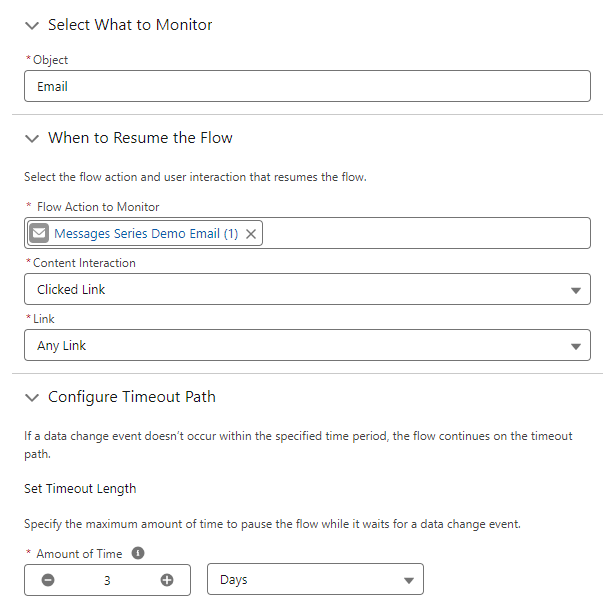
Wait Until Event

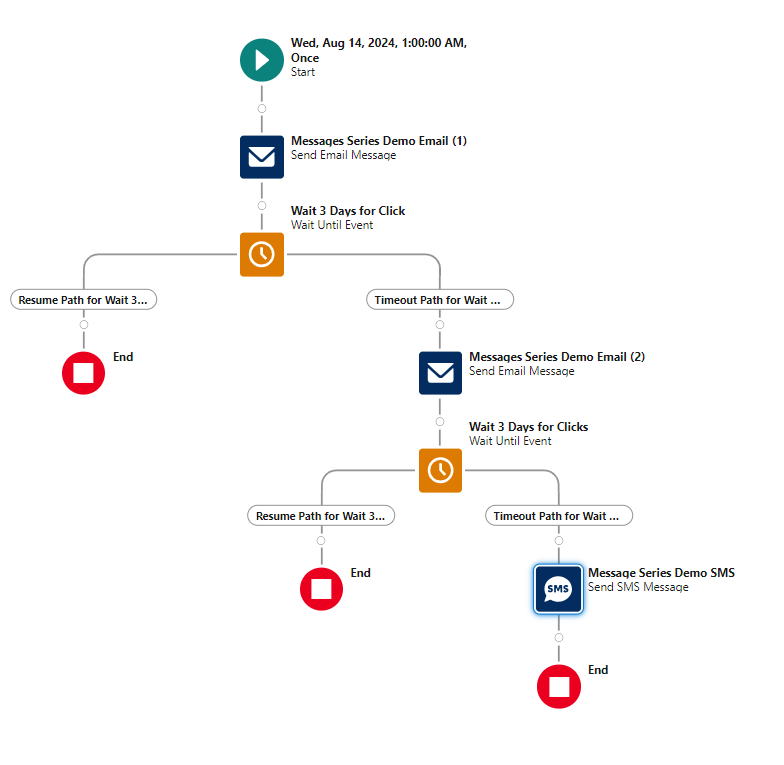
This element allows you to monitor for an action in the flow and then branch based on the engagement. As an example, you could monitor for individuals who clicked a link (and link or a specific link) in the first email in your series and then branch based on the interaction (or lack thereof). This can also be applied to SMS messages.
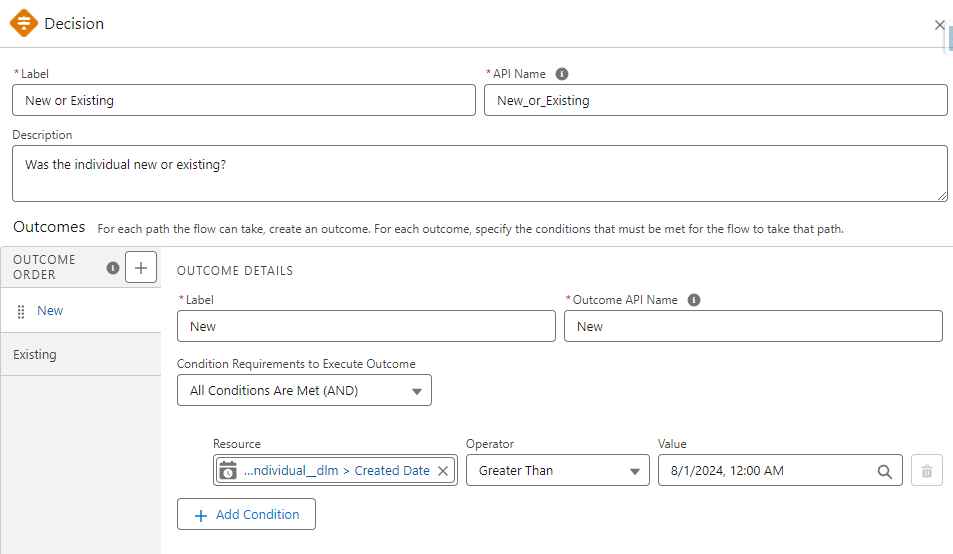
Decision Element

This decision element is another way to apply branch logic by specifying criteria for outcomes. The cool thing here is that you are not limited to two branches, additional outcomes can be added as needed creating multiple branches.

The actual resource fields accessible in decision elements are somewhat limited right now. This is certainly an area to keep an eye on as it will become even more valuable in future releases.

Vary Communication Methods

Another great thing about Marketing Cloud Growth is the ability to easily integrate SMS messages into flow. This is a great way to try a different outreach method if individuals don’t respond or to customize nurtures based on individual preferences.

In the example below, the intent is to get individuals to engage (click). After sending two emails and not getting a response, an SMS message is sent to see if a different communication method gets the desired interaction.

Learn More About Marketing Cloud Growth Edition & Flow

Marketing Cloud Growth is an exciting new offering from Salesforce and it’s only going to get better with each release. If you would like to learn more about this product, be sure to check out our Marketing Cloud Growth Edition Bootcamp.

Getting hands-on with flow is something that I highly recommend. Fortunately, Trailhead has a wealth of flow-related training available for free. Here are a couple of recommendations to help get you started.

Finally, Data Cloud is at the core of segmentation in Marketing Cloud Growth Edition. The Data Cloud Basics for Marketers trail is a great way to learn some of the benefits and key terms of Data Cloud that you will run across.

Event marketing is a fantastic way to connect with your audience, build brand awareness, and generate leads. However, managing event marketing activities can take time and effort. That’s where Account Engagement can help — in more ways than you probably thought!

Salesforce Marketing Cloud Account Engagement (f.k.a. Pardot) can streamline your event marketing efforts from initial promotions and registrations to post-event follow-up and nurturing. In this post, we’ll explore how you can use Account Engagement for event marketing to ensure a seamless and impactful experience. We’ll show you which out-of-the-box tool(s) we recommend using at what time during the event process so you can maximize your efforts.

Using Account Engagement for Event Marketing: Planning and Promotion

A marketing event is only as good as the planning that goes into it. Ensuring you have your campaigns and other assets created in advance with a clear goal and structure in mind will dramatically improve the organization of your initiatives and enable consistent reporting down the road.

Here’s how to do that.

Set Up Your Event in Account Engagement (Pardot)

If you’re using Connected Campaigns, start by creating a campaign (or hierarchy of campaigns) in Salesforce for your event. This will help you track all marketing activities and ROI related to the event. You’ll then associate all your event assets (emails, landing pages, forms) with these campaigns later.

If you’re not using Connected Campaigns, then we highly recommend you read this blog post to understand the advantages of Connected Campaigns and how to enable the feature. Then, reach out to Sercante if you’re unsure of your next steps.

Create Your Campaign Structure

These are the steps to create your campaign structure:

  1. Navigate to Campaigns and click on + Add Campaign.
    • Name your campaign using your organization’s standard naming conventions.
    • Set default and/or custom fields, like cost, start/end date, and type.
      • If it is a child campaign, select the appropriate parent to create your hierarchy
    • Ensure your campaign is marked “Active” so it can sync with Account Engagement via Connected Campaigns.

Design Event Registration Forms

Now it’s time to design your forms to collect attendee information such as name, email, job title, and company.

  1. Under Content  > Forms, click + Add Form.
    • Ensure your form includes fields that are crucial for segmenting and personalizing follow-up communications.

Develop Event-Specific Landing Pages

Create engaging landing pages to capture registrations. These pages should highlight the event’s benefits, speakers, and agenda, and include a clear call-to-action (CTA).

  1. Navigate to Content  > Landing Pages and click on + Add Landing Page.
    • Choose a layout template that fits your event’s branding.
    • Customize the page with relevant content and images.
    • When prompted, select the form you created in the previous step.

Promoting Your Event

Develop Email Marketing Campaigns

After all, Account Engagement is an email marketing platform! Let’s use that core functionality to promote our event. Next, you’ll create a series of emails to promote your event. 

Your campaign will include some form of the following emails:

  • Invitations
  • Reminders
  • Last-chance registration prompts
  • Follow-up correspondence with attendees

Some emails may be used as List Emails, while others may be automated sends using email templates.

I always recommend my clients have a comprehensive, universal email template on hand in their org. What I mean by that is a repeatable template that has lots of different sections for all types of emails. You’d clone this template, remove the sections you don’t need, and save.

On the right is an example of a Sercante Ultimate Email Template the team built for The Spot. It’s a common request our clients bring to us, so drop us a message if you don’t have a universal email template and want to get one.

Sending One-Off List Emails

If you’re sending a one-off List Email, follow these basic steps:

  1. Navigate to Account Engagement Email > List Emails and choose one of your published Email Templates.
    • Modify your sections accordingly, while keeping consistent branding.
    • Craft compelling subject lines and body content that convey the value of attending your event.
    • Include a call to action, depending on the needs of the event.
    • Make sure to always test before you schedule or send your emails. There’s a handy QA checklist in this blog post so you can hit the send button confidently.

Segmentation and Targeting

Use Account Engagement’s segmentation features to target specific audience groups with tailored messages.

  1. Go to Prospects > Segmentation Lists and create lists based on criteria such as past event attendance, industry, or engagement level.
    • Use dynamic lists for criteria-based segmentation (i.e. location, job title, CRM status).
    • Use static lists for manual segmentation (i.e. adding individual prospects to an invitation list).

Want to go a step further? Use social media connectors

Tap Account Engagement’s social posting capabilities to promote your event on LinkedIn, Twitter, and Facebook.  You’ll need to set up your social media connectors under Account Engagement Settings > Connectors and log in to connect your social media accounts with Account Engagement. 

Under Content > Social, you can create, manage, and schedule social posts. To complete the circle, you can insert CTAs in your posts that link back to your event landing page.

Managing Marketing Event Registrations with Account Engagement

Tracking Registrations

Forms

Use Forms to ensure all data flows into Account Engagement seamlessly. There’s a handy form style generator here you can use to customize your forms to match your branding.

  1. Navigate to Content > Forms and click + Add Form (or clone one you already have!)
    • Map your fields to capture all necessary registration information.
    • Ensure you customize your Completion Actions for autoresponders, assignments, campaign membership, etc.

Automation Rules for Registration Management

If Completion Actions don’t offer the functionality you’re looking for, consider creating Automation Rules to manage registrants. 

Automation Rules allow you to automate actions such as adding them to a list, sending confirmation emails, or notifying your sales team when hot prospects or accounts are actively engaging.

  1. Go to Automations > Automation Rules and click + Add Automation Rule.
    • Set criteria (i.e. form completion) and corresponding actions (ie. add to list, send email, update campaign member status).
    • Once you’re ready to run it, make sure you “unpause” the automation rule.

Confirmation and Reminder Emails

For this, we highly recommend using Account Engagement’s automated nurture engine: Engagement Studio. This powerful tool comes out of the box with all MCAE editions.

Under Automations > Engagement Studio, you can create intelligent nurture programs to automate follow-up, update records and act immediately on interactions with your prospects.

Sending Confirmation Emails

Ensure that every registrant receives an immediate confirmation email with event details. 

Reminder Emails

Schedule reminder emails leading up to the event to keep registrants engaged and reduce no-shows. Create a series of reminders — starting a week before the event, a day before, and a few hours before the start.

Event Marketing Doesn’t End There. Keep it Going!

You’ve made it to the day of your event! While your pre-event promotion is over, and your email invitations and reminders have all been sent, you can still use Account Engagement to engage with your prospects during and after the event, and throughout the sales process.

During the Event

Engaging Attendees with Personalized Content

Use Account Engagement’s dynamic content features to personalize the content displayed to attendees based on their profiles. 

  1. Navigate to Content > Dynamic Content and create content blocks that change based on prospect data (i.e. industry, job title, location).

Real-Time Data Collection

Use Account Engagement’s tracking capabilities to monitor attendee interactions during the event, such as session attendance and engagement with event content. You can also implement tracking codes on event-related pages and materials to capture real-time data.

Feedback Forms

Create and send feedback forms immediately after each session to gather attendee insights and improve future events. This is a crucial step that will help your team continuously improve and build stronger relationships with your audience.

Post-Event Follow-Up

Analyzing Event Performance

Generating Reports

Use Account Engagement’s reporting features to analyze event performance, including registration numbers, attendance rates, and engagement metrics.

  1. Navigate to Account Engagement Reports to view detailed reports on your event’s asset performance (forms, landing pages, emails, etc.).
  2. You can filter and export data, or use other tools like Salesforce Lightning Reports or B2B Marketing Analytics for more advanced reporting and data visualization.

ROI Analysis

Calculate the ROI of your event by comparing the costs associated with the event to the revenue generated from leads and opportunities. 

  1. Use Account Engagement’s ROI reporting tools under Reports > Marketing Assets.

Nurturing Leads

Follow-Up Emails

Create a series of follow-up emails to thank attendees, share event highlights, and provide additional resources. Use Engagement Studio to automate these follow-up emails for timely and relevant communication.

Lead Scoring and Grading

Update lead scoring and grading models based on attendees’ behaviors during the event.

  • Go to Account Engagement Settings > Scoring to adjust scoring rules, and use this updated data to prioritize leads for sales follow-up.

Re-Engaging Non-Attendees

Post-Event Outreach

Don’t forget about those who registered but didn’t attend. Reach out with recorded sessions, summaries, and key takeaways to keep them engaged. Use segmentation lists to identify non-attendees and create a specific follow-up campaign for them.

Surveys and Feedback

Send a survey to non-attendees to understand why they couldn’t attend and gather insights to improve future events. 

  1. Use Forms to create and distribute these surveys, and analyze responses to enhance your event strategy.

Planning Future Events

Reviewing Your Feedback

Incorporate feedback from attendees and non-attendees into your planning for future events to continuously improve the experience. 

  1. Use Account Engagement Reports > Forms to analyze the feedback forms you’ve sent after previous events, and make data-driven decisions and adjustments to your approach.

Early Bird Promotions

Start promoting your next event early with exclusive offers and early bird discounts to previous attendees. 

  1. Use Account Engagement Email to create and send promotional emails, and leverage Dynamic Content for personalized offers.

Now you’re an Account Engagement event marketing pro!

Using Account Engagement’s powerful features and capabilities, you can streamline every aspect of your event marketing activities, from initial planning and promotion to post-event follow-up and long-term nurturing. This ensures a seamless and impactful event experience and maximizes your marketing ROI and strengthens your relationships with prospects and customers.

Utilizing Account Engagement for event marketing can lead to more organized, efficient, and successful events, ultimately driving more meaningful interactions with your customers.

Wanna take a deeper dive into event marketing with Salesforce? Check out this blog post, 5 Event Marketing Best Practices To Implement For Your Next Campaign, which is a roundup of insights from seasoned event marketing professionals.

Student expectations today are vastly different than they were a decade ago. It’s causing technology leaders at the most successful educational institutions to rethink their data infrastructure and student journeys through real-time interaction management strategies.

Today’s students want a personalized, seamless, engaging journey that keeps pace with their brand experiences outside of higher education. At the same time, more and more individuals are bypassing the traditional college education routes altogether. That means higher education institutions (HEIs) need to exceed student expectations to reach enrollment and retention goals and ultimately deliver successful student outcomes.

Combating Headwinds in Higher Ed: A three-part series

Throughout this three-part blog series, you will learn about using your institutional data to create personalized student experiences at scale and in real-time within your college or university. 

  1. Part one: Real-time interaction management and real-time interaction for student success  
  2. Part two: Overview of Salesforce Data Cloud for higher education professionals, potential use cases, and best practices for successfully using Data Cloud
  3. Part three: Building a unified data vision and then activating your data to build a CRM + AI + data strategy for your institution

This series was co-authored by Kirsten Schlau, VP of Technology at Sercante, and Dr. Bradley Beecher (email), Director, Student Experience at Salesforce.

Harnessing data to navigate and overcome challenges in higher education

To help combat higher ed headwinds, there’s a tremendous untapped opportunity for HEIs to use their data by improving organization-wide data infrastructure.

Yes, you’re probably reading this and thinking things like:

We do use data — we analyze our data to maximize the value of resources and stay ahead of constituent needs.

Or even…

We use our data to create strategic plans, execute them efficiently, and analyze their results to differentiate our institution, proactively improve student outcomes, and report outcomes to government agencies and ranking organizations. 

Oftentimes though, that data is trapped inside campus systems that don’t easily integrate with each other. It’s time-consuming to piece together a cohesive and accurate story when the data is trapped, but there’s a better way. It involves creating a fully integrated single source of truth to manage student data.

Unifying student data can help your institution to:

  • Generate real-time institutional reporting
  • Create a unified student record
  • Take action from the data
  • Personalize the student experience to reinforce a sense of belonging 

Taking cues from non-HEIs to use data for growth and retention

What if we told you there’s an opportunity more specifically to use that data on an individual basis, at a 1:1 scale to personalize the student experience in real-time?

This is happening in other industries. In fact, you might have experienced personalization like this as an online shopper. Here are a few examples.

What is real-time interaction management (RTIM)?

Real-time interaction management, also known as RTIM, uses customer interactions, predictive modeling, and machine learning to deliver consistent, personalized customer experiences across channels in real-time.  

“Forrester Research analyst Rob Brosman originated the term Real-Time Interaction Management in 2012, and three years later Rusty Warner, another Forrester analyst, offered the formal definition of, “Enterprise marketing technology that delivers contextually relevant experiences, value, and utility at the appropriate moment in the customer life cycle via preferred customer touchpoints.” – Source

RTIM equips marketers to gain immediate visibility into critical moments within the shopping or user experience, which can deliver better consumer experiences and outcomes. This includes generating relevant offers and product suggestions on the right devices at the right time to drive customer engagement, satisfaction, and, in turn, revenue growth. 

Impact of real-time interaction management in the real world

As an everyday consumer, you’ve likely already experienced the effects of RTIM (or you’ve experienced a scenario where you wish RTIM was in place).

Example scenario illustrating RTIM in e-commerce:

Let’s say a customer, Maria, visits an online fashion retailer’s website:

  1. Browsing Products: Maria lands on the retailer’s homepage and starts browsing through summer dresses.
  2. Real-Time Data Capture: As Maria navigates through the website, her behavior is captured in real-time. This includes the pages she visits, the products she clicks on, her past purchase history, demographic information, and any other relevant data.
  3. Real-Time Analysis: The e-commerce platform analyzes Maria’s behavior and data in real-time. It identifies her preferences based on her browsing history, past purchases, items in her shopping cart, and any other available data points.
  4. Personalized Recommendations: Using RTIM, the e-commerce platform dynamically generates personalized recommendations for Maria. It might suggest summer dresses similar to the ones she’s viewing based on her style preferences and past purchases. These recommendations are displayed prominently on the website in real-time.
  5. Real-Time Engagement: While Maria is still browsing, a pop-up notification appears offering her a limited-time discount on a dress she had previously shown interest in. This real-time engagement aims to incentivize Maria to make a purchase.
  6. Adaptive Pricing: As Maria continues to browse, she adds a couple of dresses to her cart but hesitates to complete the purchase. In response, the e-commerce platform dynamically adjusts the prices of the items in her cart, offering her personalized discounts or free shipping to encourage her to proceed to checkout.
  7. Abandoned Cart Recovery: If Maria leaves the website without completing her purchase, the e-commerce platform sends her a personalized email reminder within minutes to remind her about the items in her cart. These reminders offer her an additional discount or incentive to complete the purchase.
  8. Cross-Channel Consistency: Whether Maria interacts with the retailer’s website or mobile app, or when she receives an email, the messaging and recommendations remain consistent across all channels for a seamless and personalized shopping experience.

In this example, RTIM enables the e-commerce retailer to engage with Mary in real time, providing her with personalized recommendations, discounts, and reminders tailored to her preferences and behavior. This ultimately increases the likelihood of conversion and enhances customer satisfaction.

Additionally, some online retailers are now using RTIM not only in their marketing efforts but also as a way to offer seamless customer experiences. 

Harnessing RTIM at colleges, universities, and other post-secondary education institutions

In the e-commerce example above, the experiences were grounded in segmentation and, of course, made up of various data points. 

It’s no different for HEIs. The ability to segment and provide greater personalized content and experiences leads to a great student experience.

We’ll share a few examples of how other professionals in higher education are doing this today.

Real-time interaction for student success

Imagine a world where student advisors can gain a full 360° picture of their students in a single view. This could include:

  • Past class enrollment records and performance indicators
  • Required courses that support their designated degree path
  • Intelligence to recommend courses based on individual interests and passions outside of their degree path
  • Automatic insights into things such as on target to graduate, at risk, potential for drop-out, and any other insights unique to your institution.

Oh! And one more thing to add: this is all done at scale with minimal manual effort put on the advisor.

Step 1 to building an RTIM strategy: Unify data to create a single source of truth

This vision can become a reality when your data is not trapped in siloed campus systems. 

You might say, “How is that possible?”

Here’s how you can start building a student-centric RTIM strategy.

All of this data aggregation and related insights are powered by Salesforce Data Cloud and Einstein 1 Platform. They are the building blocks to creating personalized student experiences with real-time capabilities. And they can also help advisors to gain more time to focus on making meaningful connections with their advisees and ensuring their long-term success. 

How does the Einstein 1 Platform support RTIM strategy for HEIs?

The Salesforce Einstein 1 Platform (A.K.A. “Salesforce core”) unifies your data, AI, CRM, development, and security into a single platform. It’s an extensible AI platform (meaning, it easily connects with other Salesforce platform products and third-party integrations), and it can facilitate the fast development of generative apps and automations.

Through Einstein 1, your institution can appropriately address students’ most common, basic, or foundational questions through alerts and automated workflows. Then your advisors’ interactions with students can center on deeper and more meaningful advising conversations.

Creating unified student profiles with connected data

A unified student profile, aggregating student data into a single student record allows advisors to meet with more students and encourage those meaningful conversations. For example, instead of talking through the required courses advisees need for their program, they get automated alerts listing which courses to take next. Then, the advisee’s open office hours can become career exploration sessions or deep dives to help students better understand complex concepts.

At institutions with siloed data, creating alerts like those in the example requires a ton of manual effort and time. And let’s face it — advisors don’t have time to spare. 

How Data Cloud solves the RTIM puzzle

With Salesforce Data Cloud, advisors can provide more proactive and holistic support for students. That’s because campus data for each student is unified in a single record — something that benefits both students and the institution.

In turn, students make more informed and thoughtful decisions with this proper support from academic advisors. Getting automated alerts supports students as they navigate the university/academic program policies and procedures, and, more importantly, offers an exceptional college experience.

Ultimately, Data Cloud will help build better staff experiences with a unified student record and a seamless student experience that meets their modern expectations.

In the next post in this series, we will provide an overview of Data Cloud for Higher Education, examples of potential use cases, and best practices for using Data Cloud.  

Ready to transform your student experience through real-time interaction management?

Discover how real-time interaction management can elevate the way you engage with students, and enhance their experiences with personalized, timely interactions that make a real difference.

Learn more about Salesforce Education Cloud here to understand the platform and how it compares and relates to your current technology stack.

Then, send a message to Sercante to learn about our Salesforce consulting services for higher education institutions, including Salesforce implementations & migrations, design & architecture services, reporting & analytics, custom integrations, and everything in between.


As an SMB marketer, you’re required to wear a lot of hats. From lead generation and aligning with sales and service teams, to creating content, emails, and personalized customer journeys you’re pulled in a lot of directions – and frankly that can be tough. Cue – artificial intelligence!  Gain insights and considerations for how you can use AI to help your marketing efforts

Supporting your day-to-day tasks 

One of the main benefits of AI  is in the area of efficiency. AI allows small teams to do more with less/fewer resources – which according to some marketers – they expect AI will save them 5 hours per week – that’s over ½ a day you get back!

 Examples of this include 

  • Content creation – from minutes to seconds
  • Customer segmentation – reducing the manual effort and technical skillset commonly required

AI can also lead to better experiences for customers – which in reality is what it’s all about. By giving you the ability to get content out quickly, AI can also increase your opportunity to personalize customer experiences such as send times – waiting to send until someone is most likely to engage.

How it’s done

But before we go much further – let’s level set: AI can be categorized based on its functionality and the specific tasks it performs. Two common categories are Generative AI (as described above) and Predictive AI. Here’s how they differ:

  • Generative AI focuses on creating new content, such as text, images, music, or even entire datasets. These systems generate data that mimics the patterns and structures of the input data they were trained on – leveraging user feedback such as thumbs up or down as part of their internal feedback & learning loop.
  • Predictive AI focuses on analyzing existing data to make forecasts or predictions about future events. It identifies patterns and trends in historical data to predict outcomes. Examples include:
    • Sales Forecasting: Predicting future sales based on past sales data and market trends.
    • Customer Churn Prediction: Identifying customers likely to stop using a service.

As marketers to date – much of the focus/application of AI has been focused on GenAI but its only a matter of time before predictive AI becomes more commonplace.

Tools at your disposal

When it comes to AI tools  – what you use is based on what you’re trying to achieve. And like most things, there are free and paid options.

Popular Free tools

ChatGPT, Microsoft CoPilot, and Google Gemini are three of the most popular chatbots to answer any question or generate text. Jasper is an AI copywriting assistant specializing in marketing content, and Quillbot paraphrases and improves written content, while, DALL-E 2 is great for generating images from text prompts.

While these are popular and free – marketers should keep in mind that they may many times lack control over quality and security. TDLR – don’t put personal, private, and/or confident data into these AI tools as they aren’t entirely secure.

Getting an assist from AI

As we continue to be asked to do more with less, make sure you don’t leave yourself vulnerable either. 

Considerations for using AI as a marketer

  • Be mindful of the information you input -what would happen if there was a data breach? 
  • Check for plagiarism – is the AI-generated content pulled directly from another source?
  • Consider the reliability & accuracy – did you fact-check? How good/specific was your input? What limiters did you apply if any?

How SMBs can tap AI through their marketing automation platforms

Our Guide “Selecting a Marketing Automation Vendor that Packs a Punch for SMBs” delves deeper into how top marketing automation platforms like Mailchimp, HubSpot, and Salesforce are innovating for SMBs. These platforms offer AI-driven features that can significantly enhance your marketing efforts, making them more efficient and effective.

Download the whitepaper now to explore how these vendors are revolutionizing marketing automation for SMBs and how you can leverage AI to stay ahead of the marketing trends.

Download Whitepaper:

This field is for validation purposes and should be left unchanged.
What tool(s) do you use?(Required)
This field is hidden when viewing the form

I recently ran into a situation where a client needed to exclude select campaign types from being populated as the Primary Campaign Source field on opportunities. While this might sound unusual on the surface, the use case was very logical and likely impacts other organizations too. Read on to learn how we solved it to customize primary sources on opportunities using Salesforce flow.

Use Case

Before getting too deep into the solution, let’s first review the use case for relevancy in your organization. In this particular situation, the sales teams were leveraging Salesforce campaigns as a way to group records for outreach. Some of the outreach campaigns became quite large over time and began skewing data in the Primary Campaign Source field on opportunities.

Many reports in the organization were based on the Primary Campaign Source field and the outreach campaigns were undermining the impact of true marketing campaigns. It was determined that reporting would be more accurate if outreach campaigns were excluded and the Primary Campaign Source field was populated using the last “responded” campaign (based on the responded checkbox).

Primary Campaign Source Field Review

Before we get into the solution, let’s do a quick recap of the Primary Campaign Source field on opportunities. Campaign attribution can be a confusing topic, so it never hurts to review.

How is the Primary Campaign Source Populated?

  • Lead Conversion (with Opportunity) – The Primary Campaign Source field will be populated with the campaign that was most recently associated with the lead.
  • Opportunity Creation (from Contact) – The campaign that the contact was most recently associated with will populate the Primary Campaign Source field when a new opportunity is being created from a contact record. Users have the ability to change the value before saving the record. 
  • Manually – Users can manually update the Primary Campaign Source field on the opportunity using the picklist of active campaigns.
  • Automation – The Primary Campaign Source field can also be updated based on an automated process in Salesforce (generally a Flow).

Do Auto-Association Rules Apply?

Great question! Auto-association rules are part of campaign influence in Salesforce and are used to create campaign influence records. They are not factored into the population of the Primary Campaign Source field on opportunities.

Primary Campaign Source Field (on Opportunities) vs. Primary Source Campaign Influence Model

  • Primary Campaign Source Field (on Opportunities) – Lookup field on the opportunity that links it to a single campaign.
  • Primary Source Campaign Influence Model – Campaign influence model that attributes 100% of the influence to the campaign noted in the Primary Campaign Source field on an opportunity.  

Solution Review

Now that we’ve laid the foundation, let’s address the solution.

Step 1 – Determine Exclusions & Actions

The first question to answer is “What campaigns should be excluded from the Primary Campaign Source field?”. Depending on your organization, this could be a campaign type, a campaign record type, or a combination of both. 

Step 2 – Determine Actions

Now that we know what campaigns we would like to exclude, what should we do when we run across an opportunity with an excluded value? The default Salesforce behavior is to use the last associated campaign. We could go that route and use the last “valid” campaign that a lead or contact was associated with or we could go a step further and use the last campaign that has the “responded” box checked.

I prefer prioritizing my “valid” campaigns based on the “responded” checkbox. Similar to how I configure auto-association rules, I just don’t like giving credit to a campaign if the lead/contact has not actually engaged with it.

We also need to consider how the Primary Campaign Source will be populated if no valid campaigns are found. You can choose to keep the excluded value (as a reference point), clear the value, or populate with a default value. I elected to retain the excluded value (prefer data to no data), but you have options!

Step 3 – Build it in Flow (Sandbox)

For illustrative purposes, I created a flow in my dev org to show you how this solution could work for you. Here are the assumptions that were used.

  • Campaigns with the type of “Sales Prospecting” should be excluded.
  • When updating the Primary Campaign Source field, the most recent responded campaign (checkbox checked) should be used.
  • If a valid campaign is not found (or the only campaign has a non-responded member status), the Primary Campaign Source field should be populated with the most recent campaign (basically defer to the default Salesforce behavior).
  • Since this data is used for reporting purposes, real-time updates are not needed. 

Flow Summary 

  • This solution uses a scheduled flow based on the opportunity object. The flow runs nightly and processes all opportunities that were created or updated that day.
    • Note: Relative dates can’t be used in the filter conditions of scheduled flows. To address this, create a custom checkbox field on the opportunity object that will evaluate TRUE if the opportunity was created or updated today and use it in your criteria.
    • Below is my filter. It’s selecting opportunities that have contact roles and were created or updated today.
  • Get campaign members for contact roles
    • In this step, we get all the responded campaign member records (for the contact role) and sort them so the most recent is first.
  • Loop through campaign members
    • Next, we loop through each of the campaign member records related to the contact role, find the first valid campaign (responded), and save it to the assignment variable.
  • Update the opportunity record
    • Finally, we update the Primary Campaign Source field on the opportunity with the campaign ID stored in the assignment variable.
    • Note: If you decide to keep the most recent campaign as the Primary Campaign Source (if a valid campaign is not found), you will need to add a final assignment element prior to updating the record. The element uses a formula to ensure that the variable has been populated with a valid value and updates to the original campaign ID (even if it’s an excluded value) if blank. This prevents the Primary Campaign Source from being updated to a null value by the flow.

Complete Flow 

Here’s a look at my final flow.

Step 4 – Test & Validate

As with any flow, test, test, and test again before deploying to production. Below are some test scenarios to use for validation.

Create a new opportunity at lead conversion 

  • Lead with a single valid campaign
  • Lead with multiple valid campaigns 
  • Lead with an excluded campaign (most recent) and a valid campaign 
  • Lead with a single excluded campaign 
  • Lead with a single non-responded campaign membership

Create a new opportunity from a contact 

  • Contact with a single valid campaign 
  • Contact with multiple valid campaigns 
  • Contact with an excluded campaign (most recent) and a valid campaign 
  • Contact with a single excluded campaign
  • Contact with a single non-responded campaign membership

Update Primary Campaign Source on an existing opportunity

  • Update to an excluded value (make sure that there’s a contact role who has a valid campaign) 

Test Table

When testing and validating flows, I like creating tables to record results for review. This helps me organize my thoughts and ensure that everything is working as intended.

ScenarioOriginal ValueExpected ValuePass/Fail
Lead – Single Valid2023-09 TSW Dreamforce2023-09 TSW DreamforcePASS
Lead – Multiple Valid2024-06 SLS Sales Prospecting2023-06 WBR Product Update WebinarPASS
Lead – Excluded + Valid2024-06 SLS Sales Prospecting2023-09 TSW DreamforcePASS
Lead – Single Excluded2024-06 SLS Sales Prospecting2024-06 SLS Sales ProspectingPASS
Lead – Single Non-Responded2023-09 TSW Dreamforce2023-09 TSW DreamforcePASS
Contact – Single Valid2024-05 TSW Events2024-05 TSW EventsPASS
Contact – Multiple Valid2023-06 WBR Product Update Webinar2023-06 WBR Product Update WebinarPASS
Contact – Excluded + Valid2024-06 SLS Sales Prospecting2023-09 TSW DreamforcePASS
Contact – Single Excluded2024-06 SLS Sales Prospecting2024-06 SLS Sales ProspectingPASS
Contact – Single Non-Responded2023-09 TSW Dreamforce2023-09 TSW DreamforcePASS
Updated  – Existing Updated to Excluded2024-06 SLS Sales Prospecting2023-09 TSW DreamforcePASS

Is the Primary Campaign Source field meeting your needs?

If you are using the Primary Campaign Source field in your reporting I encourage you to take a closer look at your campaigns to see if your data is being skewed. If so, this solution is a great way to prioritize valid campaigns and put more emphasis on engagement. You can even completely filter out specific types of campaigns if you choose. Don’t sell your marketing efforts short!

More Salesforce Flow resources

Today, I’m excited to share how you can create a comprehensive Salesforce campaign hierarchy report that groups by grandparent, parent, and child levels (hierarchy) on the Campaign Object in Salesforce.

This type of report can show various metrics, including different campaign amounts and opportunity values along with displaying subtotals and totals. The greatest advantage this report gives you is that it shows the impact of campaigns that are related to one another.

There are many variations that you can do off of this report, but it should get you started in the right direction. Let’s dive into the steps for creating our report!

Step 1: Create Custom Report Types

The first step is to create a new custom report type that includes sections for both the Grandparent and Parent Campaigns. 

Report Types > New Custom Report Type

Report type menu

Setting Up the Custom Report

Since this report will only relate to the Campaign object, you will need to:

  1. Add two sections to the report: one for the Parent Campaign and one for the Grandparent Campaign.

Edit Layout > Create New Section

Salesforce Campaign Hierarchy Report: Parent and grandparent sections to added layout
  1. Populate the report with relevant fields. I included the following fields in my report:
    • Actual Cost
    • Active
    • Opportunities in Campaigns
    • Actual Cost in Hierarchy
    • Campaign Name
    • Parent Campaign

To add these fields, click on the “Add fields related via lookup” link and look for the one associated with “Parent Campaign.” This allows you to select fields from the Parent Campaign.

Add fields via lookup
Lookup selection for Parent Campaign
Selected fields on the Parent Campaign

Including Grandparent Campaign Fields

Similarly, to include fields from the Grandparent Campaign, navigate to:

  1. “Parent Campaign”
  2. Then “Parent Campaign view related fields”

Here, I selected the same fields as for the Parent Campaign.

Lookup for the Grandparent campaign

To make the report clearer, I renamed the Campaign Name fields to “Parent Campaign” and “Grandparent Campaign” respectively. This helps in easily identifying them in the report.

Once these steps are completed, save the report type. It will now be available for use when creating your report.

Step 2: Using the Report Builder

Now that your custom report type is ready, let’s create the report:

  1. Select the report type you just created.
  2. Apply the following filters:
    • Show Me: All campaigns
    • Created Date: All Time.
Filters changed to All Campaigns and All Time

Configuring the Report Layout

In the Outline tab:

  1. Add “Grandparent Campaign,” “Parent Campaign,” and “Child Campaign” to the Group Rows section.
  2. In the Columns section, select any additional fields you want to display in the report.
Groups and columns

And there you have it! With these steps, you can create a detailed Salesforce Campaign hierarchy report that provides valuable insights through different metrics and structured grouping.

The family tree of reporting

I hope you find this guide helpful in creating detailed and insightful reports using the grandparent, parent, and child hierarchies in Salesforce. With these steps, you can better organize your campaign data, track important metrics, and gain deeper insights into your marketing efforts.

If you have any questions or need further assistance, feel free to reach out.

Happy reporting, and may your campaigns be ever successful!

Salesforce Campaign Hierarchy Reports: Dive deeper & keep it going

Interested in learning more about choosing the right Salesforce reporting tool? Or perhaps you’d like to sign up for a workshop to dive deeper into Salesforce Reports or B2B Marketing Analytics?

Shout out to Brian Roff for helping with the solution to this report!

No more posts to show