Category

Mike Morris

It’s very common for sales and marketing teams to leverage title-based “personas” to influence their activities. Knowing who you are speaking to can radically alter the message content, type, and frequency needed to progress the buying process. In this post, we’ll address why and how to update marketing persona fields in Salesforce using Flow to assist sales and marketing.

Why Use Flow to Update Marketing Personas?

Let’s start with a very simple question. Why flow? The answer is really based on where your data lives and who needs access to it. I’ve used Engagement Studio in Account Engagement to update persona values in the past, but what happens if the prospect is not in Account Engagement? That’s right — no persona will be updated.

This solution accounts for the fact that all Salesforce data might not be syncing to Account Engagement (or Marketing Cloud Engagement) and that sales still needs persona values. 

Step 1 – Understand Your Buyers and Influencers

Before we can classify records, we first need to understand who is buying from us, who is influential in the purchase decision, and who is not (this is just as important). This is best achieved by analyzing data and speaking to your sales team.

Analyze the data

Create reports based on closed won opportunities and look at the contact roles for job titles that stand out. Odds are there will be clear winners – titles that appear with greater frequency. It’s also likely that you’ll see a mix of the people who actually use your product and a level above them (based on the purchasing authority needed to complete the transaction).

Talk to sales

Chat with some of the top sales representatives to find out where they are having success. Are there certain leads that they cherry-pick based on job titles? Are there certain leads that they deprioritize based on the same criteria? 

Step 2 – Group your data

Now that we know what titles we should be going after (and those that we should avoid), we need to group them into “Personas” (think of these as containers that hold records with similar/related titles). These are the values that we will be populating from our flow and will be used in future segmentation.

It’s important to create values for those that you want to target and those that you do not. An exclusion persona can be just as valuable as a target persona.

Target Personas

Records that are buying from you or are key influencers in the purchase process.

Exclusion Personas

Records that are in your system that do not buy from you and should not be included in campaigns.

  • Examples could include: Marketing, Sales, Students, and Human Resources to name a few.  

Once you have your target and exclusion persona values defined, create custom “Persona” fields (picklist) on the lead and contact objects. I like using global picklists when creating picklists with the same values between objects. Global picklists speed the setup, are great for ensuring consistency, and make maintenance a breeze (should more values need to be added in the future).

Don’t forget to: 

  • Use the same API name on both objects when creating custom fields (this is critical if you want to map the fields back to Account Engagement).
  • Map the lead field to the contact field on conversion.

Example: Global Picklist Value Set

Step 3 – Determine Keywords

Now that we know what titles we should be going after (and those that we should avoid), and we’ve defined the groups that we would like to use for categorization, we need to identify keywords that can be used to query the records (actually – we’ll be using them in formulas). It would be great if titles were standardized, but they are not. Based on this, we are going to look for common factors.

Example: Marketing

Here are some common marketing titles. It would be great if “marketing” was included in all of them, but it’s not. Therefore, we’re going to use keywords like: marketing, brand manager, campaign, content, media relations, product research, SEM, and SEO in our formula to make sure that we properly tag our records.

  • Brand manager
  • Campaign manager
  • Channel marketing director
  • Chief marketing officer
  • Content marketing manager
  • Content specialist
  • Digital marketing manager
  • Director of email marketing
  • Internet marketing specialist
  • Media relations coordinator
  • Product research analyst
  • SEM manager
  • SEO specialist
  • Web marketing manager

Step 4 – Create the Flow (In Sandbox)

We’re going to use a record-triggered flow to update our persona values. The flow will automatically update the persona value when the title field is updated. Since contacts and leads are distinct objects, a flow will need to be created for each object.

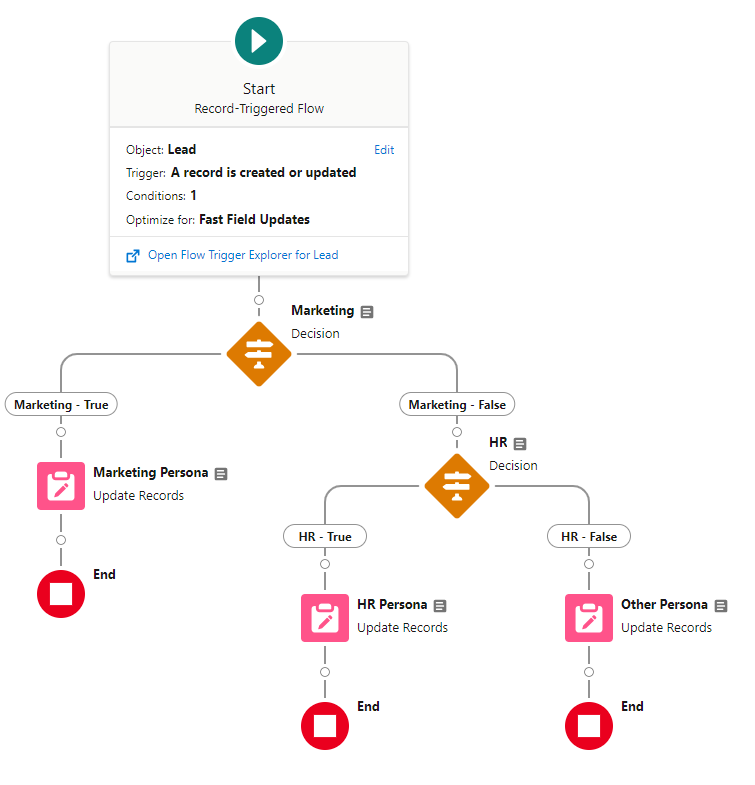
Here’s an example of what a very basic flow would look like. This flow is just updating the value to be Marketing, Human Resources, or Other. A full version of this flow would contain many more paths. 

Configure Start

This flow is based on the lead object and is triggered when a record is created or updated. Since we don’t want to trigger the flow whenever a lead is updated, we’re using a formula to set the entry conditions. We want the flow to run only when new leads are created (and the title is not blank) or the title field of existing leads is updated to a non-blank value.
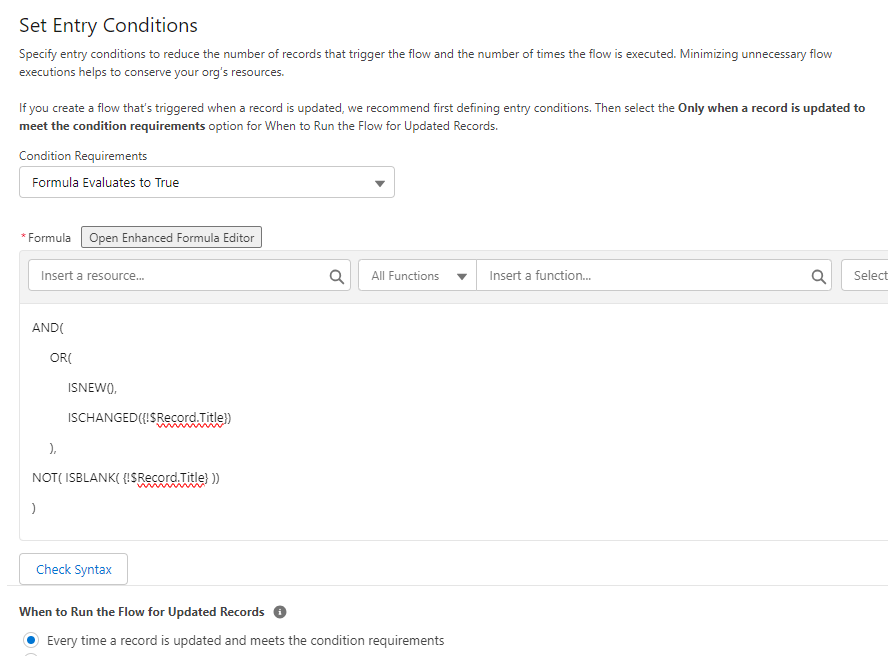


Finally, the flow will be optimized for Fast Field Updates, since we are updating fields on the same object.

Create Persona Formulas

This is probably the hardest part of this process. We are going to need to create formulas for each of our persona groups using the keywords that we’ve already defined. It’s important to note that formulas are case-sensitive by default. This is good in some cases but could cause records to be missed in other situations. Fortunately, we can address this as well.

Sample Formula 1 

This formula selects the marketing keywords that we identified, but it’s case-sensitive. It would evaluate “True” for a lead with the title “digital marketing manager”, but would not for the title “Digital Marketing Manager”.

OR( 

  /* Title contains any of these title strings */ 

  CONTAINS({!$Record.Title}, “marketing”), 

  CONTAINS({!$Record.Title}, “brand manager”), 

  CONTAINS({!$Record.Title}, “campaign”), 

  CONTAINS({!$Record.Title}, “content”), 

  CONTAINS({!$Record.Title}, “Content marketing manager”), 

  CONTAINS({!$Record.Title}, “media relations”), 

  CONTAINS({!$Record.Title}, “product research”), 

  CONTAINS({!$Record.Title}, “SEM”), 

  CONTAINS({!$Record.Title}, “SEO”) 

)

Sample Formula 2 

This updated formula evaluates the same keywords that were identified but addresses the case sensitivity issue. Here, we’ve used a function to convert the titles to lowercase and then compared them to a lowercase value. This formula would evaluate “True” for the titles “digital marketing manager”, “Digital Marketing Manager”, or “DIGITAL MARKETING MANAGER”.


OR(

    /* Title contains any of these title strings */

    CONTAINS(LOWER({!$Record.Title}), “marketing”),

    CONTAINS(LOWER({!$Record.Title}), “brand manager”),

    CONTAINS(LOWER({!$Record.Title}), “campaign”),

    CONTAINS(LOWER({!$Record.Title}), “content”),

    CONTAINS(LOWER({!$Record.Title}), “content marketing manager”),

    CONTAINS(LOWER({!$Record.Title}), “media relations”),

    CONTAINS(LOWER({!$Record.Title}), “product research”),

    CONTAINS(LOWER({!$Record.Title}), “sem”),

    CONTAINS(LOWER({!$Record.Title}), “seo”)

)

Sample Formula 3

Sometimes, you are going to need a mix of case sensitivity and case insensitivity. As an example, we would not want to update any job title that contains “hr” to Human Resources. This could lead to a lot of false matches. In this case, only titles that contain “HR” in all capitals will evaluate “True”.

OR(

  /* Title contains any of these title strings */

    CONTAINS(LOWER({!$Record.Title}), “human resources”),

    CONTAINS({!$Record.Title}, “HR”)

)

Sample Formula 4

There are also going to be times when you need to look for a specific value, like CEO, and also look for title strings. We can do that too! 


OR(

    /* Title is any of these values */

    {!$Record.Title} = “CEO”,

    /* Title contains any of these title strings */

    CONTAINS(LOWER($Record.Title), “chief executive”),

    CONTAINS(LOWER($Record.Title), “president”)

)


As you can see, there’s a fair bit of work involved in creating and testing the formulas. That’s why working in a sandbox is critical. If you can get all the formulas to update all the values exactly as you would like on the first try, I encourage you to check out our careers page!

Configure Flow Elements

Each path includes a Decision and an Update Records element (learn more about Flow Elements). We’ll walk through the marketing paths and the same logic can be applied to additional paths. The only difference is that the “No” outcome for the final decision should update the persona value to “Other”. We want to add a value to leads that don’t match any of our formulas for two reasons.

  1. We want to verify that they were processed by the flow.
  2. We want to be able to identify the leads that were not matched by our formulas so we can evaluate and improve. This is VERY important.

Decision Element 

The element is pretty straightforward. The “True” outcome looks for leads where the marketing formula evaluates to “True”. Leads that do not evaluate true progress down the “False” outcome and move to the next decision element.


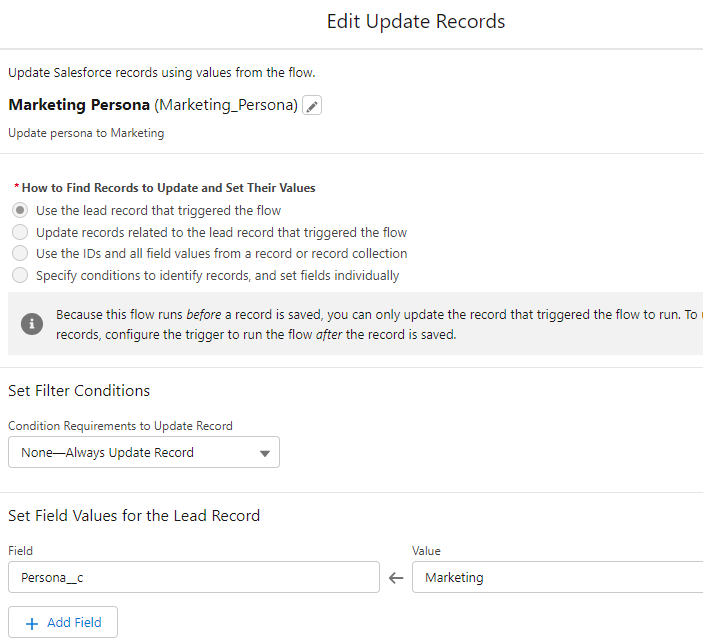
Update Records 

Leads that match the “True” outcome conditions then proceed to the Update Records element. This is where the magic happens and the record is updated in Salesforce.
Debug

The final step before activating your flow is to do some debugging. Test by updating the titles of a few leads to make sure that they progress down the correct path, Be sure to vary the case of the titles to make sure that upper, lower, and mixed cases work as expected.

Step 5 – Rinse and Repeat

Once deployed into production, your flow is not going to be perfect. There are going to be some records that are classified as “Other” that should fall into other categories. That’s OK!

The final step is to do regular reviews and updates of the records that have the “Other” persona. It’s possible that we missed a keyword on our first pass or that a new hot title has emerged. I compare this a lot to scores in Account Engagement. You don’t quit once you define your scoring model, you evaluate and refine it. The same process applies here. 

Give it a Shot! 

We’ve done a lot in a short post. I encourage you to give this a shot in your sandbox. You’ll be surprised by the number of records that you’ll be able to update and the value that it will bring to your sales and marketing teams. If you get stuck, let us know. That’s why we are here! 

Shout out to Heather Rinke and Jason Ventura for their collaboration in building this process!

Contrary to the opinion of just about everybody in marketing, all your marketing leads are not “Hot” and the sales team is not lazy. The issue is that sales wants marketing to send them the right leads with the right expectations. In this post, we’ll address ways to improve the marketing lead handoff process using Salesforce and Account Engagement (Pardot) so sales and marketing can live in harmony.

The Problems with Marketing Leads

Before we can address the issues that sales teams have with marketing leads, we must first identify them. Below are the most common issues that I’ve encountered as a marketer (20+ years) and as a consultant. While all these issues might not apply to you, I bet more than a few will.

Top Sales Issues with Marketing Leads 

If you have issues that are not included in this list, please share them by dropping a note in the comments!  

Poor Quality/Bad Data

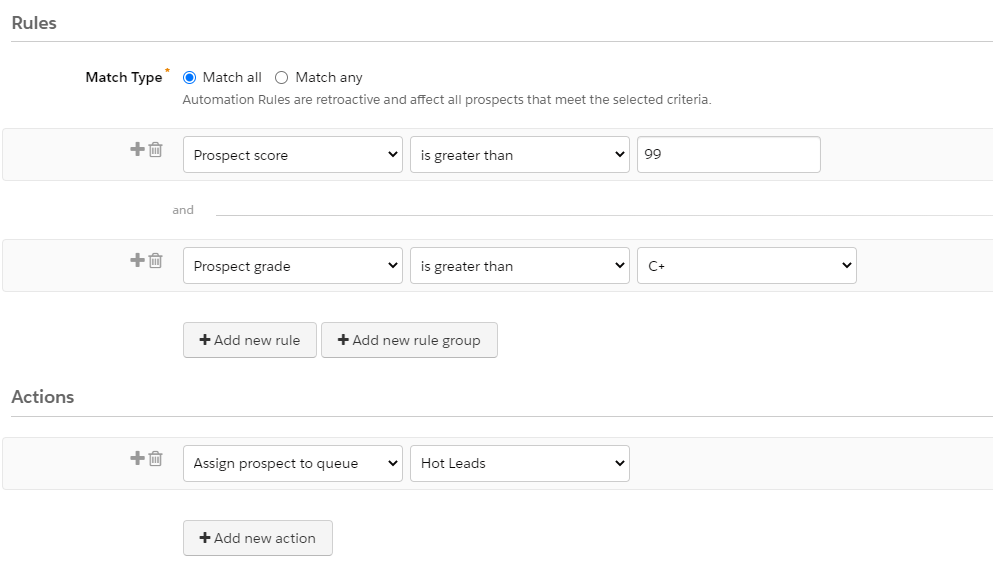
Let’s start with data quality. Marketers have the ability to control what prospects sync from Account Engagement to Salesforce. Most often, this is based on a prospect achieving an agreed upon score & grade threshold. A rule could look something like this.


This rule assigns prospects to the Hot Leads queue when they achieve a score of 100 and a grade of B- or higher. Seems pretty solid?

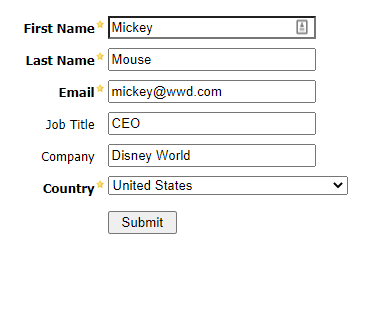
This is a good start, but not perfect. Let’s say that a demo form on your website adds 50 points (in addition to the 50 that included in the default scoring model for a form fill). Let’s also assume that your grading model adds a full letter grade for prospects in the United States and another full letter grade is added based on job titles that include CEO.

If your form was completed with the data below, guess who would be assigned to the Hot Lead queue, synced to Salesforce, and assigned to a member of your sales team? Sending over leads like this is the fastest way to sour your sales team on marketing leads.

Keeping Bad Data Out of Salesforce

The example above is not uncommon and is a step up over blindly assigning all prospects from Account Engagement to a queue, but we can do better.

At Sercante, we use a tool named Prospect Updater for Pardot that was created by our labs team. This tool can be used to fix, enhance, and enrich prospect data before it enters Salesforce. Here’s how we leverage Prospect Updater in our organization.

  1. Visitor fills out a form and a new prospect is created in Pardot.
  2. Prospect updater runs and marks a custom field as “Suspected Spam” or “Not Spam” based on criteria that we defined.
  3. Assignment automation rules run (in Account Engagement) and only match prospects with a value of “Not Spam” – ensuring that “Suspected Spam” records do not enter Salesforce.


This example just scrapes the surface of what Prospect Updated can do.  See more Prospect Updater examples and use cases.

Want to know more about how Prospect Updater keeps spam out of our org? Check out this post.

Unrealistic SLAs/Expectations

I’ll admit that I’ve been guilty of having some unrealistic expectations in the past. Does this sound familiar? You just got back from a week at that huge trade show in Las Vegas with several thousand leads that are gold and need to be called immediately.

The truth is that there is some gold in your pile of leads, but they are not all worthy of sales follow up. So what should you do?

Managing SLAs & Expectations

  1. Agree to what constitutes a Hot Lead first.
  2. Collaborate with sales leadership to agree to follow-up SLAs (Service Level Agreements).
    • Hot Leads – 24 Hours
    • Warm Lead – 3-Days
  3. Understand the volume of lead that the sales team can follow-up on.
    • If thousands of leads meet your Hot Leads criteria and sales can only follow-up on hundreds, your definition needs to be refined or you need more sales people.
  4. Ensure leads are tagged with a priority rating so the proper SLA can be applied.
    • At events, this could be adding a note when you have conversations with prospects.
    • For prospects entering Account Engagement, this could be based on scores, lead sources, or specific form/form handler submissions.

Marketing Leads Are Too Cold/Don’t Know Who We Are

Let’s go back to the trade show example. Your marketing team has done an awesome job of identifying the “must have” swag item and everybody is flocking to your booth to get one. The team is frantically scanning badges and moving to the next eager person in line. Are these leads that should be sent to sales?

Here’s another one. Your marketing team is generating hundreds of leads per week by syndicating content on a third party site. People are gobbling up your content, sales is going to love these leads!

In both scenarios, these leads should not meet your Hot Lead definition (based on these activities alone) and should not be sent to sales for follow up. It’s highly likely that these people don’t even know what your company does. They came by your booth because of the great swag or downloaded a piece of content related to a specific interest. These are prime leads for a nurturing program.

Warming/Education Nurture

Before sending those leads to sales, warm and educate them with Engagement Studio. This is an area where Account Engagement excels — use it! 


When creating your nurture program, keep the following in mind.

  • Prospects showing buying signals should be sent to sales as quickly as possible
  • Prospects don’t need to complete all steps before being sent to sales
  • Not all prospects are ever going to be sent to sales (and that’s OK)
  • Don’t add scores at random just to make prospects “score up” to your hot lead criteria

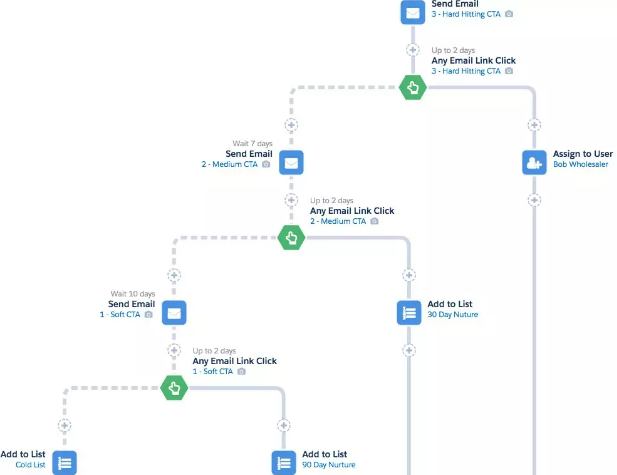
I like the 3-2-1 Campaign recommended by Salesforce. It basically inverts the traditional logic by focusing on hard hitting CTAs first in an effort to identify those with immediate interest and fast tracking the handoff to sales. As an example, your first CTA might be to schedule a demo vs. reading your latest white paper.


Learn more about the 3-2-1 Campaign in the Engagement Studio Best Practices module in Trailhead.

Whether you find the traditional or 3-2-1 Campaign works best for your organization, the point remains that leads need to be warmed before sending your sales teams. Sending cold leads over to sales is a surefire way to create a jaded team. 

No Background Information

This lead is supposed to be hot and I’m supposed to follow-up within 24 hours, but I have no idea why or what they are interested in. Could you imagine following-up with a lead in this situation? How about hundreds of them? That’s how sales feels if you don’t enable them with information. Fortunately, Salesforce and Account Engagement have us covered here too.

Arm Sales with Data

Here’s a list of ways we can provide data to our friends in sales.

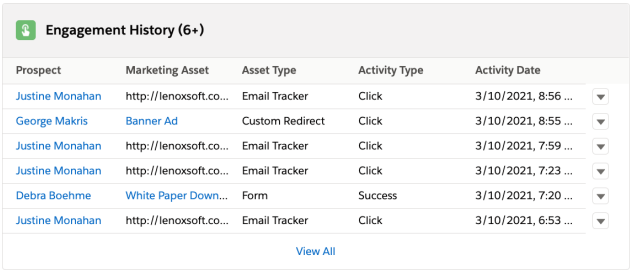
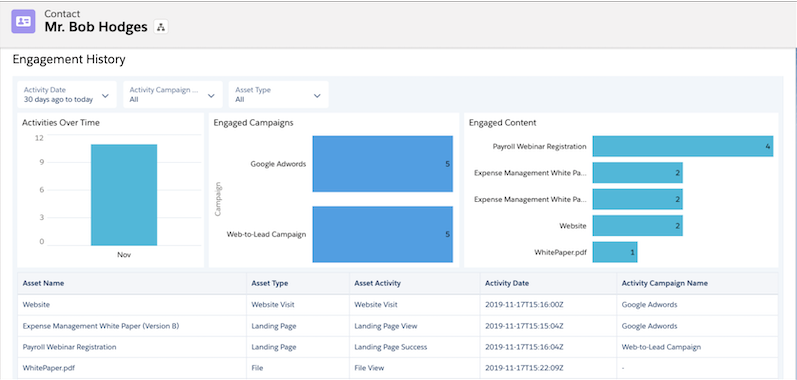
  • Engagement History Related list
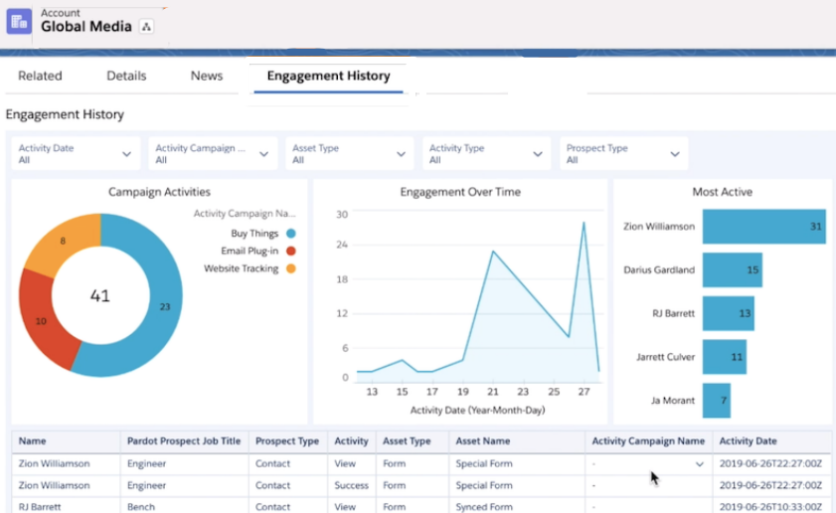
  • Engagement History Dashboards
  • Scoring Categories Related list
  • Custom fields


Let’s look at all of these in a bit more detail.

Engagement History Related Lists 

This displays a feed of a recent engagement from Account Engagement in Salesforce. This list can be added to account, contact, lead, and person account page layouts to provide engagement information for sales and all other users in Salesforce.

Engagement History Dashboards 

These dashboards are powered by CRM Analytics and provide a way for users to see and interact with data on accounts, contacts, leads, and person accounts. These dashboards do require permissions to be granted to users in Salesforce and the number of licenses are limited by your edition.

Scoring Categories Related List 

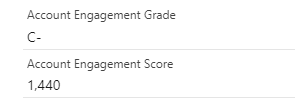
Most organizations add Account Engagement score and grade fields to their page layouts. This is a great way to show sales the total score that leads and contacts have accumulated, but it does not provide any insight into interests. That’s where scoring categories come in.

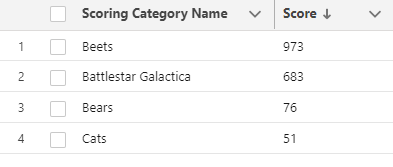
Scoring categories allow you to break down the total score in Account Engagement by categories that you define (up to 50). This allows you to see what that prospect is interested in. Note that scoring categories are only included in Plus, Advanced, and Premium editions of Account Engagement.

Account Engagement Grade and Score (in Salesforce)


Account Engagement Scoring Categories (in Salesforce)

The total score of 1,440 does not help the sales team at all. However, the scoring category provides information on topics of interest (Beets) and topics of little interest (Cats).

Custom Fields 

Custom fields are another great way to share information with your sales team. Fields can be created in Account Engagement and synced to the corresponding fields on contact and lead records. Custom fields can vary from organization-to-organization, but here are a couple that I find useful.

  • Asset/Event Name – Capture the name of the last asset that a prospect downloaded or the name of the most recent event that they registered for/attended.
  • Last Form Completed – Let sales know the name of the last form that a prospect completed. This can be used to customize tasks created in Salesforce too!

Incorrect Lead Assignment

Assignment is always a bit of a sticky one. You can do assignments from Account Engagement, but it’s not something that I would recommend.  Engagement Studio can be used for simple assignments, like assigning leads to a queue, but it’s not intended to do direct assignment to specific sales people based on specific territories. It’s best to leave individual assignments to a tool that’s designed for that purpose.

Popular Lead Routing Tools

When looking at lead routing tools, consider the needs of your organization. Assignment rules in Salesforce are great, but only one assignment rule can be active on the lead object. This can become an issue if you have more complex rule logic. You can reassign leads using lead assignment rules, but it requires flows and invocable actions.

Assignment rules have some limitations, but you also have plenty of options if they can’t support your needs. There are tools that allow you to build easy routing flows using tools that feel a lot like engagement studio and others that allow you to do geographic assignment using maps. Selecting the right tool for your organization is a critical decision. The best leads are not going to generate any revenue if they are sitting in a queue somewhere or have not been assigned at all.

Inability to Provide Feedback

Feedback from sales is an incredibly valuable tool. It helps keep sales happy by letting marketing know what leads they like and what leads they don’t. It also helps marketing know where to spend their budget to maximize their impact.

Remember those content syndication leads that we spoke about earlier? Maybe marketing generated a large number of leads at a low cost per lead, but sales found a large number had bad phone numbers or simply did not meet your ideal customer profile. How impactful could knowing this be to marketing? I bet they would change the spend allocation of their budget in a hurry with this data. The great thing is that this level of reporting is possible with disposition codes.

Lead Status and Disposition Codes

Lead status is used in Salesforce to represent the current status of a lead. Common values include: Open – Not Contacted, Working – Contacted, Closed – Not Converted, and Converted. These let you know the status a lead is in, but not the reason why.


This is a great start, but we want more. This is where adding a disposition code can help. Disposition codes are commonly used in call centers to classify the results of calls. This same logic can be applied to support the lead stage changes and provide additional insight to marketing and the organization as whole.

Once set up, disposition codes are required when moving a lead from one stage to the next. Field dependencies provide a list of relevant disposition codes for each status. In the example below, the user is required to tell you “why” the lead needs to be nurtured when updating the status to Open – Nurture.


Disposition Code Uses

  • Timely indicator of lead quality
  • Tailoring of follow up communications/nurtures
  • Identifying records to suppress from marketing communications
  • Determining records to delete from Account Engagement

The disposition code field can be used to create reports in Salesforce for increased visibility. These can be a huge asset for marketing when planning how to allocate future budgets. I find reporting on disposition codes at the campaign level to be the most impactful. To do this, formula fields are used on the campaign member object to enable reporting on your custom fields. Check out Jenna Molby’s blog “How to Add Custom Fields to Campaign Members in Salesforce” to learn more. A record-triggered flow is also needed to update the contact status and disposition codes on the contact object then a lead is converted (but that’s a post for another day).

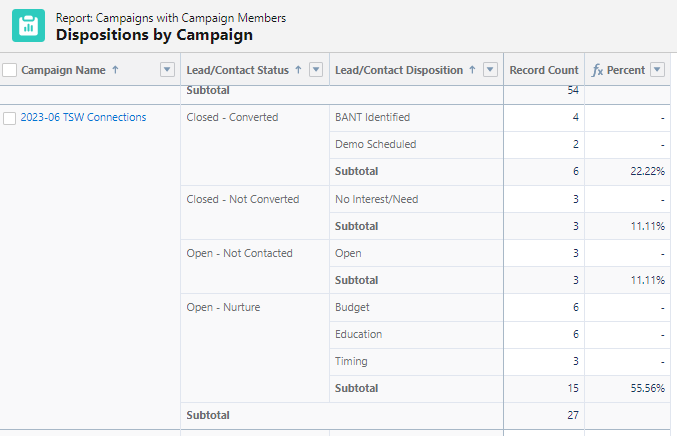
The end result is a really cool report that shows what happened to all the leads that were included in a campaign. Keep in mind that if a person is included in multiple campaigns, the same status and disposition code will display for both.

Here, I can quickly see that 22% of the leads from my 2023-06 TSW Connections campaign were converted to contacts (and why).  I can also see that 56% of the leads need further nurturing (and how they should be nurtured). By syncing the disposition code field to Account Engagement, the values can be used to enter prospects into targeted nurture campaigns based on their needs vs. a generic nurture program. Pretty cool!

Collaboration and Communication are Key

Sales and marketing are really on the same team. Both want to drive sales and both want to be able to show the impact of their efforts. By working together and addressing the issues discussed, you can create an environment where your sales and marketing teams are united and work together towards a set of common goals.

The surest way to get a reaction from any Salesforce Admin is to mention multi-select picklists. They are notoriously hard to report on and can be challenging at times. However, there are times when more than one value is needed. 

Multi-select picklists can also cause quite a few issues for Marketing Cloud Account Engagement (Pardot) Admins. In this guide, we’ll discuss the proper way to create, sync, and update multi-select picklists in Account Engagement.

Field Types and Compatibility

Field types between Salesforce and Account Engagement don’t always behave the same way. Before we address how to work with multi-select picklists, we first need to understand field types and compatibility.

Account Engagement

  • Checkbox – Allows a prospect to select multiple options from a list of values.
  • Dropdown – Prospects can select a single value from a picklist.
  • Multi-Select – Prospects can select multiple values from a picklist.
  • Radio Button – Allows a prospect to select a single option from a list of values.

For more information, see the complete list of Account Engagement Prospect Field Types.

Salesforce

  • Checkbox – A single select field that is used to indicate true or false.
  • Picklist – Allows users to select a single value from a defined list.
  • Picklist (Multi-select) – Allows users to select multiple values from a defined list.

For more information, see the complete list of Salesforce Custom Field Types.

The first thing to note is that checkboxes are multi-select in Account Engagement, but not Salesforce. This can lead to issues when syncing to a checkbox field in Salesforce. To avoid issues, set your field type to radio button in Account Engagement when syncing to a Salesforce checkbox (for more information see – Mapping Pardot checkbox fields to Salesforce checkbox fields).


The next thing that you’ll notice is that Account Engagement has two fields that allow users to select multiple values – checkbox and multi-select. So what’s the difference and how should each be used? I’m glad you asked.

  • Checkbox – Select this option if you are creating a form in Account Engagement and you would like all values to be shown as individual boxes where prospects can check one or many.
  • Multi-Select – Select this option if you are creating a form in Account Engagement and would like the values displayed in a picklist where the user can select one or many options. 

Salesforce and Account Engagement Field Compatibility 

Salesforce Field TypeAccount Engagement Field TypeCompatible
CheckboxCheckbox
CheckboxDropdown
CheckboxMulti-Select
CheckboxRadio Button
PicklistCheckbox
PicklistDropdown
PicklistMulti-Select
PicklistRadio Button
Picklist (Multi-Select)Checkbox
Picklist (Multi-Select)Dropdown
Picklist (Multi-Select)Multi-Select
Picklist (Multi-Select)Radio Button

Account Engagement Custom Fields

Now that we are all on the same page related to fields and compatibility, it’s now time to create our custom fields in Account Engagement to hold the data. You have options when creating custom fields, so it’s important to consider the data in Salesforce and how you would like the information displayed on your Account Engagement forms before creating your field.

Option #1 – Checkbox

If the multi-select picklist in Salesforce has a small number of values (less than 5) and you would like all options visible to prospects when they view your form, checkbox is the field type for you.

Example Form with Checkbox Field Type 

Example Form with Checkbox Field Type

Option #2 – Multi-Select

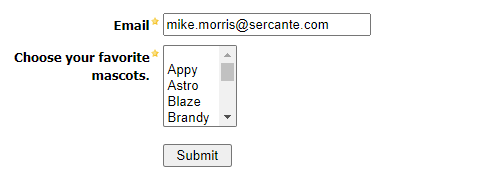
If the multi-select picklist in Salesforce has a large number of values and displaying all on a form would not be practical, multi-select is the way to go.

Example Form with Multi-Select Field Type

Example Form with Multi-Select Field Type

Additional Field Options & Considerations

Regardless of the field type selected, there are a few options that I would highly encourage you to consider.

Options that Should Always be Selected 

  • Keep this field’s type and possible values (for dropdowns, radio buttons, checkboxes) in sync with the CRM.
  • Use pre-defined values (for checkboxes, radio buttons, drop downs, and multi-selects).

Record and Display Multiple Responses 

The “Record and display multiple responses (useful for fields that are set to always be displayed like reporting issues)” box is not as clear cut as the other options mentioned above. Its use is really tied to how you are using the field and what data should be retained. 

  • Selected
    • Initial selections will be recorded in Account Engagement upon initial form completion and synced to Salesforce.
    • If form is completed again and new values are selected, they will be added to the prospect record in Account Engagement (and will sync to Salesforce). 
    • Values that were deselected during the second submission will still be included in the prospect record in Account Engagement and would also be visible in Salesforce. Essentially, the original selections from the initial form submission will be retained – even if they are not selected during the second form submission.
  • Not Selected
    • Initial selections will be recorded in Pardot.
    • If form is completed again and new values are selected, they will be added to the prospect record in Account Engagement (and will sync to Salesforce). 
    • Values that were deselected during the second submission will be REMOVED from the prospect record in Account Engagement and would NOT be visible in Salesforce after the records sync. 

Account Engagement Forms

We’re getting there! Now that we have decided how we want the multi-select picklist options to display on our form and we’ve created the custom field in Account Engagement, it’s time to build our form.  For this exercise, I’m going to assume that you are familiar with creating a form. If you need a quick refresher, check out the Create a Form article from Salesforce.

Forms with Checkboxes

The process of adding a checkbox field to a form is pretty straightforward. Simply click the +Add New Field button once you reach the “Fields” tab and configure the field. Be sure to set the type to Checkbox and make sure to click the Load Default Data button.

Check the “required” box if you would like the field to be required. You can also select the “Always display even if previously completed” option on the “Advanced” tab, if you would like the field to always display.

multi-select picklist info


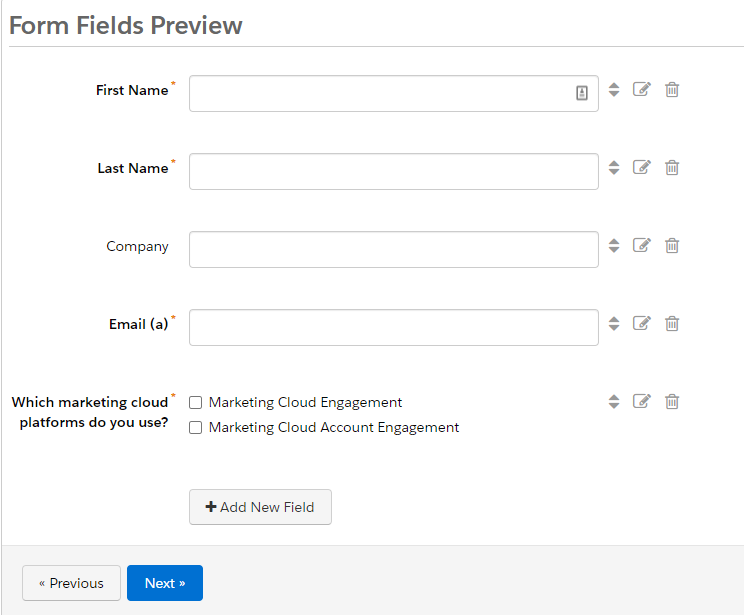
After configuring, your form preview will look like the example below. Finish the form wizard for completing the additional tabs (Look and Feel, Completion Actions, Confirm & Save) and your form will be ready for use.

form fields preview multi-select picklist

Form with Multi-Select Picklists

The process for creating a form using a multi-select field is very similar to the process for creating one for a checkbox. The only real difference is the “Type” of field that you’ll select.

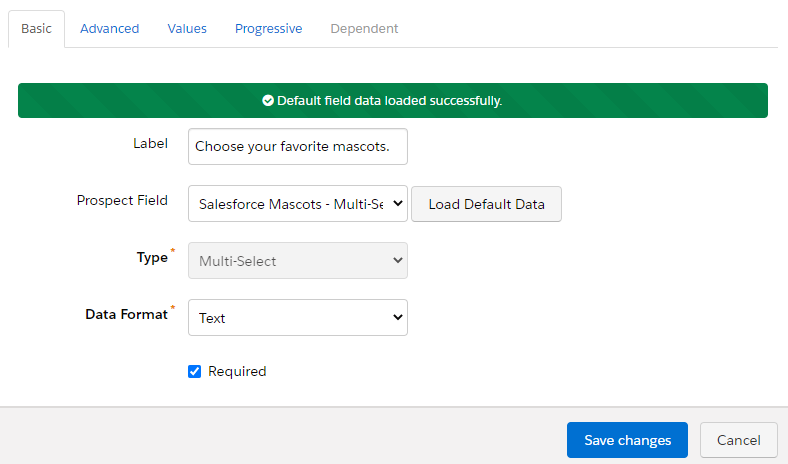
Very quickly, you’ll notice that there is not a multi-select option in the “Type” list. This can be confusing, but is not an issue. When configuring the form, set the checkbox type.

The magic will happen when you click the Load Default Data button. This will pull in the data from the multi-select field that you previously created and update the type selection to Multi-Select.

Form with Multi-Select Picklists


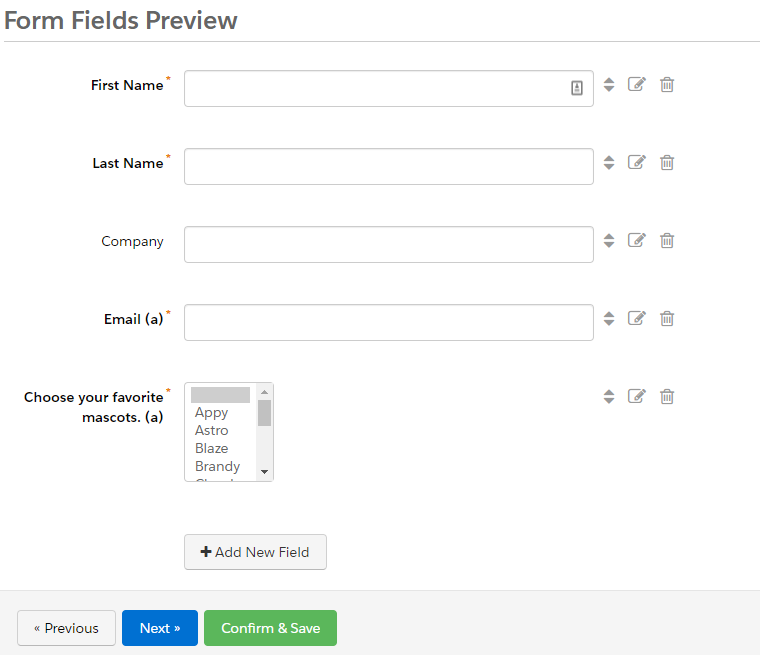
After configuring, your form preview will look like the example below. Finish the form wizard for completing the additional tabs (Look and Feel, Completion Actions, Confirm & Save) and your multi-select form will be ready for use.

Form fields preview

Importing Multi-Select Picklist Values 

When importing data into a multi-select field in Account Engagement, you must first decide on the desired action. Do you want to overwrite the current selections or do you want to add new selections to the existing data? This is a big one as it will determine if you should select the Record and display multiple responses (useful for fields that are set to always be displayed like reporting issues) option when creating your field. 

Import – Record and Display Multiple Responses NOT Selected

In this scenario, the Record and display multiple responses (useful for fields that are set to always be displayed like reporting issues) is not selected for either of my custom fields in Account Engagement.

After completing both forms, my initial selections were recorded in Account Engagement and synced to Salesforce.


The data below was then imported into Pardot. The “overwrite existing data” option was selected for the MAP field, but not not the Mascot field upon import.


The result is that the MAP field was updated to Marketing Cloud Engagement, but no changes were made to the Mascot field. This makes sense as we opted to overwrite the data in the MAP field when we imported. Since we did not overwrite the Mascot data, the initial values were retained.

Import – Record and Display Multiple Responses Selected

In this scenario, the Record and display multiple responses (useful for fields that are set to always be displayed like reporting issues) IS selected for both of my custom fields in Account Engagement.

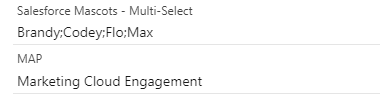
After completing both forms, my initial selections were recorded in Account Engagement and synced to Salesforce.

The data below was then imported into Pardot. The “overwrite existing data” option was selected for the MAP field, but not not the Mascot field upon import.


The result is that the MAP field was updated to Marketing Cloud Engagement and that the additional values of Flo and Brandy were added into the Mascot field. This is exactly what we would expect. We told Account Engagement to overwrite the data in the MAP field so it did. Since we did not select “overwrite” for the Mascot field and the field was configured to record and display multiple responses, the new values were appended to the existing.

salesforce mascots - multi-select picklist values

Updating Multi-Select Picklist Values 

When using automation rules to change data in multi-select picklist fields, you must first decide on the desired action – just like you did for list imports. Checking (or not checking) the Record and display multiple responses (useful for fields that are set to always be displayed like reporting issues) option when creating the field will impact the results in Account Engagement and Salesforce.

Automation Rule – Record and Display Multiple Responses NOT Selected

In this scenario, the Record and display multiple responses (useful for fields that are set to always be displayed like reporting issues) is not selected for either of my custom fields in Account Engagement. The values have also been reset to the values below as the starting point. We will now create automation rules to update the values. 

Salesforce mascots multi-select picklist

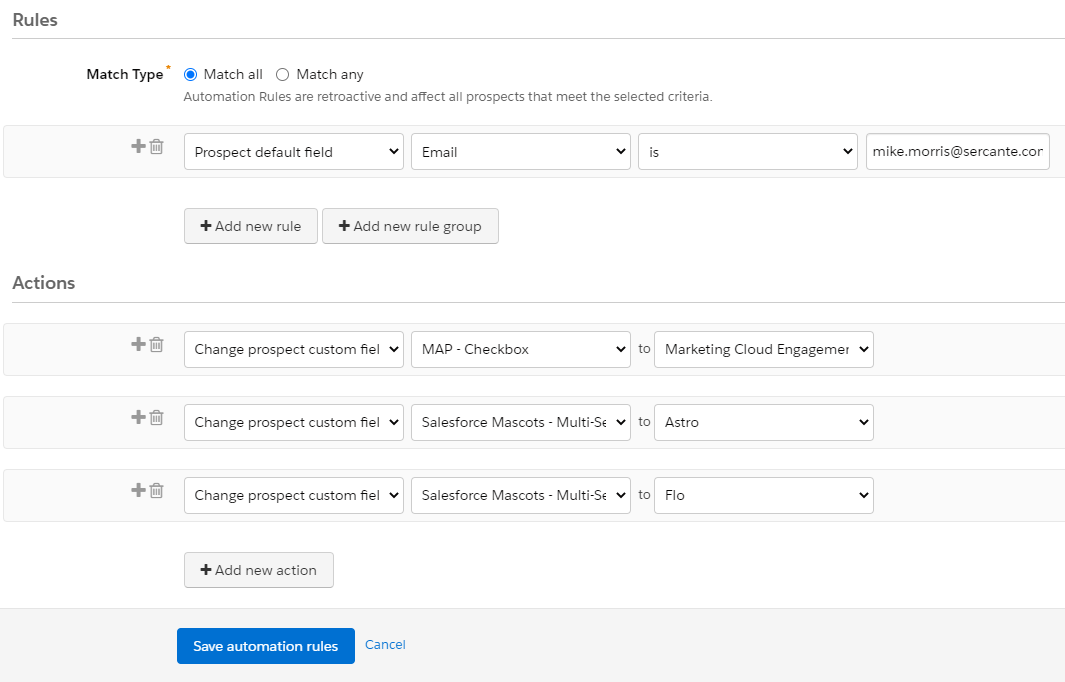
For this exercise, I’m going to assume that you are familiar with creating automation rules. If you need a quick refresher, check out the Create an Automation Rule article from Salesforce. The automation rule below contains actions to update the MAP field to “Marketing Cloud Engagement” and the Mascot field to “Astro” and “Flo”. Let’s run and record our results.

Multi-Select Picklists

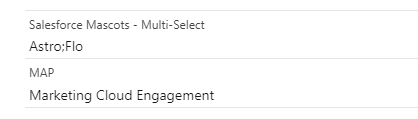
The result is that both fields were updated based on the actions included in the automation rule. This is the expected behavior based on the field configuration. The automation rule told Account Engagement to change the field values and that’s exactly what it did. 

Form with Multi-Select Picklists 3


Automation Rule – Record and Display Multiple Responses Selected

In this scenario, the Record and display multiple responses (useful for fields that are set to always be displayed like reporting issues) IS selected for both of my custom fields in Account Engagement.

The values have also been reset to the default values below.

Form with Multi-Select Picklists 2

We’re now going to recreate the exact same automation rule as we did earlier. As a reminder, the rule contains actions to update the MAP field to “Marketing Cloud Engagement” and the Mascot field to “Astro” and “Flo”. What do you think will happen this time?

Form with Multi-Select Picklists

If you said that both MAP fields would be selected and that the Mascot field would contain all four of our fiends (Astro, Codey, Flo, and Max), you would be correct. Since our fields are now configured to record multiple responses, the new values were added and the original values were retained.   

Parting Words 

In this guide, we tested a lot of situations that can result when working with multi-select picklists in Account Engagement to help add clarity to how these fields work. The decisions that you make related to how data should display on forms and the data that you would like to retain are two critical questions that must be addressed at the beginning of your project. These decisions will determine how your fields are created in Account Engagement and the data that will ultimately end up in Salesforce. 

Further Reading

Questions?

Contact the Sercante team for help.

I’ve seen more than a few great marketing campaigns fail due to the lack of a clear call-to-action (CTA). Some campaigns have multiple CTAs that confuse the prospect while others don’t have a CTA at all. In both cases the end result is the same, a lot of work for very few responses. 

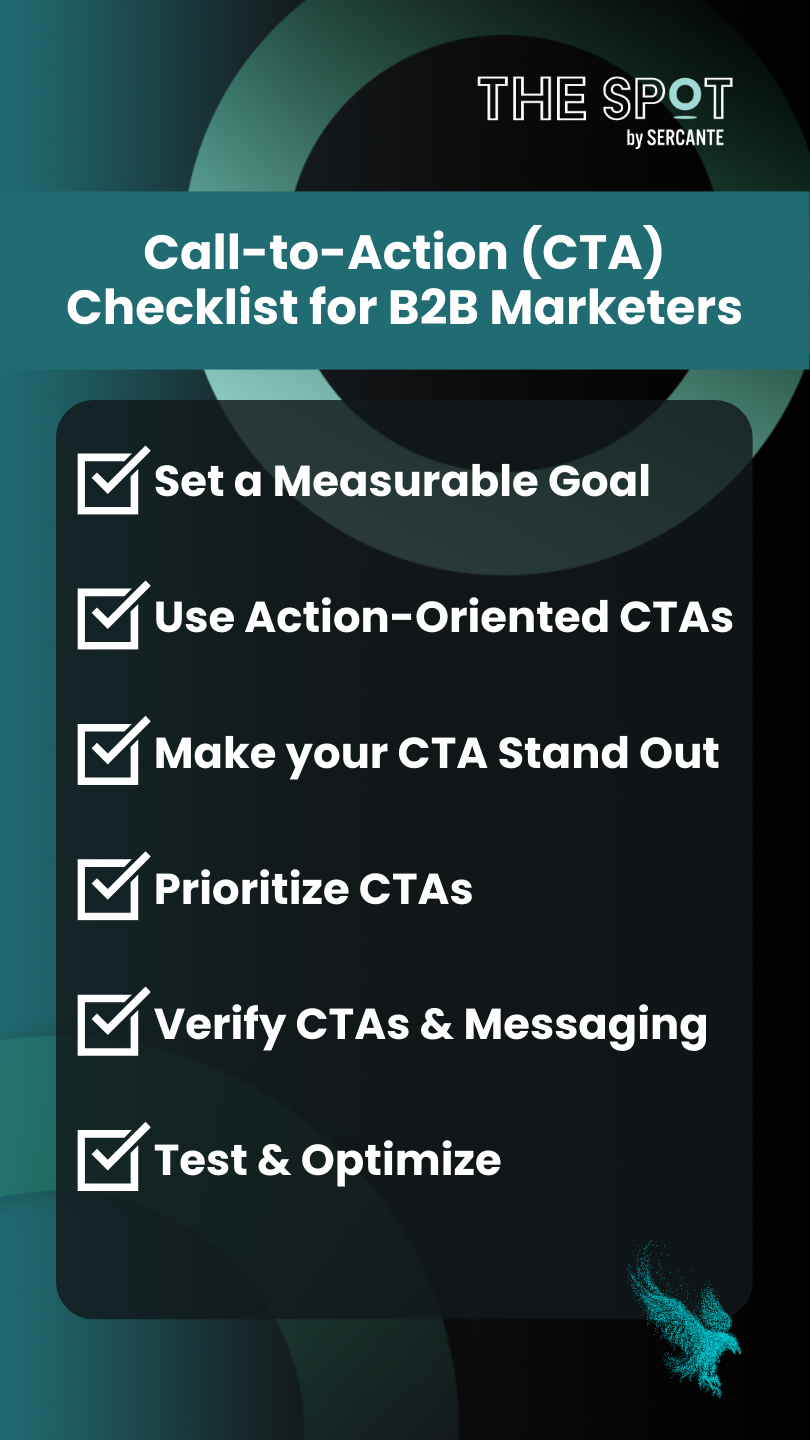
In this post, we’ll provide a CTA checklist that will help ensure the success of your B2B marketing campaigns.

Set a Measurable Goal

I know this one seems super obvious, but this step is all too often ignored. Before executing any campaign, a measurable goal needs to be defined. What are you trying to accomplish with your CTA? You can’t measure the success of a campaign if it does not have a clear goal. Write down your goal as the first step — the clearer the better.

Goal Example: 

Get 50 registrations for next month’s webinar.

Use an Action-Oriented CTA

Avoid generic terms like “submit” or “click here,” and don’t be bossy.  Action-oriented words and phrases that describe the end result or value the prospect will receive are less demanding, convey greater value, and ultimately result in more responses.  

GenericAction-Oriented
RegisterSave My Spot
SubmitStart My Free Trial

Make your CTA Stand Out

How many times have you seen the word “here” linked in the text of an email? As often as you’ve seen it, I bet there are just as many times that you’ve read over it and not seen it. It’s also not great for email accessibility, as Cara Weese points out in this blog post about email accessibility.

When using hyperlinks in the body of text, avoid single words like “here,” “click,” and “more.” Make your CTA stand out by linking phrases that describe what the reader will receive. 

Bad Example: 

The Spot is a community resource for marketers whose tech stacks include Salesforce clouds and tools. Click here to view our latest tips, tricks, and solutions.

Good Example: 

The Spot is a community resource for marketers whose tech stacks include Salesforce clouds and tools. Click here to view our latest tips, tricks, and solutions.

Prioritize CTAs

The best advice that I can give you is to provide a single CTA when possible. The easier you can make it for prospects to understand what you are asking them to do, the better.

However, anybody who has spent any time in marketing has fallen victim to the manager who wants to add “just one more thing” to your well-thought-out email moments before it goes out. While this often has the intent of optimizing communications being sent, the reality is that it often detracts from the message, muddies the water, and reduces the overall number of responses.  

When this happens, make sure your primary CTA is the most visible action and is displayed in the most prominent location — above the fold.

Verify CTAs & Messaging

Before your campaign is released into the wild, be sure to double check your CTAs and related landing pages. The first step is to ensure that your CTA link is live and going to the correct destination. Equally important is the content on the destination page.

Make sure your destination page delivers on the promise made by the CTA. If you are linking to a landing page or form, make sure that it’s consistent and builds upon the story. 

Keep in mind that the content on the destination page should not be exactly the same as the message that was sent. Instead, it should be used to continue the conversation by providing additional details and information that supports and enhances the original message.

Test & Optimize

You’ve mulled over multiple ideas and CTAs in your head and finally came up with the option that you know will knock your goal out of the park. Now’s the time to deploy!

Wrong – Now is the time to test.

Before fully deploying your campaign, perform an A/B test to optimize your CTA. Test variables like CTA text, button color, page layout, and location. The results might surprise you!

Don’t Settle for a Lackluster CTA 

The CTA is one of the most important components of a successful campaign. Failing to put in the time and effort when developing your CTA can make the difference between achieving or falling short of your goals. Use the checklist from this post to ensure the success of your marketing campaigns.

You’re a responsible marketer and adhere to the Salesforce Marketing Cloud Account Engagement (Pardot) Permission-Based Marketing Policy. You’ve enabled Marketing Data Sharing (MDS) rules to ensure that prospects who have not opted-in are not syncing to Pardot. Now you get a call from your Salesforce Admin about Pardot creating duplicates in Salesforce.

In this post, we’ll discuss how you can remain compliant AND prevent unintentional dupes in Salesforce.

Let’s start at the beginning

Most sales organizations use tools like Clearbit, Lusha, or ZoomInfo to research companies, find new contacts, review intent data, or enhance data. 

These are perfectly valid use cases and can be very beneficial to organizations. However, the problems start when marketing begins emailing these records through Pardot.


What’s the problem? The email addresses are valid.

Salesforce has a Marketing Cloud Account Engagement Permission-Based Marketing Policy that strictly prohibits the sending of emails to customers or prospects who have not expressly opted-in to receive them. 

Our customers certify that they will not use rented, traded, or purchased lists, email append lists, or any list that contains email addresses captured in any method other than express, customer-specific opt-in when using our system to send emails.

Sending emails to acquired records is a clear violation of the permission-based marketing policy and can result in the suspension or termination of your account. I’d hate to be the person responsible for that!

What’s a marketer to do?

Verify your connector preferences

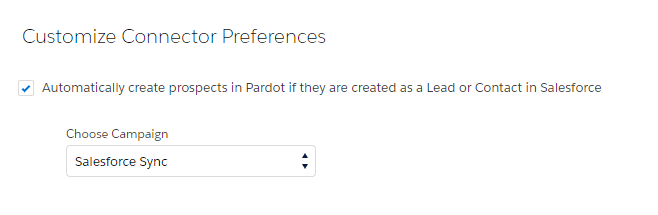
The first thing is to understand your connector settings in Pardot. Most accounts will be configured to automatically create prospects in Pardot if they are created as a Lead or Contact in Salesforce. This means that ANY lead or contact created in Salesforce from ANY source is going to end up in Pardot and could unknowingly be emailed by your marketing team. 

Limit record entry with Marketing Data Sharing Rules

MDS is the safest way to make sure that data does not enter Pardot (Here’s a great post on MDS if you have questions – Pardot Marketing Data Sharing: Tips, Gotchas, and Setup). You can restrict which leads, contacts, opportunities, or custom objects sync to Pardot. The intent of MDS is to control the data that can be seen by the Pardot connector. The issue is that MDS does this job a little too well and this can result in duplicate leads being created in Salesforce.

MDS and duplicate records

Hold up a minute! Are you telling me that by doing the right thing, I could actually create duplicates in my Salesforce org? Yep.

Here’s the rub. Before creating a lead or contact in Salesforce, Pardot undergoes a series of checks to see if the prospect is in Salesforce already. The intent is to identify matching records and not create duplicates. Since MDS limits the visibility of the connector, Pardot is not able to find prospects who might be in SFDC from a source deemed “not marketable” if they visit your site and complete a Pardot form (for example).

For reference here are the checks performed by Pardot before creating a lead or contact in Salesforce.

  • Is there a lead or contact with a matching CRM ID?
  • Is there a contact with the same email address?
  • Is there a lead with the same email address?
  • Is the prospect assigned to a user in Pardot?

Here’s how we addressed this issue for one of my clients

Don’t activate MDS

It’s important that MDS is not activated in this solution. We want the prospects to sync from Salesforce to Pardot. We’re going to use custom fields and automation rules to make sure that we remain compliant and don’t create duplicates in Salesforce.

Create custom fields

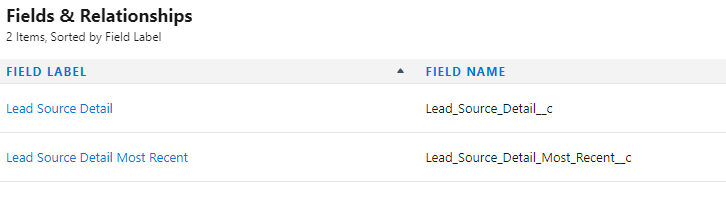
The first step involves creating several custom fields in Salesforce and Pardot. We created first touch and last touch fields to capture the needed information on leads and contacts. In this case, we used Lead Source Detail and Lead Source Detail Most Recent.

  • Lead Source Detail – This is a FIRST TOUCH field that identifies the specifics of where the lead originated (ex. ZoomInfo).
  • Lead Source Detail Most Recent – This is a LAST TOUCH field that identifies the specifics of the most recent source that drove the prospect to your site (ex. LinkedIn).

Map data to your custom fields

We’re going to stick with the ZoomInfo example here since I see this product used in a lot of organizations. When setting up your CRM Integration in ZoomInfo, you have the ability to map fields to for your Account, Contact, and Lead Objects.

In this case, we mapped Lead Source (standard field) and the two custom fields that we created. We also set fixed values for each.

Based on this configuration, any new records added from ZoomInfo into Salesforce will have the fixed values specified. This is super important.

Automation Rules

Remember the Pardot prospect mailability upgrade that took place with the Winter ‘22 release? We’re going to take advantage of it to make sure that we comply with the Marketing Cloud Account Engagement Permission-Based Marketing Policy. Don’t remember the changes? No problem – check out this post “Are You Ready for the Pardot Prospect Mailability Upgrade?” from Erin Duncan.  

Automation Rule #1 – Set Do Not Email to TRUE 

This automation rule will look for prospects in Pardot where Lead Source Detail and Lead Source Detail Most Recent equal “zoominfo”. This lets us know that the prospect was added into Salesforce from ZoomInfo, synced to Pardot, and that the person did not opt-in. As a result, we’ll mark the record as “Do Not Email.”

Automation Rule #2 – Set Do Not Email to FALSE 

This automation rule will look for prospects in Pardot where Lead Source Detail is “zoominfo” and Lead Source Detail Most Recent is NOT “zoominfo.” This will show us that the person interacted with our marketing and is eligible to be emailed. It goes without saying that we only want to “activate” prospects who have given permission for us to email them. The Lead Source Detail Most recent field can be updated using completion actions or UTM parameters from URLs (that’s another post).

The short and sweet summary

This solution allows records added into Salesforce (that have not opted-in) to sync to Pardot. Automation rules in Pardot update the “Do Not Email” field based on Pardot interactions and opt-in status. This ensures that prospects who did not previously opt-in are updated correctly when they do opt-in and that no duplicates are created in Salesforce.

Let’s play by the rules AND not create duplicate records 

Based on how your organization uses tools like Clearbit, Lusha, or ZoomInfo and the volume of records added to your Salesforce org, MDS might be the best solution for you. However, if a high volume of records are being added into Salesforce, I would recommend that you give this solution some consideration. The chances of duplicates being created in your system grows exponentially based on the number of records being added from external sources.


If you have any questions about this solution, MDS, or anything related to Marketing Cloud Account Engagement or Marketing Cloud Engagement, contact us with your questions.

Many organizations assign Marketing Cloud Account Engagement (Pardot) prospects who are not yet sales ready to a “Cold” leads queue in Salesforce so data syncs and is available for reporting. The problem is that Pardot can’t reassign these leads once they “score up” and many get stuck in the cold leads queue in perpetuity.

In this post, we’ll discuss how leads can be automatically reassigned from the cold leads queue with the help of Salesforce Flow and some Apex code. This solution allows marketing teams to have full-funnel lead reporting in Salesforce without burdening sales with unqualified leads.

To Sync or Not to Sync?

The question of when to sync prospects from Pardot to Salesforce is one that comes up quite often when speaking to my clients. The answers from marketing and sales often differ. And both sides are passionate about it with compelling arguments.

The Marketing Perspective 

I need to show the full impact of my marketing activities and the leads my team is generating. If leads are only synced to Salesforce when they are sales ready, my numbers are going to be understated. That means my budget is going to be questioned — and probably slashed.

The Sales Perspective 

My time is valuable and I’m working on a commission. I don’t want to be distracted by a bunch of junk leads. I need to focus my time and energy on leads who have an interest in what we have to offer. I have a quota to hit!

I’m often pulled into these conversations and asked for my recommendation. Without hesitation, my answer is always the same — it depends. Some organizations need all prospects in Salesforce for reporting purposes and some only want sales ready leads added into Salesforce. Both approaches have merit and are correct based on the needs of the organization. 

However, you can have your cake and eat it too! Enter — the cold leads queue.

The Salesforce Cold Leads Queue

My favorite solution to satisfy the needs of my friends in marketing and sales is the introduction of a cold leads queue. 

The cold leads queue is the best of both worlds solution. It allows all the Pardot prospects to sync immediately to Salesforce — which allows for accurate lead reporting for marketing while not burdening sales with leads that are not yet ready. The cold leads queue is also a great place for sales teams to find additional leads to call in the event they are running low on MQLs to call.


So What’s the Catch?

Like all good things, there is a catch to using a cold leads queue. By design (and for good reason), Pardot can only assign prospects if they are currently unassigned. Once the prospect is assigned and synced to Salesforce, Pardot can’t change the assignment.

I’m sure you see where I’m going with this. In our case, we would assign a lead that does not meet our MQL criteria to the colds leads queue (in Pardot), so it will sync to Salesforce. This is perfect as the lead is in Salesforce for reporting purposes and is not cluttering the lists views of our sales teams. 

But what happens when that prospect interacts with our marketing campaign and “scores up” to meet our MQL criteria? Houston, we have a problem!  


Reassigning MQLs from the Salesforce Cold Leads Queue

I’ve seen this many times. Leads get stuck in the cold leads queue and are not reassigned once they hit the MQL threshold. 

Why does this happen? Well, there are a few reasons.

  1. People forget that Pardot can’t reassign previously assigned leads and assume that their automation rule is doing the trick!
  2. Since reassignment has to be done in Salesforce, the marketing team does not have the proper permissions to do the job.
  3. Manual reassignment of leads is not a fun or glamorous job that Salesforce Admins look forward to doing.
  4. People just plain forget about leads once they hit the cold leads queue.

So what’s the solution to this issue? I’m glad you asked. 

The solution is to use a Salesforce flow and Apex combined to automate it.

Let’s Start With Some Definitions

Apex 

Apex is a strongly typed, object-oriented programming language that allows developers to execute Flow and transaction control statements on Salesforce servers in conjunction with calls to the API. Using syntax that looks like Java and acts like database stored procedures, Apex enables developers to add business logic to most system events, including button clicks, related record updates, and Visualforce pages. Apex code can be initiated by Web service requests and from triggers on objects.

Flow 

A flow is an application that can execute logic, interact with the Salesforce database, call Apex classes, and collect data from users. You can build flows by using Flow Builder.

*Definitions from the Salesforce Glossary

The Big Reveal

I know I talked about having your cake and eating too at the beginning of this post. Well, it’s time for cake! The trick to using cold lead queues effectively is automating the process of “promoting” leads from the queue and into the hands of your sales team — and here’s how you do it.

  • Step 1 – Determine the criteria that should trigger the reassignment of leads that are in the cold leads queue. This could be a Pardot score crossing a threshold or the change in a custom field value.
  • Step 2 – Review your Lead Assignment Rules (Salesforce) for accuracy and make and needed updates.
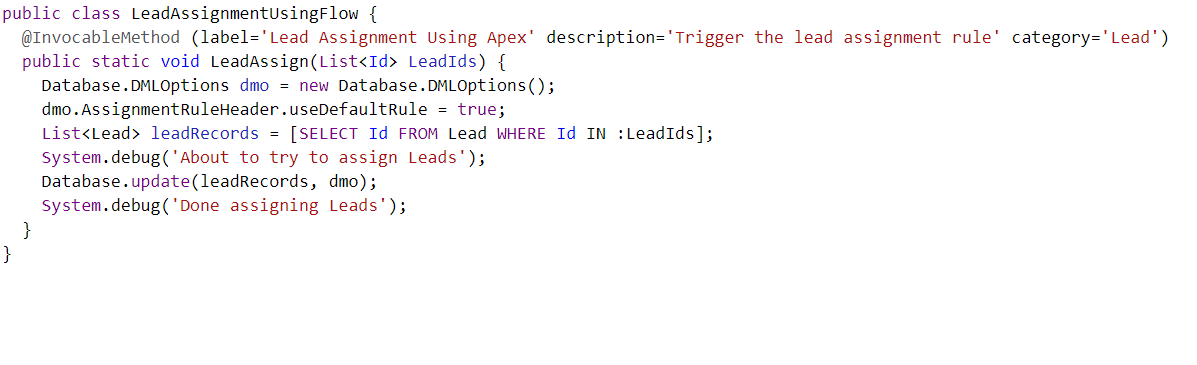
  • Step 3 – Create an Apex class to call your lead assignment rules from Salesforce — in sandbox. This is an invocable process and can be called by flow. Below is an example of how this code could look.


  • Step 4 – Create a test class to ensure code coverage. You’ll need to have 75% code coverage in sandbox before your code can be pushed to production.
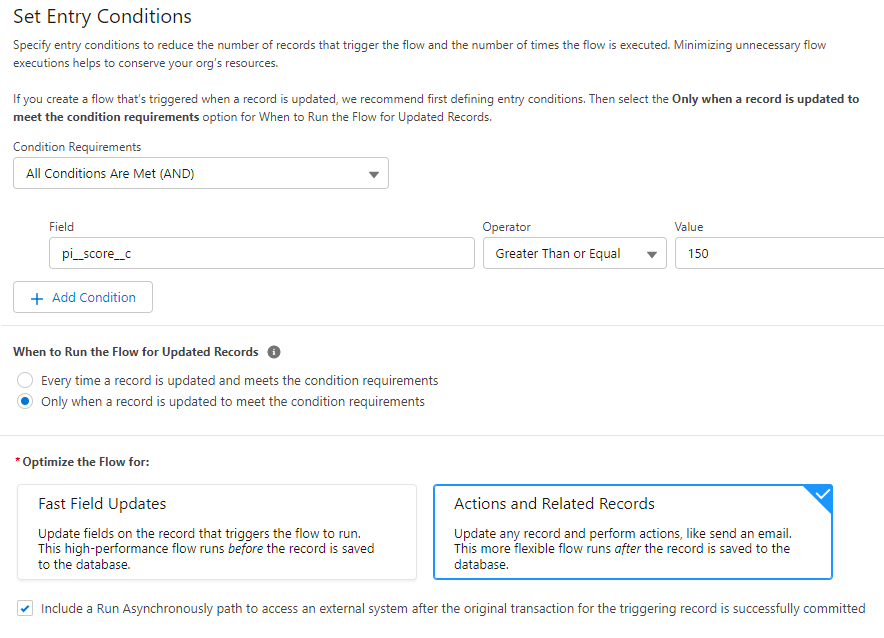
  • Step 5 – Create a record triggered-flow based on your MQL criteria. As an example, your flow could be triggered when a lead is updated and their Pardot score exceeds 150 points.

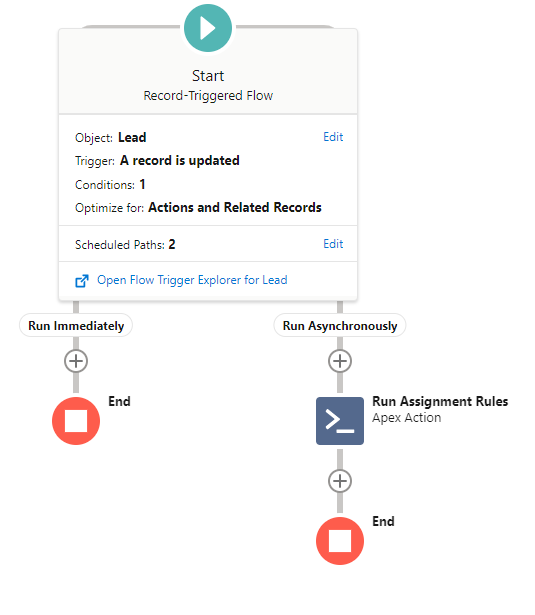
When creating your Flow, it’s important that you include an asynchronous path. This will ensure that the flow runs after the changes to the lead record (that triggered the flow) are complete.

The rest of the Flow is pretty basic and will look something like this.

  • Step 6 – Test and validate. Test your Flow first using Debug to make sure it’s being triggered when your lead score is changed to exceed the target score. Once verified, activate the flow in sandbox and test on some actual leads.
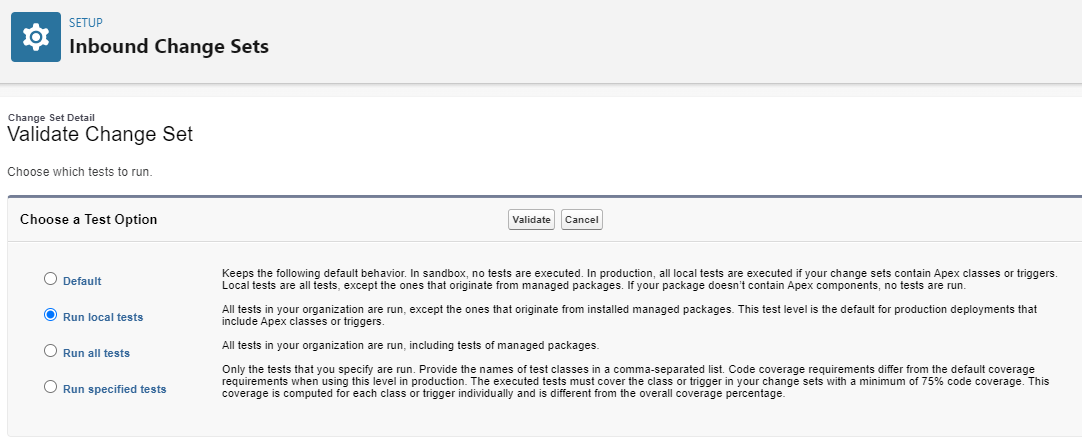
  • Step 7 – After validating your flow in sandbox, create your outbound changeset. In production, validate your inbound change set (since this change set does include Apex code, be sure to run all local tests). Deploy once validated.
  • Step 8 – Activate your flow and relax — knowing that no good leads are going to go bad in your cold lead queue!

Get Those Lead to Sales!

This post provided a high-level overview of how to automate the reassignment of leads from your cold leads queue. This is a common problem and addressing it is a great way to get some great leads into the hands of your sales team immediately. 

If you need a hand setting up the actual process, contact us with your questions.

No more posts to show