Higher education institutions around the world are embracing a digital future with the shift to marketing with Pardot.
Teams are replacing the traditional ways of reaching prospective students, donors, and community with personalized digital marketing tactics. And an integrated marketing platform is the key to connecting institutional departments while providing right-time and right-message communications.
Enter Pardot. Marketing teams at higher education institutions that are also Salesforce customers can finally feel like they’re part of the action. That’s because Pardot is built on the Salesforce platform, which enables marketing teams to connect their data and content to other departments at their institution. And Pardot allows marketers to generate valuable leads, nurture relationships, and convert more prospects throughout the power of marketing automation.
This is how Pardot empowers marketers working in higher education to reach their goals.
Pardot connects higher ed marketers to other departments
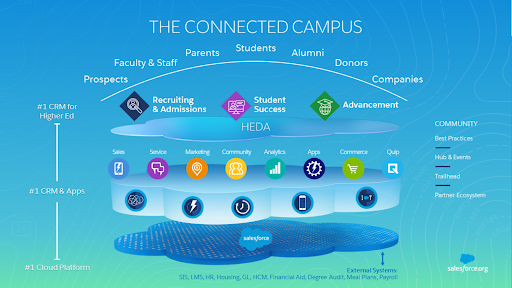
Pardot is a Salesforce product. That means it connects seamlessly with other Salesforce clouds in place at your institution. You can pass data (e.g., prospect activity) and content (e.g. email and landing page templates) for better cross-departmental collaboration.
Pardot has a cloud product for just about any type of company and organization. That includes clouds different departments in higher education may be using already. For example, here’s how the technology stack may look for a mid-size regional university.
Prospects get better experiences with higher ed institutions through Pardot
Pardot is great for B2B companies because they have a long sales cycle. This cycle includes lead generation, nurturing, and multiple opportunities and sales over a long period of time. Many institutions of higher education operate in a similar fashion.
Current students may come from a long line of repeat students and family legacy.
They may engage with your institution by attending as undergraduate students. While at your university, they require student success resources so they keep coming back each semester. After graduation, they may slowly start giving back as their earnings increase each year. And finally, their children will make it to your mailing lists as the time to look at colleges arrives.
Pardot ensures a consistent and personalized experience for everyone in your funnel. And it gives you the opportunity to tailor your efforts based on tangible insights through engagement activity tracking.
Here’s how it works.
Lead Generation
You create a conversion point, like a form on a ‘Schedule a Visit’ page on your website. Then, create a Pardot campaign for that form so you know people in that campaign have interest in visiting your university campus.
Pardot creates a prospect record for everyone who completes the form. Then, you’ll start to see engagement activity on the prospect record as they interact with your content (e.g., web pages and emails) thanks to the power of web tracking cookies.
Prospect Nurturing and Student Retention
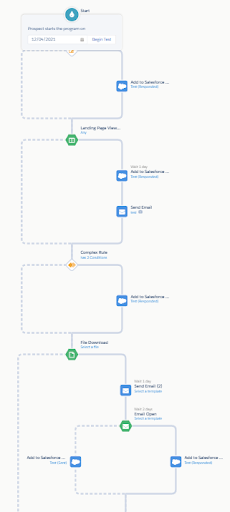
Pardot Engagement Studio Program Example
Once you get prospects into your funnel, the goal is to keep them engaged so your institution is top of mind when they finally make a decision about where to go to school or spend their annual donation budget.
You can accomplish that by creating content that provides value for your audience — whether it’s educational, entertaining, or inspirational. Your content marketing strategy will include a robust website with rich content resources. Then, you can use Pardot to track the effectiveness of your content efforts.
Then, you can start nurturing your prospects by sending them on personalized and automated content journeys with Pardot Engagement Studio.
You can even use Pardot to drive student retention initiatives. For example, your team can create an Engagement Studio Program that delivers wellness and educational resources to current students. You can use the data from that program to identify students who need outreach from a school advisor or administrator.
Marketing Reporting
Higher ed institutions are feeling the crunch when it comes to scaling marketing efforts with limited budgetary resources. And nothing helps to justify budget allocation more than solid marketing reporting metrics.
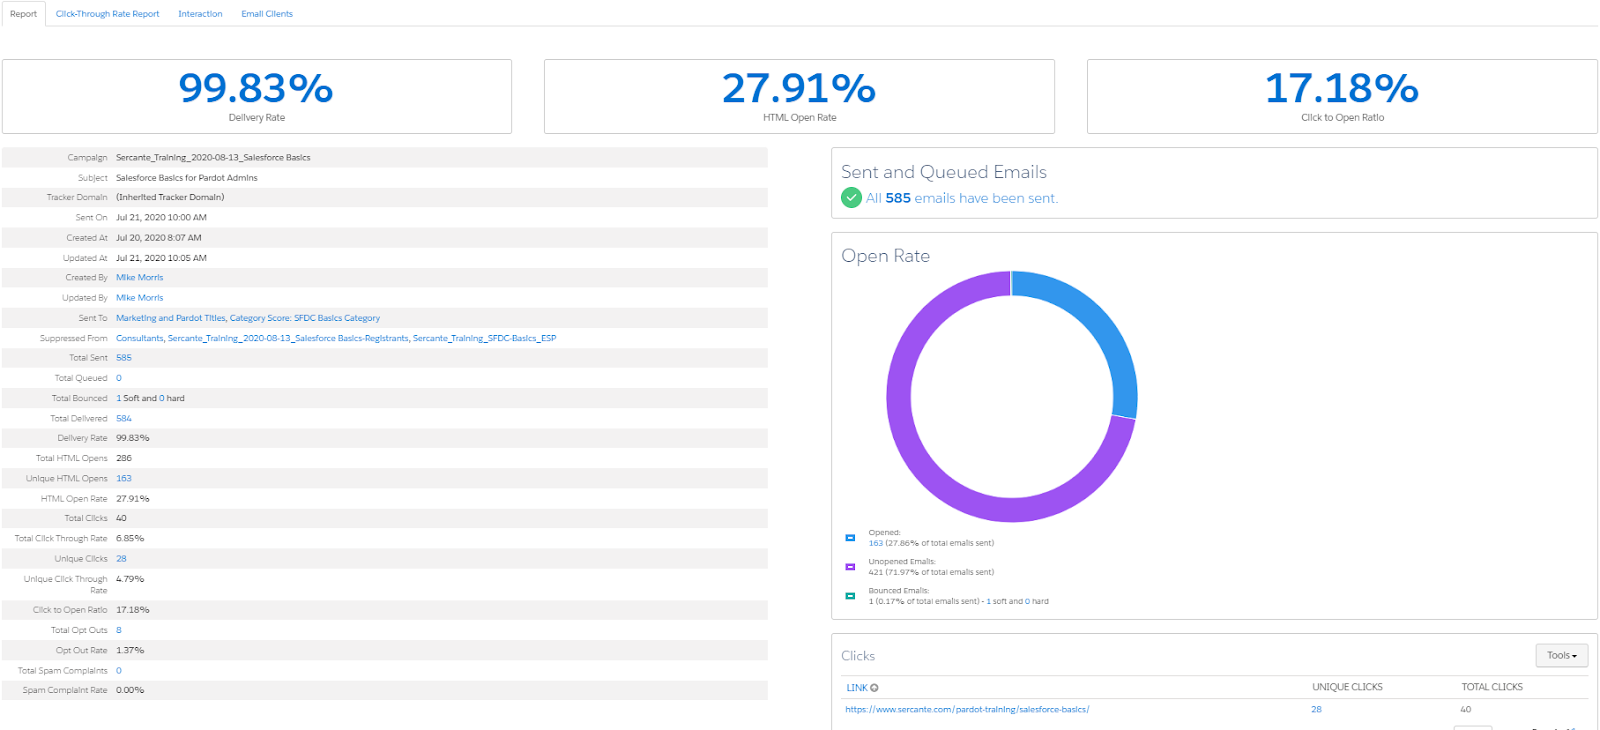
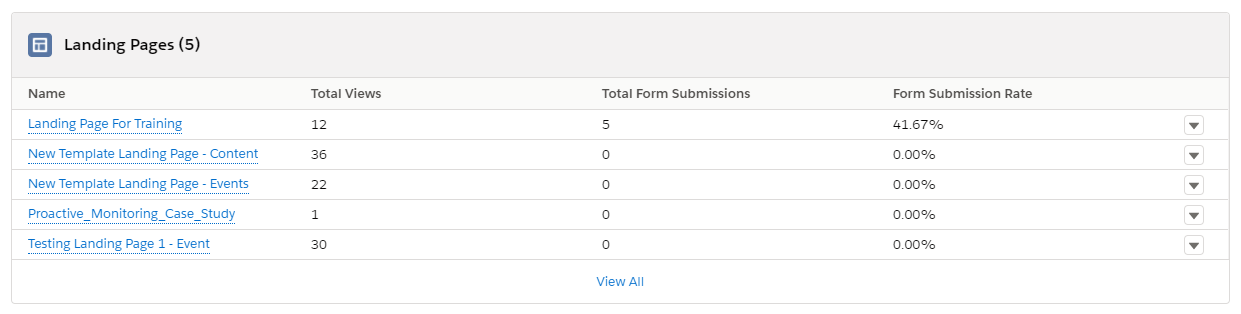
Pardot provides a set of built-in reports, which are the day-to-day reports for marketing teams. From emails to forms, these reports show the performance of marketing assets created in Pardot, and they allow you to monitor and make adjustments to assets.
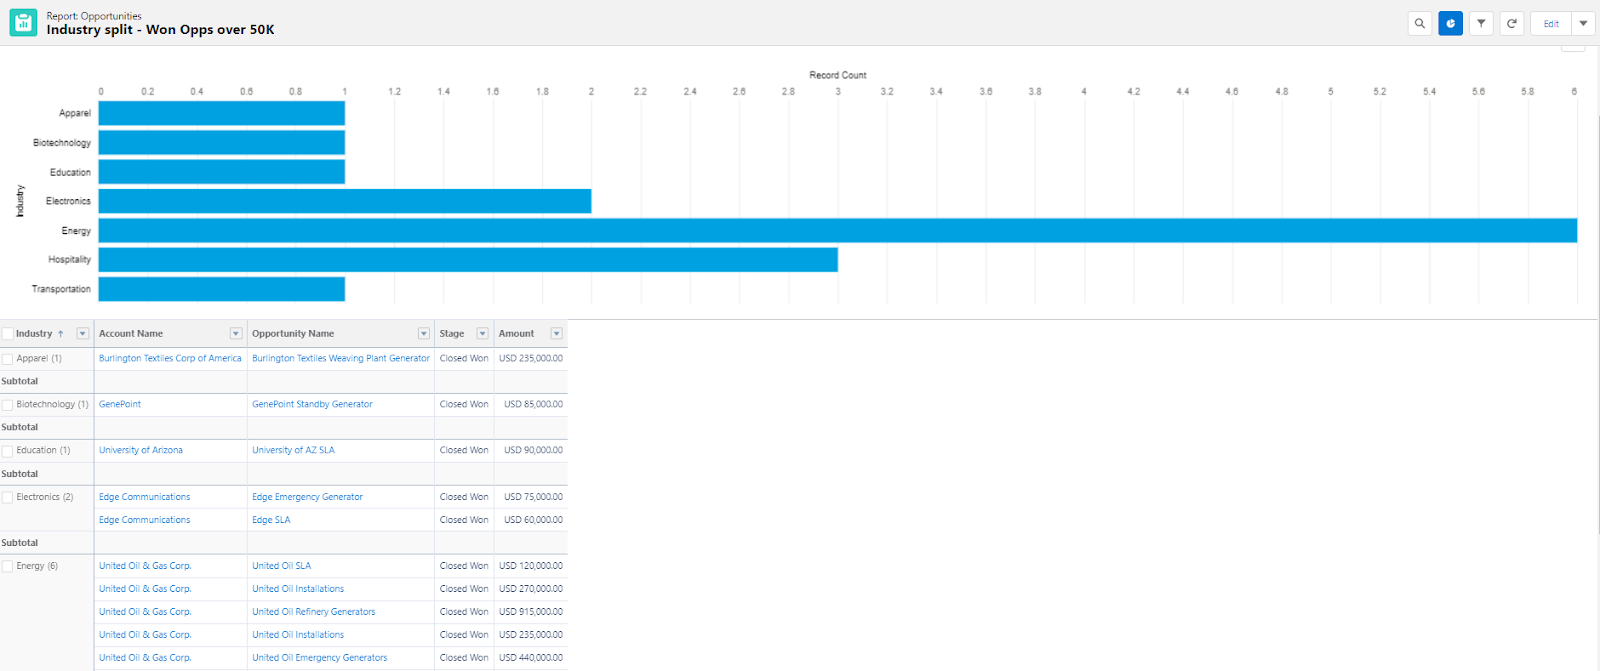
Salesforce reports and dashboards allow you to customize your reports. Additionally, it can be the first step in helping to align the marketing team with other departments within the college or university.
That means, you can sync data from Pardot into Salesforce, such as data collected from forms. Then, you can create Salesforce reports using the data and start using shared marketing and advancement or student recruiting dashboards.
Resources about Pardot for higher education marketers
Understanding why your college, university, or higher education institution should migrate to Pardot is the easier part. Convincing your colleagues and leadership team may be another story.
One thing’s for sure. Your marketing team can finally feel like part of the greater team by migrating to Pardot if the rest of the institution is operating on the Salesforce platform.
Thinking about making the switch? Tell us about your current marketing strategy in the comments. And reach out to Sercante when you’re ready to implement Pardot at your higher education institution.
When it comes to reporting on your marketing assets, the feeling of not knowing what tool to use can be quite overwhelming. I’ve been there! You’ve been asked to show the performance of a marketing asset, asked to explain the impact of a marketing campaign on the sales pipeline or simply, “how can we report on x?” and you don’t know where to start.
Whether you’ve been using Pardot for a while or you’ve just started, having an understanding of what the most common reporting tools can do can go a long way in knocking the socks off stakeholders when you’re next asked about reporting! This post provides a non-technical overview of the most common Pardot reporting tools.
Pardot reporting basics
I’m looking for… Reports that will show the performance of my marketing assets, so I can monitor and make adjustments. Only the marketing team needs to see this data.
Pardot provides a set of built-in reports, which are the day-to-day reports for marketing teams. From emails to forms, these reports show the performance of marketing assets created in Pardot, and they allow you to monitor and make adjustments to assets.
Low click-through rate (CTR) showing on your list email report? Let’s switch the calls-to-action (CTAs). High error rate showing on one of your forms? Maybe we need to re-evaluate how easy the form is to complete.
When could I use these built-in Pardot reports?
Pardot reports are great if you want to report on the performance of individual Pardot assets. They are likely to be the tool of choice for your marketing team and will be used to monitor marketing key performance indicators (KPIs) such as, CTR, bounce rate, submissions or visitor-to-prospect conversions.
Pardot reports cover the basic needs for a marketing team to monitor and react, but they do lack the customizability you’ll find in other reporting tools. They don’t always tell the full story for piecing together the whole customer journey, from visitor to opportunity. That means primarily relying on Pardot built-in reports isn’t recommended and can sometimes be inaccurate if you don’t have all the data inside Pardot.
What Pardot reports are available?
Prospect Lifecycle Report Gives you a high-level view of your sales cycle
List Email Report Breaks down data from your sent list emails, such as number sent, unique clicks and click-through rate
Form and Form Handler Report Gain insight into the number of views, submissions and conversions your forms and form handlers have generated.
Landing Page Reports Shows how many people viewed your landing pages, submitted a form and converted.
Social Posts Reports Monitor the performance of your social messages via these reports
Pardot Campaign Reports Provides insight into the effectiveness of your marketing activities.
Are there any prerequisites for built-in Pardot reports?
Nope! Pardot reports are available straight out of the box and data will populate as you start to create assets.
Salesforce reports and dashboards
I’m looking for… Customizable reports and the ability to create visual dashboards using selective data held within Pardot. These reports and dashboards should help align marketing and sales teams.
Salesforce reports and dashboards allow you to be a bit more customized with your reports and can be the first step in helping to align the marketing and sales teams. Not only can you sync data from Pardot into Salesforce (such as data collected from forms), but you can then start to create Salesforce reports using this data, and from here start to create shared marketing and sales dashboards.
If you want to create a Salesforce report that includes data collected in Pardot, you’ll need to ensure you have synced the Pardot field to the correct Salesforce object. Note: There are some Pardot fields, like Score and Grade, that are automatically synced when you connect Pardot and Salesforce (take a look at those fields).
When could I use these reports?
Use Salesforce reports to create a dashboard for sales and marketing managers and track information that is important to your business. You can also use Salesforce reports to segment your leads and opportunities using the data collected from marketing forms, for example, industry split on won opportunities greater than $50k.
Bonus Tip! You can download (FREE) sample reports and dashboards from the AppExchange.
Are there any prerequisites?
Yes, marketers who want to create Salesforce reports will need access to Salesforce (so you’ll want to check your permissions in Salesforce). You’ll also want to make sure you connect Pardot and Salesforce. Finally, if you want any additional Pardot fields to show within Salesforce reports, then you’ll need to plan out, map and sync these.
Connected Campaigns for Salesforce and Pardot
I’m looking for…Campaign performance and attribution reporting, as well as the ability to report on marketing asset engagement within Salesforce. I want these reports to be available for both marketing and sales teams.
A report you’re more than likely to be asked to pull as a marketer is a campaign performance report (Answers questions like, How are our marketing campaigns performing?How many opportunities have they generated?). If you’re actively using Pardot and Salesforce, you’ll notice that they both use campaigns. This can be confusing when faced with this reporting request — which one do you use!?
First we need to understand the difference between the two types of campaigns.
Difference between Pardot and Salesforce Campaigns
Pardot Campaigns are considered thematic touchpoints, which is similar to a “source.” They are used to track a prospect’s first touch. Pardot prospects can only have one campaign (the first touch). But as marketers, we know a number of different marketing campaigns can influence a sales journey, so with Pardot campaigns only showing the first touch, we are no closer to being able to report on campaign performance by just using Pardot campaigns.
Meanwhile, Salesforce Campaigns are treated as marketing initiatives, such as advertisements, email campaigns or marketing events. This way of using campaigns is more familiar with marketers, with a Salesforce Campaign being an actual marketing campaign and not necessarily the first touch point or source. With Salesforce Campaigns, leads and contacts in Salesforce can be members of multiple campaigns, unlike Pardot Campaigns and opportunity data (such as $$$) can be attributed with Salesforce Campaigns (via Contact Roles). This all sounds perfect, and at this point you’d think Salesforce Campaigns is clearly where I go for all my campaign performance reporting.
Pardot Connected Campaigns
But, there’s one problem. While Salesforce Campaigns are linked to your sales funnel, Pardot Campaigns are linked to your marketing assets as Engagement. How can we get this data over into Salesforce so we can report on things like campaign performance, number of opportunities created from campaigns, or best performing campaigns?
Enter Connected Campaigns, which bridge this gap to create a relationship between Salesforce Campaigns and Pardot Campaigns. Once enabled, everyone can see the performance of marketing assets and measure the success of a campaign and its contribution to the sales funnel from within the Campaigns tab in Salesforce.
Prospects are added into a campaign at the start of their journey based on their first touch action. Using Pardot automation, we can add them to even more campaigns (Email nurture, webinar attendance, whitepaper download), and once they convert into leads they are now members of several campaigns. You can now start reporting on campaign performance metrics, like how many leads each campaign has from within Salesforce, for example.
When could I use Connected Campaigns reports?
Use these reports when you’re asked to report on campaign performance, attribution reports, or reporting on your marketing initiatives. Take a look at the Engagement History and Campaign Influence section of this blog post to expand the reporting capabilities of Connected Campaigns.
Are there any prerequisites?
Connected Campaigns requires a verified Salesforce-Pardot connector and an admin to enable the feature.
BONUS – Engagement History Reporting and Campaign Influence Reporting
With Connected Campaigns comes the opportunity to use Engagement History Components and Campaign Influence reporting to expand your reporting powers!
Salesforce Engagement History
Engagement History (components that you will add to your Salesforce objects) gives you access to prospect engagement data (that traditionally lives in Pardot) inside Salesforce. Engagement History is a generic term for a collection of fields, related lists, and other Salesforce Lightning components that make it possible to show valuable prospect engagement data in Salesforce.
Engagement Metric Fields
Engagement History Report Types
Engagement History Related Lists
Lightning Components
Engagement History Dashboard
Campaign Influence Reporting
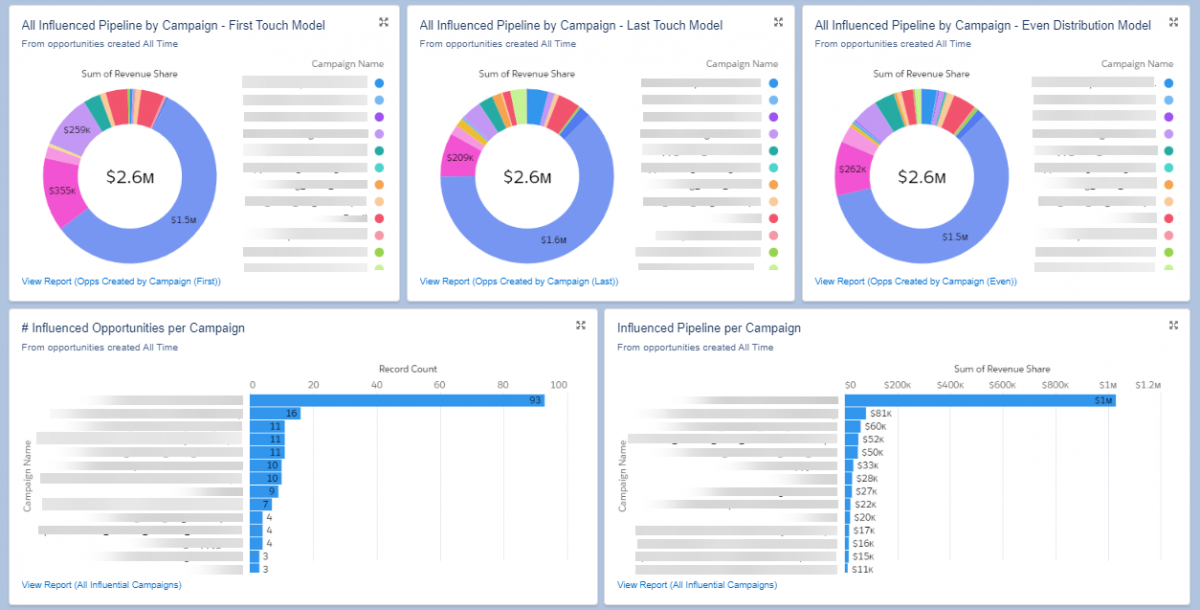
Campaign Influence allows you to report on and measure the success of your campaigns in terms of opportunities gained. It associates your opportunities with campaigns that helped generate them, joining the dots between sales revenue and marketing campaigns.
When could I use these reports?
Engagement History Components – If you want to report on Marketing engagement activity from within Salesforce. Use the Engagement History Metrics Fields to create more advanced Salesforce reports and dashboards based on Engagement on marketing assets.
Campaign Influence – If you want to report on all things campaign attribution and marketing ROI. Report on things like how much a campaign has influenced opportunities (using first touch, last touch, and even touch distribution). Take a look at this post for more on how to use Connected Campaigns and Campaign Influence to get the metrics that matter.
Pardot B2B Marketing Analytics (B2BMA) and Tableau CRM
I’m looking for… the whole package. I want customizable dashboards using a vast amount of data from both Pardot and Salesforce. I also want to be able to report on the whole sales pipeline and include how marketing activities have contributed to won opportunities. And I want to be able to share these dashboards with key stakeholders in the business.
Pardot B2B Marketing Analytics
Pardot B2B Marketing Analytics can help if you’re asked to report on things like:
How’s our sales pipeline looking?
What marketing campaigns were attributed to the most opportunities in Q1?
What marketing activities should we focus on next quarter to win more opportunities
B2BMA is a marketing analytics app (within the Salesforce platform through the Analytics Studio), which, with the help of your Salesforce connector, pulls Pardot Data to populate up to five out-of-the-box dashboards. These pre-built dashboards allow you to track your sales pipeline or campaign performance, as well as other common KPIs.
Tableau CRM is the underlying tool that allows you to create new dashboards and combine or transform data for truly customized visualizations.
Engagement Dashboard – See how your marketing assets perform and how they are contributing to the sales pipeline and lifecycle.
Pipeline Dashboard – Visually displays your sales funnel, from visitors captured in Pardot through to the opportunities you’ve won
Marketing Manager Dashboard – A great dashboard for those Monday morning meetings between sales and marketing teams. Take a quick look at the health of your business and which campaigns are bringing in the best results.
Explore the out-of-the-box dashboards in this Trailhead.
Grouped Datasets
How does it all work? In a nutshell, data is grouped into datasets (a dataset is a collection of source data). Think of it as a spreadsheet containing summaries of data coming from Salesforce.
Types of data included in datasets.
Emails and email templates
Forms and form handlers
Landing pages
Opportunities
Campaigns
Visitors
Tags
Datasets can be used to create lenses (a view of your dataset). These lenses can be used to explore the data further (think of it as a query) and save for reuse. You can also easily change your lens to visualize your data as a chart, pivot or compare table.
Dashboards are created by selecting a dataset and then bringing in widgets that allow you to enhance your view of the data to explore the aspects that will answer your questions.
What is a use case for creating a dashboard?
Anytime the standard B2BMA app dashboards don’t meet your needs. For example, using the Pardot dataset “Emails and Email Templates,” you could create a custom dashboard looking at the change in open, or click through rate that shows information not displayed in the standard Marketing Engagement B2BMA template dashboard.
Are there any prerequisites?
The B2BMA app is available in Pardot Plus, Advanced and Premium editions (or for an extra cost in Pardot Pro and Ultimate). To use the Multi-Touch Attribution Dashboard, you’ll need to set up Customizable Campaign Influence first. You will also need to make adjustments to your user permissions such as, the ability to create B2BMA apps and assigning the permission sets for the connector user and B2BMA users. Take a look at the B2B Marketing Analytics Implementation Guide for more information.
If you don’t have/can’t have access to B2BMA, you could use Connected Campaigns- Engagement History components and Campaign Influence to build out reports and dashboards.
More on Pardot and Salesforce Reporting
Taking the time to understand how each of these tools work is a great first step in understanding the power of Pardot and Salesforce when it comes to your reporting needs.
Learn more about these reporting tools with these resources
Let us know how you’re using Pardot and Salesforce reporting tools in the comments or reach out to the team at Sercante if you need help along the way.
The life of a marketing and sales consultant is never boring at Sercante, working with companies of all shapes and sizes on tasks both large and small.
The days flow along in a sensible cadence … until …
Are you a Halloween horror story fan?
Marketing has its own kind of terror — not in the chainsaw/demonic way, but on the topics of spam, user roles, missing form follow-up, sync mishaps — you get the picture.
Read on — if you dare! (But really, you should — you’ll learn a few tricks.)
Avoid these 6 Pardot horror stories
Soothsayer Sales Team?
Picture this: You’ve placed a clean and crisp “contact us” form on your website. It’s nice and trim (not too many fields) and has prominent placement on a main page. The sales team is rubbing their hands together in anticipation of ALL of the leads.
Your worst fears come true: The sales team gets nothing, zilch, nada, zero — NO leads. ????
You frantically look around for the culprit. Finally, the ugly truth bubbles to the surface: The beautiful “contact us” form is missing a critical step. (Are you hearing the “Psycho” sound? I am.)
Pardot Horror Story 1: An inspection reveals that form completions aren’t being assigned or sending notifications to the sales team.
???? Of course. The sales team doesn’t have a crystal ball and can’t “see” the leads without a little form-based action.
It’s time for you to optimize your form setup so leads make it to the right people.
Your day starts with an urgent note from your boss: “An email must be sent asap on ProductX because sales numbers aren’t as expected.”
Between back-to-back calls and a multitude of Slack messages, you prep the email, to get it ready for the final copy you are not-so-patiently awaiting. The copy arrives,and you review it while on yet another call, then drop it into the email you already started. Cool. Looks good ????.
You send a test to the boss, copywriter and your own inbox, and review the test email while still on a call (you are crushing the multi-tasking game ????).
You wait for approvals, then wait some more, and finally message your boss (“Please respond so I can get the email out!”). He comes back with a not-so-convincing “Yeah, it’s fine — send it” (and you never hear back from the copywriter).
You hit the “send” button — “asap” as requested — unaware of the horror to come.
Ding! The email hits your inbox. Ding! Ding! Emails from coworkers: “The button doesn’t work.” Uh-oh.
While distractedly rushing to get the email done, the link in the CTA button was forgotten.
Pardot Horror Story 2: Everyone’s messaging you to say your CTA button leads nowhere because it’s a dead link ????.
Anyone in charge of sending emails has been there — I feel you. It’s easy to miss test-clicking a link. And, as we all know, a rushed task is an invitation for errors.
Implementing a better quality assurance process can help you feel confident the next time you hit the ‘send’ button.
One day your database size is X, the next day it is X+5000! Where did the extra records come from? Magic? Sorcery? ????
You dig around, looking at new records trying to find the answer.
Hmmm — you see a few imports that you did not perform. Only one other user has import access — your boss. You message her: “Hey, I see you imported some lists into Pardot. Can you tell me where they are from?” She proudly comes back with, “We purchased a few small opt-in lists!”
Oh boy.
Pardot Horror Story 3: You find out that the zombie prospects in your Pardot org came from purchased lists.
Say it with me now: “Purchased lists are noncompliant with Pardot.”
Seriously, Pardot will put a hex on your account if you use those purchased prospects. Don’t do it. Just don’t.
There are four default Pardot user roles defined by their level of access/ability (Administrator, Marketing, Sales Manager, and Sales).
Salesforce user profiles are mapped to Pardot user roles.
You’re with me, right? Great.
According to the Thesaurus, “administrator” is also authority, commander, head, official, head honcho. You would probably agree that this would be a title reserved for the very top-most spots (I’m thinking 1-5, depending on how large the organization is).
How about 31,634 users with the Administrator role ????.
Yes, we’ve actually seen that IRL (this sounds like a Farmers Insurance® ad).
Pardot Horror Story 4: You discover that most of the users in a Pardot org have Administrator user roles.
????♂️ Keep the zombies at bay: Be selective with assignments to the Pardot Administrator role!
With admin access comes great power. Determine who really needs full access to everything in Pardot when assigning this role.
Marketing-Killer Troll
Once upon a time, ABC Company sent out emails marketing its products and services to an opt-in list. People on the list were not a match for ABC Company, so they opted OUT of receiving emails.
Seeing this made ABC Company very angry, so they consulted the Troll living in the basement. Smashing his club into the ground, Troll decided these people MUST receive the emails ????.
Every email was then sent as an operational email. Every. Single. One.
Who knows where this story is going? ????♀️
An operational email is just that: operational. As in: service announcements, transactional messages, legal notices. As in: NOT marketing.
If you send an operational email and it does contain marketing information, then it is SPAM.
Pardot Horror Story 5: A quick check reveals that all emails are being sent as operational emails.
Don’t be a marketing killer, don’t send unsolicited messages and get shut down (or worse).
Something is killing your synced information. Leads and contacts are dropping like flies directly into the Pardot Recycle Bin ⚰️.
No, it’s not the work of a serial killer, but it could be the work of a Marketing Data Sharing mismatch.
Pardot Horror Story 6: You realize prospects are being sent to the recycle bin because of a Marketing Data Sharing (MDS) criteria mismatch.
If you rely on specific data values to control information that syncs from Salesforce to Pardot (leads, contacts, opportunities, custom objects), then you are likely using Marketing Data Sharing (MDS).
When data values change in the field that the MDS criteria is using, the match won’t happen and prospects will be archived. If you import prospects that don’t match the MDS criteria, they’ll automatically be stuffed into the recycle bin too.
Your daily life in marketing shouldn’t rival ghost stories or legends of monsters. With proper planning and constant education, it can be a quite happy tale.
Here are 4 ways to start:
Market with morality.
Make sure you understand Pardot’s stance on permission-based marketing.
Build a good base of GDPR knowledge.
Put yourself in the shoes of your recipients and send helpful email messaging, not spam.
Get involved in a conversation on the Trailblazer Community, follow hashtags on LinkedIn or Twitter (such as #pardot, #marketingautomation), add channels to Slack (#emailgeeks, #pardashians), and more!
Reach out to the team at Sercante if you need help along the way. Or tells us about your biggest marketing horror story in the comments section… if you dare.
Establishing a connection between leads and accounts can give you insight into what customers are coming in as leads and tighten sales and marketing alignment. Salesforce Flow can be used to automatically match leads to existing accounts based on different criteria. In this post, I’ll show you how to match leads to accounts based on domain a well as company/account name.
There have been new features and capabilities added to Salesforce Flow since the original post was published on May 26, 2020. You can now achieve lead to account matching in Salesforce using Flow only.
The lead to account matching process
The goal is to populate a related list on the accounts with the matched leads.
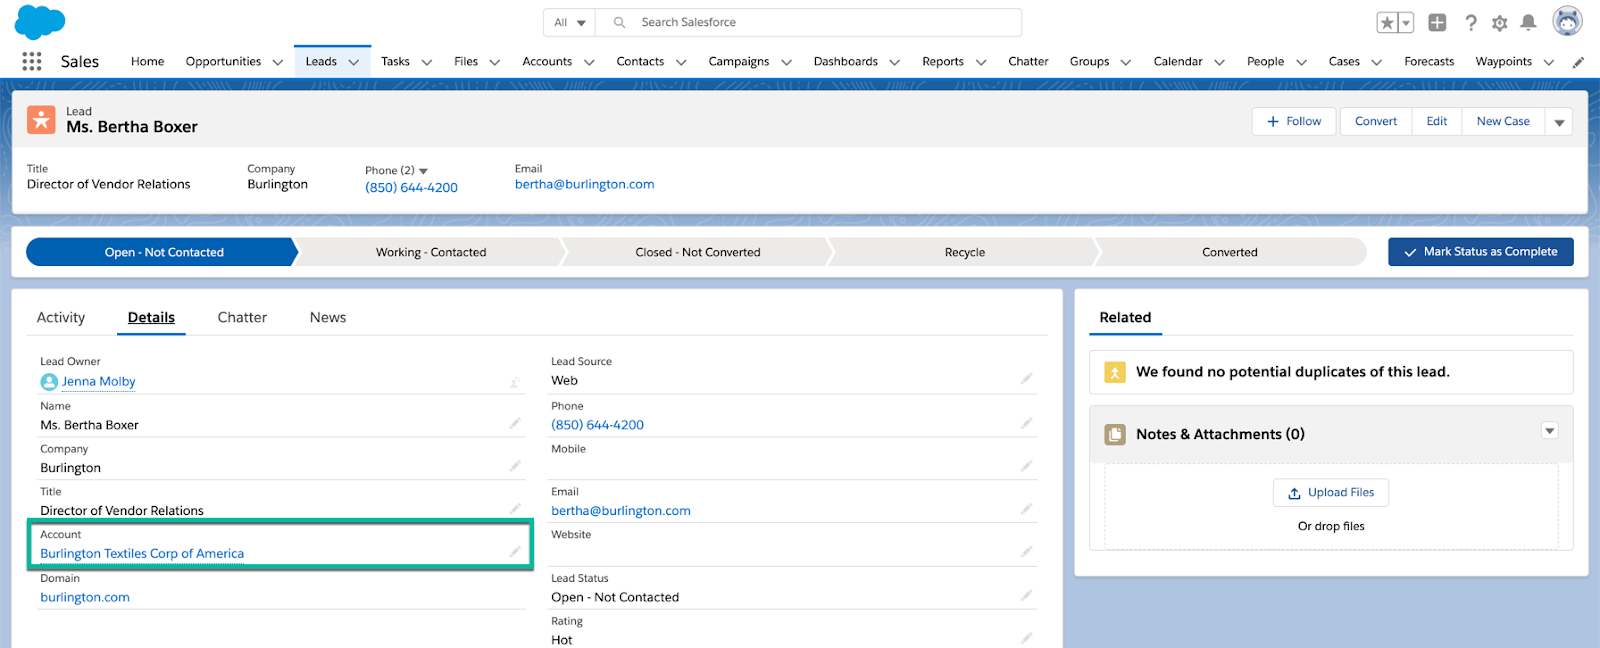
The matched account will also be shown as a lookup field on the lead.
Here’s a high-level look at what needs to happen to setup lead to account matching:
Lead is matched to an account based on email domain.
If the lead email domain does not match an account email domain, the match will be based on lead company = account name.
A Flow is used to identify the matched leads and update them accordingly.
Create lead fields
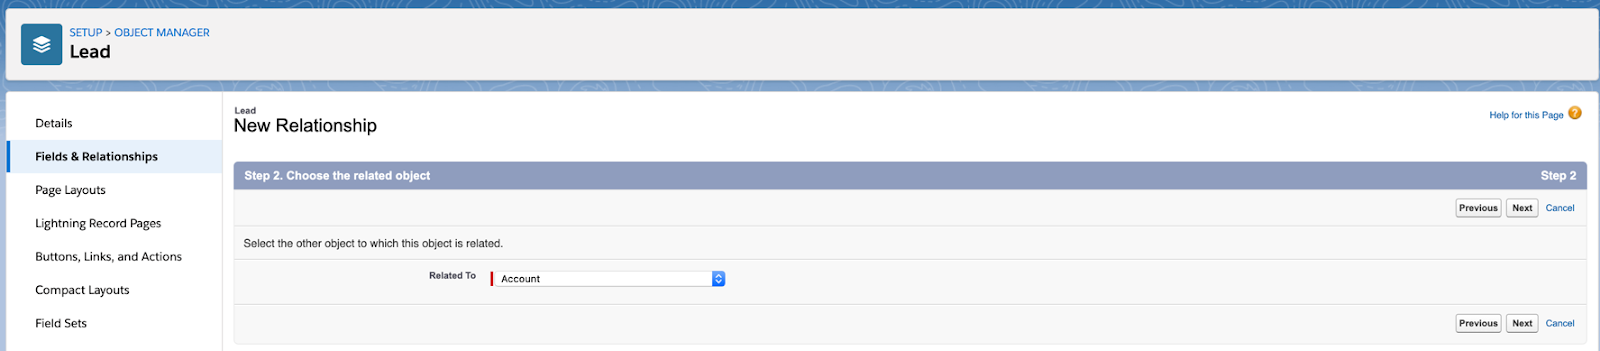
Create a new lookup field on the lead to the account called “Account”.
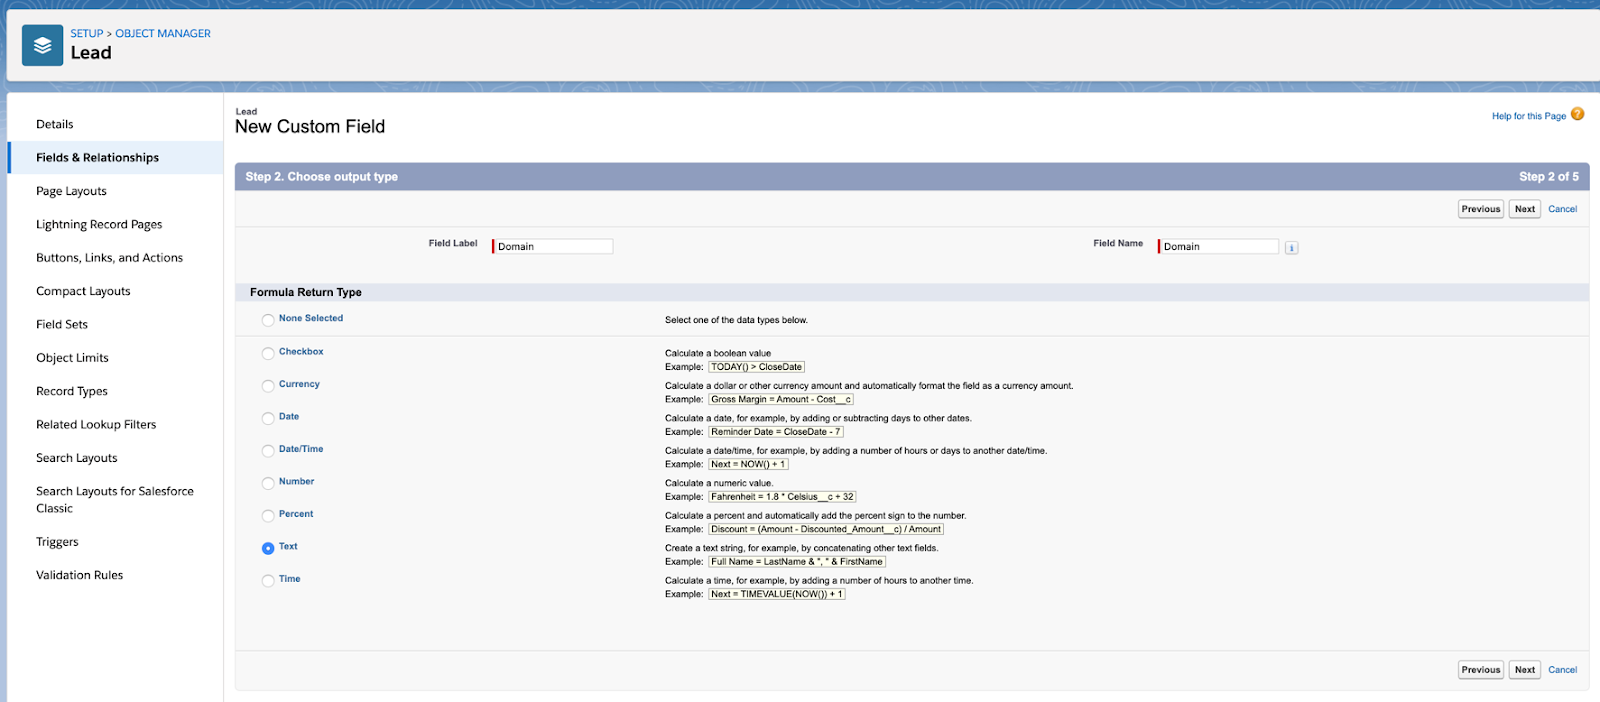
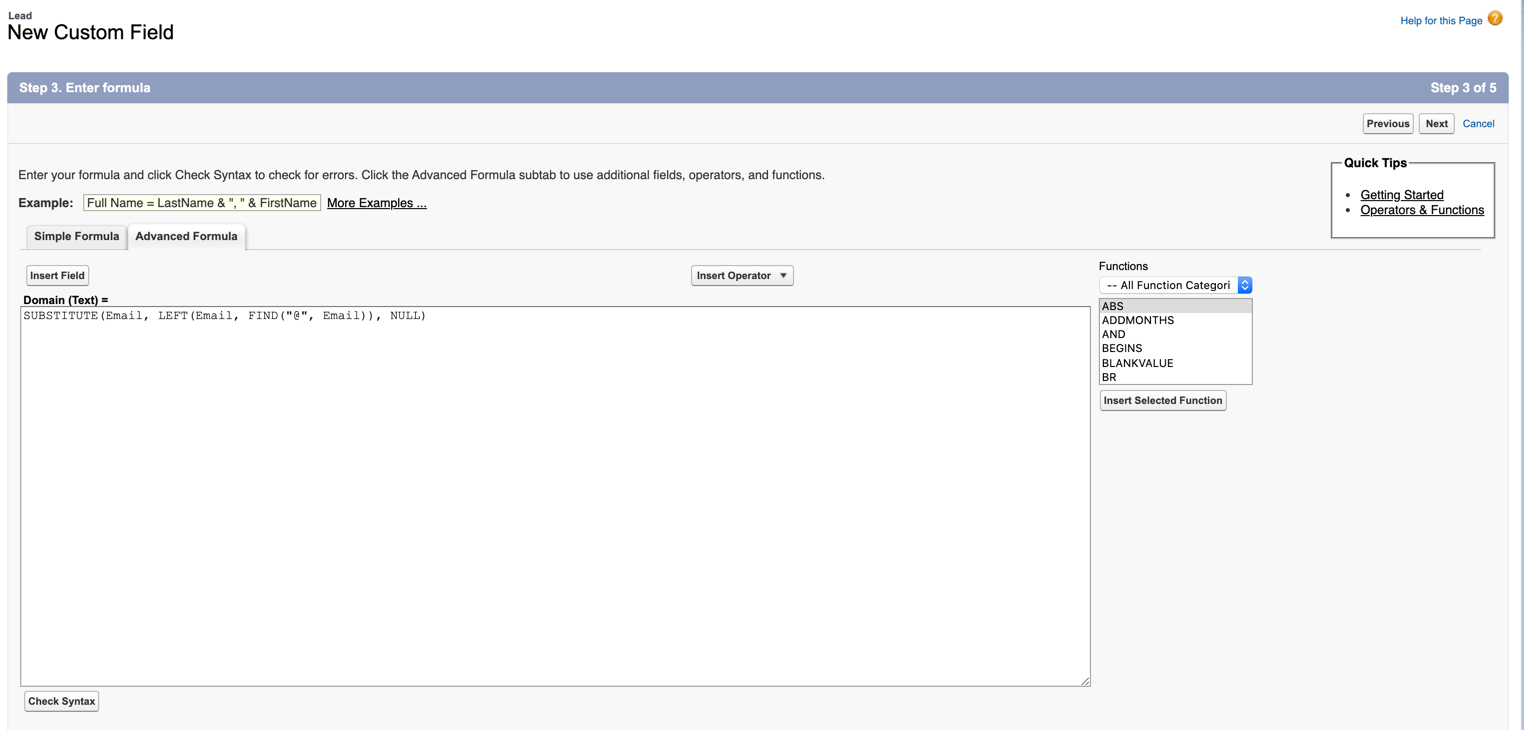
Create a new formula field on the lead called “domain”, using the following formula:
Create a text field on the account called “domain”. This is the field we will use to match the account domain to the lead domain. You will need to populate the account with the domain. This tutorial will not cover how to populate the domain on the account level.
Create the flow
Navigate to Setup > Process Automation > Flows and select new flow. Select Record-Triggered Flow from the wizard.
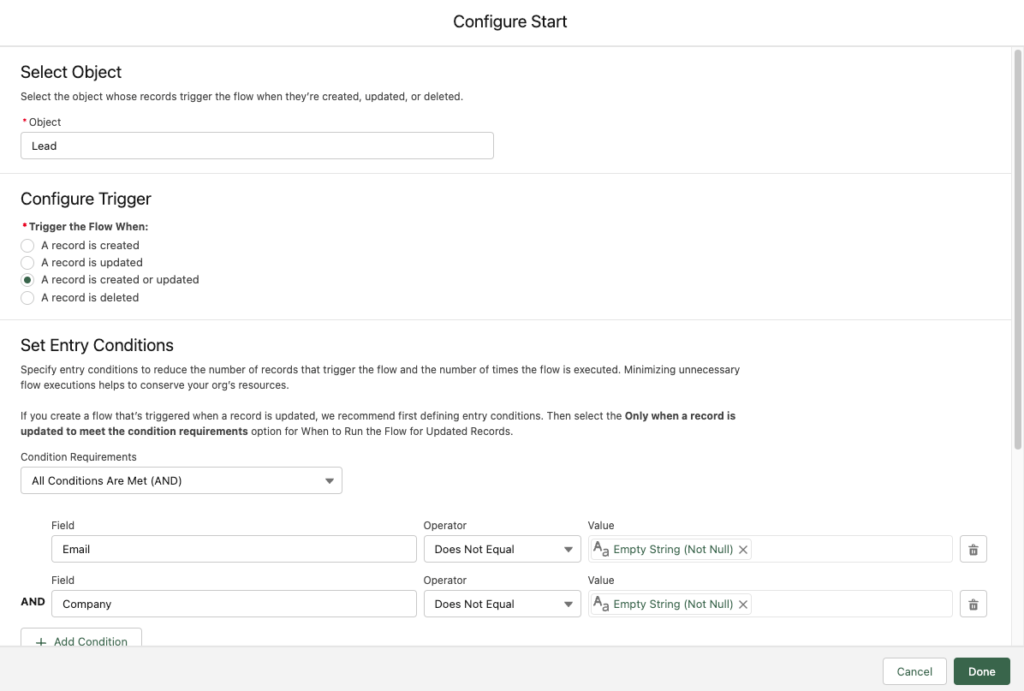
Configure Start
Configure the start conditions to occur when a record is created or updated and optimize the flow for Actions and Related Records.
Set the trigger to run on the lead object if email is not empty or if company name is not empty.
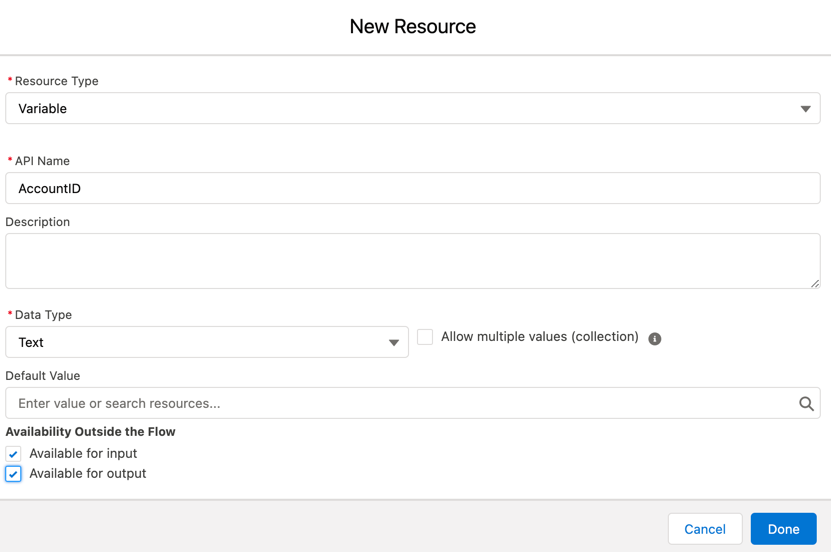
Create variables
Create a variable called AccountId
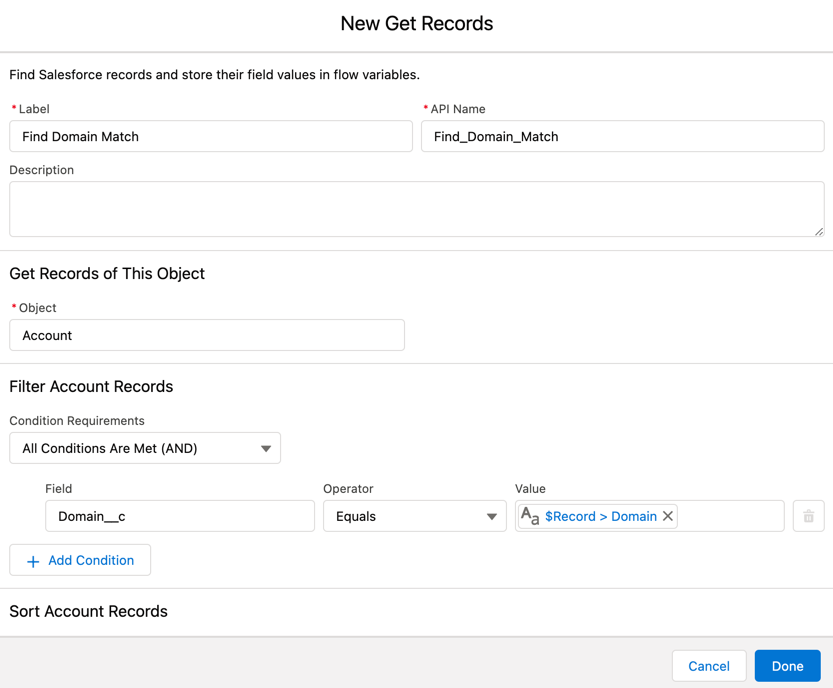
Add a Get Records element to the flow
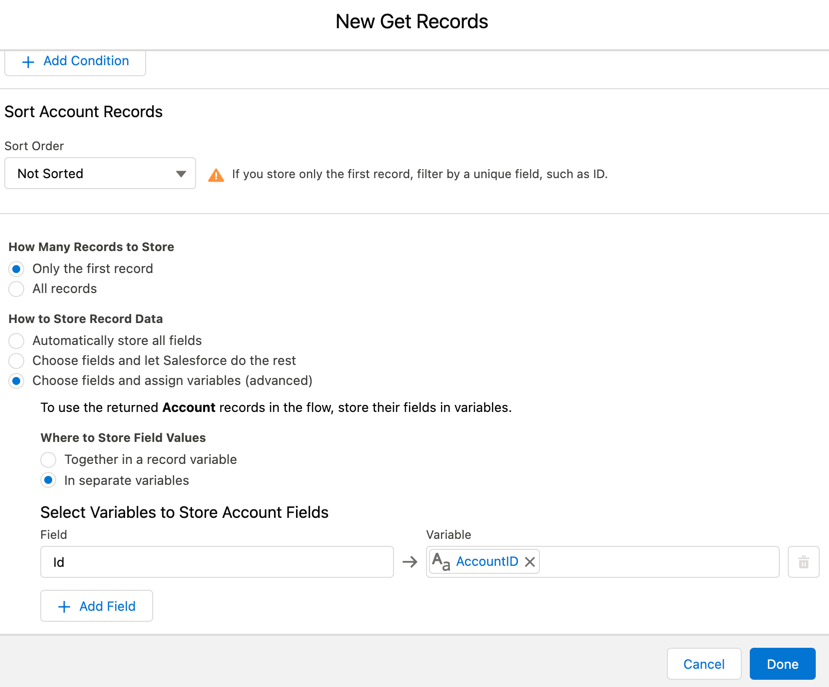
Drag and drop a Get Records element to the page. This element will look for a domain match based on the domain on the account and the domain on the lead.
Connect the start of the flow to the new element.
Add a Decision element to the flow
Drag and drop a decision element on to the page. This will check to see if there is a domain match or not.
The default outcome should just be left empty.
Save and connect the get records element to the decision element.
Add a Update Records element to the flow
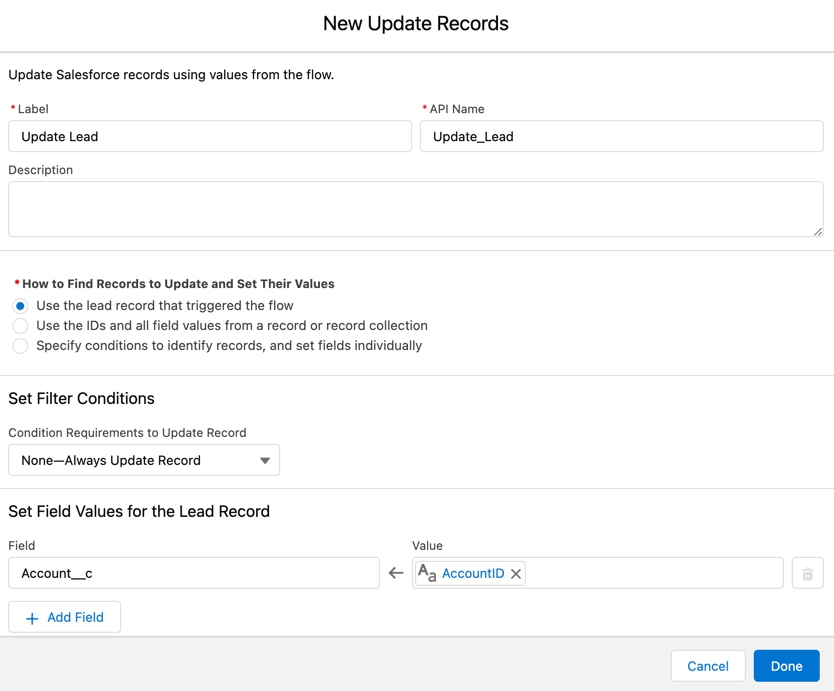
Now add an update records element to the flow. This will update the matched Account lookup on the lead if there is a domain match.
Add a Get Records element to the flow
Next, add another get records element to the flow to check to see if there is a company/account match.
Save and connect the element to the decision element (default outcome).
Add an update records element to the flow
Lastly, add another update records element to the flow to update the account lookup on the lead if there is a company name -> account name match.
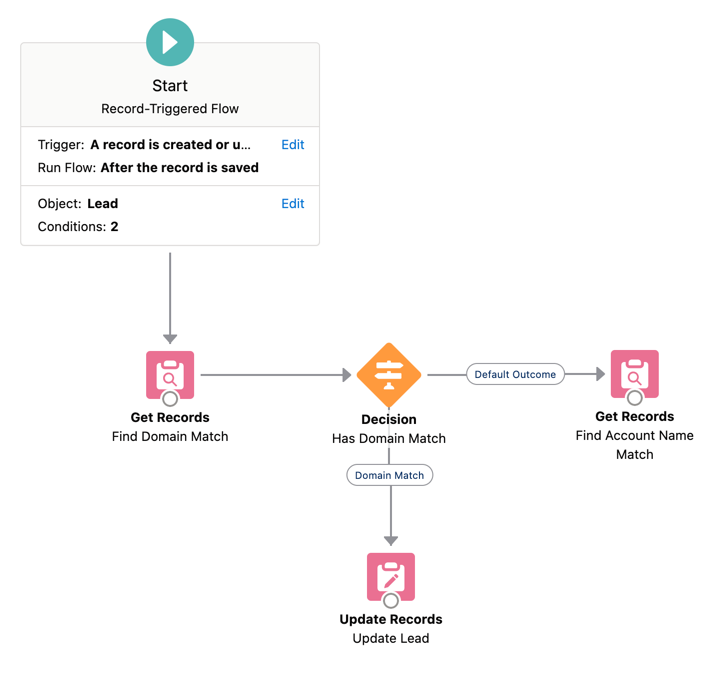
Save and connect the last element to the flow. Your final flow should look something like this:
Activate the flow
Save and activate your flow!
Test, test, test
Make sure you test! Here is what my testing process looks like:
Make sure all the new fields are added to the page layout (at least for now)
Find an account to use to test (ex. Burlington Textiles Corp of America)
Populate the domain field on the account (ex. burlington.com)
Create a new lead using that domain as part the email address (ex. [email protected])
Ensure the domain field on the lead is populated with the correct domain from the email address you entered (ex. burlington.com)
Look at the lead to see if the account lookup is populated with the correct account
Look at the account to ensure the lead is populating in the related list
Create a new lead where the company name = the account name from your test account (ex. Burlington Textiles Corp of America). The email address for the lead should use a invalid domain name (ex. [email protected])
Look at the lead to see if the account lookup is populated with the correct account
Look at the account to ensure the lead is populating in the related list
If you have it set up so your process will run when a lead is created and updated, repeat the steps to test an updated lead. You will also want to test different lead scenarios based on the filters you specified in your process builder. For example, if you have a filter to exclude all @gmail.com email addresses, try updating or creating a lead with an @gmail.com email address to ensure the lead updates as expected.
The reliability of your data in Pardot and Salesforce is largely dependent on what you put in it and it starts with how you import prospects into Pardot. Luckily, Pardot includes features to ensure your data is clean when you import it. And you can take additional steps to extend these Pardot capabilities further.
The key benefit of importing prospects into Pardot is the Prospect Processor. This program will evaluate the leads against several sets of criteria, like email domain and CRM ID, to ensure they meet agreed upon standards before syncing into Salesforce and being sent to sales teams.
The Pardot Prospect Processor feature reduces “junk” records in Salesforce and makes it easier for sales to identify prospective customers. For example, the feature checks for and doesn’t create duplicates it identifies. This process also assigns the prospect, which is required for syncing to Pardot.
Getting ready to import prospects into Pardot
So you’re ready to start your Pardot prospect import. Here are some preliminary steps you should take care of before you begin the import process.
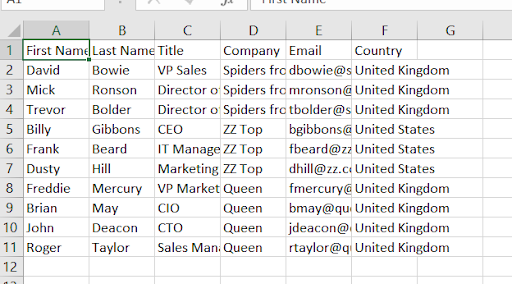
The first step is to determine your requirements and make a .CSV template. You will also have to define campaign member statuses in Salesforce that are consistent for campaign types.
As part of the process below, we can create the following custom fields in Pardot. You do not have to create these fields in Salesforce. This is an optional step, but it ensures accurate assignment, source tracking, and campaign enrollment.
Salesforce Campaign ID
Custom lead sources
UTM fields
Required Fields
First Name
Last Name
Email
Company
Salesforce Campaign ID
This is the alphanumeric from the campaign link in Salesforce. Example: 7013u0000006qg1AAA
Lead Source
Original
Most Recent
Lead Source Detail
Original
Most Recent
Opt in (Which field? Or keep it as is?)
Prepare files for Pardot prospect import
Here’s what you should do to prepare your prospect files to import into Pardot.
Step 1. Prepare .CSV file
Create a .csv file and add all the data into the correct columns. You’ll have to map the fields in your .csv file to the fields in your Salesforce org.
Spot check for duplicate email addresses. Duplicates will throw off your count when you are seeing how many prospects made it into the Salesforce campaign.
Also, remove any instances of “N/A”, “.”, or “-” where data was not provided. This will prevent the system from overwriting good data that is already in it.
If “N/A” or junk data is included in a required field, the record can’t be imported.
If “N/A” or junk data is included in a non-required field, you can delete the data and import the record.
And finally, check that the “Salesforce Campaign ID” is not a fill series.
As an extra step, you may wish to run the emails in your import through a third-party app like Neverbounce. This will ensure the emails are valid before importing into your Pardot instance.
Prospect import steps for Pardot Lightning
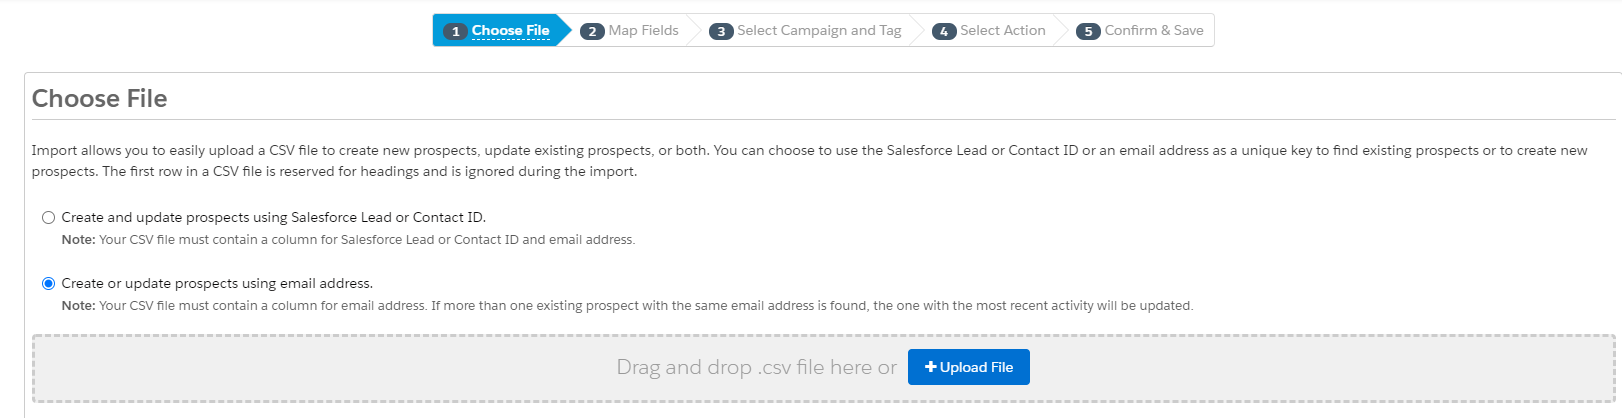
In Pardot, click Admin > Import > Prospects.
Select “Create or update prospect using email address.”
Choose the file to upload.
Select the compliance checkbox, and click Next.
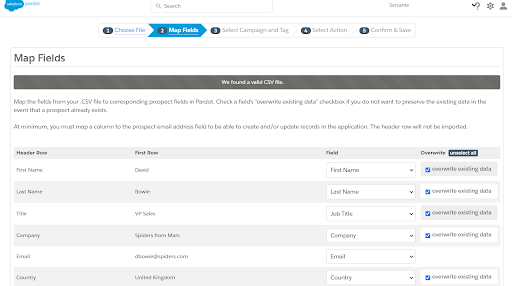
Ensure your fields are mapped correctly. That means, check the field names in the Header Row and make sure they are mapped to the appropriate place in the Field row.
Select overwrite existing data for all fields as applicable, and click Next.
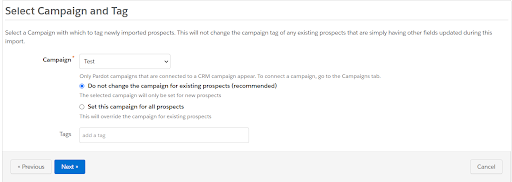
Choose the correct Salesforce connected campaign.
Select “Do not change the campaign for existing prospects,” and click Next.
To override the source campaign, select “set this campaign for all prospects.” This will override the campaign for existing prospects.
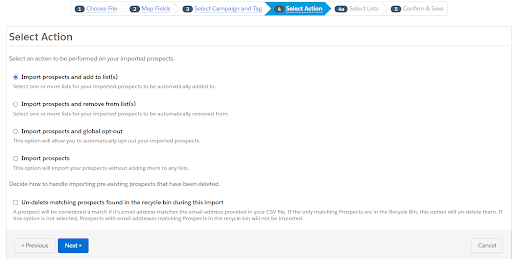
Select “Import Prospect and add to list(s)” and “Un-delete matching prospects found in the recycle bin during this import.“ This will essentially ‘wake up’ any prospects you have previously sent to the Recycle Bin and re-add them to your Pardot mailable prospects.
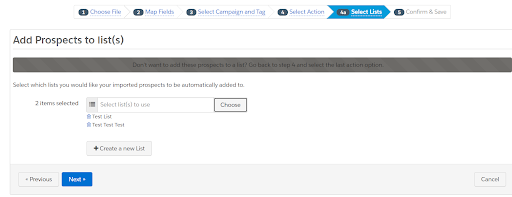
Select or create a list for your imported prospects, and click Next.
Verify the field mapping and the import data, and select Confirm & Save.
Wait for the import completion email to show up in your inbox.
If the completion email reports that any prospects could not be imported, review the errors and see if you can fix any of the data to import again
How to add Pardot prospects to a Salesforce Campaign
Here are the instructions to add your newly imported prospects to a Salesforce Campaign.
Set the parameters as follows. Rules: Prospect is on list [the import list from step 10 above] – OR – Prospect custom field [Salesforce Campaign ID value is ID from above]Actions: Add to CRM Campaign <correct Salesforce campaign> <the appropriate Salesforce Campaign member status>
Run a preview to make sure the prospects you have imported are being matched.
When you are comfortable with the number of prospects matched in the preview, resume the automation rule.
Pause or delete the automation rule you created, either the next day or as part of a monthly cleanup process.
You might have a limit on automation rules in your account. If that’s the case, then you will have to remember to delete your automation rules after they run.
You could use segmentation rules instead of automation rules to update the campaign members statuses. However, you would have to make sure the import is complete and all the prospects have synced before running. This is because rules only run once.
You can navigate away from Pardot when the import is running. It will not stop the import from happening!
Go forth and import prospects into Pardot
Clean data is happy data that gets you closer to your goals. The preliminary steps we recommend before importing prospects may seem like overkill. But you’ll be thankful in the long run as you build meaningful connections with real people through Pardot.
Remember to reach out to the team at Sercante to get expert guidance on everything Pardot. And let us know how you did importing prospects into Pardot in the comments below.
Feel more confident as a budding admin or end user by kicking ass at Pardot quality assurance testing. (includes downloadable PDF checklist)
We’ve all been there before. Everything is set up in Pardot for an email or engagement studio program. But the fear hits before clicking the button to launch it. Is everything set up so it tracks correctly? Could there be a typo or broken link somewhere? This is where checklists and quality assurance (QA) testing are helpful.
The term ‘quality assurance testing’ makes the process seem more complicated than it needs to be. What you’re essentially doing is checking the details to be sure everything looks and behaves the way it should before you finalize and launch whatever it is you’re doing in Pardot.
While checklists give us a certain level of assurance real confidence comes from experience and learning, if you are interested in learning from our seasoned experts then why not check out these Pardot training courses Sercante offers to immerse yourself in the topics you aren’t totally confident about yet.
What types of Pardot quality assurance testing should admins do?
Lots of quality assurance testing needs to be completed to be sure that any Pardot instance works as expected. Pardot advanced users and admins can complete quality assurance in a Pardot sandbox environment. But most of the day-to-day Pardot QA testing tasks happen in production orgs. Typically, QA tasks related to the flow of data between Pardot and Salesforce are completed in a sandbox environment to prevent the potential loss of data.
Get a PDF checklist to use for QA testing in Pardot
You can view and download a handy PDF checklist to use every time you’re launching Pardot admin campaign materials here.
You should complete quality assurance testing in a Pardot production environment (that’s a fancy term for your regular ol’ Pardot instance) when you create or launch the following:
Engagement studio program
List email
Pardot form or form handler
Static list
Dynamic list
Social media post
Custom redirects
Page actions
Dynamic content
Email preference centers
Scoring
Grading
Seasoned Pardot admins likely have lists in their heads to double-check each of these items before sending, saving, or launching them. But admins and end users who are newer to Pardot lack the experience of knowing what can go wrong without proper QA testing.
If you’re in the latter category, then you’re in the right place! These checklists are for Pardot admins and end-users who are in the beginning stages of learning to use Pardot.
You can find information about more advanced types of Pardot quality assurance testing & the Pardot Sandbox in this blog from Mike Fazio.
Pardot quality assurance testing checklists for admins and end users
As you build your confidence in Pardot, you’ll feel less apprehensive about sending your marketing efforts out into the world. You’ll also get less and less of those “please fix it” messages from your team.
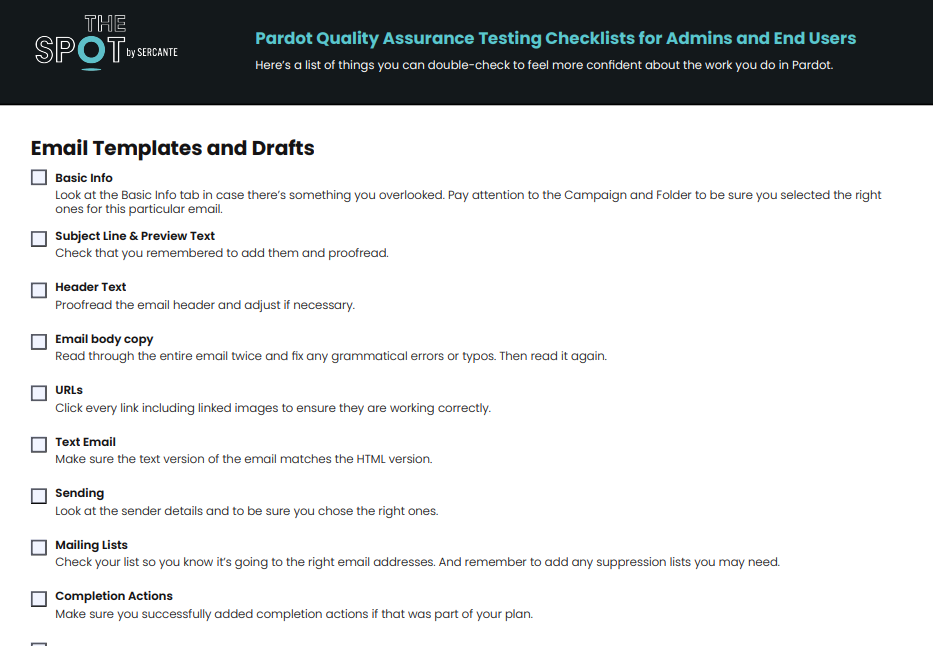
Here’s a checklist of things you can double-check to feel more confident about the work you do in Pardot. Or, download the PDF version of the checklist here.
Email templates and drafts
You can perform basic quality assurance checks on Pardot email templates and list email drafts. But you may need to invest in a more advanced tool, like Litmus, to be sure your email will render correctly and pass through email spam filters.
When you’ve finished building your email, click on the ‘Testing’ tab in Pardot to send yourself and any other reviewers test emails. This list may be longer depending on the complexities of the email itself. But we’re going to assume it’s a simple email for the purposes of this checklist.
Basic info Look at the Basic Info tab in case there’s something you overlooked. Pay attention to the Campaign and Folder to be sure you selected the right ones for this particular email.
Subject line & preview text Check that you remembered to add them and proofread.
Header text Proofread the email header and adjust if necessary.
Email body copy Read through the entire email twice and fix any grammatical errors or typos. Then read it again.
URLs Click every link including linked images to ensure they are working correctly.
Text email Make sure the text version of the email matches the HTML version.
Sending Look at the sender details and to be sure you chose the right ones.
Mailing lists Check your list so you know it’s going to the right email addresses. And remember to add any suppression lists you may need.
Completion actions Make sure you successfully added completion actions if that was part of your plan.
Pardot form or form handler
Complete the form to test Using incognito mode in your browser, complete the form or form handler. You can add the word “test” as you’re completing the form so other Pardot users know your form data is from a test.
Find your test data Verify data from your test entry made it into Pardot and Salesforce, if applicable, as expected. Pay attention to every field.
Check completion actions Verify completion actions are carried out as expected.
Cause form errors Repeat testing the form by trying to “break” it. Fill out the form again, and mess up your entry (use an incomplete email address, leave required fields blank, etc.)
Test in other browsers You can use a tool like Browserling (free and paid versions) to mimic different types of browsers and operating systems for further testing.
Segmentation lists
Static list
Spot-check the list to ensure the correct prospects are present.
Dynamic list
Click the Preview button. Spot-check the prospects on the list to ensure the correct prospects are present.
Engagement studio program
Test every path Click on ‘Testing.’ Run the test several times until you’ve tested every possible path.
Check your dates Double check all of your dates to be sure they align with your goals and best practices.
Add test prospects Create test prospects and add them to your program first when you want to test more complex programs (make sure your test prospects fit your rules). You may have to shorten your wait times to complete the test in a reasonable amount of time.
Automation rules
Check the preview Preview automation rule to be sure it matches your expectations.
Social media post
Review post copy Proofread your text. Then read it again.
Verify @ mentions Go to the social media channel and search for actual profiles to verify any @ mentions you include in the post. Keep in mind that @ mentions on one social media channel probably won’t work on other channels. You’ll have to duplicate tje post and change the @ mentions for other social media channels.
Check hashtags Look up any new hashtags you want to include on the social media channel you want to use it on. This is so you know you’re using something that’s related to your post and not already in use or irrelevant.
Link to something Remember to include a call-to-action URL if applicable. Click ‘Insert Link’ if you’re sending people to something that’s in Pardot or a custom redirect.
Check the link Copy the URL and paste it into a separate tab to check the link.
Include a graphic Make sure you include a graphic (if applicable). Also, check that the graphic size is appropriate for the social media channel.
Check the profile Double check that you selected the correct social media profile for the post.
Proofread again Read the text one last time.
Custom redirects
Click the link Access the link from your usual web browser. Then, look for your prospect record in the custom redirect prospect list.
Test in incognito Test the link again from a web browser that’s in incognito mode and look for your click on the custom redirect.
Check completion actions Verify any completion actions are carried out as expected.
Page actions
You can check that your page actions are working properly after you add tracking code to your website.
Configure page actions Set up your desired page actions.
Go to the pages Visit those pages as a cookied prospect.
Look for results Verify that your page actions worked as expected.
Be fearless with your Pardot quality assurance testing skills
It’s totally normal to feel uneasiness before completing tasks in Pardot. I mean, you’re sending things out into the world that hundreds or thousands of people might see. Sorry to startle you. But that’s also the cool part about working in marketing. The stuff you’re marketing is going to solve problems for people. And you’re going to help them find out about it!
Confidence will come to you in time after you click around in Pardot and test all the things you’re building.
Build confidence faster through Pardot training courses
You can fast-track yourself to feeling confident in Pardot by attending structured training sessions. There is so much to learn about Pardot with a seemingly endless list of resources. But nothing beats the real-life applications you learn through talking to people who understand Pardot and use it every day.
Check out the training courses and workshops Sercante offers for Pardot users and admins. You can find specific courses for deep-dives into a topic or beginner-level overviews for people who are new to Pardot.