When it comes to email marketing, creating beautiful emails with riveting content is only half the battle. Sending emails to the right prospects at the right time is just as critical as crafting the right message. Marketing Cloud Account Engagement’s (Pardot) segmentation tools take the guesswork out of finding the right prospects at the right time, but there are infinite ways to go about segmenting your database.
First, Why is Pardot List Segmentation Important?
Segmenting your database can help you identify prospects based on interest, activities, lifecycle stage, etc., so you can send them relevant, personalized information right when they need it. This kind of personalized experience not only helps build brand loyalty between you and your prospects, but it also increases email engagement because your prospects will actually use the information you are sending them.
When done correctly, Pardot list segmentation is a win for all parties involved. Read this blog post about creating a Pardot Email Preference Center for an example of segmentation done right.
Winning Pardot Segmentation Strategies
Below are just some of the ways you can segment your prospects for personalized emails. Make sure you share your other segmentation strategies in the comments!
Tip 1. Follow up with event registrants
Segmentation should be used both before and after events. Before events, you can thank prospects for registering, send them related content to the event, and send them reminders of where/when the event will be held. After the event, send them recap information, direct them to next steps, or introduce them to their Account team.
Tip 2. Nurture based on product interest
If you’re using Scoring Categories to gauge prospect interest in your different offerings, nurturing them based on their interest is a great way to speak to their needs. For these types of nurtures, I like to use a dynamic list to locate prospects who have a score over 100 in a scoring category, but do not have an open opportunity and have not yet scheduled a demo.
Tip 3. Send region-specific content
If your org regularly hosts events or webinars, segmenting your prospects by region is a great way to invite prospects to events in their area or webinars in their time zone. If your sales team is also divided by region, sales users can use these lists to zero in on their prospects. For these segmentation lists, I typically focus on the prospect’s Country and State fields and use the free Creuz Your Data tool to easily compile my lists of states/countries in each region.
Tip 4. Keep your partners up to date
Segmenting your partners into their own list is a great way to easily send them special newsletters and updates. But the best part is that this list can be used to suppress partners from prospect-specific marketing efforts, such as product nurtures.
Tip 5. Stay in touch with lost opportunities
Just because your prospect didn’t buy right now doesn’t mean they won’t become a customer in the future! Creating a Pardot segmentation list for prospects with lost opportunities is a great strategy to nurture them. That’s because they already know about your company and product offerings. They’re also more likely to already be subscribed to your marketing materials.
For prospects with lost opportunities, I like to use a more lengthy nurture that highlights new product offerings and customer use cases. These nurtures ensure our company stays top-of-mind so the prospect can reach out when they are ready to re-enter the sales funnel.
Tip 6. Exclude non-prospects from marketing efforts
Finally, another great way to segment your database is to build a primary suppression list that collects all the prospects you want to exclude from marketing emails, nurtures, “hot lead” lists etc. Building one list that all your Pardot users can reference takes the guesswork out of which prospects to suppress. Read more about Primary Suppression lists in this blog post.
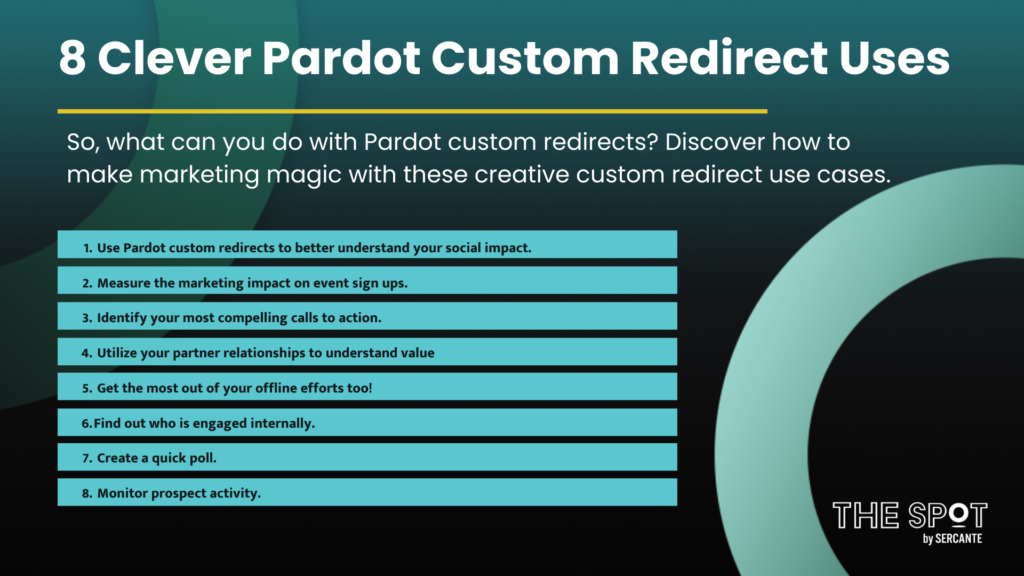
The marketing magician has many tricks in the Marketing Cloud Account Engagement (Pardot) toolkit. One of those magical tools is the Pardot custom redirect.
What makes a Pardot custom redirect special? It allows you to segment and get the right data at the right time as your customers and potential customers interact with your marketing assets. This in turn allows you to better target interests and hone in on what’s working and what’s just cluttering your audience’s feeds.
So, what can you get out of using Pardot custom redirects? Read on to find out!
Use Pardot Custom Redirects to Better Understand Your Social Impact
Every social media channel contributes a unique insight about your offerings to your audience. When promoting content through social media channels, it’s important to make sure you measure what your audience reaction is to ensure your message is effective and not ignored (or worse, annoys your target audience).
If you’re publishing the same content to multiple platforms, you should create separate custom redirects for each platform. Not only will you see which of your social sites receives the most traffic, but patterns of engagement will emerge and help you draw conclusions about the specific interests of each audience.
Measure the Marketing Impact on Event Sign Ups
Every marketing department wants to show the impact they are making. One of the key drivers of revenue is based around events. It’s important to place custom redirects behind any event promotions created by marketing.
You should also give your sales reps custom redirects to use when they pitch the event as well. Better yet, create separate custom redirects for each channel that you use to promote the event for more insight into what’s working and what’s not.
Identify Your Most Compelling Calls to Action
There is a lot of buzz around the importance of “calls to action.” But how do you know which are most impactful?
The answer: a custom redirect! You can “play” with wording, placement and who clicked (did you get a response from your intentional target audience or someone else?). Now you can measure and make adjustments that will help ensure the right action from the right audience.
Utilize Your Partner Relationships to Understand Value
Want to get even more reach for very little investment? Use custom redirects with partners that show how their site is impacting traffic to your site. This information can help you make decisions about the value of the partnership and where you should invest more.
Get The Most Out of Your Offline Efforts Too!
While it might seem obvious, the value of creating custom redirects that are specific to written and offline content is critical. An engaged audience will interact with your content and their next step will be to visit your site.
Knowing which pieces generated the most interest (or sales in the long haul) helps you make the most of your marketing budget and determine what efforts are worth investing in. Offline is expensive… do you know what it’s doing for your business? Now you can.
Find Out Who is Engaged Internally
Most businesses send important information to their employees. But, do you know who actually reads those communications? Are they effective? Is your desired message being received? Are there patterns based on subject? Or frequency? Or send time?
We often consider these questions when we are dealing with our external audiences, but they are just as critical internally. Consider custom redirects as another tool that human resources, marketing or any department internally can use to ensure your company’s internal resources are engaged as well.
Check out this blog post for more creative ways to use Pardot to increase employee engagement.
Get Creative with Pardot Custom Redirects: Create a Quick Poll
How can you get quick input from your audience without a full online survey? Custom redirects might be the answer.
The process is simple. Create custom redirects to the separate links, buttons, or images used for voting and they will automatically record the clicks on each link.
A great example of this would be something like a Net Promoter score. You can create links with one question (example: Would you recommend our company/product/service to someone else?).
From the reporting side, you could now segment between “Yes” (raving fan) and “No” (potential detractor) answers. Then you can address any concerns from those who need follow up or are ready to promote your brand for you!
Monitor Prospect Activity
Ever wished you could be alerted to a certain prospect’s activity on your site? Imagine you’ve had a prospect close to close for over a month now, but they want time and space to make their own decision. Wouldn’t it be nice to know when that person gets serious and looks at your pricing options?
Custom redirects allow you to track such activity in a few different ways. For example, If using email to contact prospects, create custom redirects to monitor prospect clicks.
Using a service like Account Engagement (Pardot)? You can create an automation to notify your team that an action has been taken by a prospect, allowing you to be super responsive to high probability prospect activity. Strike while the iron is hot!
When you’re ready to level-up your sales team response skills, check out Salesforce Engage. Here’s a blog post that walks you through the tool.
Experience the Magical Insights Pardot Custom Redirects Can Offer
The most important thing when preparing any marketing effort is to determine how you will measure success. Custom redirects allow you to effectively collect relevant and timely data on who did what and why.
Used correctly, they can greatly improve the efficacy of your marketing activities and help you “prove” what you already know: Effective marketing strategies work. Even beyond that (and maybe more importantly) understanding what’s not working and being able to “fail fast” and move on to more impactful actions.
Need help understanding the full impact of your marketing efforts? Here’s a blog post that provides insight into proving the impact of your marketing efforts through connected campaigns. And if you’re still feeling lost, you can reach out to the Sercante team for help.
As Marketing Cloud continues to grow and integrate more and more with Salesforce, the good old days of marketers working in silos within Marketing Cloud Account Engagement (Pardot) are long past due. Today, modern marketers are being asked to manage both the marketing operations and Salesforce, requiring a multifaceted skill set.
It can be difficult for marketers working in the trenches day in and day out to capture customer data, grow their audience, and prove a return on investment. With a full integration to Salesforce, those days are in the past, as we can now harness the power of Salesforce and combine that with Marketing Cloud, analytics tools, and third-party systems to create a full picture of all of your marketing efforts.
In this blog, we will highlight all things Salesforce Sales Cloud from a marketer’s perspective, including data architecture, security, sales processes, reports, dashboards, and the integration between Salesforce and Pardot.
Let’s Get to Know Salesforce
Salesforce is one of the leading Client Relationship Management systems (CRM) worldwide. At its core, a CRM helps companies grow and manage their customer base, streamline day-to-day operations, and increase profitability organization-wide. Specifically, Salesforce serves as a glorified rolodex — providing a vast array of departments, including sales and marketing, a centralized view of your customer.
Note: We often refer to Salesforce Sales Cloud as simply “Salesforce.”
Data and Relationships
Salesforce is built upon data models. Think of data models as a spreadsheet. Everything built within Salesforce is built within a spreadsheet.
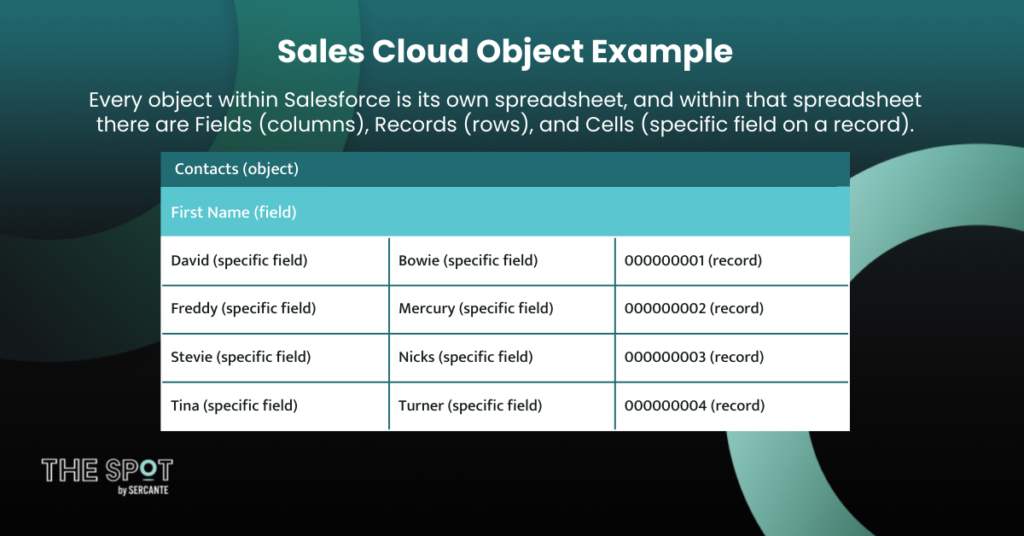
When you think of it in that way, it’s so much simpler when you first login and start navigating the CRM. Every object within Salesforce is its own spreadsheet, and within that spreadsheet there are Fields (columns), Records (rows), and Cells (specific field on a record).
Contacts (object)
First Name (field)
Last Name (field)
CRM ID (field)
David (specific field)
Bowie (specific field)
000000001 (record)
Freddy (specific field)
Mercury (specific field)
000000002 (record)
Stevie (specific field)
Nicks (specific field)
000000003 (record)
Tina (specific field)
Turner (specific field)
000000004 (record)
Standard and Custom Objects
There are two types of objects in Salesforce — Standard and Custom objects. Standard objects are the items provided out-of-the-box when you initially purchase Sales or Service Cloud. They contain standard fields as well, though custom fields can be created. Custom objects are created by a Salesforce Administrator to store data that is specific for your organization. These objects can include the standard fields as well as custom fields.
The out-of-the-box objects included in Salesforce are:
Campaigns: A marketing initiative (the way to create a MQL)
Leads: Potential customers (generated MQL)
Contacts: People sales are negotiating with (SQL)
Accounts: Companies you do business with (customer)
Opportunities: In-progress deals (SOW)
Connecting Salesforce and Marketing Cloud Account Engagement (Pardot)
While marketers prioritize their time within Pardot, the sales team is operating within Salesforce. By connecting the systems together, it allows the two teams to collaborate, by leveraging shared knowledge and resources via segmentation for marketing and messaging for Sales.
So, how does it all work?
Website visitors are cookied by tracking code in Marketing Cloud Account Engagement (learn more about web tracking cookies in this blog post).
Visitors complete Forms or Form Handlers and are converted into Prospects
Prospects are nurtured by the marketing team and once they reach MQL status are assigned to Sales
Prospects assigned to Sales convert into a Lead record that feeds information back to Marketing
Once the Lead reaches the SQL status they are converted into a Contact and Account and an Opportunity is created
When opportunities are closed, revenue is attributed back to marketing and sales, and ROI is calculated
Let’s Build a Campaign
When marketers say “Campaign,” what they are really saying is the key initiative they are running to generate leads, create an upsell opportunity, or promote a company event.
A marketing campaign is made up of a multitude of efforts that include:
Digital Ads
Social media
Emails
Search Engine Optimization (SEO)
Print Media
Radio/TV
Several of these efforts can be created within Pardot or connected through integrations, and they can be tracked both by marketing and sales by syncing the data back to Salesforce.
Salesforce Campaign vs. Pardot Campaign
We all know what a “Campaign” is, but there are other uses of this term within Pardot and Salesforce. Also, they have very different uses and properties. Let’s learn the differences!
Pardot Campaigns populate sources within the platform and serve as thematic touchpoints that track first touch for Prospects.
Salesforce Campaigns are used to track, manage, and report on all marketing collateral.
Together, a Pardot Campaign captures first touch, and Salesforce Campaigns can capture ongoing touch points, showing a multi-touch attribution.
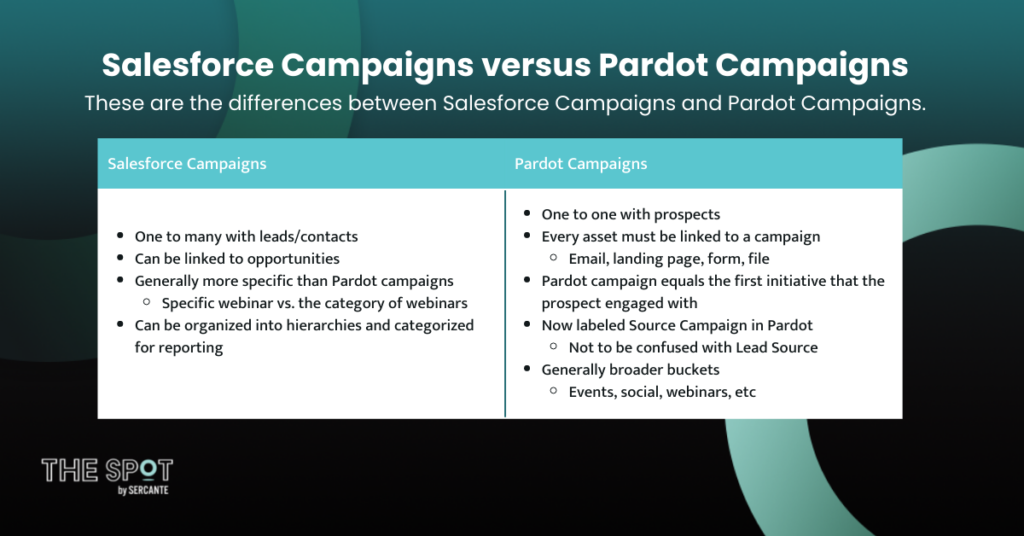
Salesforce Campaigns
One to many with leads/contacts
Can be linked to opportunities
Generally more specific than Pardot campaigns
Specific webinar vs. the category of webinars
Can be organized into hierarchies and categorized for reporting
Pardot Campaigns
One to one with prospects
Every asset must be linked to a campaign
Email, landing page, form, file
Pardot campaign equals the first initiative that the prospect engaged with
Now labeled Source Campaign in Pardot
Not to be confused with Lead Source
Generally broader buckets
Events, social, webinars, etc.
Here’s a chart that compares the differences between Salesforce and Pardot campaigns:
Data Sync and Segmentation
It is important to note that Pardot syncs on an individual level, not a company level. Records sync directly to Leads, Contacts, and Person Accounts within Salesforce. They can read Accounts and Opportunities, but they must be related to a person object with an email address. However, any object that you sync to Pardot can be used for segmentation, as long as it is tied to a Lead, Contact, or Person Account record.
You can learn more about Pardot sync behavior in this blog post.
This sync behavior becomes key in building a marketing campaign to know what you can and cannot segment your lists by, thus determining your target audience. Furthermore, the sync works both ways, allowing you to target a specific subset of Prospects based on specific data and then syncing those Prospects back to the Salesforce Campaign to track engagement.
Let’s Update the Sales Team
As marketers, we rely on the sales team to help us drive performance, segment data, and prove ROI as well as confirming marketing qualified leads. In turn, sales relies on us to see how our marketing engagements are impacting their Leads and Contacts so as not to overlap efforts.
When working with each other, you will see improved growth across the organization. This is much easier to accomplish by connecting Pardot and Salesforce.
Learn more about building strong relationships with the people who manage your Sales Cloud instance in this blog post.
Lead Assignment
Pardot was built with the primary goal of warming Prospects in order to advance them to sales as a marketing qualified lead. This is done most often through Pardot’s Scoring and Grading features, which allows marketers to know when a Prospect is ready to be handed to Sales.
Learn more about Pardot Scoring and Grading in this blog post.
Once Prospects are ready, Pardot has ways to automate lead assignment, such as Automation Rules or Completion Actions, to get that Prospect to the next level of the funnel.
Marketing Data in Salesforce
As marketers, we use data day in and day out to drive our decision making. Sales does the same, and we can arm them with additional data just as they do for us.
With the Salesforce sync, there are now a series of available fields and buttons that can empower your sales team to make more strategic decisions and to help you run even more successful campaigns. The data points provided below can be easily referenced by working with your Salesforce Administrator to add them to the Page Layouts for Contacts, Leads, and Person Accounts.
Pardot Data in available in Salesforce:
Pardot Campaigns
Pardot Comments
Pardot Conversion Date
Pardot Conversion Object Name
Pardot Conversion Object Type
Pardot Created Date
Pardot First Activity
Pardot First Referrer
Pardot First Referrer Query
Pardot First Referrer Type
Pardot Grade
Pardot Hard Bounced
Pardot Last Activity
Pardot Last Scored At
Pardot Score
Pardot URL
In addition to sharing fields between Salesforce and Marketing Cloud Account Engagement, you will also have the capability to enable the sales team to be able to add Prospects to campaigns or lists within Pardot via “Add to Pardot List,” “Add to Campaign,” or “Add to Engagement Studio.”
Let’s Prove Your Marketing ROI
By enabling Connected Campaigns, you will also be able to view Engagement History metrics within Salesforce. All of your reporting data will be easily accessible and measurable through Salesforce reporting. Through Engagement History and Campaign Influence, we are empowering the marketing team with the full force of Sales Cloud to report on their end-to-end marketing efforts.
Through Engagement History, you will gain five custom report types:
Engagement Metrics on Campaigns: Provides data on all campaigns and all associated assets, including emails, links, forms, and landing pages produced within Pardot.
Engagement Metrics on Landing Pages: Provides data points pertaining to Landing Pages produced and operated from within Pardot.
Engagement Metrics on List Emails: Provides metrics specific to emails deployed out of Pardot, including Engagement Studio, list emails, autoresponders, and email templates.
Engagement Metrics on Marketing Forms: Measures the performance of Pardot Forms and Form Handlers that exist outside of the platform, such as on the company website.
Engagement on Marketing Links: Measures clicks and activity directly related to Custom Redirect links or files housed within Pardot.
These reports enable you to report on Leads and Contacts who are also Campaign Members to measure their marketing engagement, performance, and the overall success of marketing’s efforts.
You can learn more about how Salesforce handles Pardot marketing reporting in this blog post.
Salesforce Campaign Influence
Next, Salesforce offers Campaign Influence, which measures end-to-end performance and proof of ROI on all marketing efforts. Ultimately, it allows marketers to see the impact of your campaign on the closed/won opportunities.
Within Salesforce, there are influence models set up that scan all active campaigns to identify campaign members who are also assigned a contact role on an opportunity. They also verify eligibility based on additional rule criteria that can be configured. There are currently two types of Campaign Influence – Campaign Influence 1.0 and Customizable Campaign Influence.
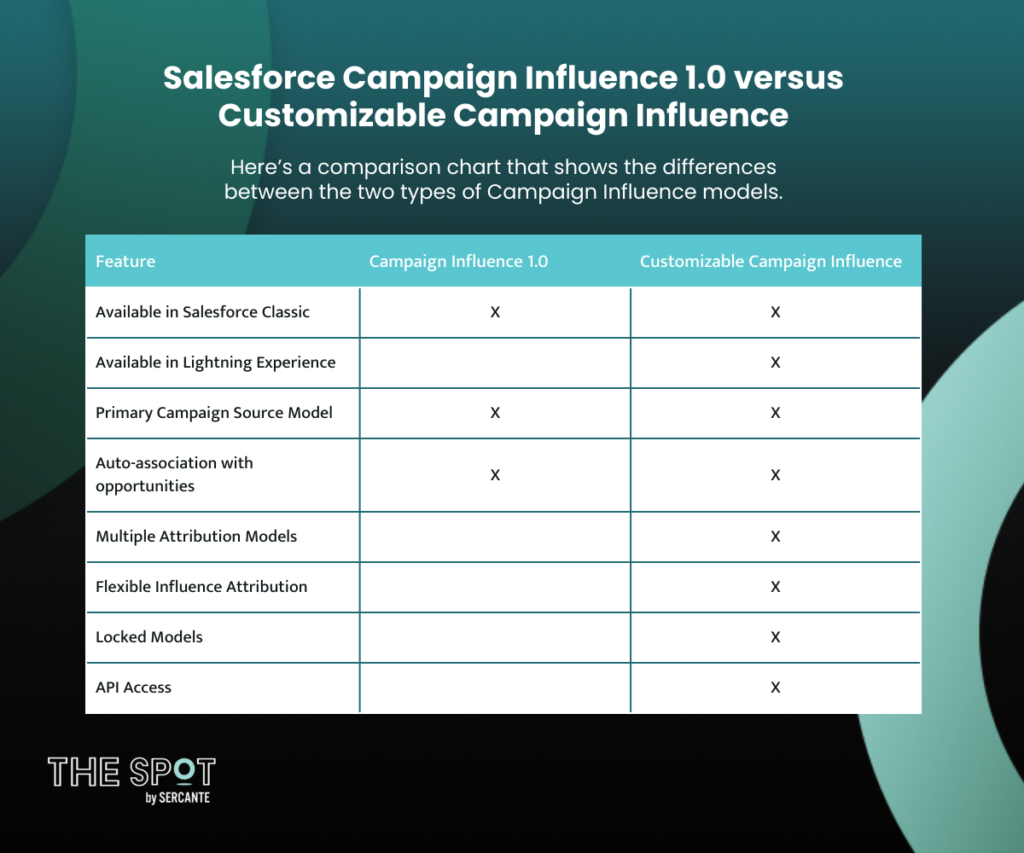
Here’s a comparison chart that shows the differences between the two types of Salesforce Campaign Influence models.
Feature
Campaign Influence 1.0
Customizable Campaign Influence
Available in Salesforce Classic
X
X
Available in Lightning Experience
X
Primary Campaign Source Model
X
X
Auto-association with opportunities
X
X
Multiple Attribution Models
X
Flexible Influence Attribution
X
Locked Models
X
API Access
X
Through these data-driven models, Salesforce uses artificial intelligence to look at engagement patterns that led to conversion and tailors attribution credit based upon Campaign Influence Eligibility Limits and Auto-Association Rules. By setting eligibility limits, you are controlling how long a campaign is considered influential. This is determined by comparing the date that a contact was first associated with the campaign and the date that the opportunity was created.
In general, you want to double your average sales cycle. For the Auto-Association Rules, you are applying specific criteria to limit the types of campaigns that are considered influential.
When combined together, Campaign Influence and Engagement History give marketers worldwide insights into their campaign performance and allows for adjustments to be made or campaigns to be built upon to improve marketing effectiveness and to improve revenue company-wide.
Check out this blog post to watch a video that explains Campaign Influence in further detail.
Sales and Marketing Teams Work Better Together
By embracing these tips and tricks, the goal is for you to learn how to use Salesforce to drive alignment between your marketing efforts and the sales team to grow your business and prove your marketing ROI.
The integration between Salesforce and Marketing Cloud Account Engagement (Pardot) plays a key role in growing your brand. It is our goal at Sercante to help you in this effort. To learn more about Salesforce and receive more in-depth training, we encourage you to register for one of our upcoming Salesforce Basics for Marketers online courses.
Salesforce Marketing Cloud Engagement has so many complex ways to create personalized experiences for the audiences the platform touches.
And if you haven’t gathered from the title, Salesforce Marketing Cloud Personalization (formerly Interaction Studio… RIP Interaction Studio) is a great way to level up your personalization game. This is for the pros who have long since mastered things like personalization strings, dynamic content, and even AMPscript in the platform.
However, as with many Marketing Cloud features, Marketing Cloud Personalization offers so much flexibility and configurability that it can be challenging to know just where and how to begin.
Three Marketing Cloud Personalization Use Case Examples
Perhaps the best way to get started is to understand some industry-specific use cases for when Marketing Cloud Personalization web and mobile personalized campaigns can be strategically leveraged to create a customized, unified, and value-driven experience for your customers at every stage of the life cycle.
Use Case #1: Serve targeted educational content for prospective customers in the finance industry
A financial advisory company knows that potential new customers frequently conduct more research in the earliest stages of the buying lifecycle. Fortunately, the company maintains a finance blog on their site that features thought leadership from their advisors for just this very purpose.
When a new customer first comes to the company’s site, they may see an assortment of featured blog posts on the home page. Some posts on mutual fund investments capture their interest, so they click into them. They may then use the navigation menu or site search to investigate further.
Tracking content engagement
Meanwhile, Marketing Cloud Personalization tracks their site activity, such as which blog posts and product pages they spend more time on. They use this information to build a profile of customer preferences and affinities. Then, surface content in which the customer has indicated an interest using this customer profile information.
Showing profile-specific content
The next time the customer navigates to the home page or the blog landing page, they see featured posts on best tips to diversify their funds and an explainer of what investment objectives, risks, charges, and expenses they should be aware of when selecting a mutual fund. The customer clicks into the posts and successfully becomes further engaged with the company’s website.
Use Case #2: Enrich a student’s higher education on-campus experience.
With tuition more expensive than ever and the pool of college students ever shrinking, a regional college knows that one of the strongest differentiators they can offer their students is a rewarding college experience that isn’t just confined to the classroom.
Showing targeted reminders in the college online portal
When a student subscribes to a college campus group’s mailing list, Marketing Cloud Personalization tracks that activity. The tool displays reminders of upcoming meetings hosted by that group on the home page of the student’s online portal account.
And, Marketing Cloud Personalization highlights a promotion for an upcoming lecture hosted by a notable product designer when the student browses the college’s events calendar. That’s because the system knows the student once took an elective on product design.
After class, the student stops by a local art gallery that features art from fellow college students. Marketing Cloud Personalization notes the geolocation and time spent within the store. It uses that information to display a 15% discount code for the gallery in an infobar banner ad within the college’s mobile app. The student also sees an ad for the store when they get the monthly campus newsletter they subscribed to.
Enhancing the overall student experience
By being served content that is tailored to the student’s own personal and educational interests, the student is more connected with their campus and, as a result, their satisfaction with their college experience increases.
Use Case #3: Onboard new app users with well-timed contextual tips and cross-sell to existing customers in the same place, at the same time.
New users logging into a company’s app for the first time may need initial guidance on how to use the app to encourage adoption. But there also needs to be a balance between providing timely instruction and not being obstructive.
Marketing Cloud Personalization first designates which users are logging into their accounts for the first time and those who have already been using the app extensively into two audiences.
Automate first-time user adoption
When a first-time user logs onto the app, they receive a pop-up window offering them a brief tutorial on how to use the app, with the option to entirely skip or end the tutorial at any time. The tutorial displays step-by-step contextual pop-ups at different places on the screen to demonstrate the app’s functionality and features. The tutorial finishes by pointing out to the user where they can access the support center for future assistance. If the user skipped the tutorial or exited out of it early, Marketing Cloud Personalization can note this.
Ensure continued use over time
Marketing Cloud Personalization can then monitor these new users for a defined period of time to evaluate whether they are using the app, and place them on a journey within Journey Builder to issue reminders and feature highlights. Once a user becomes comfortable in using the app, they can be moved from the first-time user audience and into other segments for further targeted marketing.
Create deeper connections over time
For the audience of existing users, Marketing Cloud Personalization can display inline banner promotions for other products they may be interested in or useful tips on how to use the product that they bought based on their actions, how long they’ve been a customer, and their personal attributes, all within the app, on the company website, and in marketing emails and text messages.
While targeting two different audience segments, Marketing Cloud Personalization can display content not only based on customer activity, but also at strategic moments and through different statuses, such as whether they’re a first-time user or not. Customers, in turn, not only receive personalized content, but content that is served to them at the time they would benefit from it the most.
Three Things to Prepare Before SFMC Personalization Implementation
The above examples are hardly an exhaustive list of all the ways in which companies can engage potential, new, and existing customers with Marketing Cloud Personalization. But no matter the industry or use case, there are also three things you should do to set your company up for success long before you implement.
Step 1. Align Internal Teams
You need to align your internal teams. The lift for setting up Marketing Cloud Personalization is quite a bit heavier than many of Marketing Cloud’s other tools. Depending on your business needs, the tool will require more resources of varying specializations.
You’ll need web development resources for deploying the necessary code to your website and apps (and the more frequently your site changes, the greater the demand on your web development team).
Your marketing and graphic design teams will need to create all the variations of content and assets that could be displayed to your audiences.
It is also highly recommended that you invest in UX Design resources as well, because…
Step 2. Know Your Audience
You need to know your customers. Not only should you identify all potential customer personas, but you should also map the journeys each persona could have across your website or app, whether it’s a first-time visitor browsing your site or a long-standing customer who wants to change the billing information associated with their account.
Identify customer interaction points
This process involves identifying every point of customer interaction, including areas where your customer is likely to experience frustration and reward (there’s a reason, after all, that Marketing Cloud Personalization is called a Real-Time Interaction Management platform).
A good UX designer will conduct research and testing to accurately paint a full picture of how customers use your website or app. From there, you will be able to create a strategy for how Marketing Cloud Personalization will display the right messages in the right ways at the right time to deliver the highest value for your customers.
Step 3. Create Content Beforehand
You must frontload your content. Of course, with all that pre-planning and journey mapping means you’ll actually have to create the content you’ll be using for every personalized path your strategy involves.
Determine content categories and tags
You will also need to make sure your content is properly categorized and tagged for the audiences and customer interaction points with which they’ll be associated, and this is even more crucial.
For example, you want to feature other recommended products (let’s say, a moisture-resistant jacket, water bottle, and thermal socks) that are related to the product that a customer is viewing on your website (hiking boots).
You’ll need to decide on the content tags that determine what other related products to display (hiking, moisture resistance, outdoors) and for what type of audience segment attributes (new and returning customers, hikers, outdoor enthusiasts, beginner to intermediate experience, ages 20-45).
Completing Marketing Cloud Personalization implementation pre-work is totally worth it
While the amount of pre-work required to leverage Marketing Cloud Personalization can seem daunting all on its own, it’s important to remember that a hyper-personalization system requires a hyper-detailed amount of content to feed into it.
And all that work is likely to pay significant dividends in the end. According to a McKinsey & Company report, over three-quarters of consumers report that personalized communications are a key factor in brand considerations and increase the likelihood of repurchase.
When implemented (and maintained) correctly with the right personalization strategy in place, Marketing Cloud Personalization can give your company a powerful tool to sharpen your communications and truly engage with the full breadth and depth of your customers.
Dynamic lists are by far my favorite Marketing Cloud Account Engagement (Pardot) automation tool. These “smart” lists automatically update and can be used for everything from Recipient and Suppression lists to a tool to help keep your Pardot org clean and spam free.
What are Pardot Dynamic Lists?
Dynamic lists automatically match and unmatch prospects based on the criteria you specify. They are living breathing lists that are constantly updated.
When a prospect matches your criteria, they will be automatically added to your list and when they no longer match the criteria, they will be automatically given the boot. Dynamic lists are ideal for building lists around prospect information that changes often.
To build a dynamic list, in Pardot:
Navigate to Automations, then Segmentation Lists
Select + Add List
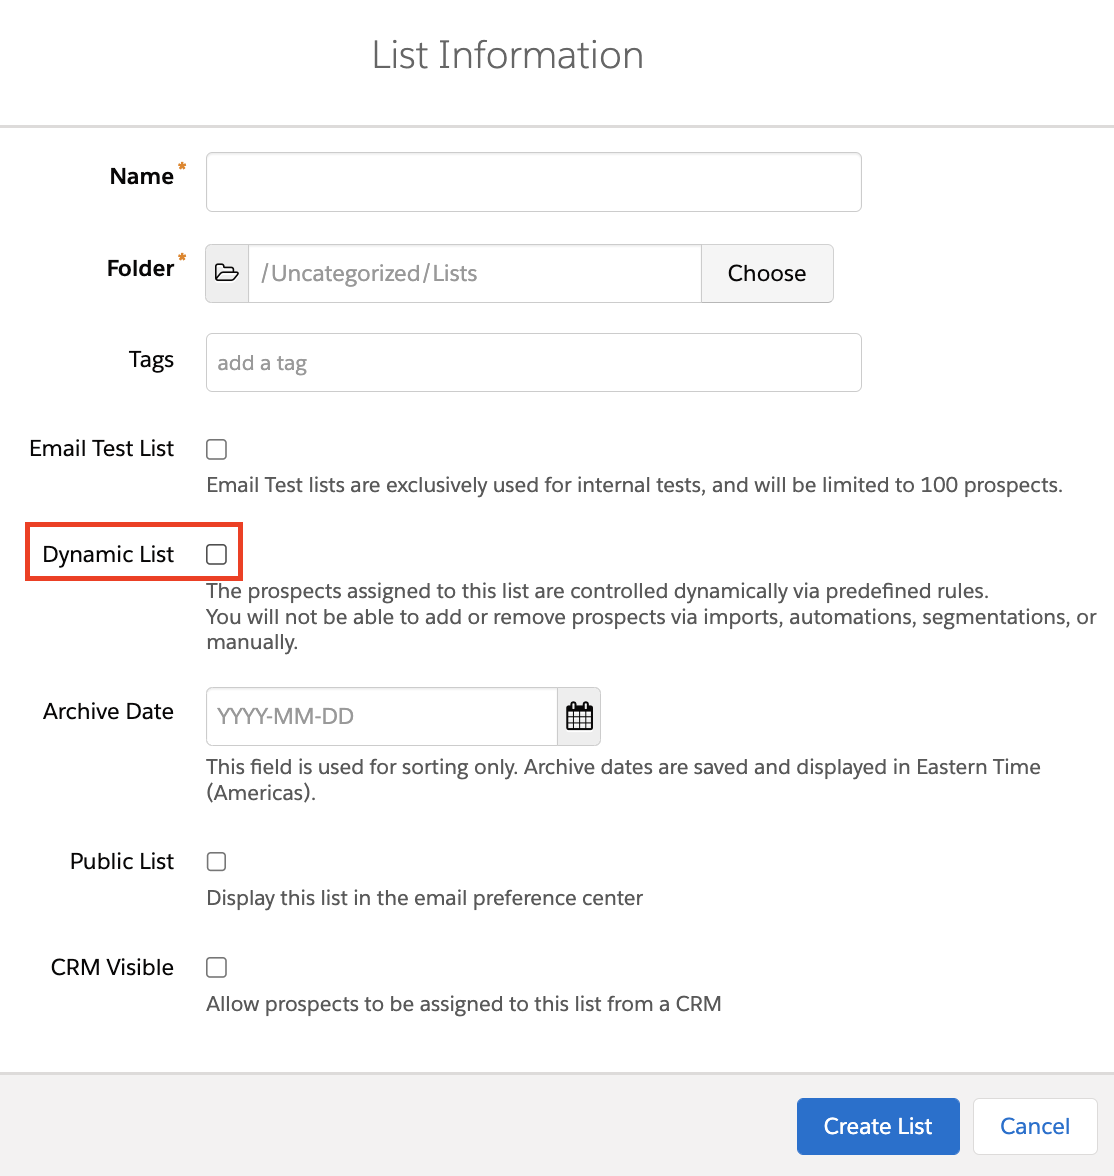
Name your list and select the Dynamic List checkbox
Note: You have to select the dynamic List checkbox when your list is created. If you create a static list, you cannot later go back and make the list dynamic.
Select Set Rules
Specify the criteria for your dynamic list
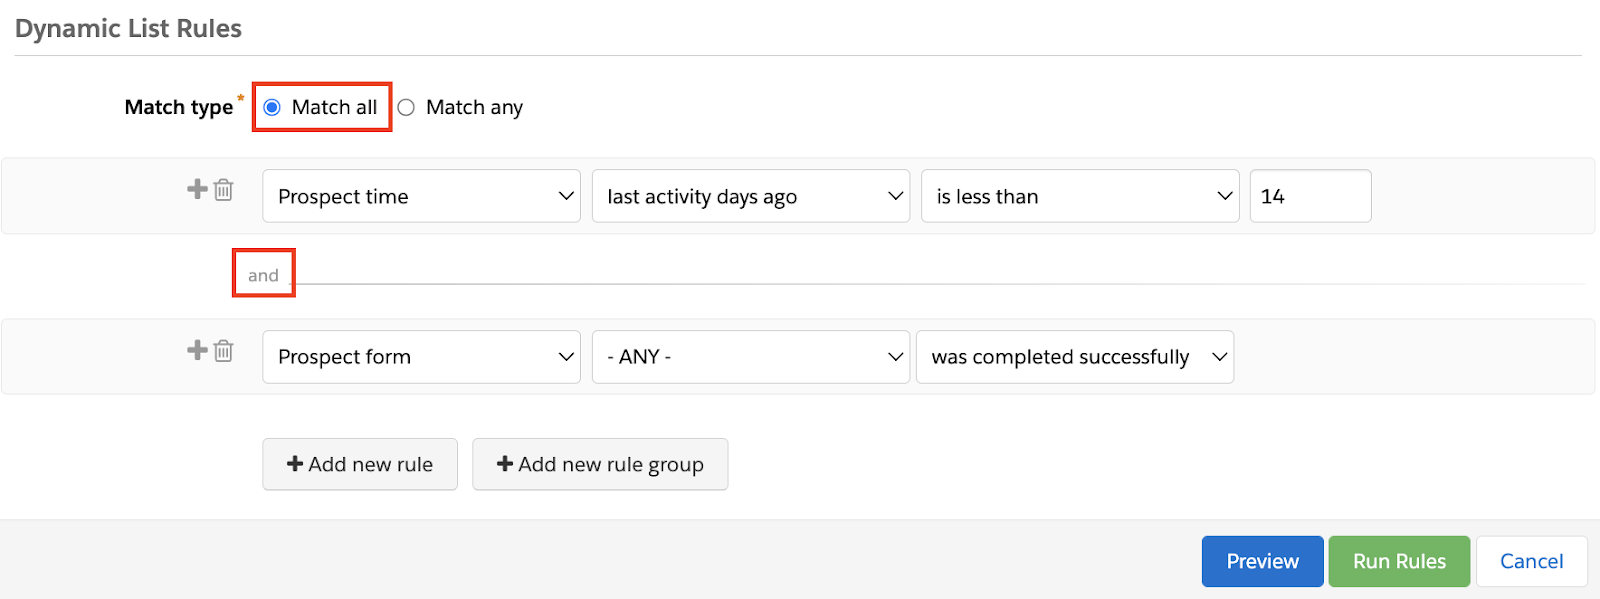
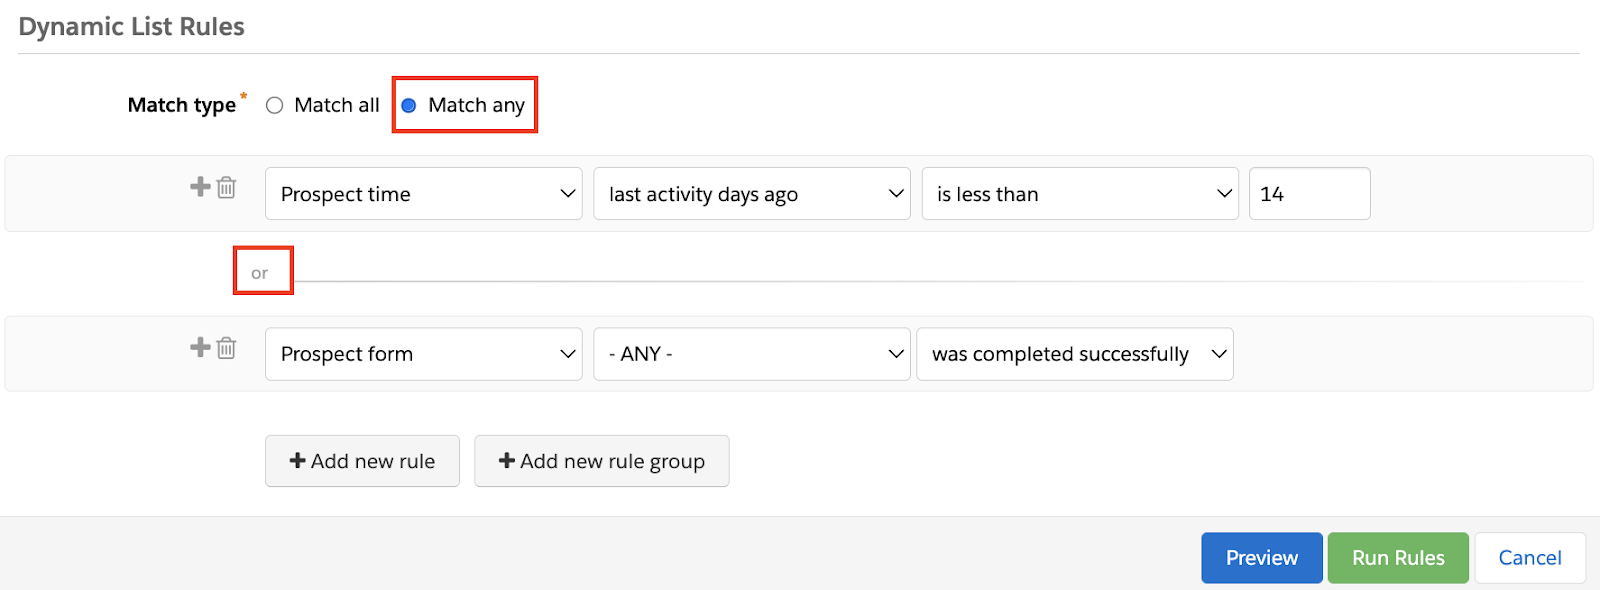
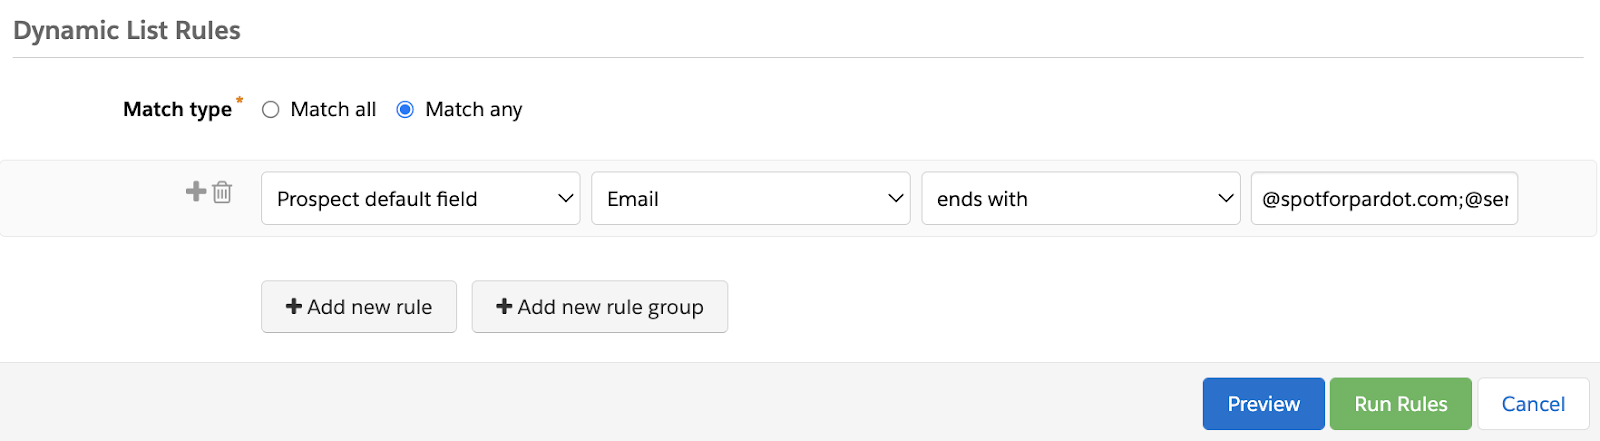
Dynamic List Rules can be set to Match All or Match Any, for example:
These rules are looking for any prospects who have been active in the last 2 weeks AND have ever submitted at least 1 Pardot form.
These rules are looking for any prospects who have been active in the last 2 weeks OR have ever submitted at least 1 Pardot form. These are very different criteria.
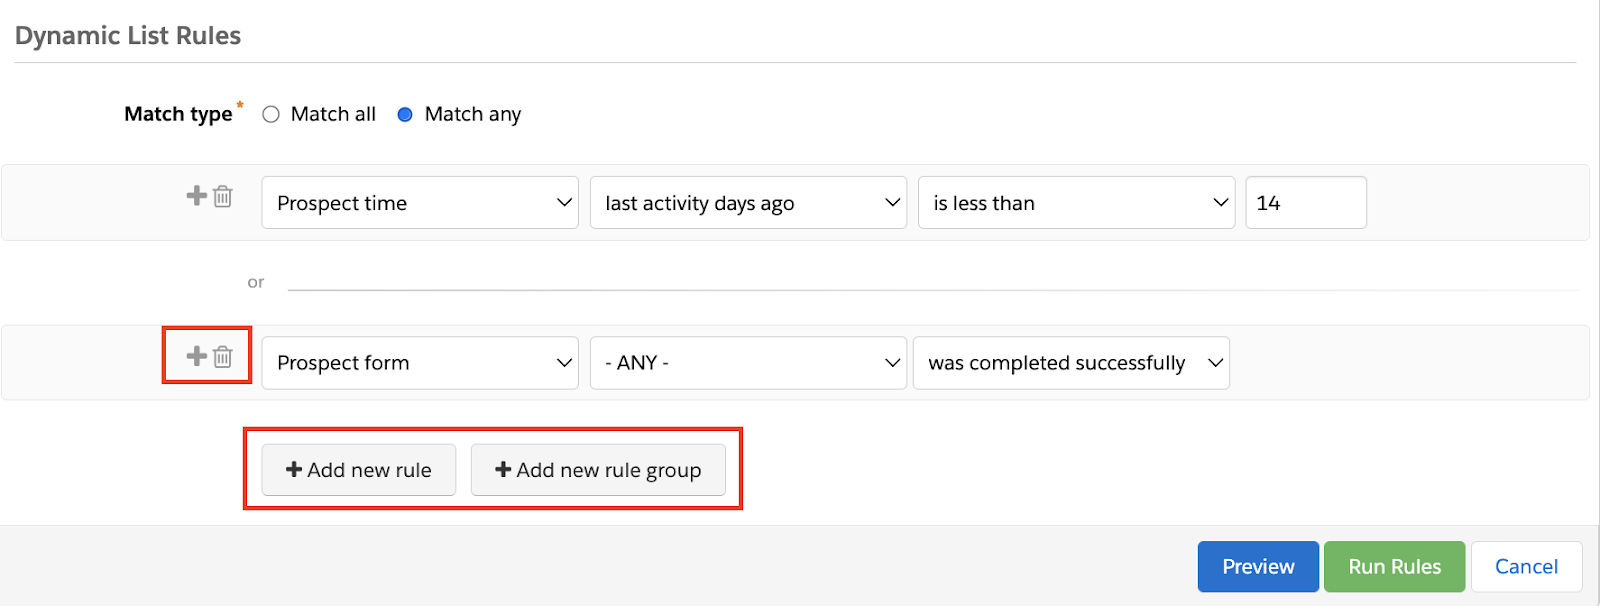
Use the + Add new rule and + Add new rule group buttons or the + icon next to a rule to add additional criteria. If you need to remove the rule, select the trashcan icon next to the rule.
Separate multiple values in a rule with semicolons. Dynamic list criteria is limited to 255 characters, so you may have to split your criteria into multiple rules.
How are Dynamic lists different from Static lists?
Static lists are updated manually or via other automation methods, such as automation rules or completion actions. Static lists do not automatically update and are not based on criteria. Unlike dynamic lists, you can create and add prospects to a static list via import and/or make static lists visible in Salesforce.
How do I use Dynamic Lists?
Ok, now we’re getting to the good stuff!
As a Recipient list
If a dynamic list is used as a recipient list on a scheduled email, then it will email all the prospects that match the dynamic list rules at the time the email is sent. For example, your dynamic list may match 100 prospects today, but the email that is using this list is not scheduled to go out until two days from now. When the email is sent, your dynamic list may match 1000 prospects, or it may match 0, it is totally dependent on the rules you set up.
As a Suppression List
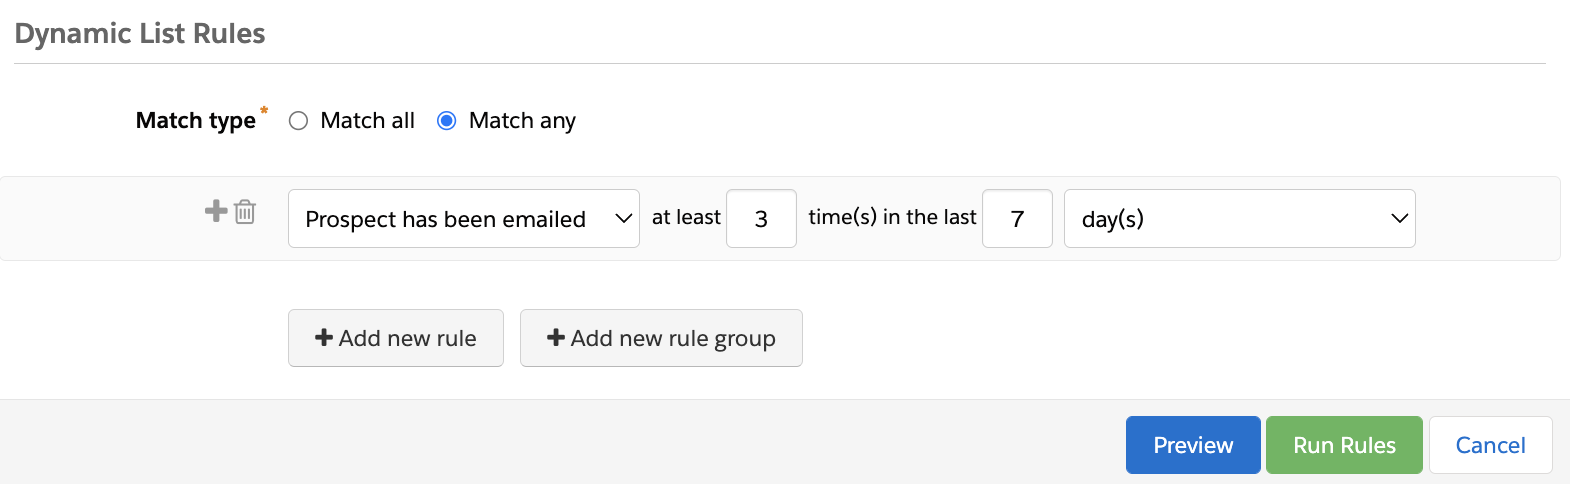
Similar to using dynamic lists as a Recipient list, using it as a Suppression list will suppress all prospects that match the rules at the time an email is sent. This is especially helpful when avoiding over emailing prospects. For example, if I want to suppress all prospects who have been emailed 3 or more times this week, I could set up a dynamic list with the following rule:
I like to create a Primary Suppression list that collects all prospects we suppress from emails on a regular basis. This list can then be added to all email sends, or dynamic recipient lists. That way, my Pardot users don’t need to worry about which lists to suppress — they can just use the Primary Suppression list every time.
A Primary Suppression list may consist of:
Partner, vendor, or competitor prospects
Internal employees
Prospects who have met the maximum number of emails we want them to receive in a time period
Spammy prospects
Role based emails
In an Engagement Studio Program
Dynamic lists are a great way to feed prospects into an Engagement Studio Programs (ESP). For example, say you want to nurture any prospects who visited your “Donate” page but didn’t make a donation, or any prospect who showed interest in a product but didn’t request a demo.
If a prospect is removed from a dynamic list used in an ESP, the prospect is paused from moving forward in the program. If the prospect later re-matches the dynamic list, they will resume the ESP where they left off. They will not skip steps or email sends.
In an Email Preference Center
You can use both static and dynamic lists in your email preference centers, however only prospects who are already members of a dynamic list will be able to see a dynamic list on an email preference center. If a prospect is a member of a public dynamic list, the prospect will be able to opt out of communication from that list by unchecking the box associated. Prospects cannot opt themselves into a public dynamic list, only opt out.
To Clean Your Database
My favorite use of dynamic lists it to create rules that catch spammy or junk prospects. These are evergreen lists that I review on a regular basis to clean up or remove prospects as needed.
Dynamic content rules are limited to 255 characters. If you have a long list of criteria, use the Creuz Your Data tool (it’s free!) to easily add semicolons and split your data into the right sized chunks. More info on how to use this tool can be found here.
If you split an existing dynamic list, the resulting lists will be static. Prospects will not automatically be added or removed from the resulting split lists, it will only split the prospects that exist on that dynamic list at the time the split occurs.
If you use “Prospect Account Field” in your dynamic list rules, Pardot will only look for prospects associated with an Account. Even if your rule says “Prospect Account Field “name” is not empty” it will still only review prospects associated with an Account.
Finally, to keep your Pardot org running smoothly, Salesforce recommends a limit of 1,000 Dynamic Lists per org. If you have millions of prospects in Pardot, consider reviewing Dynamic Lists matching over 5 million prospects to see if these lists can be broken into smaller pieces.
Now you’ve officially been empowered with everything there is to know about Pardot Dynamic Lists. Do you have other creative uses for dynamic lists? Tell us in the comments!
It’s a Salesforce Marketing Cloud basics 3-parter, y’all. In this three-part series, we’ll uncover the fundamental skills you should master when you’re getting started with Salesforce Marketing Cloud Engagement (SFMC).
You’ll learn how SFMC allows you to easily connect with potential customers, nurture their interests, and convert that interest into sales. In Part 1, we review all the ways SFMC can help you connect with potential customers.
Connect with Potential Customers via SFMC
The word ‘connect’ can mean different things to different people. There’s connecting from a business lens perspective, which is where we’re making connections with prospects on different channels as well as connecting those various channels for a customer across a user journey, like Journey Builder from a platform perspective.
Connecting From a Business Lens
When we think about it from a pure business lens, Salesforce Marketing Cloud Engagement allows us to connect with existing customers but can also help make a connection with prospective customers and leads via form capture.
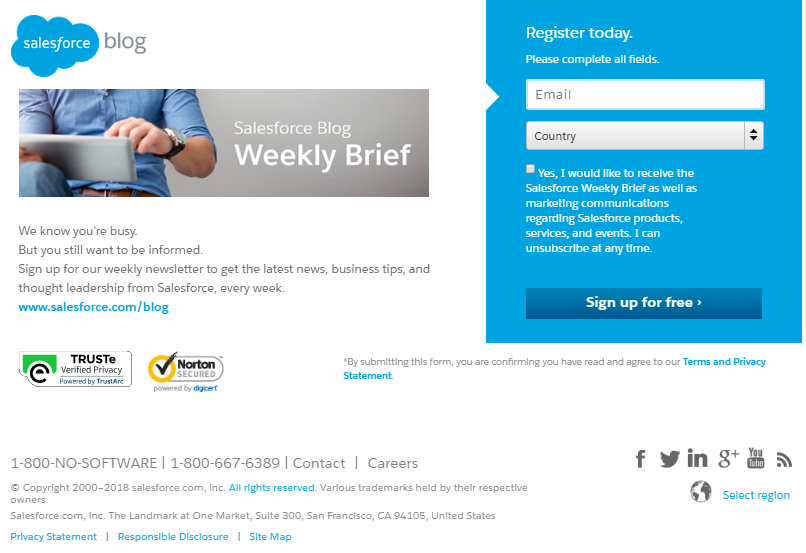
Lead acquisition and generation is a top initiative for all marketers and a critical component of the Engagement platform. Over the years, the lead capture functionality has really evolved and is now pretty easy for a non-technical person to implement.
There are two main features of SFMC for lead acquisition and capture:
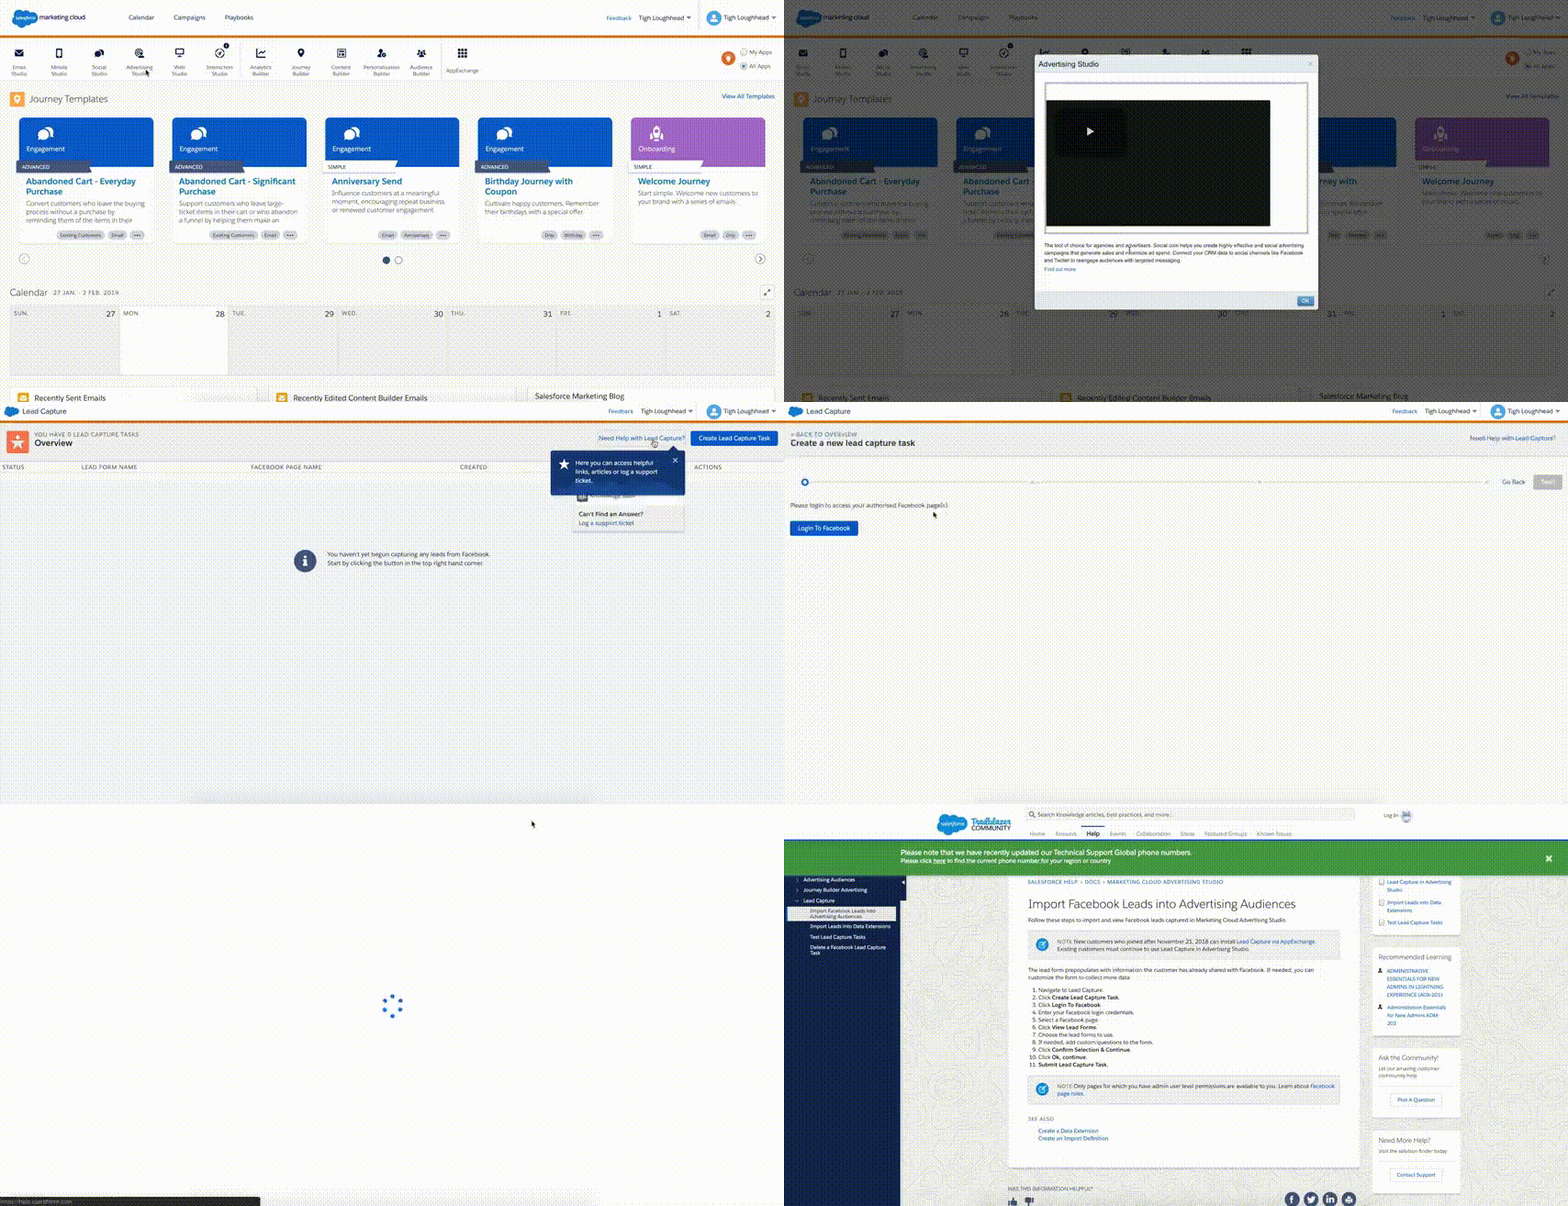
The app is free to use. It enables you to collect leads from Facebook and Google and have them enter directly into Engagement.
This lead capture app and functionality allows you to collect lead data from your paid ads, which is awesome by itself. But more importantly, you’re able to capture first-party data, which is the future when a cookieless world finally arrives. This first-party data in turn can be used to help nurture your prospects and drive transactions.
Lastly, highlights of the app include:
Capture is real-time via a secure connection (not like we would expect anything less)
Leads captured can get added directly to a lead nurture journey and therefore can create more targeted intent-based content
You can do both via a simple and intuitive user flow
Smart Capture
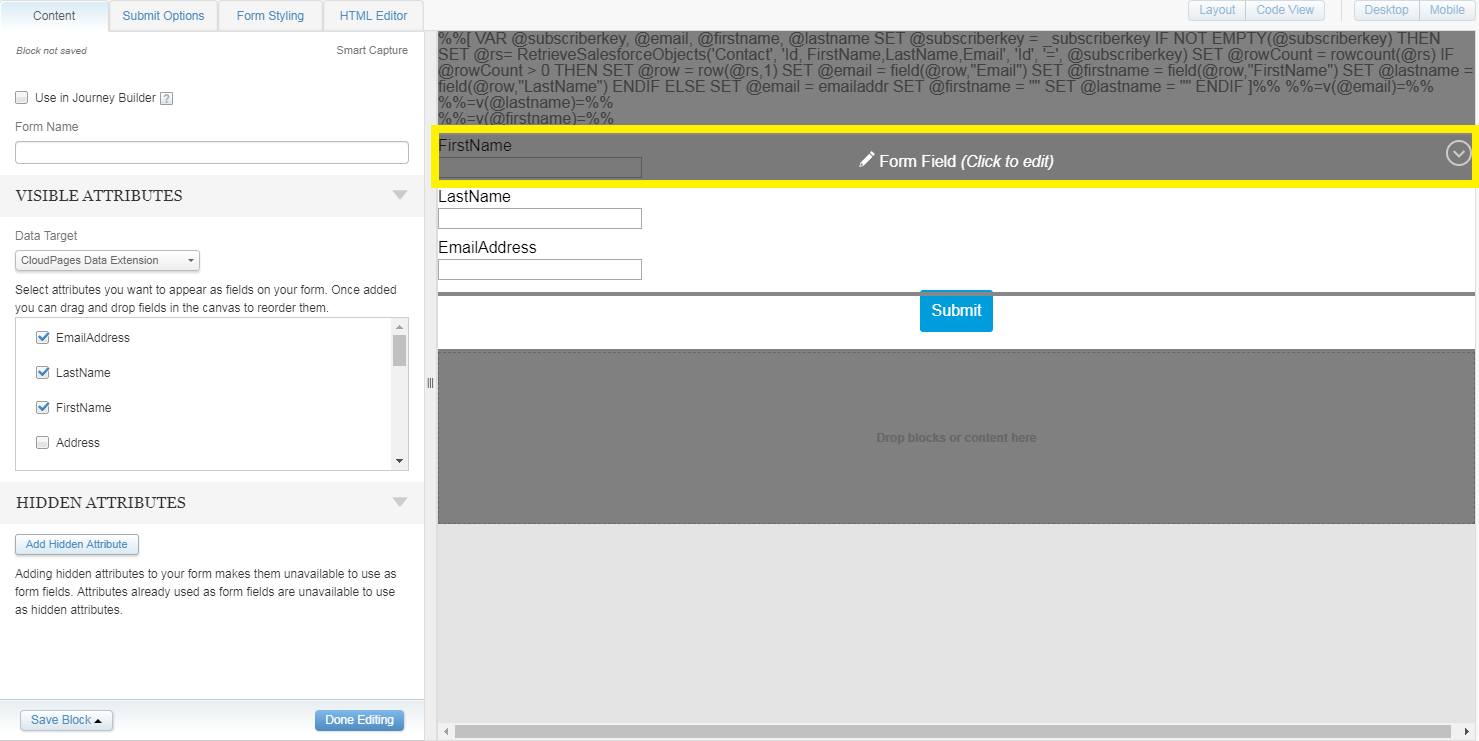
Smart Capture is another tool, this one native in Email Studio, that you can use to create lead capture forms that you can then include on your landing pages.
When a lead completes the form on the landing page and clicks the Submit button, the Smart Capture form automatically adds the information to a subscriber list, data extension, or outside data source such as an integrated CRM system like Sales Cloud. Smart Capture forms are super easy to use within a much better UI, unlike the previous form functionality.
Some common use cases for Smart Capture forms include:
Generate leads from people who sign up to receive a newsletter or attend an event.
Create tasks in Salesforce to follow up with leads.
Send automated emails to people who complete the form.
Send email messages through Salesforce CRM.
Connecting from a Channel Perspective
When we think of the concept of Connect from a channel perspective, Salesforce Marketing Cloud allows us to connect with prospects and customers through a variety of channels.
And while with Engagement you have access to all these channels, email still remains the workhorse.
Email
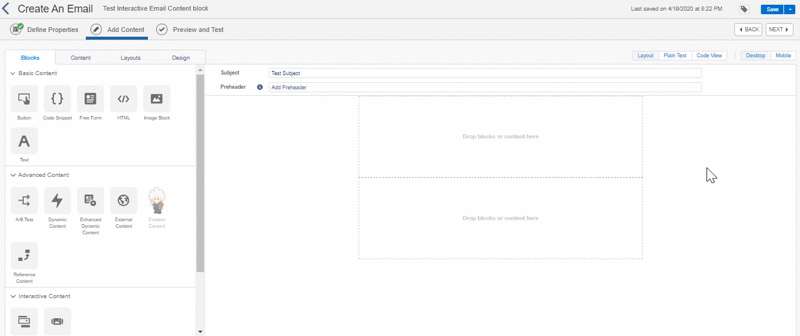
I’d like to focus on an underutilized feature of Email Studio that can help you better connect with prospects and clients: Interactive Email Content Block as well as Mobile Studio.
Interactive Email Content Block
If you are a long-time user of the system or industry, you will remember that this tool was an acquisition — formally known as Rebelmail. But, I digress.
The Interactive Email Form block in Marketing Cloud Content Builder allows marketers to receive subscriber information like profile data, product reviews, and sales leads directly from an embedded form in an email. Allowing subscribers to submit forms without ever leaving their inbox helps increase customer engagement and gives marketers more data to use for segmentation.
There are several templates available to solve these use cases:
The Empty Form Template allows you to start from scratch and create any type of form you want.
The Reviews Template allows subscribers to complete product reviews or other feedback surveys.
The Progressive Profile Template collects or updates subscriber preferences and demographic data, such as name, birthday, product preferences, and interests.
The Case Form Template allows subscribers to create or update a support case via Journey builder.
And finally, the Lead Form Template captures or updates subscriber information from your leads.
Yes, I’ll say it again — users can respond to forms, reviews, and update cases right from their inbox!
Mobile Studio
And yes, while Email is the bread and butter of SFMC Engagement, Mobile Studio is another great way to connect with your customers and prospects.
So, what do we mean by Mobile Studio? Well, at first thought most people automatically think Mobile Studio equals SMS. But, that’s really not true. (I, too, am guilty of using both these terms synonymously!)
There are three main offerings under this studio:
MobileConnect
MobilePush
GroupConnect
MobileConnectis where you can create, send and receive and track SMS and MMS text messages (this is what comes to mind for most folks). Typically these messages are transactional in nature to alert subscribers as well as allow marketers to automatically respond to incoming messages based on established keywords.
MobilePushas the name suggests allows you to send notifications to encourage the use of your app. A few examples to consider based upon industry include:
Flash sale from your favorite retailer that has an app to make purchasing on mobile a breeze
A strategically sent time of day message before dinner time from your favorite food delivery app provider
Time-based notification 24 hours before your flight letting you know you can check in on your airline carrier of choice
Proximity-based notification using beacon technology for in-store coupons at your local nationwide pharmacy
GroupConnect allows you to send messages via the LINE messaging app and Facebook Messenger via messaging API. (this offering is not as widely used as the others, but is still valuable — especially for those based in Asia – history of LINE)
(There’s also WhatsApp Chat Messaging. But that’s not truly considered part of Mobile Studio and is positioned as more of an add-on to Marketing Cloud.)
Connecting from a Platform Perspective
And finally, from a platform perspective, through Salesforce Marketing Cloud Engagement, specifically Journey Builder you can connect all your communications across varying channels to reach customers with the right message at the right time.
Journey Builder 101
Journey Builder is a campaign planning tool in SFMC Engagement that allows you to design and automate campaigns that guide customers through their journey with your brand. You can begin with a blank canvas or an existing template and select various activities based on how you want to communicate with your audience. These activities can range from types of messages (by channel), decisions, updates, or a combination of these elements and are grouped in the builder panel as the following categories:
Messages
Advertising
Flow Control
Customer Updates
Sales & Service Cloud
Custom
The possibilities of journeys you can create are quite endless. Take a look…
Messages
Messages supported in Journey Builder include email, SMS, LINE message, push notifications, inbox message, in-app message, as well as WhatsApp.
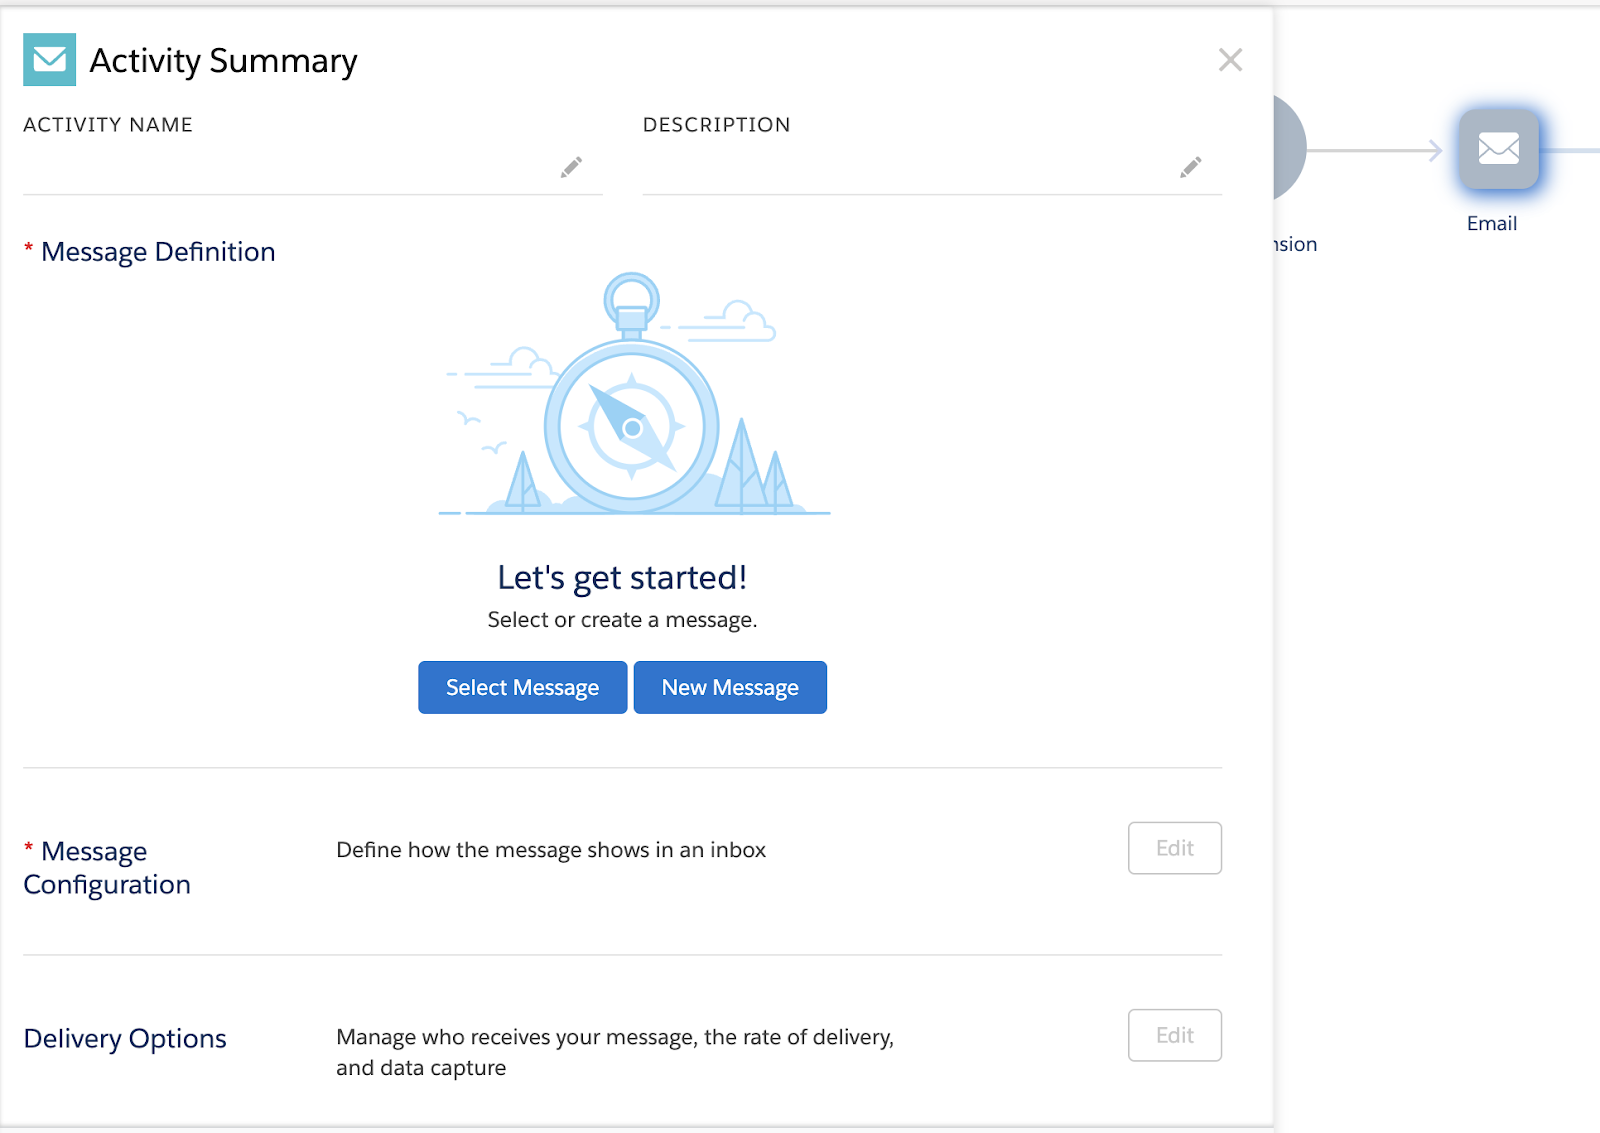
If you’re just getting started, we recommend starting simple with email. When you drag and drop the email message activity you will notice it is grayed out — this is because you need to finish configuring this activity. You have the option to select an existing email (we recommend this), or you can create from within Journey Builder from scratch.
You’ll also notice you can update the name of the email or really any activity by hovering over the text and clicking the pencil icon.
Advertising
There are currently only two activities under the Advertising section:
Ad Audience
Campaign
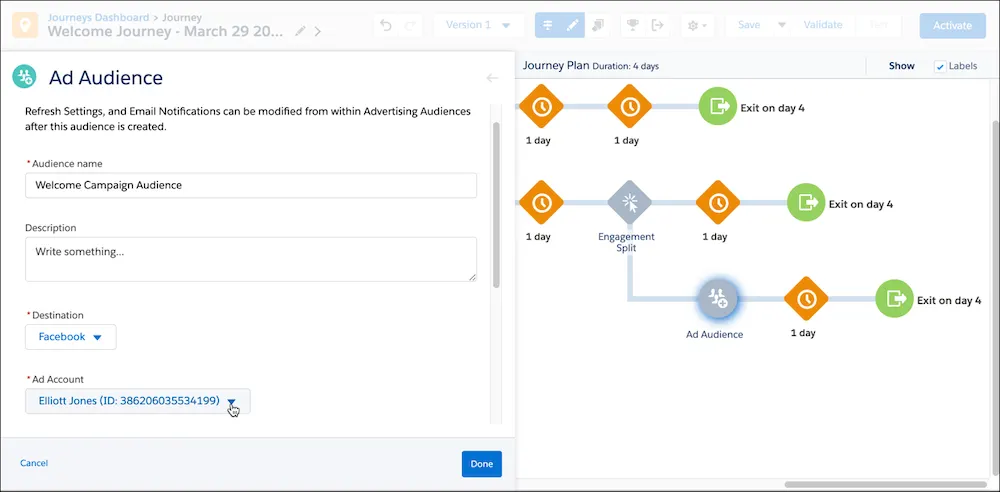
Ad Audience allows you to create an advertising Audience for any activated channel (Pinterest, Facebook, and so on) in Journey Builder. A common use case would be for targeting new customers who haven’t engaged with an email — perhaps a paid ad will be better suited for driving engagement. Don’t forget, you’ll need to navigate to the activated channel for further targeting and to complete the ad campaign setup.
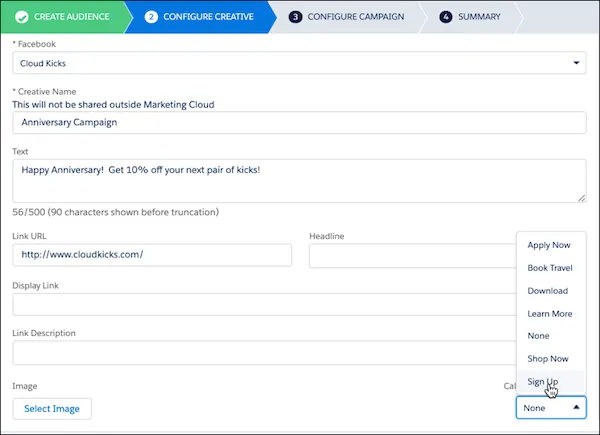
Whereas the Ad Campaign activity will allow you to create a Facebook Ad Campaign directly in Journey Builder. This can be helpful if you have a new simple Facebook campaign you want to test out or one that isn’t already set up.
You configure the creative elements of your advertisement and set campaign specifications, including total and daily advertising spend settings, within Journey Builder. You can also set a Retention Period for campaign members to prevent oversaturating their social media feeds with your advertisement.
When you activate the journey, it creates an advertising campaign, too. As the journey continues, customers populate the advertising campaign and see your advertisement.
Two important things to call out:
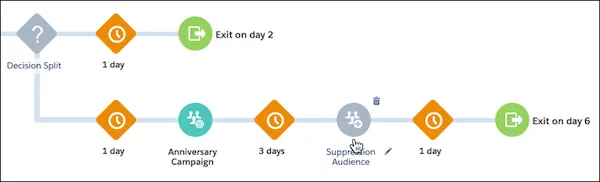
Customers who exit journeys aren’t automatically removed from that Advertising Audience, so it’s important to add in a suppression step to avoid retargeting the same customers.
You can edit the campaign outside of Journey Builder, but not all changes will be reflected in that running journey.
These activities allow marketing teams to easily build cross-channel journeys that extend the reach of email campaigns.
Flow Control
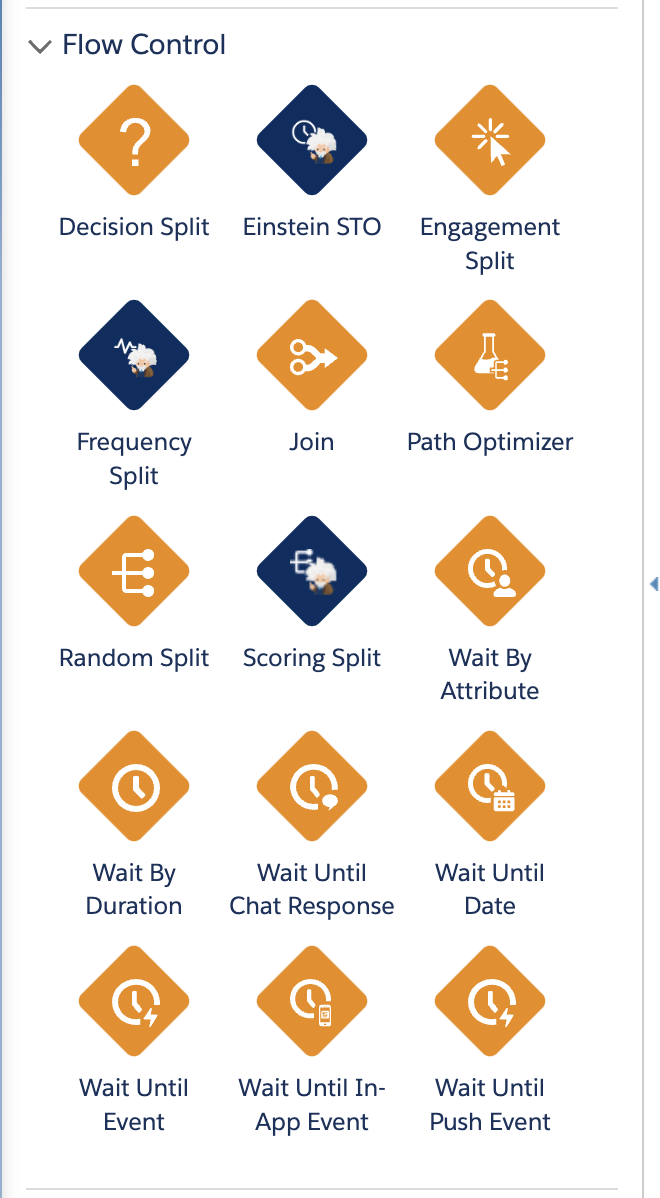
Flow Control activities are by far the most numerous — with 15 to be exact options for ‘controlling’ the flow of your journey from splits and joins to wait by/until how your journey flows is up to the marketer’s discretion!
But builders beware, Flows can get quite complex if you’re not careful. Thankfully the Validate function, which didn’t always exist, helps identify when you’re missing a Join or have a ‘dead end path of sorts’ occurring.
Typically for those just starting out, Decision Split and Engagement Split are good ones to include in your journey.
Did you know that using an Engagement Split to resend an email with an updated subject link to those that didn’t Open can result in tremendous payoff and engagement lift?
Check out these stats:
54.7% increase in the overall email reach
CTR is 51.1% greater than your first email
An email (with a different subject line) resent a week later has 30% more openings
To learn more about other flow actions stay tuned for Part 2 of 3 of this Series: Nurturing your Prospects & Customers
Customer Update
Customer Update Activities include:
Salesforce Personalization Activity
Update Contact
The Salesforce Personalization Activity will only appear for those customers that have purchased Personalization (formerly known as Interaction Studio). This activity allows you to pass data from Journey Builder to Marketing Cloud Personalization during the course of a customer journey. You can include custom action names that indicate the journey or journey step. After you share the data with Personalization, you can use it to personalize the experience your customers have with your website or mobile app based on recent journey interactions.
This integration allows you to tie all your customers’ experiences together — from the website as mentioned to calling your call center, or entering a loyalty number on point of sales.
A few use cases to consider are:
A retail customer recently purchased a snow jacket for the upcoming winter season. The Personalization activity could suggest matching a hat and gloves to complete the look based on the color and age/gender category of the snow jacket purchased.
A banking customer applies for a home mortgage. The personalization activity could suggest a credit card with 0% interest for 12 months to help with the moving expenses associated with a new home purchase.
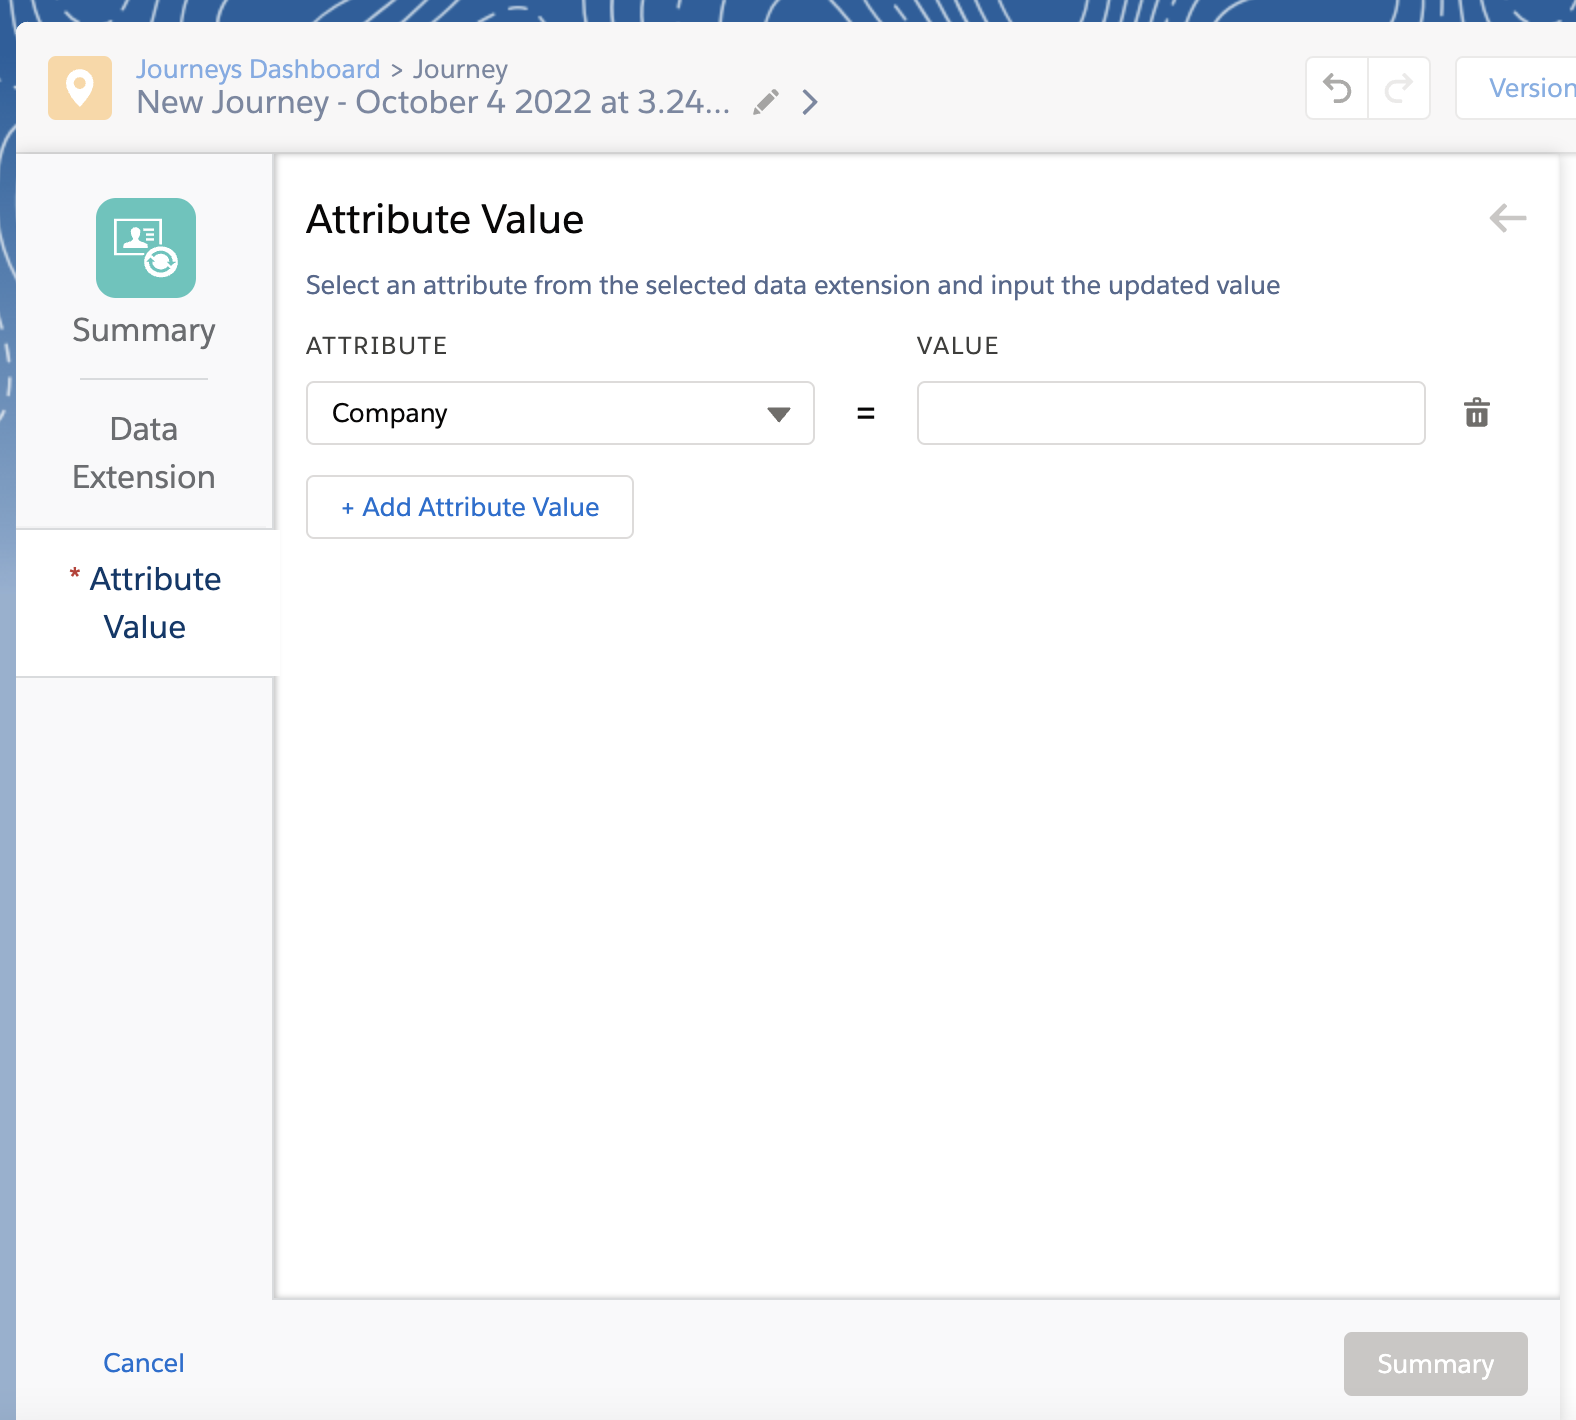
Update Contact, as it sounds, allows you to update a contact to a specific attribute of a selected data extension.
Some common use cases for use of this function in a journey include:
Updating Customer Tier based upon a previous activity or perhaps based upon the length of time as a customer. For example, as an airline loyalty customer — after reaching x miles you update their status to ‘gold’.
Updating the date field using current time to timestamp for the most recent visit to a doctor’s offer perhaps so you can remind them of the next visit.
Lastly, Sales & Service Cloud activities require integration with Sales and/or Service Clouds to be able to leverage. Here’s a quick rundown of what each specific activity entails:
Activity
Details
Account
Create a New Record or Find and Update using a Salesforce look-up field whose data matches a Marketing Cloud attribute to identify the correct record to update. If you have a Person Account, you can create or update both Business and Person Account activities.
Campaign Member
Add a new or existing contact or lead to an existing campaign in Salesforce and optionally set their activity and status as you see fit. Use this activity to track important moments of engagement throughout the journey.
Case
Create a case and associate it to the Sales and Service Cloud contact that matches the Marketing Cloud contact’s ID. Or create a Sales and Service Cloud contact to associate to an existing case.
Contact
Create or update a contact from Sales or Service Cloud using Sales or Service Cloud data brought into a journey or Marketing Cloud contact data.
Convert Lead
Convert qualified leads from the Sales and Service Cloud into a contact or account. This activity schedules important actions, such as assigning a lead owner, creating an opportunity or task, and changing the lead’s conversion status.
Lead
Just like contact, except for Lead object – Create or update a lead from Sales or Service Cloud
Object Activity
Use this activity to create or update a standard Salesforce object record, such as a lead or task, or a custom object record.
Opportunity
Creates an opportunity record in Sales and Service Cloud. Use Marketing Cloud contact attributes to populate the fields in the opportunity record, or populate each record with a fixed value.
Task
Create a task in Sales and Service Cloud for each Marketing Cloud contact that reaches this activity based upon their assigned sales or service rep.
Common use cases include:
Create a lead when a Marketing Cloud contact enters a journey.
Update a lead based on engagement within a journey.
Create a CRM contact record when a Marketing Cloud contact reaches the activity.
Update a CRM contact record with Marketing Cloud contact data.
Update a custom object based on engagement within a journey.
Create a task when another object, such as a lead or contact, enters a journey.
Associate a case or task to an account.
Update a task based on a contact or lead’s response in a journey.
Update a person or business account.
Summary
As you can see, Marketing Cloud allows marketers to connect with potential customers in many different ways — from acquisition and driving engagement on various channels to uniting communications across a customer journey. My hope is your one takeaway is: it’s a pretty powerful tool that can meet the unique needs of any organization, regardless of size, vertical, or industry.
To keep it going, check out this quick reference that explains the basics things to know about each tool within SFMC Engagement.
Next up…
Part 2 of 3: Nurturing your Prospects and Customers. While you’ve got a sneak peek of what Journey Builder can do from our 101 section, we’ll discuss more of the how-tos: from concept to execution.