Category

Marketing Automations

Lead routing with Salesforce Sales Cloud and Pardot can trip up even the most experienced sales and marketing teams. And choosing the right lead management strategy and tools to automate the process is even more challenging and important. 

Cultivating interest, inspiring action, and responding to people who raise their hands is why we’re here, right?

LeanData is a third-party tool with Salesforce-native functionality that enables you to create complex lead routing rules. These complex rules enable you to do things like pull cleaner data into your org, reroute already assigned leads, or customize how sales gets alerts.

Here’s what you should know about lead routing in Salesforce and Pardot with LeanData.

Lead routing in Salesforce

Here’s how Salesforce Sales Cloud handles lead routing.

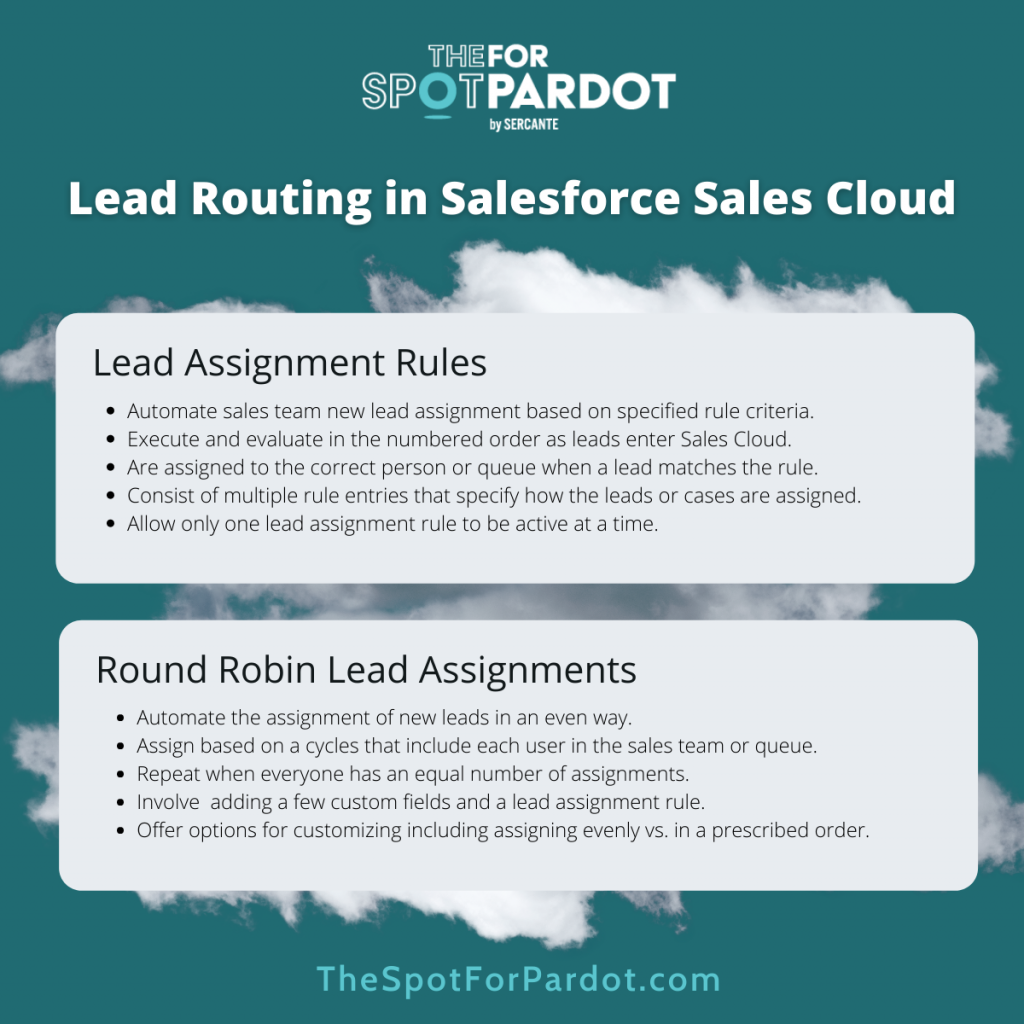
Lead assignment rules

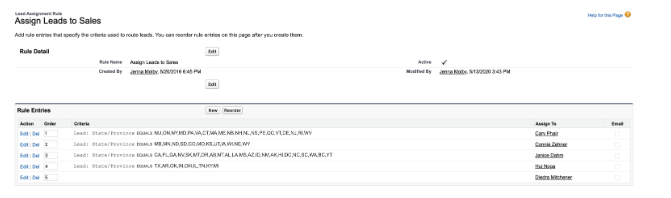
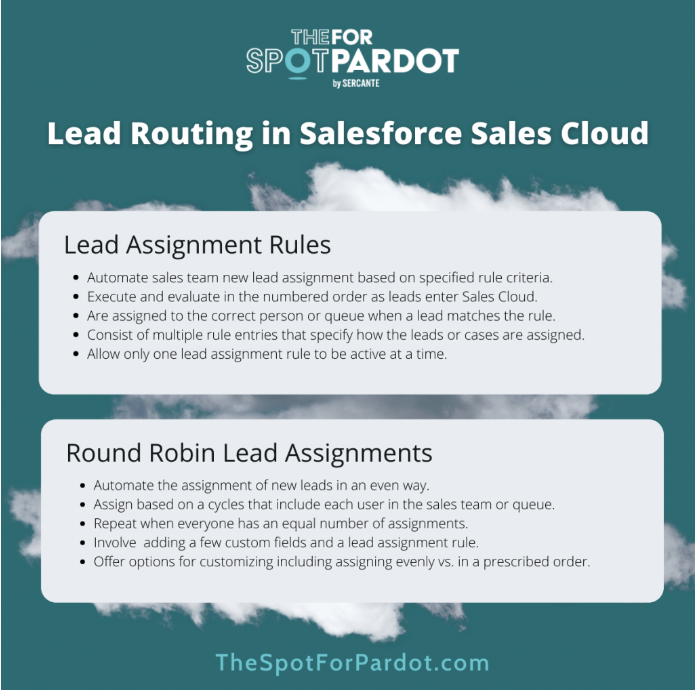
In Sales Cloud, you can set up lead assignment rules to automate the assignment of new leads to your sales team or queues based on the specified rule criteria. 

The rules will execute and evaluate in the numbered order as leads enter Sales Cloud. Each lead assignment rule consists of multiple rule entries that specify exactly how the leads or cases are assigned. When a lead matches the rule, it will be assigned to the correct person or queue. Only one lead assignment rule can be active at a time.

To get started, review this Salesforce help article: Set Up Assignment Rules

Round-robin lead assignment

The round-robin lead assignment rule in Sales Cloud helps you automate the assignment of new leads in an even way to your sales team or queues.

Here’s how the repeating round robin assignment looks if your sales team for lead assignment has 3 members:

  • Lead 1 is assigned to sales person 1
  • Lead 2 is assigned to sales person 2
  • Lead 3 is assigned to sales person 3
  • Lead 4 is assigned to sales person 1
  • Lead 5 is assigned to sales person 2
  • Lead 6 is assigned to sales person 3

To get started, review this Salesforce help article: Create a Round-Robin Lead Assignment Rule

Extra Resources

Lead routing in Pardot

There are multiple ways to assign new leads in Pardot ranging from manual assignments to complex and automated assignments based on lead criteria or activity.

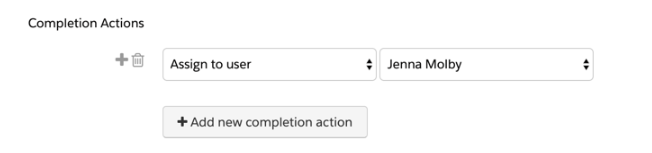
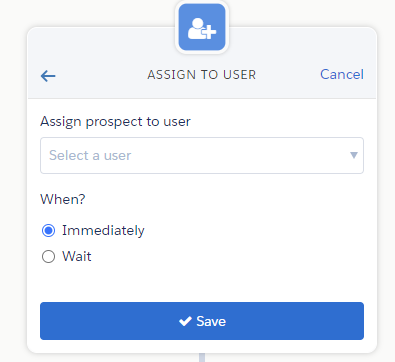
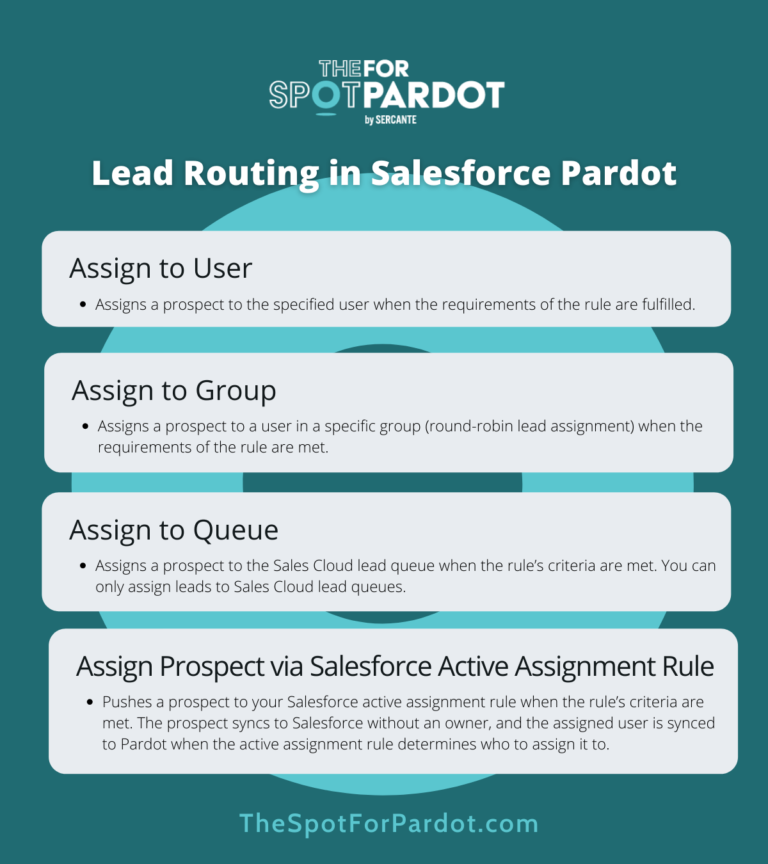
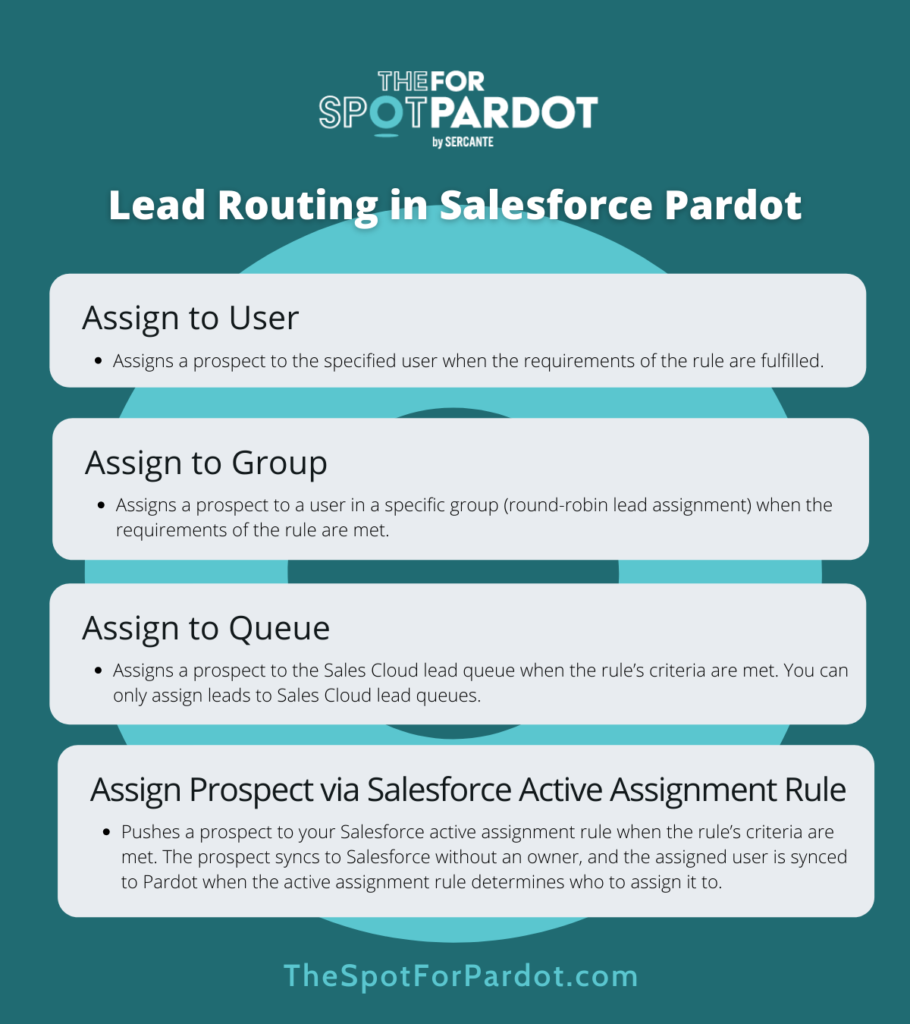
Assign to User

Assigns a prospect to the specified user when the requirements of the rule are fulfilled.

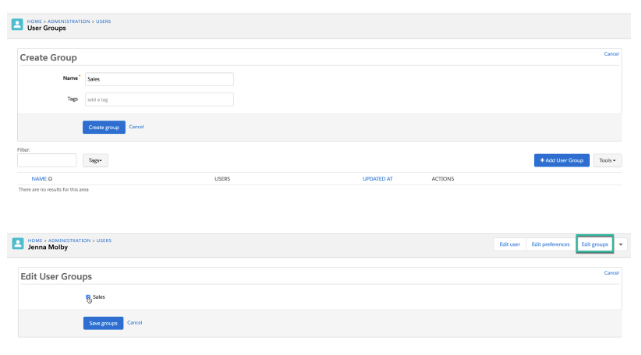
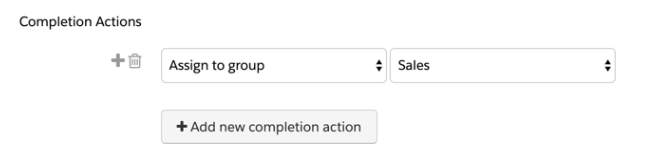
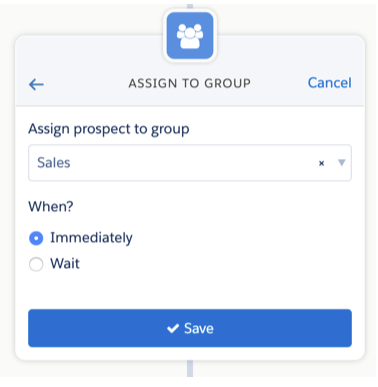
Assign to Group

Assigns a prospect to a user in a specific group (round robin lead assignment) when the requirements of the rule are met.

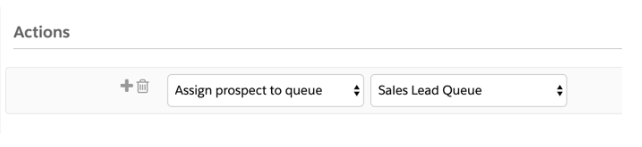
Assign to Queue

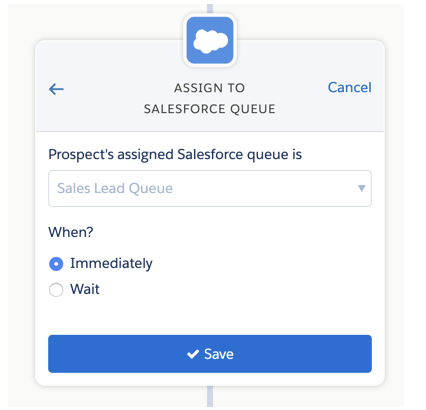
Assigns a prospect to the Sales Cloud lead queue when the rule’s criteria are met. You can assign only leads to Sales Cloud lead queues.

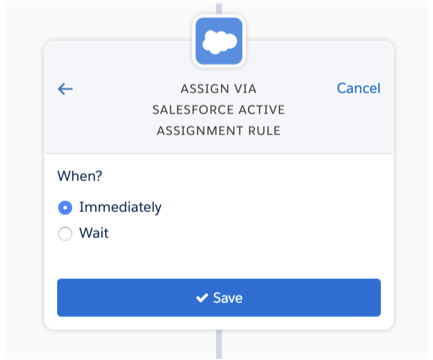
Assign Prospect Via Salesforce Active Assignment Rule

Pushes a prospect to your Salesforce active assignment rule when the rule’s criteria are met (see more information on this process below). The prospect syncs to Salesforce without an owner. The assigned user is synced to Pardot when the active assignment rule determines who to assign it to.

To get started, review this Pardot help article: Assigning Prospects

Extra resources

Complex lead routing with third-party tools

Third-party tools enable you to create complex lead routing rules that go beyond out-of-the-box Salesforce and Pardot lead routing features. Different tools serve specific purposes that may be the right fit depending on what you’re trying to accomplish.

Here are the most common ones.

LeanData

LeanData is a native Salesforce lead matching and routing platform that is easy to use and customize with their visual drag-and-drop interface functionality and complex rule building.

RingLead

RingLead is a native Salesforce lead routing, data normalization, enrichment, and duplicate managing platform.

Validity

DemandTools from Validity is a data management platform to help with importing, assigning, standardizing, manipulating, and the deduplication of your Salesforce data quickly.

Integrating LeanData with Pardot & Salesforce for lead routing

After you’ve weighed your options, you may decide that LeanData is the best third-party tool to accomplish your goals.

Here’s how to make it happen.

Getting started

Find the LeanData listing on the Salesforce AppExchange, and contact LeanData via the Get It Now button. Then, install the LeanData managed app in Salesforce. 

You will need to partner with your Salesforce admin to configure the settings both in Salesforce and LeanData. Assuming you have Salesforce and Pardot connected, you won’t need to do anything extra in Pardot during this setup phase.

To ensure a seamless install and configuration, plan out the platform strategy with your marketing and sales operation managers, sales leadership, and your marketing campaign or demand generation managers. LeanData expands your assignment capabilities from just leads to leads, contacts, accounts, and opportunities. By taking the time to allow these roles to understand the functionality and goals of the new tool, you will avoid complications and process restarts later in the year.

Keep your company’s open sales pipeline and quarterly goals in mind. For instance, you probably don’t want to change the lead assignment and data management process in the middle of the year or end of a quarter. Give sales time to learn and adopt the new tool and process as well.

Favorite LeanData lead routing features and challenges they solve

Matching

Matching helps identify orphaned leads or leads not linked to an account through lead to account matching and prevents duplicates from being created at the account, contact, and lead levels. This keeps the data clean and organized, providing marketing and sales a more complete view of an account.

The LeanData matching algorithm is based on their core, multipoint matching criteria to quickly identify exact matches, while helping determine and automate close matches by evaluating a set of criteria rules and tiebreakers. These rules can be added to, reordered, and customized as needed.

This feature is essential to your success with LeanData, Pardot, and Salesforce. Take the time to confirm which rules best match your data management needs and then start cleaning. There is no point in having a great lead assignment process if you’re working with bad data!

Lead Routing & Assignment

LeanData routing allows you to create complex lead assignment and reassignment processes with functionality that’s easy to test and update. Instead of being stuck with only one active assignment rule, you can create multiple rules within a process or separately to indicate the order in which leads and contacts should be evaluated and routed.

Want to know one of the best parts about this feature? You can route net new leads and contacts, plus reroute and reassign existing leads and contacts based on different criteria. Salesforce-native routing functionality only focuses on the new leads.

Common routing and assignment rules are:

  • Regional assignments
  • Territory queue round robin
  • Product and service queue round robin
  • Sales representative to customer success team selling
  • Net new lead assignment vs. nurture lead reassignment
  • Channel or campaign specific paths

This feature is also key for other things. You can map out the assignment considerations for net new leads in demand generation efforts and new leads or contacts at known accounts for your account-based marketing (ABM) target accounts. 

For each assignment process, you are able to list out who you do or don’t want to run through the program. So, you can assign net new leads to your regional sales team immediately, while the platform automatically converts new leads to contacts on your target account list through lead to account matching and assignment. And, by all means, you should. Draft out as many simple or complex assignment evaluation processes as your business needs. 

Real Time Notifications

Because of the integration of LeanData in Salesforce and Pardot, routing and assignment rules are run in real time, making sure sales is being alerted as the lead comes in. By reducing the time to assignment (and assigning to the right sales person or queue on the first try), the lead gets follow-up quickly and efficiently.

Plus, you can bring Salesforce fields into LeanData to trigger and evaluate matching, routing, and assignment. Create layers of logic to automate these processes and reduce missing leads and bad data.

You can also notify sales of their new leads wherever they prefer to work — in a Salesforce task, email, or Chatter post. And the new LeanData and Slack integration is something we’re excited about.

Get LeanData certified

Keep it going! Here are resources to get LeanData certified so you can master lead routing using the tool.

Ready to implement LeanData in your org? Or maybe you decided to go with another option to manage and automate your lead routing. Either way, tell us about it in the comments! And reach out to Sercante when you need Pardot consultant expertise for extra help and customization.

Campaign naming conventions are a must have. They keep your campaigns organized, improve reporting, and provide key information about the campaign at a glance. However, campaign naming conventions can only be helpful if they are used — and used consistently. 

Enforcing naming conventions is tricky because it typically relies on the users to remember the order, abbreviations, variations by type etc. Without good governance, your campaigns will end up having disparities.

Here’s an example of possible disparities: 

Instead of continuing to rely on your users remembering your naming conventions, we can automate this process with APEX.

But First

Before you start automating your campaign names, ensure the data that goes into your naming conventions is on the campaign object. For instance, my naming convention is YYYY_MM_Campaign Type_Description/Name, so I’ll need to make sure the following fields are required:

  1. Start Date 

Year and Month will be pulled from this field

  1. Campaign Type 

Create a picklist field on the campaign object for your different campaign types such as webinar, email, trade show, etc.

  1. Short Name 

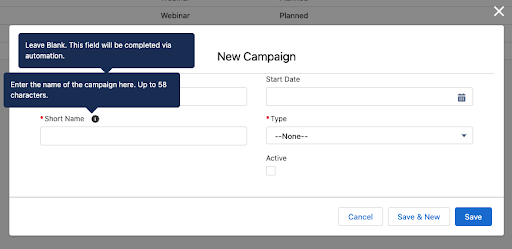
Create a text field on the campaign object for the user specified description/name. The user will only enter data into the “Short Name” field, the default field “Campaign Name” will be completed by our APEX trigger.

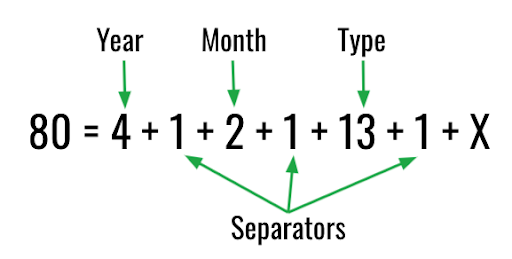
You’ll need to do a quick calculation to see how long your new Campaign “Short Name” field can be. The default “Campaign Name” field can only be 80 characters, so you’ll need to calculate:

calculating character count for naming convention

X=58

The Campaign “Short Name” field can be up to 58 characters.

To ensure this is clear to your users, add Help Text to both the “Short Name” and “Campaign Name” fields.

new campaign

Automating the Salesforce Campaign Name

Next, we’ve created a little Salesforce DX project that you can take a look at to see an example of how this can be done: https://github.com/sercante-llc/campaign-name-enforcer. 

The project includes the Custom Field, Trigger code and the APEX Test code as well.

The CampaignNameTrigger is how we can enforce the Name of the Campaign. In this code, we see that we are using the date format “YYYY_MM_” to get us started, which will write out the 4 digit year and 2 digit month. Other formats are available.

trigger CampaignNameTrigger on Campaign (before insert, before update) {
    if(Trigger.isBefore && Trigger.isInsert) {
        //we will set the Name of the Campaign based on other fields,
        //overwriting whatever was placed there before
        for(Campaign campaign : Trigger.new) {
            campaign.Name = 
                Datetime.newInstanceGmt(campaign.StartDate, 
                    Time.newInstance(0,0,0,0)).formatGmt('YYYY_MM_')
                + campaign.Type + '_' + campaign.Short_Name__c;
            if(campaign.Name.length() > 80) //make sure length is good
                //if it isn't, trim it down to size
                campaign.Name = campaign.Name.substring(0, 80); 
        }
    }
    else if(Trigger.isBefore && Trigger.isUpdate) {
        for(Campaign campaign : Trigger.new) {
            Campaign oldCampaign = Trigger.oldMap.get(campaign.Id);
            //first lets see if anyone else tried changing the name
            if(campaign.Name != oldCampaign.Name) {
                //we want to prevent that
                campaign.addError('You can\'t change the Name directly.');
                continue;
            }
            //ok, we are safe to set the correct value now
            campaign.Name = 
            Datetime.newInstanceGmt(campaign.StartDate, 
                Time.newInstance(0,0,0,0)).formatGmt('YYYY_MM_')
            + campaign.Type + '_' + campaign.Short_Name__c;
            if(campaign.Name.length() > 80) //make sure length is good
                //if it isn't, trim it down to size
                campaign.Name = campaign.Name.substring(0, 80); 
        }
    }
}

This trigger will also trim the final campaign name down to 80 characters, if needed. 

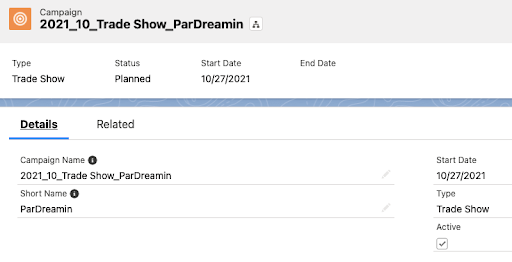
Once implemented, the above APEX Trigger will fire whenever a Campaign is created and/or edited. 

final view

This is a subtle reminder that this year’s ParDreamin virtual conference starts on October 27th! Register here.

Want to automate your campaigns even further? Check out how you can auto-generate and enforce campaign member statuses by campaign type.

This post was originally published on February 2, 2021. After this post was published, Salesforce released the ability to check if a field has been changed. Previously, the solution to capture every UTM touchpoint in Salesforce was to clear out the UTM field values after the flow ran. The new solution is to use the is changed feature instead of clearing out field values.

Refreshed and republished on September 10, 2021

The Concept

If a lead or a contact’s fields for UTM Source, UTM Medium and UTM Campaign have a value, run a Salesforce Flow to create a record in a custom object. The process will run again whenever the UTM information is updated.

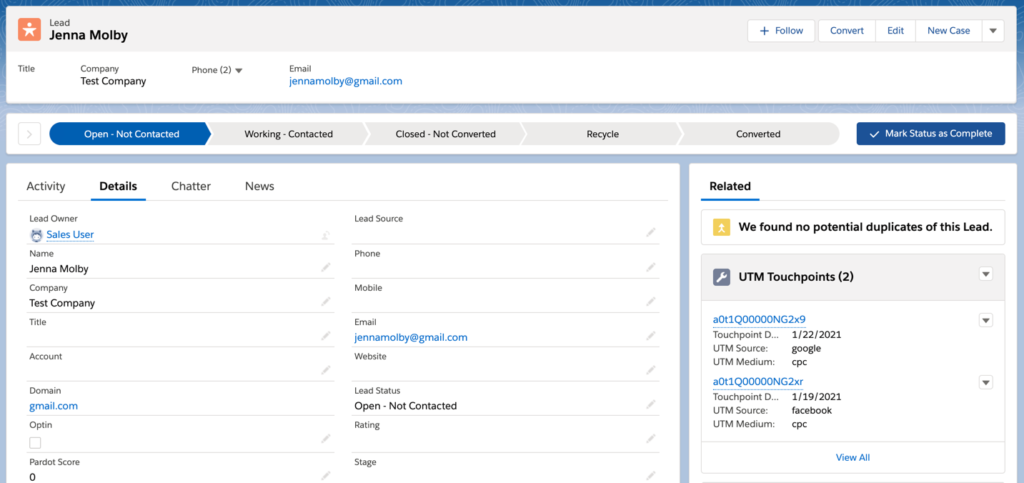
UTM touchpoints displayed on the lead layout

UTM touchpoints displayed on the lead layout

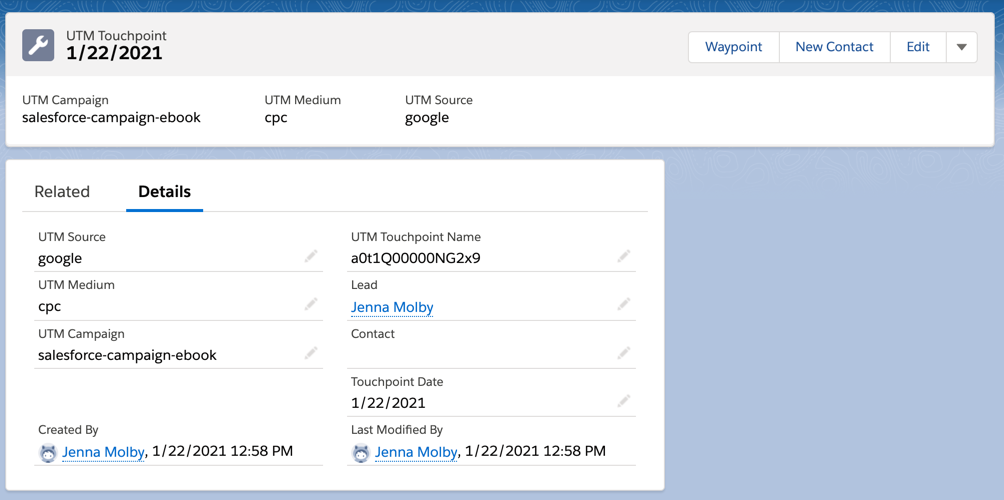
Record detail page for a UTM touchpoint

Record detail page for a UTM touchpoint

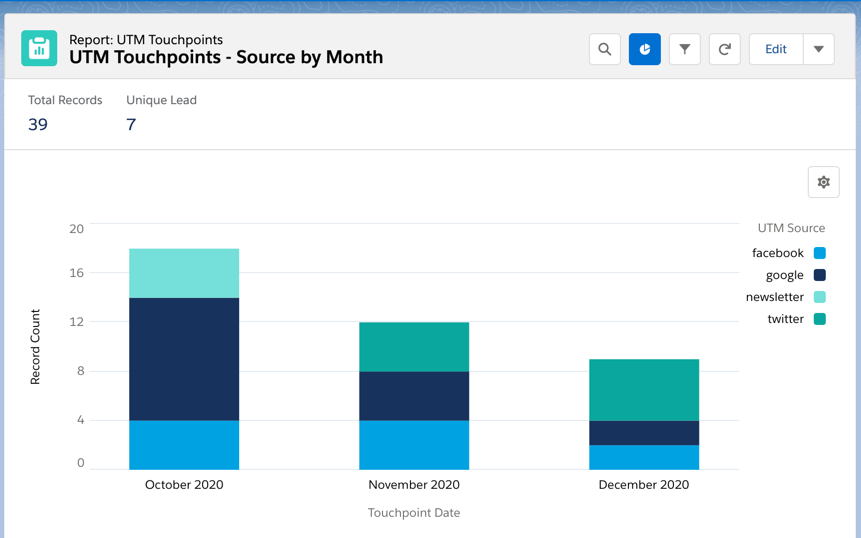
Report preview

Report preview

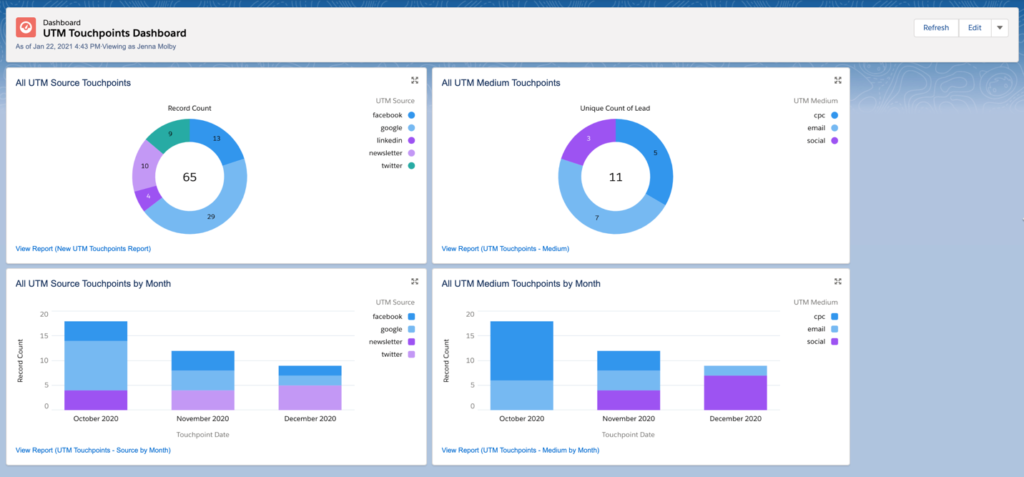
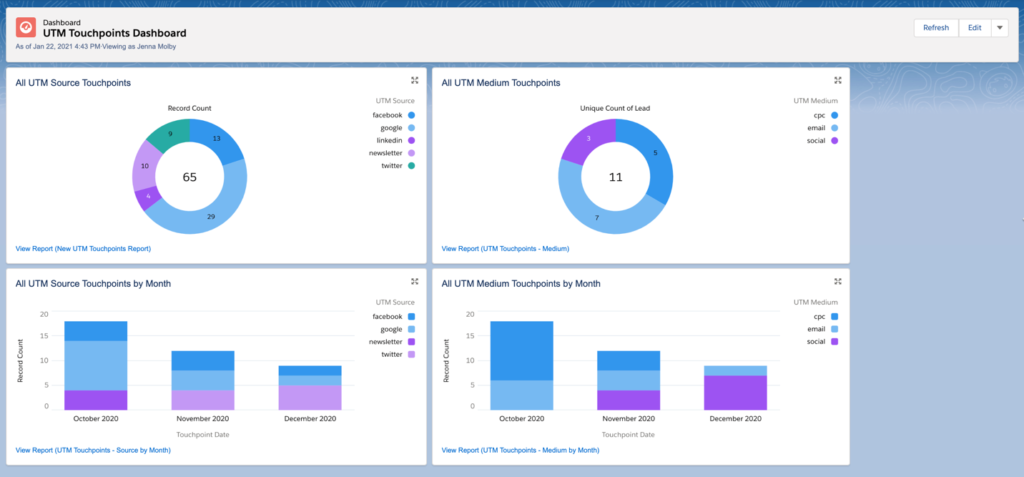
Dashboard preview

Dashboard preview

Planning

In order for this approach to work, there are 2 things you need to plan for:

  1. UTM fields for the Lead and Contact MUST be set up to be overwritten every time.
  2. What to do if there’s EXISTING UTM data in these fields to prevent data loss.

I recommend you review how your UTM fields are currently populated, what data currently exists in these fields and what reports/automations, etc rely on these fields. You should be able to answer these questions before getting started:

  1. How are the UTM fields populated?
  2. Do the UTM fields get overwritten?
  3. What are we going to do with existing data?

What to do if you have existing data

There are plenty of options on how to get this to work if you have existing data in your UTM fields. It all depends on your current setup. Here are some ideas:

  1. Create new fields named “First UTM Source”, “First UTM Medium”, etc. Rename your CURRENT UTM field labels (not API names) as “Last UTM Source, “Last UTM Medium”, etc. Populate the “First UTM” fields with your current data and use the “Last UTM” fields in your Flow.
  2. Once the UTM custom object is set up, use DataLoader.io to create records using all the existing UTM values.

Create the custom object

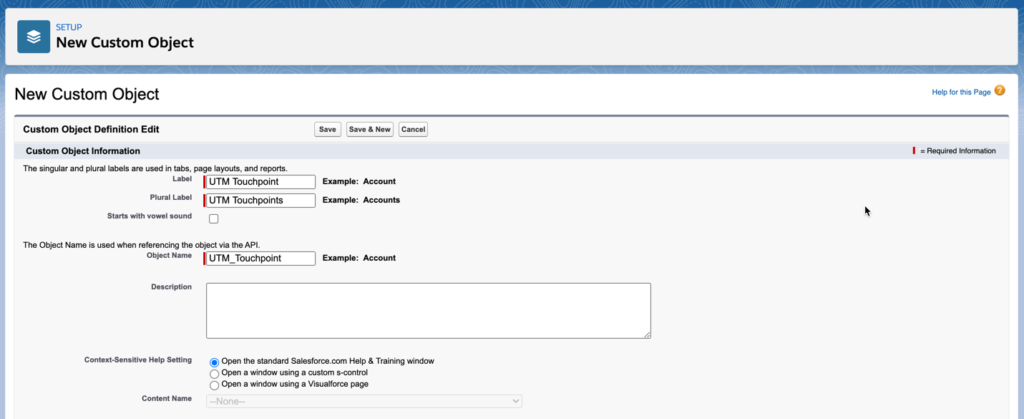
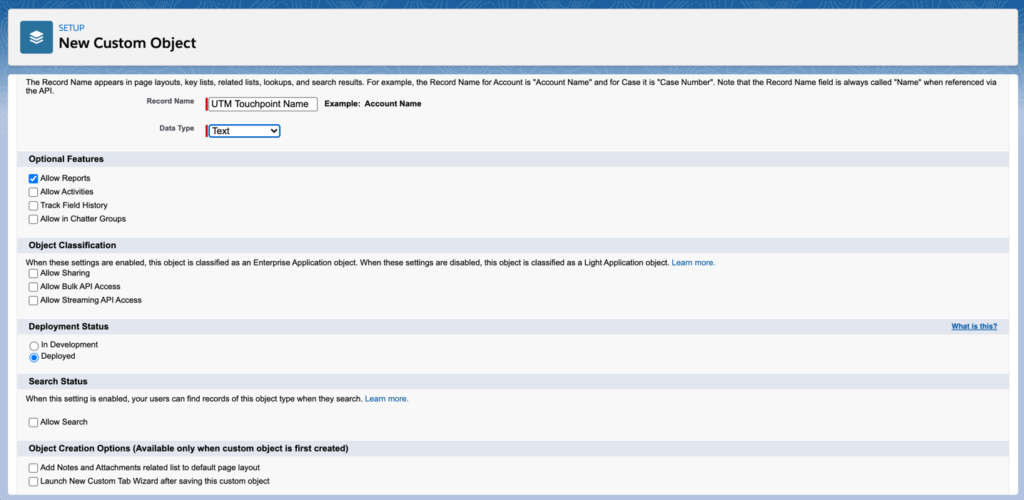
Create the custom object. I named by object “UTM Touchpoint”.

UTM touchpoint custom object 1
UTM touchpoint custom object 2

Create your fields

Next, create the custom fields for your custom object.

Field nameField type
LeadLookup (Lead)
ContactLookup (Contact)
UTM SourceText
UTM CampaignText
UTM MediumText
Touchpoint DateDate

You can also create any other fields you want to track using this object. For example, UTM Term or UTM Content.

Create the Flow for Leads

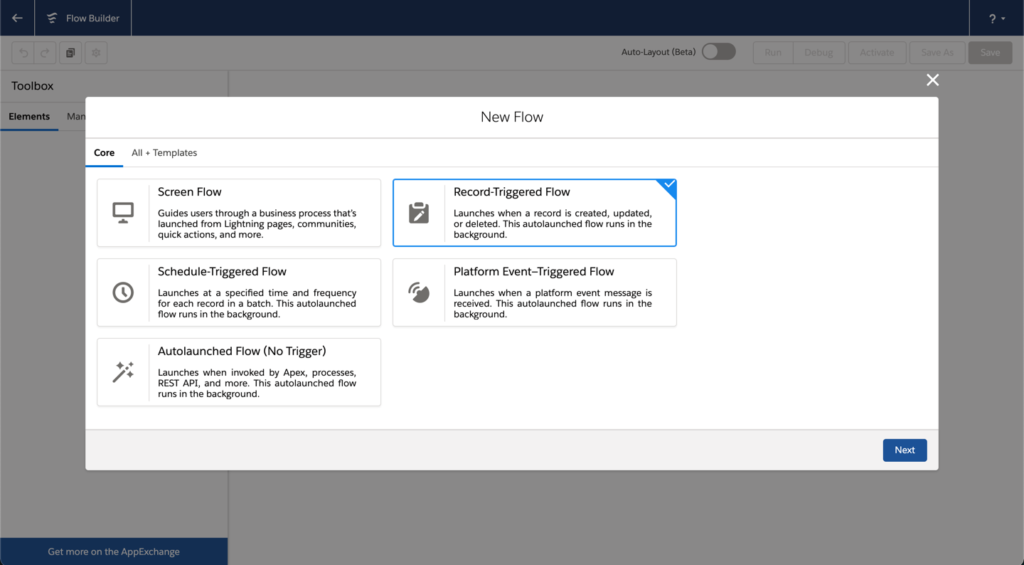
Navigate to the Flow builder and create a new Flow. Select Record-Triggered Flow as your Flow type.

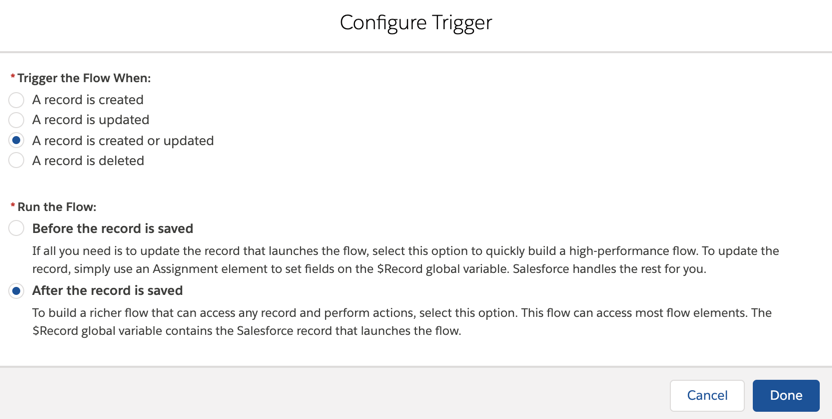
Configure Lead Flow - Step 1

Configure the trigger to run when a a record is created or updated and after the record is saved

Configure Lead Flow - Step 2

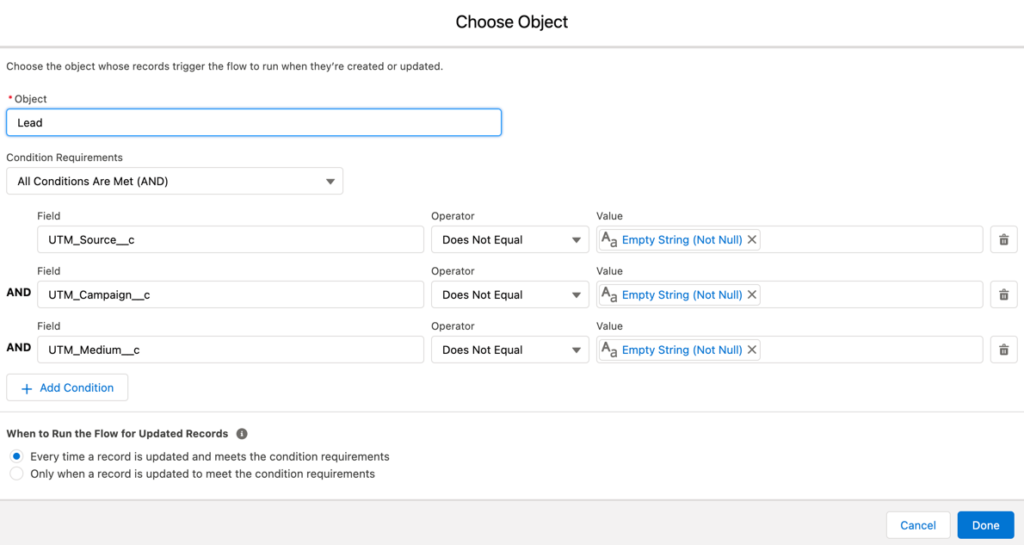
Select the Lead object as the starting object and add in the filters that will trigger your flow. For this example, I want to trigger the flow when UTM Source, UTM Medium AND UTM Campaign have values.

Configure Lead Flow - Step 3

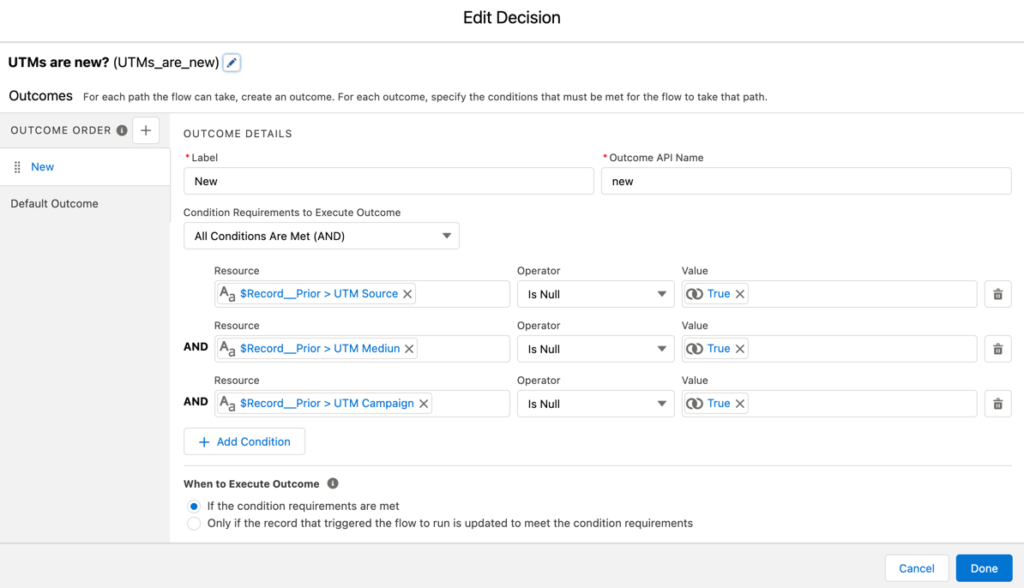
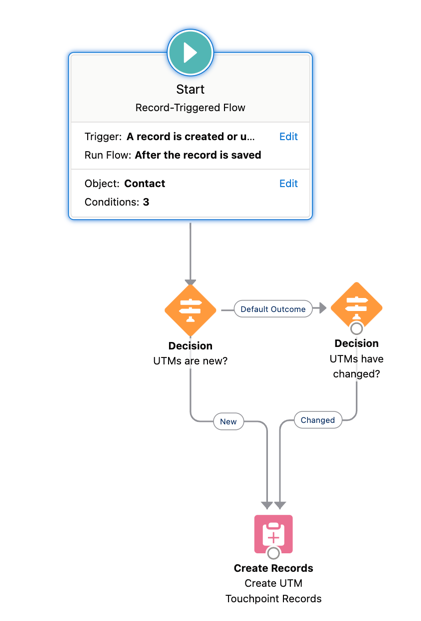
Add a decision element to the flow that will check if the UTM values are set.

Configure Lead Flow - Step 4

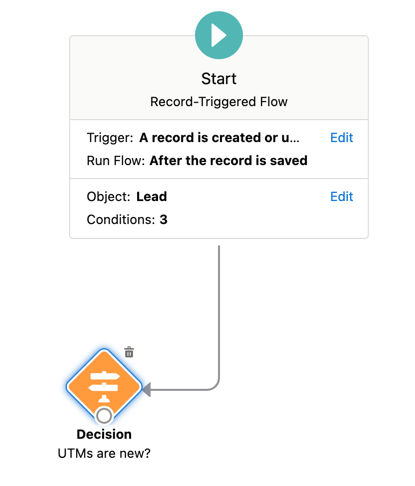
Now your flow should look like this.

Configure Lead Flow - Checkpoint 1

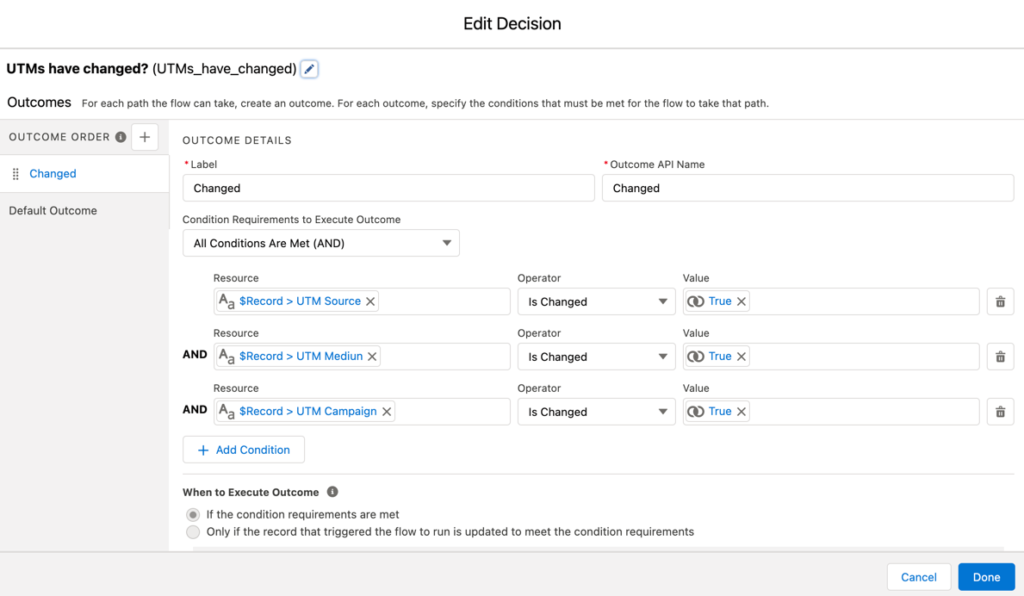
Add another decision element that will check if the UTM fields are updated.

Configure Lead Flow - Step 5

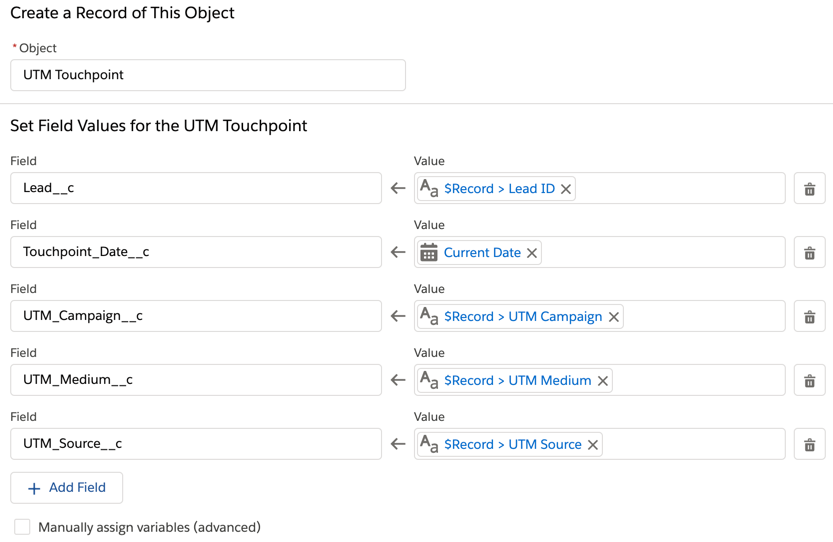
Add a create records element to the Flow that will take the UTM values from the lead and set the values for the UTM Touchpoint object.

Configure Lead Flow - Step 6

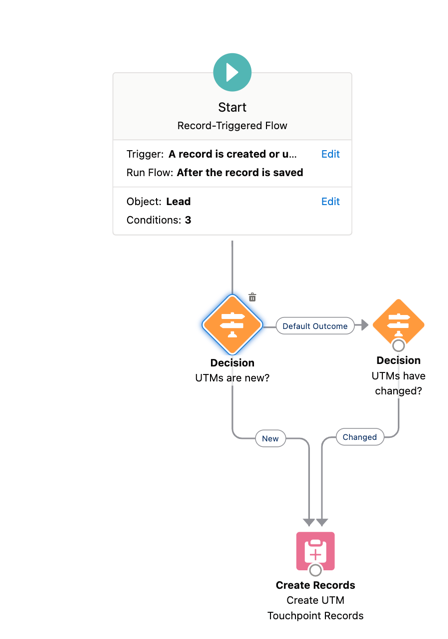
Connect the decision elements and the create records element. The final flow should look like this.

Final Lead Flow

Create the flow for contacts

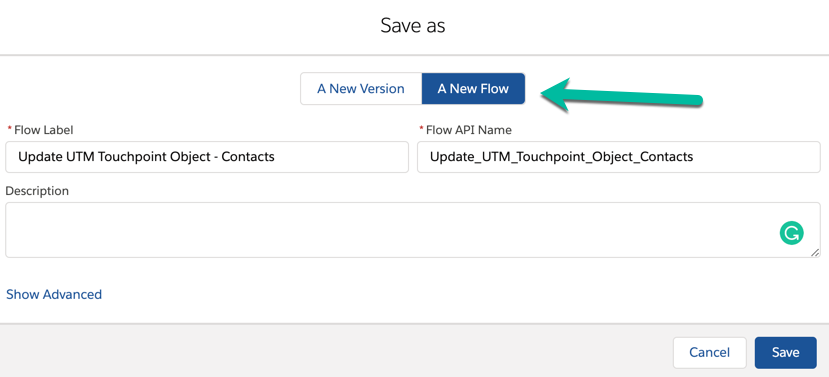
To create the flow for contacts, click save as on the lead flow and select save as new flow.

Configure Contact Flow - Step 1

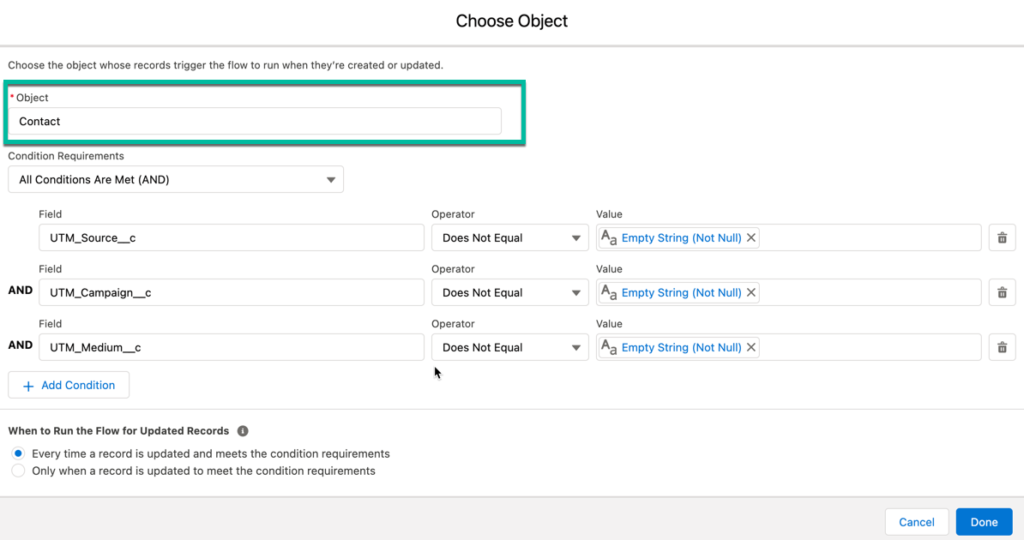
Edit the flow to start on the contact object instead of the lead object.

Configure Contact Flow - Step 2

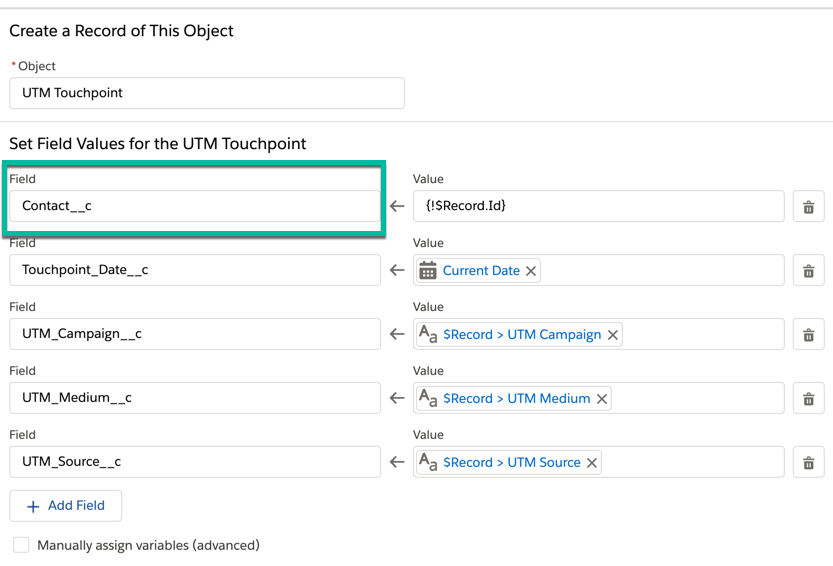
Edit the create records step to update the contact rather than the lead.

Configure Contact Flow - Step 3

Here’s what my completed flow looks like for contacts.

Final Contact Flow

Creating reports

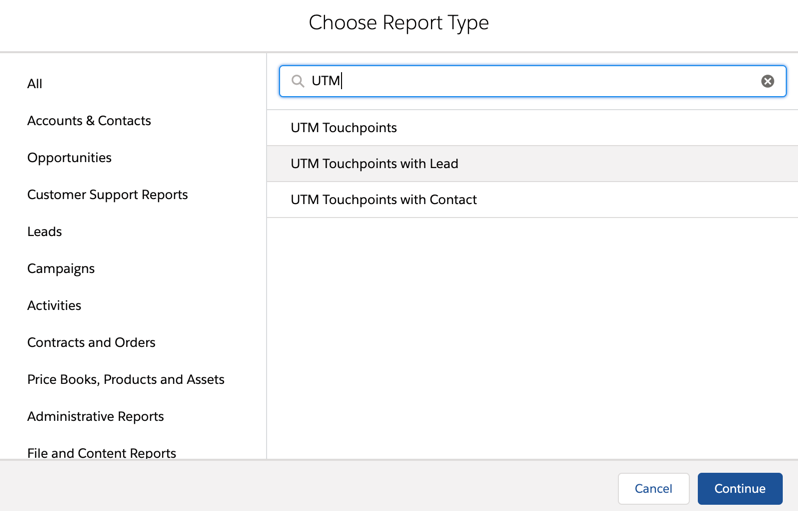
You can create reports by using one of the predefined UTM report types. The report type “UTM Touchpoints” will allow you to pull a report of ALL UTM touchpoints for both leads and contacts.

UTM Touchpoint Report 1

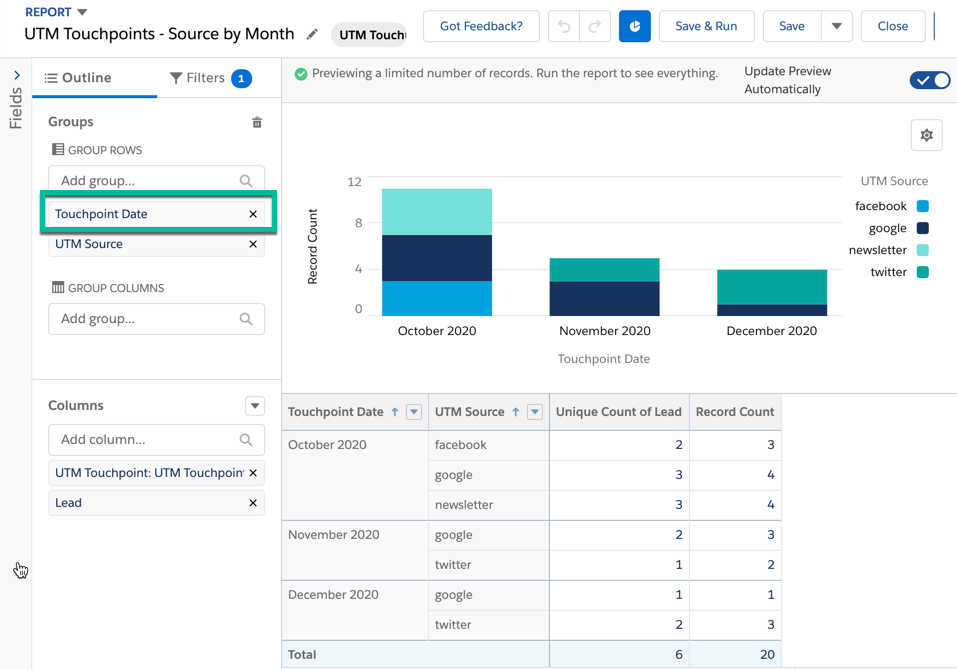
You can group by UTM Touchpoint Date to view all the touchpoints for a specific month, day, quarter, year, etc.

UTM Touchpoint Report 2
UTM Touchpoint Report 3

Questions?

Send me a tweet @jennamolby, or contact the Sercante team for help.

Spam and junk data is the bane of my Pardot Admin existence. Nothing irks me more than seeing sales was notified of a form fill from [email protected], or that [email protected] was added to an engagement program. However, spam is an inevitable part of any marketing automation platform and there is only so much we can do to prevent it from entering, or remaining within, the system.

Kick out the spams

Song references aside, there are a number of things we can do to give junk data the boot from Pardot. I typically recommend creating dynamic lists that look for spam keywords in the most common Pardot Prospect fields (more info here). Then, use these lists to review and delete junk data on a regular basis. This process works great for small and mid-sized Pardot instances. But dynamic lists alone leave something to be desired for Pardot instances that intake thousands of new prospects a day.

When using Pardot native functionalities to identify junk, I found myself wanting to know why a prospect matched my junk lists:

  • Which field on the prospect’s record was raising the spam flag? 
  • Is this legit junk or do my junk lists need to be tweaked? 

Unable to solve this issue with native Pardot functionality alone, I turned to our Prospect Updater tool to see if I could turn this into a spam identification tool. With some tweaking and a lot of input from the Sercante Labs team, I was able to create a process that not only tells me why a prospect matched my spam criteria, but also allows me to easily manage spam clean up through the use of tags and automations rules. 

Prospect Updater to the rescue

With Prospect Updater, we moved the criteria from our junk catcher dynamic lists over to  Google Sheets and created two new Pardot fields for the updater to use; “Spam Status” and “Spam Rules Matched.” Prospect Updater then compares all prospects in Pardot to the rules in the Google Sheet and updates their “Spam Status” field with one of the following values:

  • Suspected Spam: Prospect Updater has determined this prospect matches one of the spam rules.
  • Confirmed Spam: The Prospect has been reviewed and deemed to be spam
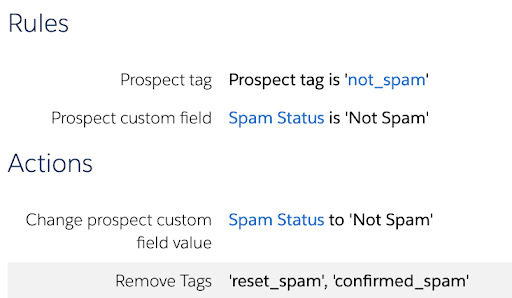
  • Not Spam: The Prospect matches one or more of the spam rules but has been reviewed and is deemed not to be spam. The Prospect will be excluded from future Prospect Updater spam reviews. 
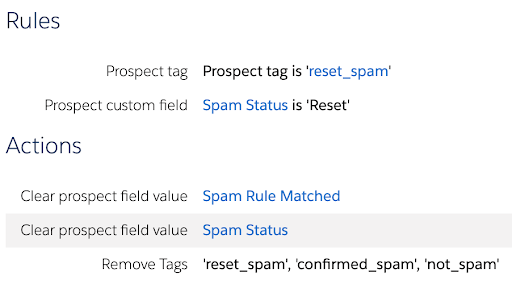
  • Reset: The Prospect’s junk data has been corrected. Prospect Updater will include this Prospect in future spam reviews. 

The “Spam Rule Matched” field is also stamped with which spam criteria the Prospect matched. 

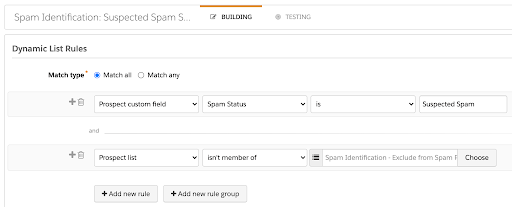
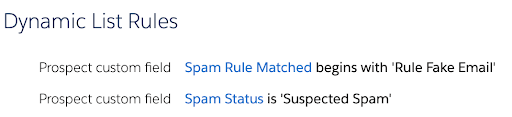
Once the Prospect Updater Spam Identification process was up and running, I created new dynamic lists that collected Prospects marked as “Suspected Spam” and grouped them by the field that was spammy. This allows me to easily review and clean up these prospects on a regular basis. 

Spam Identification Process with Prospect Updater

Automate all the things

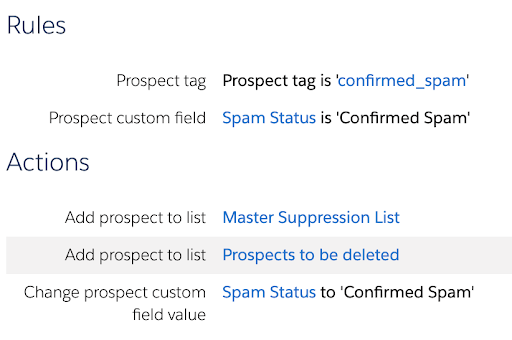
To make the spam review process even easier, I put automation rules in place that would allow me to update prospects by tagging them or changing their “Spam Status” value. That way, I could use whichever update method was easiest at the moment. 

For instance: 

  • If a Prospect is indeed spam
Spam Identification Process with Prospect Updater
Prospect Updater can even automatically delete Prospects matching “Spam Status = Confirmed Spam”
  • If a Prospect will always match spam but is not actually spam (i.e. Pamela Smith with email SPam[email protected])
Spam Identification Process with Prospect Updater - not spam
  • If a Prospect has been edited to no longer match spam rules
Spam Identification Process with Prospect Updater  - reset spam

Having the “Spam Status” fields also allows me to create a suppression or “holding” dynamic list where new prospects will not be emailed until their “Spam Status” field is updated.

Spam Identification Process with Prospect Updater - dynamic list rules

This process now runs like a well-oiled machine. It allows us to easily identify and kick out junk data and prevent said data from causing any damage in the short time it exists in Pardot. 

Implementing the Prospect Updater Spam Identification Process

Set up and implementation of Prospect Updater is pretty painless. The first thing we need to do is set up a connected app: 

The team will give you all the details and support you need to get this set up properly.

While the cogs are starting to move on that process, you can schedule a meeting with the Sercante Labs team to talk through your spam use case and any other challenges you might have for Prospect Updater. It can do a lot, and your wish is its command. The Sercante Labs team will then go back and do what developers do, and push buttons and stuff. 

Once your Prospect Updater configuration is complete, the only thing left is a final training session to make sure you and your team are equipped to create, modify and maintain your new Super Spam Spotting System plus any other cool things you want to do with it (data clean up and normalization, maybe?). 

Interested? Give the Labs team a shout through the form on the bottom of the Prospect Updater for Pardot page.

Thanks to Mike Fazio & Adam Erstelle for contributing to this solution.

Dynamic Content is the built-in way to use Pardot to personalize marketing assets like emails. You can improve your email marketing performance, including click-through rates (CTRs), by providing the right content based on known (or unknown) prospect information. 

However, throughout the process, many Pardot users run into limitations of Pardot Dynamic Content. They wonder how they can actually achieve personalization within their Pardot emails and newsletters.

This post will walk you through solutions to overcome common challenges with Pardot Dynamic Content. You’ll also get strategies to expand your personalization options far beyond what it can achieve. 

If you’d like to dive deeper into these strategies, you can catch a session on the topic at ParDreamin’ this year.

Overcoming Limitations of Pardot Dynamic Content

Limitation #1: Only one field criteria

One of the primary limitations of Pardot Dynamic Content is that the criteria can only be based on one field. This can make users feel frustrated when they need to use more complex criteria or multiple fields to determine which piece of content an audience member sees. 

One way around this is to use an automation rule (that embodies multiple criteria) and have it change one field you can then use for dynamic content. 

For example, you might want to send different content to these three audiences:

  • East Coast people who aren’t registered for your webinar (send an invite to your East Coast presentation)
  • West Coast people who aren’t registered for your webinar (send an invite to your West Coast presentation)
  • People who are registered for you webinar (send an eBook)

Because these audiences use multiple criteria (location and registration status in this example), you aren’t able to achieve the goal with dynamic content without some finesse. 

To achieve this, you would need to create a new field. Then you could use an automation rule so that everyone who is on the East Coast and is registered has that prospect field filled with a value that reflects “East Coast + Registered” and then do the same with your other variations.

At the end, you would have one prospect field that takes into account multiple criteria to base dynamic content on. 

Limitation #2: No “is empty” criteria option exists

Another limitation Pardot users run up against with Dynamic Content is the fact that there is no “is empty” option when creating criteria. 

The standard criteria include:

  • Is
  • Is between
  • Is greater than
  • “Contains” (for dropdowns)

Luckily this one is fairly easy to solve. If you go into the Admin section for that specific Dropdown field, you can make sure the blank value is also selected. This will allow you to use “blank” as a criteria option.

Keep in mind that this only works for dropdown field types, so it does not work for all prospect fields. 

Limitation #3: 25 Variation limit 

This limitation is not the most common one for users to come up against, especially when they first start using dynamic content. However, you might see this if you are regularly creating new options for one dropdown field that you then use as a base for your dynamic content.

You can only have 25 variations per dynamic content piece. 

You can work around this a bit by combining Handlebars Merge Language (HML) with your dynamic content. We will discuss HML as another tool for personalization later in the blog post, but it is an option (even if it comes with its own challenges.) 

Other challenges with Pardot Dynamic Content

However, despite the tricks and tips to get around some of these common limitations, many users still feel that true personalization cannot actually be realized.

Even when criteria options are sufficient, Pardot Dynamic Content has other challenges, such as:

It’s time intensive. 

It takes a while to properly strategize and then set up the custom fields and automations you need to make dynamic content a success. Even once the framework exists, you’ll still need to take the time to reformat your dynamic content modules for each email. 

Once you’ve practiced editing these modules, it probably won’t take as long as it would have to create an entirely separate email, but it is still something to be mindful of.

It’s also prone to errors. 

Dynamic content can be difficult to test, especially if you have a lot of variations. Because it is harder to test, spotting errors can be tricky. 

You also have to keep diligent track of what Pardot Dynamic Content module is the correct one because you insert it with its numeric code — not as an actual block of content. 

Overall, many of the clients I’ve worked with have found Pardot Dynamic Content limiting from the start or they have outgrown it over time. But there are other ways to achieve personalization that are less time intensive, more user-friendly, and more automated. This includes Handlebars Merge Language, Pardot Snippets, and integrations with other software. 

Handlebars Merge Language (HML)

HML was originally the Salesforce version of variable tags. But in 2019, it was brought to Pardot as well. HML allows you to use conditional logic statements in emails and email templates to change what a user sees in an email based on fields. 

HML uses

The benefits to using HML over Pardot Dynamic Content are that you can write the condition you need directly in the email itself. Then you don’t have to recall which specific module you need. It is simply based on your field information, and you can change details within a block of content instead of creating a new block of content for each category.

HML language requires you to code everything, but this does open up design and style options in addition to changing text. With HML, you aren’t limited to what you can paste into Pardot’s Dynamic Content boxes.

The limitations to using HML are:

Technical coding and setup required

Email templates that use HML conditional statements need careful coding of the IF statements. Unlike Pardot Dynamic Content, there is not a simple way to insert conditionals. Everything must be written in HTML and HML code. If you aren’t experienced with writing code in these languages, then you may need outside help. 

Prone to errors

It can be easy to accidentally break the IF conditions or underlying code if you are updating content directly in the Pardot email builder. And as is true with Pardot Dynamic Content, conditional emails are difficult to test before release.

Limited logic

HML logic is not as robust as Pardot Dynamic Content. You can only use “field = true” logic. Most use cases will require the creation of new custom fields and workflows that map preferences to custom fields which you can use in the HML email. However, that is also true of complex Pardot Dynamic Content criteria. 

Pardot Snippets 

Pardot Snippets are static and reusable blocks of text, dates, or links you can use in emails, forms, and landing pages. You will need access to Salesforce (and/or Pardot Lightning) to create them. They are especially useful for helping marketers keep track of information they would normally copy/paste across multiple Pardot assets. Pardot Snippets are most helpful when it comes to updating event information or footers across your various assets. 

There are a few limitations to Pardot Snippets, such as:

They don’t support HTML/CSS

This means you can’t use Pardot Snippets to stylize your email. You can only use them as blocks of text. While this certainly has a time and place, I haven’t seen my consulting clients use this method to achieve advanced personalization. 
Criteria is very limited

The Pardot Snippet criteria is very limited. It is only based on Business Unit or Campaign Ownership. If you need any other logic (which you likely will if you really want to personalize your prospect’s email and newsletter content), then you’ll have to use a different method. 

Emailing personalized content still takes time in 2021

No matter which of the Pardot-native personalization methods you choose, you still have to manually copy and paste content into the Pardot builder or Dynamic Content blocks. This pain point is the biggest reason companies shy away from personalizing these days.

If you’ve made it through this post and still want to pursue personalized Pardot emails, then I highly recommend looking for a Pardot add-on that can help you automate the email creation process using RSS or a curation process. Pardot automation add-ons can reduce errors, save you time, and make personalization a more realistic possibility.

You can learn more about personalization that goes beyond Pardot Dynamic Content at ParDreamin’ 2021. We’ll present a session to teach you how to overcome the limitations of dynamic content using powerful Pardot integrations.

View ParDreamin’ session description for Beyond Dynamic Content: How to Create REAL Content Personalization in Pardot

If you’re like me, then you often work with marketing tools that do not integrate nicely with Pardot forms.

Maybe they claim to have a ‘direct’ integration with the tool. However, we all know it’s nothing more than a Salesforce integration. #annoying 

Don’t give up! There is a way around this common frustration. Enter Zapier webhooks, which you can use to bring data into Pardot.

This handy little-known feature is the solution to all your Pardot integration problems! Dramatic maybe. But it’s still a game changer. 

How to use Zapier webhooks with Pardot

Zapier is a tool you can use to send data into Pardot from third-party apps and platforms. With Zapier webhooks, you can capture data from nearly any place and push it to Pardot as a form handler submission.
You read that correctly — a form handler submission. 
Prerequisites for using Zapier webhooks with Pardot

You’ll need to do the following before we get into the setup: 

  1. Create a Zapier account. (they have a free account that allows for 100 zaps a month)
  1. Set up a Pardot form handler.

    Here are two rules to follow when you configure your form handler:
  • ONLY have email as ‘required.’ You can add other fields. But do not mark them with ‘required.’

  • Set the form in kiosk mode.
    Pardot FH - kiosk mode
  1. Identify how you’ll bring data into Zapier.

    This can look like using one of Zapier’s native integrations or using a Zapier webhook to get data. Whichever method you use, the most important thing to do is to get the data triggering the Zap. 

Use cases for Zapier with Pardot

Here are common examples of ways to use Zapier with Pardot to bring data into the platform via a form submission.
LinkedIn Lead Generation

In this example, a company is using LinkedIn Lead Generation forms to capture new leads.
There is no direct way to tie LinkedIn submissions to Pardot. So, the company sets up a zap to trigger when a new response is received. Their zap is configured to push the data to Pardot via a form handler post.
LinkedIn Form Response Zapier

Google Form Submission

For this example, our company is using Google Forms to send out a survey to their customers.

The survey itself has data they don’t want within Pardot. So, they chose to send it using Google Forms.

Still, the company wants to see the name and email address of everyone who completes the survey within Pardot.

They can trigger a new workflow (zap) using Zapier when a survey submission comes in. That’s because Zapier integrates directly with Google. Their zap is configured to push the data to Pardot via a form handler.

Drift Lead

In this case, a company captures a new lead via a drift chat. They leverage Zapier’s ability to receive those leads to route the data to Pardot via a form handler. 

Setting Up a Zap with a Pardot Form Handler

Follow these steps to set up a Zapier ‘zap’ to bring data into Pardot as a form handler submission.

Step 1

Create a new zap and select the Google Sheets integration (the app selection will change based on where your data comes from).  

The trigger is ‘New Spreadsheet Row,’ and then select the correct sheet from your drive.

Zapier for Pardot Forms - New Spreadsheet Row Google Sheets

Pro Tip: Test the data capture to ensure it’s working. This will only work if there is data in the app triggering your zap. 

In our example, I submitted example data to the form, and Zapier successfully pulled it in as a test.

Zapier for Pardot Forms - Zap Trigger - Test

Step 2

Now move to select the Webhook as the Action step. Select the POST option on the setup page.

Zapier for Pardot Forms - Zapier Action - Post 1

Step 3

Paste your HTTPS encoded Form Handler url into the URL box.

Zapier for Pardot Forms - Zapier Action - Post 2

Step 4

If we were to activate it now, the zap would trigger and post to the Form Handler URL. But, no data would pass through. 

We need to set up the data pass.

We’ll take this step by step below:

  1. Add a ? to the end of your URL
    Pardot forms Zapier Action - Post 3
  2. For each field you want to pass to Pardot:
    • Right after the question mark, add the external field name.
      Zapier for Pardot Forms - Pardot FH - Fields
    • Immediately after the external field name, add an equal sign.
      Zapier Action - Equal Sign
    • Immediately after the equal sign, add in the data source. This can be done via the dropdown in the URL field.

      Scroll until you find the field that contains the data you want to pass. Then, click on it.
      Zapier Action - Select Data
    • Your URL will now look like this. The underlined portion is the part that you’ve added to send over a single field.
      Zapier Action - Final URL
    • If you want to add another field, then add a “&” to the end of your URL and then repeat steps I – V for each field.
      Zapier Add Another Field

Step 5

Test your action and make sure the submission comes through in Pardot. The final URL will contain all the fields you’d like to pass. On the testing screen, you’ll see what the final URL will look like with your test data.

Click test. Then, ensure you captured the data in Pardot.

Zapier Action - Testing

Now, turn on your Zap, and watch the leads flow into Pardot! 

Go forth and let the data flow into Pardot

Now you know how to bring in data from third party tools into a Pardot form handler. 

This unlocks the ability to score, grade, assign, add to Salesforce campaigns and more! The sky’s the limit with how you can use this setup. 

Happy building!

Learn more about Pardot forms

No more posts to show