Components are a hidden gem in the CRM Analytics (formerly Tableau) toolbox. You can re-use them in any dashboard and then centrally make changes that affect any dashboard where the Component is placed. But before the Salesforce Summer ‘23 release, they had to be identical on every dashboard!
If you wanted revenue by State on one dashboard and revenue by Country on another Dashboard, you needed two different components.
Not anymore! Here we provide a step-by-step guide (with pictures) to get you feeling confident and excited about using (and re-using) these amazing widgets. Thanks to the Salesforce Summer ‘23 release, you can now use parameters to make component widgets dynamic.
How to Make Component Widgets Dynamic in CRM Analytics
Ready to get started? Here are the steps to making your CRM Analytics component widgets display dynamically using parameters.
Step 1: Create a Component
There are a few ways to do this. I’ll outline the method that flows best with dashboard creation. But like many Salesforce tasks, there is more than one way.
From a dashboard, drag the component widget to your dashboard.
From the dialog box, select Create New Component.
Add a widget to your new component.
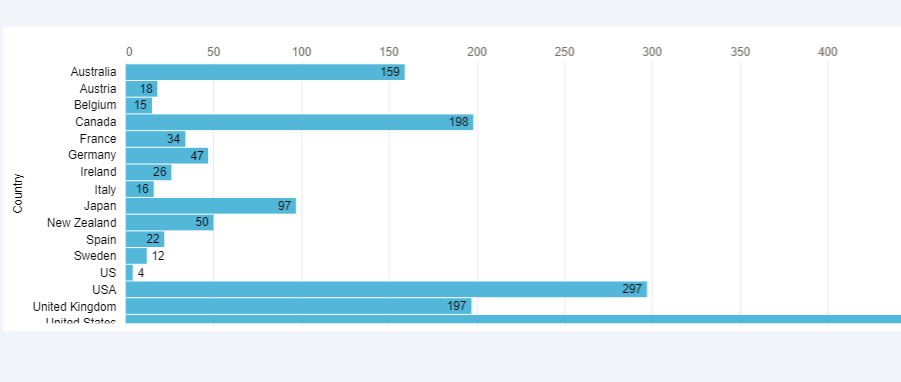
In our example, we are using the Account Engagement (Pardot) Prospects and grouping by country.
Save your component
2. Add a Parameter to your component
Click on the Component Widget and choose the advanced editor from the widget menu.
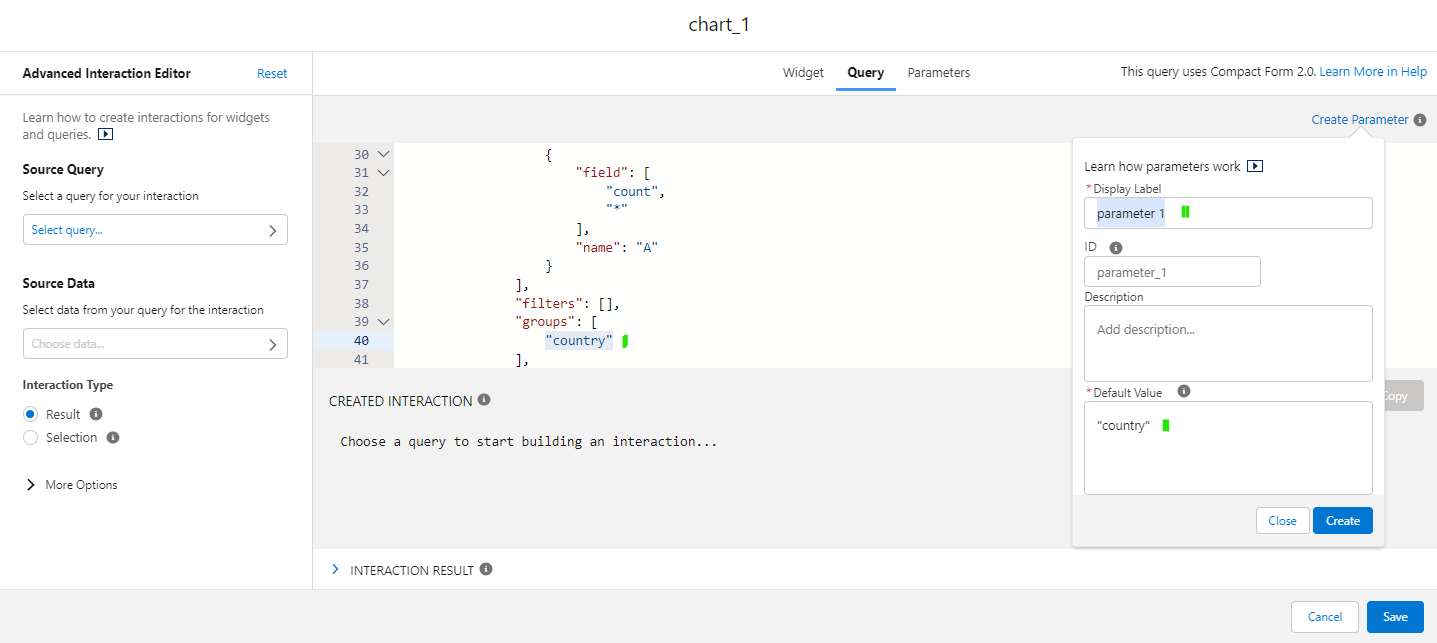
2. On the Query Tab, find the value you want to parameterize. In our case it’s “Country.”
Click on the pages icon (next to ID to copy the parameter to your clipboard)
Click Create (or update if altering an existing parameter). Note: The value MUST be in the correct case (NOT Country)
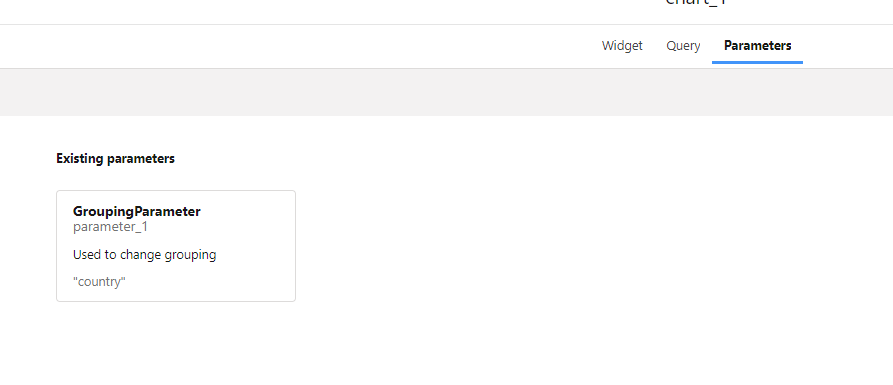
Click on the Parameters tab to see what you just created.
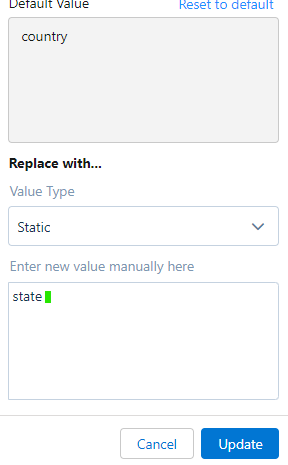
Next, change the query to use the parameter. Go to the query tab and replace the group and name with your new filter. Where you see city, replace as shown below for the group and name
Need help digging into this super helpful feature? Or wondering how this can fit into your overall marketing reporting strategy? Reach out to the team at Sercante to start a conversation.
The Salesforce Summer ’23 release includes many changes to the platform, like the ones we’re seeing with Account Engagement that include the ability to copy marketing assets between business units. However, the thing we’re going to talk about in this blog post are two new features that (hopefully) help you simplify user access management for the Salesforce platform.
First, we’re going to quickly go over the new User Access Policies (Beta) feature and then we’ll talk about setting field-level security in permission sets.
Salesforce User Access Policies (Beta)
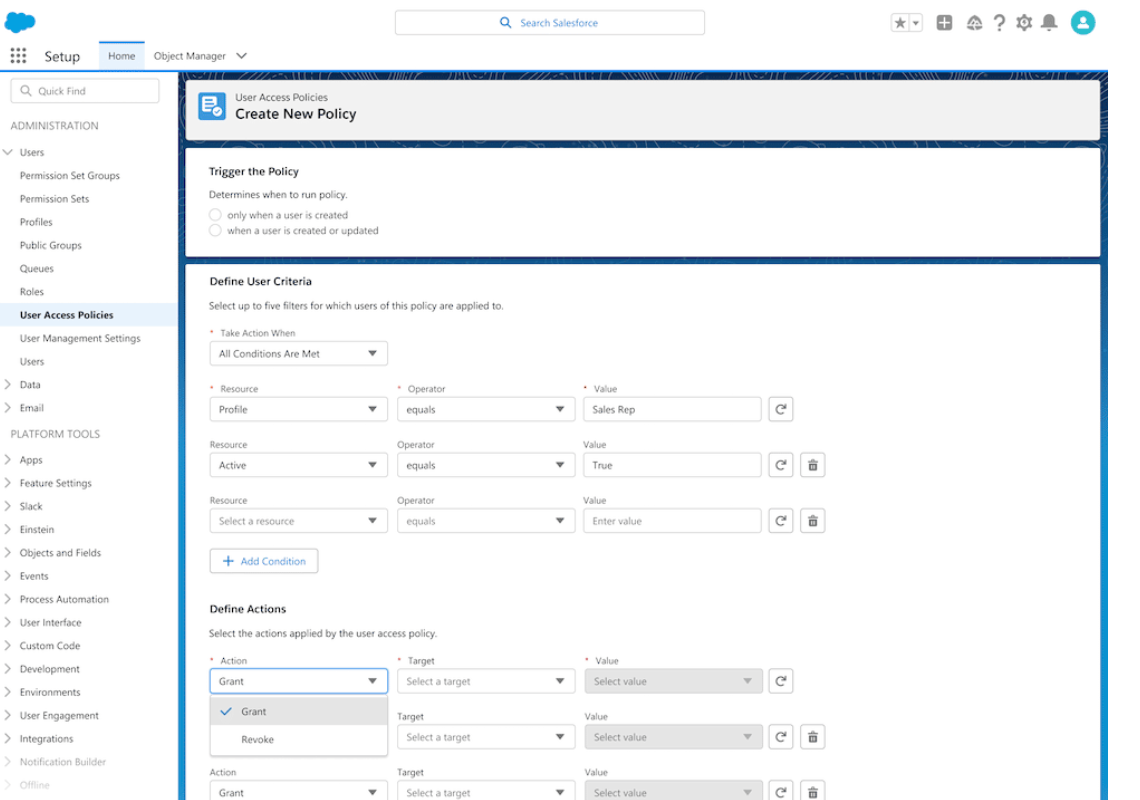
User access policies are a new feature that allows you to control user access based on criteria such as user roles profile, or other user fields. For example, we can give users different access to the same data, depending on their role in the organization or their department.
Users can be assigned to permission set licenses, permission sets, permission set groups, package licenses, queues, and groups using user access policies.
User Access Policies are broken down into two types, Manual User Access Policies and Active User Access Policies.
Manual User Policies
Manual User Access Policies are one-time processes to grant or revoke bulk access for designated users. What this means is that you can identify users by using filters and modify, add, or remove access that you define in the policy itself.
Example: You’re migrating permissions for a group of users from profiles to permission sets. You would create filters to identify the users assigned to the profile, then create actions in the user policy to assign permission sets and permission set groups.
Active User Policies
Active User Access Policies automatically grant or revoke user access. An active user access policy runs in the background and is triggered by an event like a created or updated user record.
Example: You can have an active policy set to assign a series of permission sets permission set licenses and groups to a user when they are created and have the Sales Manager role, or grant/revoke assignments to an existing user who’s been updated with this role.
Sounds like a flow if you ask me…
Ok, that’s cool Jason. So how do I get to it?
Go to Setup > Quick Find “User Management Settings” then enable User Access Policies (Beta).
Then, Quick Find “User Access Policies” to create or manage user access policies.
Considerations before enabling User Access Policies
A couple of things to be aware of before you go and enable this setting in your org:
Each org is limited to 20 access policies in total.
This feature is in Beta and is subject to change without notice. Be sure to watch future Salesforce releases to find out when this will be made Generally Available (GA).
Set Field-Level Security for a Field on Permission Sets Instead of Profiles (Generally Available)
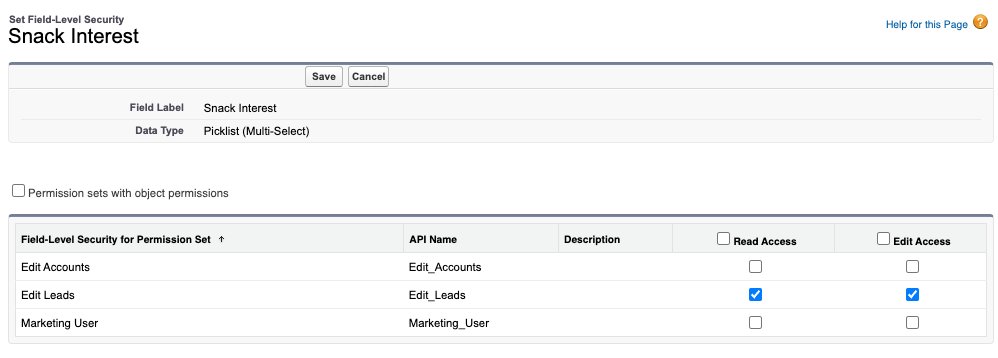
In the past, field-level security could only be set on profiles which, even with the Enhanced Profile User interface, could be extremely tedious. However, in the Summer ’23 release, you can now set field-level security on permission sets when creating a new custom field.
What does this mean?
When creating a field you would normally have a step that would have you pick which profiles have access to view or edit..
Now, once the Set Field Level Security for a Field on Permission Sets feature is enabled, this step (Profiles step) is replaced with something that looks like this screenshot:
Go to Setup>Users>User Management Settings, then Enable Field Level Security for Permission Sets During Field Creation.
Considerations for the Set Field Level Security for a Field on Permission Sets feature
Things to keep in mind when enabling Field Level Security for Permission Sets During Field Creation:
Enabling this setting will remove the profile list from view when setting or changing field level security at the profile level.
When you set or change field-level security for a field on permission sets, you can view by permission sets with object permissions, or by all permission sets.
Streamlining Salesforce user management today and beyond
Cool stuff, but how is this going to affect me now and in the future?
These changes are all part of Salesforce’s master plan to streamline User Management to make it less tedious, less challenging, and less time-consuming so we can spend more time taking the dog for a walk or enjoying the awesome Pacific Northwest Summers.
Eventually, we will see Salesforce sunset Profiles and move solely to controlling record access via permission sets as outlined in this Salesforce Admins Article.
If you would like to know more about the future of User Management I encourage you to check out this awesome blog by Cheryl Feldman and the Awesome Admin team over at Salesforce. And reach out to Sercante when you’re ready to talk about how these changes fit in with your overall marketing and technology operations strategy.
It’s here! It’s finally here! It’s the Account Engagement Business Unit Bulk Asset Copy Flow.
Marketing Cloud Account Engagement (f.k.a. Pardot) Business Units have become my niche over the past few years. I love setting them up and standardizing them, but I don’t love copying over assets when configuring a new Business Unit(BU).
Note: This blog post was updated on November 2, 2023, to include the three new Assets types that were recently added to the flow!
Access the Account Engagement Business Unit Bulk Asset Copy Flow
During the Summer ‘23 release, your org should have received a new flow called “Account Engagement Bulk Asset Copy Flow.”
To find this Flow:
In Salesforce, navigate to Setup > Flow
Select the Account Engagement Bulk Asset Copy Flow
From the Flow Builder, select Run
Set up the Flow
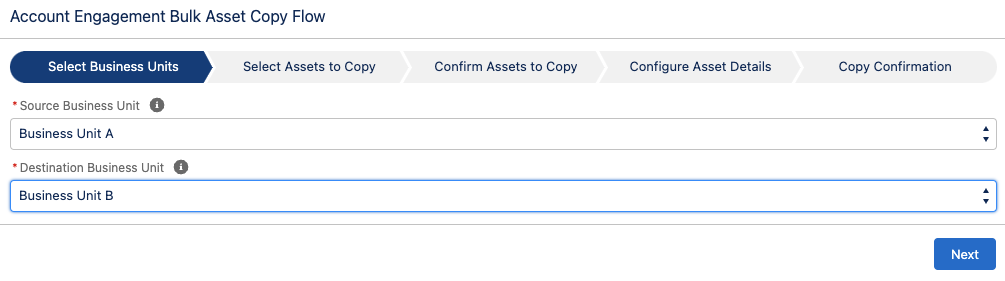
The flow itself is pretty straightforward. It will walk you through selecting your assets and setting the new asset details.
Select your Source and Destination Business Units, select Next
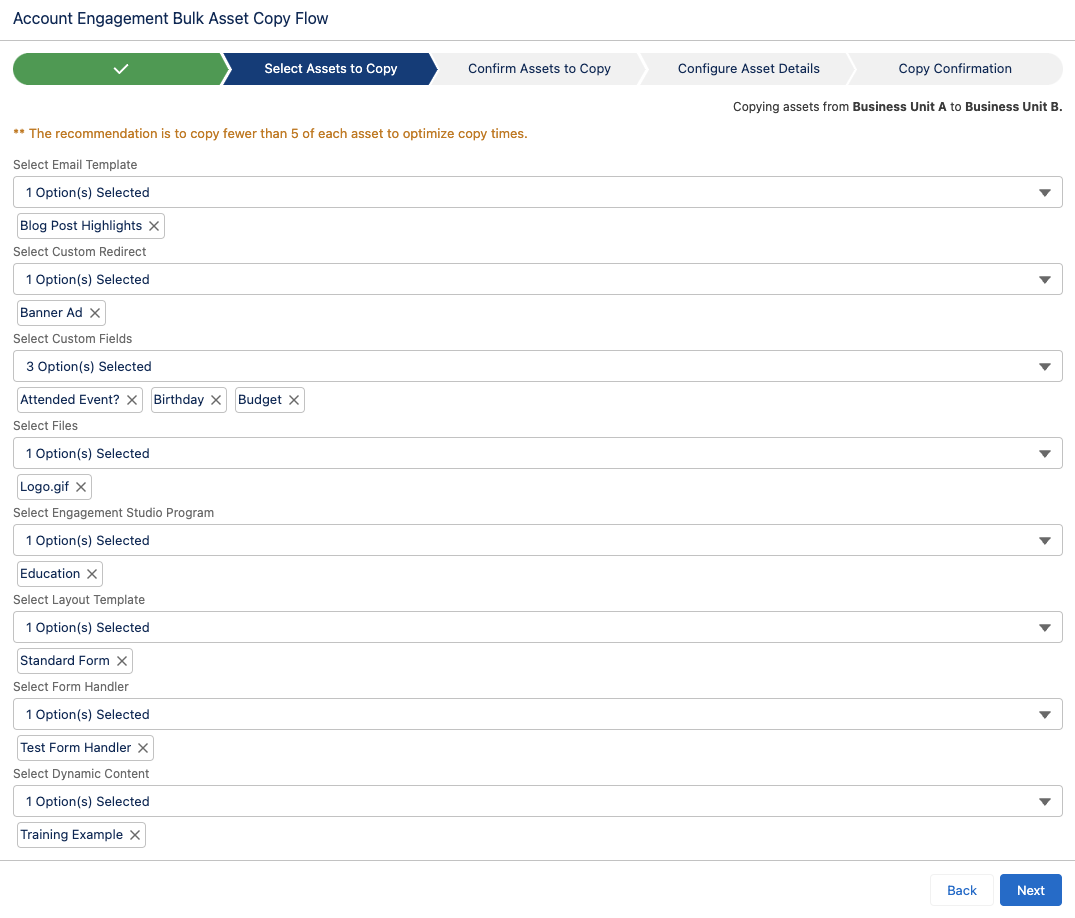
Select the assets to copy, select Next
Note: Keep in mind, all assets selected here will be copied to the same Folder, will be assigned the same Campaign, and use the same tracker domain. You may want to run the Flow multiple times if your new assets need to have different settings.
Confirm the Assets, select Next
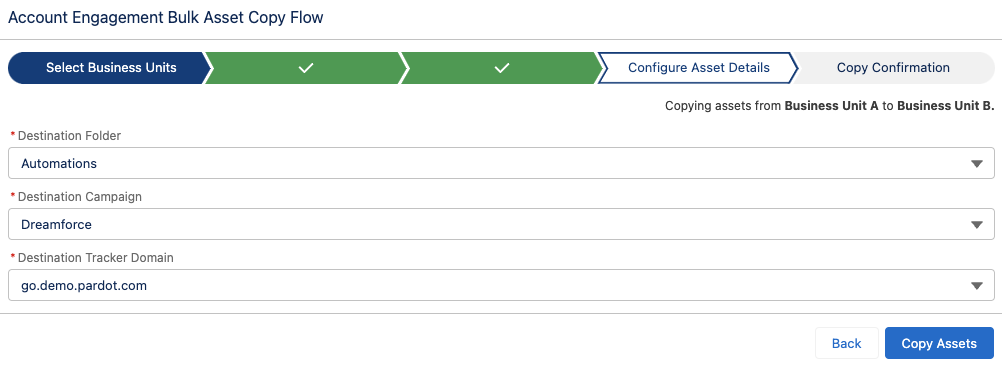
Select your Folder, Campaign, and Tracker Domain for your new assets
Select Copy Assets
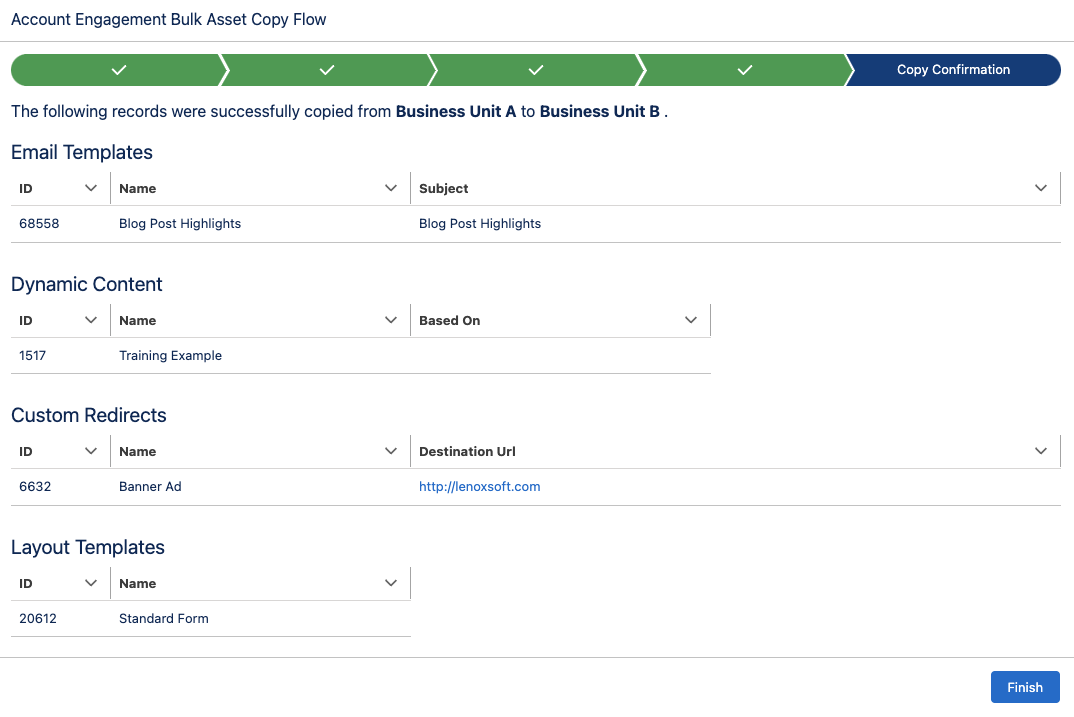
Bulk Asset Copy Confirmation Screen
If your action was successful, you will see the list of assets created on the Confirmation screen.
You don’t get an error message if your action was unsuccessful, but your confirmation screen won’t have any/all assets listed.
Considerations for Using Business Unit the Bulk Asset Copy Flow
Since this is a brand new capability for Account Engagement, there are some details and settings that do not come over when copied. I thoroughly tested each asset type and below are the considerations that I found.
Custom Fields
When you copy custom fields from one Business Unit to another, only the following information comes over
Field Name
Field API Name
Field Type
The field’s mapping to Salesforce, Salesforce sync behavior, predetermined values (for dropdowns, radio buttons, etc.), and optional settings will not be configured.
Email Templates
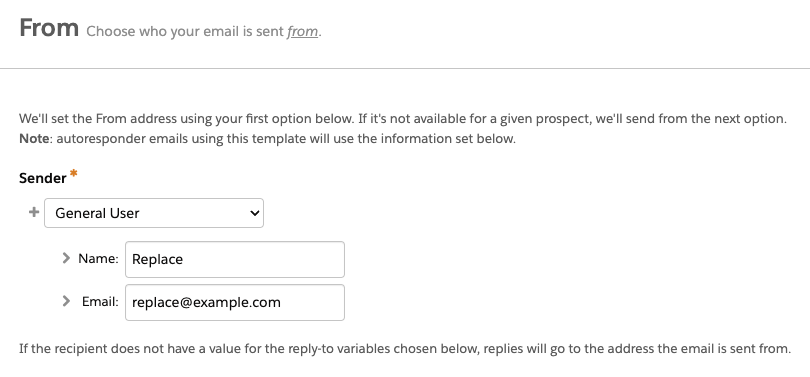
When copied, the email sender will be replaced by a General User with the email [email protected]. This applies even if you have a sender hierarchy specified using “Assigned User” and ‘Account Owner.”
Email Templates containing Dynamic Content will not copy over. This is because dynamic content is unique to the Business Unit. Even if you have the same Dynamic Content in each Business Unit, they will have a different asset ID and merge tag.
Watch for email template nuances between BUs. If you copy an email template from Business Unit A to Business Unit B, make changes to Business Unit A’s template, then copy the template from Business Unit A to Business Unit B again, the flow will not update the existing template in Business Unit B. Instead it will create a brand new email template with the updated changes.
Files
During my testing, I was only able to get image files to copy over view the flow. I tested .pdf, .ics, and .css files with and without Completion actions and was unable to get anything but images to successfully copy.
Engagement Studio Programs
When you copy an Engagement Studio Program (ESP) to a new Business Unit, only the ESP structure is copied. The Recipient List, Suppression lists, Send days/times, and “Allow prospects to enter more than once” settings do not come over and will need to be reconfigured in the new Business Unit.
The assets specified in a Trigger or Action node, such as email templates, landing pages, and forms, will need to be reselected in the new ESP. However, the number of wait days specified in the node will copy over.
If an Action node looks at a Prospect field (i.e. Prospect default field “Job Title” is not blank) and that field is in both business units, then the node will be copied to the new ESP with the field and value/settings specified. If the field does not exist in both business units, then the Action node will still be in the ESP but the field and value/settings will need to be reconfigured.
Custom Redirects
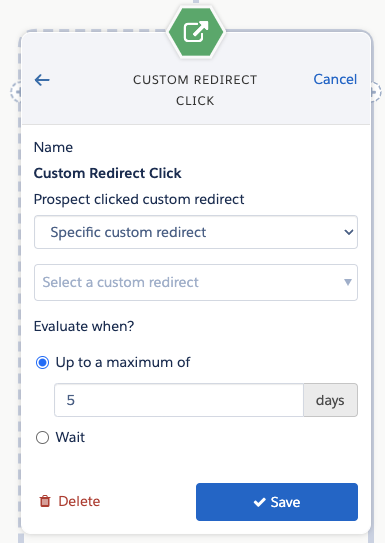
When a Custom Redirect is copied from one Business Unit to another, the redirect’s Completion Actions will not copy over, however, the Google Analytics Parameter values do.
Layout Templates
If you use Dynamic Content within your Layout Templates, keep in mind that the Dynamic Content will not come over when the Layout Template is copied. You can copy the Dynamic Content over as a separate asset, but you will still need to edit the Layout Template in your destination Business Unit to make sure it has the correct Dynamic Content ID.
Form Handlers
If your Form Handler only uses Default Prospect Fields, then all of the fields will come over when the Form Handler is copied. However, if your Form Handler uses any Custom Prospect Fields, only the “Email” field will be present in the Form Handler Copy. In my testing, this was true even if the Custom Prospect Field was in both Business Units. When copied, the Success Location and Error Location details will copy over to the new asset. Completion Actions do not copy over.
Dynamic Content
If the Dynamic Content depends on a Custom Prospect Field that is not already in the destination Business Unit, the copy will fail. To copy over Dynamic Content that depends on a new custom field:
Run the Bulk Asset Copy Flow to first bring over the Custom Field
Once finished, run the flow again to bring over the Dynamic Content
If you try to create both the Custom Field and the Dynamic Content in the same run, it will fail.
Now it’s even easier to work with Account Engagement Business Units
This new Flow is a huge step toward making Business Units easier to set up and manage. My hope is that the capabilities of this Flow will continue to grow until we can make a near-identical copy of an entire Business Unit.
What other capabilities would you like to see in this Flow? Let us know in the comments!
Hey there! So, I wanted to chat with you about something that can be a bit tricky but super important in the world of marketing: capturing UTM parameters.
You know those little bits of code you see at the end of URLs? They help marketers track where their website traffic is coming from and measure the success of their campaigns.
Well, capturing and using UTM parameters can sometimes be a real challenge — especially when you’re dealing with UTM capture on Marketing Cloud Account Engagement (Pardot) landing pages.
But don’t worry. we’ve got your back!
In this post, we’ll cover four ways to use UTMs for capturing the first and last touchpoints on Account Engagement landing pages. If you’re also looking for information on capturing UTM parameters in Salesforce, then check out this post.
4 methods for capturing UTM parameters on landing pages
Let’s dive into four different ways you can script your way to capturing first and last touch UTM parameters on Account Engagement landing pages. This solution works even if the form fields don’t match the UTM exactly or if you need to use cookies.
Trust me, it’s not as complicated as it sounds!
1. Map the URL to hidden form fields
Option 1 is all about handling those pesky form field variations. Imagine the form fields on your Pardot landing page don’t exactly match the UTM parameters. No worries!
With some JavaScript magic, you can extract the UTM values from the URL and map them to the right hidden form fields. It’s like connecting the dots, making sure you capture those first and last touch UTM parameters accurately.
See example and steps to setting this up in the video below.
2. Store UTM values in a session cookie
Now, let’s talk about Option 2. Sometimes you need session-based tracking, and that’s where scripting with session cookies comes in.
Using JavaScript, you can grab the UTM values from the URL and store them in a session cookie.
This cookie will keep the UTM data available as the user navigates through different Pardot landing pages. You can then map these UTM values to hidden form fields, ensuring you capture the first and last touch UTM parameters consistently during the session.
See example and steps to setting this up in the video below.
3. Pass UTM parameters to forms embedded in iFrames
Option 3 is for web landing pages that have an Account Engagement (Pardot) iFrame. Here, you can use scripting to set a cookie value that passes the UTM parameter to the iFrame.
JavaScript to the rescue again — it helps you extract the UTM values from the URL and store them in a cookie. The Pardot iFrame can then grab the cookie value and fill in the hidden form fields.
Voilà! You’ve captured the first and last touch UTM parameters and can use them in Pardot form submissions.
See example and steps to setting this up in the video below.
4. Capture UTM parameters across multiple website visits
Last but not least, Option 4 involves persistent cookies and hidden form fields. If you want to capture UTM parameters across multiple sessions or visits, this is the way to go. With some clever scripting using JavaScript, you can store the UTM values in a persistent cookie.
So, even if your visitors come back later, the cookie remembers the UTM data. When they submit a form, the hidden form fields get populated with the UTM values, ensuring you capture the first and last touch UTM parameters consistently.
Get instructions for this method in this blog post.
Go forth and track all the things through UTM capture
So, my friend, there you have it! These four scripting paths will help you capture first and last touch UTM parameters on Account Engagement landing pages like a pro. Whether you’re dealing with form field variations, session-based tracking, iframes, or multiple visits, these options have got you covered. You’ll be able to gather accurate UTM data for analyzing your campaigns and making data-driven marketing decisions within Pardot.
Now go ahead and rock those UTM captures with confidence! Not sure what to do with the information you’re tracking? Reach out to the team at Sercante for help building a marketing campaign strategy that gets results.
Marketing Cloud Account Engagement (Pardot) offers the opportunity for marketers to give their sales team the information they’ll want, notifications worth paying attention to, and truly actionable insights about their prospects.
But it’s not always easy to get people excited about new software — especially when it involves learning a new process or procedure.
When I became an accidental admin of Account Engagement in 2015, it took me a while to dig into the underutilized features that make it a great platform. But once I did, I learned how to provide sales with useful, actionable data.
In this post, I’ll share the big things that have helped to get sales teams excited about Account Engagement so they can be more productive with marketing leads.
Show all that Account Engagement goodness in Salesforce — where your sales folks can see it
Your sales and leadership teams are probably not using Account Engagement. But that’s where the marketing team is getting work done, like sending email campaigns, building engagement studio journeys, and reviewing prospect engagement.
However, since Account Engagement is baked into the entire Salesforce ecosystem, there are a lot of ways to bridge the gap between the two systems and offer visibility into everything Account Engagement is doing.
Add Engagement History to Contact Page Layout
If I had a dime for every client I met who didn’t have Engagement History added to their Contact page layout, I would have at least enough money for a mocha latte at Starbucks. But I cannot imagine a scenario where you wouldn’t want this information in Salesforce for everyone to see.
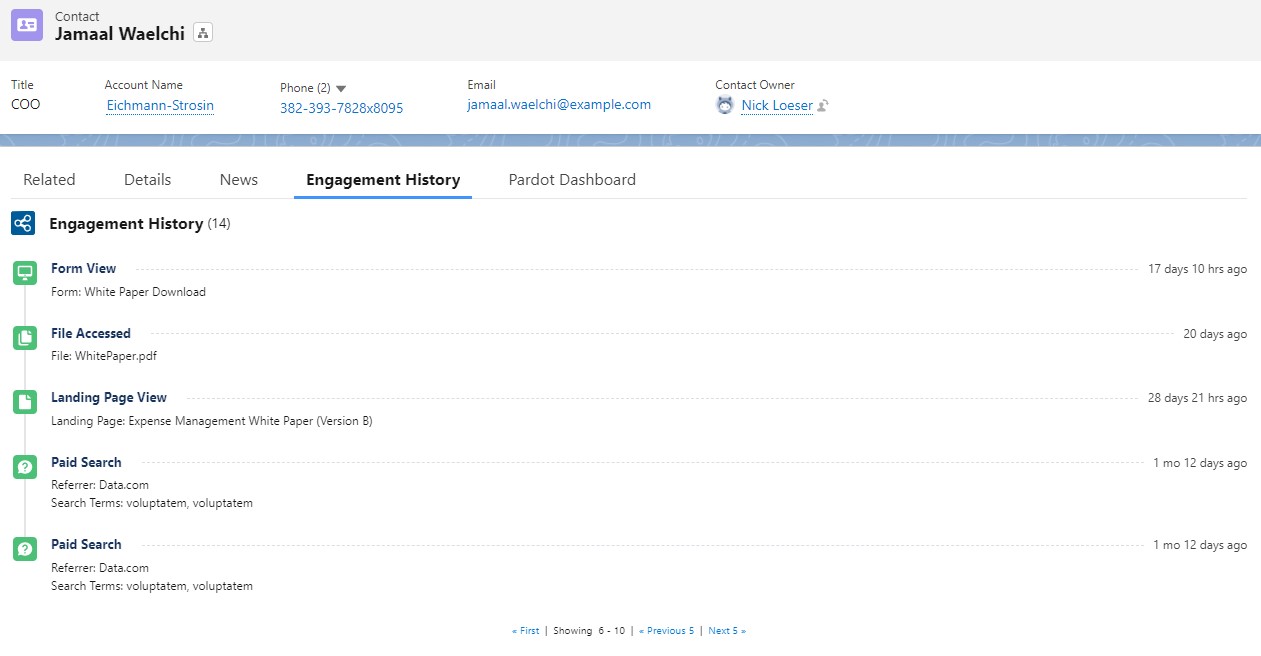
Adding the Engagement History component to your Lightning record page is super-simple and will provide a log of all activities your trackable prospects are doing. For example, the component shows emails they are opening or clicking, landing pages they’re visiting, PDFs they’ve downloaded from your site and all the pages on your domain they have visited.
Your Salesforce administrator can easily edit the Contact record page in Lightning Builder and drag the Engagement History component onto the page.
The sales team is going to love this intelligence because it offers them insights into their prospects that they wouldn’t normally have. Furthermore, they’ll know simply by reviewing the history whether or not their prospects are opening marketing emails and what their level of engagement is.
A couple of caveats
Only prospects that are cookied will show engagement history. They must be a prospect that has clicked on an email or previously filled out a Pardot form to be cookied and trackable.
Oftentimes emails may show opened or even clicked multiple times. Spam protection software can send a message pack to the sender (Pardot) that an email has been opened or clicked, even if it hasn’t been, which can be confusing.
Bonus Tip!
I love Page Actions, which allow you to designate specific pages on your website that trigger an automated action when a cookied prospect visits that page (for example, Add prospect to a list if they visit this particular product page).
In addition, there is a checkbox on the Page Action that indicates it’s a Priority Page. By checking this box when setting up a Page Action your page will actually show up in the prospect’s Engagement History with the specific page they visited. So, for example, if you created a Page Action for your pricing page and marked it as a Priority Page, when a prospect visited that page it would be very easy for your sales folks to see that on the prospect’s history.
Don’t forget to connect your campaigns
With the introduction of connected campaigns a few years ago, Account Engagement now syncs relevant email engagement data directly into Salesforce.
There’s no need for leadership or other stakeholders to ask the marketing team how an email campaign or landing page is doing — that data is available right in Salesforce.
Similar to the Engagement History component, this needs to be added to the campaign Lightning record page.
A couple of caveats
Users will need the Marketing permission checkbox on their profile to be checked to access Campaigns.
Emails and landing pages must be associated with the campaign in Account Engagement for the data to flow into the connected Salesforce Campaign.
Bonus Tip!
Use Campaign Hierarchy to your advantage. On the dashboard you can view just the parent campaign results, or click the toggle to view the child campaigns as well. For example, you may have one main campaign for a Spring Campaign, then create and assign a child campaign to each email wave, or separate landing page.
Let’s add the Account Engagement fields, too
Not everything Account Engagement related can be added with a component. We’ll need to add some fields to the page layouts as well.
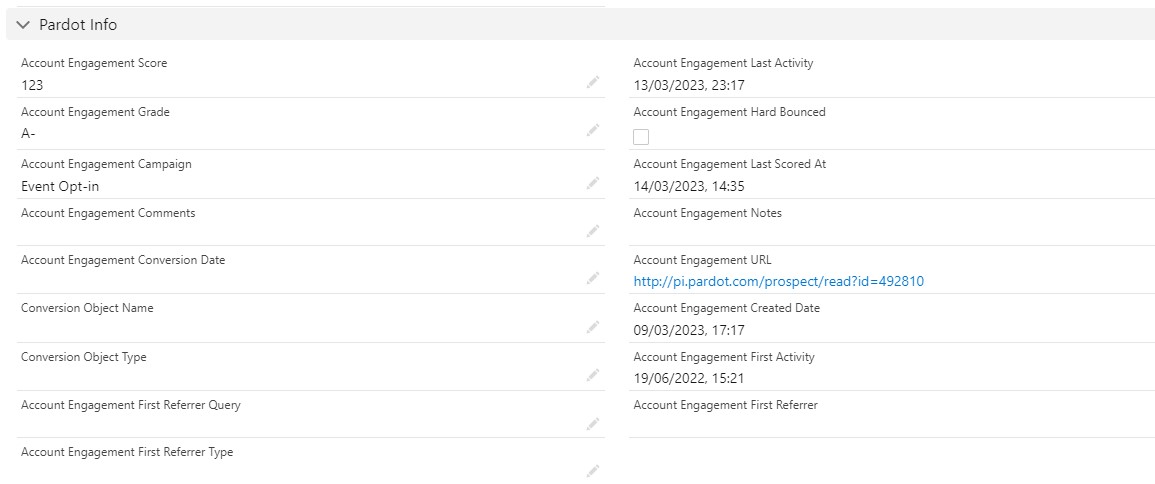
I recommend adding a new Section to the Details area of the Contact page layout. Drag in the Account Engagement fields you wish to display.
At a bare minimum, let’s give your team:
Score: Your team will love the Score because it’s an implicit indicator of the level of interest a prospect has in you. It will help guide the sales folks in their prospecting efforts.
Grade: Not all organizations have this setup, if you don’t start here to learn about why it’s worth the time and effort.
Last Activity: This gives you a good idea of how long it’s been since a prospect has opened/clicked on an email or visited your website.
Created Date: This is different from the contact’s create date. This is when Pardot first created the prospect record.
Finally, I like to include the Hard Bounce field so that the sales team is aware if they have a prospect with a bad email address. This will usually prompt them to check to see if they have the correct email on the record, or if the contact has left the company.
Salesforce reports your team will love
It’s nice to have all of the fields and components in Salesforce where your team can easily access them, but let’s talk a bit about reports too. There’s some cool stuff you can do with Salesforce reporting to keep your sales team wanting more.
Account based marketing (ABM) reports
Instead of looking at the engagement of a single prospect, why not look at the entire account to see how engaged they are as a whole?
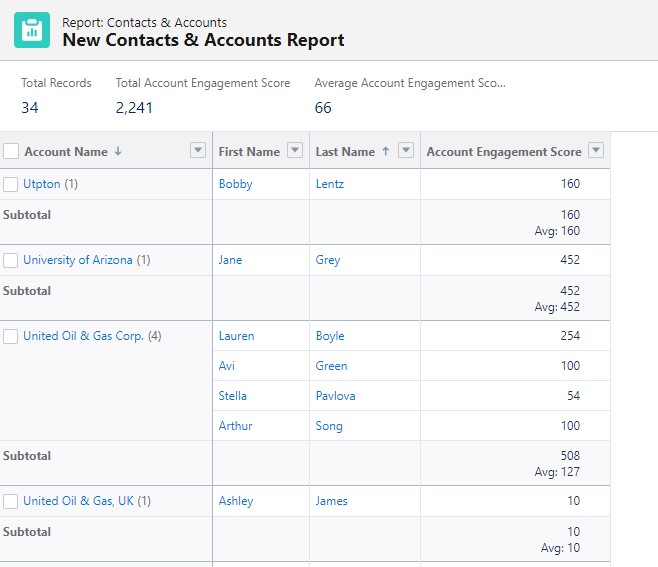
Let’s create a report that will summarize our accounts and give us the Sum and Average of all of the contacts that belong to the given account.
Create a new Contact & Account report. Apply any filters you need.
The report layout should include the contact’s name, Account Engagement Score and whatever other fields you need.
Under Group Rows, add Account Name to add a grouping by Account.
On the Account Engagement Score field, click the down arrow to expand the field options in the layout
Hover over Summarize and check Sum and Average.
Save and Run your new report!
Recently active and highly engaged prospects report
The purpose of this report is to help sales folks identify prospects that are highly engaged and recently active. It creates a call sheet of sorts for your sales team.
To create this report, simply build a normal Contact & Account report but include the fields Account Engagement Last Activity and Score.
You can then filter and/or sort the report to see the most recently active prospects with the highest engagement. I used this type of report to keep an active list of prospects that sales people could call on when they had spare time.
Note: Your users may already receive a similar report from Account Engagement called their daily prospect activity report. To find out, go to Account Engagement Settings > User Management > Users and click on a user. Then select Edit Preferences in the top right to see what emails they’re subscribed to.
Final thoughts
Hopefully you have found a couple of tidbits you’re ready to implement in your own org. One of the reasons I absolutely love this topic is because I know as a marketer it’s important to prove your value to the organization as a whole. I spent a large portion of my career learning to work with sales teams and leadership to provide them the insights they needed to succeed.
It wasn’t always easy but good synergy between your sales and marketing teams is essential and will pay dividends. A good relationship includes transparency and Account Engagement offers that through excellent native integration with Salesforce.
Looking to break down silos and build a stronger relationship between your sales and marketing teams? Contact the team at Sercante to start a conversation and learn about solutions we’ve built and the possibilities that exist.
Handling multiple languages with Account Engagement (Pardot) forms has always been complex — especially when it comes to reporting. But there is a way to multi-language Account Engagement forms.
The traditional solution — one form per language — has its drawbacks. But it’s something that’s super important for companies that use Account Engagement on a global scale to do in a logical and user-friendly way.
Today, we’ll explore a new, more efficient method that improves reporting and streamlines the translation process.
Challenges with traditional solutions for creating multi-language Account Engagement forms
There are a few ripple effects that we have to handle when we use multiple forms to realistically capture one set of data.
First, we need a way of figuring out which form we want to display. Commonly this is done as a piece of dynamic content driven off a known Prospect field.
Next, we need to handle submissions for a single goal across multiple forms. The approach we take can vary depending on how complex our Automations and Reporting strategies are, and it all can add up.
A new solution for handling multiple languages
We can still work within the constraints of Account Engagement (Pardot) and leverage a common web development pattern of internationalization (or i18n for short). With the power of JavaScript, we can have one Account Engagement form and feel confident that our visitors will be able to have it in their language.
JavaScript and Handlebars.js
Before we dive into the actual code (honestly my favorite), it might be helpful to talk about what we are going to use. We have a mix of a little bit of custom JavaScript with a common JavaScript library called HandlebarsJS, not to be confused with Account Engagement Handlebars Merge Language (HML).
The custom JavaScript takes the HTML that Account Engagement will render, look for the i18n placeholders and do a real-time replacement with the translations you have set up. This gives you full control over the wording and design in each language for every page.
Both HML and HandlebarsJS (by default) use double curly braces for wrapping placeholders. We’ve chosen to help differentiate between the two easily by specifying square brackets.
Getting into the details
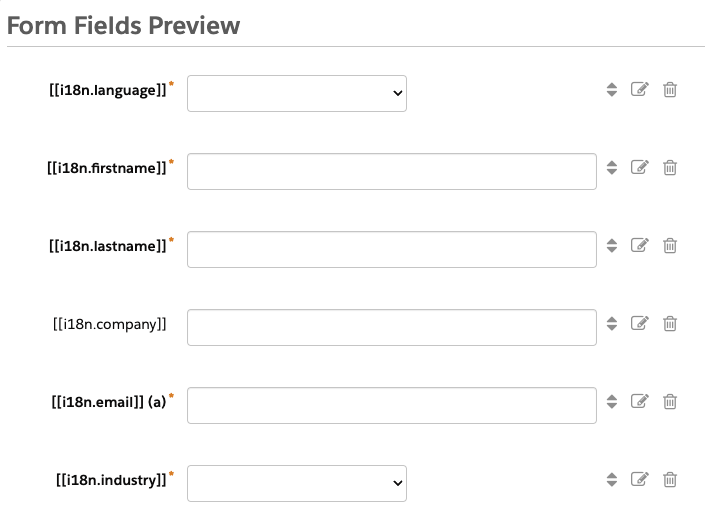
So as a super simple example, you can use the label [[i18n.firstname]] to have English, French, Spanish (or any other language you want) for the value {{Recipient.first_name}}.
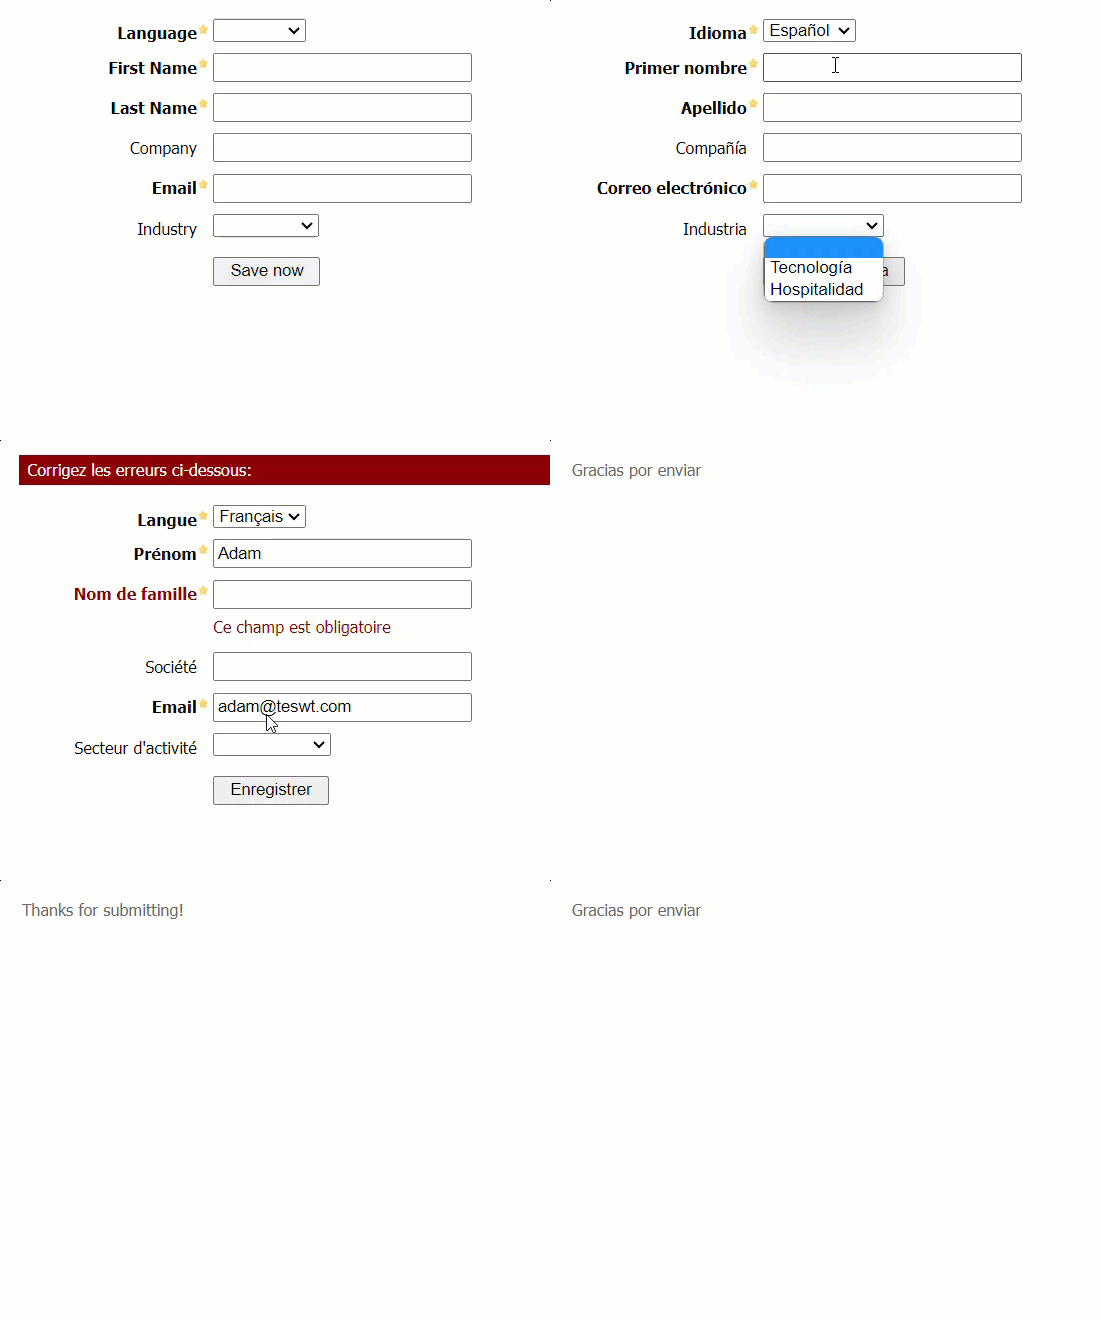
Example of single Account Engagement form supporting 3 languages
Ok, let’s show what this can look like. Here we have a demo form that supports three languages.
Pre-work to do for your multi-language Account Engagement forms
If you’ve previously filled out the form, we will render the form in the language you specified. If you haven’t, we’ll try to use your browser’s language. Form error messages and thank you content are all translated.
Back in Account Engagement, there are a few things that need to be done.
Here’s what to do:
Step 1: Edit form fields – Each Form Field needs to be edited to use a label in the format [[i18n.TOKEN]] (where the TOKEN can be a field name or anything you like
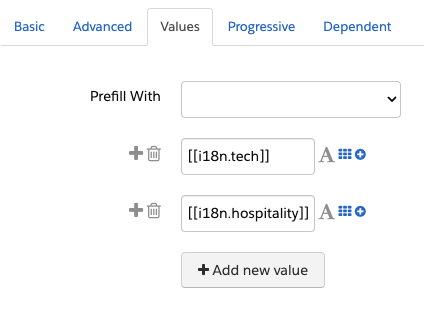
Step 2: Edit dropdown field values – Each Dropdown field value needs to be edited to use a label in a similar format
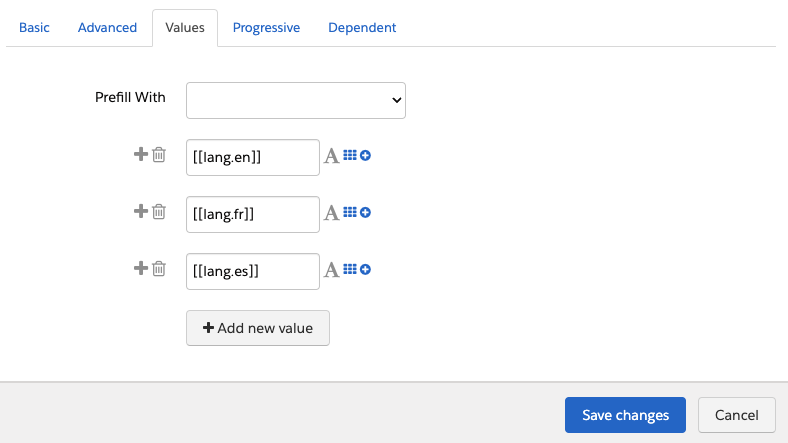
Step 3: Ensure dropdown fields store language code – The Form should have a Language dropdown field that stores the language code. Language choice labels should use a label in a slightly different format. It should use [[lang.CODE]].
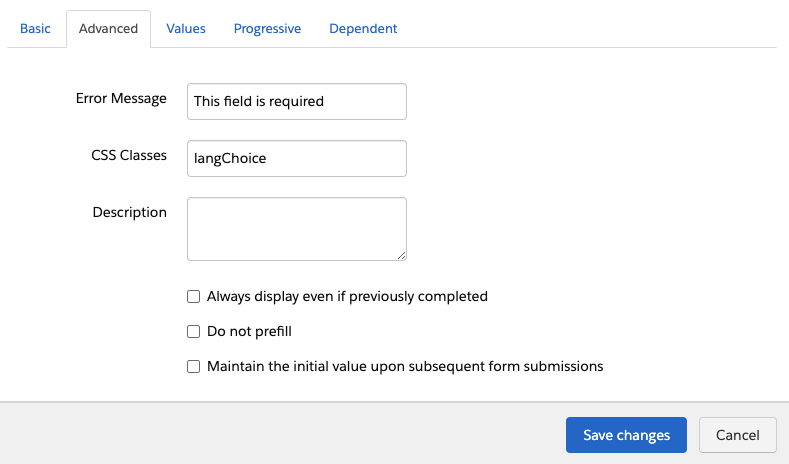
You’ll also need to add the CSS Class langChoice to this field:
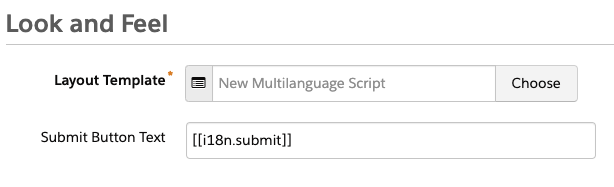
Step 4: Update the submit button text – Submit button text should be edited to use [[i18n.submit]].
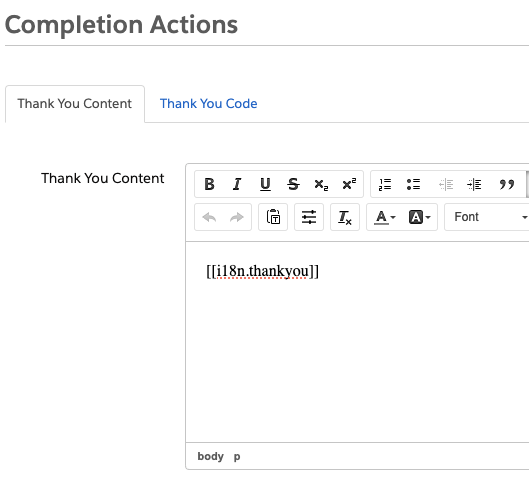
Step 5: Check thank you content – Thank you content should be edited to use [[i18n.thankyou]].
Add JavaScript to the form
Once you have all your labels set up, we need to actually add the JavaScript to the form. There are a few ways you can do this and the approach will depend on just how reusable (and large) you want your JavaScript to be.
In our example, we’ve placed the JavaScript in the Layout Template, which provides a balance of re-usability (can be used by multiple forms) and maintenance (common, but not all translations for the entire site).
Ok, time for the code. I’ve split this JavaScript into three sections, but it can all be copy and pasted into a single <script> block in your Layout Template.
Define languages the form will support
First, we have a JavaScript object that defines the languages that we will be supporting, as well as the label of that language. Feel free to adjust this as necessary, just keep the structure intact.
<script src="https://cdn.jsdelivr.net/npm/handlebars@latest/dist/handlebars.js"></script>
<script>
// the supported languages by this script
const languages = {
    lang: {
        en: 'English',
        fr: 'Français',
        es: 'Español'
    }
};
Add the translations
Next, we have all of the translations
// the translations for each language
const translations = {
  'en': {
    i18n: {
      firstname: "First Name",
      lastname: "Last Name",
      company: "Company",
      email: "Email",
      industry: "Industry",
      hospitality: "Hospitality",
      tech: "Tech",
      submit: "Save now",
      language: "Language",
      formErrors: "Please correct the errors below:",
      fieldError: "This field is required",
      thankyou: "Thanks for submitting!"
    }
  },
  'fr': {
    i18n: {
      firstname: "Prénom",
      lastname: "Nom de famille",
      company: "Société",
      email: "Email",
      industry: "Secteur d'activité",
      hospitality: "Hospitality",
      tech: "Technologie",
      submit: "Enregistrer",
      language: "Langue",
      formErrors: "Corrigez les erreurs ci-dessous:",
      fieldError: "Ce champ est obligatoire",
      thankyou: "Merci d'avoir soumis"
    }
  },
  'es': {
    i18n: {
      firstname: "Primer nombre",
      lastname: "Apellido",
      company: "Compañía",
      email: "Correo electrónico",
      industry: "Industria",
      hospitality: "Hospitalidad",
      tech: "Tecnología",
      submit: "Guardar ahora",
      language: "Idioma",
      formErrors: "Por favor corrija los siguientes errores:",
      fieldError: "Este campo es obligatorio",
      thankyou: "Gracias por enviar"
    }
  }
For each token you want to be translated, you will need to add a translation for each language. Like how languages are set up, you can make any adjustments/additions you want… just keep the structure intact.
Add the main functionality to apply the translations you defined
Next, we have the main functionality. This handles the actual work of applying the translations we have defined already.
function i18nForm(prospectLang) {
    document.addEventListener("DOMContentLoaded", function(event) {
        const brO = '{', brC = '}';
        let formErrors = document.querySelector('#pardot-form p.errors');
        if (formErrors != null) {
            document.querySelector('#pardot-form p.errors').innerHTML = `[[i18n.formErrors]]`;
            [...document.querySelectorAll('#pardot-form p.error.no-label')].forEach(node => {
                node.innerHTML = `[[i18n.fieldError]]`;
            });
        }
        let notYou = document.querySelector('.email span.description');
        if (notYou != null) {
            let origHtml = notYou.innerHTML;
            notYou.innerHTML = origHtml.replace('Not', '[[i18n.notYou]]').replace('Click Here', '[[i18n.notYouClickHere]]');
        }

        // Get the original HTML of the form, replacing [[ with {{ and ]] with }}
        const originalHtml = document.querySelector('#pardot-form').innerHTML
            .replace(/\[\[/g, `${brO + brO}`).replace(/\]\]/g, `${brC + brC}`);
        // Compile the template with Handlebars
        const processTemplate = Handlebars.compile(originalHtml);

        // Get the browser language
        const browserLang = window.navigator.language.substr(0, 2);
        let formLangCode = '';
        let currentLangVal = '';

        // Dynamically map Pardot option values to language codes using innerHTML
        const pardotLanguages = {};
        const langNodes = document.querySelectorAll('.langChoice select option');
        langNodes.forEach(option => {
            let langKey = option.innerHTML.replace(/\[\[lang\.(.*?)\]\]/, '$1');
            pardotLanguages[option.value] = langKey;
        });

        // Determine the selected language in the dropdown
        langNodes.forEach(option => {
            if (option.selected && option.value !== '') {
                currentLangVal = option.value;
                formLangCode = pardotLanguages[option.value];
            }
        });

        // Determine the language to use
        let currentLangCode = formLangCode || prospectLang || browserLang;

        // Function to apply translations
        function applyTranslations() {
            let translatedHtml = processTemplate({ ...translations[currentLangCode], ...languages });
            document.querySelector("#pardot-form").innerHTML = translatedHtml;
            document.querySelector('.langChoice select').value = currentLangVal;

            // Handle language dropdown change event
            document.querySelector('.langChoice select').onchange = function () {
                let selectedLang = pardotLanguages[this.value];
                if (selectedLang in languages.lang) {
                    currentLangCode = selectedLang;
                    currentLangVal = this.value;
                    applyTranslations();
                }
            };
        }
        applyTranslations();
    });
}
i18nForm();
</script>
Test and revise
All that’s left to do is test it out, and then mold this example into what you need.
Considerations
Like any JavaScript examples you might find online, they are opinionated in approach. Making minor changes can sometimes break the code due to assumptions that might not be well documented/understood. I’ve left a bunch of console.log statements commented throughout the code to hopefully help you troubleshoot when things go wrong.
One of those opinions is using the “i18n” and “lang” prefixes. We think this makes the placeholders easier to read, even if it slightly complicates the JavaScript object itself. Feel free to remove this if you want, just know to make the various adjustments.
One Account Engagement form can handle all the languages you need
If your company works with audiences who speak a variety of languages, then this is the perfect solution for you to simplify the way you build forms in Account Engagement. Our new approach simplifies translating Pardot Forms, improves reporting, and offers a better user experience for a multilingual audience.