
Product Note: Marketing Cloud Growth and Advanced are editions of Marketing Cloud Next and have also been referred to as Agentforce Marketing.
Marketing Cloud Next offers an intuitive, drag-and-drop email builder packed with smart features that streamline the email creation process. In this blog post, we’ll walk through the key features and functionality of the Email Builder—everything from layout and design features to personalization and testing options—so you can confidently build, preview, and send your first email.
Before we dive into using the builder, let’s have a quick overview of the builder and its different sections:

- View Mode – Use this to switch between Desktop and Mobile view. You can also show or hide the HTML code in this section.
- Components Panel – This section displays the available components for the email. This section will include standard components as well as layout components and, after the Winter ‘26 release, any reusable content blocks created in your org.
- Row – All Components are placed in rows. These are the editable sections of your email.
- Canvas – Add components by dragging and dropping them onto the canvas.
- Property Panel – Displays what can be changed and customized for the currently selected row. When no row is selected, this panel allows you to select a brand, specify your email details, and set your preheader and subject line. You can also specify styling for the email as a whole or configure your email’s data source.
Customizing a Component
Let’s dive into the features and options when building a component. We’ll drag-and-drop a Paragraph component into our email for this section.

The editing options vary depending on which component you have selected, but the Paragraph component shows a good variety of the options. Let’s talk about these from Left to Right
- Container Component – this helps you toggle between the component and the container the component resides in. For example, if you wanted to change the background for the container entirely, select the Container Component to switch from the Paragraph component to its container. The Property panel on the right will change as you toggle between these two items.
- Component Type – the next section will just display which type of component you are currently working with (button, divider, heading, etc.)
- Draft with Agentforce (aka Agentforce Sparkles [insert jazz hands here]) – this option allows you to use Agentforce to write or revise your email content. If a Brand is associated with your email, Agentforce will even use the Brand Identity and Tone specified in the brand when generating content. Agentforce also gives you the option to revise the content by your key message or target audience (which is defined in the Campaign Brief), change the tone of the content, or increase/decrease the content length, all within the Agentforce window.

- Formatting Components – The next couple of components are pretty universal to WYSIWYG editors, so we’ll cover these quickly. We have:
- Indent
- Bold
- Italize
- Underline
- Strikethrough
- Link
- Merge Fields – Here you can populate required information, like your organization’s address or email preference center link, or insert fields from your Data Graph to personalize the email to the recipient. If your team has merge fields they want to use again and again, create and save a Reusable Expression in your CMS for quick access here.
- The final three icons all deal with things you can DO with the component, from left to right, we have
- Drag
- Duplicate
- Delete
Styling your Email
If you’ve set a default Brand for your CMS workspace, your email will be autobranded before you even start building. However, if you need to apply or switch your brand, you can do so at any time from the Property Panel.

When building your email components, you can access the Style of said component in the right side Property Panel. This will display what is auto-styled from the Brand as well as what can be edited without straying from the Brand specifications. You can override the branding by changing the style options to “custom”, just keep in mind that if the Brand itself later changes, those changes will not automatically update any components where the styling has been overridden.
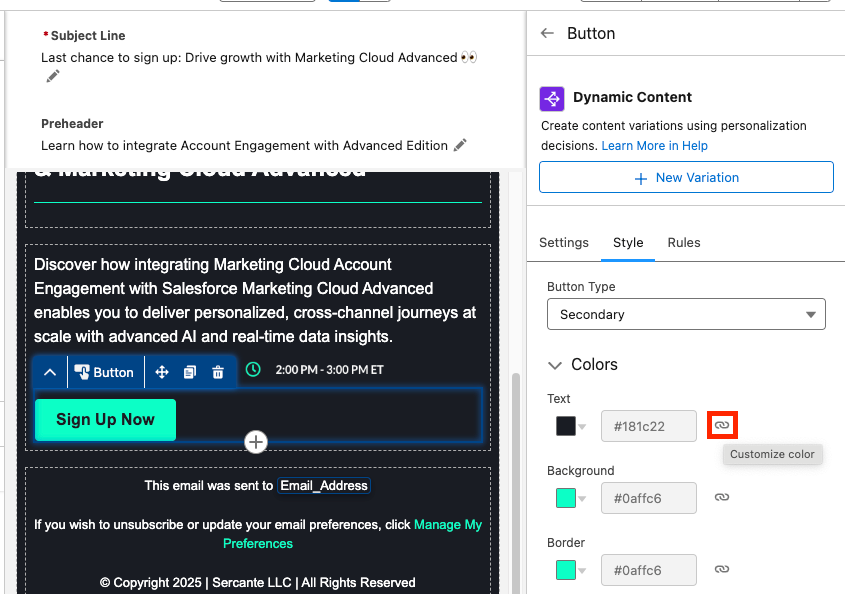
Personalizing your Email
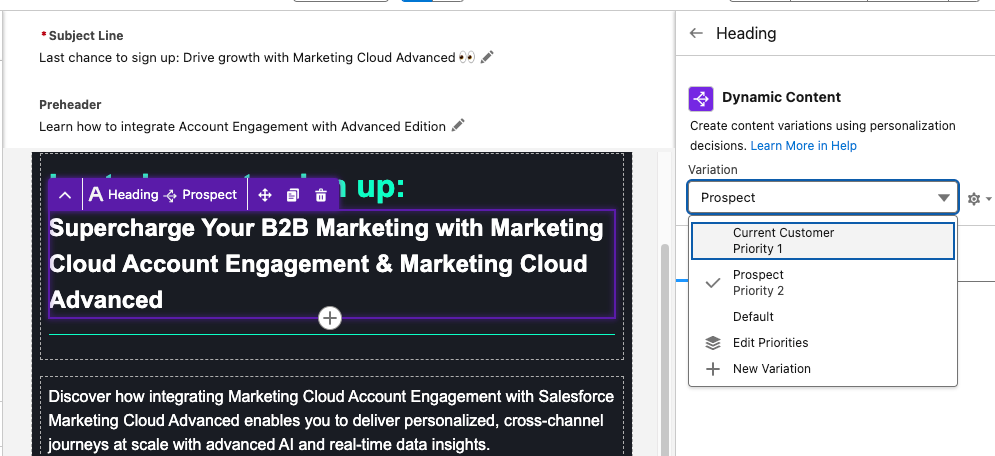
Beyond Merge Field, you also have two great personalization options in the builder: Dynamic Content and Email Repeaters.
Dynamic Content allows you to create variations in your email and specify when those variations appear. For example, you can change your email heading text depending on if the recipient is a prospect or a customer. When you have a component selected, the Dynamic Content option will appear in the Property Panel. Learn how to set up Dynamic Content variations from our previous blog post.
Email Repeaters allow you to show a series of items customized to the recipient. For example, we could display upcoming events that the reader may be interested in attending and tailor which events we display based on the Marketing Tech the reader is interested in.

Email Repeaters require a Data Source, but you can learn how to set those up here.
Testing Your Email
To test your email first, toggle between the Desktop and Mobile views within the View Mode to make sure your email looks great on both. Then ensure you’ve customized your Subject Line and Preheader text. You can edit your Subject Line and Preheader both above your email or in the Property Panel on the right. You can also insert Merge Fields or Dynamic Content into both.

Then select Preview from the top right corner. You’ll need to select a published Segment with at least one recipient in order to preview the email.

Next select the Test tab and enter the test email recipient and the From Name and Address. Your From Address needs to match the authenticated DKIM domain in Marketing Cloud.
The final step will be sending your email, which can be done in a couple of different ways, but all revolve around using Flow. See some of the resources below for help building and activating a Marketing Cloud Flow:
- Building a Message Series Flow in Marketing Cloud Growth Edition
- Quick Start: Send an Email Campaign
- Working with Campaigns and Flows in Marketing Cloud Next
Email Builder FAQ
Can we create reusable Email Templates for Marketing Cloud? Yes, this feature is coming as part of the Winter ‘26 release.
Can we view or edit the HTML of Marketing Cloud Emails? Yes, in the View Mode, you can toggle between the drag-and-drop builder and the HTML of the email. Here you can view the HTML, if you want to edit your email via HTML you can select Convert to HTML. However, once an email is converted to HTML, it cannot be converted back, so be careful! My guess is that this will change with future releases.
Can we use Custom Fonts with Marketing Cloud Emails? Only if you build your emails via HTML, or you could build an email with the drag-and-drop builder, convert it to HTML, then add the custom font code. However, this isn’t ideal. I believe Custom Fonts will be supported in a future release though.
Should Account Engagement users start using this builder? I’ll have to give you the annoying consultant answer of “it depends”. Account Engagement orgs can use the Marketing Cloud builder but, without Marketing Cloud also installed, it has some limitations that I don’t love. However, Account Engagement users can also get free access to Marketing Cloud Growth/Advanced as part of their Account Engagement license, so my recommendation would be to install Marketing Cloud Growth/Advanced and give the new builder a shot.
Can I build an email in the Marketing Cloud Drag-and-drop builder and copy the email HTML to Account Engagement? I was asked this recently, and you know what, that could work! However, proceed with caution and test often. I briefly gave this a shot, and the email in Account Engagement turned out pretty OK. I had to do some tweaking and had to replace the merge tags, but it looks like a viable solution in a pinch. Marketing Cloud specific features, like Dynamic Content based on personalization points, Cross Object Personalization, Repeaters etc. will not translate, but the structure and styling of the email should be pretty good.
Do Keyboard Shortcuts work with this builder? Yes!
Final thoughts
Marketing Cloud Next’s Email Builder delivers a streamlined, drag-and-drop experience that helps marketers craft personalized communication at scale with the help of AI, Agentforce, Dynamic Content, and Cross Object Personalization. The more familiar you are with its features, the more you’ll see what’s possible for creating even better communication experiences for your audience.
When you’re ready to start building, refer back to this guide—and if you’d like help with navigating your next steps in the meantime, reach out to the Sercante team, we’ll help you map out your next steps for success.