Identifying which campaigns and channels have influenced an opportunity is a key piece of information to see which marketing campaigns are the most effective. In this tutorial, I’ll walk you through how I use Salesforce campaigns in Pardot to track campaign influence.
Planning
Create a naming convention
If you already have a standard naming convention in Pardot, great! You can use the same naming convention for you Salesforce campaigns. Otherwise, here’s an idea on how you can set it up.
[Campaign Type]_[4-digit Year]-[2-digit Month]-[2-digit date]_[Campaign Description]
Examples:
Email-Blast_2017-03-02_Product-Newsletter
Webinar_2017-02-12_Pardot-Best-Practices
Nail down your campaign types & statuses
Standard campaign statuses are essential to have consistent reports within Salesforce. Here are some suggestions on what campaign types and statuses you might want to use.
| Campaign Type | Campaign Member Statuses |
|---|---|
| Online Advertising | ClickedConverted |
| Email Blast | SentOpenedClickedUnsubscribed |
| Tradeshow | AttendedRegisteredVisited BoothNo Show |
| Webinar | RegisteredAttendedNo ShowInvited |
The Salesforce Setup
Once you have figured out what your naming convention, campaign types, and statuses should be it’s time to get started with the Salesforce setup.
First, we need to set up 1 campaign for each campaign type. These will act as ‘templates’ for all your campaigns going forward. When you create a new campaign in Salesforce, you will ‘clone’ one of the campaign ‘templates’ instead of creating a new campaign each time. This will ensure that all you campaign statuses are consistent throughout all campaigns and make reporting MUCH easier.
How to create campaign ‘templates’
Create a campaign and give it the a descriptive name to indicate the type of campaign and that it’s a template.
Go to the campaign and click advanced setup to create and modify your campaign statuses.
Add each one of your statues and select one or more statuses as ‘responded’.
Repeat this process until you have all your campaign template setup
Once your campaign templates are setup you can create a new view, so you can easily locate your campaign templates.
How to create new campaigns
Find one of your campaign templates, click on the name and clone the campaign.
Name your campaign according to your naming convention and update the rest of the fields.
The Pardot Setup
Now that you have everything set up in Salesforce, it’s time to use these campaigns in Pardot.
Adding prospects to a Salesforce campaign in Pardot
Prospects are not automatically pushed into a Salesforce campaign. They will only sync to a Salesforce campaign if you set up an automation rule, segmentation rule, completion action, an engagement or drip program. This Pardot knowledge article explains in detail on when to use each one of these methods and here’s a breakdown of which method I recommend for each campaign type and status.
Email Blast Campaign
| Campaign Status | Pardot Action |
| Sent | Automation Rule Update by creating an automation rule and include everyone that’s in your emailing list. You can also go to Reports > Marketing Assets > Emails > List Emails, scroll down to the total sent and click on the link. Select all the prospects and add a tag to them. Then you can create an automation rule based on the prospects who have that tag and sync them with your Salesforce campaign. |
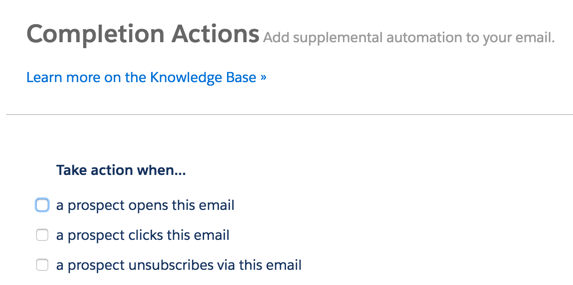
| Opened Clicked Unsubscribed | Completion Action Update using a completion action when scheduling the email. |

Online Advertising Campaign
| Campaign Status | Pardot Action |
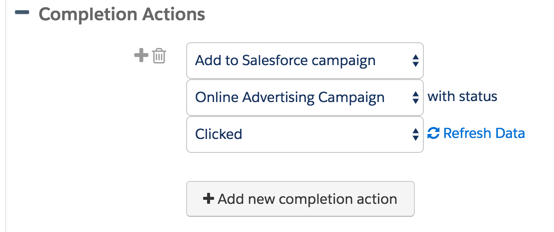
| Clicked | Completion Action Setup custom redirects and use completion actions to update the Salesforce campaign status to clicked. |
| Downloaded | Completion Action Use a completion action on your Pardot form or handler to update the Salesforce campaign status to downloaded |

Tradeshow Campaign
| Campaign Status | Pardot Action |
| Attended | Automation Rule Use an automation rule to track who attended a tradeshow. |
| Registered | Completion Action or Automation Rule Dependent on how the registration for your tradeshow is set up. You might use a completion action on a form or form handler to manage this status update, or have an automation rule running if you’re uploading a list of prospects. |
| Visited Booth | Automation Rule Dependent on how you manage badge scans at a booth. Most likely you will need to use an automation rule to update the status to visited booth. |
| No Show | Automation Rule An automation rule will need to be created to update the status to no show. |
Webinar Campaign
| Campaign Status | Pardot Action |
| Registered | Completion Action Use a completion action within your registration form or form handler to update the Salesforce campaign status to Registered. |
| Attended No Show | Automation Rule Use an automation rule to update the statuses to attended or no show. |
| Invited | Automation Rule Update by creating an automation rule and include everyone that’s in your emailing list. You can also go to Reports > Marketing Assets > Emails > List Emails, scroll down to the total sent and click on the link. Select all the prospects and add a tag to them. Then you can create an automation rule based on the prospects who have that tag and sync them with your Salesforce campaign. |
Reporting
Salesforce has campaign reports already set up for you, which is a great starting point. Standard reports include:
- Campaign ROI Analysis Report: How are each of your campaigns performing?
- Campaign Call Down Report: Shows all the members of a specific campaign.
- Campaign Member Report: Shows all the members of your campaigns.
- Campaign Member Analysis Report: Who has responded to your campaigns?
- Campaign Leads: Which leads have been marketed to in the past?
- Campaign Contacts: Which contacts have been marketed to in the past?
- Campaign Revenue Report: Shows the revenue generated from your campaigns.
- Campaigns with Influenced Opportunities: Shows the opportunities influenced by your campaigns.
Questions?
Send me a tweet @jennamolby, or contact the Sercante team for help.


