
If you are an Account Engagement User, you’ve likely been hearing for months that Account Engagement Orgs can get free access to Marketing Cloud Growth and Advanced Edition with their current contract. There have been numerous webinars, blog posts, and speaking topics exploring the features and functionalities of Growth and Advanced, and encouraging you to get started, but we’ve all been missing one key element. It wasn’t until Sercante’s recent Dreamforce recap webinar that someone said, “The Implementation Guide is 53 pages long, how do we actually get started, and what is required to just test the platform?”
This question struck me as a no-brainer once someone said it out loud. Of course, 53 pages of implementation steps are overwhelming! This new platform is uncharted territory for a lot of Marketing users, so it totally makes sense that users feel a bit nervous and confused about where to start. So, let’s talk through the base implementation you need to just test out the platform and see if it is a good fit.
Step 1: Data 360
Before you implement Marketing Cloud Growth and Advanced Edition, you need Data 360 (formerly Data Cloud). If your org doesn’t already have this tool, you have a couple of options:
- Salesforce Foundations
- Foundations is a $0 SKU that allows you to “access the powerful AI capabilities of Agentforce and discover key features in Agentforce, Sales Cloud, Service Cloud, Marketing Cloud, Commerce Cloud, and Data Cloud — all at no cost”. This SKU includes 250k credits for Data Cloud, more than enough to get started
- Free Data Cloud SKU
- Salesforce also offers a free Data Cloud SKU to help orgs get started. This also includes 250k credits.
Once you have Data 360, set it up by going to Setup > Data Cloud Setup and select Get Started.
This will take 5-15 minutes to run, and your page should auto-refresh once complete. Next, select Assign Permissions. Assign your user both the Data Cloud Architect (fka Data Cloud Admin) and Marketing Cloud Admin permission sets.
Finally, back on the Data Cloud Setup page, select Connect an Org and install the Sales Cloud Standard Data Bundle.
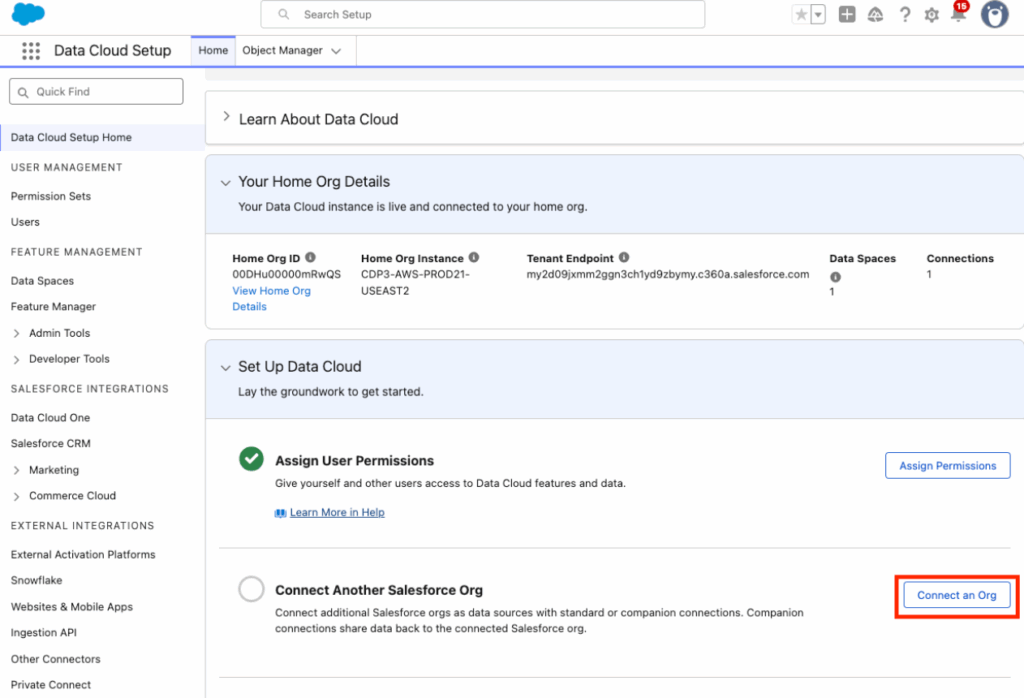

This is going to ensure Data 360 has access to all the Salesforce Objects you’ll need, we will deploy this Data Bundle in a bit.
Step 2: Enable Marketing Cloud
Next, we are going to set up Marketing Cloud, navigate to Setup > Assistant Home. The Assistant Home page guides you through the required and recommended tasks as well as gives you an overview of where you are in the setup process. We’re going to jump around a bit, but make sure you come back to this page if you decide to fully deploy Growth or Advanced Edition later.
Select Go to Basic Settings. The first four tasks should kick off and complete on their own, the only step you’ll need to do is select your data space. Most orgs will just have the “default” data space to work with, at least until the Business Unit feature is available (expected in Spring ‘26). Marketing Cloud will auto-enable once the data space is selected. If it does not, select Enable Marketing Cloud.
Step 3: Data Streams
Next, select Update within the “Install the Marketing Data Kits” section. This will take 5-10 minutes to finish running. Don’t worry if initially some of the data kits fail, just select Refresh or Retry to try them again. Once all the data kits have successfully been installed, we will go into Data 360 to deploy them.
First, we want to take care of the Sales Cloud Data Bundle we installed earlier.
- Navigate to the App Manager > Data Cloud > Data Streams
- Select New
- Select Salesforce CRM, then Next
- Select the Sales Standard Data Bundle
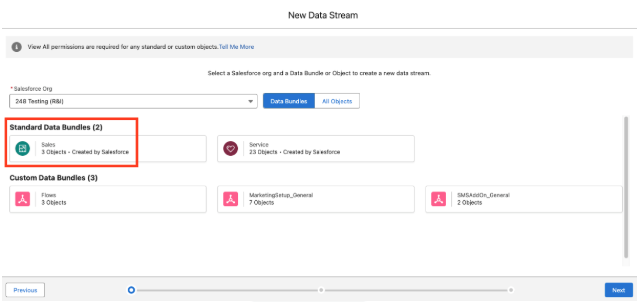
- Select Next, then Deploy
Next you’ll deploy the data kits. Use the instructions in the Manually Deploy the Updated Data Streams section here for guidance. You’ll need to do this about 5 or 6 times to ensure all the data kits are deployed.
Step 4: Identity Resolution
Now we’ll set up our Identity Resolution Ruleset. This step will create the Unified Individuals that Marketing Cloud Growth and Advanced use (similar to how MCAE uses Prospects). Creating Unified Individuals and running Identity Resolution Rulesets uses Data 360 credits. How many credits depends on:
- The number of records it is ingesting (likely just your Leads and Contacts, unless you have other data sources connected)
- How many rulesets you have per object (I recommend having just one for the Individual Object)
- How often the ruleset runs
Back on our Setup > Basic Settings page, you should see a Generate Ruleset button in the “Configure Identity Resolution Rulesets” section. Select this and give the system a few minutes to run, a green banner should appear when complete.
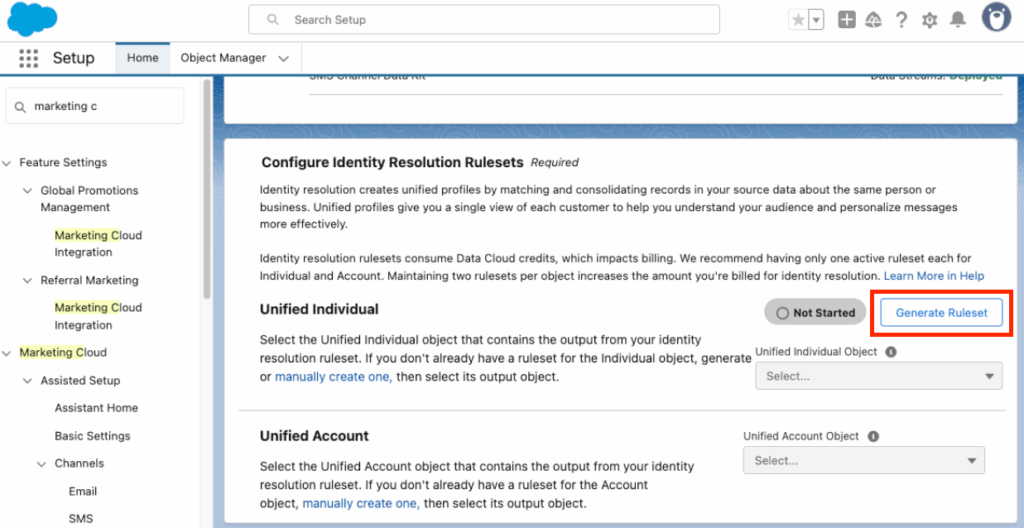
Your new Identity Resolution Ruleset should autopopulate in the Unified Individual Object dropdown.
If you want to manually build an Identity Ruleset or build a Ruleset for Accounts (Advanced only and needed for Account Scoring), use this help article.
Step 5: Add Additional Users
Ok we’re done with the highly technical stuff, now let’s add some users and get to the fun features! Your Growth and Advanced users will need a couple of different permissions depending on what they need to do in the system.
Permission Sets
To use Marketing Cloud Growth and Advanced users will need either Marketing Cloud Admin or Marketing Cloud Manager. You can also set up your own permission set or even create an Identity License profile for users without an existing Salesforce license.
If your users need to work with the Data 360 side of things, they will also need a Data 360 permission set. The comparison chart in this help article always helps me pick the right one.
Workspace Contributors
Next, add users as contributors to your “Content Workspace for Marketing Cloud”. This article outlines the steps. The available roles for contributors are:
- Content Admin: Manage users and sharing settings, create and publish all content in a CMS workspace, and assign a default brand to a marketing workspace.
- Content Manager: Create and publish all content in a CMS workspace and assign a default brand to a marketing workspace.
- Content Author: View, edit, and create all content in a CMS workspace. They can’t publish content.
Site Contributors
This is needed if you are going to work with Landing Pages during your testing. This article outlines the steps. The available roles are:
- Experience Admin: These contributors can do just about everything in an assigned Experience Builder site. They can access Experience Builder, can manage contributors, and publish the site.
- Publisher: These contributors help you build and publish the assigned Experience Builder site. They can access Experience Builder, and they can publish the site. They can’t manage contributors. They have read-only access to the Experience Workspaces Administration | Contributors tab.
- Builder: These contributors help build the assigned Experience Builder site. They can access Experience Builder. They can’t publish the site or manage contributors. They have read-only access to the Experience Workspaces Administration | Contributors tab.
- Viewer: These contributors have read-only access to Experience Builder in an assigned site. They can’t publish the site or manage contributors. They have read-only access to the Experience Workspaces Administration | Contributors tab.
The remaining setup items depend on what you’d like to test out in Growth and Advanced.
Try out AI Features
There are a lot of Agentforce and Einstein features you can enable within Growth and Advanced. Using these features does consume credits, but I wouldn’t let that stop you from testing and exploring their capabilities. Have a plan around who is testing and what they are testing, so you don’t duplicate work and credit usage.
Enable Gen AI for Campaign and Content Creation
For the Generative AI features of Growth and Advanced, we will need to enable Einstein and add some topics to the default Agentforce Agent.
- Navigate to Setup > Einstein & Agentforce > Agentforce & Gen AI
- Select Go to Einstein Setup
- Toggle the switch for Turn on Einstein
- Back on the Setup > Einstein & Agentforce > Agentforce & Gen AI page, select Go to Agent Studio
- Toggle the switch for Agentforce to on
- Wait for your screen to refresh or manually refresh
- Toggle the switch for Enable the Agentforce (Default) Agent to on
- Select the dropdown arrow next to your Agent and select Open in Builder
- Deactivate Agent if already activated
- Select the New dropdown
- Select Add from Asset Library
- Select the Content Creation and Marketing Cloud: Campaign Planning assets
- If you are an MCE user, you can also select Journey Decisioning
- Select Finish
- Select the dropdown arrow next to your new topics and select View Details
- Select This Topic’s Actions
- Ensure the actions outlined in the Enable Marketing-Specific Topics and Standard Actions in Agent Builder section are present. If they are not, use this article to manually add them
- Once done, Activate your Agent
Note: Any users who need access to use these features will need the “Access Agentforce Default Agent” permission set.
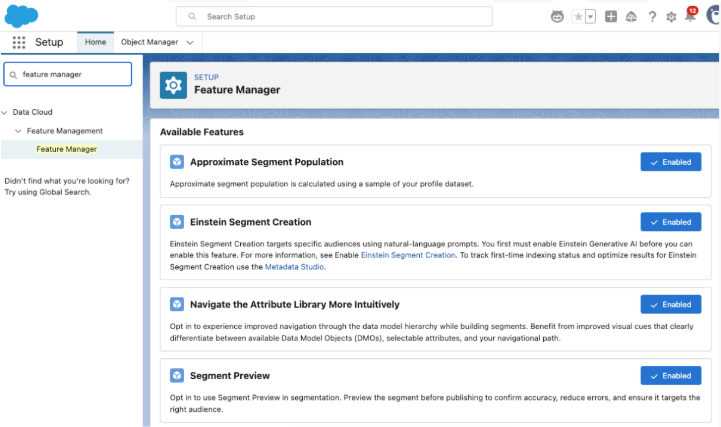
Activate Einstein Segment Creation
Einstein Segment Creation allows you to use natural language prompts to build segments within Data 360. Use this help article to enable Einstein Segment Creation. You will also likely want to enable:
- Approximate Segment Population
- Navigate the Attribute Library More Intuitively
- Segment Preview
Enable Additional Einstein Features
Einstein Send Time Optimization, Einstein Metrics Guard, Einstein Engagement Frequency, and Einstein Scoring are all just one click each to enable and all the instructions are consolidated in one help article.
Build and Personalize Assets
Enable Personalization to Test Dynamic Content
If you would like to test out Dynamic Content in Growth and Advanced, you will need to enable Personalization and configure your Data Graph. I recommend setting up your Data Graph first, Cate Godley wrote a really great blog post that will walk you through this process. Finally, use the Set Up Personalization steps here to complete the process.
Configure a Brand
Setting up a Brand in Growth and Advanced will let you auto-style your Marketing Assets and update the branding within Marketing Assets en masse. Check out Ambre Juryea-Amole’s blog post on setting up a brand for guidance on using this feature. A couple of additional features have been added since Ambre wrote her post; we can now configure a Brand Identity and Tone, which will be used by Agentforce when generating content, and assign a default Brand to the CMS workspace.
Dig Into Reports
Set up Marketing Performance
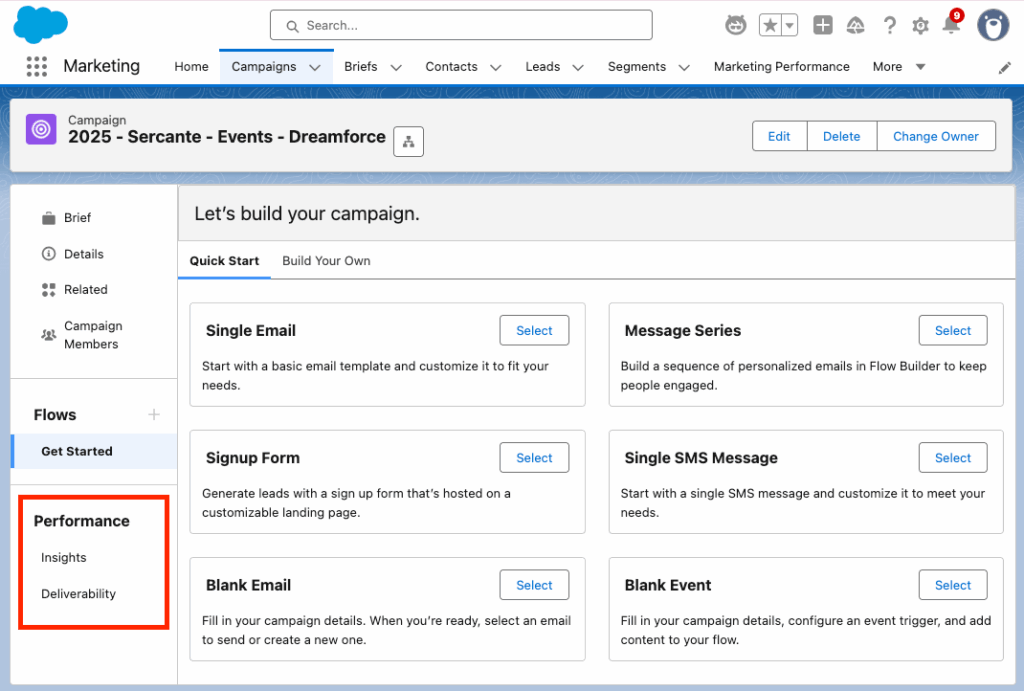
To dig into campaign metrics and content, install Marketing Performance using this help article. Once installed, you will have a Marketing Performance tab within the Marketing Cloud Growth/Advanced app where you can view campaign, channel, and content insights.
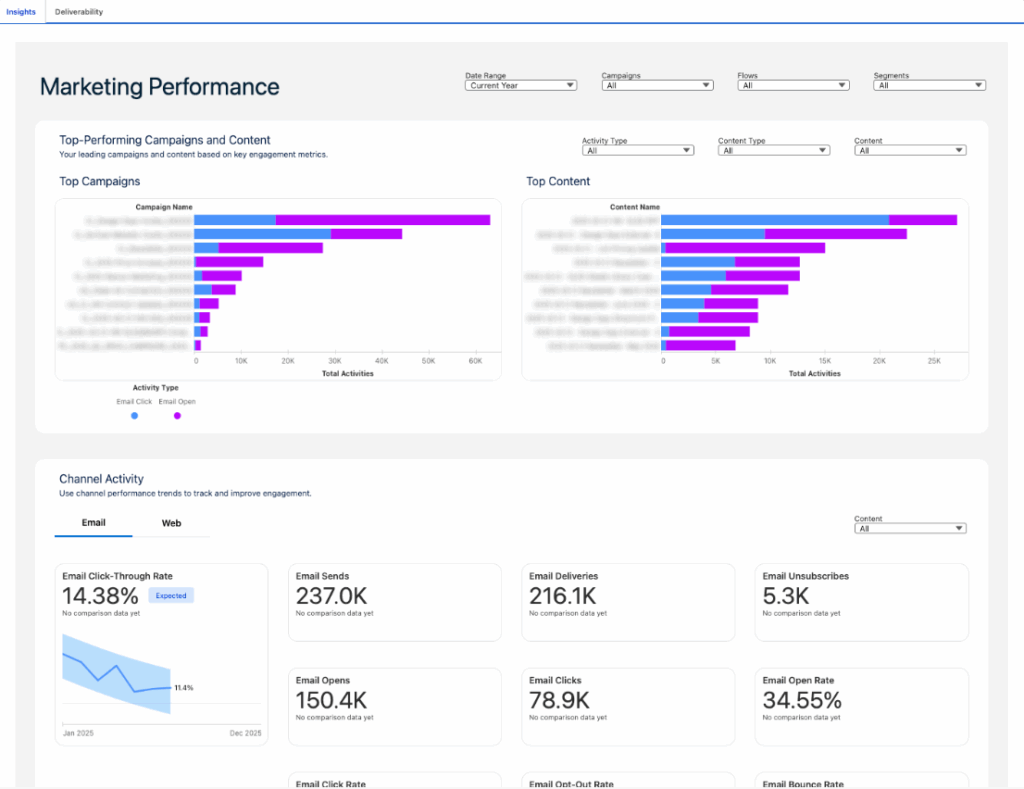
You can also view an individual’s campaign Performance reports on the left side of the Campaign view.
Note: Any users who need access to Marketing Performance reports will need the “Tableau Next Included App Business User” permission set.
Connect Analytics
Finally, install the Analytics packages for access to preconfigured dashboards and reports on your Marketing activities. This article walks you through everything you need to do to get Analytics up and running.
What’s Next?
The above steps are enough to get you started, so you can test Growth and Advanced and determine if you want to use it alongside Account Engagement. Additional implementation steps will really depend on what you want to use Growth and Advanced for, but here are some likely paths forward.
- Start sending emails
- Build and publish Landing Pages and Forms
- Set up SMS
- Track Activity on External Sites
- Customize and Publish Scoring
If you’d like help implementing or exploring Marketing Cloud Growth and Advanced, reach out to the Sercante team!