Category

Data Management

Before we dive into the details of finding success with your Salesforce Data Cloud implementation, let’s set the stage. Whether you’re a seasoned Salesforce admin or just stepping into the realm of cloud-powered data solutions, Data Cloud is a game-changer, and here’s why you should care.

Navigating the Data Cloud Landscape

Salesforce Data Cloud is a platform that takes all of your data and turns it into actionable insights. It’s for anyone eager to supercharge their Salesforce experience. Whether you’re a department manager or an admin serving sales, marketing, customer service, or any other department, Data Cloud is your ticket to streamlined processes, informed decision-making, and ultimately, success.

The key to success is covering your bases early — before and during implementation. That means asking the right questions, collaborating with the right people, and establishing processes that keep everything running smoothly. 

Why Data Cloud Matters

Imagine having a centralized hub where diverse data streams — from identity platforms and purchase history to website interactions — seamlessly come together. Data Cloud does just that, offering a unified space to make sense of the data chaos. You may also be wondering what to do with the free Data Cloud license that you got as part of another cloud package.

You might wonder, “Why should I care?” Well, the answer is simple — efficiency, effectiveness, and exponential growth.

How to Ensure a Successful Salesforce Data Cloud Implementation

Now that we’ve set the groundwork, let’s delve into five practical tips you can use to guide your Data Cloud implementation with the ultimate goal of unlocking the platform’s full potential. We’ll explore how to propel your Salesforce Data Cloud implementation to new heights. You can also check out this post for a few ‘gotchas’ you may encounter during your Data Cloud implementation.

5 Tips for a Successful Data Cloud Implementation:

  1. Reach for organizational alignment
  2. Choose impactful use cases
  3. Measure success effectively
  4. Use out-of-the-box data models
  5. Be intentional with your data

Tip#1: Reach for organizational alignment

Now, let’s talk tactics. Aligning your organization before embarking on a Data Cloud implementation is paramount. Here are a few specific tactics to ensure everyone is on the same page:

Establish a Clear Owner

Designate a dedicated owner for the Data Cloud implementation. This individual should be someone with a comprehensive understanding of your organization’s goals and processes. Having a clear owner ensures accountability and a streamlined decision-making process.

Conduct Cross-Functional Workshops

Bring together representatives from various departments for workshops. Discuss the potential impact of Data Cloud on each team and encourage open communication. These sessions not only educate team members but also foster a collaborative spirit.

Define Roles and Responsibilities

Clearly outline the roles and responsibilities of each team involved in the implementation. From data management teams to end-users, everyone should know their part in the process. This clarity prevents confusion and sets the stage for a smoother implementation.

Communicate the Benefits

Emphasize the benefits of Data Cloud to every stakeholder. Whether it’s time savings, improved insights, or enhanced customer experiences, make sure everyone understands how Data Cloud aligns with the organization’s overarching goals.

Address Concerns Proactively

Open the floor for questions and concerns. Addressing potential roadblocks early on builds confidence among team members. Proactively seeking and resolving concerns sets the tone for a collaborative and supportive implementation journey.

Tip#2: Choose impactful use cases

Now, let’s talk about choosing the right use case — the cornerstone of a successful Data Cloud implementation. We urge you to start with the end goal in mind (instead of a technology-first approach, which many of us are so tempted to do). Focus on one or two initial use cases that drive team optimization and deliver tangible results within a reasonable timeframe. Whether it’s streamlining contact behaviors or enhancing customer segmentation, these impactful use cases showcase the value of the platform and generate positive buy-in across the organization.

Start with end goals in mind

Begin by identifying the desired outcomes of your Data Cloud implementation. What specific business objectives are you aiming to achieve? Whether it’s improving sales efficiency, enhancing marketing targeting, or optimizing customer service, starting with clear end goals ensures alignment and focus.

Evaluate business processes

Conduct a thorough assessment of your organization’s existing business processes. Identify pain points, inefficiencies, and areas for improvement. Look for processes that rely heavily on data and could benefit from the insights provided by Data Cloud. Consider areas where you’ve got trapped data and manual flows/processes.

Prioritize use cases with high impact and feasibility

Once you’ve identified potential use cases, prioritize them based on their potential impact and feasibility. Focus on use cases that offer significant benefits with manageable implementation efforts. Consider factors such as resource availability, data availability, and technical complexity.

Involve stakeholders in use case selection

Engage stakeholders from relevant departments in the use case selection process. Gather input from sales, marketing, customer service, and other teams to ensure alignment with their needs and priorities. Collaborative decision-making increases buy-in and promotes cross-functional synergy.

Prototype and validate use cases

Before committing to a full-scale implementation, consider prototyping and validating selected use cases. Build prototypes to test the feasibility and effectiveness of the proposed solutions. Use feedback from stakeholders and pilot tests to refine and iterate on use case designs. This is a great use case of taking advantage of the $0 Data Cloud SKU as well.

Data Cloud Use Case Examples
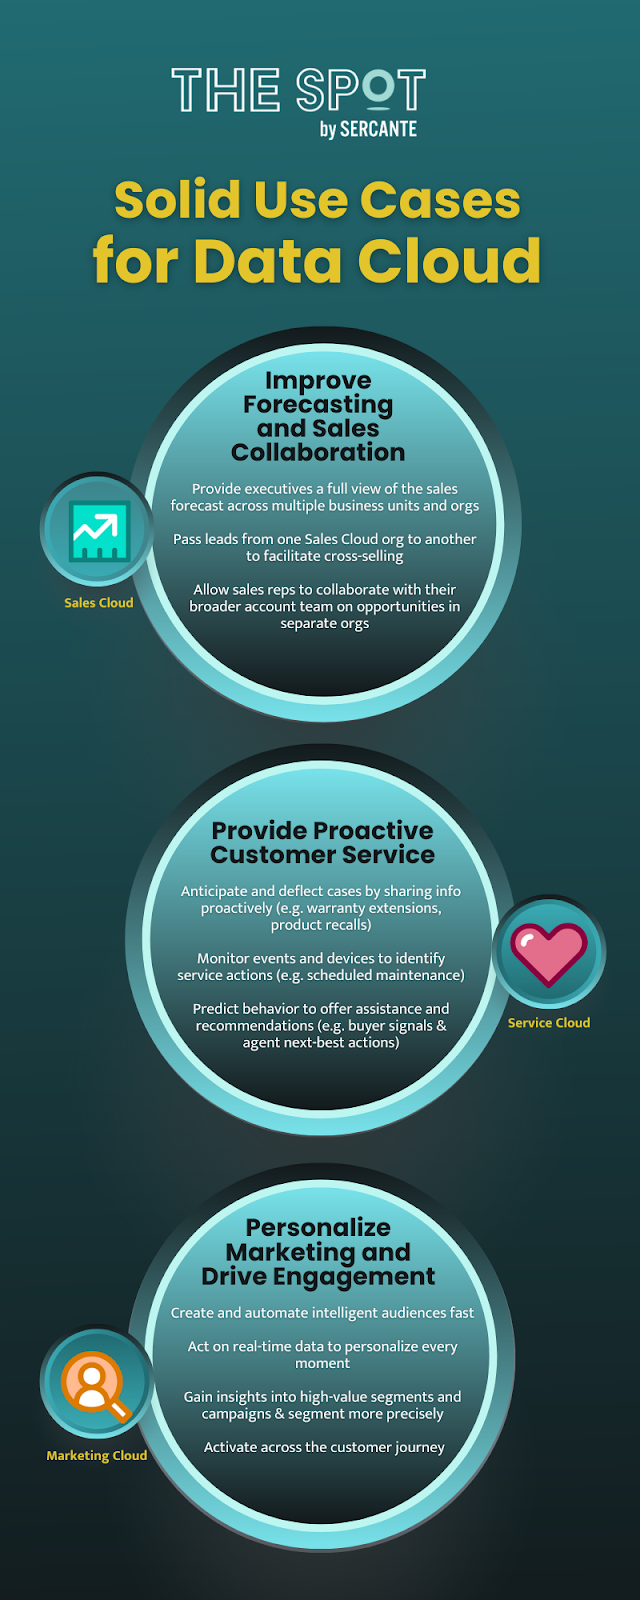
Examples of how customers across Salesforce Clouds are using Data Cloud

Improve Forecasting and Sales Collaboration 

Admin Type: Sales Cloud

  • Provide executives a full view of the sales forecast across multiple business units and orgs
  • Pass leads from one Sales Cloud org to another to facilitate cross-selling
  • Allow sales reps to collaborate with their broader account team on opportunities in separate orgs

Provide Proactive Customer Service

Admin Type: Service Cloud

  • Anticipate and deflect cases by sharing info proactively
    • Examples:  warranty extension notifications, product recalls 
  • Monitor events and devices to identify service actions
    • Examples: proactively avoid usage or entitlement overcharges or schedule proactive maintenance based on device data
  • Predict behavior to offer assistance and recommendations
    • Examples: provide agents with customer’s propensity to buy and next-best action

Personalize Marketing and Drive Engagement 

Admin Type: Marketing Cloud

  • Create and automate intelligent audiences fast
  • Act on real-time data to personalize every moment 
  • Gain insights into high-value segments and campaigns
  • Segment more precisely 
  •  Activate across the Customer Journey

Tip#3: Measure success effectively

Now, let’s discuss how to measure the success of your Data Cloud implementation effectively. Here are a few specific tactics to guide you.

Define key performance indicators (KPIs)

Identify measurable metrics that align with your organization’s goals. Whether it’s increased revenue, improved customer satisfaction, or enhanced operational efficiency, define KPIs that reflect the impact of Data Cloud on your business outcomes. And don’t forget to keep them SMART (specific, measurable, attainable, realistic, and timely)

Establish baseline metrics

Before implementing Data Cloud, establish baseline metrics to benchmark your current performance. This allows you to track progress over time and quantify the impact of the implementation.

Monitor data quality

Ensure that the data ingested into Data Cloud is of high quality and accuracy. Implement data quality checks and validation processes to maintain data integrity throughout the implementation. This is where taking advantage of our Data Cloud Readiness Assessment is key.

Track user adoption and engagement

Monitor user adoption and engagement with Data Cloud tools and features. Track user logins, usage patterns, and feedback to gauge the effectiveness of training and support initiatives.

Iterate and improve

Once you’ve successfully implemented, continuously review and iterate on your measurement approach. Get feedback from stakeholders, analyze performance data, and identify areas for improvement. Adjust your measurement strategy accordingly to ensure ongoing success.

Tip#4: Use out-of-the-box data models

You have to walk before you can run. Let’s delve into using the out-of-the-box data models during your Data Cloud implementation.

Explore standard data models

Familiarize yourself with the standard data models offered by Data Cloud. These pre-built models cover common data structures and relationships, saving you time and effort in designing custom solutions. Take advantage of these models wherever possible to accelerate your implementation.

Align with Salesforce Einstein 1 (Core) data model

Ensure alignment between the Data Cloud data models and the Salesforce core data model. By aligning these models, you facilitate seamless integration and interoperability between Data Cloud and other Salesforce products. This alignment simplifies data management and enhances overall system efficiency.

Customize only when necessary

While out-of-the-box data models provide a solid foundation, don’t hesitate to customize them to meet your specific requirements. However, exercise caution and prioritize customization only when absolutely necessary. Striking the right balance between standardization and customization ensures long-term scalability and maintainability.

Tip#5: Be intentional with your data

Now, let’s take a look at how you can be intentional with your data. Careful planning on how to use it within Data Cloud is crucial. Whether it’s analytics, segmentation, or real-time data actions, understanding the tools available and selecting the right ones for your use case is key. From calculated insights to data segmentation and AI capabilities with Einstein Studio, being intentional with data ensures effective utilization and actionability.

Data governance framework

Establish a robust data governance framework to govern the lifecycle of data within your organization. Define policies, procedures, and standards for data collection, usage, and management. Ensure compliance with regulatory requirements and industry best practices to maintain data integrity and security.

Data quality management

Implement data quality management processes to ensure the accuracy, completeness, and consistency of your data. Utilize data cleansing tools and techniques to identify and rectify errors, duplicates, and inconsistencies. Regularly monitor data quality metrics and address any issues promptly to maintain the reliability of your data.

Data privacy and security measures

Prioritize data privacy and security by implementing robust measures to protect sensitive information. Encrypt data in transit and at rest, restrict access to authorized users, and implement multi-factor authentication. Stay informed about data privacy regulations such as GDPR and CCPA, and ensure compliance to safeguard customer data.

It’s crucial to promote ethical data practices and mitigate bias in data analysis and decision-making. Educate stakeholders about the ethical implications of data usage and the potential impact on individuals and communities. Implement fairness, accountability, and transparency principles to ensure equitable outcomes and build trust in your data-driven initiatives.

Data lifecycle management

Develop a data lifecycle management strategy to govern the flow of data from creation to archival or deletion. Define retention policies based on regulatory requirements and business needs, and automate data archival and deletion processes where possible. Regularly review and update data lifecycle policies to adapt to evolving business and regulatory requirements.

Data-driven decision-making culture

Foster a data-driven decision-making culture within your organization by promoting data literacy and empowering employees to leverage data in their day-to-day activities. Provide training and resources to enhance data skills across departments, and encourage collaboration and knowledge sharing around data insights and best practices.

Bonus: Tap into expert guidance

Salesforce Data Cloud implementation requires strategic planning, thoughtful execution, and continuous refinement. By aligning your organization, selecting impactful use cases, leveraging out-of-the-box data models, measuring success effectively, and being intentional with data, you can unlock the full potential of Data Cloud and drive transformative outcomes for your business. 

As a bonus tip, we suggested looking toward expertise available in the Salesforce community. Seeking guidance from those who have navigated Data Cloud’s complexities can be invaluable. Whether through expert coaching sessions, community groups, or support office hours, connecting with experienced professionals can enhance your success with Data Cloud.

However, if you find yourself in need of expert guidance or support along the way, don’t hesitate to reach out to the Sercante team. Our experienced consultants are equipped with the knowledge and expertise to help you navigate every step of your Data Cloud journey and ensure success. Contact us today to learn more about our Data Cloud readiness assessment so you can embark on your Data Cloud implementation with confidence.

Related Resources:

You may be aware that when it comes to improving user experience on a record page,  Dynamic Forms have become more and more powerful over the last few Salesforce releases. A good example is the ‘Add Fields from Related Objects to Dynamic Forms-Enabled Pages’ feature from the Spring ‘24 release, which came from a  Salesforce IdeaExchange request.

Dynamic forms are a huge win for making more customizable and engaging user experiences, at least for custom objects and most standard objects. There are still a few that don’t have this feature yet. (I’m looking at you, Campaigns) 

Here’s a handy workaround that may help where dynamic forms in Salesforce aren’t supported.

Check out the latest Spring ‘24 Release updates here, including where you can display related record fields on a record. 

The Use Case: A “Dynamic” Campaign Page

You want to collect certain information for your campaigns, but the data differs depending on the type of campaign. 

Examples may include:

  • Events
    • Location
    • Venue Address
    • Venue Contact Info
    • # of Days
  • Webinar
    • Webinar platform
    • Presenter details
  • Partnerships
    • Partner Information
    • Type of Partnership
    • Partner Contact Info

All of this different data living on the record page can be cluttered and noisy, and forcing the user to scroll through the page to get to the data they need to fill in. It’s not a great user experience and not a great recipe for capturing quality data. 

Wouldn’t it be nice if we could bump up specific fields to more prominent areas of the page based on the type?

Unfortunately, Dynamic Forms can’t help us here (at least not yet — you can upvote the idea here). Some may choose to use record types and page layouts, but that may not be ideal for all companies. 

An Alternative Solution for Salesforce Dynamic Forms

While we may not be able to use Dynamic forms, there are some other Lightning features that can give us a potential workable solution: 

  • First we create a Quick Action, which allows us to build a mini page layout of the fields we want to highlight.
  • Then we use Lightning Page builder features to display this mini-layout above the fold so it’s easy for the user to find and update:
    • Related Record component
    • Set Component Visibility 

Here’s how.

Create an Action for Partner fields

  1. From Object Manager > Campaign > Buttons, Links, and Actions
  2. Click New Action
  3. For Object Name, select Campaign
  4. For Action Type select Update a Record
  5. For Label, enter a label that is appropriate for this purpose. It’s a good idea to make it relevant and easy to idenity what it’s for.
    • For example ‘Update Campaign – Event Details’
  6. Enter a Description outlining the purpose of this action
  7. Click Save

Edit the Action Layout

Once you have saved, you will be looking at the Action Layout page. Here is where you can choose what Campaign fields to display and the arrangement. 

  1. Just like you would for a page layout, drag and drop the fields that you want to be visible. 
  2. Click Save
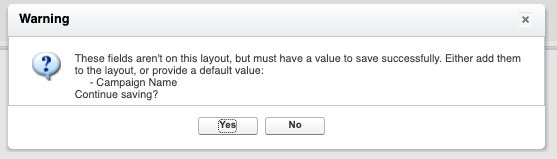
  3. If you see this message, go ahead and select Yes. We won’t need the Campaign Name on this layout for our use case.
  4. You can edit this later from the Edit Layout button at the top of the page.

Now we can add our new layout to the Campaign record page

  1. From Object Manager > Campaign > Lightning Record Pages
  2. Select the Lighting Record Page you want to update and click Edit.
  3. Drag the ‘Related Record‘ component where you want it on the page
  4. In the Related Record settings panel on the right, update the following:
    • Header Label = the heading that should appear at the top of that layout on the page
    • Lookup Field = Use this Campaign
    • Update Action = the action that you created in Step 1
    • Click Save
  5. Select ‘Set Component Visibility’ for the Related Record component. 
  6. In the filter area, select Type = ‘Conference’

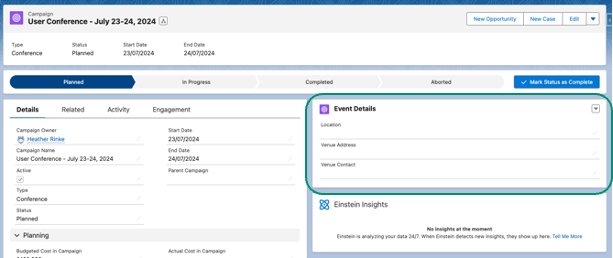
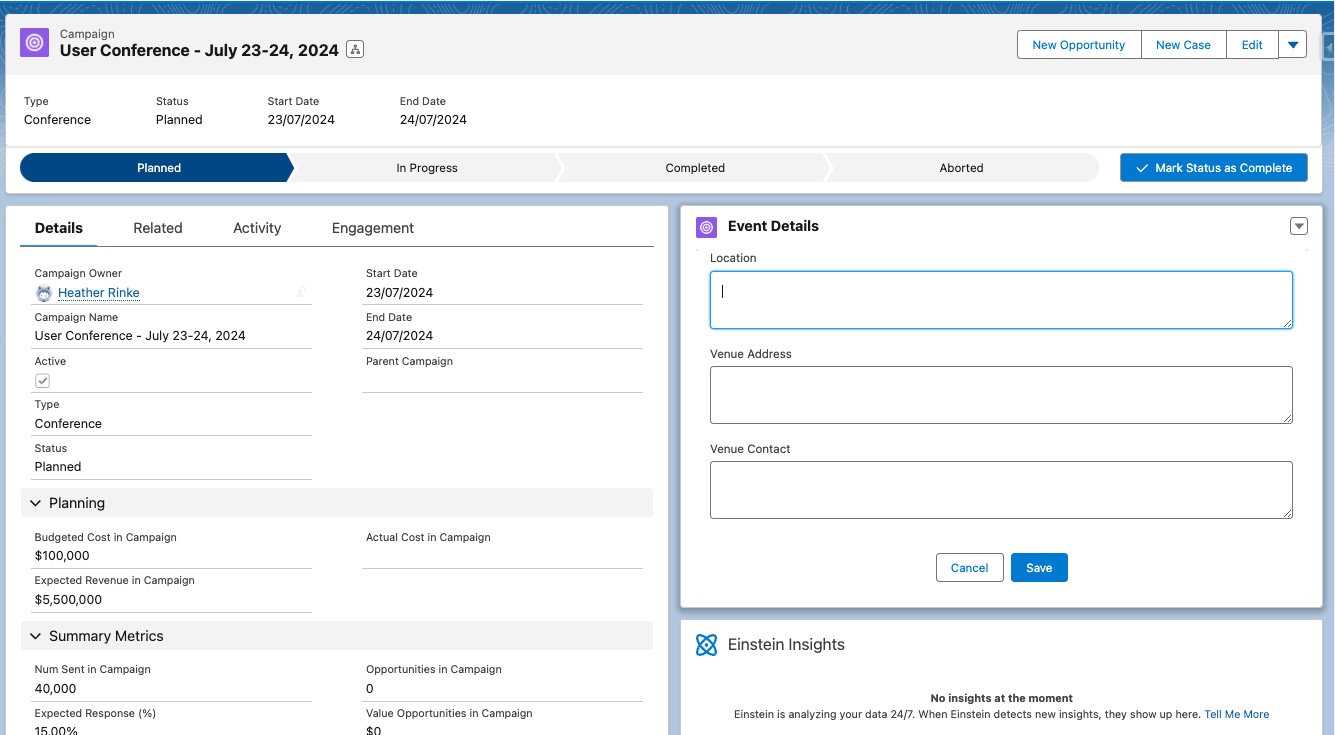
Voila! Now when working on a Campaign record, the Event Details will appear in their own “section” when the Campaign Type = Conference.  You can repeat this for other fields you want to appear on the page in specific circumstances.

To edit these fields, click the pencil icon next to the field you want to edit. All of the fields in that section will become editable, and notice that the other fields are not. These fields are edited separately because they are part of another component. When done, click the Save button to save the fields in that section. 

Build better experiences with this alternative to Dynamic Forms

While Dynamic Forms in Salesforce are fantastic for jazzing up user experiences, there are times when you need alternatives. Diving into Lightning features such as Quick Actions and Lightning Page Builder can help you to cook up custom solutions that do the job,  like the workaround we’ve explored here for displaying those crucial record fields based on different scenarios.

As you tinker around with ways to supercharge your Salesforce setup, remember, we’re in your corner. Want to chat about how to make your Salesforce dreams a reality? Reach out to the Sercante team today. Let’s brainstorm together and unlock the full potential of your Salesforce journey.

Salesforce Starter was unveiled in August 2023 as an easy way for small-medium businesses (SMBs) to get started with Salesforce CRM. Historically, SMBs have found CRM systems to be overly complex and difficult to implement, but Salesforce Starter was built with this struggle in mind, allowing customers to get up and running in a matter of minutes while making future growth of the CRM easy.

What is Salesforce Starter? 

Salesforce Starter focuses on sales, service, and marketing and provides guided onboarding to ease users into Salesforce CRM. It’s an easy-to-use platform that’s aimed at getting teams at small businesses up and running with a CRM that can grow as the company scales.

The best part is that getting up and running with Salesforce Starter brings your data into the platform. You’ll avoid some migration expenses later on if you outgrow Salesforce starter and decide to implement other Salesforce clouds to replace it.

What marketing functionality is included in Salesforce Starter?

Salesforce Starter’s marketing features focus on emails, segmentation, and, with Pro Suite, process automation. The marketing features work a bit differently than what we’re used to with Marketing Cloud Account Engagement and Marketing Cloud Engagement. But if you’re familiar with the Lightning Email Builder and Salesforce Flows, you’ll be able to pick up Salesforce Starter’s marketing functionality pretty easily. 

Campaign-Centric Workflow

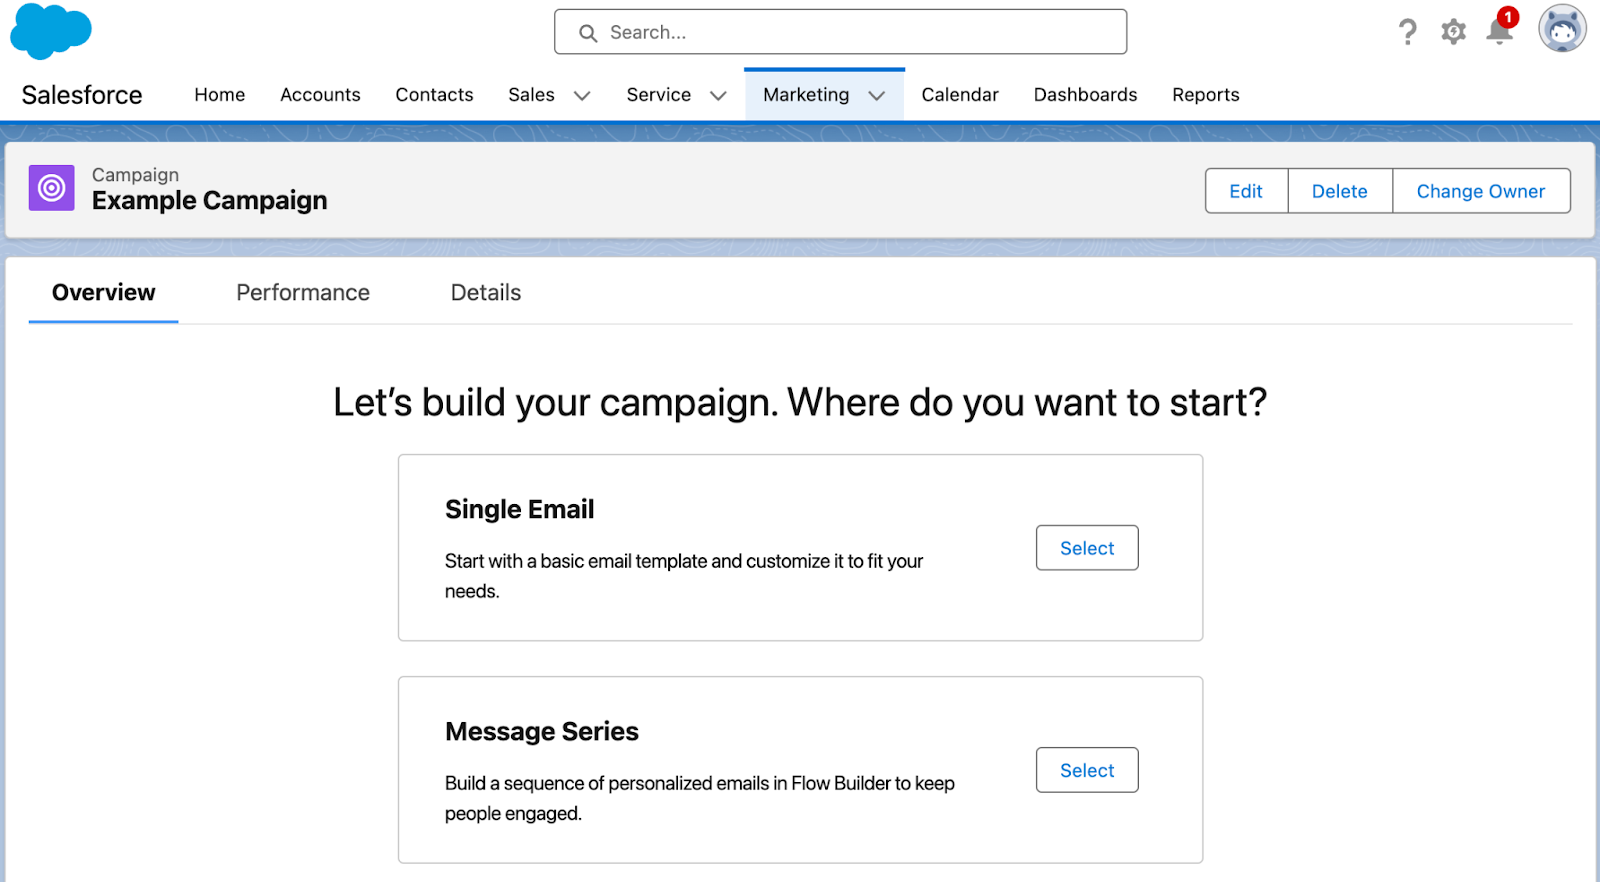
Marketing in Salesforce Starter revolves around the Campaign. Once you’ve created a campaign, you’re guided to choose between creating a single email (similar to a List Email for Account Engagement users, or a single email send for MC Engagement users) or a Message Series (similar to a “Engagement Studio Program” for Account Engagement users, or a “Email Journey” for MC Engagement users).

Segmentation

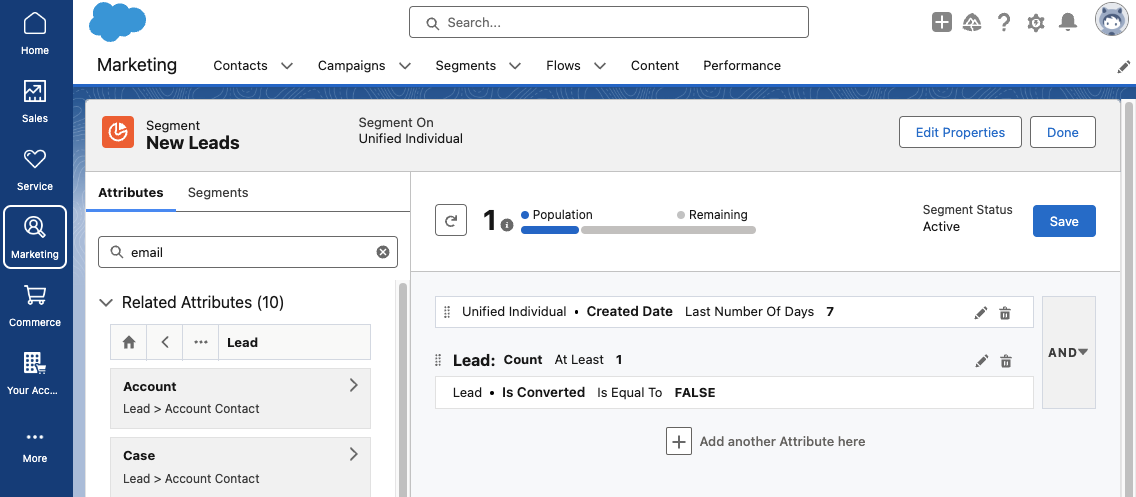
Segmentation in Salesforce Starter is handled with Data Cloud, which allows you to create a unified customer profile and harness data from all interactions your Lead/Contact has with your company. If you’re new to Data Cloud segmentation, I highly recommend working through the Segmentation and Activation Trailhead module to get a feel for creating and editing Segments in Salesforce Starter. This help article also provides several Segment examples to help you get started. 

Before we start building our first email, we’ll want to set up an Audience Segment. A Segment is required to preview and test your email, so we’ll want the Segment running while we’re building the email. Click Select Audience from your Campaign page to begin, then select New Segment

Building Emails in Salesforce Starter

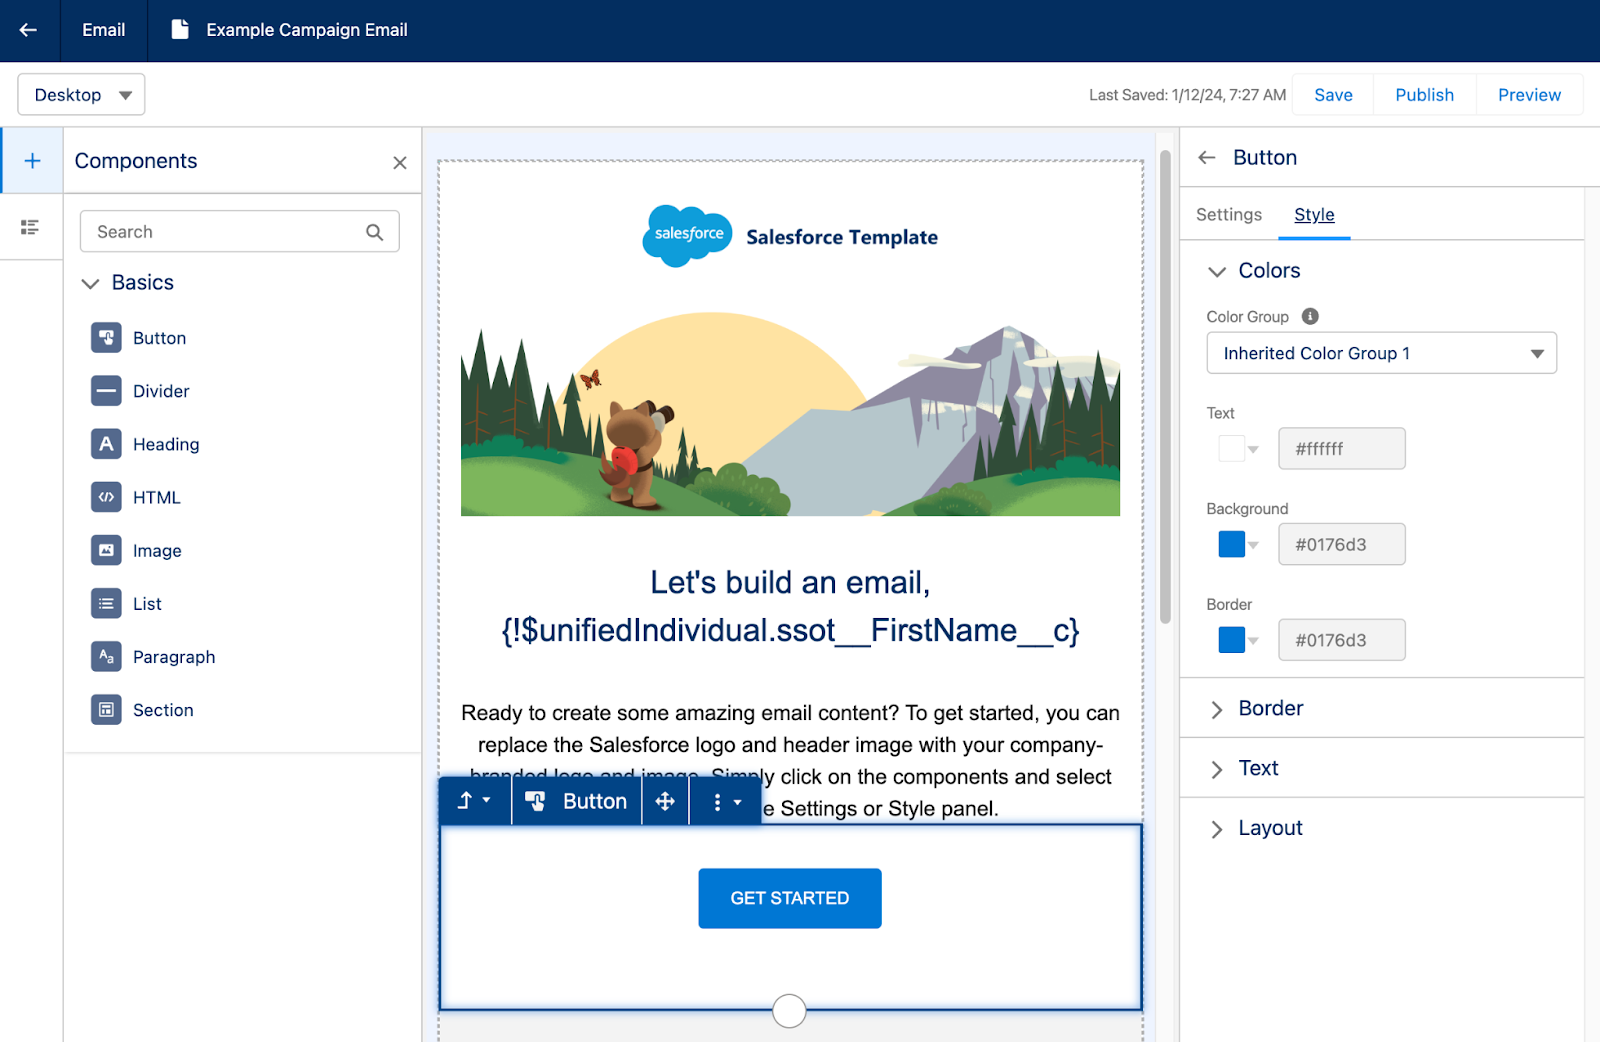
Building emails in Salesforce Starter feels familiar to the Lightning Email Builder. You’ll start off with a pre-built email template that can be edited by dragging and dropping components from the left side menu. Custom styling can be configured on the right side menu and will change depending on the component you have selected. 

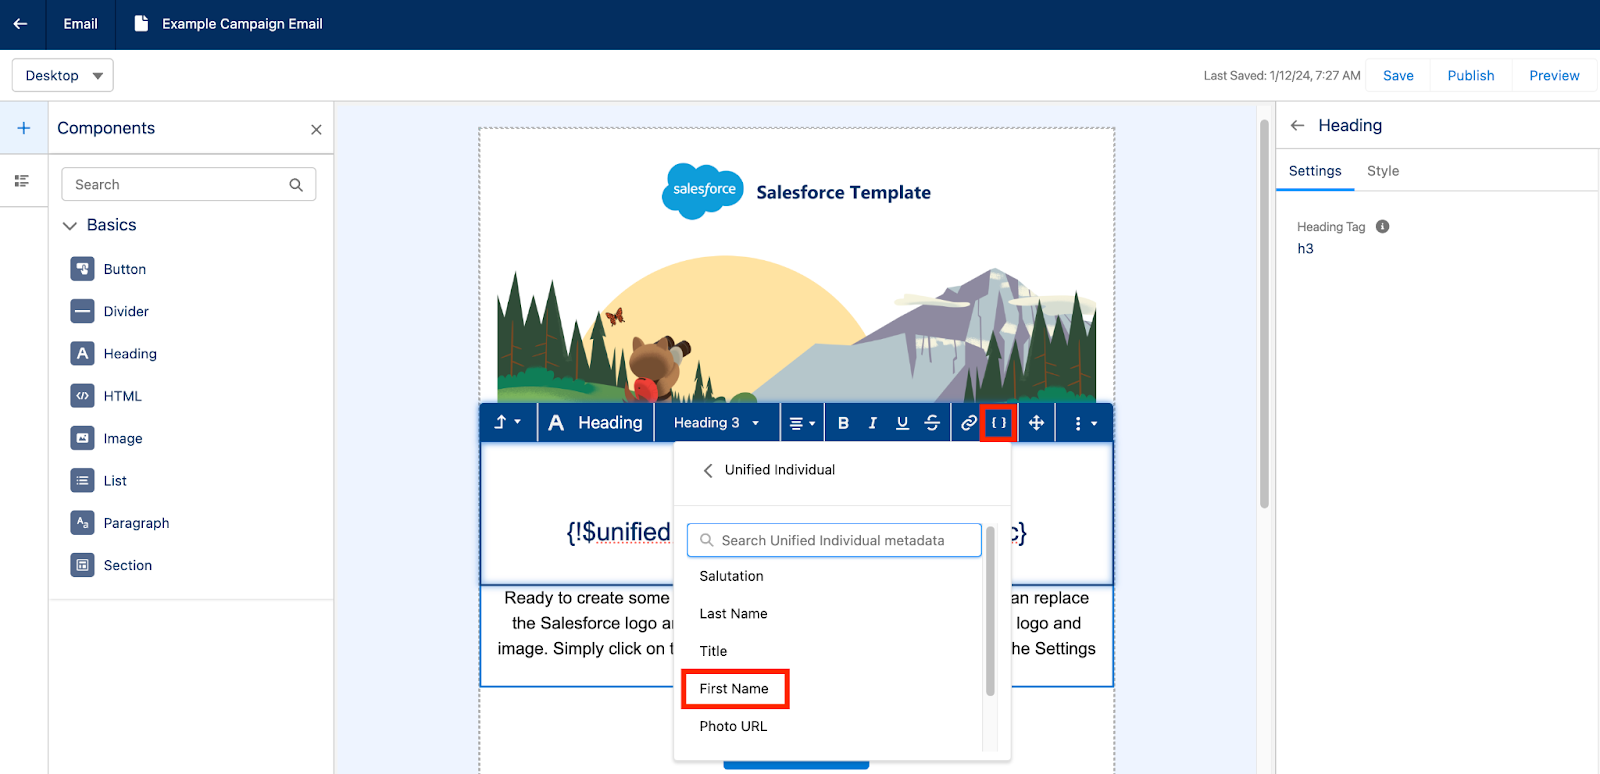
Merge tags can be inserted to personalize the email for each recipient. These merge tags rely on the Data Cloud unified individual rather than having to choose a specific Marketing Platform or Lead Object field. 

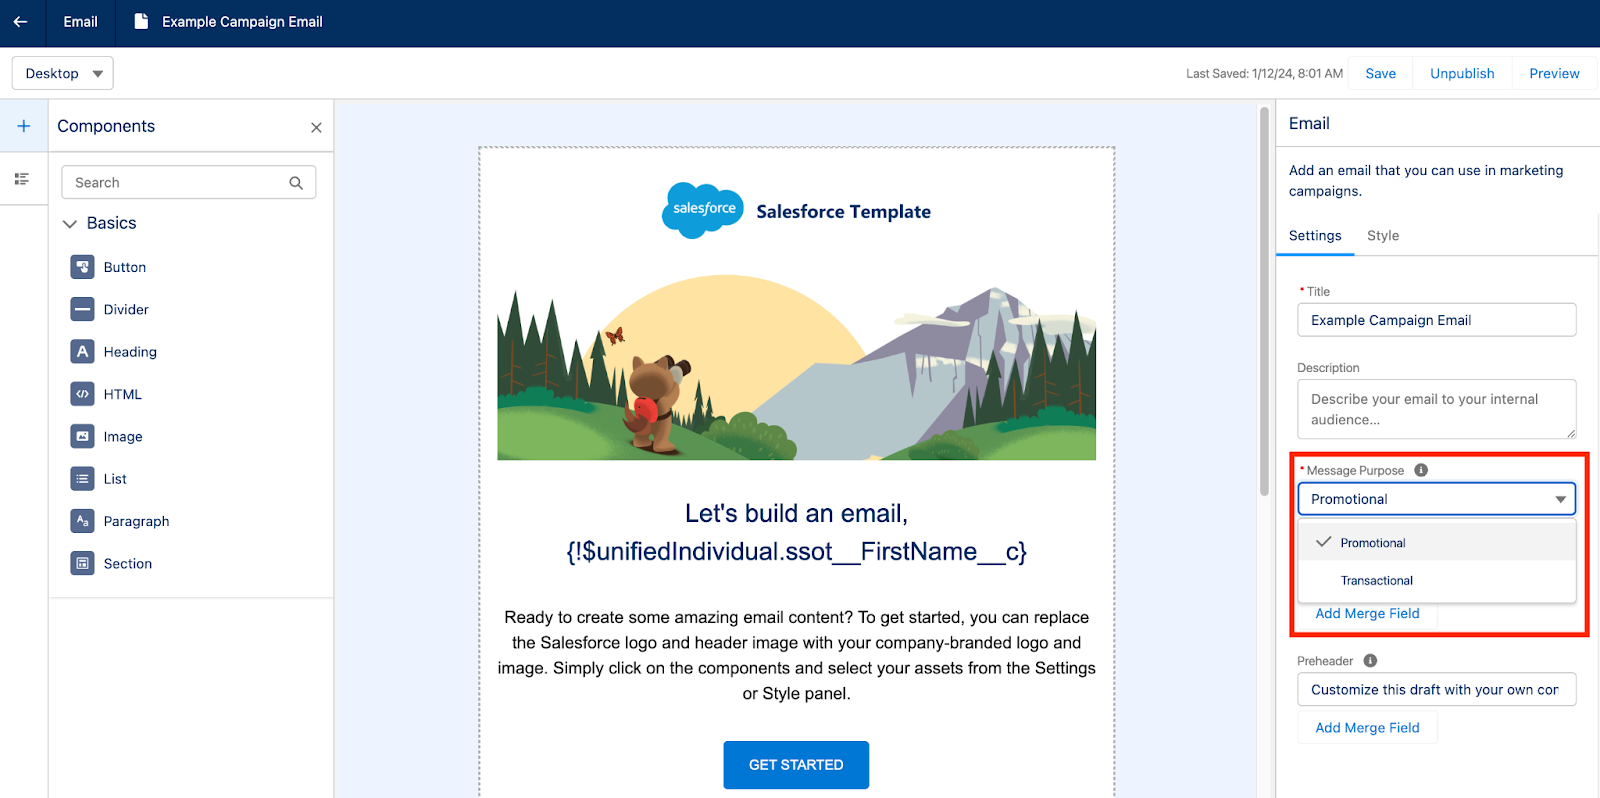
Salesforce Starter also supports sending transactional, also known as operational, emails by toggling the Message Purpose field.

Once you are done building your email, make sure you select Publish before previewing and testing your email. Publishing the email will ensure all the associated images are published and won’t be broken during testing. 

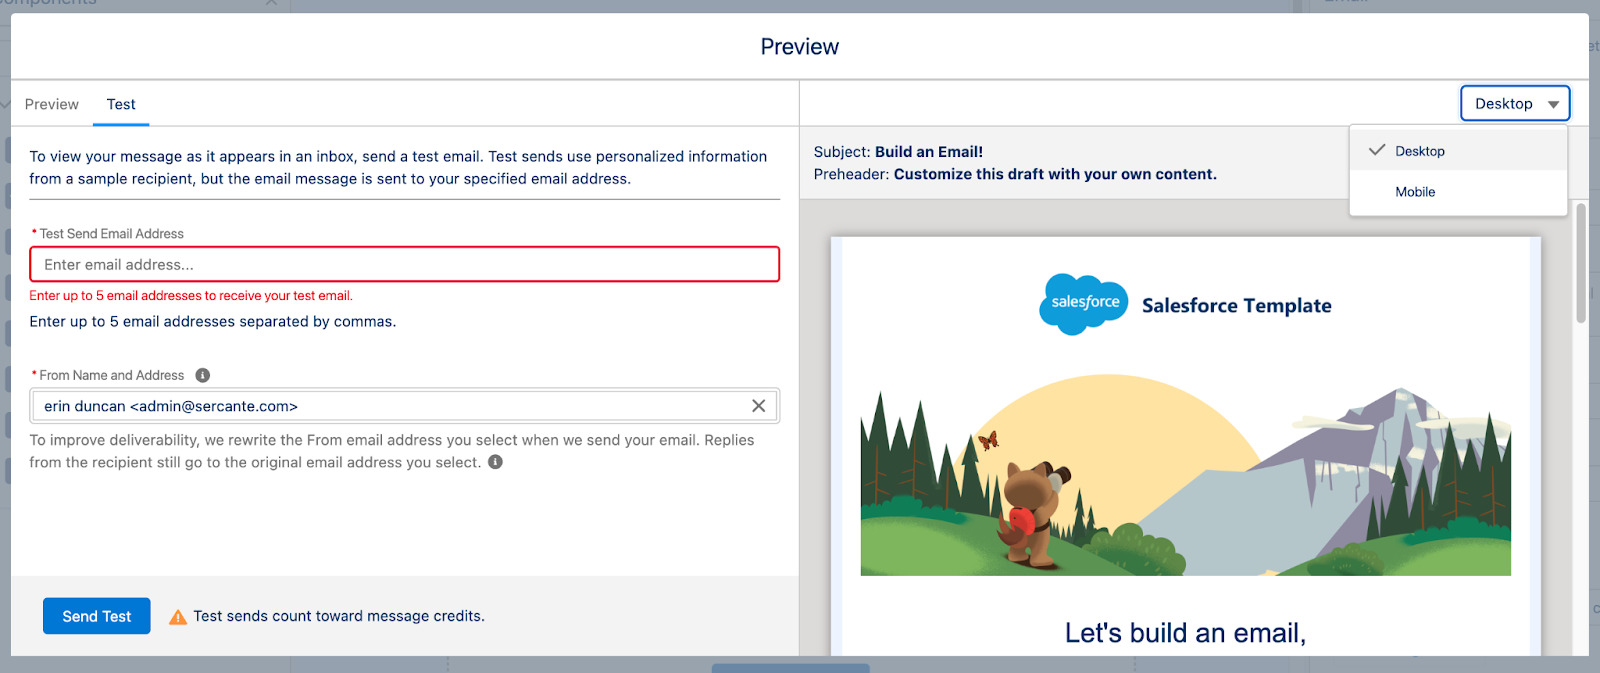
The Preview option allows you to toggle between Desktop and Mobile views to ensure your email is responsive. You can also send your team a test email for review, but note that test sends count towards Salesforce Starter’s base credits of 2,000 emails per org/month.

Sending Single Emails with Salesforce Starter

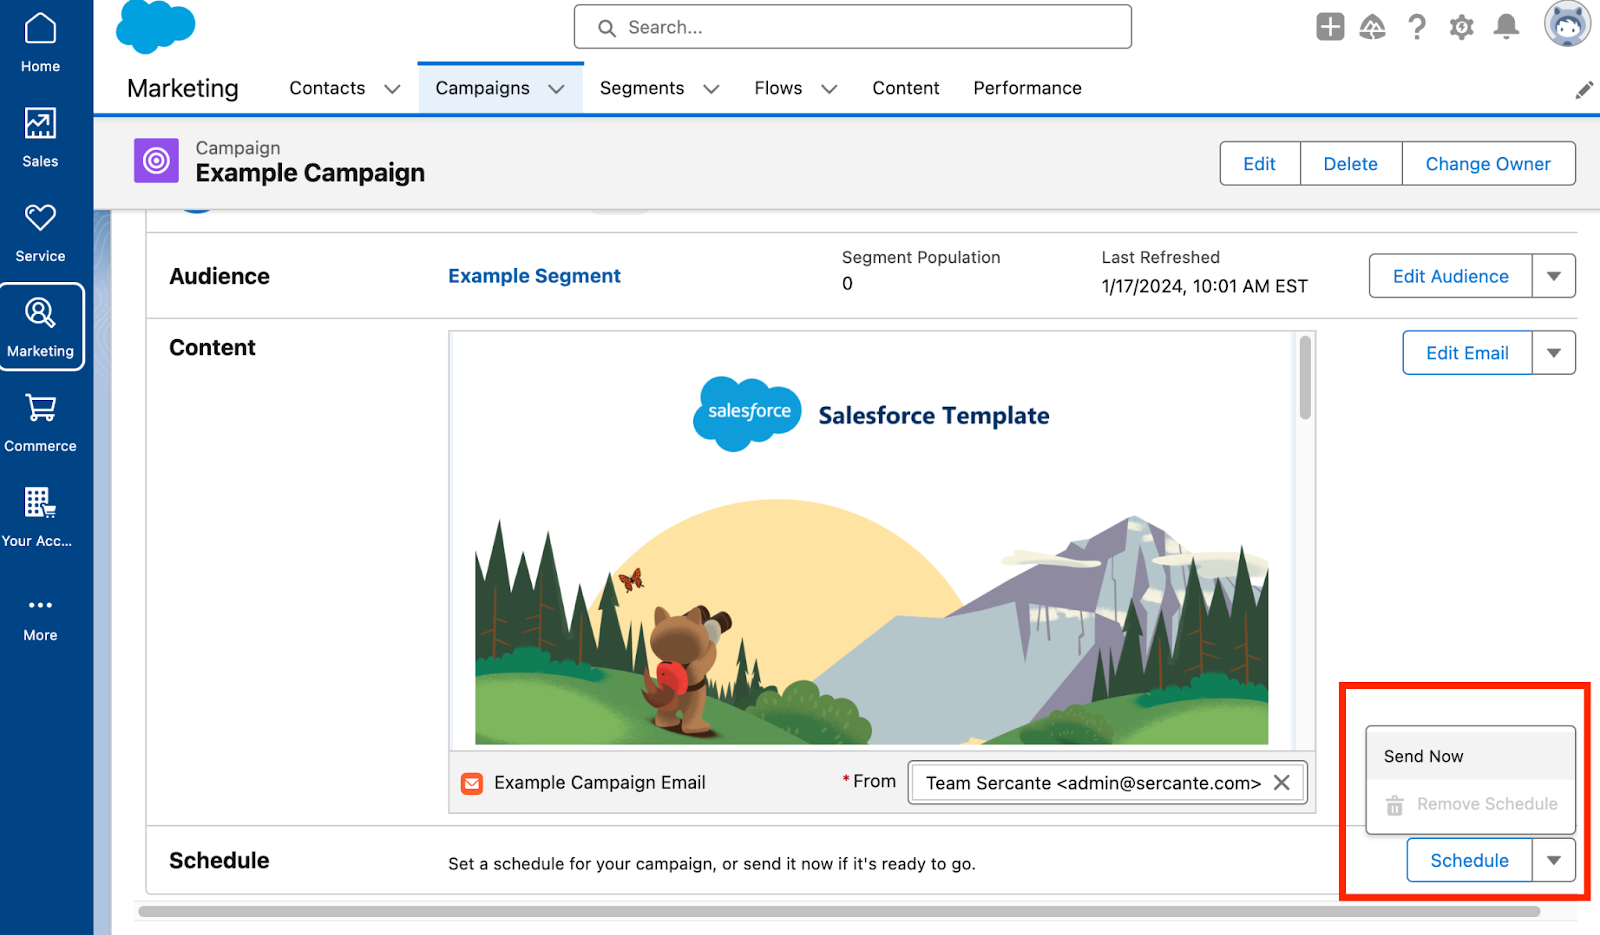
If you’re sending a single email, navigate back to the Campaign Overview page and select Schedule or Send Now.

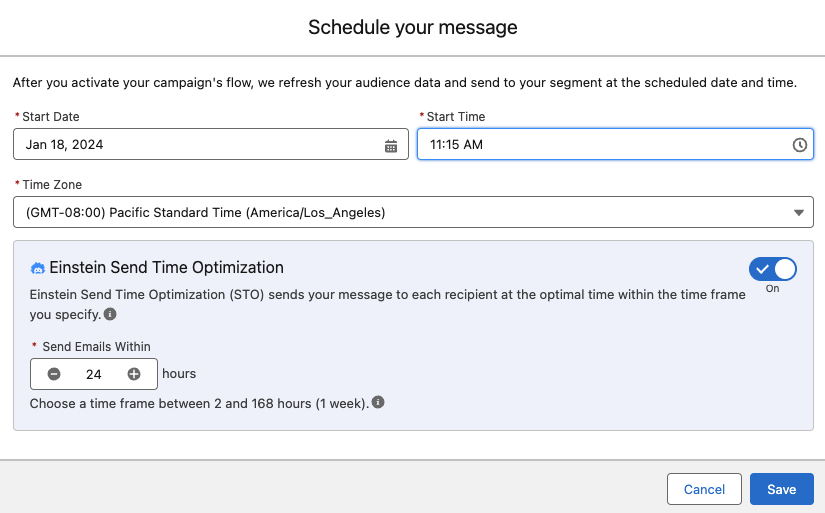
When scheduling, Einstein Send Time Optimization is available to help select the best time for each recipient on your Audience Segment. Check out our blog post, Pardot Einstein Send Time Optimization: A How-To Guide, for more information on how Einstein Send Time Optimization works.

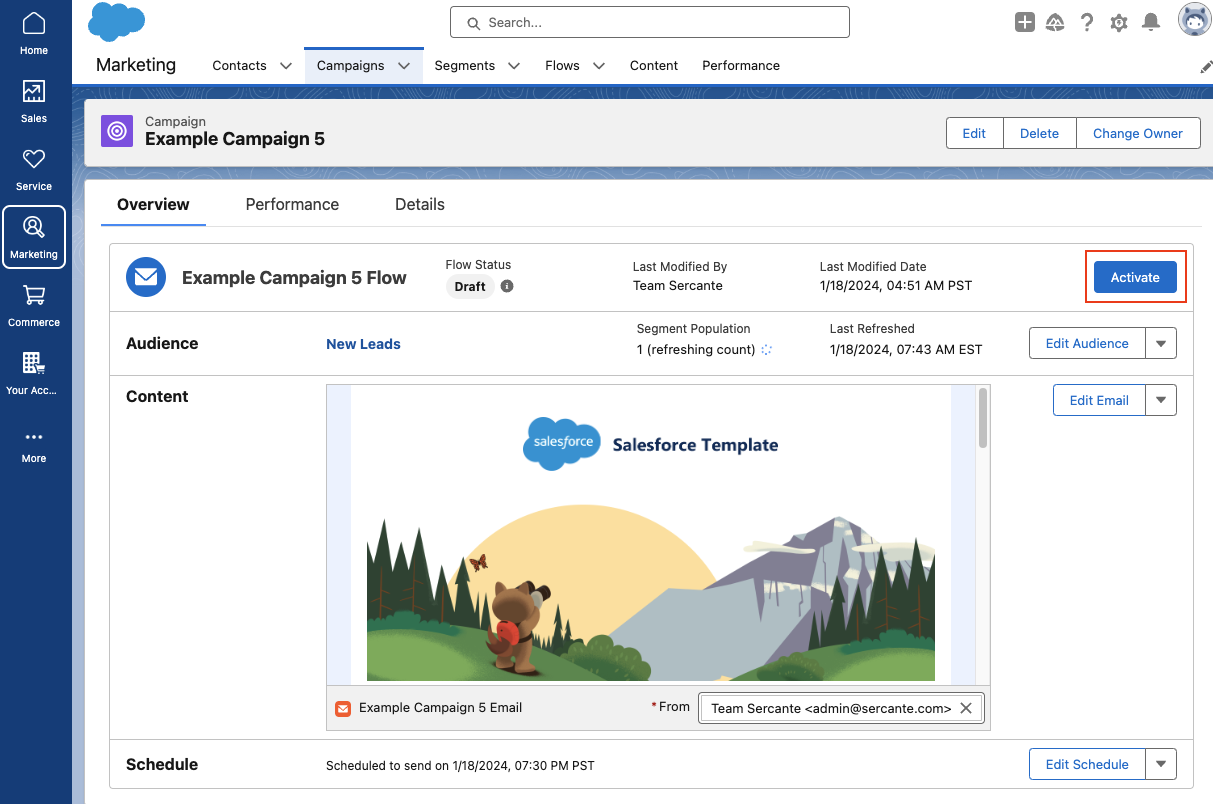
If you’ve selected Send Now your Email Campaign Flow will automatically be activated. However, if you are scheduling the email in advance, you’ll need to manually select the Activate button to ensure the Flow is ready for this email send. 

Sending a Message Series in Salesforce Starter

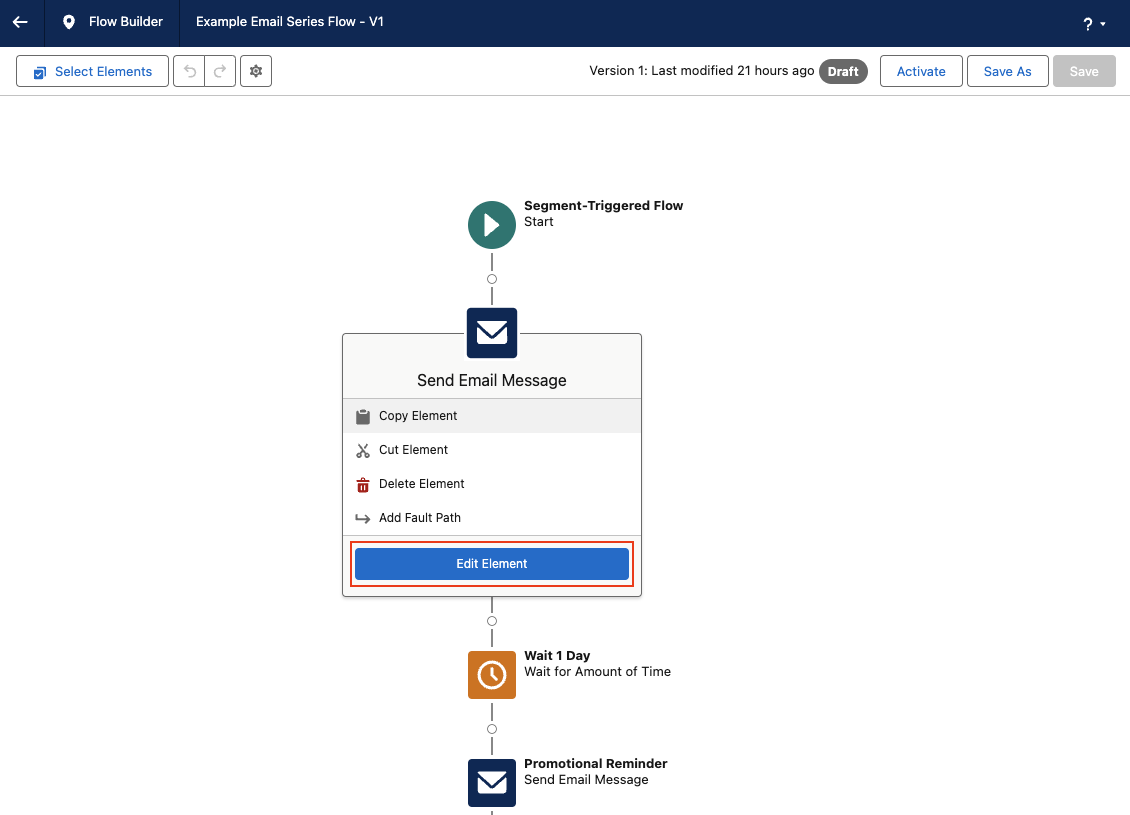
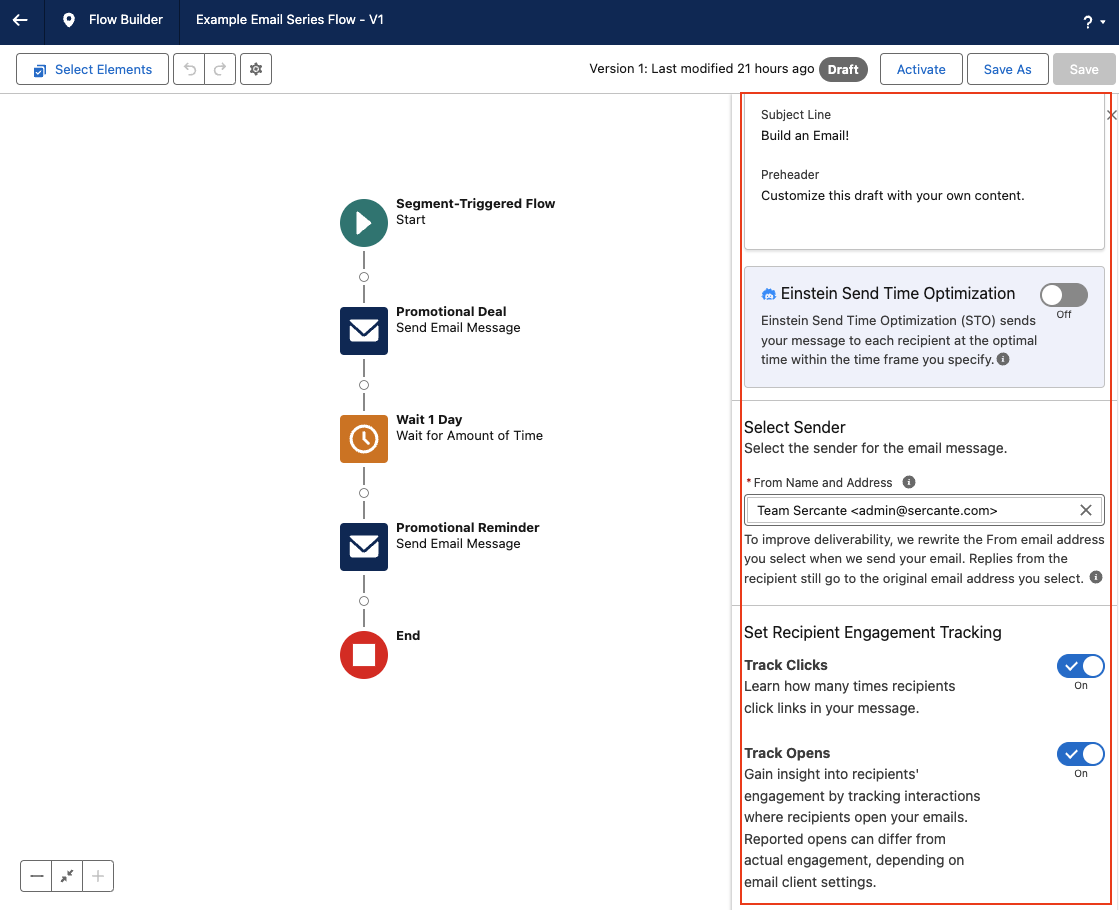
If you’re sending a message series, you will have to first edit your Flow so you can configure the schedule, segment, and wait steps between each email send. By default, the Message Series Flow will be built with a 1 day wait step between each email, Einstein Send Time Optimization is disabled, and Track Clicks and Track Opens is enabled. All of these settings can be reconfigured by clicking each element within the flow. 

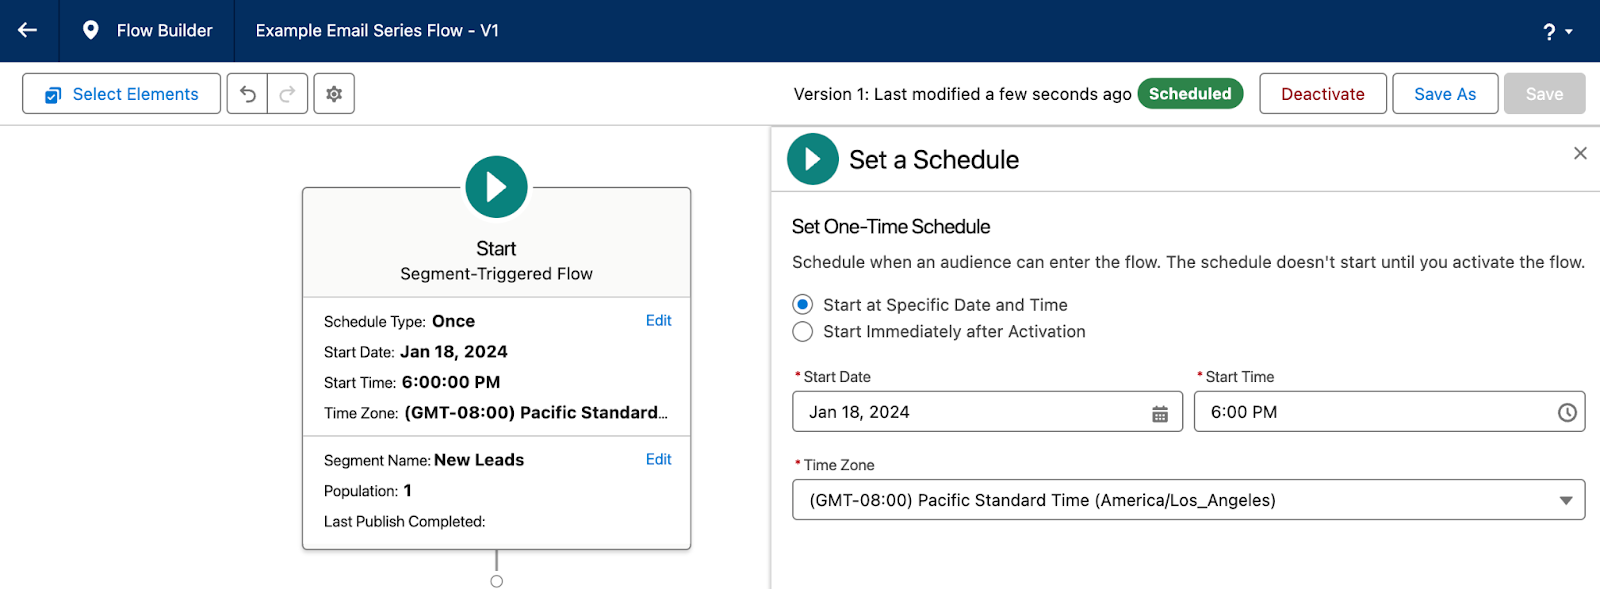
Make sure you select the Start element to configure your segment and schedule. 

Once you’ve finished configuring your Message Series Flow, make sure you Save and Activate the flow before navigating back to the Campaign overview page. 

Now, if you are new to Flow and the steps above are causing a bit of existential dread, don’t worry! Flows seem a little intimidating at first, but I promise they are pretty easy to use and you can do some really neat things with them. Check out our blog post, An Introductory Guide to Salesforce Flow for Marketers, or the Flow Builder Basics Trailhead Module to get more familiar with Flows. 

Salesforce Starter Reporting and Performance

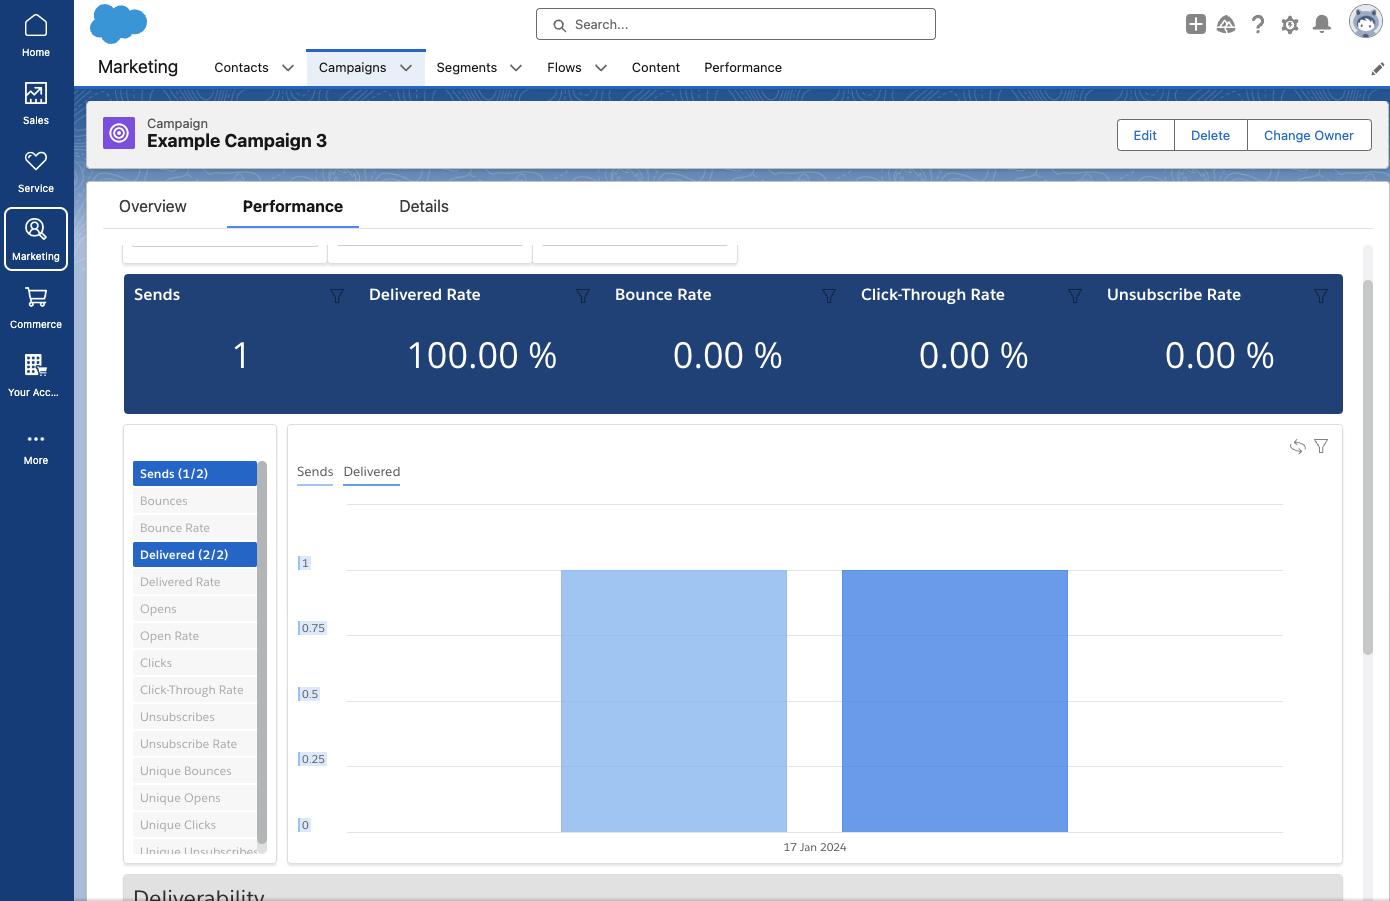
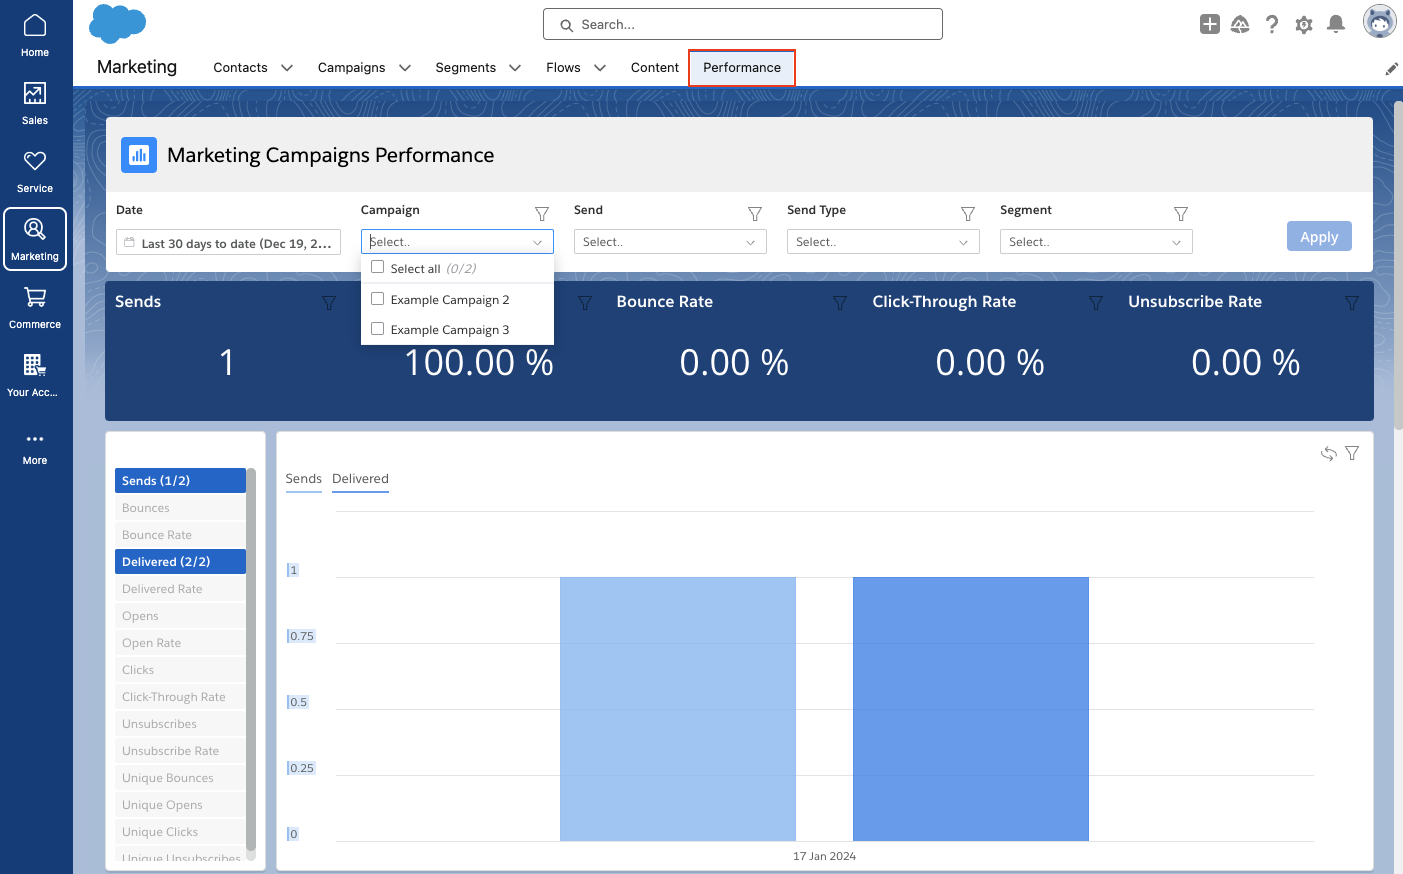
Salesforce Starter automatically collects and displays aggregate engagement data about your campaign on the Performance page. Common metrics, such as opens, clicks, unsubscribes, bounces, etc. can all be viewed in this prebuilt dashboard. 

To view the Performance of multiple Campaigns, navigate to the Performance tab. In this view you can filter your dashboard by date range, campaign(s), individual sends, send type, and even segments.

Salesforce Starter — easing small business marketers into CRM life

And there you have it! In summary, Salesforce Starter is a great way for SMBs to get started with CRM and Marketing Automation. As your company and familiarity with CRMs expands, you may outgrow this edition. But the great thing about Salesforce Starter is that you can avoid migration costs because your data is already in the Salesforce platform if you outgrow the product at any point. 

Reach out to the team at Sercante if you have any questions or need help figuring out if Salesforce Starter is the right tool for your team.

The beginning of the year is an ideal time to have a reset on your Marketing Cloud contact strategy. That way, you can get your Marketing Cloud contacts in order, have an org cleanup, and create a future-proof strategy that will ensure those contacts within your org are serving a purpose (and you stay within your Marketing Cloud contact limit).

So where do you begin when it comes to developing a Marketing Cloud contact strategy? 

A Marketing Cloud contact is an individual added to any contact database within your Marketing Cloud instance. So, your Marketing Cloud contact strategy is the process you’ll create to make the most of your marketing efforts by focusing on promising contacts and letting go of contacts that aren’t helping your team reach its goals.

Step 1. Find out how many Marketing Cloud contacts you have purchased.

Every Marketing Cloud contract will have a contact limit. You can expect communication from your Salesforce Account Executive if you breach this limit, which can result in you needing to pay for more contacts. So it’s important to know what you’re working with. 

Refer to your Marketing Cloud contract to find how many contacts your license includes, or reach out to your Salesforce Account Executive to find out. 

Step 2. Find out how many contacts you currently have in Marketing Cloud.

Once you know the number of contacts you have purchased, you’ll want to find out how many contacts you currently have in Marketing Cloud. This will help you identify if a review or a cleanup is needed. 

Follow these steps to find out how many contacts you have in Marketing Cloud:

  1. Go to Contact Builder > ‘All Contacts’ tab
  2. From there, click ‘All Contacts’ for the total number to show up.

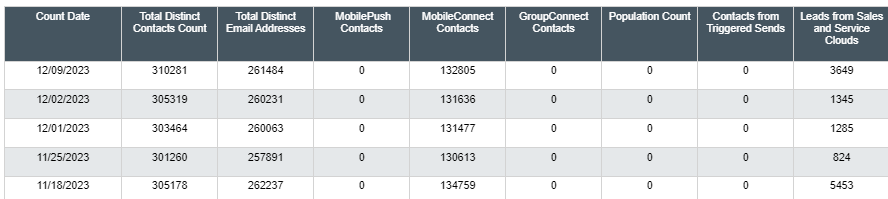
Alternatively, you can run a report that will show you how many contacts you have from each audience, such as Sales and Service Cloud leads, and contacts, per channel.

Keep your Marketing Cloud contact numbers handy

At this point you should have two numbers:

  1. The number of contacts you are contracted to
  2. The number of contacts currently in Marketing Cloud 

Review your Marketing Cloud contacts

The next step is to review your contacts. Think about:

  • What they are doing
  • Who they are
  • If they should even be in Marketing Cloud (after all each contact comes at a cost)

From there, decide which ones you can remove from your org. 

Ask Yourself: Do all your contacts provide value to your business?

If you’re not sure how to make that decision, then check out this blog post where Sarah Smith explores the reasons why deleting your marketing contacts regularly is a good thing when you delete the right ones.

Step 3. Review Marketing Cloud contacts and complete your cleanup tasks.

A key part of a good contact strategy is ensuring you only have the contacts that are needed in Marketing Cloud. As part of your contact strategy, it’s important to evaluate your current contacts and perhaps have a clean-out. 

Check for Duplicate Records

One of the biggest reasons Marketing Cloud users go over their contacts limit is due to duplicate records. 

First, identify how many duplicates you have using SQL queries in Automation Studio

  1. Identify how many duplicate records you have by following the instructions in this trailhead: Evaluate Your Contacts Unit 
  2. Delete your duplicates – follow this Salesforce help article: Contact Delete Best Practices in Contact Builder

Bonus Duplicate Contact Tips

Identify the source of the duplicates: 

  • Do you import contacts directly into Marketing Cloud?
    • This can sometimes cause an issue, particularly if you are also syncing records from Salesforce
    • You’ll end up with the “Salesforce version synced down” + the Marketing Cloud version you imported!  
  • Review your Salesforce lead-sync approach
    • Syncing both leads and contacts can often cause duplicates in Marketing Cloud when a lead is converted into a contact, particularly if you’re using Salesforce Record ID as the unique identifier
    • Your lead record will have a lead ID and this lead will sync with a Marketing Cloud contact but when you convert that lead it will have a different ID, a contact ID thus creating a duplicate record in Marketing Cloud 
    • It is however best practice to use the Salesforce ID as  the unique identifier rather than email 
  • Review your Salesforce records 
    • Are there duplicates here? If so then this could be causing duplicates in Marketing Cloud as well 
  • Do you import records into Salesforce (manually or via a third party)? 
    • This could cause duplicate records in Salesforce and therefore Marketing Cloud

Review contacts that do not have an assigned channel address

Assigned channels are things like email, mobile, ad studio, and any channel within Marketing Cloud that uses your contacts to target. If you have contacts that do not have a channel address, then these are likely to be a good candidate for removal. These types of contacts often get into Marketing Cloud because of the Marketing Cloud Connector [Keep reading to implement a solution that minimizes the “wrong” records being synced into Marketing Cloud from Salesforce!]

Identify if your contacts do not have an “assigned channel.” Why? If they don’t have an assigned channel then you haven’t “used them” in your marketing campaigns:

  1. In Marketing Cloud, navigate to Automation Studio.
  2. Click the Activities tab, then click Create Activity.
  3. Select Data Extract and click Next.
  4. Add a name, external key value, and a file naming pattern. The file naming pattern value doesn’t actually affect anything, because all results go into a Contacts Without Channels data extension in the root folder of the account.

Remove contacts that are not right for your business

If you have been letting everyone into your Marketing Cloud org, then chances are some folks just shouldn’t be there (for example, competitors or spam submissions). As part of your contact strategy, it’s important to define the purpose of Marketing Cloud for your business. If it’s only to engage with leads and customers, then you could remove staff, partner, and competitor contacts.

Use SQL and Automation Studio to identify any contacts that do not meet your criteria (for example, if they do not have a “client” or “lead status” or if they have your business email address). Add these contacts into a non-sendable data extension and then delete them. 

Step 4. Implement the right processes to keep a clean Marketing Cloud contact database moving forward.

Below are some suggestions to help when creating your Marketing Cloud contact strategy so it’s an easy lift for your team and you avoid over-limit surprises.

Think about the ways Marketing Cloud fits into your overall business goals

Start with the right foundation. Evaluate the ways your marketing and business goals align with your team’s use of Marketing Cloud.

Who are your audience personas? And who are you connecting with through Marketing Cloud? Your list may include:

  • Leads
  • Customers
  • Partners

Putting this on paper may help you prioritize your contact usage and determine the ‘nice to haves’ versus the ‘need to haves.’

Determine how you’ll segment your Marketing Cloud contacts

From there, create segments for each group of contacts:

  • Those who are highly engaged and likely to purchase
  • Those who may need a little more encouragement 
  • Those at the start of their journey who need a lot more nurturing 

You can follow Cara Weese’s blog post Audience Segmentation Strategies for Salesforce Marketers for guidance on segmenting your contacts in Marketing Cloud.

Once you have your segments, create a Content Strategy for each. Then, you can develop messaging strategies for each of your audience segments.

Control how Marketing Cloud syncs contacts with Salesforce

This one is for Marketing Cloud Connect users. If you use Marketing Cloud Connect with Salesforce, create a ‘Sync to Marketing Cloud’ field in Salesforce.

  • Develop a list of criteria for who should be in Marketing Cloud. For example, everyone should at least have an email address or mobile number, and everyone should be mailable and be opted into emails and/or texts.
  • Use a Salesforce flow to check the Sync to Marketing Cloud field
  • Select the field in Marketing Cloud as the sync criteria. 

You can also use a single unique identifier, such as Salesforce ID, to match Marketing Cloud records to Salesforce records. 

Other contact strategy tips

  • Create contact count reports and build a process to ensure your team is monitoring them regularly. This can be as simple as setting a monthly calendar reminder to check the contact report.
  • Build a process in Automation Studio via a script to remove contacts. This avoids manual deletion in the future.
Final tips from our Marketing Cloud Developers at Sercante 

Zach Norman, Marketing Cloud Developer of 12 years: If you have Marketing Cloud Connect enabled and you implement a “sync to Marketing Cloud” field, any contacts that you delete that do turn out to be needed in Marketing Cloud will sync back down should they meet your criteria.Note: Engagement data will be lost for the contact once you delete it though 

Chris Putnam, Marketing Cloud Developer of 6  years: Before deleting unwanted contacts, copy them to a non-sendable data extension. This will serve as an archive of your deleted contacts. Capturing the date of deletion as well as the date the contact joined Marketing Cloud would be two useful data points to include.

Future-Proof Your Marketing Cloud Contact Strategy 

Remember, there’s no one-size-fits-all when it comes to creating a Contact Strategy, it needs to be specific to your business and your goals. However, there are steps you can follow to create a future-proof plan that will ensure all your contacts serve a purpose in Marketing Cloud:

  • Know your limits.
  • Keep your data clean.
  • Implement automation to manage your contacts.
  • Review and reiterate continuously — your plan needs to grow as your business does!

Need help with creating a contact strategy for your marketing automation platform? Get in touch with the team at Sercante to get the ball rolling.

As your business grows, so does your Marketing Cloud Account Engagement org. And that’s a good thing. Inevitably you’ll reach a point where your org is stretched too thin. 

You may start to experience issues such as:

  • Frequently hitting System Limits (Automation rules, ESPs, Mailable Database, etc.)
  • Difficulty locating the right assets and segmenting Prospects
  • System Processes running slower than expected
  • Struggling to manage the traffic flow of outgoing emails

There’s no need to panic. When your org is at maximum capacity, there are a few strategies you can follow to optimize your system. Here they are:

  1. Establish regular maintenance and clean-up policies.
  2. Upgrade your Account Engagement edition.
  3. Split your org into multiple Business Units.

Let’s take a look at each of the strategies you can use to prevent org growth issues or address them so you can keep getting the most out of your Account Engagement org.

Establishing Maintenance and Clean-Up Policies

Regularly archiving old assets and prospects is the best practice for all orgs. These strategies will not only keep your system running smoothly and make assets easier to find, but they also protect your sending reputation by preventing you from emailing old, unengaged prospects. 

I like to establish criteria for my regular clean-up efforts in advance. This allows me to ensure other stakeholders are on board with the archiving guidelines and makes the process easier to repeat each month or quarter. 

Below are some of the criteria I use to clean up our internal Sercante org each month:

  • Archive Forms that have not been completed in 2+ years
  • Archive Landing pages with no views in 2+ years
  • Archive Automation Rules that have been paused for 3+ months or have not matched a prospect in 12+ months
  • Archive Prospects who have been inactive for 18+ months and are not associated with an open opportunity
  • Archive any assets with names containing “Test”, “Delete”, “Demo”, or “Example”

The Account Engagement Optimizer will also help you proactively spot potential issues or causes for system lag, so make sure you regularly review your Optimizer report as part of your regular maintenance efforts. 

We have several blog posts that will help guide you through establishing your maintenance and clean-up policies.

If you’re still running into issues after cleaning your org, it may be time to consider an edition upgrade and/or Business Units. 

Upgrading your Account Engagement Edition

If you’re constantly hitting system limits after archiving old processes and assets, it may be time to upgrade your Account Engagement Edition. Below is an overview of the system limitations for each edition. Keep in mind that Advanced and Premium Editions come with added features, such as Einstein and Marketing Data Sharing, that can help streamline your processes as well as extend limits. 

Edition
FeatureGrowthPlusAdvancedPremium
API Access – Calls Per Day25,00050,000100,000100,000
Automation Rules50100150150
Mailable Prospects10,00010,00010,00075,000
Custom Object Integration44
Engagement Studio Programs20100200200
Repeating ESPs10101015
External Activity Extensions102030
External Activity API (Daily)50K100K100K
File Hosting100MB500MB10GB10GB
Forms50UnlimitedUnlimitedUnlimited
Landing Pages50UnlimitedUnlimitedUnlimited
Tracker Domains3102020

Moving to Multiple Business Units

If the above options will not solve your org woes, it may be time to consider splitting your org into multiple Account Engagement Business Units. 

Business Units (BUs) allow you to partition your database while still being connected to the same Salesforce instance. Partitioning your database is a great strategy whenever you have disparate marketing teams or multiple unique audiences that require distinct marketing assets.

Typical partitions are by Region, Product, Brand, or Industry Vertical. The Advanced edition includes 2 BUs, Premium includes 5 BUs, and additional BUs can be purchased as an add-on.

Benefits of Multiple Business Units

  1. Each BU has its own limits in regard to the number of automations, the number of Engagement Studio Programs, etc. 
  2. Each BU has its own sending IP and sending reputation
  3. Each BU can have an Email Preference Center and email opt-in process unique to its own needs.
    • This is especially beneficial when splitting BUs by region and complying with each region’s spam/compliance requirements
  4. Scoring and Grading is separate and unique to each BU
  5.  User access and roles can be changed (and automated) per BU
  6.  Account Engagement Account Settings can differ between BUs (i.e. operational emails, connector settings, 1st/3rd party tracking, etc.)

Considerations for Multiple Business Units

  1. Mailable Database limits are shared across business units. So, if you’re constantly hitting against your mailable limit, Business Units won’t solve your issues. You will need to either reduce the number of mailable prospects in your org or purchase additional Contact blocks. 
  2. Only platform assets are easily shared between BUs. Platform assets consist of Snippets as well as Emails and Landing Pages built in the new Lightning Builders. All other assets can be copied and transferred between BUs using the Bulk Asset Copy Flow
  3. BUs do not share Campaigns. When using multiple BUs, you need Campaign record types to manage which campaigns sync to which BUs. A campaign record type can only have a one-to-one relationship with a BU.
    • Campaign hierarchies can be used as a workaround to view a campaign’s metrics across BUs. In the example structure below, you could have the two BU campaigns nested under a parent campaign in order to view the metrics across both campaigns.
      • Webinar ABC (Parent Campaign)
        • Webinar ABC US (Syncs to the US BU)
        • Webinar ABC EU (Syncs to the EU BU)
  4. BUs cannot share the same Tracker/Vanity Domain

If Business Units sound like the best next step for your org, check out some of Business Unit blog posts for tips on getting started:

Solving Account Engagement Org Growth Challenges

Need help figuring out how to deal with your Account Engagement org’s growth? Contact the team at Sercante to start a conversation.

Salesforce Campaign Record Types are a great feature to employ when you have varying page layouts, required fields, Campaign processes, or teams for different types of Campaigns. However, often we see orgs deploy Campaign Record Types without really needing them, adding an unnecessary level of complexity to their org. In this post, we’ll cover how to determine if you actually need Salesforce Campaign Record Types and some tips and tricks for better management of Salesforce Campaigns overall. 

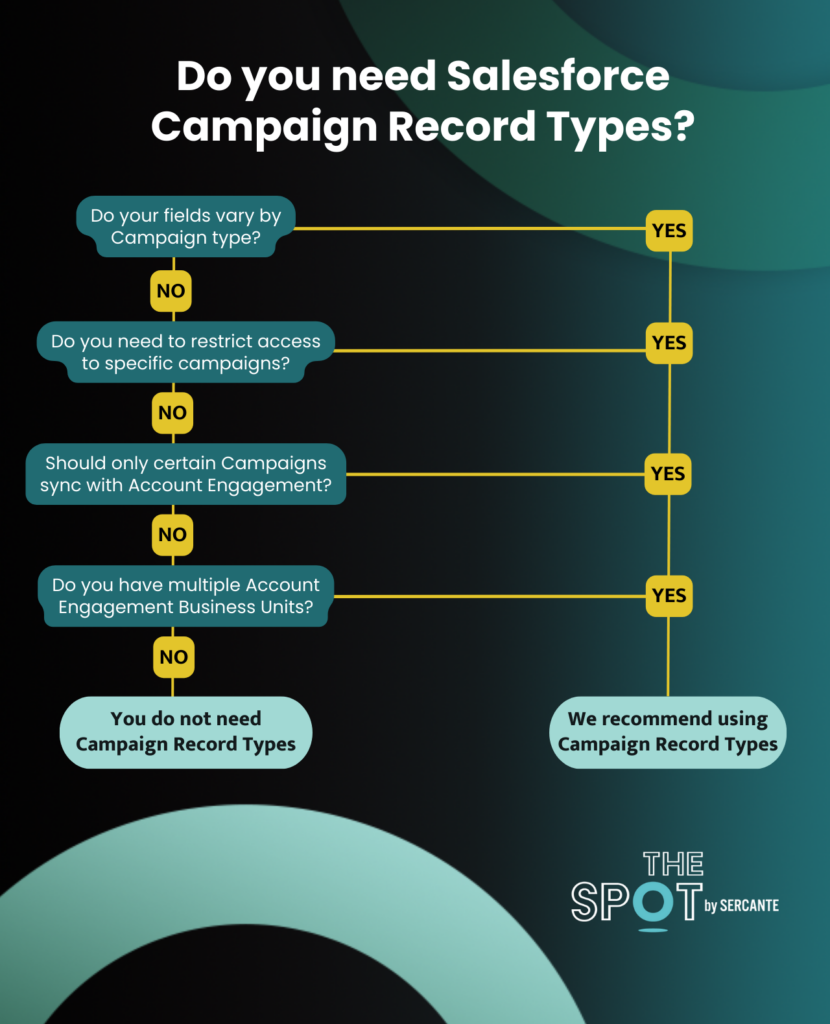
Use this infographic to determine if you need Salesforce Campaign Record Types

Do fields vary by Campaign Type?

Needing different fields and/or having different field requirements for different Campaign Types is a great use case for Campaign Record Types. For example, you may want to record “Start Time” for Webinar Campaigns, but the “Start Time” field should not be required and isn’t relevant for Email or Tradeshow Campaigns. If you only have one or two variations like this, you can create Validation Rules to require fields when appropriate, but if many of your Campaign types have varying Fields and Requirements, you’re better off creating Campaign Record Types with a Page Layout for each variation. 

Dynamic Forms would be an excellent solution for the above scenario, but Dynamic Forms are not yet available for the Campaign object, but you can upvote this feature request on the IdeaExchange!

Do you need to restrict access to specific types of Campaigns?

Another use for Campaign Record Types is when you have multiple teams creating Campaigns, but they should be restricted to specific types of Campaigns. For example, if both your Sales and Marketing teams are creating Campaigns, you may want Sales to only create Email Campaigns while Marketing can create campaigns for Email, Event, Webinar, Tradeshow, etc. Campaign Record Types allow you to customize which Profiles have access to which Record Types. 

Should only certain Campaigns sync to Account Engagement?

When setting up Account Engagement Connected Campaigns, you have to select which Salesforce Campaign Record Type(s) sync down to Account Engagement. If you are not using Record Types then your only option is to select “Master Record Type” which will sync all active Campaigns. If you have a large number of active campaigns ongoing at any one time, this may make the Campaigns list in Account Engagement too large to navigate easily. Campaign Record Types can be used to segment your Campaigns and only sync the relevant ones down to Account Engagement. 

Are you using multiple Account Engagement Business Units?

If you have multiple Account Engagement Business Units then you will definitely need Campaign Record Types. Campaign Record Types have a one-to-one relationship with Business Units, so, if you are syncing the “Marketing” Campaign Record Type to your US Business Unit, you cannot also sync it to your EU Business Unit. Mapping one Campaign to multiple Account Engagement Business Units will cause conflicts and issues with your Campaign data. 

If you answered “No” to the four questions above, then Campaign Record Types are likely not a good fit for your org. However, you can still streamline the creation and management of your Campaigns using the tips and tricks below. 

Standardize custom Campaign Member Statuses

Protected Campaign Member Statuses is a free solution from Sercante Labs that allows you to standardize which Campaign Member Statuses are available for each Campaign Type. For example, you may want Webinar Campaigns to have “Registered”, “Attended”, and “Absent” while Email Campaigns have “Sent” and “Clicked”. You can also accomplish this using Salesforce Flows.

Automatically Activate and Deactivate Campaigns

Ensure your Campaign’s “Active” checkbox is always correct by automating it with flow. This tip is especially helpful for Account Engagement users since all Active Campaigns will sync down to Account Engagement. If you never deactivate past campaigns, your Campaign list in Account Engagement can quickly get overwhelming and difficult to navigate. 

Auto-generate your Campaign Naming Conventions

Campaign naming conventions keep your Campaigns organized, improve reporting, and provide key information about the Campaign at a glance. However, naming conventions can only be helpful if they are used — and used consistently. Ensure your Campaign naming conventions are used correctly every time with an APEX Trigger.

Automate Opportunity Contact Roles

To get the most out of your Campaign reporting, Campaign Members need to be added to relevant Opportunities via Opportunity Contact Roles. You can automate this process by using a flow, or get more granular control over which Contacts are automatically added to Opportunities with the Automated Opportunity Contact Roles tool. 

Finally, for even more tips, check out our 7 Tips for Organizing Your Campaigns in Salesforce blog post!

No more posts to show