
You might already be tracking MQLs in Salesforce or in Pardot, but are you tracking all the information you need for enhanced reporting? I’ll walk you through the 3 steps you need to take for complete MQL tracking that can be used within reports and dashboard in Salesforce.
MQL (marketing qualified lead) tracking basics
The first step to MQL tracking is identifying what your organization considers to be an MQL. There are two common paths:
- A lead is considered an MQL when it reaches a defined lead scoring threshold. For example, if a lead has a score greater than 50, the lead is considered as an MQL. Some organizations use a lead rating or lead grade instead. In that case, if a lead has a rating or grade that is equal to A, B, or C, the lead is considered as an MQL.
- A lead is considered an MQL if they do some form of “hand raise” that says “talk to me now!”. For example, if a lead fills out a contact us form or a pricing request form, the lead is considered an MQL.
In this example, I will be using the lead score as my indication that the lead is an MQL. If the lead score is greater than 100, then assign the lead to a Sales Rep using a Pardot automation rule.
Enhanced MQL tracking
The key to enhanced MQL tracking is date stamping important milestones within your lead lifecycle. Date stamping will allow you to pull reports to answer questions, such as:
- How many MQLs did we get this quarter?
- How many of our opportunties were generated for MQLs this month?
- How many times has a lead been a MQL?
- What channels generate the most MQLs?
If you are a Pardot and Salesforce user, MQL tracking is fairly simple to set up. It requires creating two custom fields and leveraging Pardot automation rules. Let’s dive in how to set this up…
Step 1: Create the tracking fields
The first step is to create all the fields needed for tracking. Two fields will need to be created in Salesforce.
- MQL Counter: Counts how many times the lead has become an MQL
- MQL Date: Tracks the last date the lead became an MQL
Create the MQL Date Field in Salesforce: Step-by-step
Under Setup > Customize > Lead > Fields, create a new date field called MQL Date.

Create the MQL Counter Field in Salesforce: Step-by-step
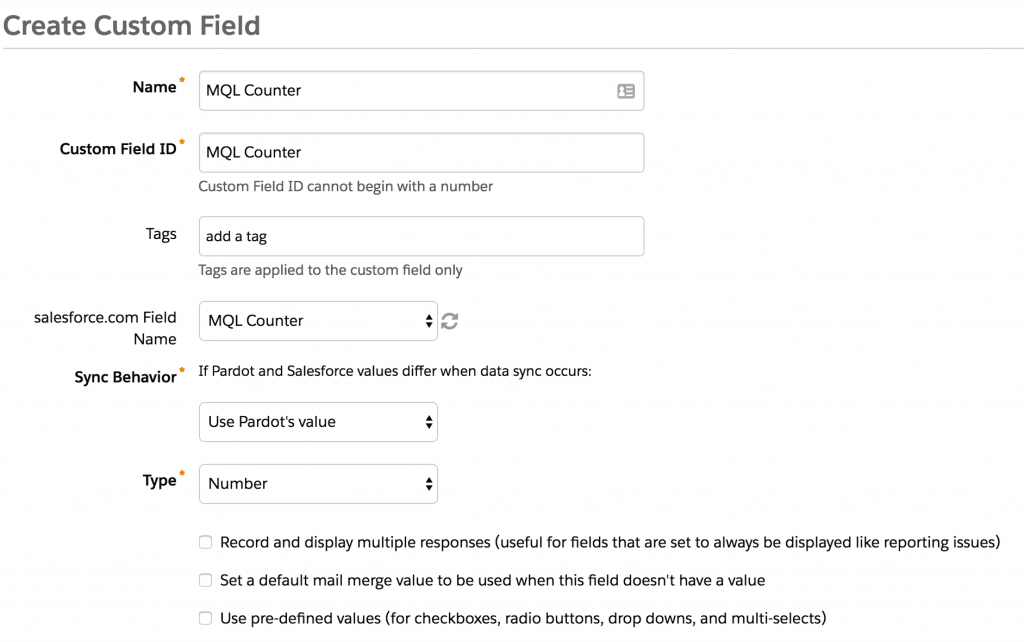
Under Setup > Customize > Lead > Fields, create a new number field called MQL Counter.

Repeat this process for Contacts as well and don’t forget to map the lead fields to the contact fields.
Step 2: Create and map the fields in Pardot
Repeat the same process within Pardot and map the fields to the newly-created Salesforce fields. Don’t forget to select the correct data type for the fields.

Step 3: Create (or edit) automation rules
This step is dependent on what your organization considers to be an MQL. As mentioned at the beginning of this post, in this example, if a lead score is greater than 100, the lead is considered an MQL.
If you already have an automation rule created to manage MQLs, you can edit it and add some actions. If you don’t have something in place to manage MQLs, you will need to create a new automation rule.
Here’s what my automation rule looks like: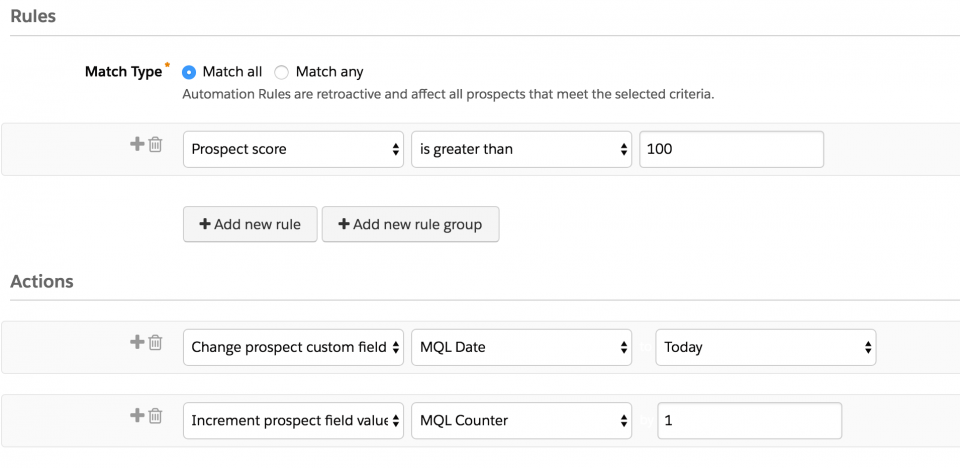
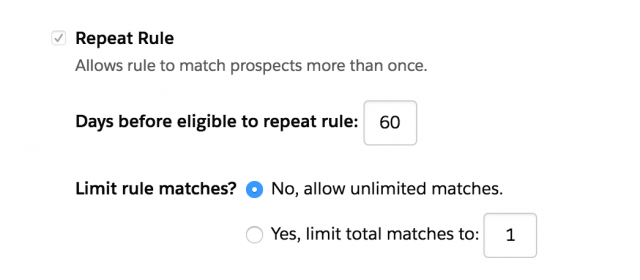
Another piece of business logic you will need to determine is how many times a lead can become an MQL within a time period. Some common time frames are every 30, 60, or 90 days. Whatever time period you chose you will need to add a repeat rule to your Pardot automation rule. In this example, I want a lead to be considered an MQL only once in the period of 60 days, so my repeat rule looks like this:
Since automation rules are retroactive, you might want to modify your some of your prospect’s lead scores so old leads don’t run through the automation rule. You could also add some custom filters within your automation rule to ensure other leads don’t run through and get date stamped.
Finally, activate your automation rule.
Take it a step further
Now that you have the basic MQL tracking rules implemented, you can take it a step further by implementing these ideas:
- Date stamp the first time a lead is an MQL: Create another date stamp field and another automation rule that doesn’t have a repeat rule.
- Remove leads from lead scoring if their MQL counter is greater than 10: if there’s a lead that has been an MQL more than 10 times, for example, you can remove these from scoring since they might be a browser and not a buyer.
- This same process can also be implemented for other stages within your lead lifecycle (SAL, SQL, etc).
Date stamping can also be done in Salesforce using flows. You can read more about date stamping using flows in Salesforce in the follow up post here.