
Salesforce has robust native reporting capabilities that come out of the box. But what happens when you need more? What CAN you do?
This Salesforce native reporting overview will make you a custom operational reporting superstar. That’s because it highlights the ways you can leverage custom objects and use joins in your reporting.
The good news is, once you know what’s possible, the world of Salesforce reporting is much easier to navigate.
Where to Start: Create a Lookup Relationship on a Custom Object
We’re going to start by going through the process of creating a lookup relationship on a Salesforce custom object.
Why start here? In short, all Salesforce reporting is based on relationships between objects.
Let’s say you have a custom object where you store all of your team’s required compliance paperwork. You want to report on which opportunities need which paperwork within that custom object.
While you can create a custom report type for your custom object, there is no link between Opportunities and your custom object.
The good news is that you can create one!
Example: Creating a relationship between custom object and Opportunity
Here’s an example that we can use as we move through our reporting exploration. Specifically, these are the steps to create a relationship between a custom object and an Opportunity in Salesforce:
- Open the custom object. In this case, I have created a custom object called “Compliance Documents.”
- Select Fields & Relationships.
- Select “New” to create a new field.
- Select “Lookup Relationship.”
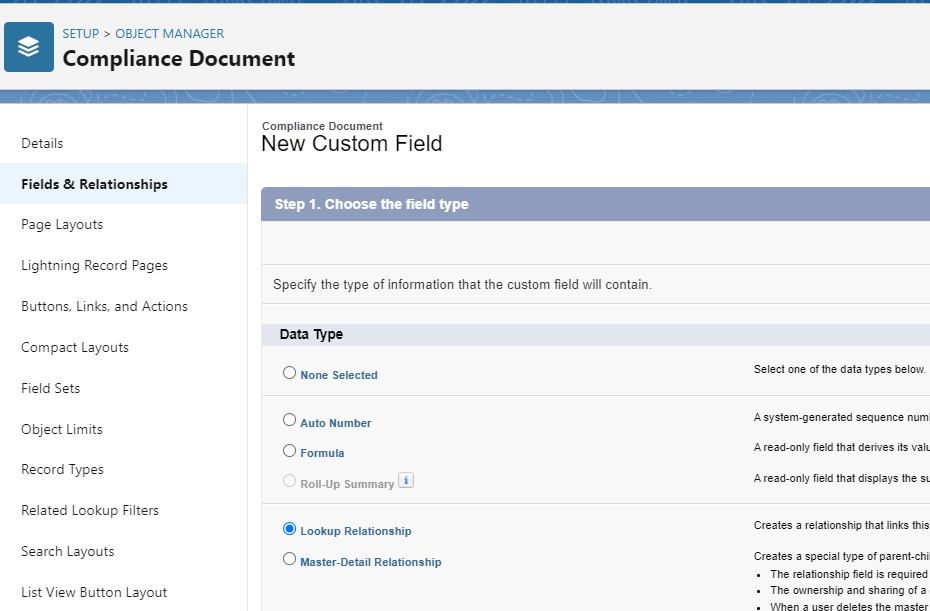
- Select “Opportunity” as the Related to. This will create the relationship between Opportunity and the custom object, making them “linked” for reporting and other related purposes.
- If you want the relationship to be consistent and there should be a value selected, make sure to select “Always require a value in order to save the record.” Also make sure that “Add this field to existing custom report types that contain this entity” is checked.
- Click through the next few screens to verify permissions, Related list label and select what layouts to the new field to.
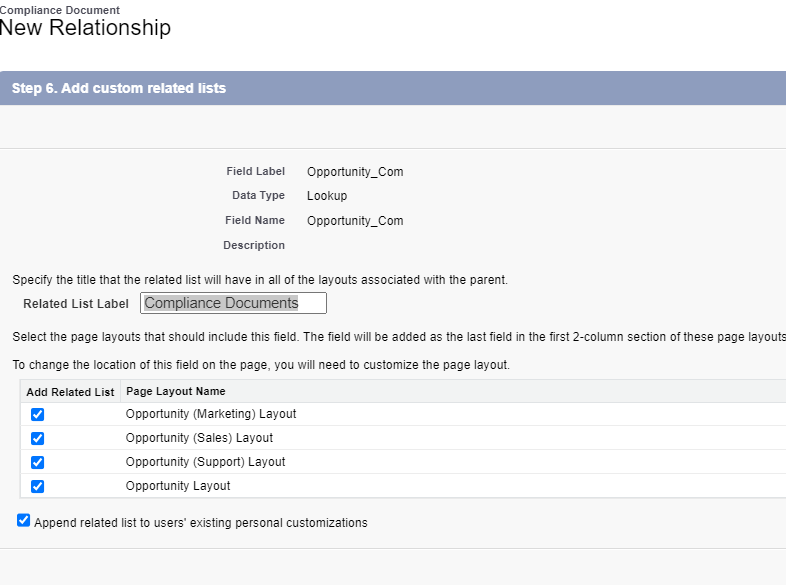
With these steps, you can now add the custom object in a report type AND the related list will appear for the Opportunity. So easy, right?
Exploring Salesforce Custom Report Types
So, now that we have linked our custom object with a lookup relationship, let’s get ready to report!
Use the following example to inspire your use of native Salesforce reporting capabilities.
Use Case Example: Set up a custom report type
You want to be able to see what type of compliance reports have been completed (and what opportunities do NOT have documents) for your Opportunities. To accomplish this, we will set up a custom report type.
- Go to Setup and select “Report Types.”
- Click “New Custom Report Type.”
- Select the Primary object (see tip below for more information).
- In our case, we will use Opportunities as our base object. We are interested in both Opportunities that have documents AND those that don’t. So, we’re calling it “Opportunities with or without Compliance Documents.”
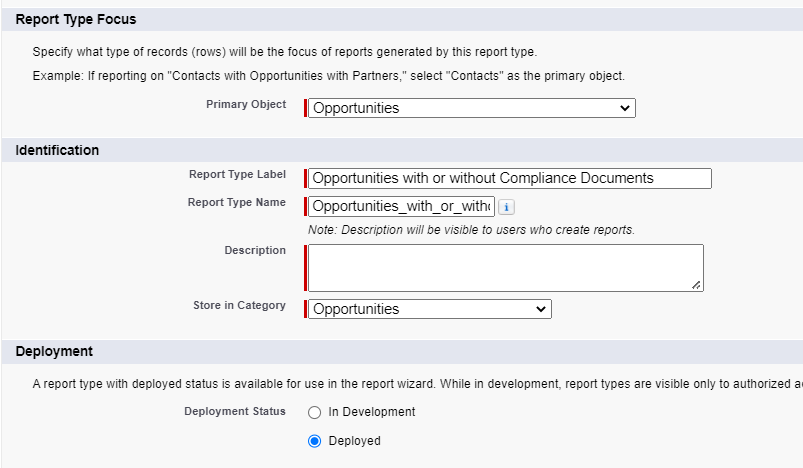
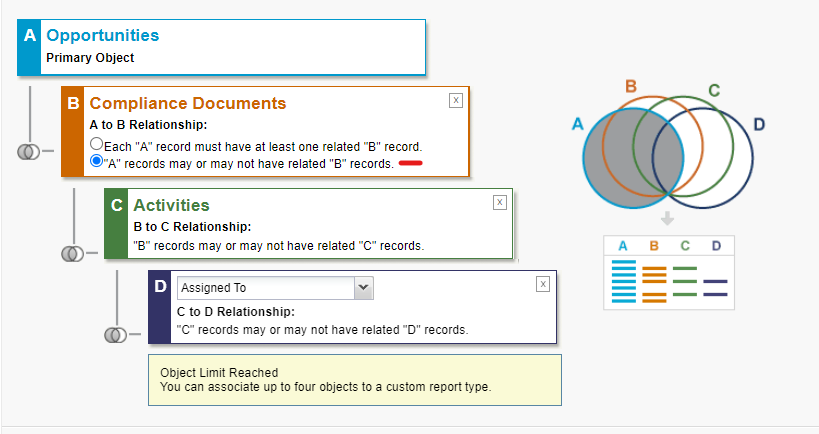
- Now we can select the related objects. In this case, we want to see Compliance Documents.
Because our custom objects were created to support Activity creation, and Activity creation links to the Assignment object, we can add all these to maximize our report.
NOTE: We are selecting “A” Records may or may not have “B” records so we can see how many of our total Opportunities have records. If we selected Each “A” record must have at least one “B” Record, we would ONLY see these records and not be able to compare (which will be handy in our report).
- Save your changes.
Tip: What is the Primary Object?
![]() The primary object is the “base” Object for your report. You can select a custom or standard object. To decide which to select, consider what fields you want and whether they are connected as you select these.
The primary object is the “base” Object for your report. You can select a custom or standard object. To decide which to select, consider what fields you want and whether they are connected as you select these.
Remember that all reporting starts with relationships between objects. One tool that can help you “see” the relationships in Salesforce is the Schema Builder in setup, which is where you can select your objects and get a visualization of how they are connected.
Good news for us, Salesforce report types makes this easy by only allowing you to select objects that are related and have lookup relationships. If you don’t see a child object, it’s because there isn’t a defined relationship.
Add Lookup Fields in Salesforce Custom Report
So, great news! You have connected your custom object to a standard object and created a new report type. But what other data can we add from here?
Let’s see what we can add using the “edit layout” section of the Report Type. ![]()
- Click on “Edit Layout”
- On the left, you can dropdown the list under “view” to see the objects in your report type.
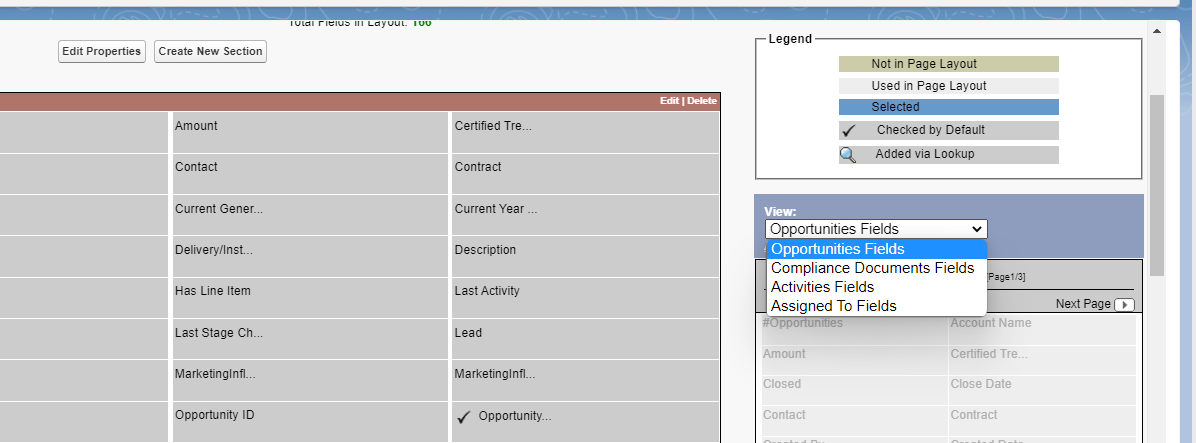
- Use the “Add fields related via lookup” to see what you can add to your report from other related objects.

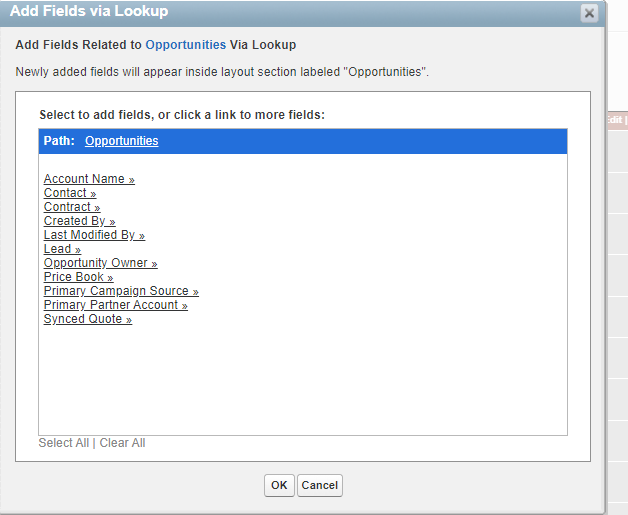
- You can see all the objects that have a relevant relationship to “opportunity” in this window. Clicking on the object name allows you to select fields to add to your report.
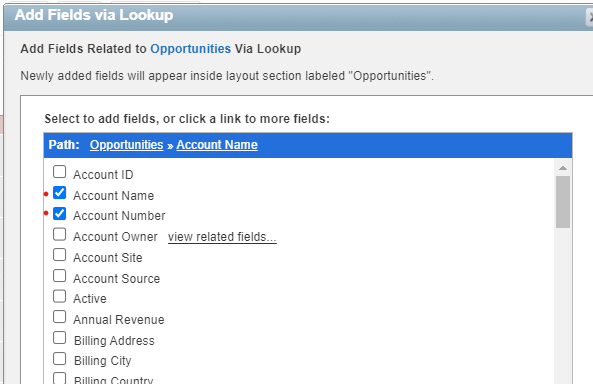
In the example above, I am adding Account Name and Account Number. You can change the view to show any of the objects in the custom report type to select related fields. You can see which fields were added by lookup easily since they have a magnifying glass next to them in the layout window.
NOTE: Watch out for duplicate fields. For example, if I select the ID for Account using the related lookup, I will end up with two almost identically named fields when creating reports, which could be confusing. Not all lookup fields contain data. If a field is not required in a related object field, you may not get any additional data (just empty fields)

- You can add sections, add and remove fields and do many other fun things in this window, but we’ll move on to creating our report with our shiny new report type! (more information on working layouts here.) For our use case, we are ready to move on.
Creating a Report Using Your Custom Report Type
Finally all your work will come together in an amazing report! Let’s jump in!
- Go to Reports
- Click on “New Report”
- Be sure to select “all” to search for our New Custom Report type
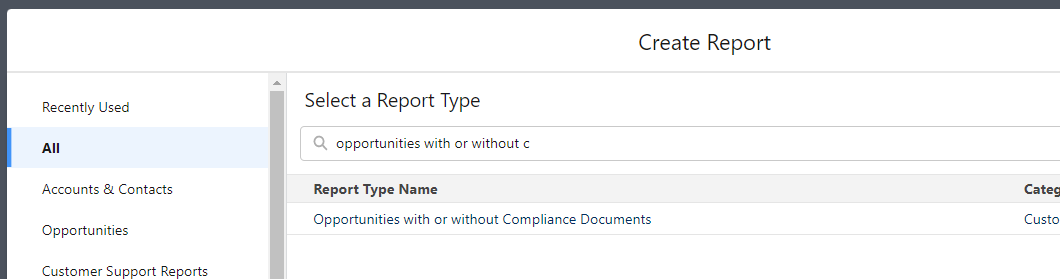
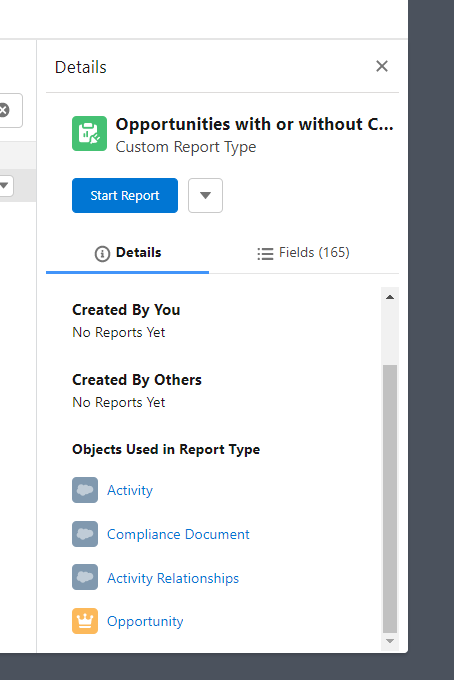
- On the right, you can quickly see what reports have been created with this report type and what objects are included. Click on “Start Report”. You can add whatever fields you need.
Using Cross Filters to Filter Records Based on Related Objects
Now that I have a report in progress, what else can I do to use other objects with it? One example of this is a cross filter.
A cross filter allows you to filter your report type based on a related object. For example, If I have a report type based on opportunities, I can use a cross join to limit the results to opportunities that have related campaign influence records (without actually having to include the Campaign Influence object in the custom report type).
- Click on “Filters”
- Select the drop down next to filters and select New Cross Filter
- Select Opportunities as the “show me” and Campaign Influence as the limiter
NOTE: You can use “With” or Without” as the criteria to return records.

TIP: Check out the Sercante Campaign Influence Starter Pack for more information.
Using Joined Reports in Salesforce to Enrich Your Data
Joined Reports in Salesforce are a little tricky to understand but can be VERY practical. Here’s how the feature works.
Consider the following use case. You want to be able to show Products on Opportunities related to those with compliance documents. Your custom report type does not have Product information.
No worries at all! If there are related fields between the two report types, you can join them together in blocks.
Here’s how to do that:
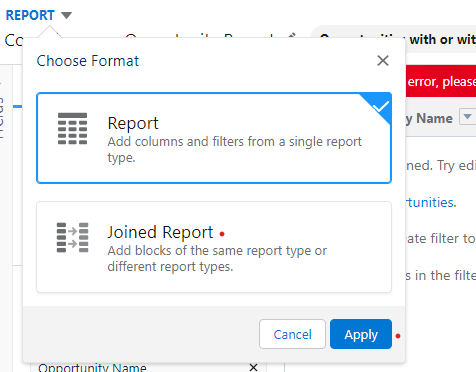
- Click on “Report” at the top left of your report window.
- Click on “Joined Report,” and click apply.
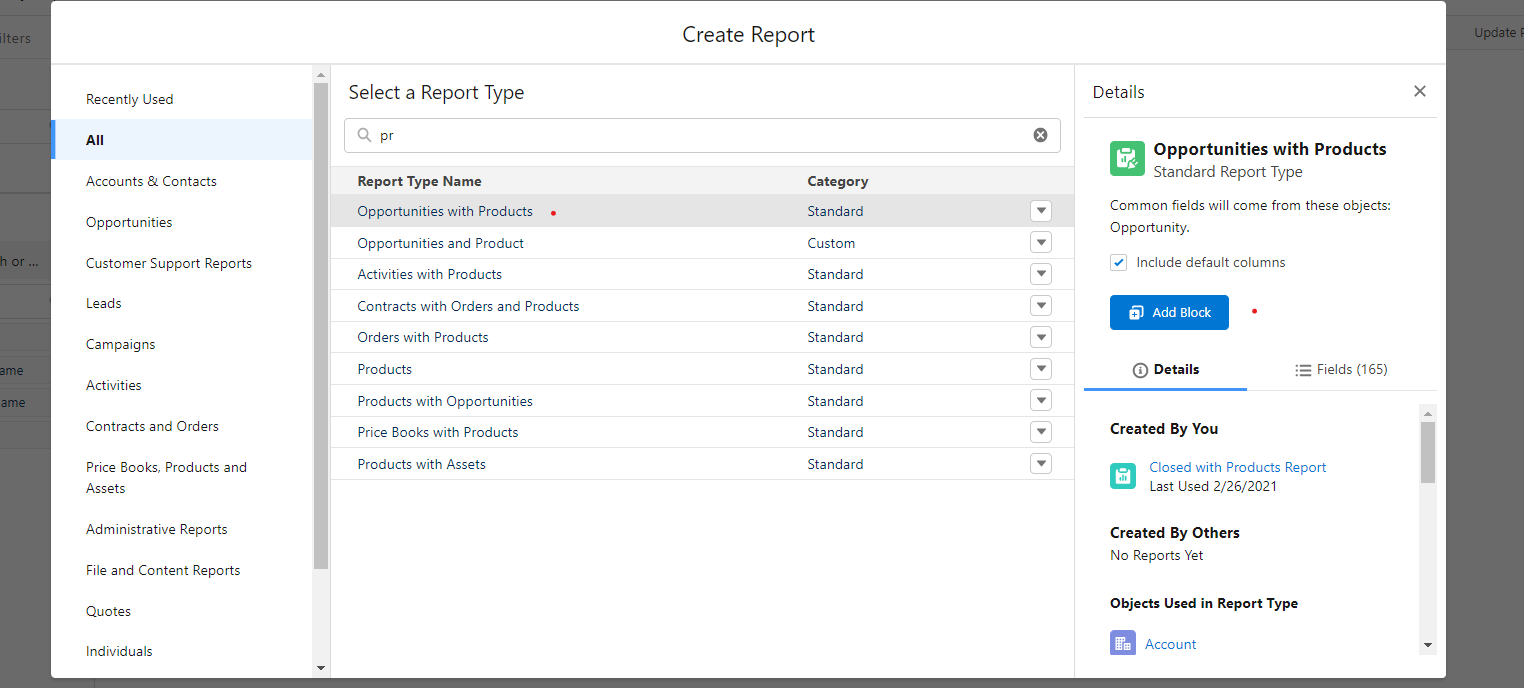
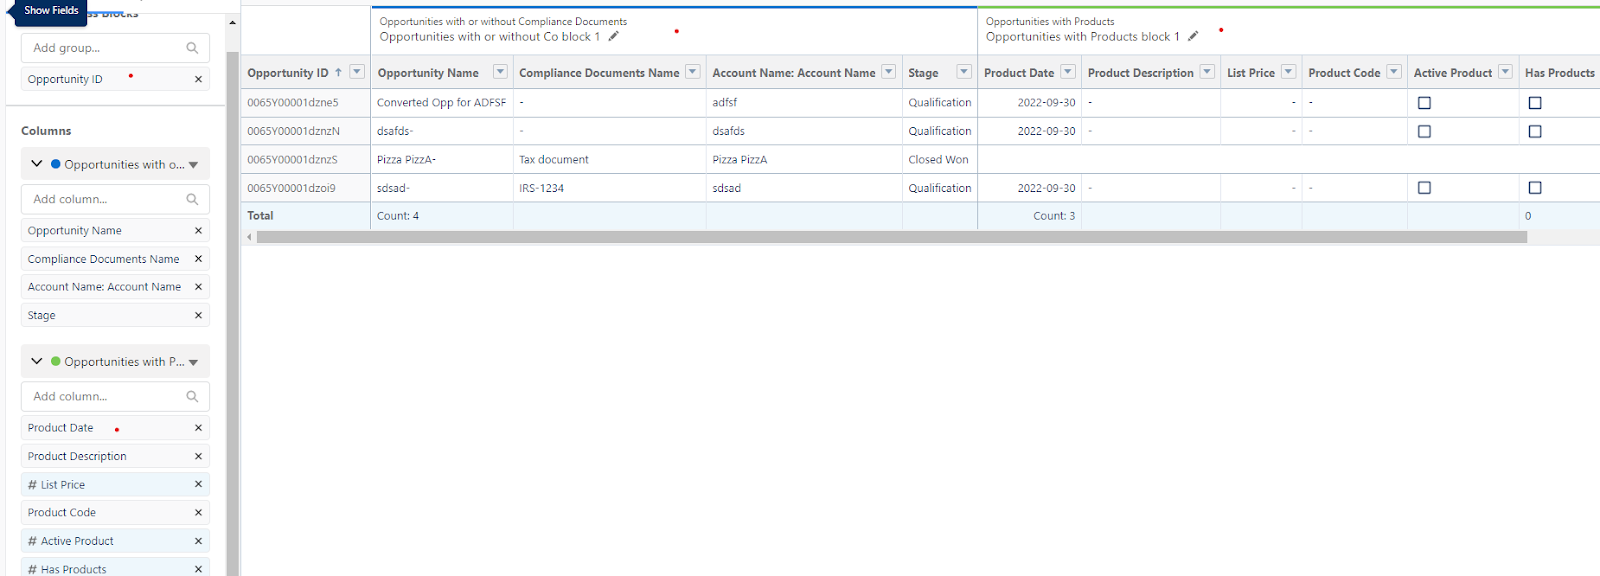
- Click on Add Block.
- Select the Opportunities with Products block.
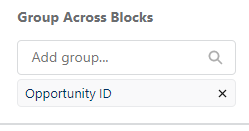
- Use the lookup window under “Group Across Blocks” to pick the field you want to group on. This will create a connection on a common field.
In this case OpportunityID is most appropriate since I want to see detail for each opportunity. You can now see the fields I selected from my Custom Report type and fields I selected from the Opportunities with Products report.
NOTE: Once you create a Joined Report, you also need to manage filters for each one separately under the filter area.
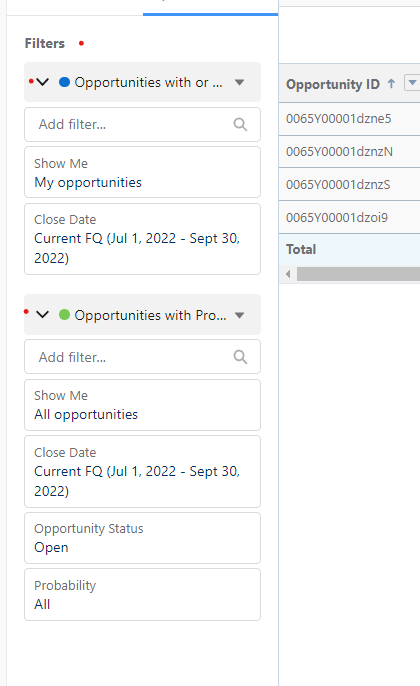
Now you can see how the Joined Report enriches your data! We can see if any Opportunities with or without documents have products linked.
So what happens now?
In our little summary we have reviewed the ways in which you can show data in Salesforce reports through Lookup relationships on objects for the following:
- Custom reports types
- Lookups on Custom report Types
- Joined Report
- Cross filters
The wonderful world of Salesforce Reporting is constantly changing and improving with every release. Knowing what you can do to bring your data together is the key to creating meaningful, actionable reports.
I hope this summary helps in your understanding of what’s available and related use cases.
Looking for information about Salesforce native reporting?
Salesforce has a wonderful help section with videos and how tos that can help you on your journey. And remember, you can always reach out to the team at Sercante if you have any questions.
Tell us what you’re going to build using Salesforce native reporting capabilities in the comments section.