Category

Getting Started

Event marketing is a fantastic way to connect with your audience, build brand awareness, and generate leads. However, managing event marketing activities can take time and effort. That’s where Account Engagement can help — in more ways than you probably thought!

Salesforce Marketing Cloud Account Engagement (f.k.a. Pardot) can streamline your event marketing efforts from initial promotions and registrations to post-event follow-up and nurturing. In this post, we’ll explore how you can use Account Engagement for event marketing to ensure a seamless and impactful experience. We’ll show you which out-of-the-box tool(s) we recommend using at what time during the event process so you can maximize your efforts.

Using Account Engagement for Event Marketing: Planning and Promotion

A marketing event is only as good as the planning that goes into it. Ensuring you have your campaigns and other assets created in advance with a clear goal and structure in mind will dramatically improve the organization of your initiatives and enable consistent reporting down the road.

Here’s how to do that.

Set Up Your Event in Account Engagement (Pardot)

If you’re using Connected Campaigns, start by creating a campaign (or hierarchy of campaigns) in Salesforce for your event. This will help you track all marketing activities and ROI related to the event. You’ll then associate all your event assets (emails, landing pages, forms) with these campaigns later.

If you’re not using Connected Campaigns, then we highly recommend you read this blog post to understand the advantages of Connected Campaigns and how to enable the feature. Then, reach out to Sercante if you’re unsure of your next steps.

Create Your Campaign Structure

These are the steps to create your campaign structure:

  1. Navigate to Campaigns and click on + Add Campaign.
    • Name your campaign using your organization’s standard naming conventions.
    • Set default and/or custom fields, like cost, start/end date, and type.
      • If it is a child campaign, select the appropriate parent to create your hierarchy
    • Ensure your campaign is marked “Active” so it can sync with Account Engagement via Connected Campaigns.

Design Event Registration Forms

Now it’s time to design your forms to collect attendee information such as name, email, job title, and company.

  1. Under Content  > Forms, click + Add Form.
    • Ensure your form includes fields that are crucial for segmenting and personalizing follow-up communications.

Develop Event-Specific Landing Pages

Create engaging landing pages to capture registrations. These pages should highlight the event’s benefits, speakers, and agenda, and include a clear call-to-action (CTA).

  1. Navigate to Content  > Landing Pages and click on + Add Landing Page.
    • Choose a layout template that fits your event’s branding.
    • Customize the page with relevant content and images.
    • When prompted, select the form you created in the previous step.

Promoting Your Event

Develop Email Marketing Campaigns

After all, Account Engagement is an email marketing platform! Let’s use that core functionality to promote our event. Next, you’ll create a series of emails to promote your event. 

Your campaign will include some form of the following emails:

  • Invitations
  • Reminders
  • Last-chance registration prompts
  • Follow-up correspondence with attendees

Some emails may be used as List Emails, while others may be automated sends using email templates.

I always recommend my clients have a comprehensive, universal email template on hand in their org. What I mean by that is a repeatable template that has lots of different sections for all types of emails. You’d clone this template, remove the sections you don’t need, and save.

On the right is an example of a Sercante Ultimate Email Template the team built for The Spot. It’s a common request our clients bring to us, so drop us a message if you don’t have a universal email template and want to get one.

Sending One-Off List Emails

If you’re sending a one-off List Email, follow these basic steps:

  1. Navigate to Account Engagement Email > List Emails and choose one of your published Email Templates.
    • Modify your sections accordingly, while keeping consistent branding.
    • Craft compelling subject lines and body content that convey the value of attending your event.
    • Include a call to action, depending on the needs of the event.
    • Make sure to always test before you schedule or send your emails. There’s a handy QA checklist in this blog post so you can hit the send button confidently.

Segmentation and Targeting

Use Account Engagement’s segmentation features to target specific audience groups with tailored messages.

  1. Go to Prospects > Segmentation Lists and create lists based on criteria such as past event attendance, industry, or engagement level.
    • Use dynamic lists for criteria-based segmentation (i.e. location, job title, CRM status).
    • Use static lists for manual segmentation (i.e. adding individual prospects to an invitation list).

Want to go a step further? Use social media connectors

Tap Account Engagement’s social posting capabilities to promote your event on LinkedIn, Twitter, and Facebook.  You’ll need to set up your social media connectors under Account Engagement Settings > Connectors and log in to connect your social media accounts with Account Engagement. 

Under Content > Social, you can create, manage, and schedule social posts. To complete the circle, you can insert CTAs in your posts that link back to your event landing page.

Managing Marketing Event Registrations with Account Engagement

Tracking Registrations

Forms

Use Forms to ensure all data flows into Account Engagement seamlessly. There’s a handy form style generator here you can use to customize your forms to match your branding.

  1. Navigate to Content > Forms and click + Add Form (or clone one you already have!)
    • Map your fields to capture all necessary registration information.
    • Ensure you customize your Completion Actions for autoresponders, assignments, campaign membership, etc.

Automation Rules for Registration Management

If Completion Actions don’t offer the functionality you’re looking for, consider creating Automation Rules to manage registrants. 

Automation Rules allow you to automate actions such as adding them to a list, sending confirmation emails, or notifying your sales team when hot prospects or accounts are actively engaging.

  1. Go to Automations > Automation Rules and click + Add Automation Rule.
    • Set criteria (i.e. form completion) and corresponding actions (ie. add to list, send email, update campaign member status).
    • Once you’re ready to run it, make sure you “unpause” the automation rule.

Confirmation and Reminder Emails

For this, we highly recommend using Account Engagement’s automated nurture engine: Engagement Studio. This powerful tool comes out of the box with all MCAE editions.

Under Automations > Engagement Studio, you can create intelligent nurture programs to automate follow-up, update records and act immediately on interactions with your prospects.

Sending Confirmation Emails

Ensure that every registrant receives an immediate confirmation email with event details. 

Reminder Emails

Schedule reminder emails leading up to the event to keep registrants engaged and reduce no-shows. Create a series of reminders — starting a week before the event, a day before, and a few hours before the start.

Event Marketing Doesn’t End There. Keep it Going!

You’ve made it to the day of your event! While your pre-event promotion is over, and your email invitations and reminders have all been sent, you can still use Account Engagement to engage with your prospects during and after the event, and throughout the sales process.

During the Event

Engaging Attendees with Personalized Content

Use Account Engagement’s dynamic content features to personalize the content displayed to attendees based on their profiles. 

  1. Navigate to Content > Dynamic Content and create content blocks that change based on prospect data (i.e. industry, job title, location).

Real-Time Data Collection

Use Account Engagement’s tracking capabilities to monitor attendee interactions during the event, such as session attendance and engagement with event content. You can also implement tracking codes on event-related pages and materials to capture real-time data.

Feedback Forms

Create and send feedback forms immediately after each session to gather attendee insights and improve future events. This is a crucial step that will help your team continuously improve and build stronger relationships with your audience.

Post-Event Follow-Up

Analyzing Event Performance

Generating Reports

Use Account Engagement’s reporting features to analyze event performance, including registration numbers, attendance rates, and engagement metrics.

  1. Navigate to Account Engagement Reports to view detailed reports on your event’s asset performance (forms, landing pages, emails, etc.).
  2. You can filter and export data, or use other tools like Salesforce Lightning Reports or B2B Marketing Analytics for more advanced reporting and data visualization.

ROI Analysis

Calculate the ROI of your event by comparing the costs associated with the event to the revenue generated from leads and opportunities. 

  1. Use Account Engagement’s ROI reporting tools under Reports > Marketing Assets.

Nurturing Leads

Follow-Up Emails

Create a series of follow-up emails to thank attendees, share event highlights, and provide additional resources. Use Engagement Studio to automate these follow-up emails for timely and relevant communication.

Lead Scoring and Grading

Update lead scoring and grading models based on attendees’ behaviors during the event.

  • Go to Account Engagement Settings > Scoring to adjust scoring rules, and use this updated data to prioritize leads for sales follow-up.

Re-Engaging Non-Attendees

Post-Event Outreach

Don’t forget about those who registered but didn’t attend. Reach out with recorded sessions, summaries, and key takeaways to keep them engaged. Use segmentation lists to identify non-attendees and create a specific follow-up campaign for them.

Surveys and Feedback

Send a survey to non-attendees to understand why they couldn’t attend and gather insights to improve future events. 

  1. Use Forms to create and distribute these surveys, and analyze responses to enhance your event strategy.

Planning Future Events

Reviewing Your Feedback

Incorporate feedback from attendees and non-attendees into your planning for future events to continuously improve the experience. 

  1. Use Account Engagement Reports > Forms to analyze the feedback forms you’ve sent after previous events, and make data-driven decisions and adjustments to your approach.

Early Bird Promotions

Start promoting your next event early with exclusive offers and early bird discounts to previous attendees. 

  1. Use Account Engagement Email to create and send promotional emails, and leverage Dynamic Content for personalized offers.

Now you’re an Account Engagement event marketing pro!

Using Account Engagement’s powerful features and capabilities, you can streamline every aspect of your event marketing activities, from initial planning and promotion to post-event follow-up and long-term nurturing. This ensures a seamless and impactful event experience and maximizes your marketing ROI and strengthens your relationships with prospects and customers.

Utilizing Account Engagement for event marketing can lead to more organized, efficient, and successful events, ultimately driving more meaningful interactions with your customers.

Wanna take a deeper dive into event marketing with Salesforce? Check out this blog post, 5 Event Marketing Best Practices To Implement For Your Next Campaign, which is a roundup of insights from seasoned event marketing professionals.

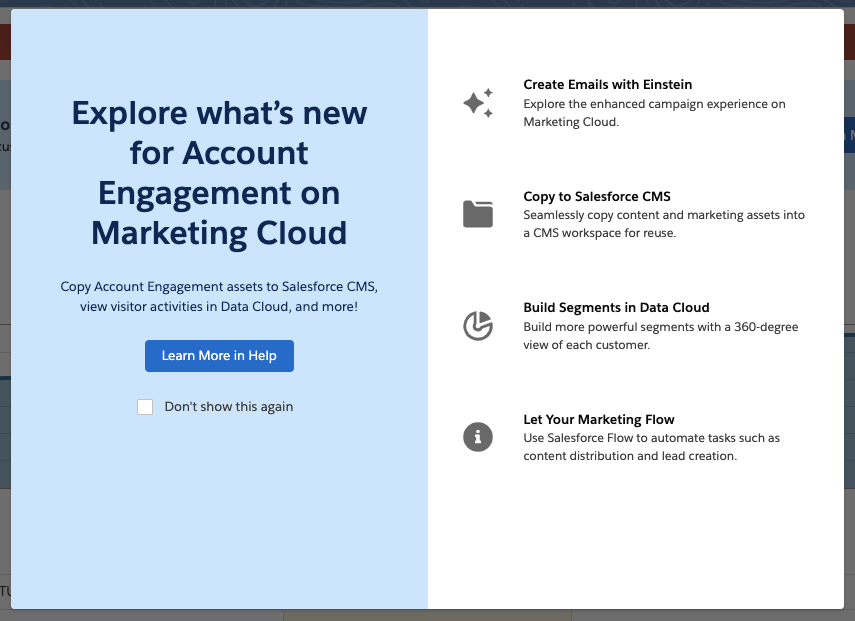
Product Note: Marketing Cloud Growth and Advanced are editions of Marketing Cloud Next and have also been referred to as Agentforce Marketing.

In February 2024, Salesforce released Marketing Cloud Growth Edition, its first marketing automation platform built fully on the Einstein 1 Platform (a.k.a. “On Core”). Marketing Cloud Growth Edition has been rapidly evolving and expanding the features of this new solution ever since, and Account Engagement (f.k.a. Pardot) users are about to get a taste of it.

Update! In the Dreamforce ‘24 Marketing Keynote, Salesforce announced that all Account Engagement orgs can get Marketing Cloud Growth provisioned at no additional cost. Previously, this offer was only for orgs with Growth Edition Account Engagement, but it now includes all orgs with a current edition of Account Engagement. A banner notifying all Account Engagement orgs that they can now get access to Marketing Cloud Growth Edition was published on October 15th. This blog has been updated to reflect the most recent news around this offering.

In this post, we’ll cover how to take advantage of the offer and use Marketing Cloud Growth alongside Account Engagement.

A Note on Naming

Now the naming of this new tool has caused quite a bit of confusion in the Salesforce community as it seems to change on a weekly basis. When launched, this new solution was referred to as “Marketing Cloud Growth Edition” or “Marketing Cloud on the Einstein 1 Platform”. During Dreamforce, Advanced Edition was announced, so this solution became “Marketing Cloud Growth or Advanced Edition” or “Marketing Cloud built on Data Cloud”. Finally, during the Winter ‘25 release, this tool started showing up in Salesforce documentation as just “Marketing Cloud” or the “Marketing Cloud App”, much to the chagrin of Marketing Cloud Engagement users. Now, if you are using Marketing Cloud Growth with Account Engagement, it is being referred to as “Account Engagement on Marketing Cloud” but also “Account Engagement powered by Data Cloud”.

Confused? Yes, me too. But all this is to say there is one new Salesforce Marketing tool that is built on core to bring users a truly unified marketing experience. For simplicity, we will continue to refer to this tool as “Marketing Cloud Growth” for this blog post.

What Account Engagement Users Need to Access Marketing Cloud Growth Edition

  1. A current instance of a Marketing Cloud Account Engagement
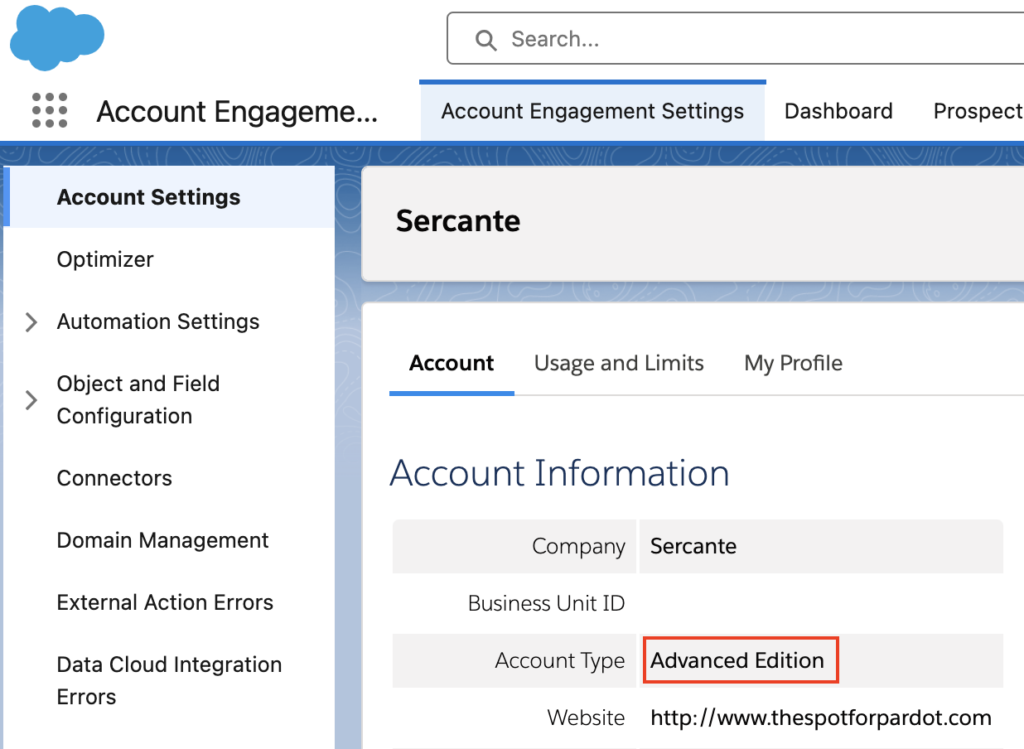
    This includes Growth, Plus, Advanced, and Premium editions of Marketing Cloud Account Engagement (MCAE). Your MCAE Admins can view your Edition by going to the Account Engagement Settings tab.
  1. Data Cloud
    Data Cloud not only unifies customer data for use within Marketing Cloud Growth, but also ensures data continuity between Account Engagement and Marketing Cloud Growth. Free Data Cloud is available for orgs with Enterprise and Unlimited Edition Salesforce customers. If you have a lower edition of Salesforce, check out more information on provisioning and access here.

    If you are brand new to Data Cloud or don’t have a Data Cloud Architect at your disposal, don’t fret! Marketing Cloud Growth comes with Data Kits that help map your Marketing and CRM Data to Data Cloud. The free Data Cloud SKU + Marketing Cloud Growth’s out of the box data kits will cover everything most orgs need to get started, but if you’d like assistance with additional Data Cloud Data Streams or want to dive into more advanced Data Cloud use cases, we’re happy to help!

Data Cloud Credits

Marketing Cloud Growth uses Data Cloud’s credits to fuel its activities. So, although MCAE users will get Marketing Cloud Growth at no additional charge, orgs still need to purchase credits to fuel Marketing Cloud Growth. Think of it like you’re being given a car, but you still have to purchase the gas to make it run.

If you’re new to Data Cloud’s consumption model, our previous blog post and this Trailhead module will help give you an idea of how this works and the different types of credits available. If you’re using the Free Data Cloud SKU to get started, note that this does include some credits to fuel data ingestion and unification. However, orgs will need to reach out to their AE to purchase the credits that fuel sending emails, sending SMS, compiling Segments, and using Einstein.

You don’t necessarily have to purchase these credits before implementing Marketing Cloud Growth for testing purposes, but you may be limited in the features you can play around with without them.

Getting Started

Here are a few things to keep in mind as you start using Account Engagement and Marketing Cloud Growth side by side.

Understanding Consent and Subscriptions

Consent works a little differently between the two systems. 

Account Engagement has a permission-based marketing policy, meaning that although there is no default “Opt-in” field, users must certify that they only contact prospects who have expressly consented to receive marketing communications. 

In Marketing Cloud Growth Edition, consent is a bit more rigid. To send marketing communications, each prospect must have a Consent Record comprising of:

  • The Contact Point (email or phone number)
  • The Marketing Channel (Email, SMS, etc.)
  • The Communication Subscription (Webinars, Events, Product updates, etc.)
  • The Date and Time the prospect opted in

More considerations for Consent and Subscriptions are available in this Salesforce Help article

Import Consent Data

Before you import consent data, make sure the contact point exists in Marketing Cloud Growth Edition. A consent import can update consent information for existing contact points, but it can’t create new leads or contacts or update other fields (at least as of the Winter ‘25 release).

First, export your list from Account Engagement:

  1. In Account Engagement, navigate to Prospects > Segmentation > Segmentation Lists
  2. Locate and open the preference list you would like to import into Growth
  3. Select Tools
  4. Select CSV Export

You’ll need to format your export before importing it into Growth, see this help article for guidance

Start Your Import

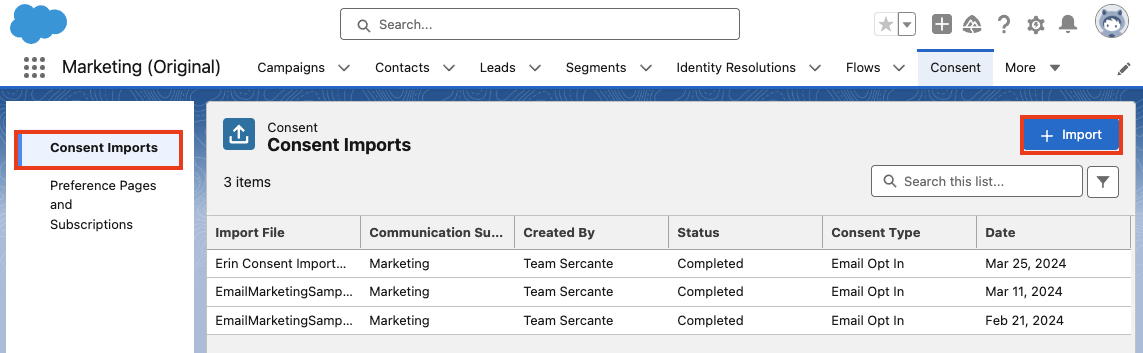
  1. Within Marketing Cloud Growth, navigate to the Consent tab
  2. Ensure you are on the Consent Imports tab, then select + Import
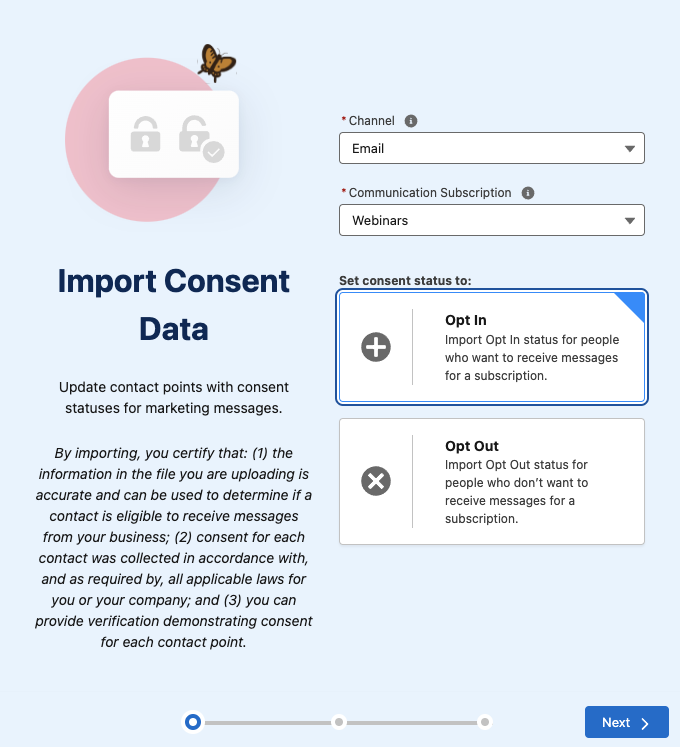
  1. Select your Channel, Communication Subscription, and whether this list is opted in or opted out
  1. Select Next
  2. Upload your CSV, select Next
  3. Review the import preview and select Import
  4. Select Done

Send Account Engagement Images to CMS

Use images in both Account Engagement and Marketing Cloud Growth by enabling “Copy to CMS”.

  1. In Salesforce, navigate to Marketing Setup > Copy to CMS
  2. Use the dropdown menu next to your Account Engagement business unit to select Enable
  3. Repeat for additional Account Engagement business units

This will create a CMS Workspace named, “Content Workspace for Marketing Cloud Account Engagement – Copied Content – [business unit name]”. To avoid issues, do not change the workspace name or remove the B2BMA Integration user as a contributor. 

Copy Images from Account Engagement to the Growth Edition CMS Workspace

Next, you’ll need to copy the images from Account Engagement to your new CMS Workspace. 

  1. In Account Engagement, navigate to Content > Files
  2. Use the checkboxes on the left-hand side to select the files you would like to move. Once selected, use the dropdown menu at the bottom of the table to select Copy to CMS 
  3. Select Go

Use the New Growth Edition Email Editing Experience

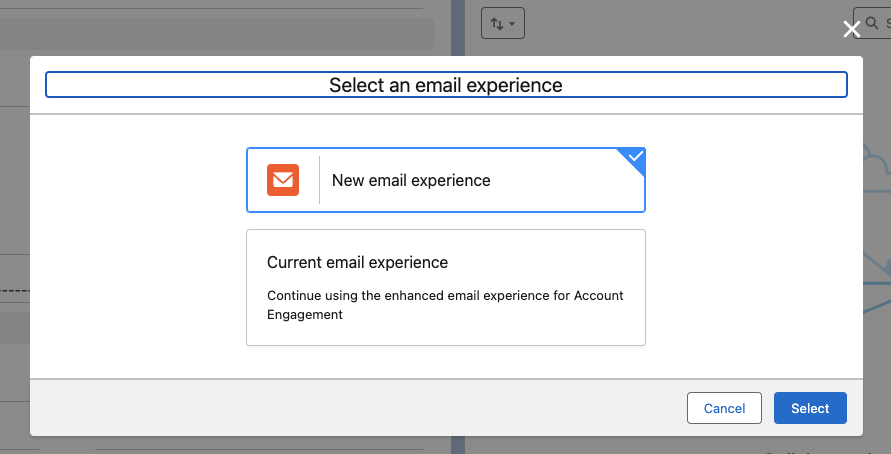
Now you can build emails that are available in both Account Engagement and Growth Edition. When creating or editing Email Content in the Lightning Email Builder, select New Email Experience to use Marketing Cloud Growth Edition’s editor.


Account Engagement Campaign Considerations 

Account Engagement and Marketing Cloud Growth Edition cannot currently share campaigns, so you’ll want to have distinct naming conventions to easily identify which campaigns belong to each platform. You can also keep Marketing Cloud Growth’s campaigns from syncing to Account Engagement by creating a new campaign record type for Growth. 

Read more about Campaigns for Marketing Cloud Growth in this help article. 

Using Account Engagement & Growth Edition Together

Current users of Account Engagement probably have long-standing engagement studio programs that are set up to run on a recurring basis. Account Engagement thrives in this situation and provides flexibility for enrolling prospects and ensuring that the marketing journey you want to happen actually happens. Let’s look at instances where you can use this existing functionality with all the bells and whistles Growth offers.

Use cases for combining the two platforms

  1. SMS functionality. In Account Engagement, You may have a pre-existing engagement studio program set up for every event your company puts on, thanking attendees for joining and sharing pertinent details. If you want to send a reminder text message to people who have registered for the event, you can now take advantage of native Marketing Cloud Growth functionality to do so.
  1. Using cross-object personalization. Say you have a recurring monthly email sent out to your customers letting them know their account status, YTD savings with your company, and other information pertinent to the customer on an ongoing basis. If this information is stored within custom objects, it’s difficult to populate an Account Engagement email with those details. With Marketing Cloud Growth Edition, users can create Data Graphs for cross-object personalization, allowing marketers to personalize emails with data from any object. 
  1. Custom processes for post-form-fill actions. Another great example of how you can use Marketing Cloud Growth Edition alongside Account Engagement is when you want to implement a custom process when someone submits a form.

Since Growth uses Flow for automation, the actions taken after a form is completed can be customized to each unique need. For instance, you can standardize field values or send data to several objects within Salesforce before the Lead/Contact record is updated. 

There you have it

You are now ready to start experiencing Marketing Cloud Growth Edition. The future of Salesforce marketing is bright and evolving every day.

Stay tuned for Growth’s next iterations. In the meantime, use these resources to get started:

If you need help implementing or learning how to use Marketing Cloud Growth Edition, send us a message!

As an SMB marketer, you’re required to wear a lot of hats. From lead generation and aligning with sales and service teams, to creating content, emails, and personalized customer journeys you’re pulled in a lot of directions – and frankly that can be tough. Cue – artificial intelligence!  Gain insights and considerations for how you can use AI to help your marketing efforts

Supporting your day-to-day tasks 

One of the main benefits of AI  is in the area of efficiency. AI allows small teams to do more with less/fewer resources – which according to some marketers – they expect AI will save them 5 hours per week – that’s over ½ a day you get back!

 Examples of this include 

  • Content creation – from minutes to seconds
  • Customer segmentation – reducing the manual effort and technical skillset commonly required

AI can also lead to better experiences for customers – which in reality is what it’s all about. By giving you the ability to get content out quickly, AI can also increase your opportunity to personalize customer experiences such as send times – waiting to send until someone is most likely to engage.

How it’s done

But before we go much further – let’s level set: AI can be categorized based on its functionality and the specific tasks it performs. Two common categories are Generative AI (as described above) and Predictive AI. Here’s how they differ:

  • Generative AI focuses on creating new content, such as text, images, music, or even entire datasets. These systems generate data that mimics the patterns and structures of the input data they were trained on – leveraging user feedback such as thumbs up or down as part of their internal feedback & learning loop.
  • Predictive AI focuses on analyzing existing data to make forecasts or predictions about future events. It identifies patterns and trends in historical data to predict outcomes. Examples include:
    • Sales Forecasting: Predicting future sales based on past sales data and market trends.
    • Customer Churn Prediction: Identifying customers likely to stop using a service.

As marketers to date – much of the focus/application of AI has been focused on GenAI but its only a matter of time before predictive AI becomes more commonplace.

Tools at your disposal

When it comes to AI tools  – what you use is based on what you’re trying to achieve. And like most things, there are free and paid options.

Popular Free tools

ChatGPT, Microsoft CoPilot, and Google Gemini are three of the most popular chatbots to answer any question or generate text. Jasper is an AI copywriting assistant specializing in marketing content, and Quillbot paraphrases and improves written content, while, DALL-E 2 is great for generating images from text prompts.

While these are popular and free – marketers should keep in mind that they may many times lack control over quality and security. TDLR – don’t put personal, private, and/or confident data into these AI tools as they aren’t entirely secure.

Getting an assist from AI

As we continue to be asked to do more with less, make sure you don’t leave yourself vulnerable either. 

Considerations for using AI as a marketer

  • Be mindful of the information you input -what would happen if there was a data breach? 
  • Check for plagiarism – is the AI-generated content pulled directly from another source?
  • Consider the reliability & accuracy – did you fact-check? How good/specific was your input? What limiters did you apply if any?

How SMBs can tap AI through their marketing automation platforms

Our Guide “Selecting a Marketing Automation Vendor that Packs a Punch for SMBs” delves deeper into how top marketing automation platforms like Mailchimp, HubSpot, and Salesforce are innovating for SMBs. These platforms offer AI-driven features that can significantly enhance your marketing efforts, making them more efficient and effective.

Download the whitepaper now to explore how these vendors are revolutionizing marketing automation for SMBs and how you can leverage AI to stay ahead of the marketing trends.

Download Whitepaper:

This field is for validation purposes and should be left unchanged.
What tool(s) do you use?(Required)
This field is hidden when viewing the form

In the Summer ‘24 Release, Salesforce launched the beta version of Einstein for Flow, which is a generative AI tool that helps Salesforce admins, regardless of their programming experience, to easily create functional Salesforce Flows via natural language prompts. 

New to Flow? Check out An Introductory Guide to Salesforce Flow for Marketers

How Einstein for Flow works

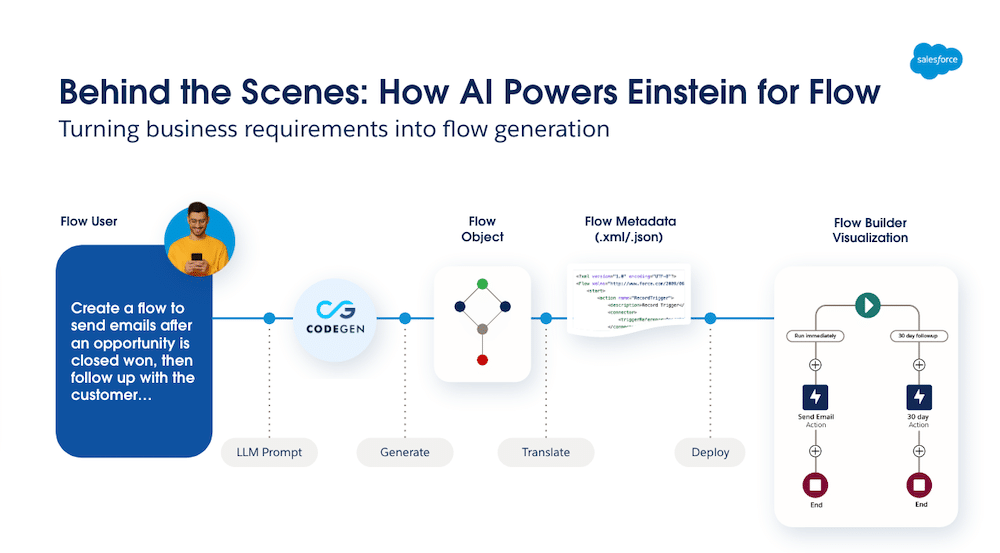
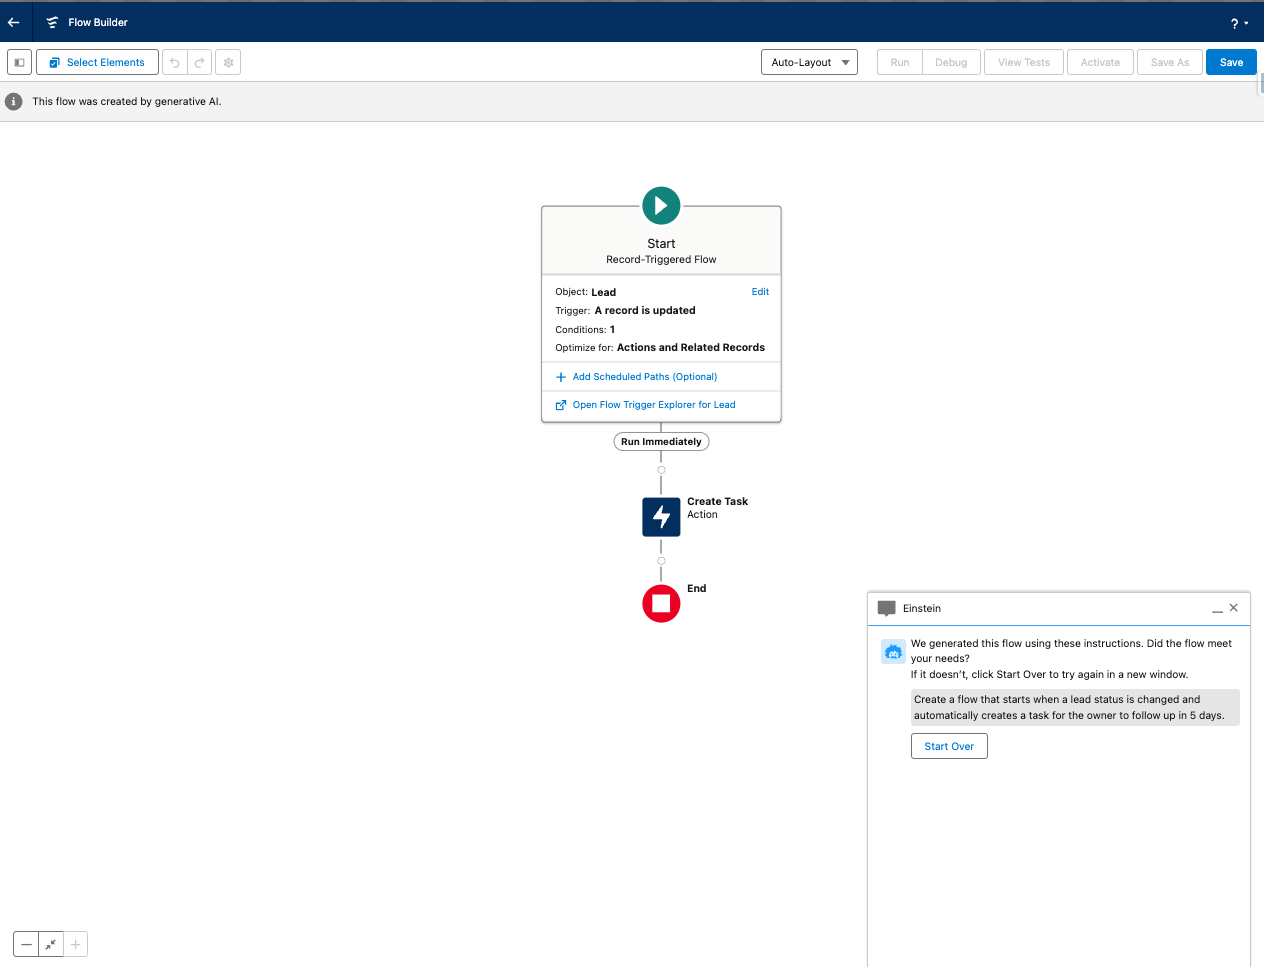
Einstein for Flow is a generative AI tool that helps Salesforce admins, regardless of their programming experience, to easily create functional Salesforce Flows via natural language prompts. You simply describe your flow requirements in plain text instructions, and Einstein does its thing to interpret those instructions and generate a draft flow for you.

Salesforce Einstein for Flow Requirements

To take advantage of Einstein for Flow, you’ll need to ensure:

  • Your org supports Einstein for Flow. This feature is available with:
    • All Einstein 1 Editions
    • Enterprise, Performance, and Unlimited Editions with the Einstein for Sales, Einstein for Service, or Einstein for Platform add-on.
  • Users who will use Einstein for Flow must have permission to use Manage Flows.
  • You also need to make sure you have enabled Einstein Generative AI in your org.
  • You will also need to opt in from the Einstein for Flow (Beta) setup screen.

Creating a Flow with Einstein for Flow

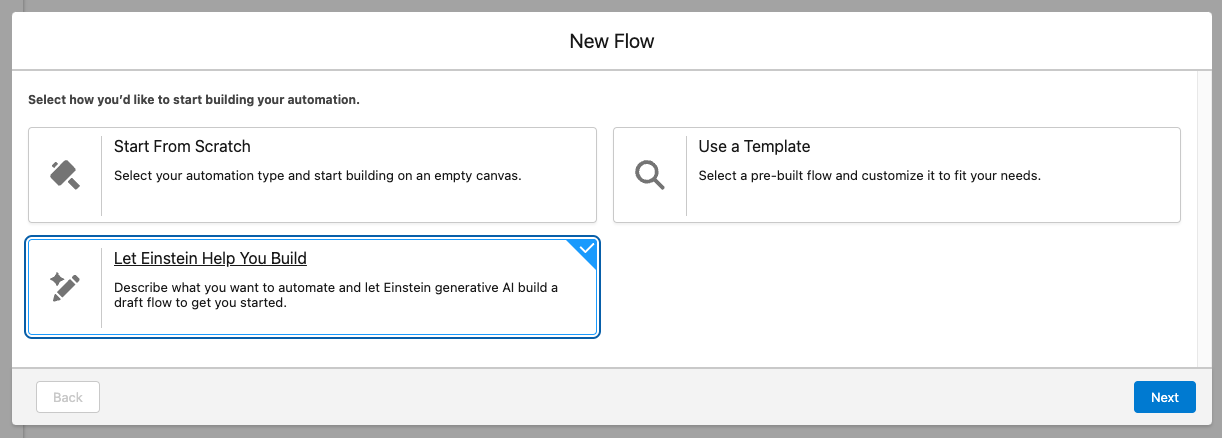
  1. When you click New Flow, select Let Einstein Help You Build and click Next.
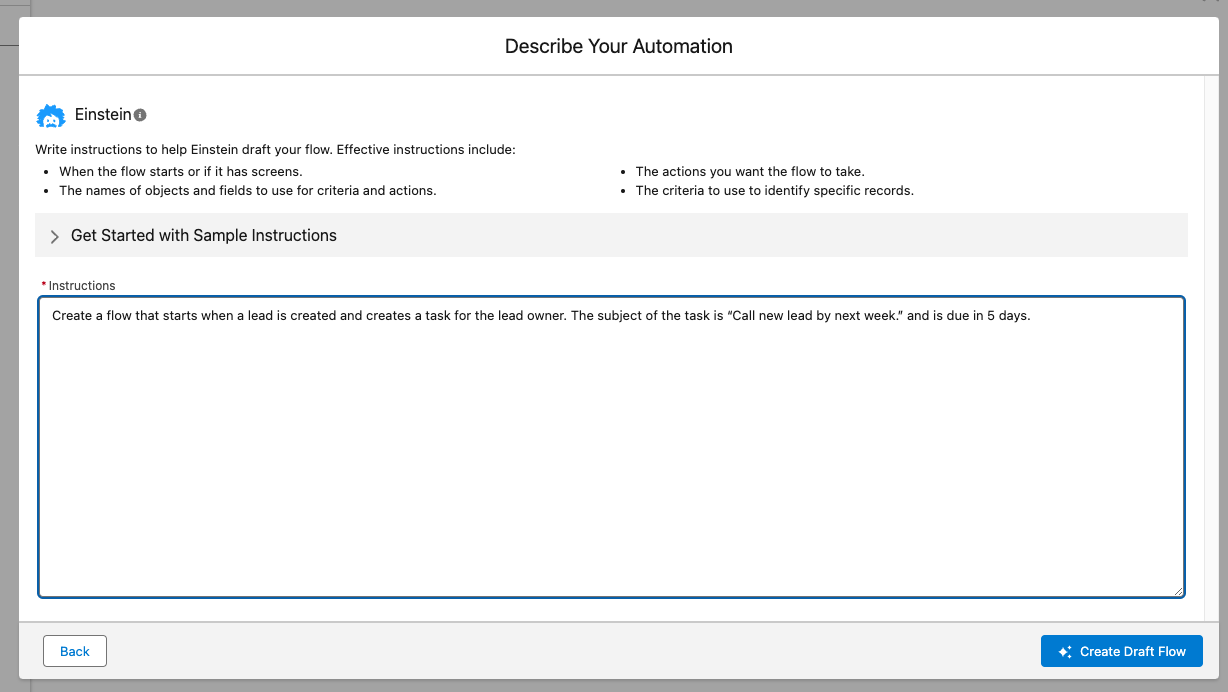
  1. Enter a prompt with instructions on the flow you want to build.
  • In the Instructions section, describe the task or process you want to automate. Provide as much detail as possible to try to get better results.
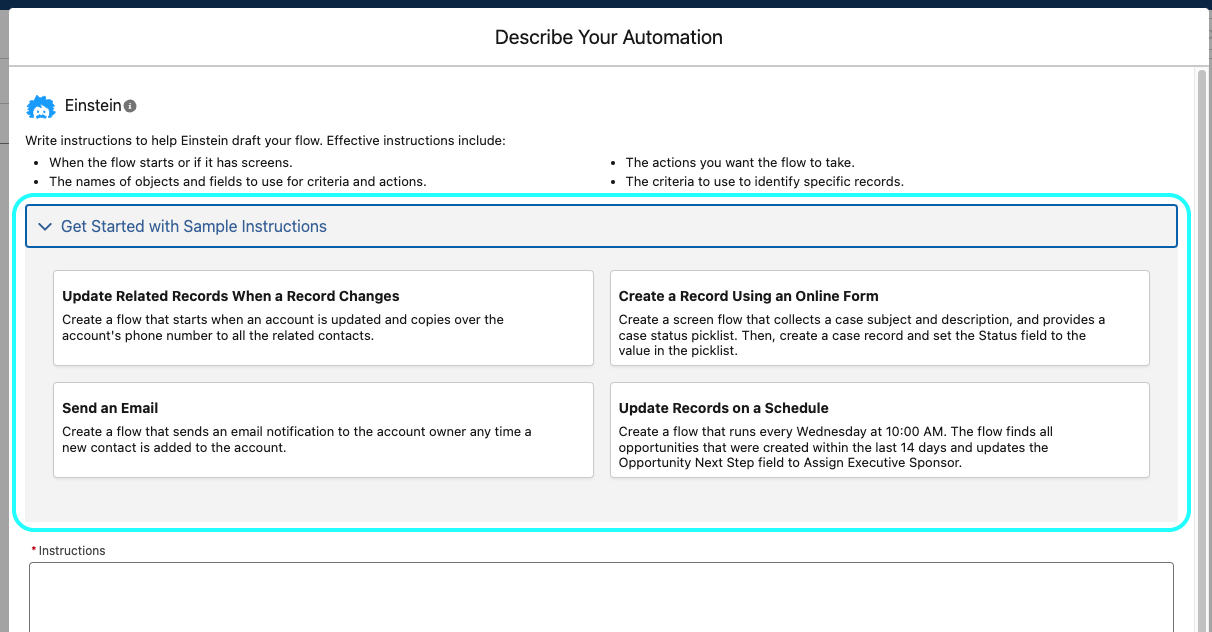
  • Not sure how to write your instructions? Expand the Get Started with Sample Instructions section.
  • For more tips on how to craft your prompts, see the Prompt Tips section below.
  1. After a few seconds, the flow is created, and a feedback modal is included on the canvas.
  • See the Helping Einstein Improve section below.
  • You’ll also notice that ‘This flow was created by generative AI.” banner is located at the top of the page, so that it’s clear how this flow was built.

Tips for Building a Great Prompt

When writing your prompt instructions, there are some guidelines for getting started:

  • Start the instructions with “Create a flow.”
  • Effective instructions include:
    • The type of flow to create
      • for example, “Create a record-triggered flow that….”
    • When the flow starts or if it has screens.
      • for example, “…that starts when a lead is created…” 
    • The names of objects and fields to use for criteria and actions.
      • for example, “… create a task for the Lead Owner” instead of  “..create a task for the sales rep”
    • The actions you want the flow to take.
      • for example, “…send an email to the Lead owner…”
    • The criteria and logic to use to identify specific records.
      • for example, “…accounts with an annual revenue over $500,000…”
  • Provide as much detail as possible.
  • Start simple and expand from there. Stick to basic instructions that the resulting flow needs a small number of elements to implement. Confirm the resulting flow is built as expected before adding more complexity to your instructions.
  • Don’t forget to use proper grammar and spelling!

Helping Einstein Improve

Einstein for Flow is still learning how to build accurate flows. Some flows created by Einstein for Flow won’t be built the way you expected. Here’s how you can give feedback:

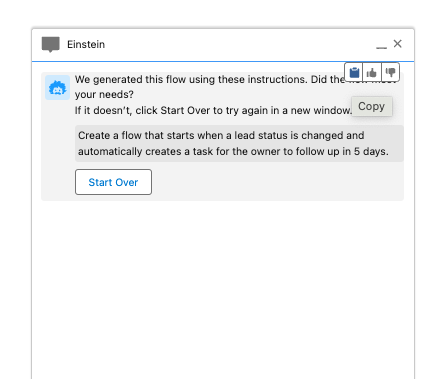
  • Start Over – If the output doesn’t meet your expectations, you can generate a new output by starting over. You can use the clipboard icon to copy the previous prompt if you want to tweak it in the next version. The generated output from the previous attempt isn’t saved and the new output replaces it.
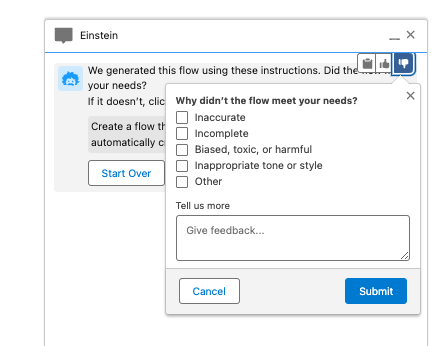
  • Provide Feedback – You can also give your feedback about what’s wrong with the flow. That helps Einstein for Flow continue to improve and build increasingly accurate flows.

Einstein for Flow Considerations

  • Flow Types supported include:
    • Screen Flow
    • Record Triggered Flow
    • Schedule Triggered Flow
  • Support building flows that include:
    • Standard and custom objects & fields
    • 3-6 custom objects
    • Create, Update, and Get Records, Screens and Send Email
    • Record variables, formulas, email templates
    • Fault paths
  • Einstein for Flow uses their CodeGen model for its natural language processing. 
  • Keep in mind that this is feature is in beta and as a generative AI tool it’s still learning. It’s a good idea to review all aspects of your flow to ensure accuracy. Check for things like field names and dates are correct, for example.

Additional Resources to check out:

The Future is Bright 😎

While this is still in its early stages, the potential looks to be awesome as a tool that can: 

  • Help those who are less technical or new to Flow get up to speed more quickly
  • Give more advanced admins a starting point that they can run with instead of starting completely from scratch

And the possibilities don’t end there. Imagine a world where we had a genAI tool that could:

  • Scan a flow and summarize what it does. As a new admin, how amazing would it be to scan the flows in your new company’s org to get up to speed more quickly!
  • Evaluate a flow against best practices. Think of how much easier it would be to find and resolve hardcoded IDs or DML elements in a loop!
  • Creating tests for the flows built

(*these are my opinions only and not tied to Salesforce’s roadmap for this tool, although I hope the Flow team keeps this wishlist in mind 😉.)

What has you most excited about this tool? What would you love to see this feature do in the future? Let us know in the comments.

The Salesforce Summer ’24 release notes have arrived, and with them, the delivery of one of the most highly sought-after Marketing Cloud Account Engagement (MCAE/Pardot) features ever requested. In fact, sending operational emails in Engagement Studio functionality has garnered the fifth most points in the Account Engagement category on the IdeaExchange.

What is an Operational Email?

An operational email is informational and is distinct from a marketing email. Erin Duncan has written a great article that goes in-depth about the differences between the two and when it is appropriate to use each.

When an email is marked as “operational,” it bypasses the recipient’s opt-in status and will send the message even if the subscriber has opted out. You must only use operational emails for their intended purpose, as this can affect your sending reputation and put you on the wrong side of the CAN-SPAM Act.

How Do I Enable Operational Emails in MCAE?

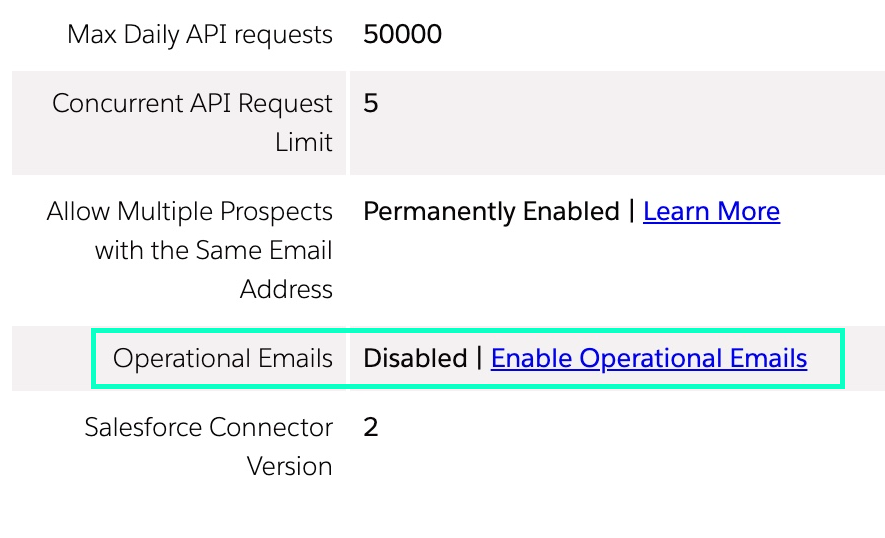
  1. Navigate to Account Engagement Settings 
  2. Click Enable Operational Emails
  3. Review the restrictions associated with sending operational emails and confirm your selection 

Keep in mind that only Account Engagement Admin users and custom user roles can send operational emails.

Sending Operational Emails with Engagement Studio

Previously, operational emails could only be sent from list sends. This required selecting an audience, building email content, and manually sending at a single point in time. Now, users can send operational emails directly from Engagement Studio, where recipients are enrolled based on user-defined criteria and emails are automatically sent based on your parameters.

Let’s put this into practice. Imagine you are a SaaS company and need to deliver communications regarding your product’s planned system outages. Instead of setting up multiple operational list sends, you could create an Engagement Studio program to automate the outage and issue-resolved notifications to your selected audience.

Another example could be letting your customers know that their product’s license is about to expire. You could create an Engagement Studio program that could send notifications to let them renew their product on a more time-based cadence. Once the Engagement Studio is set and running, you do not need to reconfigure manual email list sends.

Other use cases could include:

  • Renewal or expiration reminders
  • Order updates
  • Event registration reminders
  • Internal employee onboarding

As with all effective communications, using operational emails in engagement studios will take planning. You will need content to create your emails, data to ensure that the right emails are being sent to the right person, and, most importantly, compliance with the Marketing Cloud Account Engagement Permission Based Marketing Policy.

What are the limitations?

Salesforce has provided a list of limitations for using operational emails in Engagement Studio:

  • If a program is running and the Operational Email setting is disabled, operational emails aren’t sent. Prospects skip those steps and proceed to the next one.
  • If a program with a Send Operational Email card is paused and the account setting is disabled. To restart the program, remove the steps or re-enable the Operational Email setting.
  • If a program with a Send Operational Email card isn’t running and the account setting is disabled, the program can’t be started or resumed. To start or resume the program, you must re-enable the setting or remove the step.

One Small Step for Email Marketing, One Giant Leap Forward for Efficiency

This is a huge improvement in saving marketers time and improving customers’ experiences with your brand. It ensures that customers can receive mission-critical information at the right time without having to manually and tediously configure the email sends.

How do you plan on using Engagement Studio to send operational emails? Let us know in the comments.

Do you have an organized brain, enjoy project managing across multiple stakeholders and departments, love visualizing a process, and want to prove it with a new Salesforce certification? Well, then the Salesforce Business Analyst Certification is the right one for you!

Here is our guide to passing the Salesforce Business Analyst Certification exam. Good luck!

Step 1. Review the Salesforce Business Analyst Exam Guide & Schedule Your Test

Quick reminder that there are no longer any prerequisites for the Business Analyst exam! It is helpful to know or have experience with Salesforce and understand platform functionality and terminology though.

According to the Salesforce Business Analyst exam guide, this certification is “designed for Business Analysts with Salesforce experience. The successful candidate understands business needs, captures requirements, and collaborates with stakeholders to support the development of Salesforce solutions which drive business improvements.”

If you are interested in refreshing your Salesforce skills or earning one of the related certifications first, here are two helpful resources:

Salesforce Business Analyst Certification

Salesforce Business Analyst Exam Outline

  • Customer Discovery: 17%
  • Collaboration with Stakeholders: 23%
  • Business Process Mapping: 12%
  • Requirements: 18%
  • User Stories: 18%
  • Development Support and User Acceptance: 12%

The exam guide goes into each objective in more detail and also describes the person who is more likely to succeed with this certification (a.k.a. you!).

Schedule Your Exam

Once you have confirmed that this is the certification for you, schedule your test so we have a deadline to study for. Here is the link to make this the easiest step. 

Step 2. Organize Your Study Resources

We already established we have well-organized, to-do list, and process-visualization brains so I’ve gone ahead and done the pre-work (Googling) for you to track down our favorite resources, practice tests, and study guides. Plus we’ve included some key topics to revisit based on our experience earning the Business Analyst certification.

Trailheads & Trailmixes

Blogs

Practice Exams & Courses

This is an essential step for the Salesforce Business Analyst certification! You need to get in the head of the Salesforce test writers to best understand the use cases and user stories they are presenting because at first glance, most of the answers are going to appear correct. However, we want to choose the best process, steps, model, team structure, etc. that matches the specifics of the situation outlined.

Study Groups

Salesforce certifications are difficult. Lucky for us, there are a ton of welcoming communities that we can reach out to for support. 

One of our favorites is co-led by one of our own Sercante team members, the Boston Area Community Group with Jordyn Jaffer. This group hosts annual, virtual certification camps that are run completely by attendees. The attendees work together to present different topics each week to help each other prepare for taking the certification. Jordyn says, “ We are in our fourth year of facilitating these and are tackling the Salesforce Advanced Administrator Certification (for the second time!).” Check out their upcoming camps on their Trailblazer Community page here – Boston Women in Tech.

Topics Worthy of a Second Glance

Step 3. Ready? Pass the Salesforce Business Analyst Certification!

You might never feel ready to take the Business Analyst test – there are endless ways to think about processes and user stories and everything in between. But just like the solutions we are managing and building, there has to be an activation date. 

Test-Taking Tips from the Sercante Dragons

  • Find Keywords
    • These phrases in the questions can indicate the answer or what you can eliminate as an answer.
  • Mark Questions for Review & Read Them Carefully
    • Always refer back to the full question during or at the end of the exam when you are starting to second guess yourself, there might be something key you missed when you first read it. 
    • The correct answers for this exam are going to be very order-dependent so make sure you read them slowly.
  • Pay Attention to How Questions Answer Each Other
    • The use cases being described usually highlight a specific title or department so consider that when choosing the correct answer.
    • Think about how they phrased other questions as that might help you focus on the correct answer for a question you were unsure of.
  • Don’t Overthink Questions that Seem Easy
    • There are going to be a lot of questions that sound the same in this exam – don’t get stuck in a second-guessing loop when the answer seems too simple.
  • Using Synonyms of Words Can Help Answer a Question
    • For example, “what is the best diagram for this?” One of the correct answers is “the big picture.”
  • Have a General Understanding of the Main Salesforce Products
    • There will be questions and answers that list actual Salesforce platforms or functionality by name. For example, “your team/client/customer has this problem, which feature/product would help solve this?”

Good luck, you’ve got this!

Share any resources or problem topics in the comments section to help prepare the next group of Salesforce Business Analyst test takers.

No more posts to show