Marketing Cloud Account Engagement Progressive Profiling is an out-of-the-box functionality and a powerful solution for B2B marketers who want to get detailed prospect data without overwhelming them with a large number of form fields to complete.
This advanced form feature allows marketers to gather additional information about prospects over time, without creating lengthy forms. On one hand, it helps the marketers gain higher conversion rates, while on the other it enhances the user experience and reduces form fill burnout.
How does Progressive Profiling work?
Through Progressive Profiling, Marketing Cloud Account Engagement replaces the form fields for which data is already collected with new fields.
So when a prospect visits your progressive profiling enabled form, it will only present the fields they haven’t
filled out before, unless the ‘Always display even if previously completed’ setting is enabled. By doing so, you gradually collect more information about your prospects over multiple interactions.
When a prospect first interacts with your marketing content, Marketing Cloud Account Engagement should display a short form with essential fields such as first name, last name, email address, and company name. The goal is to capture basic prospect data to initiate the engagement.
Upon subsequent engagement, Marketing Cloud Account Engagement flips previously completed fields with new ones. For instance, if the prospect has completed the Company Name field, the next time they interact with a form, it could be replaced with the Job title field.
Through every interaction, Marketing Cloud Account Engagement will ask the prospect to provide additional data beyond what is collected already.
Gradually you can build a comprehensive profile of your prospects, and it can be used to tailor your marketing campaigns to cater to their specific needs and preferences.
Key Benefits of Progressive Profiling
Progressive profiling ensures that quality prospect data is collected, as the risk of data entry errors is minimized due to this gradual approach of presenting fields.
Since the number of fields displayed at a time is limited, it makes the form submission exercise seamless, reduces burnout and increases the likelihood of getting more form submissions.
Segmentation and targeting of prospects also becomes a lot more easier and effective as more and more prospect data is collected.
Through better segmentation, marketers can send personalized content to the prospects and improve the chances of conversion.
Collecting additional information regarding the needs and preferences of the prospects can aid marketers in channelizing marketing efforts in the right areas.
How to set up progressive profiling in Account Engagement
Create Custom Fields:
Before setting up progressive profiling, you need to ensure the custom fields to collect the incremental prospect data are created.
Create your Marketing Cloud Account Engagement Form:
This feature requires you to first create the forms you intend to use for capturing prospect data. Create a form and either add new fields or use the existing ones such as First Name, Last Name, Email and Company.
Enable progressive profiling for your form:
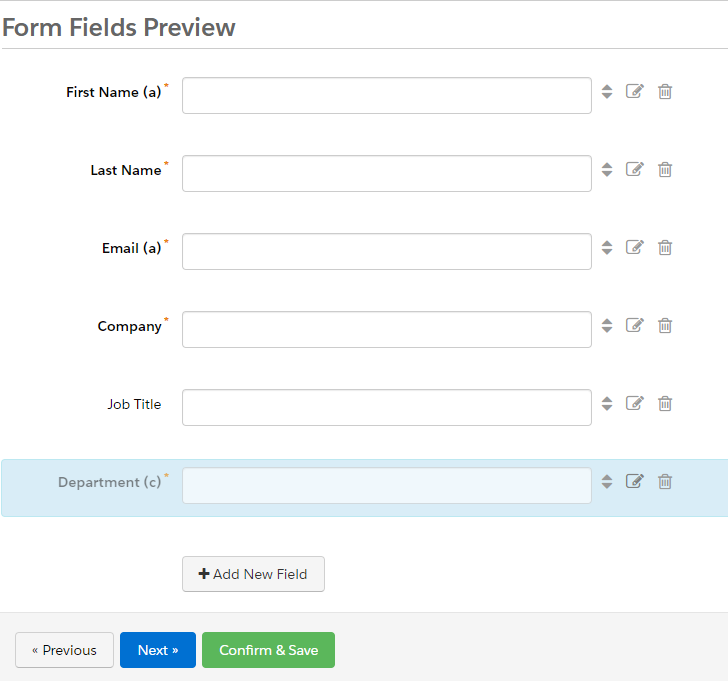
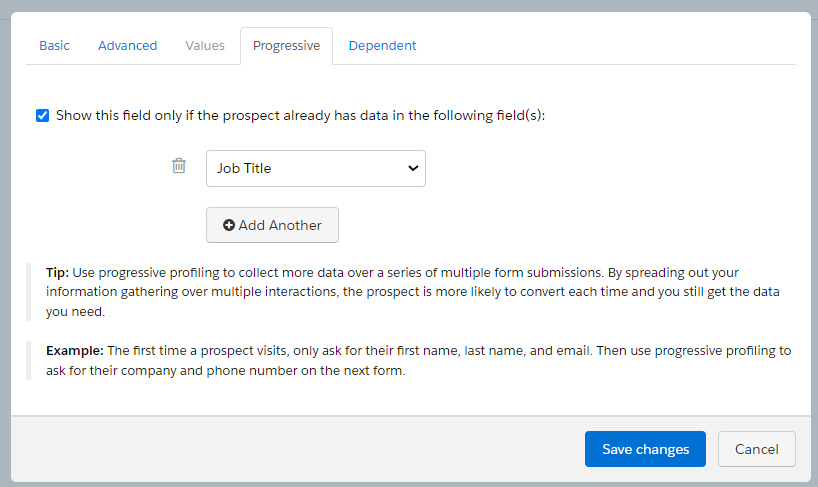
In the form editor, click on the pencil icon adjacent to the form fields you seek to progressively profile. (The screenshots below show the example of progressive profiling on the ‘Department’ field, which will be displayed only when the ‘Job Title’ field is already completed.)
Then, in the form settings dialogue box, switch to the ‘Progressive’ tab and enable progressive profiling by checking the checkbox labeled as ‘Show this field only if the prospect already has data in the following field(s)’
When adding multiple progressive profile fields, you can also manage the sequence in which they are displayed.
Remember to save the changes you made to the form settings, and click the ‘Confirm and save’ button before exiting the form editor.
Conclusion
Overall, progressive profiling addresses the issue of form fill burnout by creating a dynamic, user-friendly and incremental approach to collect prospect data. It ensures quality data is collected and aids segmentation and targeting.
This approach also ensures that marketers respect their prospect’s time and effort in the form completion process, while increasing engagement and prospect data quality. When using this approach remember to maintain a balance between asking information and honoring the prospect’s preferences.
Need help creating sophisticated prospect profiles and segmentation strategies? Reach out to the team at Sercante to get the conversation going.
Adobe’s Marketo and Marketing Cloud Account Engagement (f.k.a. Pardot) are two of the most common marketing automation platforms I’ve worked with in my career as a marketer. When migrating from Marketo to Account Engagement, there is a lot to keep in mind to make sure you:
Transform marketing processes to properly work in the new system.
Are aware of how features differ between the systems.
Keep the migration running smoothly.
Now, both Account Engagement and Marketo have their pros and cons. And this blog isn’t to convince you one is better than the other (I’d probably be a little too biased in the matter). This post is designed to guide those who are migrating from Marketo to Account Engagement to ensure your migration goes as smoothly as possible.
Things to be mindful of when migrating from Marketo to Account Engagement
These are the main considerations to make during a Marketo to Account Engagement migration.
Difference in the Email field
One big difference between Marketo and Account Engagement is how each platform treats the “Email” field.
In Marketo, the email field can be blank and it can also be an invalid value (i.e. “[email protected] – only send newsletters”).
In Account Engagement, the email field is required, always, there are no workarounds that I have found. The email value also needs to have the correct format, so you can’t enter spaces or just text without an “@” and “.”. These restrictions help protect your deliverability rate and ensure only accurately formatted data is entered.
Account Engagement also restricts role based emails from being imported or emailed to protect your account’s sending reputation. These are emails that may go to a distribution group rather than one person, so it makes opt-in consent murky (i.e. Sales@, Marketing@, info@ etc.). Account Engagement does allow you to lift this restriction, but you will need to open a support ticket to do so.
Firing when a Field Is Changed
Marketo automations have the ability to fire when a prospect’s field is changed. So, if a prospect’s job title is updated, you might run them through a process that sets the correct Job Role. Account Engagement only works with what the field value is at any current moment.
You can see a field’s previous value in the Audit table, but you can’t fire an automation off of this activity. Within Account Engagement, you can work around this by having your automations repeat on a regular basis or by creating a date field and using a Salesforce flow to stamp the date everytime the field changes.
Program Statuses versus Campaign Member Statuses
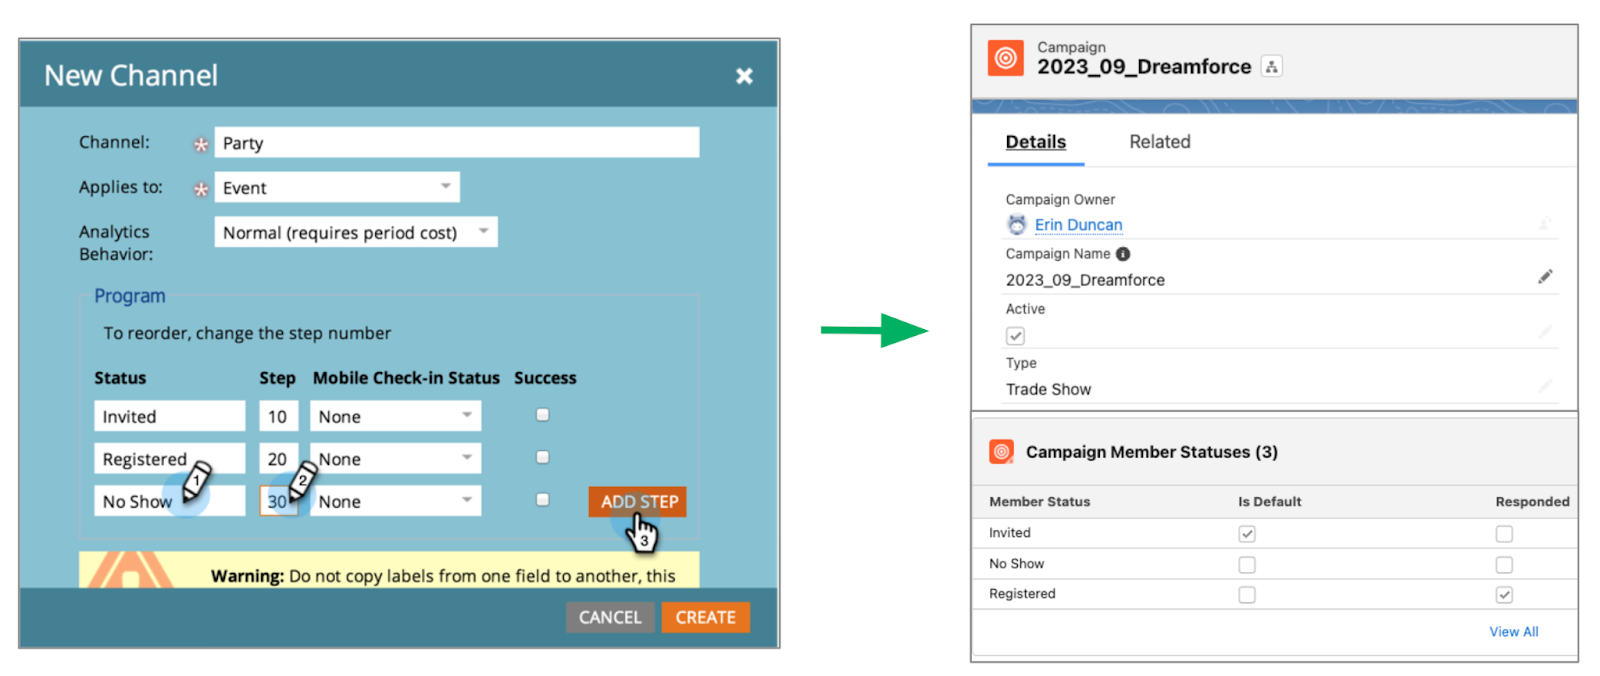
Marketo has ‘Programs’ for marketing initiatives such as events, nurtures, emails, etc. These programs have statues that designate where the prospect is within the program. This mirrors how Account Engagement uses campaigns and campaign member statuses.
Campaign member statuses can be used in the same way as Marketo program statuses, you’ll just want to make sure your users understand this change in process.
Lead Qualification
Marketo focuses solely on scores in three different scoring categories:
Behavior Scoring is implicit, it’s based off of the person’s interactions with your marketing resources or your website.
Account Engagement also has Scoring Categories that allow you to gain insight into which solution, service, or topic the prospect is most interested in.
Demographic Scoring is explicit, it’s based on other observable information such as Job Title/ Role, Company Size, and Industry.
Negative Scoring is also implicit, it’s based on what the person doesn’t do and reduces their score based on inactivity.
This can be replicated in Account Engagement with Score decay.
When migrating your Prospects from Marketo to Account Engagement, you may want them to start with their Marketo Behavior Score as their Account Engagement Score. If so, make sure you include the score in your import file for Account Engagement.
Forms
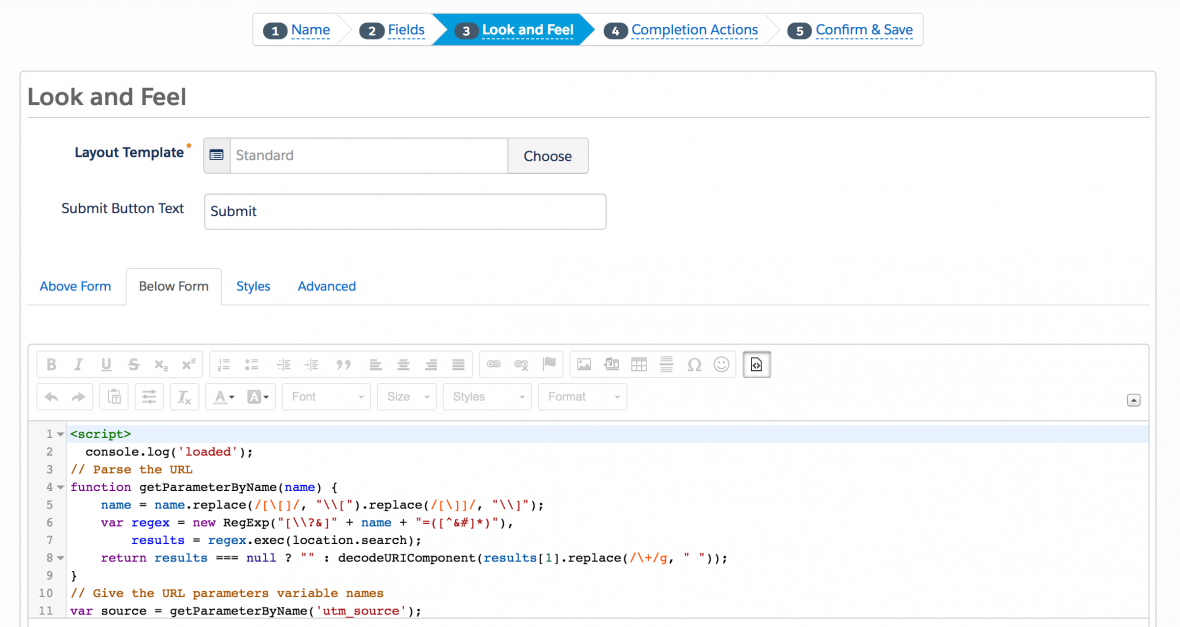
Marketo has a variety of built in options to support advanced operations, such as inserting text in the middle of the form, in form calculations, or multiple redirects depending on form values. Account Engagement relies on Javascript for these advanced configurations.
Custom JavaScript can be placed within your Account Engagement forms under the Look and Feel tab, in the Below Form section.
Marketo and Account Engagement Terminology Differences
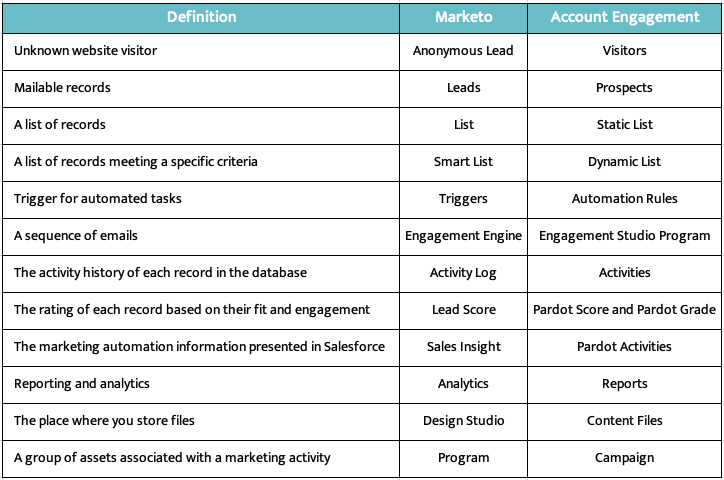
Below is a quick guide to the terminology differences between the two systems. Make sure your users have this guide early to avoid confusion and frustration during your migration!
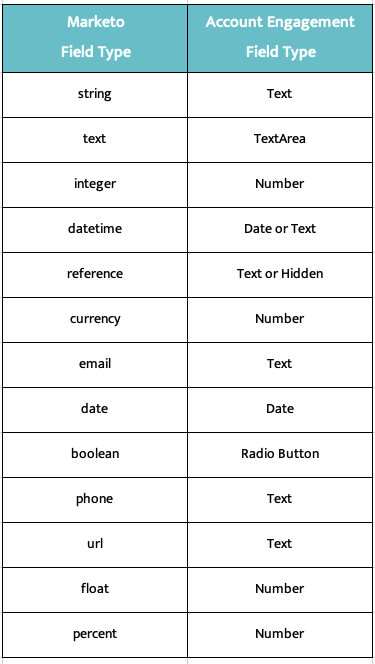
Marketo and Account Engagement Field Types
Account Engagement and Marketo field types are a bit different, but the below table will guide you when creating your new fields in Account Engagement.
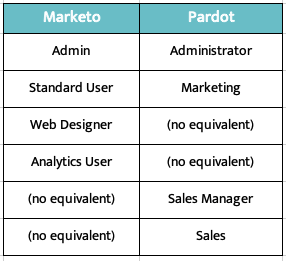
Marketo and Account Engagement User Roles
User Roles also differ between the two systems. Account Engagement’s Premium and Advanced editions provide the ability to use default user roles or create Custom User Roles so you can create a role with the exact permission needed.
Additional Tips
Marketo has restrictions on exports, typically 500MB per day. So plan accordingly, and keep in mind that you may not be able to export all your Marketo prospects in one day!
Account Engagement Automation Rule and Dynamic List criteria is limited to about 250 characters per rule (factoring in separator and spaces), while Marketo is limited to 5,000 characters. Creuz Your Data can help you split up your rule criteria into 250 character chunks, or Prospect Updater can help you circumvent this limitation entirely.
Marketers often overlook code literacy, outsourcing anything code related to website or email developers. But understanding some coding basics, such as HTML, benefits the everyday marketer more than they realize.
By learning the fundamentals of HTML, you can:
Better communicate your vision to the web developers
Understand how web pages are designed and where pieces of code need to go
Create richer, more engaging email and website content
Improve their search engine rankings
“But I don’t need to know how to code. It’s scary.”
That’s where we come in!
HTML coding basics for marketers
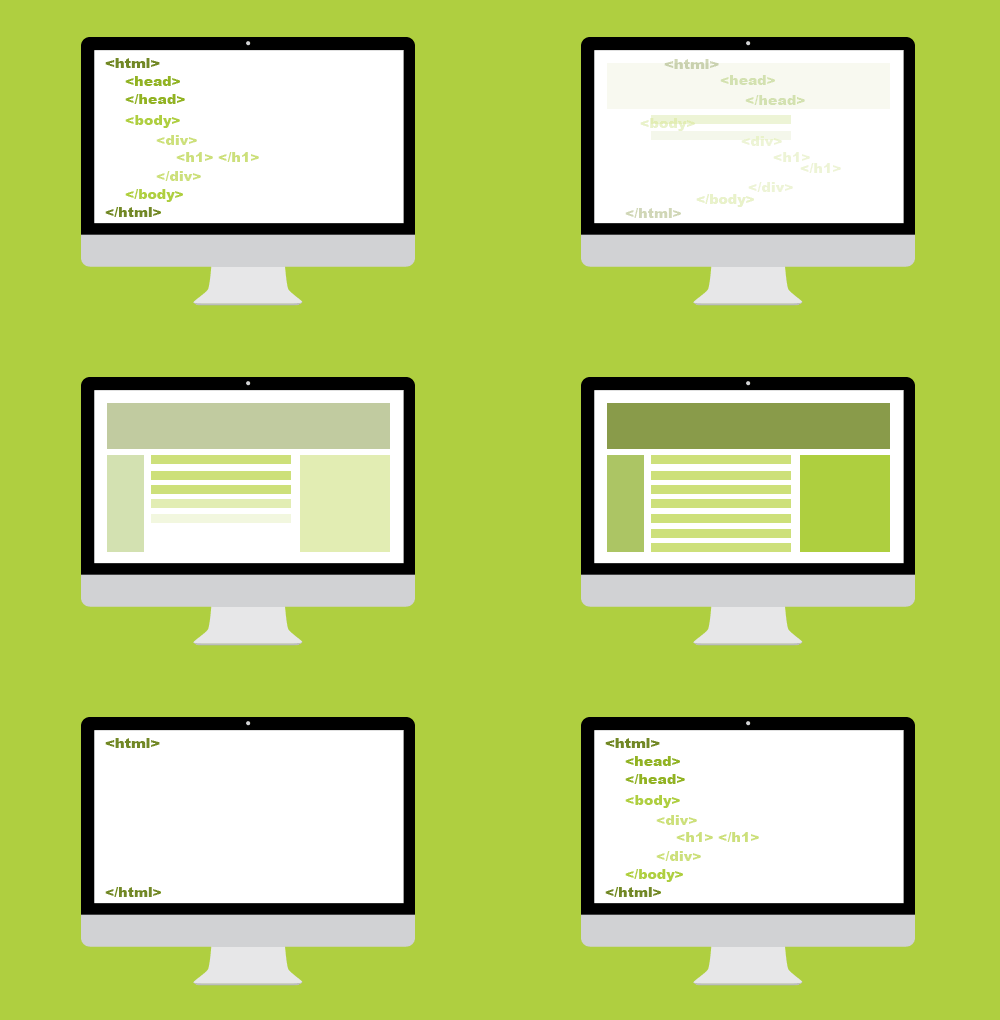
Hypertext markup language, aka HTML, is the code that tells your web browser what it should show when you go to a website. When you go to a webpage, your browser reads through the HTML tags and then presents it visually. This blog page even uses HTML to display its design and content to you in a way that is easy to read and understand.
With even the most basic knowledge of HTML code, you can better break up your page’s content in a way that will better engage your audience.
Code formatting
Each HTML tag you add must have a matching set of open and close tags. Without a close tag, any code you write will cause errors in how the info is displayed.
If we were to use the standard paragraph code, <b>, we would need to add </b> after we’re done.
<b>This tag makes text bold!</b> becomes This tag makes text bold!
HTML page structure
These tags will be utilized on every webpage. While you may not need to write them yourself, they are important to know and understand.
<head>
Any additional code for a page will go inside of the tag. This covers everything from general page design, additional styling, or Javascript code. Most tracking codes will go here as well.
<body>
This will be the main content for your website page.
<link>
If your page needs to link to a Cascading Stylesheet Sheet (CSS), it will do so inside of a tag.
<title>
Each page needs a title. What you place in the title tag will appear in search engine results as well as the name of the browser tab.
<div>
This is a structural element that goes inside the tag. Web pages and emails can be broken down into a series of nested tables. Div tags act as a single cell inside of this high level structure.
Building richer, more readable content
A main way marketers effectively use HTML is breaking up walls of text into something that is easier for a reader to sift through.
Content is meant to be read — not just for search engines to crawl. The more readable your landing page or email, the better your customers will understand the message you’re trying to convey.
With HTML, you add rich text formatting to make key points stand out or build a list of reasons why your product is awesome.
Here are some important tags to spice up your copy!
Coding basics for stronger search engine optimization
SEO is the name of the online content game. Marketers are always on the lookout for ways to improve their search engine rankings. But HTML provides some simple ways to gain a boost – no hard thinking required.
The importance of alt tags
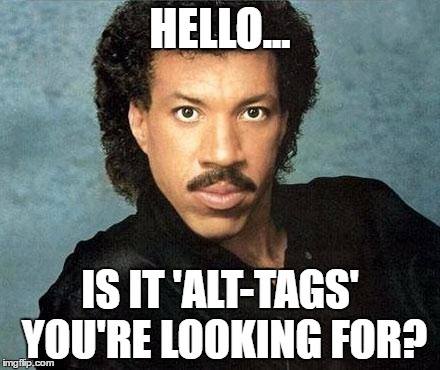
Google can do a lot of things except look at images. So how does it know what photos to show as relevant when I search for something online?
Alt text! Alt tags, also known as alt descriptions or alt text, describe the images you post to the search engine. They also allow customers who require certain accessibility tools to enjoy your more visual content.
And if an image is taking a while to load (or doesn’t load at all), the alt text will display.
To add an alt tag to an image in HTML, you would use the following format:
<img src=”(Image URL)” alt=”A meme with the text Hello… is it alt-tags you’re looking for? over a photo Lionel Richie’s face”>
Use HTML header hierarchies
Search engines like it when pages lay out what is most important. When you utilize H1, H2, etc. tags on your page, you are laying out a table of contents of what content is connected and how important each piece is.
By placing a keyword in an H1 tag, compared to an H4 tag, you tell Google that the keyword in the H1 tag is one of the most important pieces of context about what is on your landing page.
All header tags can be stylized to make the most important ones stand out visually, which assist with readability.
Let’s get meta with meta tags
Meta tags may not directly impact your SEO rankings, but by adding in appropriate meta descriptions, this tells search engines like Google know what to display on their search results page. The more accurate and correct the meta description on the results page, the higher the chance someone will click on your website’s link because your result looks more relevant to the searcher.
If you don’t set a meta description yourself, Google then gets to guess what content to put here based on what exists on your page. Also another reason why header hierarchy is vital.
These type of tags usually fall under the main <head> tag for a page and look like the following:
<head>

<title>Let’s Get Meta</title>

<meta name=”keywords” content=”HTML, Meta Tags, Meta Description, Metadata” />

<meta name =”description” content=”Answering all of your questions about meta tags!” />

</head>
Basic coding is not so scary, right?
Simple coding doesn’t have to be scary. Knowing the basics of HTML makes a difference when it comes to having stand out landing pages and email copy. And understanding how code works will help you communicate with your web developers.
If you want to learn more about code that helps marketers, check out Code School for Marketers, a 6-week interactive online course to give you the tools to improve your code literacy!
Migrating from one marketing automation platform (MAP) to another can be nerve wracking. You are bound to be overwhelmed and not know where to start. But I once had a high school coach say “nervousness equals readiness.” And while that didn’t always ease the nerves before a big race, it has stuck with me all these years. So embrace the change as you prepare for your marketing automation platform migration!
I have been on both sides of a marketing automation platform migration project — both as a person who owns the platform and as a consultant. I want to share some of the learnings from those experiences to make the process a little less painful for anyone who’s just getting started.
Remember the reasons you are changing MAPs
Since we work through so many marketing automation migration projects where we help our clients switch to Marketing Cloud Account Engagement (Pardot), we’ll use those migrations as an example for the purposes of this blog post.
Marketing teams are usually migrating to Account Engagement for one of a few reasons:
It works better with Salesforce
Their current MAP is not easy to understand
They are looking for better support
Budget
Migrating to Account Engagement means you get one unified platform for sales and marketing, which for marketers means one less system to have to log into!
With Engagement History on leads, contacts, and accounts, your sales team has insight into engagement with marketing activities right on their record. And a lot of marketing technology (martech) integrates with Salesforce.
That means you can, more often than not, pull that information into Account Engagement to use in your audience segmentation.
Account Engagement is not ‘Insert Marketing Automation Platform Name Here’
Regardless of the reason you are migrating to Account Engagement, you need to remember that Account Engagement might not be able to do everything the same way as your existing MAP — but that isn’t a bad thing! There is most likely a solution for it using native functionality or customizing code.
I have seen clients say they want everything in Account Engagement to be how it is in their current MAP. This approach will most likely cause some headaches down the road. Take a step back and get an understanding of what the end goal of your process is today so it can be translated into Account Engagement, and then look at how it can be done within Account Engagement.
Make sure you spend time on Trailhead to get an understanding of the basics of how Account Engagement works before you dive into migrating systems.
Documentation will be critical for success — marketing ops rejoice!
The first step before starting to move over assets is to make sure that you have your processes documented. Not only will this help during migration but it will allow you to take a good look at how things are done today and try to improve where possible.
Here are a few to make sure you document:
User management – Who needs access? What type of access do they need?
Lead routing – When does a lead go to sales? What information is required before it goes to sales? Who is it assigned to? What happens if the lead is not ready?
Reporting – What are your KPIs? What system does reporting need to happen in? How do you need reporting – by campaign, by channel, by quarter, by month?
Lead and customer journeys – How and when do you engage with a lead? What about a customer?
Legal requirements – Is there specific language on forms, emails, and landing pages that we need to have?
Overall martech stack – What tools are in your tech stack? How do they all work together? Do you have any new tech you are adding soon?
Channel your inner Marie Kondo throughout your MAP migration
Regardless of how clean you think your current MAP is there will always be old assets and outdated processes. Channel your inner Marie Kondo and make sure you only migrate over what brings you joy — well, migrate what is still necessary for the future. Don’t worry you can always export reporting on old assets so you are losing that data.
This is not only about cleaning up your assets, now is the time to take a good look at what isn’t working well today and make improvements. This applies not only to processes but nurture programs and email and landing page experiences.
While yes, technically, you can do a migration in 30 days, I suggest taking as much time as you can. This is especially true if you have lots of nurture programs, email templates, and complex processes to migrate to the new system.
This is not always possible. There are so many factors that go into this — especially budget and resources.
So, have an honest conversation with your team about the timeline. Don’t forget to factor in overlap with your current MAP (at least a month), and try to give yourself a little padding for the unexpected and time off.
Something will not go as planned
No matter how much you plan and prepare for a migration, something will not go as expected. AND THAT IS OKAY!!!
You might find some custom code on a form you weren’t aware of. Or you could experience sync errors with Salesforce due to a validation rule you didn’t know existed.
Just take a deep breath and know that it can be fixed.
You don’t have to go through a MAP migration alone
Again, migration projects are scary. But you can work with consulting companies that go through these MAP migrations every day. Not only do they know all the processes and logistics for migrating to the new platform, but they’ve worked with companies that weren’t fully utilizing their MAP investment and found ways to improve user experience and adoption.
Working with a partner, like Sercante, can help make it less scary and make sure you get the maximum value out of your tools.
Reach out to the team at Sercante as you get ready for your marketing automation platform migration. We’ve seen it all, so bring us your juiciest challenges!
Salesforce Marketing Cloud Personalization (Interaction Studio) is a fantastic platform to add to your marketing toolset. But starting a Marketing Cloud implementation can be daunting, especially when it is as complex as Personalization.
The following sections of this article will detail the implementation approaches available, provide indicative timelines and outline example use cases. However, if you’re wanting to understand a little more about what the tool can offer, you can check out my last article – Salesforce Marketing Cloud Personalization (Interaction Studio): A Beginner’s Guide.
SFMC Personalization Implementation Methods
With any platform like SFMC Personalization, which promises Real-Time Personalization and AI Recommendations, it’s easy to get carried away with what it can offer. However, the key takeaway from this article is that you should focus on what you and your company can achieve, which is particularly important given the tricky interdependencies you’ll face when implementing Personalization.
In a nutshell, the approaches vary from minimal viable product (MVP), where the goal is to implement a baseline as quickly as possible and then build upon it in future iterations, all the way to future-state implementation (FSI), where you depend on use cases to drive large-scale transformation. There is also a halfway house approach of implementing an As-Is, for those who may sit between the two methods above.
These helpful questions allow you to ascertain which method will best suit your needs, including:
How often does your company change its website?
Do you have easy access to developer resources?
Are you migrating from an existing tool?
Do other platforms need to be integrated?
What you’ll find is:
MVP is great for companies making constant changes to their website, have easy access to developers, and are not migrating from an existing personalization platform. In other words, it’s a viable method for those who are perhaps new to real-time personalization.
As-Is is great for companies that don’t have immediate access to developers, are looking to migrate from one tool to another and have a few live personalization campaigns ready to migrate.
FSI is the preferred option for companies that less frequently change their website, have limited access to developers, are looking to integrate Personalization with multiple clouds (Marketing, Sales or Service), and have external data sources that need to be integrated.
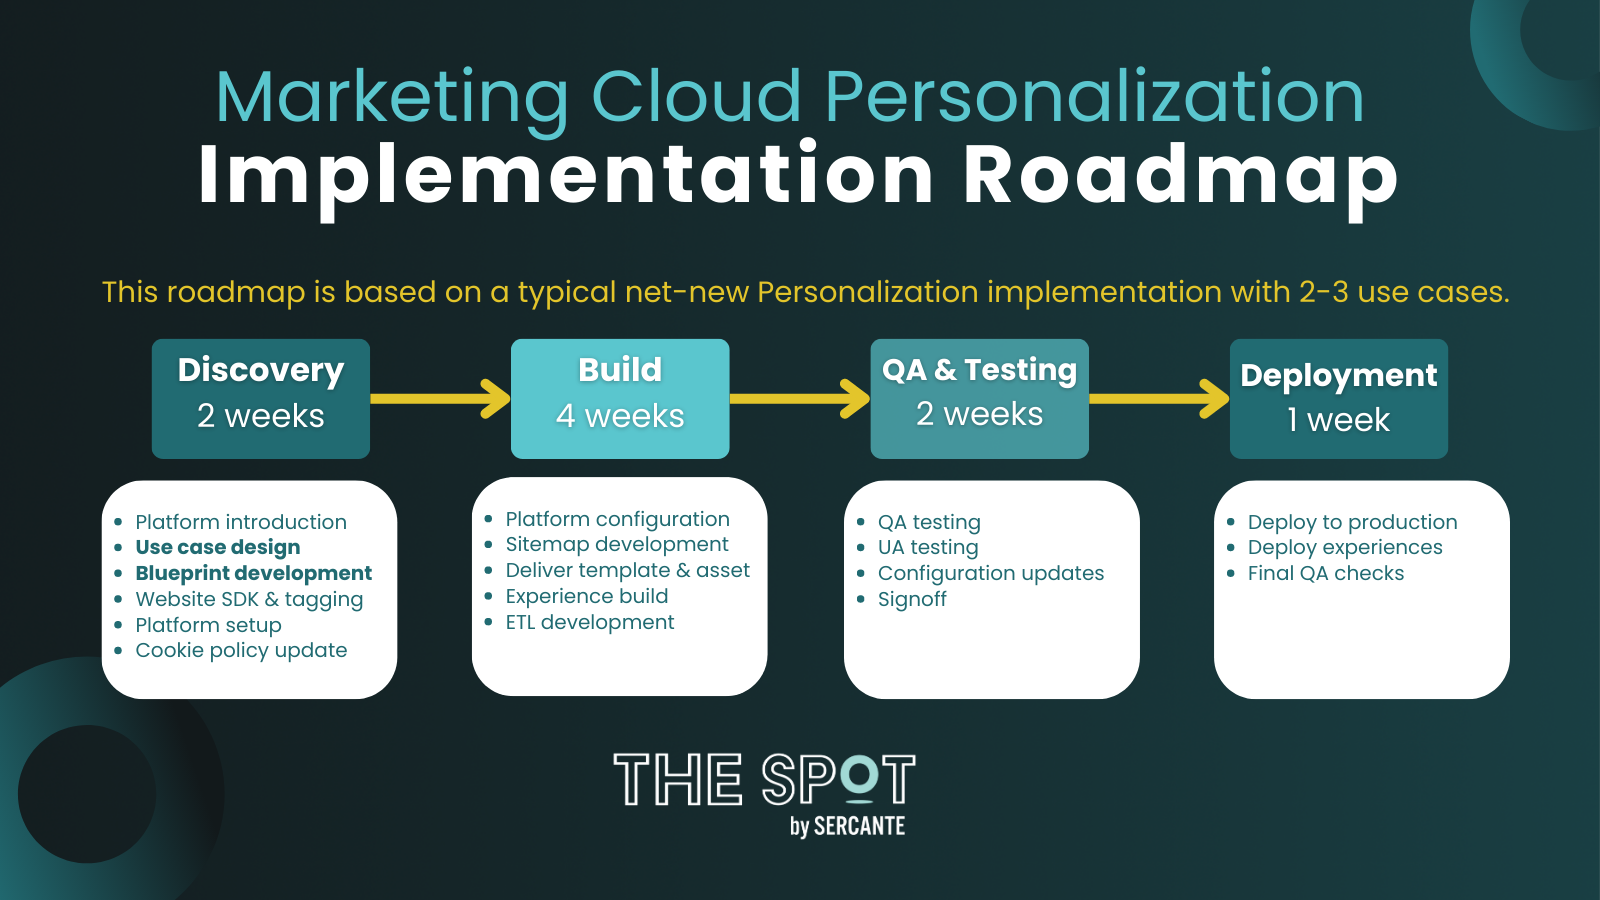
Obviously, the implementation roadmap will vary depending on the scope of your project and the implementation approach you’ve decided to use. However, there are some key milestones that will occur in all implementations, as shown in the diagram below, which is based on a typical net-new Personalization implementation with 2-3 use cases.
Roadmap Diagram
From the diagram above, the two key milestones I’d pay the most attention to are the Use Case Discovery and the Blueprint Development.
Regardless of the implementation method, defining a handful of clear and precise use cases before beginning the build is key to ensuring success. As mentioned, it’s easy to get caught up with the wide range of functionality Personalization offers. That’s why understanding the desired outcome is the most effective way of running a successful implementation and ensuring your company gets the most out of the platform. I’ll go on to share a few examples of good use cases later on.
The blueprint document goes hand-in-hand with the sitemap — which is debatably the most crucial part of Personalization. The blueprint helps define which page categories exist, which triggers exist on those pages, what data can be scraped and where it can be scraped from (i.e. DOM vs Data-Layer) for each visit.
Thankfully, to aid with your implementation, the Salesforce Partner Portal can provide a useful template that helps capture all of the information necessary to create your sitemap, and for implementing Personalization. The template covers everything from page types and content zones to events and attributes, and most importantly, where they can be found on your website to make it easier for the developers building the sitemap.
Use Cases
Without sounding like a broken record, use cases can make or break a Personalization implementation. During my first implementation of Personalization, the goal I was given was to deliver Real-Time Web Personalization aka Personalization.
There were no clear KPIs, the website was static and there was nothing to encourage returning visitors, and it made any experiences based on previous visits practically void. The end result was that our very expensive personalization engine sat on the shelf until we revisited the drawing board.
Defining Your Use Cases
In order to avoid making my mistake, don’t be afraid to get granular with your use cases. Once established, it’s easier to build on top of existing use cases with future iterations. So really think about the following aspects when defining your use cases:
Objective – What is it you’re trying to achieve with your personalization? Is it to increase the value per order? Or perhaps to encourage more users to download your app?
KPIs – How are you going to measure the success of your personalization? Is it based on the number of successful completions? What percentage increase in order value would be considered successful?
Approach – Once you know what you’re trying to achieve, you then need to consider the approach. Is it based on visitors from a particular source (Rule-Based) or is it based on trending products (Recipe-based)?
Measurement Approach – There’s no point in creating a personalized experience if there is no control to measure success. Consider what an adequate sample might look like and how long the campaign might last.
Channels – Is this going to be a web- or mobile-led campaign?
There’s no right or wrong answer for use cases and it completely depends on your company’s objectives. But for a typical net-new implementation, 2-3 concise use cases similar to the ones below is a good starting point.
Use Case Definition Example
Use Case
Approach
Channels
KPI
Measurement Approach
Encourage users to complete the onboarding application
Rules Based
Web, Email
No. clicks on CTA, no. applications started, no. applications completed
50% personalized, 50% control
Encourage mobile app downloads
Rules Based
Web, Mobile App, Email
No. clicks on CTA, no. app downloads
50% personalized, 50% control
Once you’ve defined your use cases, keep referring back to them throughout the implementation and when developing your blueprint. The use cases will help keep your implementation focused on the end goal, and help your developers build a sitemap that will be fit for purpose.
Planning is Key to a Successful SFMC Personalization Implementation
As you’ve probably gathered by now, successfully implementing Personalization is closely linked with planning. Defining clear and concise use cases as well as developing an accurate and detailed blueprint, both of which are milestones during the Discovery Phase, are imperative for a smooth implementation. This is true regardless of your chosen implementation method.
As final food for thought, don’t forget to consider your implementation team. Being the tool that it is, Personalization implementations often begin in the marketing department as it’s the marketers who want real-time personalization capabilities. However, even large marketing teams with wide-ranging skill sets will not be able to deliver Personalization alone.
The Personalization Sitemap will require JavaScript developers. Building ETLs will require support from data architects. CRM integration will require CRM administrators. And creating experiences, although there are ready-made templates, may also require HTML and CSS experts. So, consider including wider teams early on in the implementation.
Not only will this help to ensure that those resources are available to support and understand the ask, but it may also help to define use cases that are more relevant and that are also technically viable.
Need help filling the gaps on your team through your Salesforce Marketing Cloud Personalization implementation? Reach out to team Sercante to get their experts on the case.
Looking for a way to view your Marketing Cloud Account Engagement (Pardot) data within Salesforce? Not fully satisfied with data you’re able to view in the Account Engagement Reports? Well, you’re not alone. This is a comprehensive guide to B2B Marketing Analytics — what it is, what you’ll get out-of-the-box, and how you use the B2BMA dashboards.
What is B2B Marketing Analytics?
B2B Marketing Analytics (B2BMA) is a CRM Analytics App designed specially for B2B Marketers. It uses your Salesforce-Account Engagement connector to package up and display your Account Engagement data and enables several datasets to help you assess your sales and marketing performance. B2BMA comes out-of-the-box with default dashboards intended for various stakeholders on your team.
If you’re trying to view Account Engagement data within Salesforce, B2BMA should be your primary tool. It offers a wide range of data that can significantly improve your visibility into the ROI of your marketing campaigns, combining both marketing and sales pipeline data.
Key terminology within B2BMA
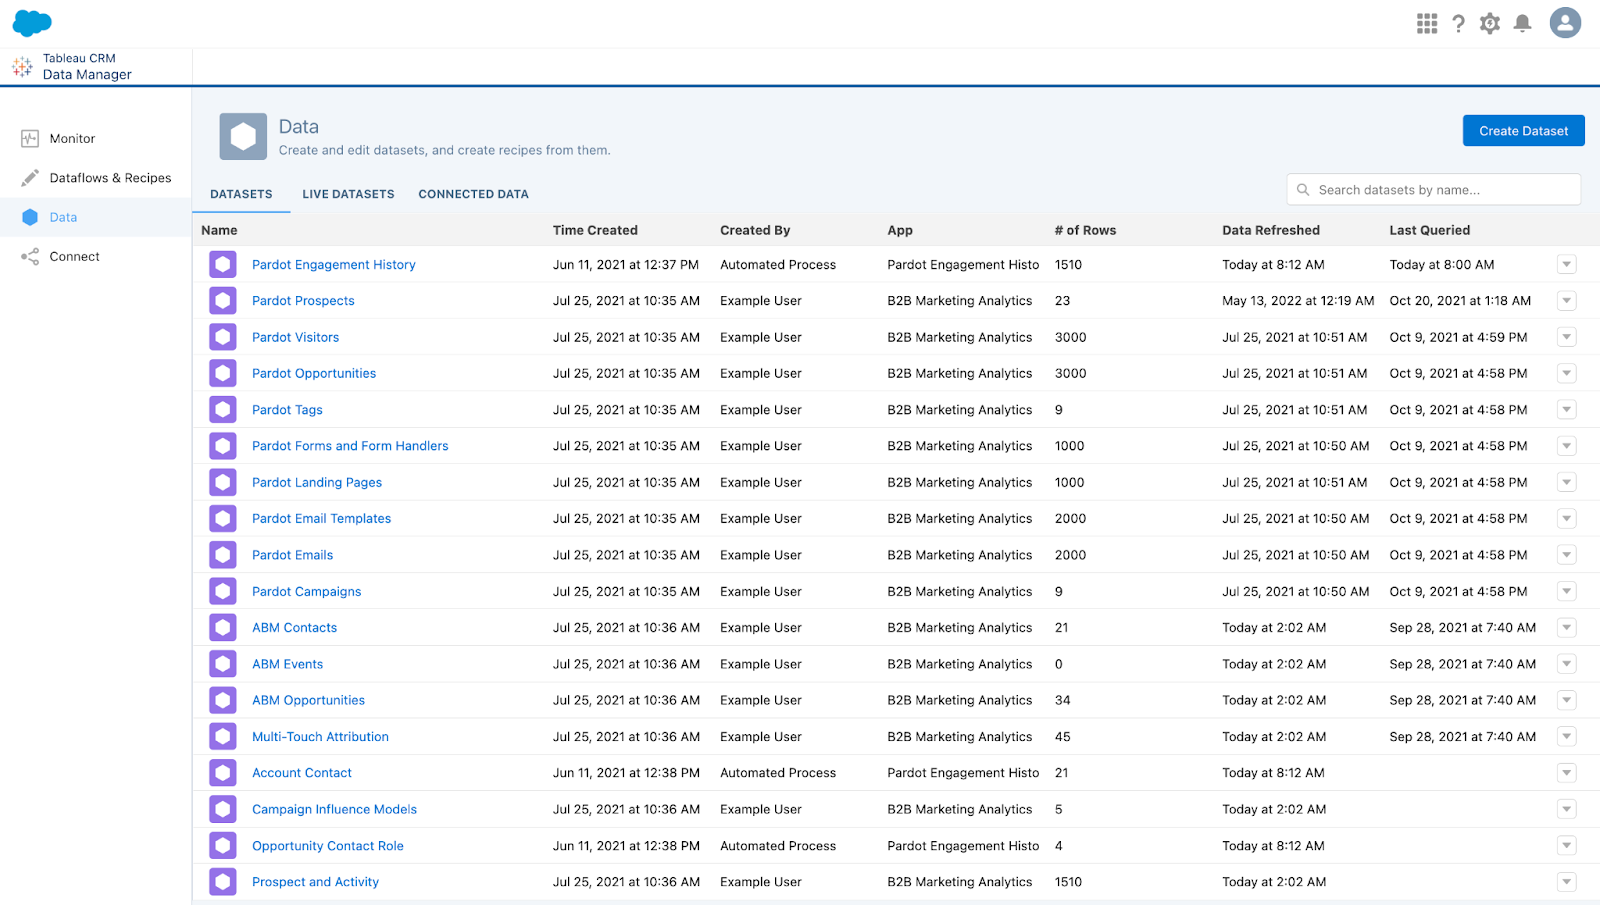
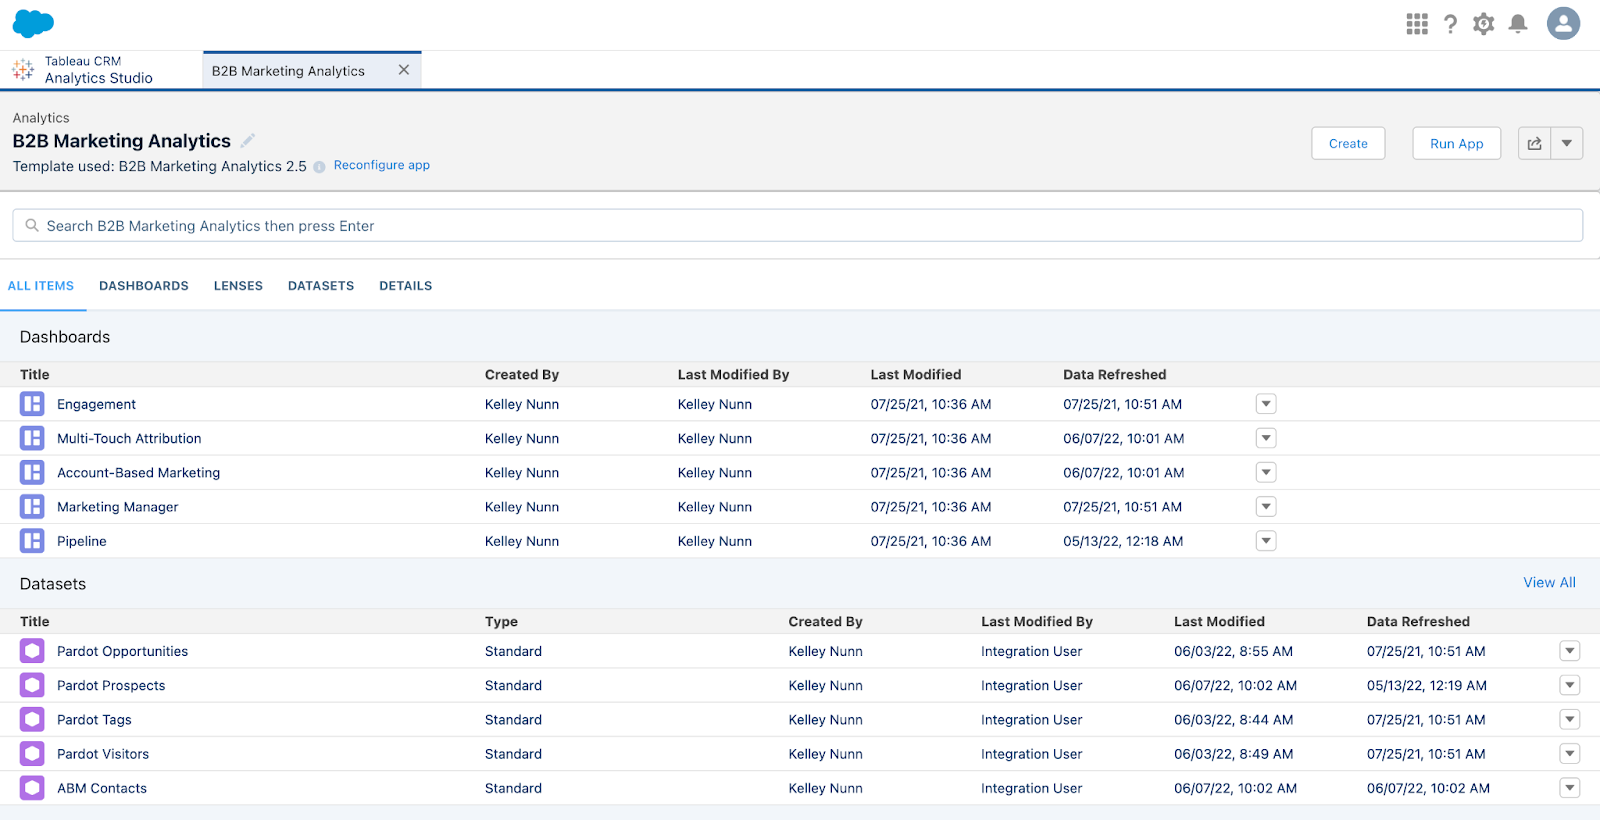
Dataset
Datasets are simply sets of source data (like an Excel table). These datasets are formatted and optimized for interactive exploration.
Note: With B2BMA Plus (a feature available with an upgrade) you can actually control how frequently the data syncs between Account Engagement and Salesforce.
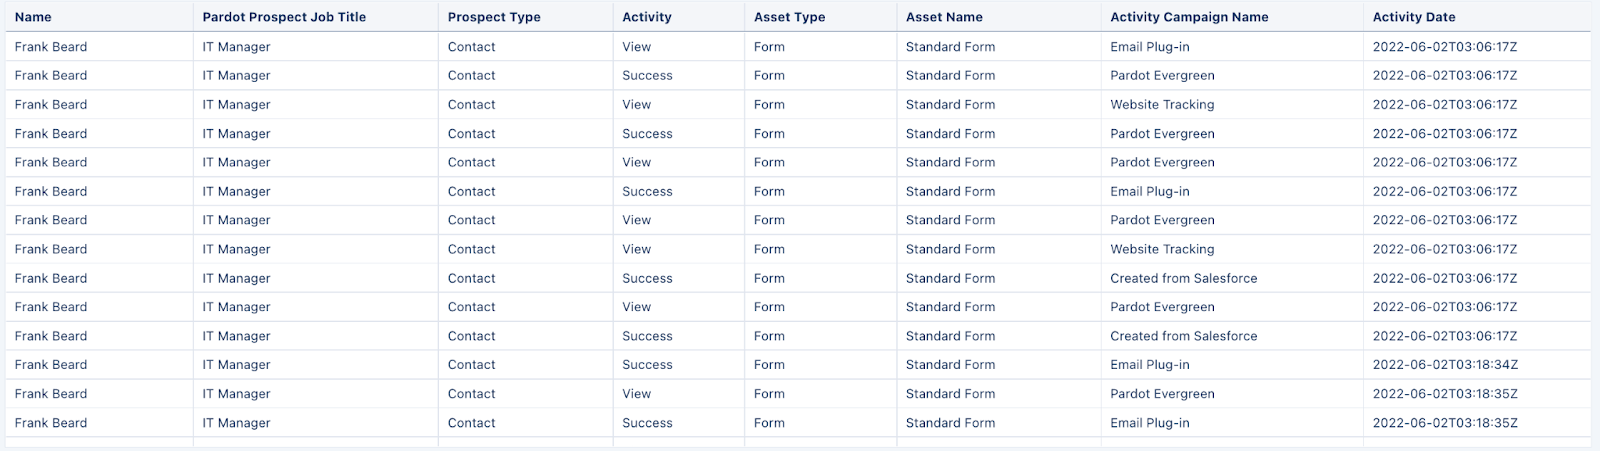
One example of a dataset may be your Account Engagement Prospects (see screenshot below).
Lens
A particular view into a dataset’s data (like a query). Use a lens to visualize your data and perform exploratory analysis.
You’ll get these four lenses out-of-the-box:
Pipeline Deals
Campaigns (Pardot Campaigns)
Lead Sources
Lifecycle Snapshot
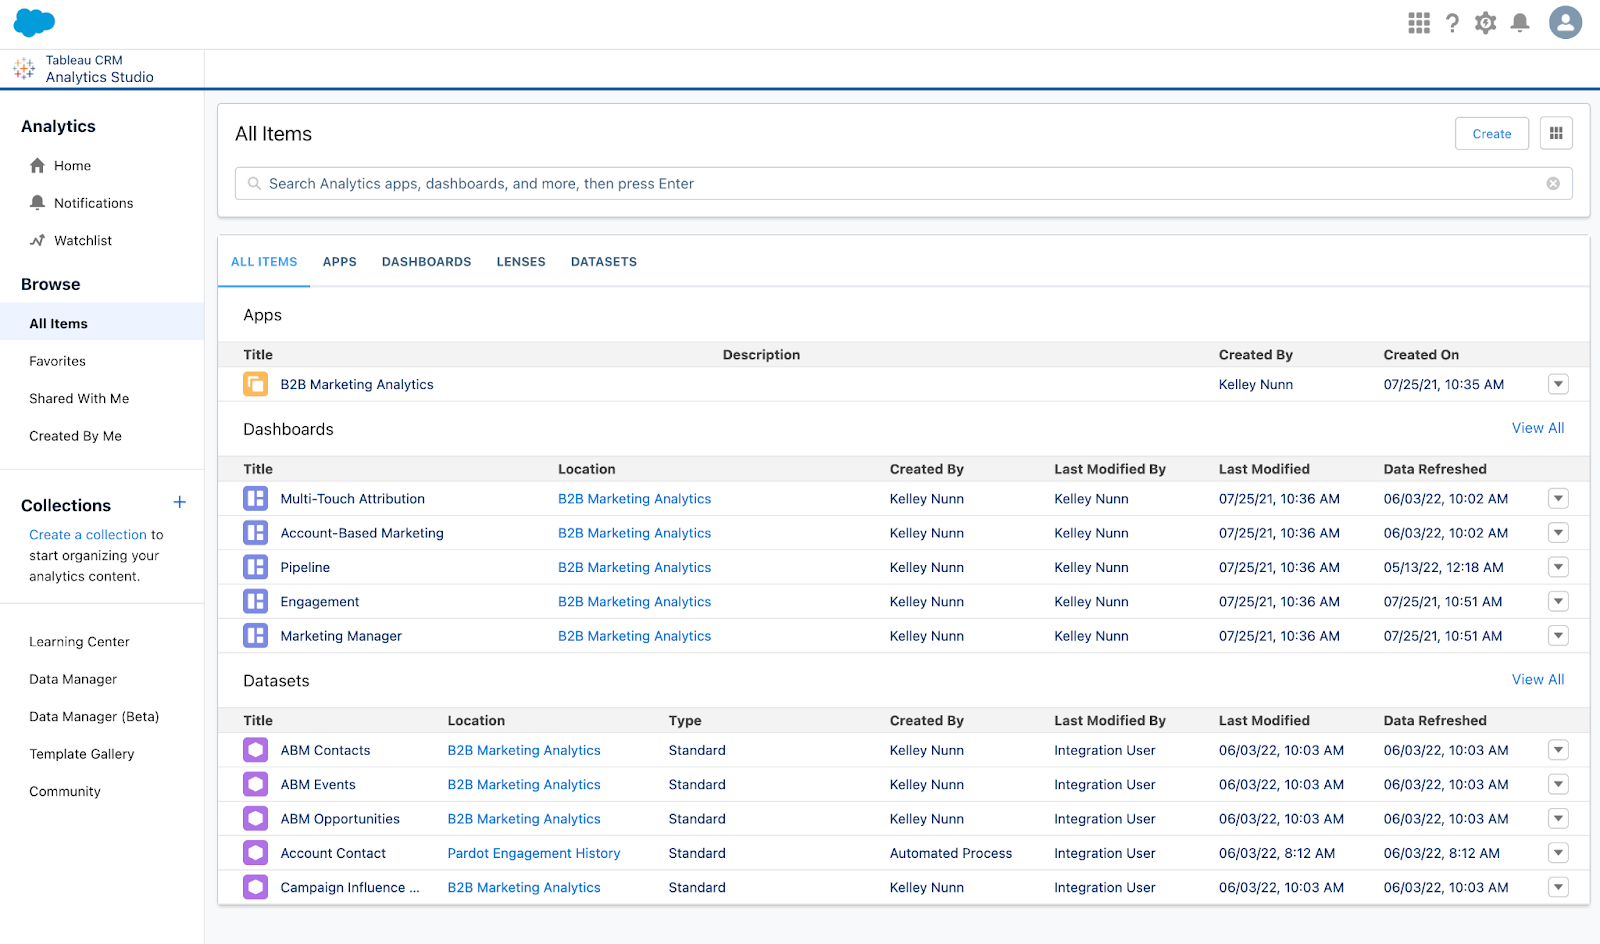
Navigation: CRM Analytics App > All Items > Lenses
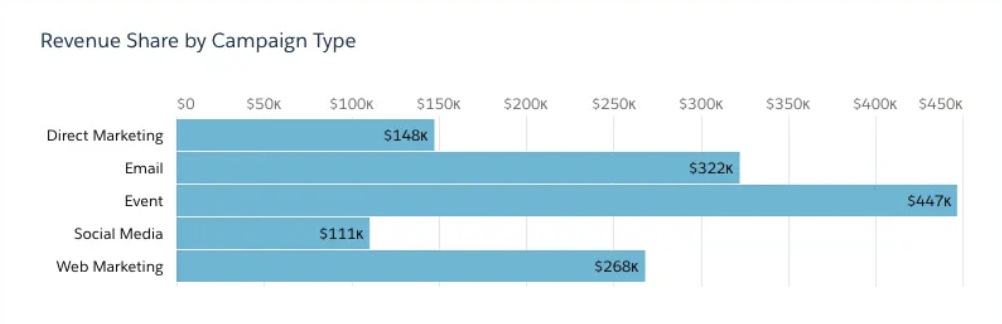
Example: Revenue by Campaign Type (see screenshot below)
Filter
Filters are used to narrow down results. Standard filters vary by dashboard. Keep in mind, you can add filters to a dashboard, but they may not filter all lenses within the dashboard. Some filters may also require customization.
Example: See all email engagement in a fiscal year
Dashboard
A Dashboard in B2BMA is a curated set of charts, metrics, and tables based on the filtered data from one or more lenses. These are typically designed to be used by a specific audience (e.g. Marketing & Sales Leadership). You’ll get these five dashboards out-of-the-box:
Navigation: CRM Analytics App > All Items > Dashboards
Pipeline Dashboard
Offers you a view of your sales funnel from Visitor to Prospect to Opportunity (Won/Lost). You’ll see the following metrics:
Visitors
Prospects
Marketing Qualified Leads (MQLs)
Opportunities (Open and Closed)
Velocity metrics
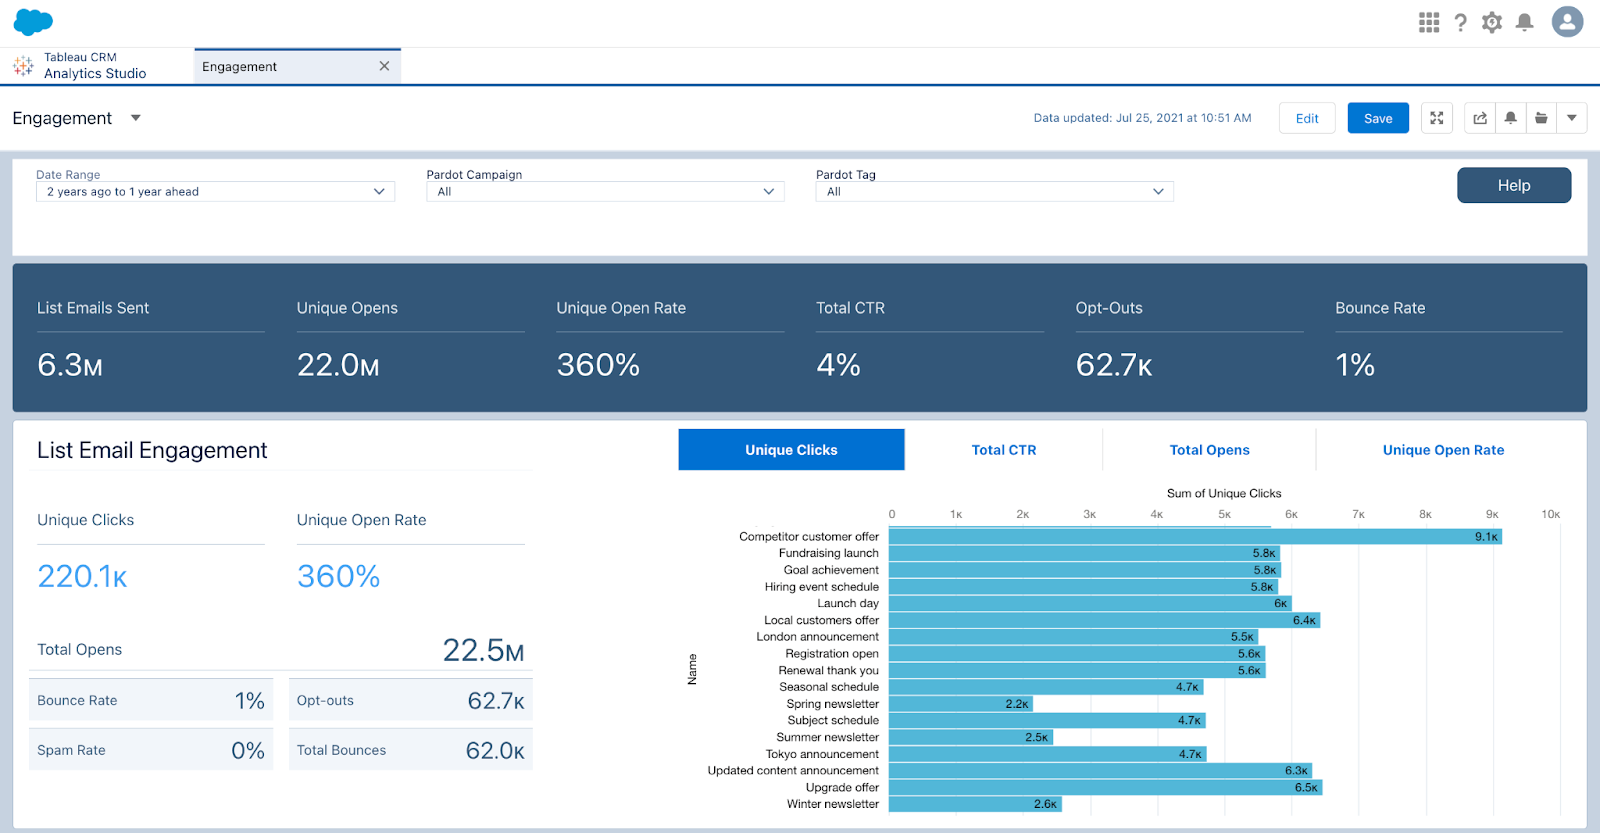
Engagement Dashboard
Offers a comprehensive view of your Account Engagement assets (think: forms, landing pages, emails, etc.) and how they’re performing and influencing your pipeline. You’ll see engagement metrics (opens, clicks, CTR, submissions, submission rate, etc.)
Marketing Manager
This is a combination of the previous two dashboards (Pipeline + Engagement) allowing you to see the overall performance and influence of your campaigns. You’ll see the following metrics:
Marketing Asset Engagement
Pipeline Deals
Revenue per Campaign
Account-Based Marketing
You’ve likely heard of ABM before — but did you know there was a B2BMA dashboard built specifically for that purpose?
This dashboard monitors your ABM campaign performance and helps you take a deeper look at how Contacts and Opportunities from a specific Account are engaging with your marketing assets. You’ll see the following metrics:
Account details
Pipeline by Account
Revenue win percentage
Stage value by Account
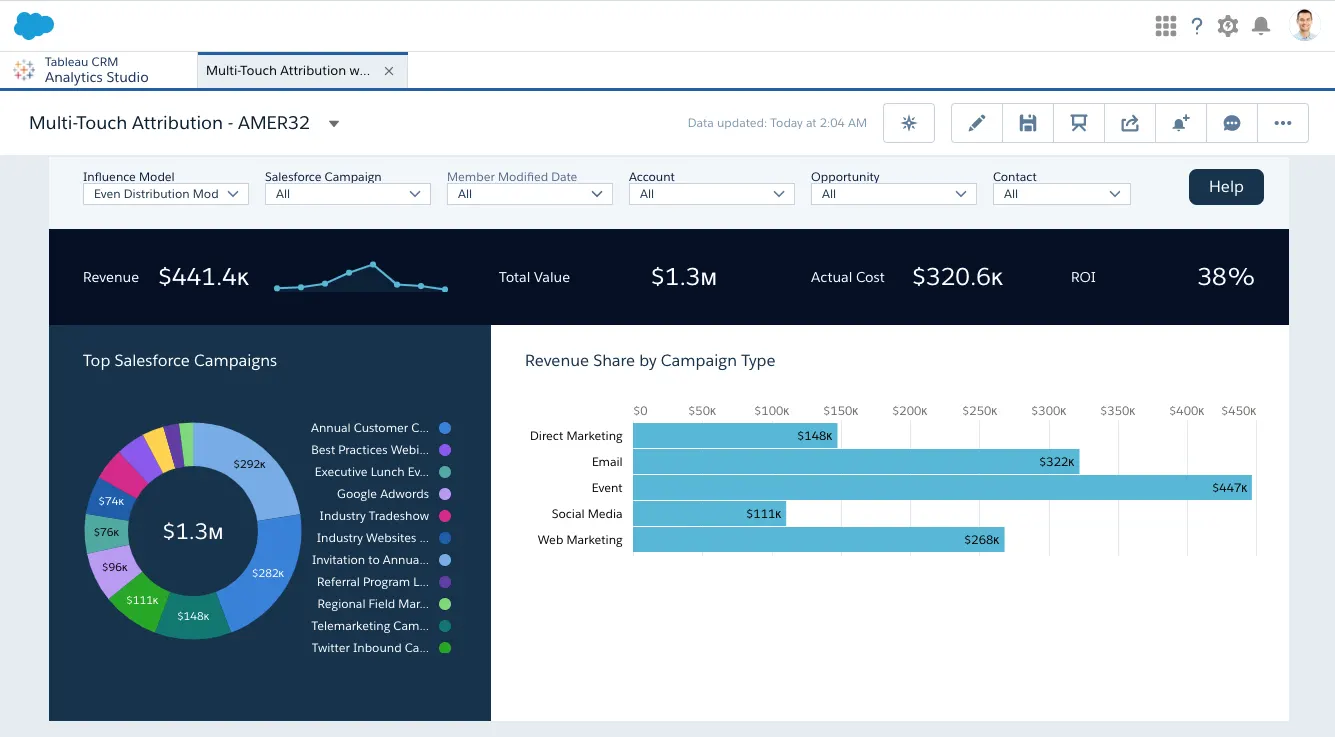
Multi-Touch Attribution Dashboard
This dashboard shows you how influential each of your marketing campaigns are during each stage of the sales lifecycle. It offers you three different attribution models to choose from: First Touch, Last Touch, and Even Distribution.
Within this dashboard, you’ll see these metrics:
Revenue
Total Value
Cost
ROI
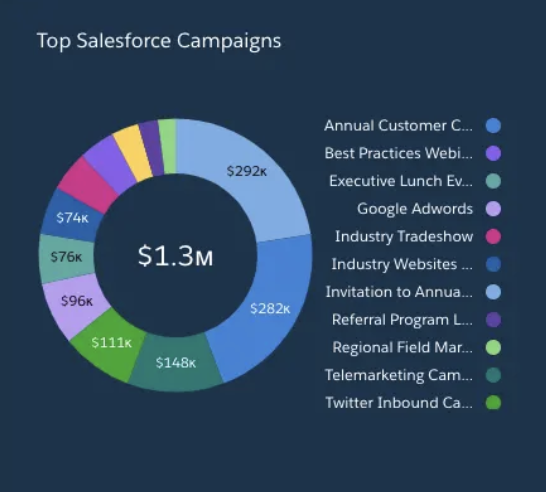
Top Campaigns
Revenue by Channel
Example: Multi-Touch Attribution Dashboard with Even Distribution (see screenshot below)
App
A CRM Analytics (B2BMA) App contains dashboards, lenses, and datasets in any combination that makes sense for sharing your data analysis with colleagues. Apps are like folders — they let you organize your data projects and control sharing across your team.
The included apps depend on your specific licenses.
Navigation: CRM Analytics App > All Items > Apps
Template
A Template is a framework for analytics apps that comes preset with KPIs and data visualizations.
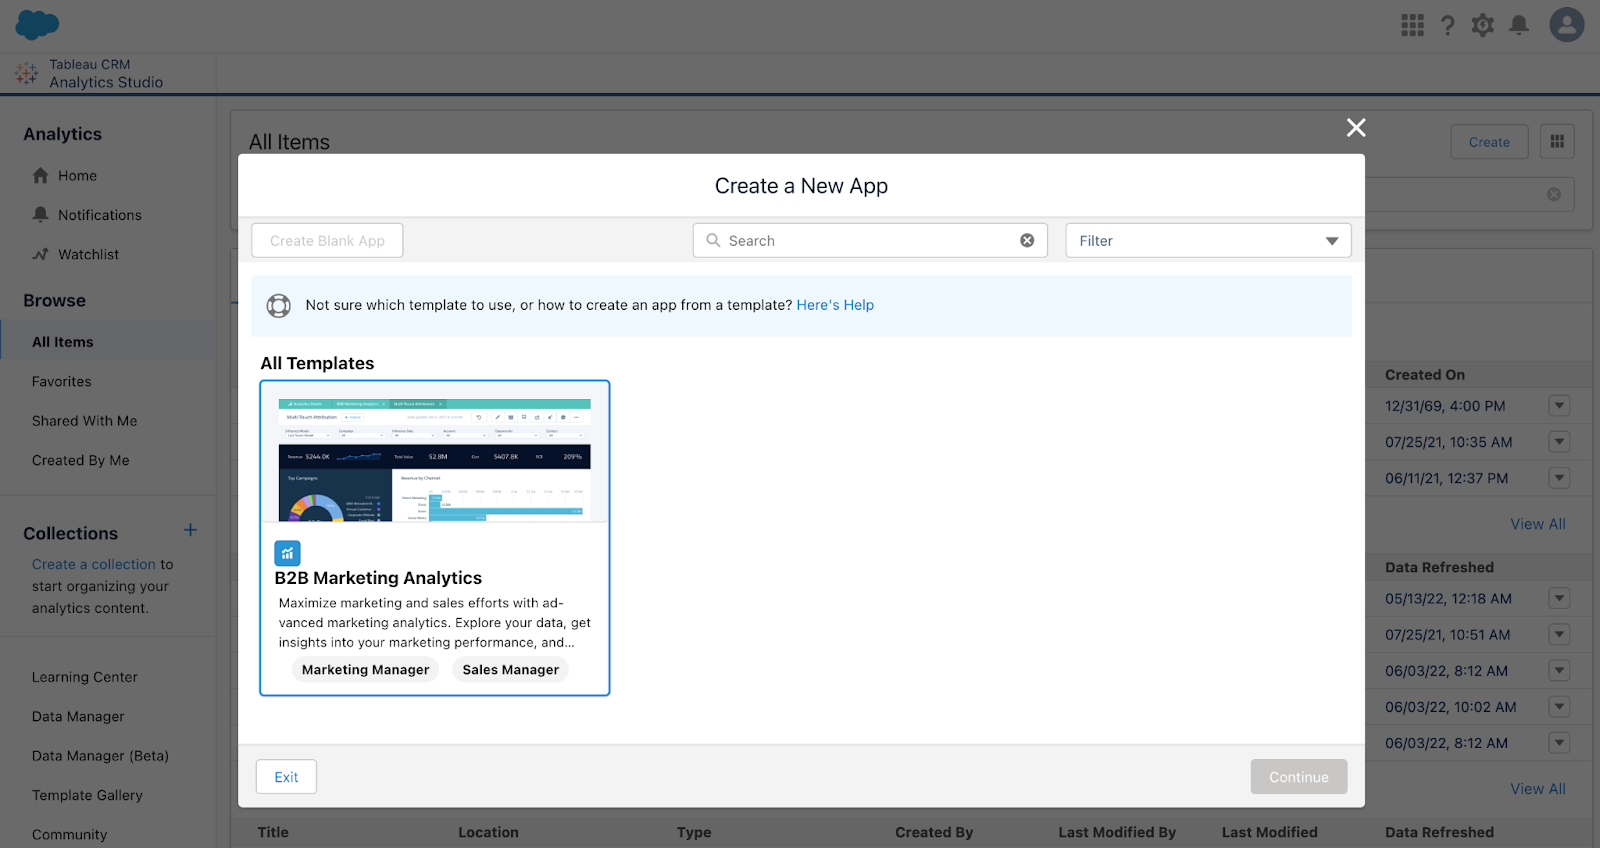
Navigation: CRM Analytics > “Create” > “App”
Functional terminology
Faceting
When Faceting within a dashboard, you can select part of a graphic, and the rest of the metrics on the dashboard filter by that selection.
Example: In “Revenue Share by Campaign Type”, click on “Web Marketing”
The dashboard will update to show to “Web Marketing” Salesforce Campaigns
Data Flow
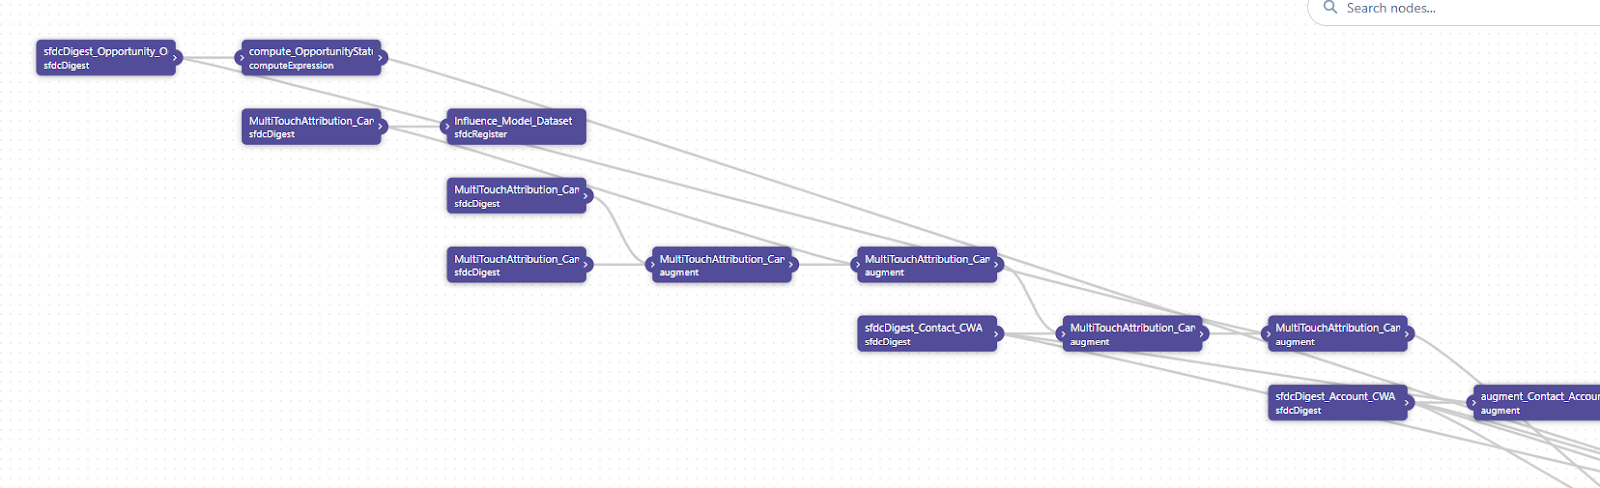
A Data Flow is a process that combines and summarizes several objects into datasets.
Examples:
Connecting your Opportunities to your Accounts
Modifying or creating datasets requires customization
Navigation: CRM Analytics > Data Manager > Data Flows & Recipes > Data Flows
Metric
A Metric is a quantitative value, such as revenue or exchange rate. You can “do math” on measures.
Example: Calculating total revenue
Dimension
A Dimension is a qualitative value that’s useful for grouping and filtering your data.
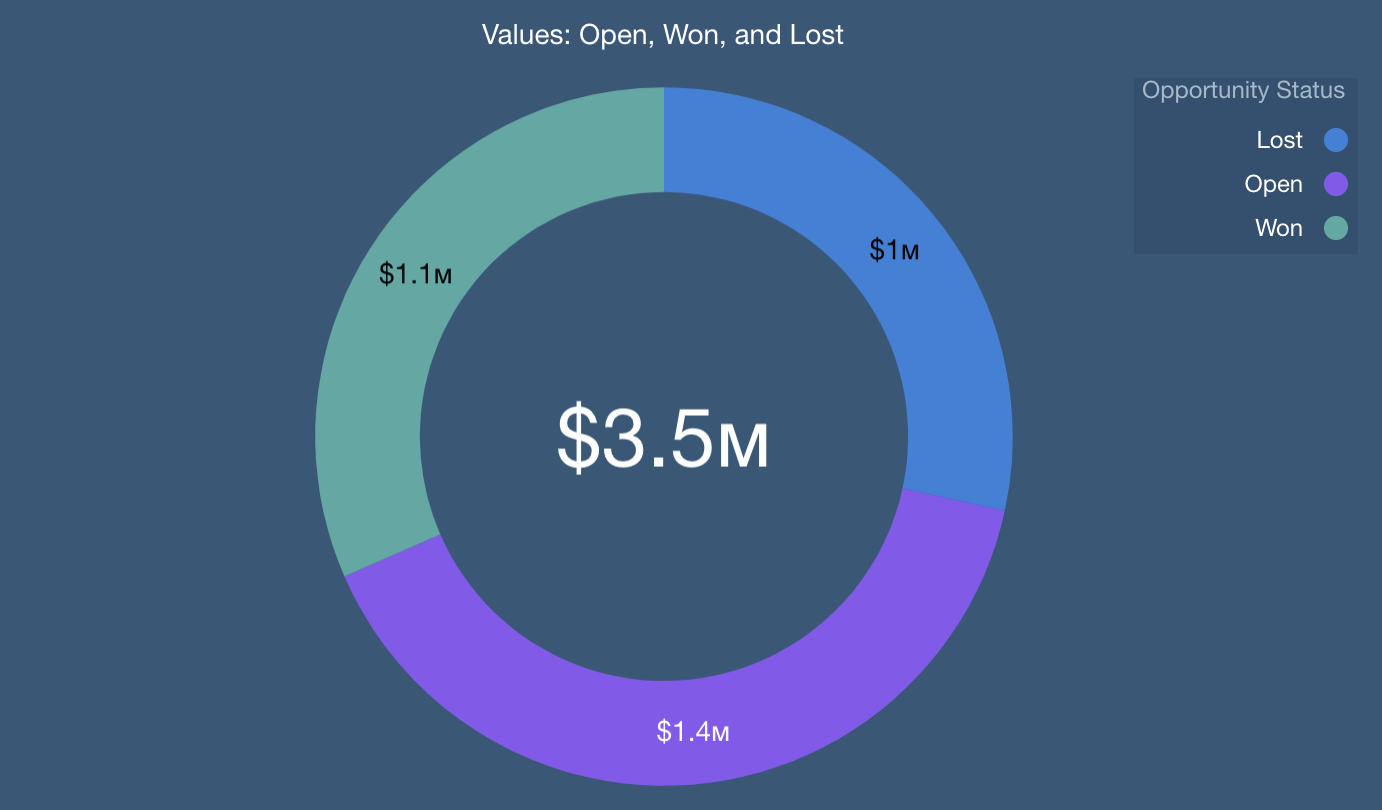
Example: Region, product name, model number, or Opportunity Status
Group
A Group is a collection of data based on a specific dimension.
Example: Product name or account.
Access and navigation within B2BMA
How do I get a license?
Access to B2B Marketing Analytics is dictated by the number of licenses you have. To check your licenses, go to Setup > “Company Information” via the Quick Find box > Scroll down to “Permission Set Licenses” and look for “B2B Marketing Analytics”.
Where do I find it?
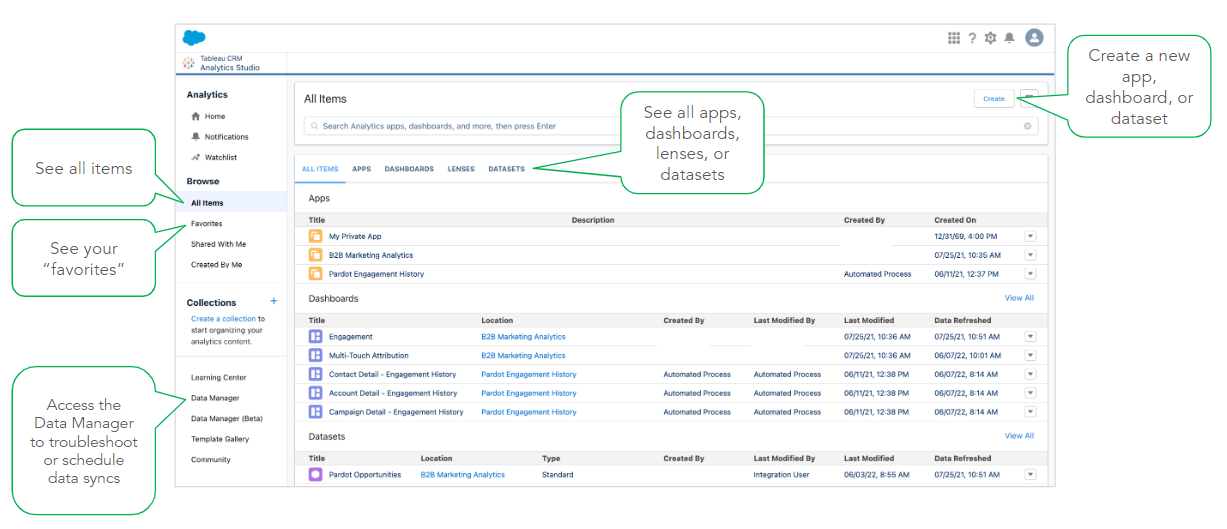
Access the Analytics Studio App by clicking the App Launcher and typing in “Analytics Studio.” Select “All Items” in the sidebar under “Browse,” then click “B2BMA Analytics” under “Apps.” Open the default dashboards and start exploring them
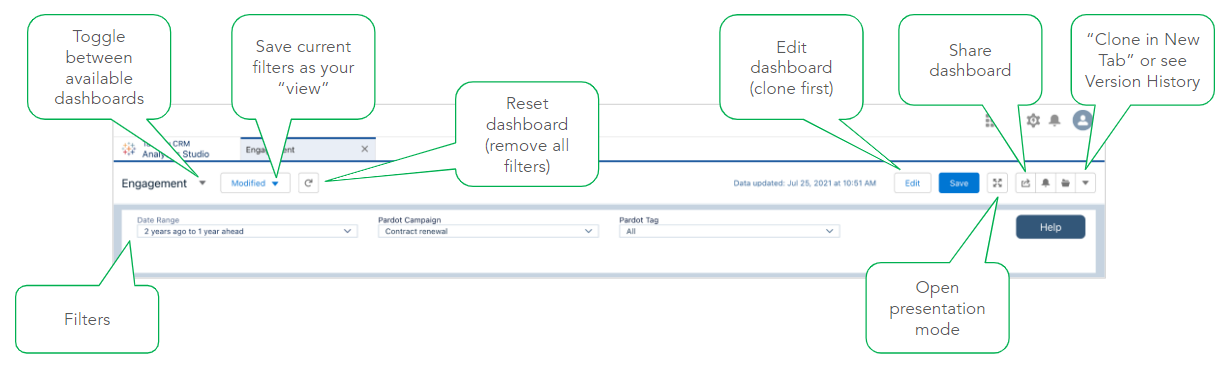
How to navigate B2BMA
Considerations for default B2BMA dashboards
The default dashboards are designed for a general audience, so they may need to be customized to suit your organization
We don’t recommend editing or saving over the default dashboards. Instead, make a copy of the dashboard by clicking the “Clone in New Tab” option. Salesforce makes regular updates to the default dashboards, which will overwrite any changes you have made (only when you choose to “reconfigure” the app).
Reach out to Sercante with any questions regarding B2BMA customization capabilities.
Exploring and sharing B2BMA dashboards and datasets
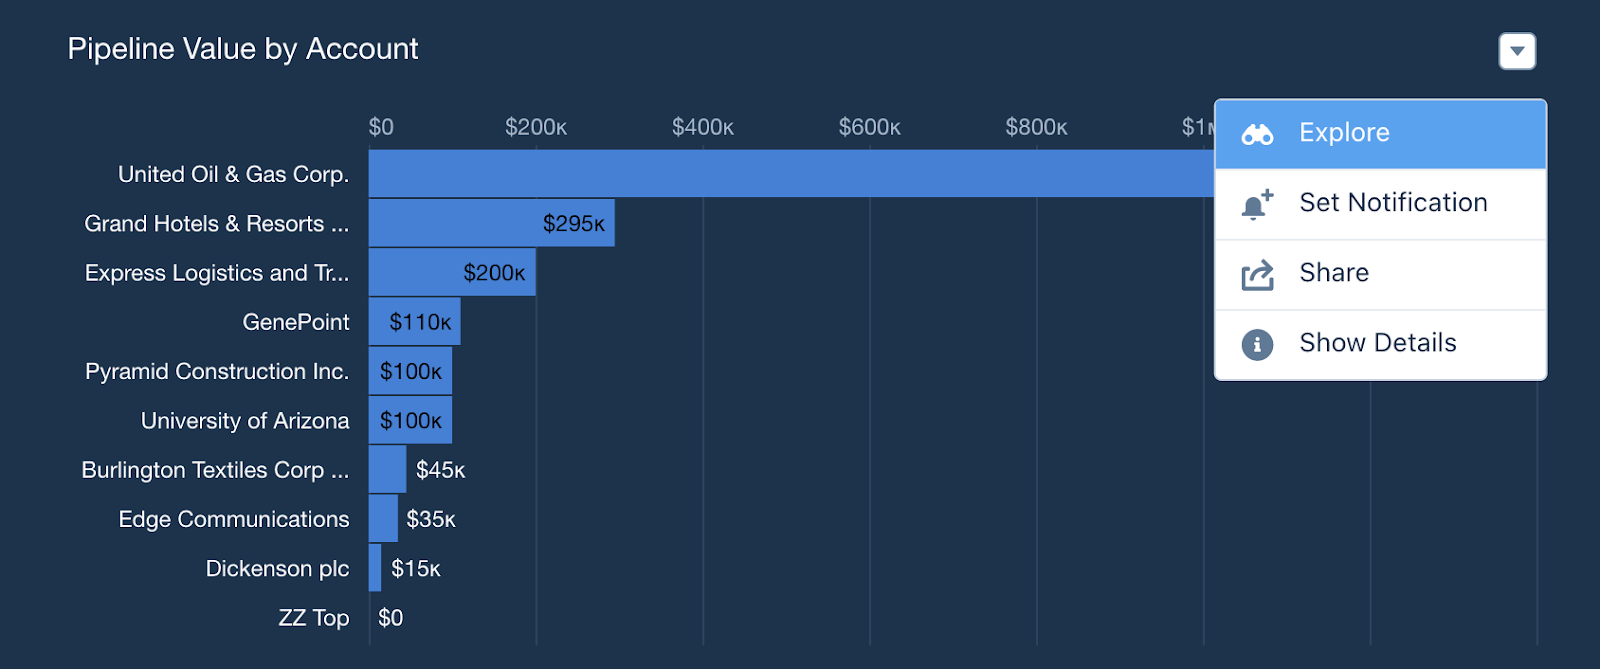
Within B2BMA, you can dive deep into the data using “Explore” functionality, viewing different lenses and reviewing the datasets, fields and filters. You can also share dashboards, giving access to critical team members, post the dashboards to feeds, export them or download them.
Exploring
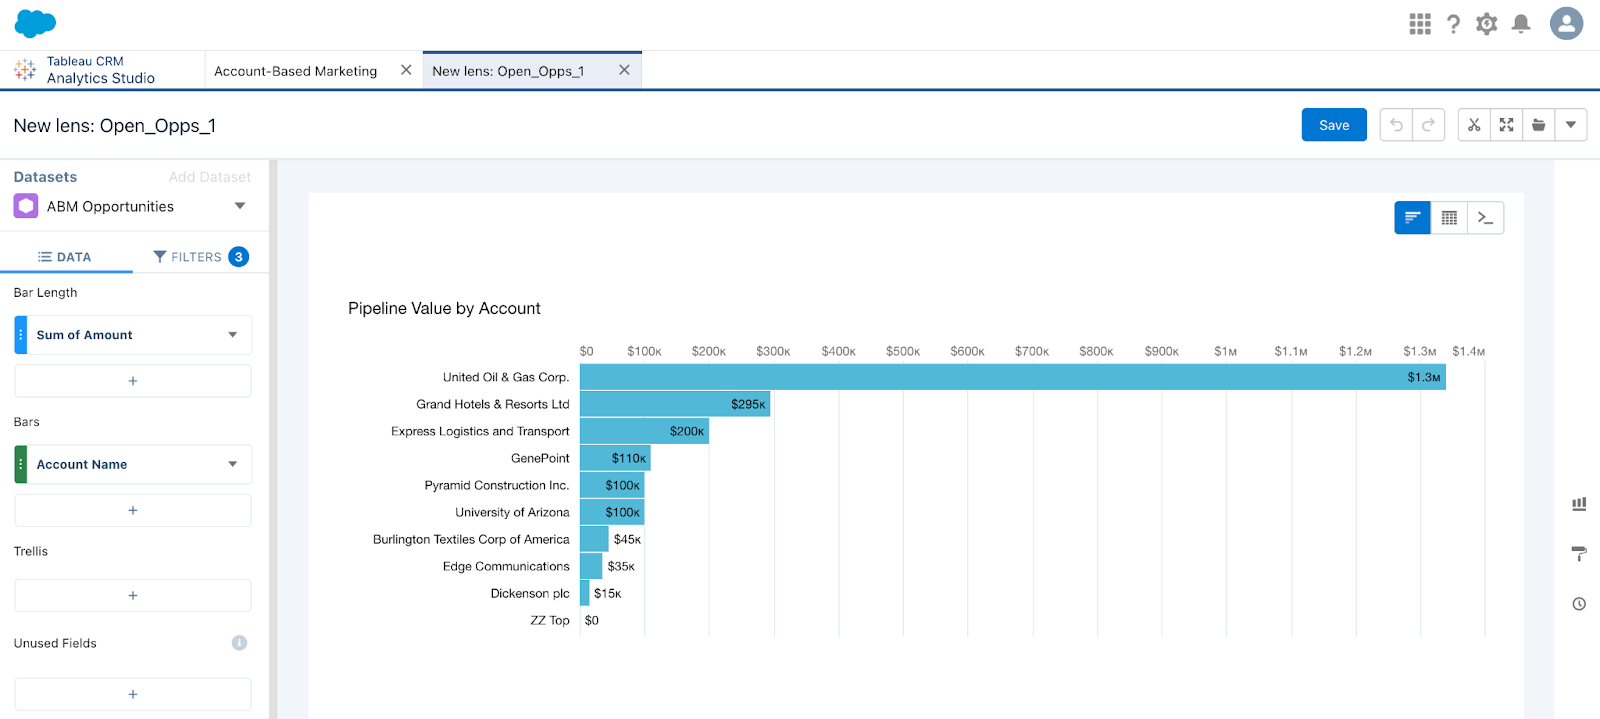
Want to know more about the data behind the chart? Click “Explore” to open a copy of the lens and review the datasets, fields, and filters. You can switch the visualization to a table view
Note: Not all filters will be shown here – click the “query mode” button to see all details
Sharing
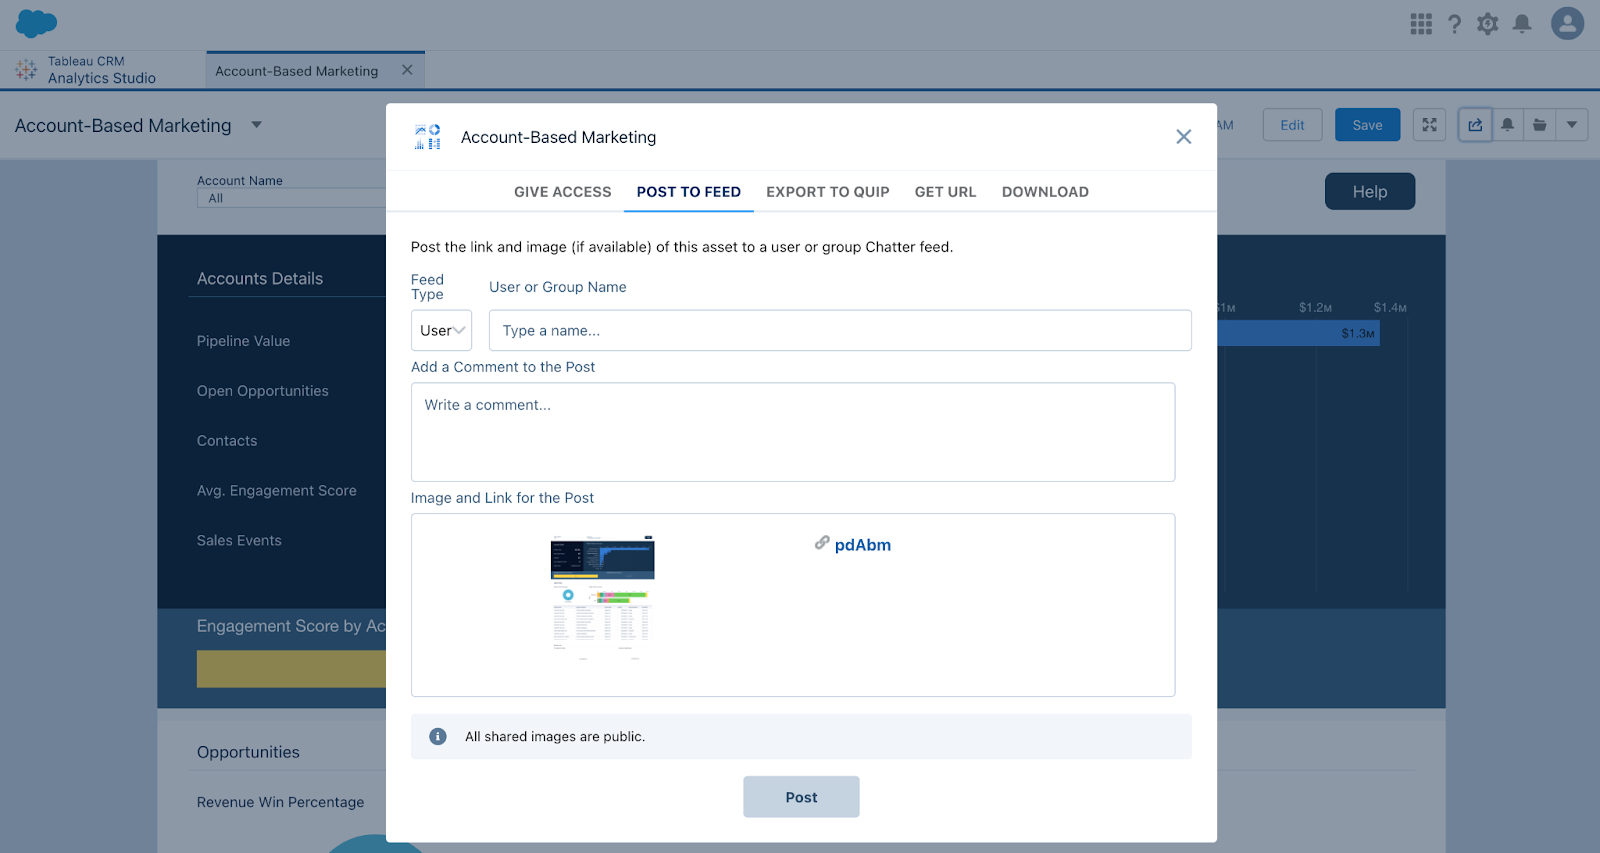
Clicking the “Share” button at the dashboard level gives you:
Give access – Showing who has access to the dashboard
Post to a Chatter feed
Export to quip
Get URL – only users with access to the dashboard can view the link
Download – download an image of the full dashboard
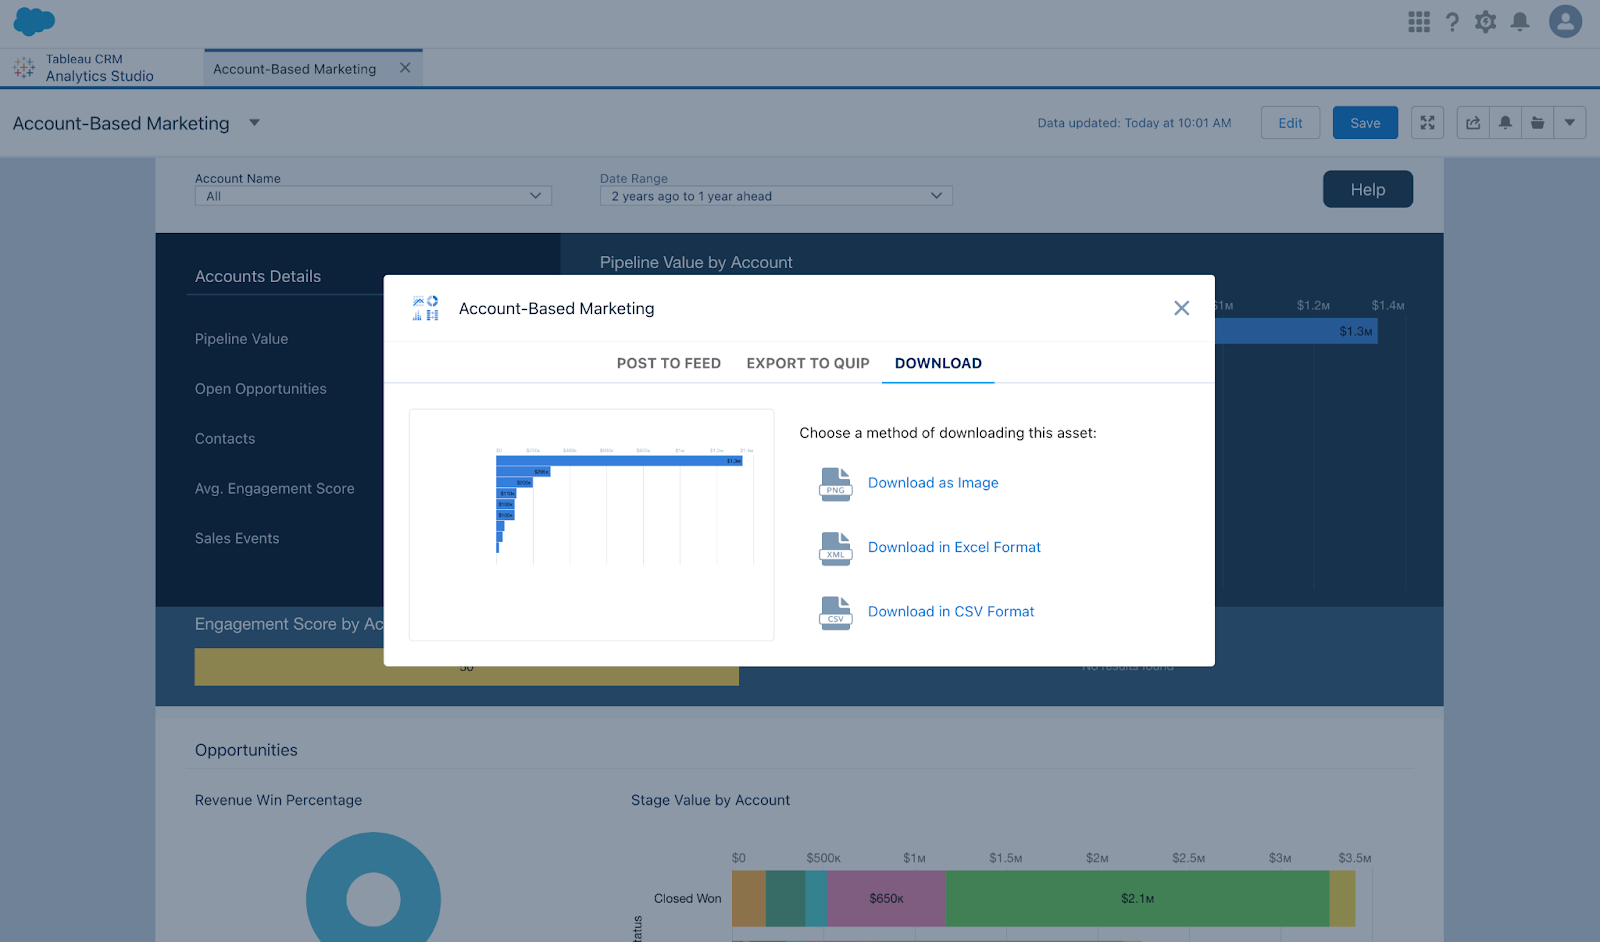
Clicking the “Share” button at the lens level gives you:
Post to a Chatter feed
Export to quip
Download – download an image of the full dashboard or a CSV/Excel file
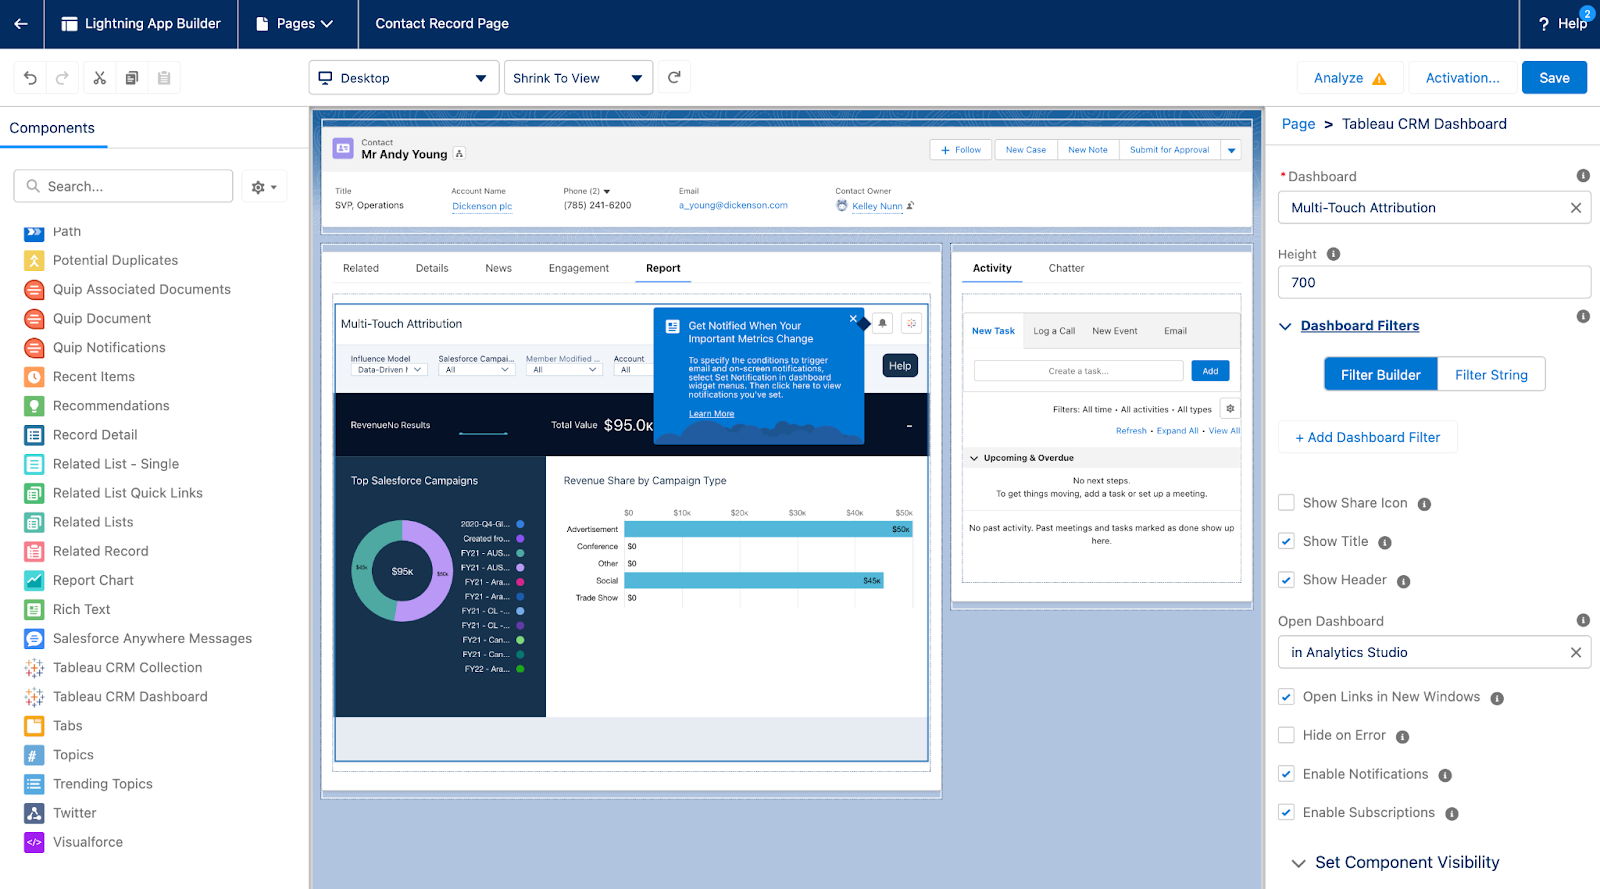
Adding to Lightning Pages:
You can embed your B2BMA dashboards in Lightning Record Pages in SFDC
Use the “Tableau CRM Dashboard” component
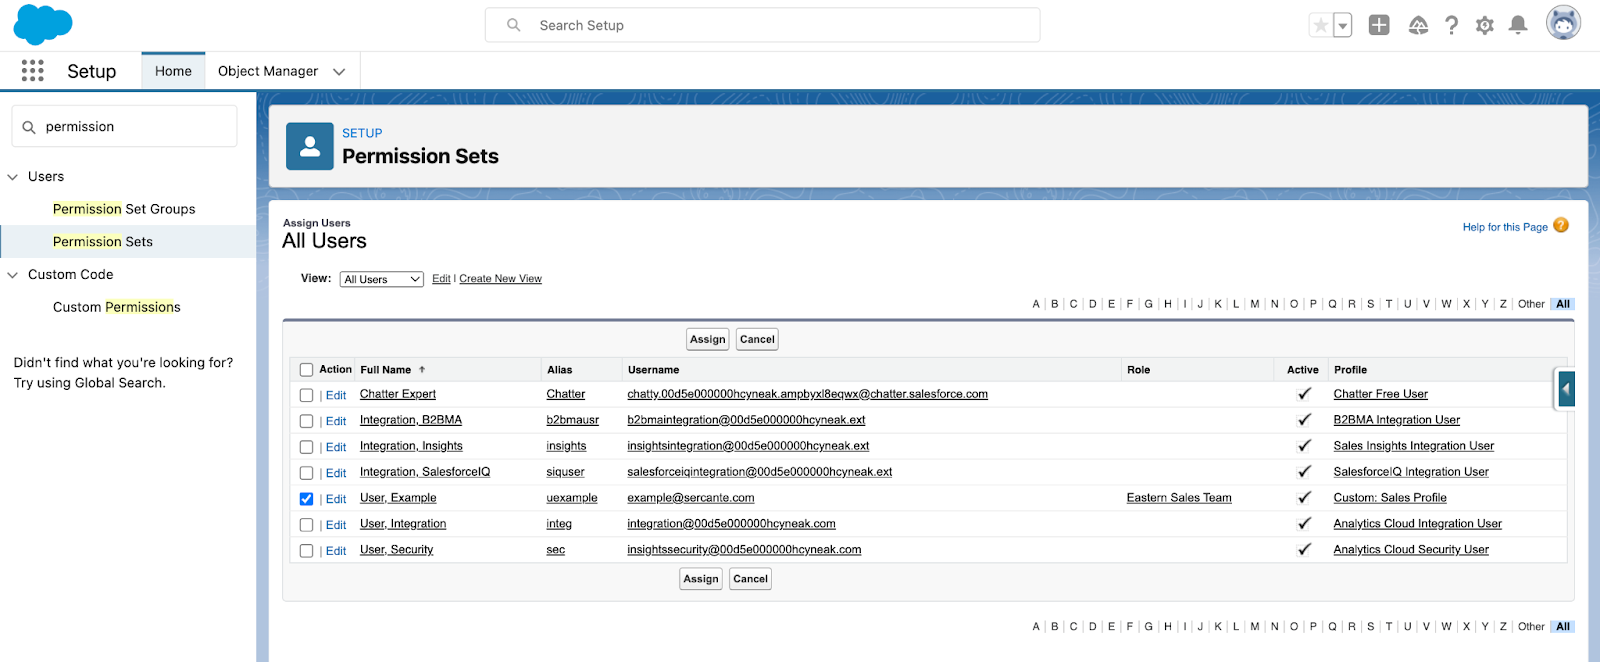
Only users with the B2B Marketing Analytics permission set assigned will be able to view the embedded dashboard
Ok – I understand everything else. Now how do I make updates to B2BMA?
B2BMA updates become available on the regular SFDC release schedule.
How do I know if there’s an update?
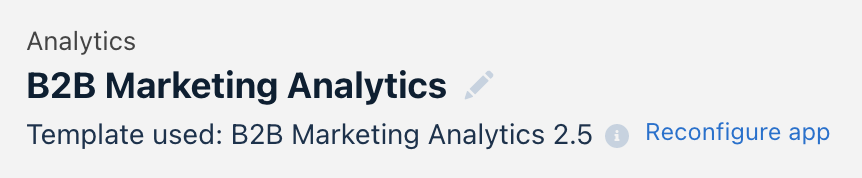
If an update is available, you’ll see the “Reconfigure app” option when you open the B2B Marketing Analytics app
Click “Reconfigure app” and go through the steps to update
The updates aren’t required – you don’t have to do them if you don’t want to
Click the info icon to see what new features are available so you can determine if it’s worth upgrading
Engagement History Dashboards
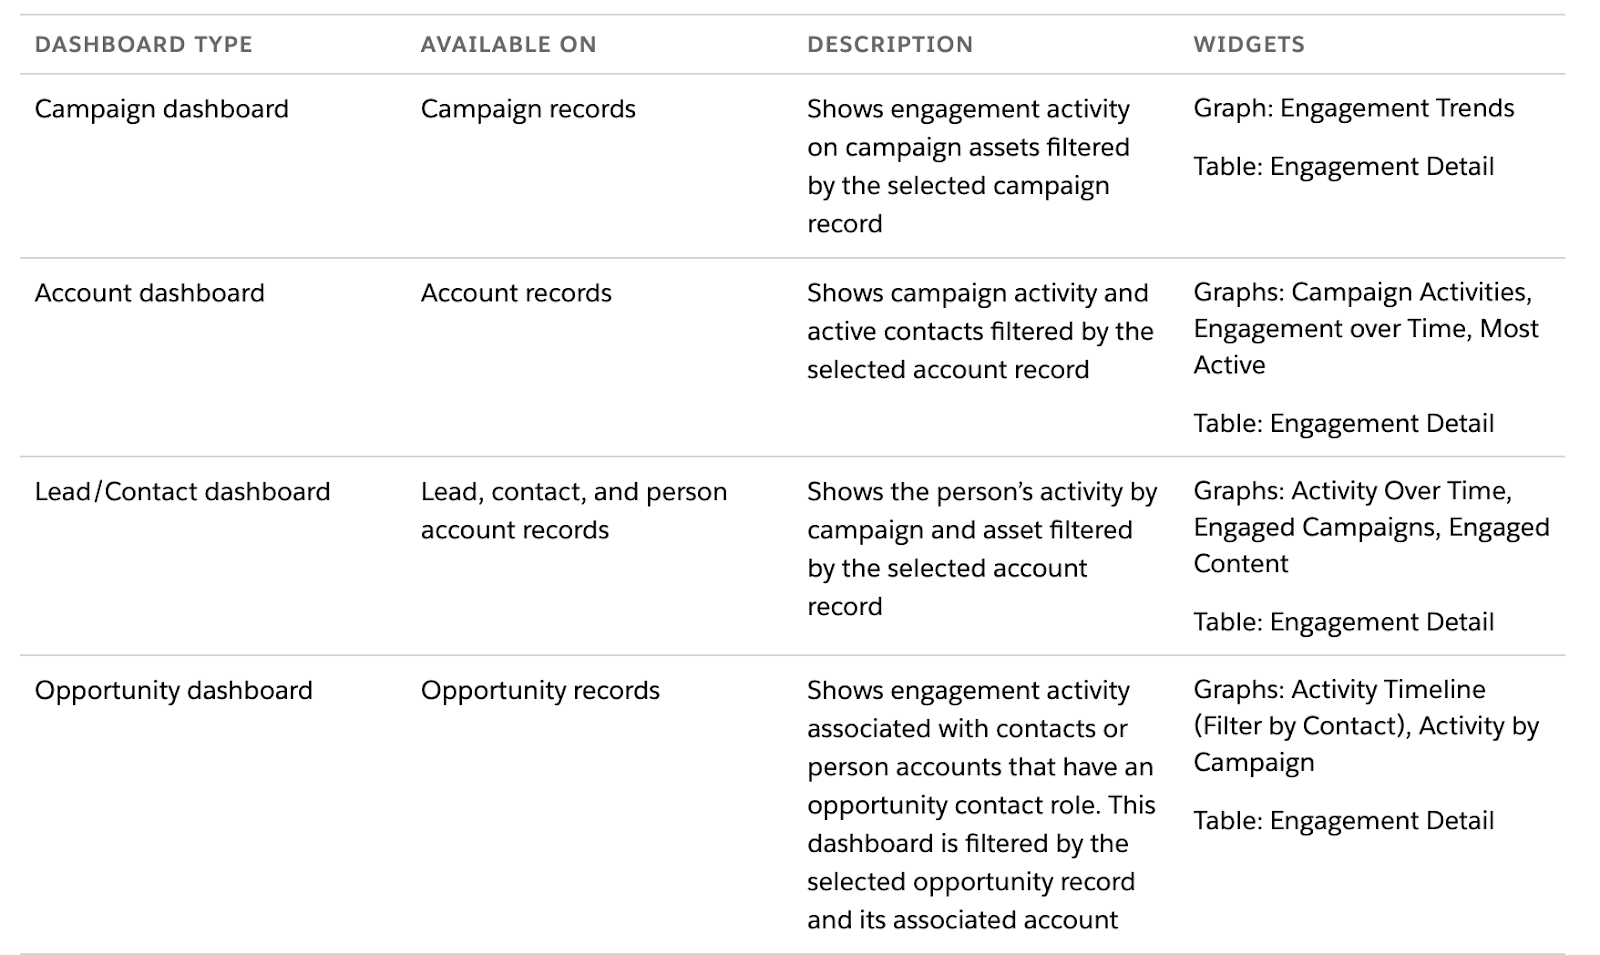
Engagement History Dashboards looks at your various marketing assets (forms, landing pages, emails, etc.) and how they are performing. They also look at how they contribute to your opportunity and sales pipeline.
Engagement History Dashboards are powered by CRM Analytics.
They allow you to:
Visualize engagement data on a variety of records
Show slightly different data based on the object (e.g. Opportunities, etc.)
Filter to show data relevant to the specific record that’s being viewed
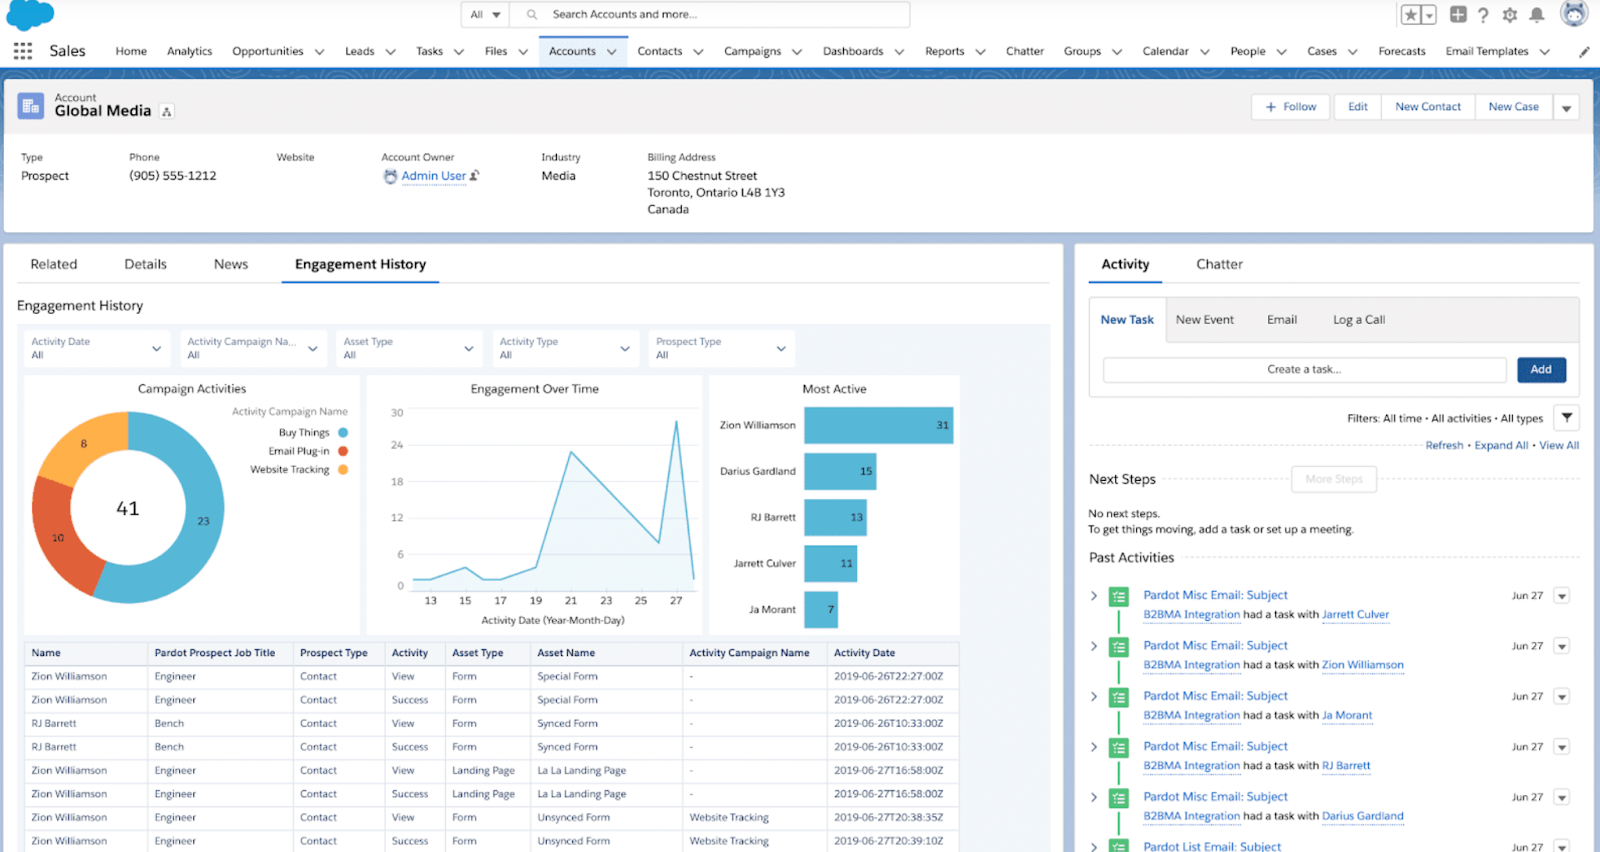
What does this look like on the Account object?
On a given Account, click the “Engagement” tab to see the most active Contacts and the Campaigns they’re engaging with. Use the filters to apply a date range, choose an asset type, etc.
Engagement History Dashboards on Page Layouts
At this point, you’ve probably added Engagement History Dashboards to these Page Layouts:
Campaigns
Accounts
Contacts
Opportunities
Only users that have been assigned the “Analytics View Only Embedded App” permission set can see these dashboards. Your Account Engagement edition determines how many licenses are available.
Considerations for Engagement History Dashboards
Here are a few things you should keep in mind about these dashboards:
The “Analytics View Only Embedded App” gives users access to Engagement History Dashboards, but not Analytics Studio/B2B Marketing Analytics
We recommend assigning this permission set to your Sales & Marketing leads
Engagement History Dashboards aren’t supported in Internet Explorer 11
Dashboards embedded on Leads, Contacts, or Person Accounts can only show data for one Business Unit at a time (delete if your client doesn’t have multiple MCAE BUs)
The Opportunity dashboard relies on Opportunity Contact Roles and dates
If data is missing from the Opportunity dashboard, it’s usually because no Opportunity Contact Roles are assigned
For emails sent through Engagement Studio, the Account Engagement Engagement History dataset includes send data only for programs that were created after December 14, 2018
Learn more about B2B Marketing Analytics
B2BMA is an incredibly valuable CRM analytics tool to help improve your visibility into your marketing and sales data, including many out-of-the-box dashboards built for a variety of stakeholders in your business.
Here at Sercante, we’re a huge fan of the Salesforce Trailblazer community. We highly recommend bookmarking the B2B Marketing Analytics Implementation Guide – a comprehensive resource that includes dataset information, field definitions, etc.
You should also check out these blog posts to learn more about B2BMA and what it can do for you: