Category

Data Management

Prospect inactivity tells us just as much about a prospect as their activity does. An inactive prospect has a lower interest level and less openness to learn more about your organization than prospects who are active.  

In this blog, we will address what makes a Prospect inactive vs. active, how inactive Prospects can impact your organization, and ways to clean up your database. 

Inactive Prospects in Account Engagement vs. Active Prospects

Inactive Prospects exist in every instance of Account Engagement, but what makes a Prospect inactive? I can tell you what doesn’t change their status to active. 

The following Prospect activities will NOT change a Prospect status from Inactive to Active:

  • Email Sends
  • Email Opens
  • Email Bounces
  • Opportunity Creation

So what does change a Prospect’s status from inactive to active? 

These are the activity indicators we’re looking for:

  • Form Submission
  • Page Visits
  • Link Clicks

Inactive Prospects can also be Prospects who are classified as “Active” but have not taken any action (i.e. form submission, page visit, or link click) in a predetermined amount of time (i.e., 6 months or 1 year). The timeline should be well thought out and considered by the marketing team. You should also adjust accordingly if needed based on the typical time it takes for the sales process to reach completion.

The Impact of Inactive Prospects

Housing inactive prospects in your org can have detrimental results to your instance if not consistently maintained. A couple of big reasons include deliverability and spam complaints, but there are more. See the full list of potential risks below.

Email Deliverability

When speaking to email deliverability, we are assessing the likelihood your email will reach its intended inbox without bouncing or being marked as spam. Prospects who have not opened any emails for a period of time or perhaps have abandoned their mailbox will be sent to spam or bounce This directly impacts your organization’s deliverability.

Furthermore, in alignment with the Account Engagement permission-based marketing policy, emails that are below 90% deliverability may trigger the Account Engagement deliverability team to check with you on your account performance and potentially freeze it.

Diluted Marketing Metrics

By sending emails to inactive Prospects, you are potentially receiving inaccurate metrics on your email performance. If you include inactive Prospects among active Prospects in your campaigns, you are skewing your open, click-through, and conversion rates by bringing them down. This leads to inaccurate portrayal of your campaign’s success.

Paid Prospects

Did you know that you pay for your Prospects? Account Engagement is set up in a way that you pay for your Mailable Prospects. Keep in mind that an inactive Prospect is not necessarily and unmailable Prospect. You can have a multitude of inactive and disengaged Prospects sitting in your account that you are paying for. Cleaning them out allows for more room for highly engaged Prospects to filter in.

Spam Reports

When we reference spam, we are referring to sender reputation, specifically how healthy your IP address is seen by target inboxes. Email services such as Google or Outlook use algorithms to filter out emails as they come in. Senders who have received consistent positive engagements, such as opens and clicks, are accepted without issues. However, senders who have been marked by negative interactions, such as deletion without opens or marking as spam, are automatically filtered into the spam folder, impacting the health of your sending IP address. This ultimately could lead to your IP address being blacklisted.

How to Maintain a Healthy Database

Now that you are aware of the impact inactive Prospects can have on your organization, let’s review ways to manage a healthy Account Engagement database. 

To begin, this clean up process should be done quarterly or on a routine basis as you see fit. And as a friendly reminder, any Prospect you delete goes to the Recycle Bin and can be pulled out at any time.

Use Dynamic Lists

Build a series of Dynamic Lists using a specific set of criteria to collect Inactive Prospects and then mass delete them via a Table Action, sending them to the recycle bin. 

Such lists may include:

  • Prospect has been emailed at least 1x in the last 90 days AND Prospect time last activity days ago is greater than 90 days. Again, you can set how many days feels best for your organization. You can also build multiple Dynamic Lists based on a variety of time limits.
  • Prospect has been emailed at least 1x in the last 90 days AND Prospect time last activity days ago is greater than 90 days AND Prospect score is below 100. Same thing here, customize the numbers to fit what is best for your organization.

Remove Junk Data

Any test emails you’ve created or spam Prospects who have filled out Forms are also taking up prime real estate in your mailable database. We recommend cleaning out any junk data that is not actively used for testing purposes. 

Read this blog for a complete list of Dynamic List criteria.

Create a Re-engagement Program

After cleaning up your database you may still have Inactive Prospects that you believe are still marketable.

Now, it’s time to enter Engagement Studio. Build a re-engagement program that targets Inactive Prospects in an attempt to nurture them. Anyone who still does not engage by the end of the program, can also be removed from your database. SalesforceBen offers a “Sunset Program” for this exact situation.

Shift your focus to from inactive prospects to active ones

Remember, Prospect inactivity tells us a lot about someone’s interest level in your organization. By being aware of what characteristics represent an Inactive Prospect, being aware of how that can affect your database, and taking actions to clean it up, you will see continued growth.

Need help making hard decisions about inactive prospects? That’s what we’re here for. Reach out to the team at Sercante for help navigating your prospect cleanup and re-engagement efforts.

The introduction of Hyperforce is one of those revolutionary milestones for Salesforce customers. That’s because migrating to Hyperforce is going to give Salesforce customers options when it comes to storing their Salesforce data.

If you’re a Salesforce customer, then you likely store Salesforce data in one of the company’s massive data storage centers. With Hyperforce, Salesforce customers can store their data in public cloud storage centers.

This is huge for companies that operate globally as well as ones in highly regulated industries like financial services and healthcare. That’s because it’ll be easier to store data locally and comply with regulations surrounding data storage in countries around the world.

What is Hyperforce?

First introduced in 2020, Salesforce reimagined its platform architecture for the public cloud with the introduction of Hyperforce. It’s code-based rather than hardware-focused infrastructure that allows more agility within the platform. 

The Customer 360 platform can live on top of Hyperforce, and Salesforce customers will store their data in public clouds like Amazon Web Services (AWS), Google Cloud, and Microsoft Azure, inside onsite servers, or within Salesforce data storage warehouses.

Migrating to Hyperforce

So, why is Salesforce having all customers move to Hyperforce? Well, for one thing, it’s a modernization of the platform to meet changing data demands. 

Salesforce will continue to maintain data warehouses they own to use when needed, but moving data to public cloud infrastructure is the most logical way forward. Imagine having better compliance capabilities, top-notch security, ultimate agility, and the power to scale up like a superhero. 

 Salesforce is all about respecting your privacy, too. So with Hyperforce, they’ve got your back.

  • Worldwide Wonders with Data: Hyperforce is like your personal travel agent for data. Go global while keeping control over where it hangs out — that’s a win-win for you and your customers.
  • Scaling Superpowers: With Hyperforce, growth is more than a dream — it’s a reality. Flexibility and sustainability are your new BFFs.
  • Fort Knox Security: Locking things up tight is Hyperforce’s jam. We’re talking about security measures that make your data sleep soundly, including encryption and zero-trust principles.
  • Privacy Party: Hyperforce comes with its own set of privacy standards, giving you the reins and a spotlight on your customers’ data.
  • Agile Adventures: Who needs downtime? Not us! Hyperforce keeps the party going with seamless releases, environments for testing and development, and an easy-peasy AWS connection.

How do I know it’s time for me to migrate to Hyperforce?

Currently, there is no publicly available migration schedule for Hyperforce, Salesforce is ‘regularly moving customers to balance our workload and modernize our systems.’

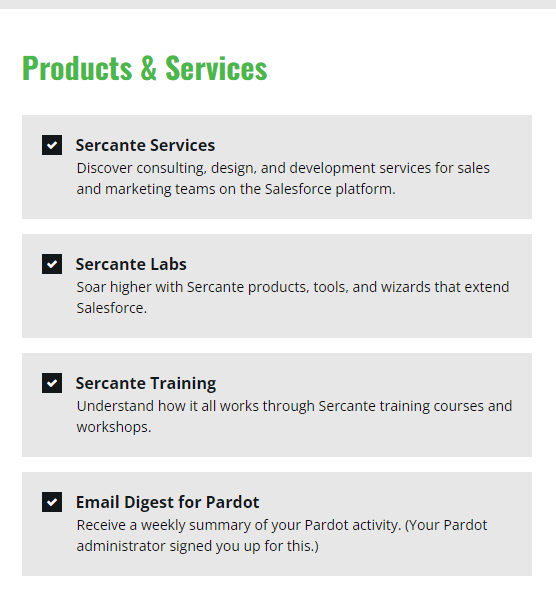
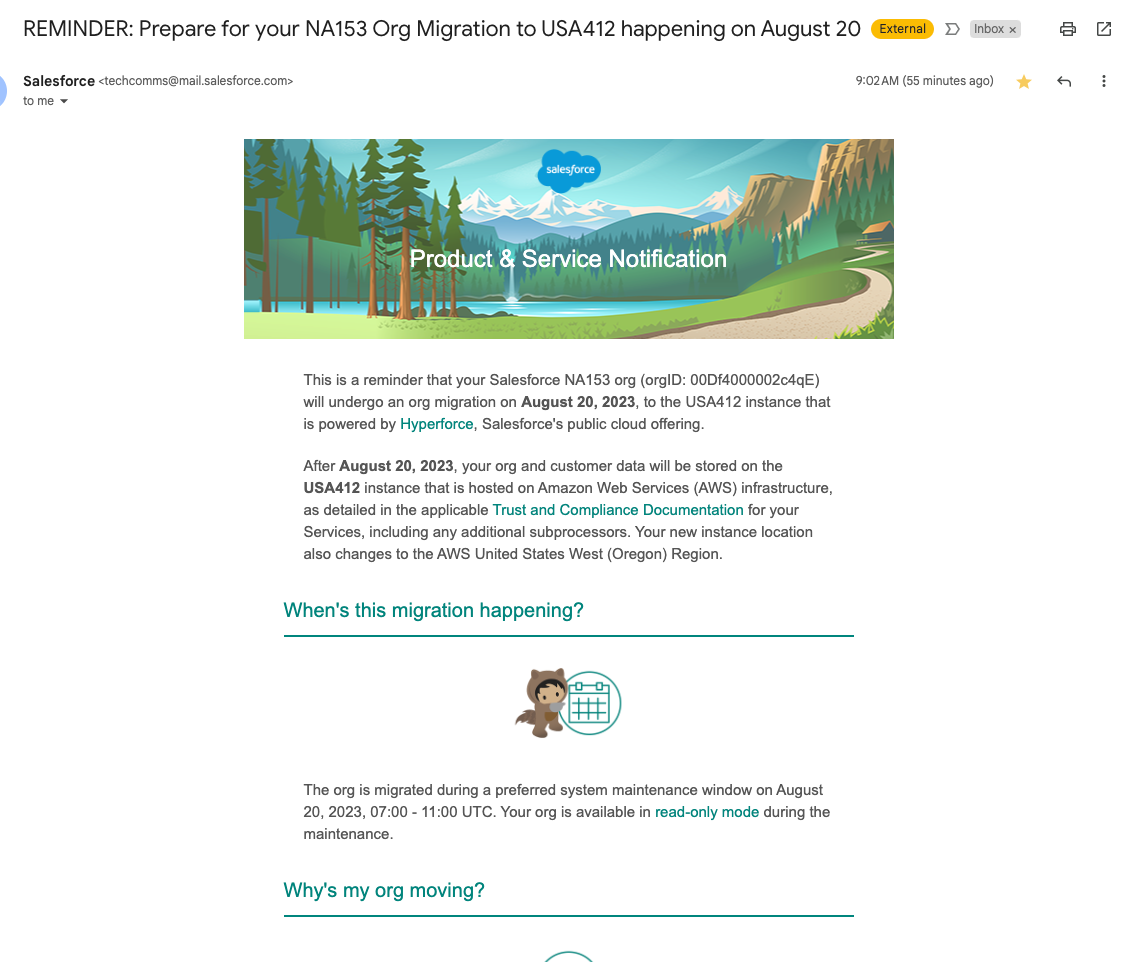
Admins of orgs scheduled to migrate will be notified via a Salesforce Product and Service notification, approximately two months and then one month before their migration date. In the meantime, you can check in with your account team to find out when you can expect to receive a notification that it’s time to migrate to Hyperforce.

Below is an example of the product notification Salesforce customers receive:


Learn more about Products & Services Notifications

If you’re notified that you are being migrated but the timeline is inconvenient for your team, you can contact your Salesforce account team (according to this FAQ article).

How to prepare for Hyperforce Migration?

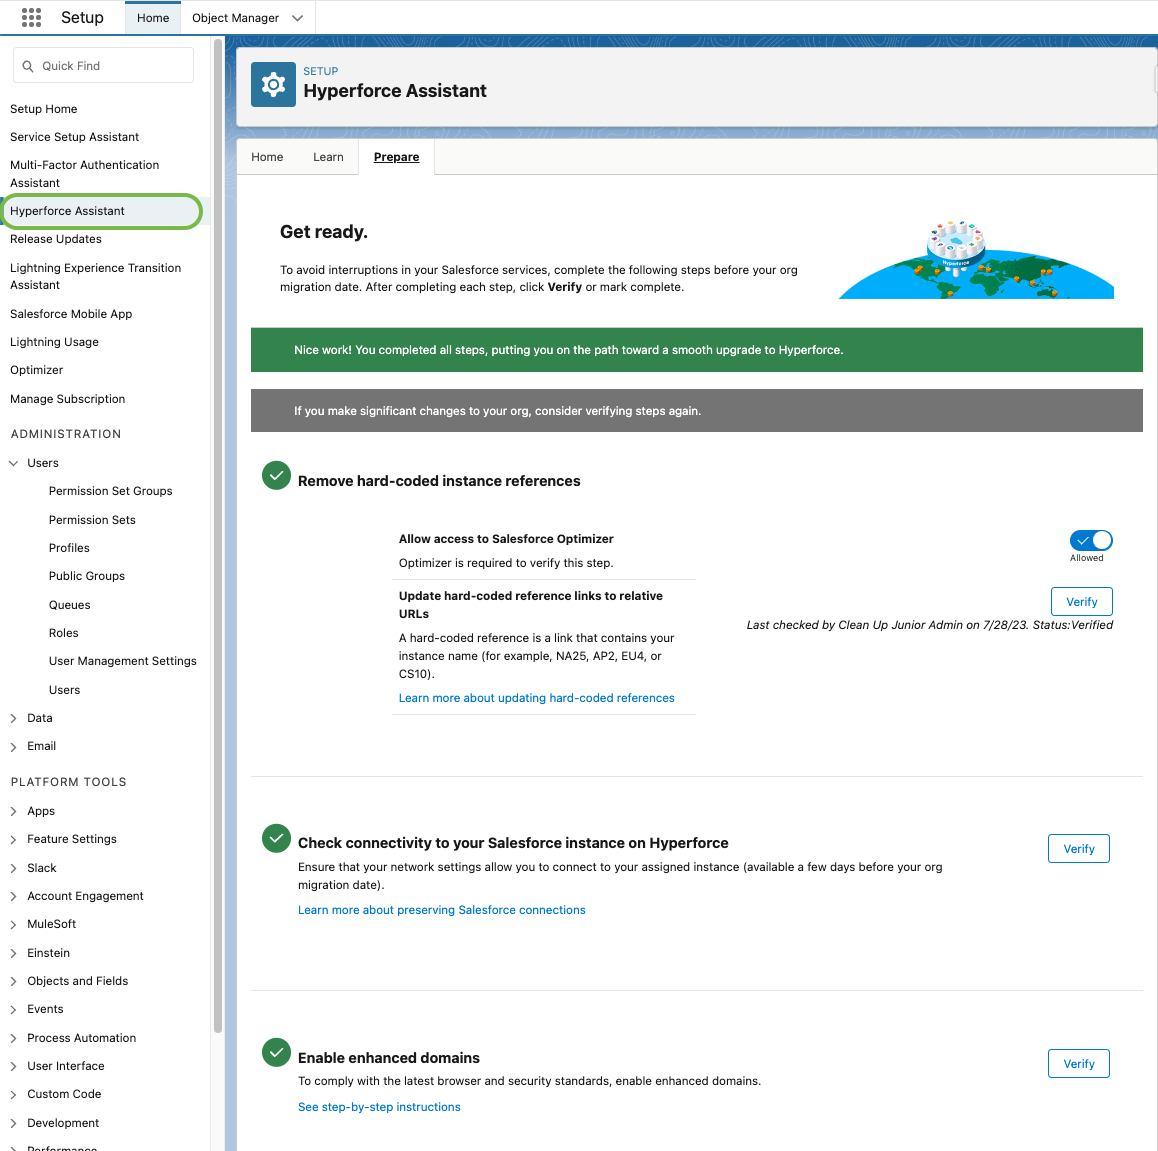
Salesforce has implemented the Hyperforce Assistant in Setup to guide you through your upgrade. The Assistant has all of the latest information and checklist to prepare for the migration. 


For additional information, see the section What can customers do to ensure a smooth upgrade to Hyperforce? in the Hyperforce FAQ article. You can also request a trial org from your account team so you can test your setup and troubleshoot before you make the switch.

Get ready for to migrate to Hyperforce

It’s a matter of time before all orgs are migrated to Hyperforce. So in the meantime, start to think about how data storage location may affect your Salesforce org. For example, the move may affect endpoint things like Single Sign On, OAuth and JSON Web Tokens (JWT). 

Reach out to the team at Sercante to evaluate your data architecture and business goals to see how the migration to Hyperforce may affect your Salesforce org.

Hey there! So, I wanted to chat with you about something that can be a bit tricky but super important in the world of marketing: capturing UTM parameters. 

You know those little bits of code you see at the end of URLs? They help marketers track where their website traffic is coming from and measure the success of their campaigns. 

Well, capturing and using UTM parameters can sometimes be a real challenge — especially when you’re dealing with UTM capture on Marketing Cloud Account Engagement (Pardot) landing pages. 

But don’t worry. we’ve got your back!

In this post, we’ll cover four ways to use UTMs for capturing the first and last touchpoints on Account Engagement landing pages. If you’re also looking for information on capturing UTM parameters in Salesforce, then check out this post.

4 methods for capturing UTM parameters on landing pages

Let’s dive into four different ways you can script your way to capturing first and last touch UTM parameters on Account Engagement landing pages. This solution works even if the form fields don’t match the UTM exactly or if you need to use cookies. 

Trust me, it’s not as complicated as it sounds!

1. Map the URL to hidden form fields

Option 1 is all about handling those pesky form field variations. Imagine the form fields on your Pardot landing page don’t exactly match the UTM parameters. No worries! 

With some JavaScript magic, you can extract the UTM values from the URL and map them to the right hidden form fields. It’s like connecting the dots, making sure you capture those first and last touch UTM parameters accurately.

See example and steps to setting this up in the video below.

2. Store UTM values in a session cookie

Now, let’s talk about Option 2. Sometimes you need session-based tracking, and that’s where scripting with session cookies comes in. 

Using JavaScript, you can grab the UTM values from the URL and store them in a session cookie. 

This cookie will keep the UTM data available as the user navigates through different Pardot landing pages. You can then map these UTM values to hidden form fields, ensuring you capture the first and last touch UTM parameters consistently during the session.

See example and steps to setting this up in the video below.

3. Pass UTM parameters to forms embedded in iFrames

Option 3 is for web landing pages that have an Account Engagement (Pardot) iFrame. Here, you can use scripting to set a cookie value that passes the UTM parameter to the iFrame. 

JavaScript to the rescue again — it helps you extract the UTM values from the URL and store them in a cookie. The Pardot iFrame can then grab the cookie value and fill in the hidden form fields. 

Voilà! You’ve captured the first and last touch UTM parameters and can use them in Pardot form submissions.

See example and steps to setting this up in the video below.

4. Capture UTM parameters across multiple website visits

Last but not least, Option 4 involves persistent cookies and hidden form fields. If you want to capture UTM parameters across multiple sessions or visits, this is the way to go. With some clever scripting using JavaScript, you can store the UTM values in a persistent cookie. 

So, even if your visitors come back later, the cookie remembers the UTM data. When they submit a form, the hidden form fields get populated with the UTM values, ensuring you capture the first and last touch UTM parameters consistently.

Get instructions for this method in this blog post.

Go forth and track all the things through UTM capture

So, my friend, there you have it! These four scripting paths will help you capture first and last touch UTM parameters on Account Engagement landing pages like a pro. Whether you’re dealing with form field variations, session-based tracking, iframes, or multiple visits, these options have got you covered. You’ll be able to gather accurate UTM data for analyzing your campaigns and making data-driven marketing decisions within Pardot.

Now go ahead and rock those UTM captures with confidence!
Not sure what to do with the information you’re tracking? Reach out to the team at Sercante for help building a marketing campaign strategy that gets results.

Before the advent of Data Cloud and Customer Data Platforms (CDPs), businesses strived to integrate their data into their CRM to obtain a holistic view. If you’re considering another expansive platform, there’s an excellent interim solution to consider: the Campaign Audience Builder (CAB).

Where to get Campaign Audience Builder

The Campaign Audience Builder is a package on the Salesforce AppExchange developed by Lightblaze. Known for its user-friendly interface, CAB allows you to create audience segments using your Salesforce data, making it an efficient substitute or preliminary step towards a full-scale CDP solution.

Campaign Audience Builder Ease of Use

Campaign Audience Builder has a simple point-and-click interface that allows you to navigate and filter data related to the people you are trying to add to an audience.  It simply gets installed alongside your data and has a very short implementation time (I was up and running in 10 minutes).

Once installed, it really is a 3-step process of getting your first audience created and usable:

  1. Define the Criteria: as a techie myself, this was really the fun part. Connecting data and filtering the right records feels natural and familiar.
  2. Generate the Audience: This is basically running the process based on all the work you did in the previous step to see who matches. As always, it’s a great idea to spot-check that some people you expected to appear were successfully matched!
  3. Populate the Campaign: you have your list of people, it is time to put them somewhere that you can act on. This is when you choose which Campaign to use, how often the audience should be evaluated, and if people should be removed should they no longer meet your criteria.

Unlike CDPs and other types of data platforms, which require accommodating complex data relationships and aren’t always user-friendly, CAB offers a seamless alternative.

Advanced Segmentation Features in Campaign Audience Builder

Looking for Contacts that have Closed Won Opportunities with Products in a certain Product Family? Yep, Campaign Audience Builder can do that. 

Do you also want to ensure those same people don’t have a Case?  Yep, you can do that too. 

While not unlimited in its power, there’s no data scenario that you cannot segment with CAB (compared to report builder or segmentation in Account Engagement).

CAB allows you to select either a Lead or Contact as your audience driver and connect it with any related object. After defining your audience, you can populate a Campaign by creating CampaignMember records. CAB also provides controls on how frequently your audience should be evaluated and whether it should clean records that no longer meet your criteria.

With your audience defined, you can now use that information to populate a Campaign by creating CampaignMember records. You have some controls on how often CAB should be building your audience and if it should clean CampaignMember records that no longer meet the criteria.

Integration and Data Security

CAB stands out with its ability to directly publish the audience into Account Engagement (Pardot) into a static list. This feature eliminates the need to clumsily attach data to the Lead/Contact records for list population.

A key feature of CDPs is the ability to “act” on the new audience that you’ve created in downstream systems. While CAB doesn’t really integrate with a bunch of other third-party tools, it can call APEX/Flows (where you can do almost anything integration-wise).

Data security is paramount for Salesforce organizations. Moving data into other systems like data platforms or CDPs can potentially jeopardize these security controls. Since CAB operates within your Salesforce organization, it only accesses the data you can, thereby ensuring data security.

CAB may be the stepping stone you seek

In summary, the Campaign Audience Builder (CAB) offers a user-friendly, efficient, and secure way to handle your Salesforce data. It’s a practical stepping stone if you’re considering a more complex Customer Data Platform (CDP) solution. 

With its easy setup, advanced features, and commitment to data security, CAB is a smart choice for businesses looking to maximize their data management and audience segmentation without taking on a full CDP solution just yet.

Thinking about implementing CAB in your org? Contact the team at Sercante to learn more about the tool and how it will work with your overall technology strategy.

As a marketing administrator within Salesforce, it is essential to understand your audiences and create a winning audience segmentation strategy. Without segmenting your audience, you will target the same group of people each time. That can lead to increasing opt-outs, spam, and a direct impact on your sending reputation. 

The goal of sending mass emails is to target the right audience so you provide value to the people who are likely to interact with your brand. And that’s exactly what audience segmentation accomplishes. 

Use these strategies to segment your audience so you can deliver the right marketing messages to the right groups of people every time — no matter if you’re a Salesforce Marketing Cloud Engagement or Account Engagement user.

Audience Segmentation Strategies for Marketers Who Use Salesforce

Whether you are a Marketing Cloud Engagement (A.K.A. SFMC) Administrator or an Account Engagement (Pardot) Administrator, fundamental principles apply across the board when it comes to audience segmentation. 

Below are tactics you can use within Salesforce Marketing Cloud Engagement and Account Engagement. 

Who is actively engaging with your brand?

Use web tracking, social, and ads to learn how visitors interact with your brand. You can compile a group of individuals to target based on clicks, form completions, and pages visited. 

For example, if you have a visitor who clicks an ad on social media and is taken to your website, where they download the content that you promised them with your ad, you can make the assumption that the visitor is interested in that product.

What preferences do your customers share?

Let’s say you are sending an invitation for an upcoming webinar. Segment your target audience based on previous ad clicks, webinar attendees, or downloaded resources. By building an audience list based on shared preferences, you will see an increase in webinar registrations and attendance.  

For example, look at the specific campaigns you’ve launched in the past. Think about how you can categorize the products or services that were the main focus. Maybe you had a marketing campaign to drive awareness about a product that would result in a one-time and low-cost purchase. And you had another campaign advertising a product that requires a high-cost ongoing purchase. The people who engaged with the high-cost product but didn’t necessarily purchase the item may be good candidates for a segmentation list that includes people with bigger budgets to potentially spend.

Who are you actively targeting to attain as a new customer?

If you could create a map of ideal customers, what attributes would they share? Is it a specific set of companies? Perhaps, it’s a specific product or service you can provide them? 

Decide on those attributes and build your segmentation strategy and buyer personas. Target this audience and help sales close the deals on your ideal customer.

Which individuals have expressly subscribed to what topics?

Take advantage of your Email Preference Center. You can create targeted campaigns that run on an ongoing basis and continue to nurture your target audience based on their expressed interests. 

Ensure that your Email Preference Center offers a variety of targets, including product interests and types of communication. For example, the Sercante Email Preference Center allows email subscribers to sign up for only emails related to the services that interest them, like Salesforce consulting, integrations, or training.

Suppress individuals based on a subset of criteria

Counterintuitive to who you want to target with your email marketing, who do you want to ignore? Considering who you don’t want to receive a message from is as important as who should receive it. There will likely be a default suppression list, including competitors, employees, spam, etc., but you may also want to create specific one-off suppression lists too, such as email frequency or inactive customers.

Account Engagement (Pardot) Audience Segmentation Best Practices

Now that you have a few ideas on strategy, let’s talk about building segmentation within Marketing Cloud Account Engagement (Pardot) . Let’s review the list creation options and the different ways to add Prospects. Keep in mind, there may be times when you use multiple list types for a single send.

Static Prospect Lists

Static lists are controlled by you, the administrator. You set the rules and criteria for who joins and comes off the list. There are several ways to add to a static list, both manual and automated. 

Imports

The most common way for building a static list is via prospect imports. When importing, you have the option to import via CRM ID or Email. If the list has existing prospects, you want to import via CRM ID. If they are brand new prospects, use the import via email option. 

Within the import wizard, you will be given the option to add to a list via an existing list or by creating a new list. Once complete, review the import report for the total number of prospects created or updated.

Table Actions

Adding a subset of prospects that already exist within Pardot can be done via Table Actions. 

To add a subset using Table Actions, follow these steps:

  1. Navigate to your prospect table.
  2. Set your filters, such as view and creation time frame.
  3. Check the boxes of those you want to add to the static list. 
  4. Use the table action at the bottom of the table and “Add to List.”

Public Lists

Public Lists can be created as dynamic or static, but most default to static and are controlled by the Email Preference Center. These lists are subscribed to directly by the Prospect. Individual Prospects are able to subscribe and unsubscribe as they see fit based on their preferences.

Completion Actions

The “Add to List” completion action exists on most Pardot assets, including forms, form handlers, files, custom redirects, emails, and page actions. Completion Actions include both standard and conditional and allow you to set specific parameters when adding to a list. 

Automation Rules

An automation rule is criteria-based. You can set multiple criteria pertaining to a Prospect by using “Match All” and/or “Match Any” statements. Based on this criteria, you then set an action, such as “Add to list,” which will populate a static list. 

The good thing about using an automation rule to populate your static lists is that they are retroactive, so they will collect past and present matches and take action on them.

Dynamic Prospect Lists

Similar to automation rules, dynamic lists are criteria-based. Unlike static lists, these are outside of your control. 

Once you set the criteria, the list will automatically add or remove prospects based on that criteria. These lists cannot be manually manipulated.

Campaign Membership

While there are several settings and criteria you can use to create dynamic lists, one of the most popular strategies is to build lists based upon campaign membership. This is especially beneficial when collaborating with sales teams. 

If your sales team is adding Leads and Contacts to Salesforce Campaigns, perhaps based on a recent trade show, you can build a dynamic list in Pardot based on that campaign membership.

Marketing Cloud Engagement Segmentation Best Practices

Lastly, let’s look at how to best create segments in Marketing Cloud Engagement. Subscriber data can come from many different sources into Marketing Cloud and can be stored in two ways: 

  1. Lists
  2. Data Extensions

Lists

A List is a collection of your subscribers. Lists are best used when you have a small dataset (500,000 or fewer subscribers) that you need to manage quickly and efficiently. 

Lists share a format with your All Subscribers table and typically include Email Address, Subscriber Key, Status and any profile attributes you have created in your account. 

Creating a List

To create a List:

  1. Navigate to the Subscribers tab within Email Studio.
  2. Within the My Lists folder structure, you can click ‘Create’ at the top right of the page to create a new List, assigning a name, external key, description, and placing the list in any folder you have created. 

Once the list is created, it can be populated by manual or automated import.

Groups

A Group is a filtered list. Creating a Group allows you to build a subset of subscribers from a list based on rules or by splitting list subscribers by count or percentage of the total list being filtered.  

The rules used to build a Group can be saved as a Data Filter, which can be used to automate the process to refresh membership in your group.

Creating a Group

To create a Group:

  1. Navigate to the Subscribers tab within Email Studio. 
  2. Within the My Groups folder structure, you can click ‘Create’ at the top right of the page to create a new group. 
  3. Select whether the group you are creating is a Filtered Group or Random Group, then select the source List. 
  • When creating a Filtered Group, drag any attributes or measures from the left side panel to the canvas and define the filter criteria. 
  • To create a Random Group, after selecting Random Group and your source list, click ‘Add Group’ to add as many random splits as needed to get the desired number of random segments.
  1. Once your filters or splits have been properly configured, click ‘Save & Build’ to create and populate your groups. 

Once created, unless automated using a data filter, Groups need to be refreshed manually to be up-to-date.

Data Extensions

Data Extensions are more complex than lists and offer greater flexibility in managing contact data. While lists can only contain Subscriber information, Data Extensions are more flexible and can contain relational data. 

Data Extensions data can be filtered in a similar fashion to Groups, and can also be combined with or filtered by data in other Data Extensions using SQL activities in Automation Studio.

Creating a Data Extension

Follow these steps to create a data extension:

  1. On the Subscribers tab in Email Studio, select a folder within the Data Extensions folder and then click ‘Create’ at the top right. 
  2. Here, you select which type of Data Extension you want to create. Standard Data Extensions require you to define the fields of your Data Extension. 
  3. After defining the name and data retention policy for your data extension, you must define the fields in the table, choosing from several data types, including Text, Date, Number, and Boolean. You can also set the length and default value for each field. 
  4. Once you have defined all fields needed in your Data Extension, click ‘Create’ to finalize your Data Extension. 

This Data Extension can now be populated by manual or automated file imports, API calls, SQL Query activities, or AMPScript.

Filtered and Random data extensions function in much the same way as Groups. Filtered Data Extensions require selection of a source Data Extension, then definition of any filter criteria. Random Data Extensions will produce a number of data extensions of randomly split rows based on the number of splits defined in the setup.

Go forth and segment your audience like a Salesforce marketing pro

Marketing Cloud offers multiple routes to implementing segmentation and audience targeting, regardless of platform. By taking into consideration your audience personas, incorporating key email marketing segmentation strategies, and applying the correct segmentation tools, you will be able to spread brand awareness swiftly.
Have any cool stories of marketing segmentation success? Tell us in the comments. Or reach out to the team at Sercante to get help with your audience segmentation strategy.

Thank you to Zachary Norman for contributing to this post!

Salesforce opportunity record pages are great for displaying all of the key information about a particular record. But, what if you need to be working with and updating multiple related records at the same time, without flipping back and forth?

That’s where this hack for displaying account fields on Salesforce opportunity record pages comes into play. 

Salesforce Opportunity Record Page Example

Let’s say a sales rep is working on an opportunity, but some of the fields they need to see and update are on the account. 

If they only needed to view the information, using custom formula fields on the Opportunity referencing Account fields would have been sufficient. Because they also wanted to update this information while they were on the Opportunity record, an alternative option may be using an Object Specific Action with the Lightning Record Page.

How to Create an Object Specific Action

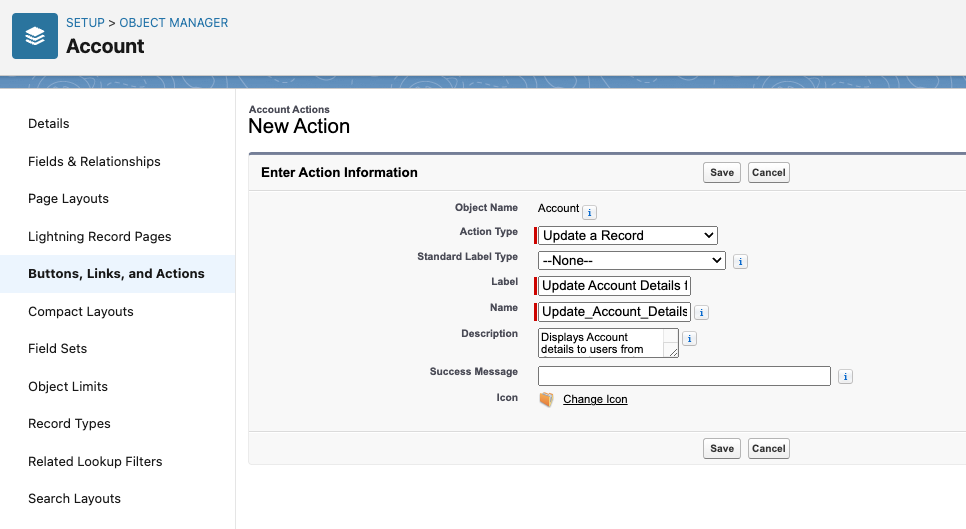
  1. From Setup, go to Object Manager > Account > Buttons, Links, and Actions
  2. Click New Action
  3. For Action Type select Update a Record
  4. For Label, enter a label that is appropriate for this purpose. For example ‘Update Account Details’
  5. Enter a Description outlining the purpose of this action. For example ‘Displays Account details to users from Opportunity record page’
  6. Click Save.

Edit the Action Layout

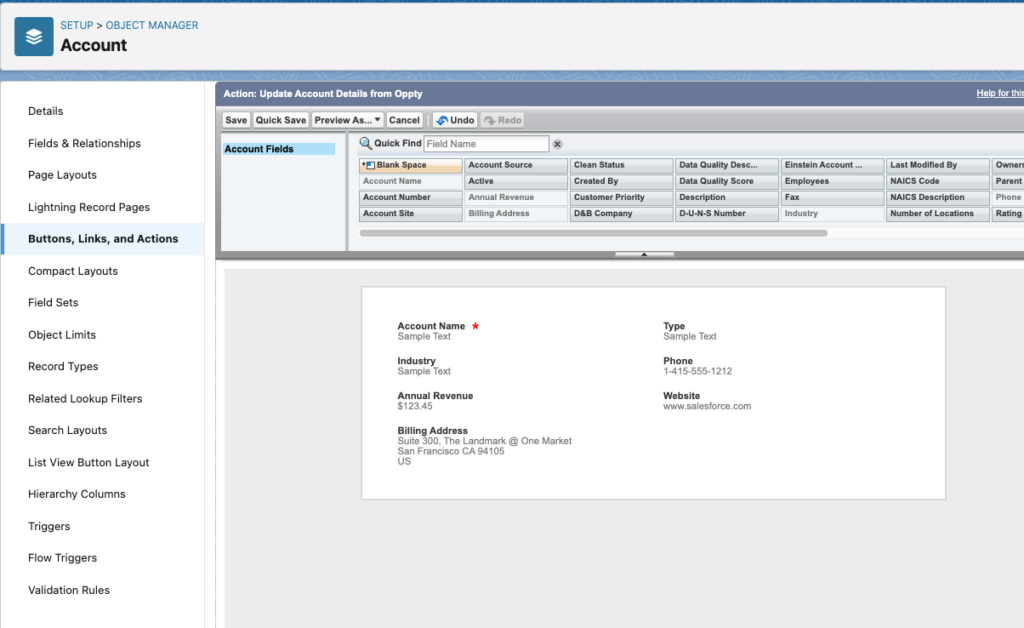
This is the key! This is where we decide what fields to display, and how they will be arranged.

  1. Once you have saved, you will be looking at the Action layout.
    • Note: you can also access this later from the Action page by clicking on the Edit Layout button.
  2. Just like a page layout, drag and drop the fields that you want to be visible.
  1. Click Save.

Add the Account Action Layout to the Opportunity record page

Now that we have the Action Layout we want, here’s where we connect it to the Opportunity. 

  1. From Setup, go to Object Manager > Opportunity > Lightning Record Pages.
  2. Select the Lightning Record Page you want to update.
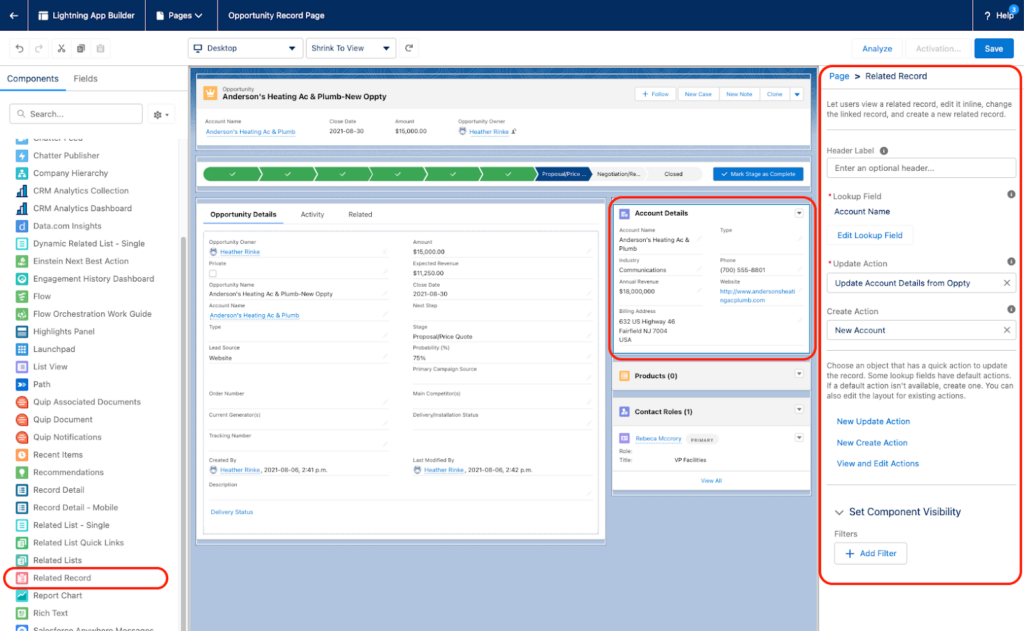
  3. Drag the ‘Related Record’ component where you want it on the page.
  4. In the Related Record settings panel on the right, update the following:
    1. Header Label = the heading that will appear at the top of that layout on the page
    2. Lookup Field = Account
    3. Update Action = the name of the action you created above
  5. Click Save.

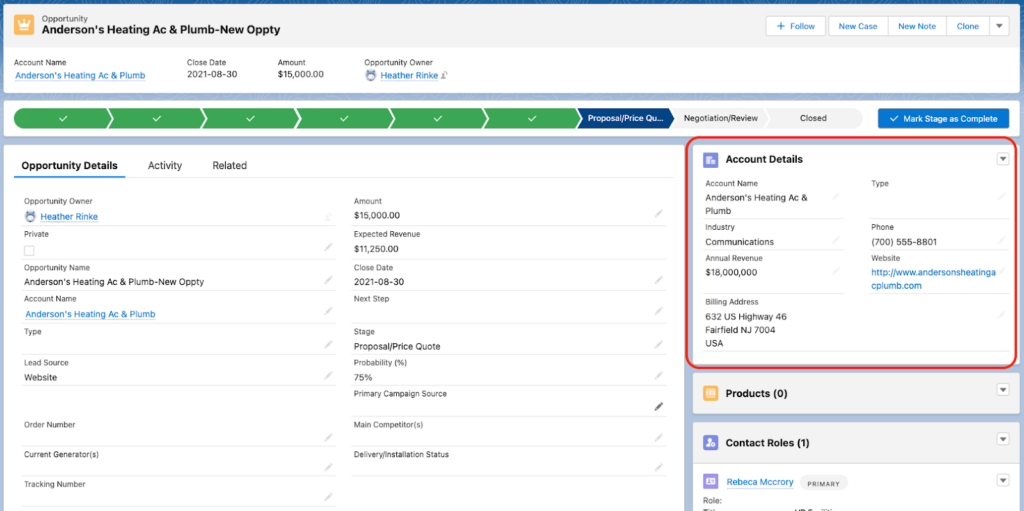
Now when looking at an opportunity, the related Account fields will appear on the Opportunity record page!

Editing Account Fields on the Opportunity Page

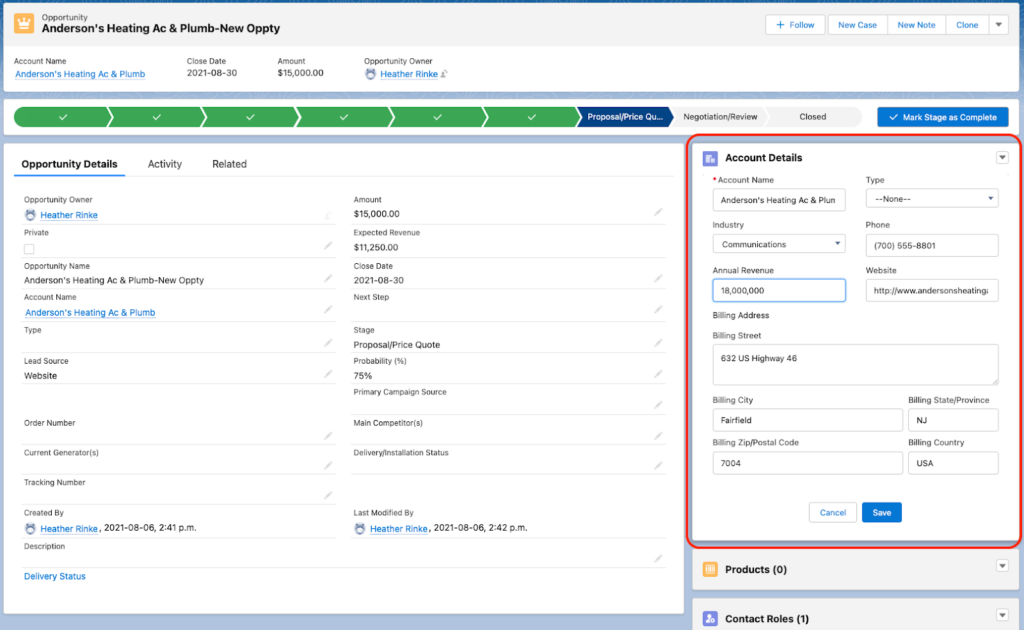
Unlike formula fields, these fields can be edited directly from the Opportunity. 

To edit the Account fields, click the pencil icon next to the Account field you want to edit. All of the fields in that section will become editable, and notice that the Opportunity fields are not. When done, click the Save button to save the fields in that section. These fields are edited separately from the Opportunity fields. 

Find Key Account Details on the Salesforce Opportunity Record Page

That’s it! Now the sales team can manage the key details on their Account and Opportunity in one place. All with a handy object-specific action layout and the flexibility of a Lightning record page.
Want to know how you can use this tip in your overall technology strategy? Reach out to the team at Sercante to start a conversation.

You can also check out these resources for more ways to make work flow between your sales and marketing teams:

No more posts to show