Category

Emails & Forms

In today’s international and digital business landscape, modern marketers often coordinate messaging and strategy across multiple countries or regions. Luckily, Marketing Cloud Account Engagement (Pardot) is an ideal tool to support those types of global marketing strategies. That’s because it enables marketers to find a balance between global coordination and initiatives that reflect the challenges and regulations of local markets. 

Here are functions and customizations in Marketing Cloud Account Engagement that support an international marketing strategy.

Crossing Language Barriers

One of the most important considerations for an international marketing strategy is delivering high-quality, localized content that doesn’t provide any barriers to engagement through the local language.

Enable international users in a single Marketing Cloud Account Engagement instance

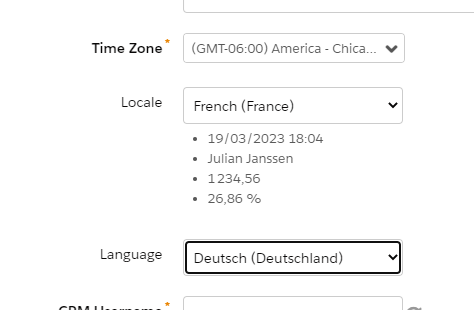
Administrators and individual users within Account Engagement can control the time zone, language and data formats in which the user interface (UI) is displayed. 

Languages and locales currently support:

  • English
  • Japanese
  • German
  • Spanish
  • French

This can be configured by an Account Engagement admin upon creating a user record. Go to Account Engagement Setting > User Management Users

Individual users can control their language and locale settings under Account Engagement Settings > Account Engagement > My Profile.

Marketing Asset Creation

While the user interface is limited to languages supported by Salesforce, all marketing assets in Account Engagement can be developed and customized in any language. For the most part, this just involves typing/inserting content in the language desired, but the following points detail areas where advanced customization is necessary to change the display language.

Form error message

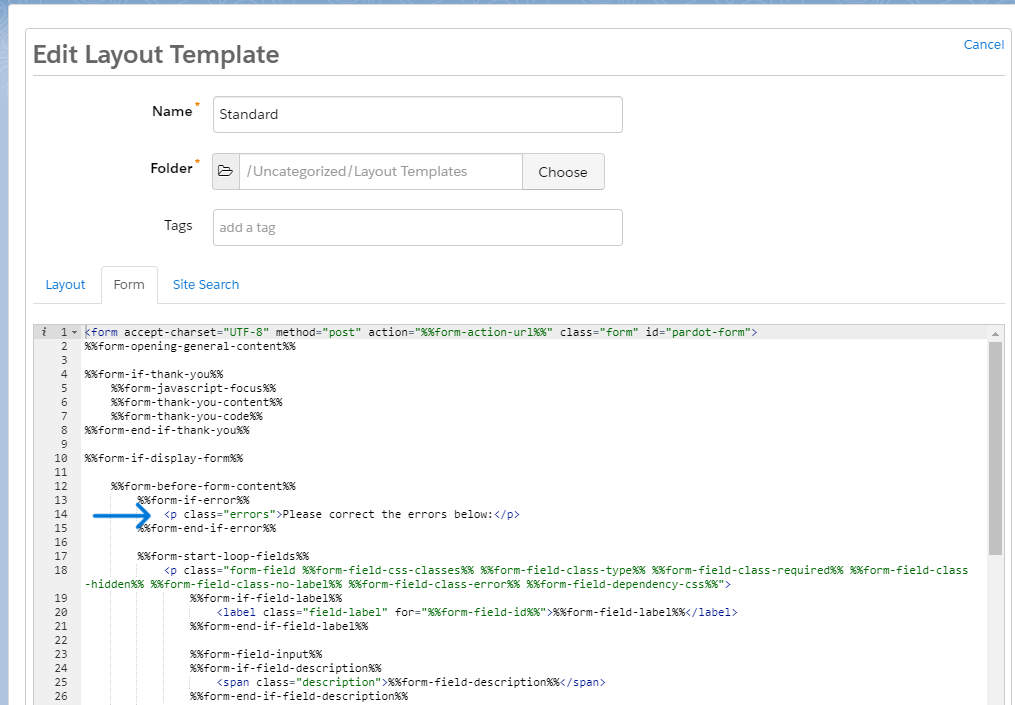
The native form error message for lacking required fields in Account Engagement displays in English by default “Please correct the errors below.” This cannot be customized within the form creation wizard, but instead must be customized within the layout template. 

To update, navigate to the layout template used by the form (Content > Layout Templates). Navigate to the form tab and replace the message after %%form-if-error%% with the desired text. 

The structure may not exactly match the included screenshot if you are using a layout template that significantly differs from the default. Use this reference for Layout Template Form Code to determine what components may need to be updated.

Encoding special characters

You may encounter situations in which characters display incorrectly when importing data to Account Engagement. To ensure all characters display correctly, you have to use UTF-8 encoding

Always confirm any exported data is edited and saved using UTF-8 encoding to ensure data is not improperly overwritten. To edit data with UTF-8 encoding in Excel, for example:

  1. Export CSV data from Account Engagement
  2. Navigate to Data > From Text (Get External Data) in Excel
  3. Select the CSV export, and chose “Delimited” and File Origin > “Unicode (UTF-8),” then “Comma” to open the data with correct forming in Excel

Any custom layout templates developed for Account Engagement landing pages should also be sure to use UTF-8 encoding. Set the below meta tag in the <head> section of the layout template so any special characters render correctly.

<meta http-equiv=”Content-Type” content=”text/html; charset=utf-8”>

Unsubscribe and Email Preference Center Pages

Account Engagement only allows for one global unsubscribe page, which can limit the feasibility of supporting multiple languages or unique messaging on the page. However, the suggested way to allow recipients to manage communication preferences is the email preference center (EPC) feature, which enables recipients to choose specific segments they would like to be included or excluded from, in addition to universally unsubscribing. 

Multiple EPCs can be set up under Account Engagement Email > Preferences Page, so customization to language and included distribution lists can be made per language. 

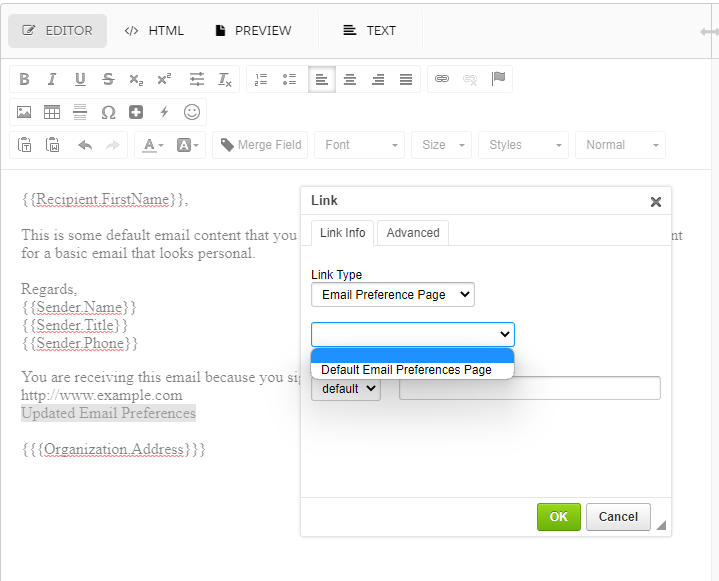
To  ensure the correct email preference center is included in different language emails, insert a link, choose “Email Preference Page,” and choose from the list of available pages. 

Learn about other customizations that can be made to Pardot unsubscribe and email preference pages.

“Not you?”/Form Reset Link

In the form creation wizard, under 3. Look and Feel > Advanced, is a handy setting to enable a link that allows viewers to reset Account Engagement pre-population and dynamic form functions, in case it is pre-populated with the wrong information (which may be the case due to shared devices, etc.) However, similar to the form required field error message discussed above, this only renders in English by default, in the format “Not Name? Click here.”

To resolve, creating another form layout template update is required. Insert the following script between the opening and closing <head> tag in the “layout” tab of the desired layout template.

<script type="text/javascript" src="/js/jquery/jquery.min. js"></script>

<script type="text/javascript">

//Replace the Not... string

$(document).ready(function(){ var span = $('span.description');

span.html(span.html().replace("Not","Desired Replacement for Not")); span.html(span.html().replace("Click Here","Desired Replacement for Click Here"));

});

</script>

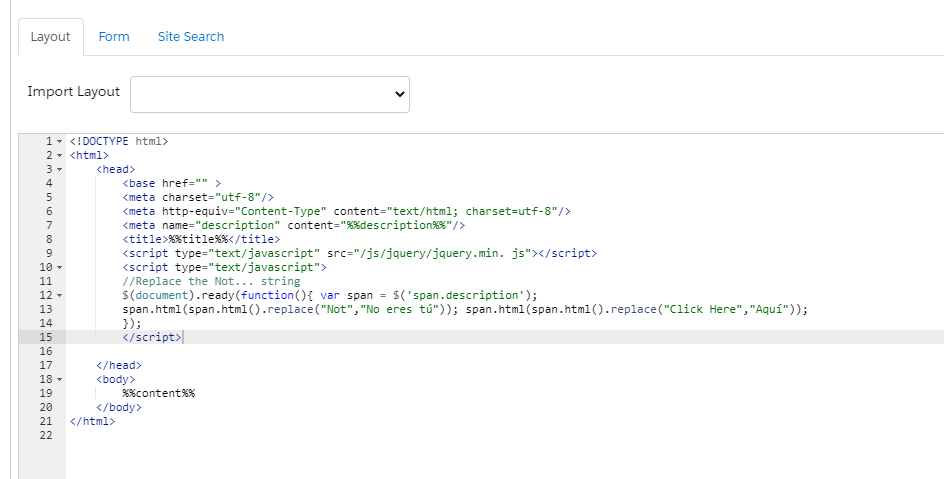
International Privacy and Data Management

With growing international business, also comes managing compliance with the various data protection and privacy laws in place across your target markets. It’s important to consult with your company’s legal counsel to ensure understanding of the regulations across various jurisdictions. Fortunately, Account Engagement includes a variety of features to enable and enforce compliant data collection and protection. 

Tracking Cookies

Account Engagement uses a combination of third and first party cookies to track visitor web behavior and build a profile of data on prospects in your database. To customize how cookies behave and allow visitors to opt-out of tracking, you can:

  • Enable first-party cookies and disable third-party cookies under Account Engagement Settings > Account Settings
  • Honor “Do Not Track (DNT)”  headers under by enabling under Account Engagement Settings > Account Settings
  • Customize Account Engagement cookie duration via Account Engagement Settings > Account Settings
  • Display a banner requesting tracking opt-in in some or all countries via Account Engagement Settings > Domain Management > Edit Tracking Opt-in Preferences
  • Utilize the Tracking and Consent API to integrate with other systems and create custom solutions

Communication Preferences

Many regulations require that explicit and informed consent be collected before a recipient can be emailed marketing materials, as well allow recipients to revoke that consent at any time. Some industries also require detailed records of communications sent. Account Engagement enables this via:

Additional permission-based marketing resources: 

Data Security

Data stored in Account Engagement is kept securely to meet international data processing regulations, along with strict user login requirements. 

Here is documentation from Salesforce on these practices:

Other Resources from The Spot on Managing Global Compliance

What’s Next 

Need help finding the right mix of Account Engagement solutions to meet your localization and compliance requirements? Reach out to the team at Sercante to get help customizing features and content in your org and enable your global team. And leave us a comment below to let us know any tips or tricks you’ve picked up for managing international teams with Account Engagement!

With the holidays coming up, I can bet all of our inboxes are overflowing with marketing emails letting us know about can’t-miss deals, the best gifts, order before X date to get your gifts in time or you will disappoint your entire family (ok maybe not that aggressive, but you get it). 

I can also bet that you’ve received so many emails from one company in such a short time that you have just opted out or blocked them entirely. This is called marketing fatigue, and it is a great way to lose your subscribers. But with the help of Marketing Cloud Account Engagement (Pardot) Recency and Frequency dynamic lists, we can target prospects that have reached their email maximum for a time period and suppress them from future sends. 

Building a Pardot Recency and Frequency Dynamic List

In Pardot:

  1. Navigate to Automations, then Segmentation Lists
  2. Select + Add List
  3. Name your list and select the Dynamic List checkbox
Note: You have to select the Dynamic List checkbox when your list is created. If you create a static list, you cannot later go back and make the list dynamic. 
  1. Select Set Rules
  2. Select Prospect has been emailed
  3. Next you can specify the number of times the prospect has been emailed (frequency) and the window of time (recency).

You can combine the “Prospect has been emailed” rule with “Prospect Time” to apply different rules to different prospects. For example, if I want to limit never active prospects to 2 emails in 10 days, and current active prospects to 4 emails in 10 days, I could use the rules below:

Once created, I can use this list as a Suppression List on any of my email sends in order to exclude prospects who have been emailed too much in one time frame. 

Can I use this in my Email Preference Center?

Yes! You can absolutely use this in your email preference center (EPC) to give Prospects the option to only receive, say, 1 email a week. First, you’ll want to create a new public list that prospects can opt into. 

Here are the steps to create a new public list:

  1. Navigate to Automations > Segmentation Lists
  2. Select + Add List
  3. Name your list (this name is internal facing only) and make sure you select the public checkbox
  4. When the public checkbox is selected, the Label and Description fields will appear. These fields are external facing and should describe what the prospect is opting into.
  1. Select Create List
    • Make sure you add this new public list to any EPCs where you want it to appear. It will be added to the default EPC as soon as it is created. 
Note: Since prospects who subscribe to this list can only receive one email per week, you’ll want to prioritize your email sends so these prospects only get the most important email in the 7 day window. To prevent these prospects from receiving less important emails, use the above list as a suppression list on those email sends. 

Next, you’ll need to create a dynamic list that looks for prospects on the list above who have already been emailed 1 time in the past 7 days. 

  1. Navigate to Automations > Segmentation Lists
  2. Select + Add List
  3. Name your list and select the dynamic list checkbox
  4. Select Set Rules
  5. Set up your first rule to look for prospects who have subscribed to the list we create above
  6. Use the recency and frequency option to set up your second rule and see who has already been emailed 1 time in the past 7 days
  1. Select Run Rules

Use this new dynamic list as a suppression list on all email sends going forward. You can also add it to your Primary Suppression List to make sure this list is not left out!

Which Email Sends Count?

The “Prospect has been emailed” dynamic list rule counts list emails and emails sent via Engagement Studio Programs. It does not count one-to-one emails, emails sent via Salesforce Engage, emails sent with an email plug-in, or emails sent by automation rules or completion actions (i.e. Autoresponders). 

What other ways are you planning on using recency and frequency dynamic lists in your org? Tell us in the comments!

This blog delves into the value that Salesforce Marketing Cloud Interaction Studio provides to marketers (B2B and B2C). We’ll discuss Interaction Studio and its key capabilities with a focus on identity stitching and machine-learning-based recommendations.  

In addition, we’ll talk about the integration capabilities with Salesforce products including the three Marketing Cloud tools that could benefit marketers, which are Open-time email, Journey Builder, and Automation Studio.

Interaction Studio Use Case Example

An example of a use case with Interaction Studio is when customers view a product in-store, browse through the web, download a mobile app to use a voucher, make a purchase, and talk to a sales representative after a few days, multiple touchpoints and delivering a consistent experience is needed. 

That’s where Interaction Studio comes in, unifying the customer experience with its features.

Web

Based on the user’s interaction with the website (e.g. what content they read, or what products view, how much time they are on a particular page), a personalized banner based on on-site behavior and backend preference is enabled. 

Instead of a static banner on the homepage, Interaction Studio activates a dynamic banner in conjunction with the user’s behavior and data.

Email

A personalized email is uniquely catered based not only on aspects such as name, or city but with micro nuances such as user behavior. 

Omni-channel

Interaction with a user happens on a specific channel, but reaching out happens on another channel. What we’re looking at here is adding a user on a journey or a nurture campaign when they sign up from a form on the website.

Common Thread between Interaction Studio use cases

Each of the three use cases is unique in its own features but a common thread to all of them is personalization

Interaction Studio puts web tracking cookies on your website to listen for all the data that comes.

Top 3 Features of Interaction Studio

Today, in this world where we have interactions happening across multiple channels, it’s really important that all your sales, service, and marketing departments talk in the same language. That can be a huge challenge at times. 

Interaction Studio is related back to contextual data such as a product catalog or a content catalog. It can bridge the two resulting in a unified view of a customer. From the data of the customer, you can make a centralized decision leading to an orchestrated delivery across all touchpoints. 

Open-Time Email

Delivers personalized content and product recommendations at the time an email is opened by the recipient, which is rendered in true real-time, utilizing the most current information of every user in your subscriber list. 

The solution is designed to work with any email or marketing provider. 

Journey Builder

Based on API. Interaction Studio listens through web, mobile, API, and data feeds, constantly gathering data about visitors, then updates existing segments in real-time. Use these segments to add customers to Journey Builder within moments of data changing.

Automation Studio

Import or export segments between IS and SFMC. Export segments from IS to SFMC/Pardot using IS SFTP — one time or nightly. 

Use Automation Studio to import data into SFMC DE. Import data into IS — Marketing Cloud data extensions are extracted using Interaction Studio SFTP as a destination in Automation Studio.

Ultimate goal

As we learned, Interaction Studio unifies multiple touchpoints of user behavior from viewing a product through a website all the way to talking to a sales representative after a purchase. From these features, it all comes down to a better understanding of the customer’s needs, making it the best experience for them as possible. 

Learn more from the original content of Deboleena Bhattacharyya here. Or, check out more MarDreamin videos here

For many Salesforce Marketing Cloud Account Engagement (Pardot) customers, using Pardot provides them with the tools necessary to communicate with their distinctive audience(s) in a personalized way. 

One common way to do this is to create dynamic customer-centric journeys that send emails on behalf of individual sales reps and help to promote new products or to educate audiences on a specific topic. After all, this is one of the main reasons organizations buy Pardot — to drive the sales pipeline.

But what happens when you need to send emails from different teams in your organization?

Follow along with this blog and learn a few tricks to create new experiences for your Prospects for sales, service, and other parts of your business by leveraging the CRM user lookup feature in Pardot.

Use CRM user lookups to send Pardot emails on behalf of other departments at your company or organization

One of the advantages of Pardot automation for email is the ability to leverage relationships in Salesforce between your sales reps, account owners, and other key service players with your Pardot leads and contacts. 

Here are some examples below:

SDR (Lead Owner) to Prospect (Lead)

Account Executive (Account Owner) to Prospect (Contact)


In fact, here are the standard out-of-the-box relationships you can leverage from Salesforce in Pardot.

  • Account Owner – Send the email from the prospect’s account owner in Salesforce.
  • Assigned User – Send the email from the user who owns the prospect record.  If the prospect is synced to Salesforce. this is the Lead or Contact Owner.
  • Specific User – Select from a list of your Pardot users to use as the email’s sender.
  • General User – Set a general address (like [email protected]) or a non-Pardot user to be the sender of the Email.


You can usually cover 97% of all your use cases using one of these options while drafting your Pardot list emails or engagement studio programs.

While most organizations don’t have a need for custom relationships, yours may be different. And that’s okay.  

What if you need a different/custom user connection? 

In your Pardot emails, you can always edit the Sender to say General User. This sends the email on behalf of that person as long as they have the same email domain you have validated in Pardot (@company.com).


However, that’s not always the best outcome. Sometimes we need more dynamic solutions.

In that case, we may want a relationship outside of Sales/Marketing for specific customer service-centric journeys like the one below:

Service Manager (Custom CRM Relationship) to Prospect (Lead or Contact)

In the scenario above, the User/record relationships were built in Salesforce and shared with Pardot in order to build out a service team to prospect customer journeys — think CSAT, follow-up surveys, etc. 


Did you know you know you can create custom relationships AND send emails on their behalf?

Watch the demo below to set up your own custom CRM relationships between Users and your Prospects:

You can also follow along with these steps.

After you set this up, you can take advantage of this field right away with CRM user lookup.

This is what it looks like:

A quick note: Sometimes fields need a few minutes to sync. Be patient, go grab coffee and come back to this. In our experience, it is never more than a few minutes.

What are other examples of custom CRM user lookups?

Honestly, the possibilities are endless. Here are some options:

  • Regional sales manager
  • Customer service representative
  • Technical support specialist

Don’t forget to check out our other cool ideas like A/B testing for you to leverage these different sender options within your organization in the most effective ways.

Where can I use these relationships?

These CRM user lookups are built into Salesforce, so you can use them in both Pardot and Salesforce. Within Pardot you can leverage them in the following ways:

  • Email templates
  • List emails
  • Rules on automation rules, dynamic lists, and segmentation rules
  • Potentially on the new conditional completion action criteria rules

This field cannot be used to send email notifications to the User linked to this Prospect. 

Additionally, we did not see them in Engagement Studio Programs as rule options. But remember, you can build a list to act as your criteria instead of using the field directly. 


Can I have more than one custom relationship?

Absolutely. This is out-of-the-box functionality in Salesforce, which can now be repurposed for Pardot-specific processes. 

Most organizations we have worked with have less than (3) custom User lookups. The only caveat is to make sure you name them correctly so there is no confusion while using them. 

As you see above, you can pick from a picklist (CRM User lookup fields) under the Prospect CRM User Custom option, and choose which one you want to leverage on that particular email. 

How do you test to make sure everything is working fine? 

The best way to test this information is up to date in Pardot is to go through the following checklist:

  • Review User mappings
    • If the User is deactivated or not in Pardot, this will fail.
  • Create a list of Prospects using the new field created and make sure the values are being reflected in Pardot.
    • Watch the video earlier in the blog for a few troubleshooting steps.
  • Run a preview test in your email test tab.
    • Enter a few email addresses you know to have this field updated and see how it works out.
    • You can create fake prospects to sync for this testing or build in Sandbox if you have access to one.

CRM user lookups make life easier for Pardot admins

Thank you for following along! Check out part two of this blog where we cover how to avoid email personalization missteps.

If you have any questions about this feature or how to use it in Pardot (MCAE) please give us a shout here

Have you ever finished working on an email template in the Marketing Cloud Account Engagement (Pardot) Email Builder with all of its convenient features like:

  • Removable sections
  • Repeatable sections
  • The ability to move sections up and down within the template

…only to start editing a landing page, and you become extremely frustrated with the fact that you can’t do the same things in the Pardot Landing Page Builder? 

In this post, we’re going to cover a way that we can basically replicate all of these features for the Pardot Landing Page Builder!

Watch a demo video to learn these hacks

Before we dive in, here’s a video to walk you through the three Pardot Landing Page Builder hacks from this blog post.

Pardot Landing Page Builder hacks — an overview of the approach

To achieve these features in the Pardot Landing Page editor, we’re going to add a little snippet of code at the end of our layout template. It goes between the closing </body> tag and the closing </html> tag

The code snippet styles the different sections, or individual elements, of the page that we want to be able to alter from within the editor.

<code pardot-region="hide_elements">
    <style>
        #sectionName {
            /* styling goes in here */
        }
    </style>
</code>

From there, we can add the different styles to each element  based on the different features we are wanting the element to have.

An important note

The first time you open this WYSIWYG editable code block for a Landing Page, it is going to include a <![CDATA]]> tag in the code. You will have to remove the tag before any of the changes you make in that code block will take effect.

Landing Page Builder Hack #1: Removable Sections

To make “Removable” sections for the Pardot landing page editor, we need to add the display property into the styling for the element we want to be able to remove. This will give us the ability to edit the display property from within the WYSIWYG editor. 

Then, we will basically toggle the display property from display: flex (or display: block if that’s the normal styling for the element) to display: none. This will “remove” the section, or element, we want to hide!

<code pardot-region=”hide_elements”>
    <style>
        /* Change display:flex to display:none to hide an element */
        #visibleSection {
            display: flex !important;
        }
        #removedSection {
            display: none !important;
        }
    </style>
</code>

Landing Page Builder Hack #2: Repeatable Sections

To create “Repeatable” sections, we’re going to use a very similar approach to the “Removable” sections. We’re going to leverage the display property again. 

The key here is to include extra copies of the section you might want to repeat in your layout template from the start, and then use the display property to hide the ones you don’t need in that Landing Page. Or alternatively, have the sections start as hidden and come back in and change the styling to show the sections if you need them.

<code pardot-region="hide_elements">
    <style>
        /* This will show the section 2 of the 3 possible times */
        #Section1a {
            display: flex !important;
        }
        #Section1b {
            display: flex !important;
        }
        #Section1c {
            display: none !important;
        }
    </style>
</code>

Considerations for “Repeatable” Sections

  • While this does effectively create a “repeatable” section for the landing page, it is important to note that we are not actually duplicating the sections from within the landing page editor. This means that the number of times you can “repeat” a section will be limited by the number of times you include that section in the original layout template.
  • Keep in mind that your editable regions in a layout template are marked by pardot-regions and these must all have a unique name. When we copy a section of our landing page to make it “repeatable” we will need to go in and update the pardot-region names as well. For example, Section1-Image might become Section1a-Image and Section1b-Image and so on.  If you don’t update these names when you copy a section, you will receive an error message when trying to save the layout template. 

Landing Page Builder Hack #3: The Ability to Move Sections Up and Down on the page

If we have sections included in our Layout Template that we want to rearrange based on the Landing Page, we can add another property into our code block. This is called the order property. This works as a sort of ranking system where the section with the lower values will appear first on the page. 

By default, we will assign each section a value to give them their original placement on the page. But by including the order property in our styling, we can adjust that order later on from within the WYSIWYG landing page editor. 

Considerations for “Movable” Sections

  • This will only work for sections, dividers, etc. that are children of a flex container in the html code. That’s because the order property only applies to flex elements. If your code isn’t set up with the main sections in a flex container, then unfortunately this approach isn’t going to work for you. The good news is that you can probably restructure your code (or we can help!) so you can make use of this “feature” for your landing pages.
  • The default value for the order property is 0. This means if you have Section A defined as order: 1, and then you add Section B but don’t define an order value for it, it will appear before Section A on the page.
<code pardot-region="hide_elements">
    <style>
        /* Use order to adjust which elements appear first on the page, with 1 being the first */
        #Section1 {
            order: 1;
        }
        #Section2 {
            order: 2;
        }
        #Section3 {
            order: 3;
        }
    </style>
</code>

More like workarounds than features

It is important to keep in mind — these are not features of the Pardot Landing Page editor. Instead, these are more of a creative approach to achieve some of the functionality we all often find ourselves wanting. 

If you run into issues with any of the approaches in this post, please reach out to us and we can help you obtain your desired experience with the Landing Page editor. Or, tell us how you did in the comments!

Have you ever wondered why sales and marketing teams combine Salesforce Marketing Cloud Engagement and Account Engagement (formerly Pardot), with Sales Cloud to reach their goals?

Thinking about how these platforms can work together likely makes your head spin like a twister in Kansas. 

But, fear not! In this edition, we’ll provide more clarity than confusion. 

We’ll go through a high-level overview of how Salesforce Marketing Cloud Account Engagement (formerly Pardot) and Marketing Cloud Engagement compare. But, this isn’t a versus and when to choose which (c’mon we’re all family!). 

We’ll devote the majority of this blog highlighting three use cases that unlock success using both Salesforce marketing automation platforms integrated with Sales Cloud. 

How do Marketing Cloud Engagement and Account Engagement compare?

If you’re familiar with these platforms, then you know they’ve traditionally been focused on industry (B2B vs B2C) and platform-specific features. While a lot of the unique needs of these industries remain true, the lines and approaches of how to communicate digital across these audiences (which are sometimes shared across a business) continue to blur. 

Below is a tried-and-true Venn diagram that shows the overlap as well as their differences. 

Features that are unique to each, such as scoring & grading from Account Engagement (Pardot) and mobile messaging in Engagement are the key differentiators. 

Why do marketing teams use both MCAE and MCE?

B2B marketers are now looking to execute more complex multi-channel messaging once a prospect converts to a customer, for example, and therefore justifies the need for both solutions. 

There are also more and more instances of B2C or D2C driven organizations that serve two very unique personas and different contacts — tne that focuses on the traditional multi-channel messaging approach and one that would benefit from lead scoring, nurturing, and more 1:1 guided selling. In this case, also, the argument for both platforms can make sense. 

And lastly, there’s the more complex instance where an organization serves two very unique personas, yet the personas apply to a single, shared contact.

Today, we’ll focus on the following:

  1. A traditional B2B org looking to execute more complex multi-channel messaging post-conversion
  2. A multi-business model organization with two unique personas
  3. A multi-business model organization with two unique personas that share a contact

Use Case #1: A traditional B2B org looking to execute more complex multi-channel messaging post-conversion

As described above, we’ve got a traditional B2B tech organization focused on a single persona that typically only applies to one contact record type. They’re looking to adopt more complex multi-channel messaging once their prospects become a customer. 

The ability to acquire leads, score and nurture until an MQL threshold is reached and sales can step in is still critical and at the heart of this organization’s business model. However, the ability to retain and engage with their customers in a competitive marketplace is of ever-growing importance.

In this scenario, the prospect will be acquired via an Account Engagement form.

  • They’ll be nurtured through email, forms, and landing pages powered by Pardot until their MQL threshold is reached.
  • Upon reaching, the MQL will be assigned to a Sales user and created as a new lead in Sales Cloud.
  • The Rep will work the lead until SQL status and from there will convert the lead and create an opportunity thereby also triggering the contact creation process.
  • Once the opportunity is closed won, the contact is now eligible for customer marketing in Journey Builder via the Marketing Cloud Connector.

Use Case # 2: A multi-business model organization with two unique personas

A hospital technology organization has two business models that support two separate personas that do not overlap. In this scenario, because of the way the organization is structured a single persona and contact is messaged only from Engagement or Account Engagement (Pardot). There is no sharing of contact and messaging between these solutions, and it’s therefore more straightforward. 

The emphasis for this use case is on how you can use both platforms to support the unique needs of your personas and overall business.

For Persona 1

  • A buyer makes a purchase and becomes a customer; a salesperson isn’t involved in this transaction.
  • As a new customer, a contact is created as a person account record in Sales Cloud.
  • Now the person account is available in Engagement via Marketing Cloud Connect and customer marketing can begin in Journey Builder.

For the Persona 2

  • The prospect will be acquired via an Account Engagement (Pardot) form.
  • They’ll be nurtured through email, forms and landing pages powered by Pardot until their MQL threshold is reached
  • Upon reaching, the MQL will be assigned to a Sales user and created as a new lead in Sales Cloud.
  • The Rep will work the lead until SQL status and from there will convert the lead and create an opportunity thereby also triggering the contact creation process and the contact is created with a specific record type: B2B Contact. 
    • Marketing Data Sharing rules in Pardot are configured to ensure that only those contacts with the B2B record type sync with Pardot. 
  • The prospect in Pardot has a bidirectional syncing relationship with the contact in Sales Cloud. 
  • And when the existing customer, still syncing to Pardot, expresses interest in another product or service, the B2B marketing team continues marketing to this customer using features in Pardot like email nurturing, scoring, grading, and sales team alignment. 
  • As it progresses from MQL to SQL, another opportunity can be created on the existing contact record. 

Use Case #3: A multi-business model organization with two unique personas that share a contact

Now this scenario is a bit tricky and is really where all the magic needs to happen – we’re tackling not only different personas that leverage both platforms but also share the contact. 

Take a financial institution, for example, that has 2 lines of business: Personal Checking/Savings and Wealth Management. The Personal LOB (line of business) is very much a self-service model, while the Wealth Management LOB is exactly the opposite of self-service, yet they both have a common, shared customer/prospect.

You may ask yourself, ‘do they really have the same target audience/segment?’ While your first gut reaction may say, ‘No, ’ which is true, it’s also partly true that these different buyer personas can have crossover and can in all actuality apply to the same single individual. 

Furthermore, the ability to convert and increase the CLV (customer lifetime value) by taking a Personal Checking/Savings customer and upselling your institution’s Wealth Management services is a very strategic and much-desired result in the banking world. The key to successfully achieving this is all in your approach. 

Let’s think through this from a basic customer journey perspective. 

  • In this case above, the potential customer gains initial awareness and exposure of the Personal Checking/Savings product through lookalike audience modeling fueled by Marketing Cloud Engagement & Advertising. 
  • They then visit the website to apply for an account, receive approval, and have now converted to a Personal Checking/Savings customer. 
  • Upon conversion, they become a contact (and Person Account record type) in Sales Cloud which is bi-directionally synced to Marketing Cloud Engagement via MC Connector. They are now eligible to be enrolled in various customer journeys — the first obvious one being a Welcome Onboarding Journey. 
  • Throughout their relationship based on their activity and inactivity, they will qualify for other journeys such as Upsell and Cross-sell. For argument’s sake, let’s say as part of one of these journeys they click on a cross-sell content piece focused on wealth management. 
  • They visit the website and fill out a wealth management form. They are then also marked as a B2B Contact Record type, and they’ll be nurtured by Pardot until their MQL threshold is reached
    • Marketing Data Sharing rules in Pardot are configured to ensure that only those contacts with the B2B record type sync with Pardot. 
  • Upon reaching the MQL, they will be assigned to a Sales user for 1:1 outreach. As it progresses from MQL to SQL, another opportunity can be created on the existing contact record. 
  • Once the Sales user converts this prospect and opportunity to Closed Won, they will now become part of the wealth management customer segment in Marketing Cloud Engagement and will likely enroll in one more many customer relationship journeys across the tenure of their relationship.

In summary, the banking institution is leveraging Salesforce Marketing Cloud Engagement for full lifecycle management including awareness of its self-service line of business. For its more considered purchase model line of business, Account Engagement (Pardot) is used. However, once these prospects convert to customers, the ongoing customer relationship communications, like SMS messaging, will occur through Marketing Cloud Engagement.

Closing Thoughts

As you can see, the potential use cases can range from simple to complex. Therefore it’s important to understand the long-term plan of what you’re trying to achieve to ensure what you’re building today can scale and grow for the future. 

A partner who has breadth and depth of experience in both platforms as well as the know-how to be future-proof, especially for organizations that have more than one business model, is an ideal next step.

What other use cases can you think of for these platforms? Let us know in the comments!

No more posts to show