Category

Marketing Automations

One of the great things about Account Engagement is that the same fields can be used over and over again for different interactions while keeping the full history of the field recorded in the Prospect’s Audit Table. This ensures you don’t need an endless amount of fields and you don’t have to create repeat fields such as “contact reason 1”, “contact reason 2”, etc.  

However, sometimes you need a specific interaction frozen in time. For example, say every time someone fills out your “request a quote” form you want the details the Prospect inputs collected into one record that you can reference later, regardless of whether they fill out the form again.

This is a problem I recently solved for our marketing team and I am finding that the solution can be used for many different scenarios. In fact, at the Dreamforce Genius Bar, I recommended this solution for many of the questions that were brought to me by attendees. 

So, let’s dive in!

Why don’t we just use Tasks?

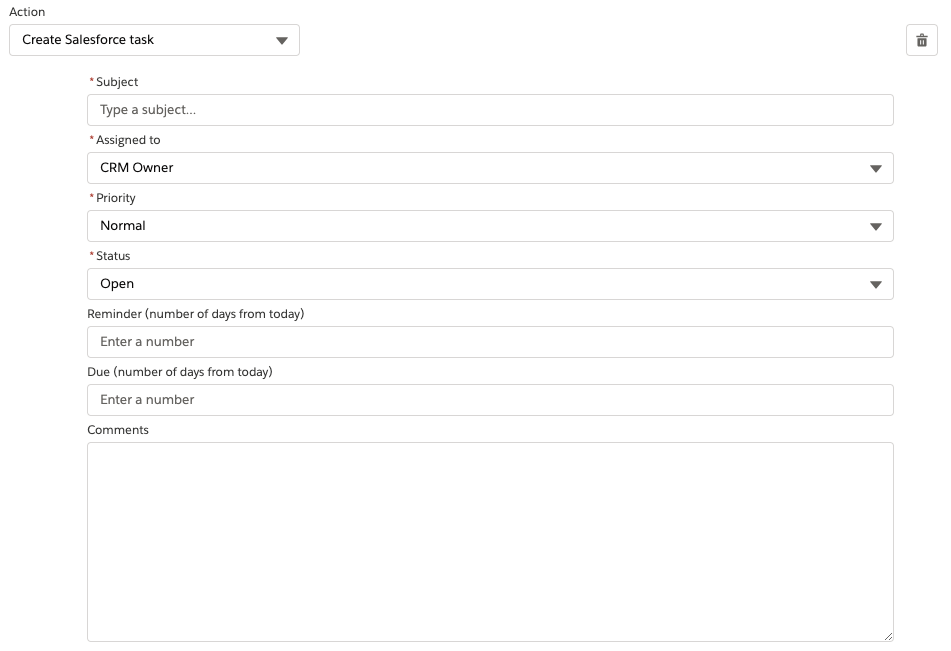
You may be asking, if you want an interaction frozen in time, why not just create a Salesforce task as a completion action? This would create a record at the time of the interaction that could later be referenced and followed up on. 

While this is true, Salesforce tasks are limited in the information you can provide (example below). You also cannot use Account Engagement Merge tags within the tasks to stamp field values, and you can’t easily create custom task fields to store additional needed information. 

Original Scenario

I’ll use the original scenario I solved for as my example for this blog post. Our marketing team is serious about event marketing strategies and wanted to record what they refer to as “Event Interactions.” 

These interactions would be created via form fills or via imports and needed to include:

  1. The name of the event
  2. Details about the event 
  3. Which team member led the event
  4. What topics were covered 
  5. What type of opportunity this is
  6. Lead/Contact the Event Interaction is associated with

What we built

To store these Event Interactions, we created a Custom Object and fields for each data point the team wanted to record. We also created two lookup fields, one for Leads and one for Contacts, so we could associate the Event Interactions with the Lead/Contact records. 

Next, we created fields 1-5 on the Lead and Contact Object and in Account Engagement so the data can move between the two systems. Finally, we created a Flow that will fire and create the Event Interaction record when these fields have data.

To recap:

  1. Create a new Custom Object
  2. Create the custom object fields
  3. Create the fields on Leads and Contacts
  4. Create and sync the fields in Account Engagement
  5. Create the flow

Creating the Flow

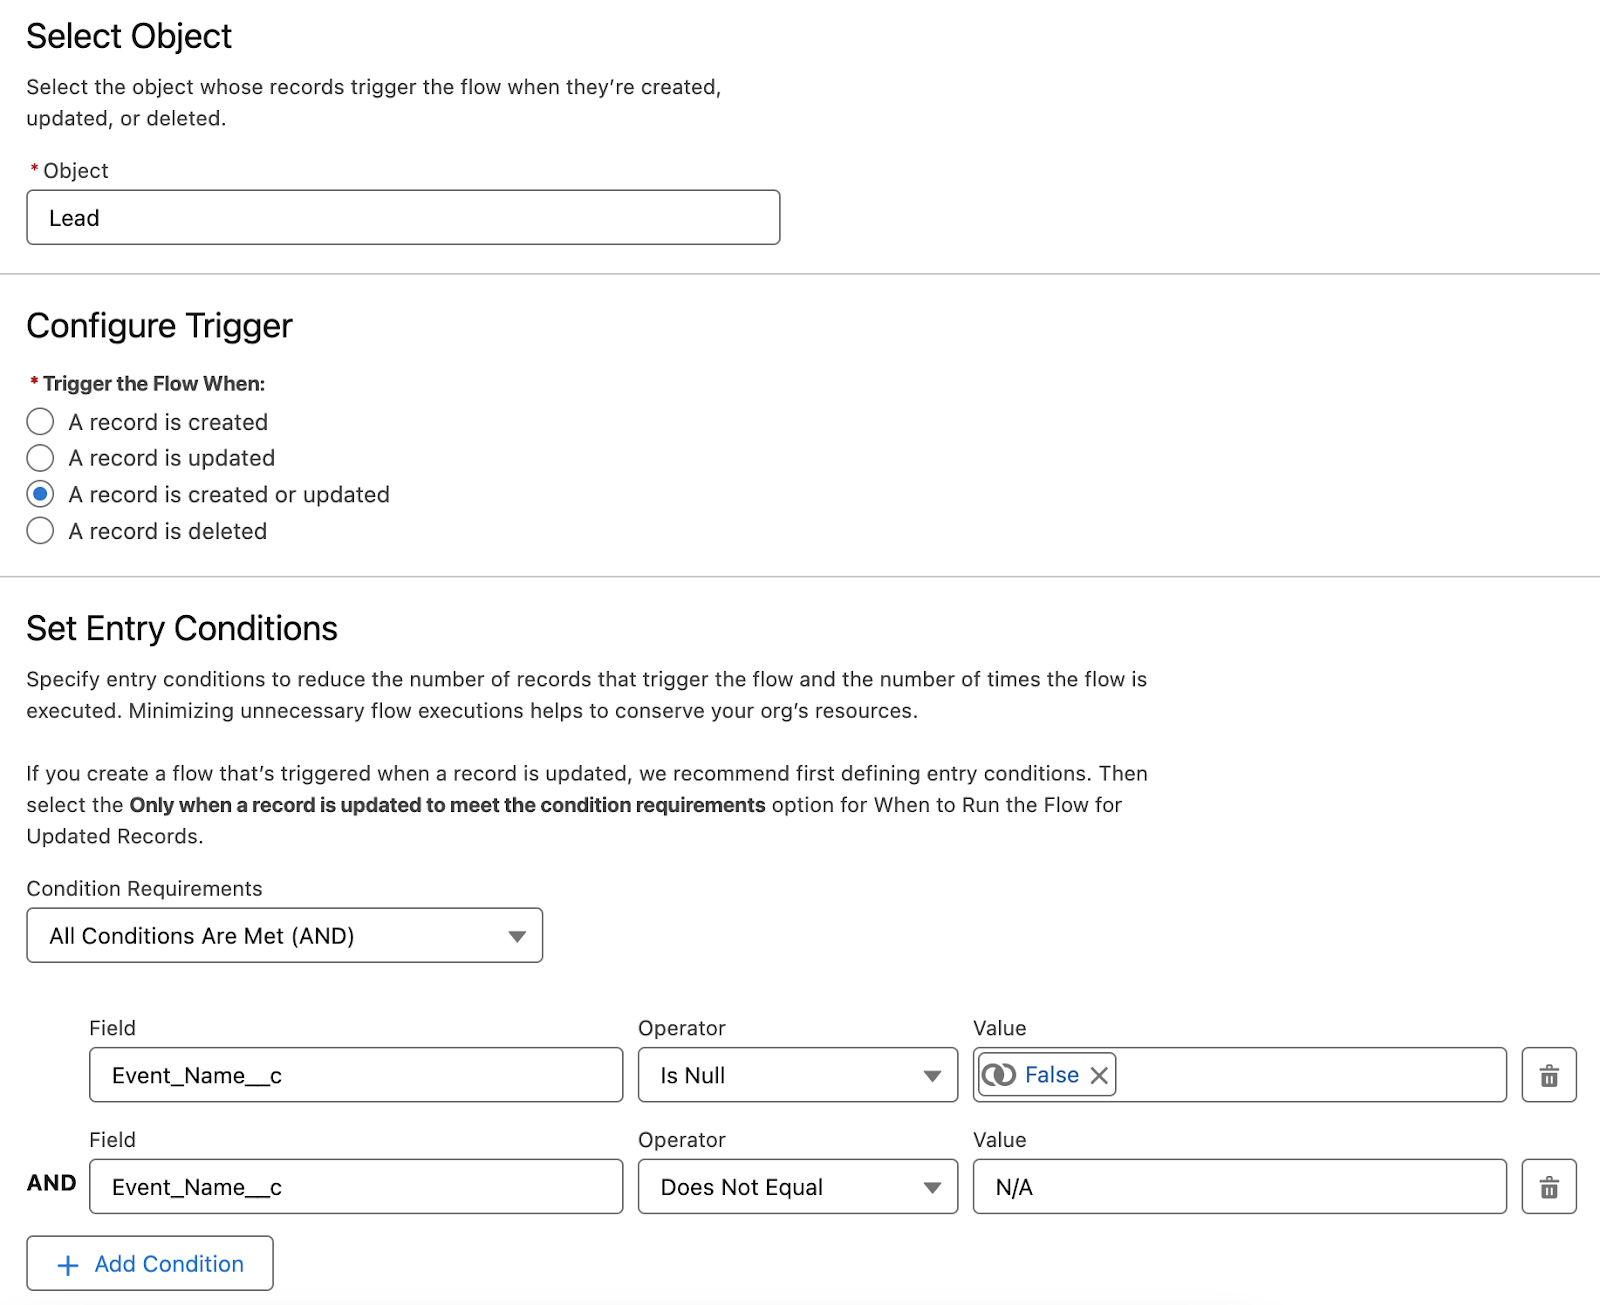
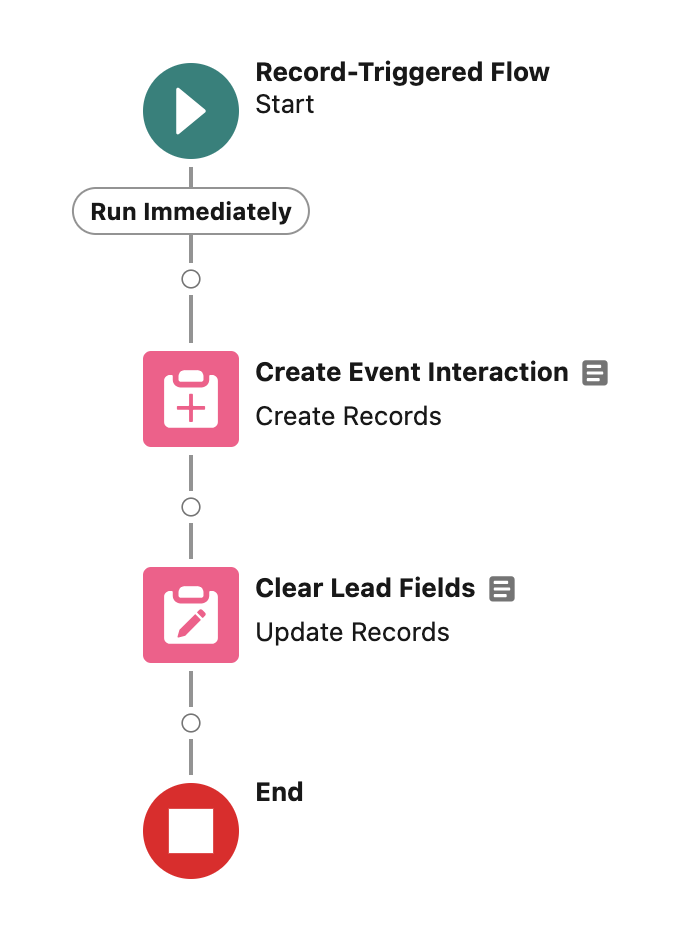
First, we want to create a flow for Leads. This flow will fire whenever a record is created or updated. The Entry Criteria are that the Event Name is not blank and is not “N/A”.

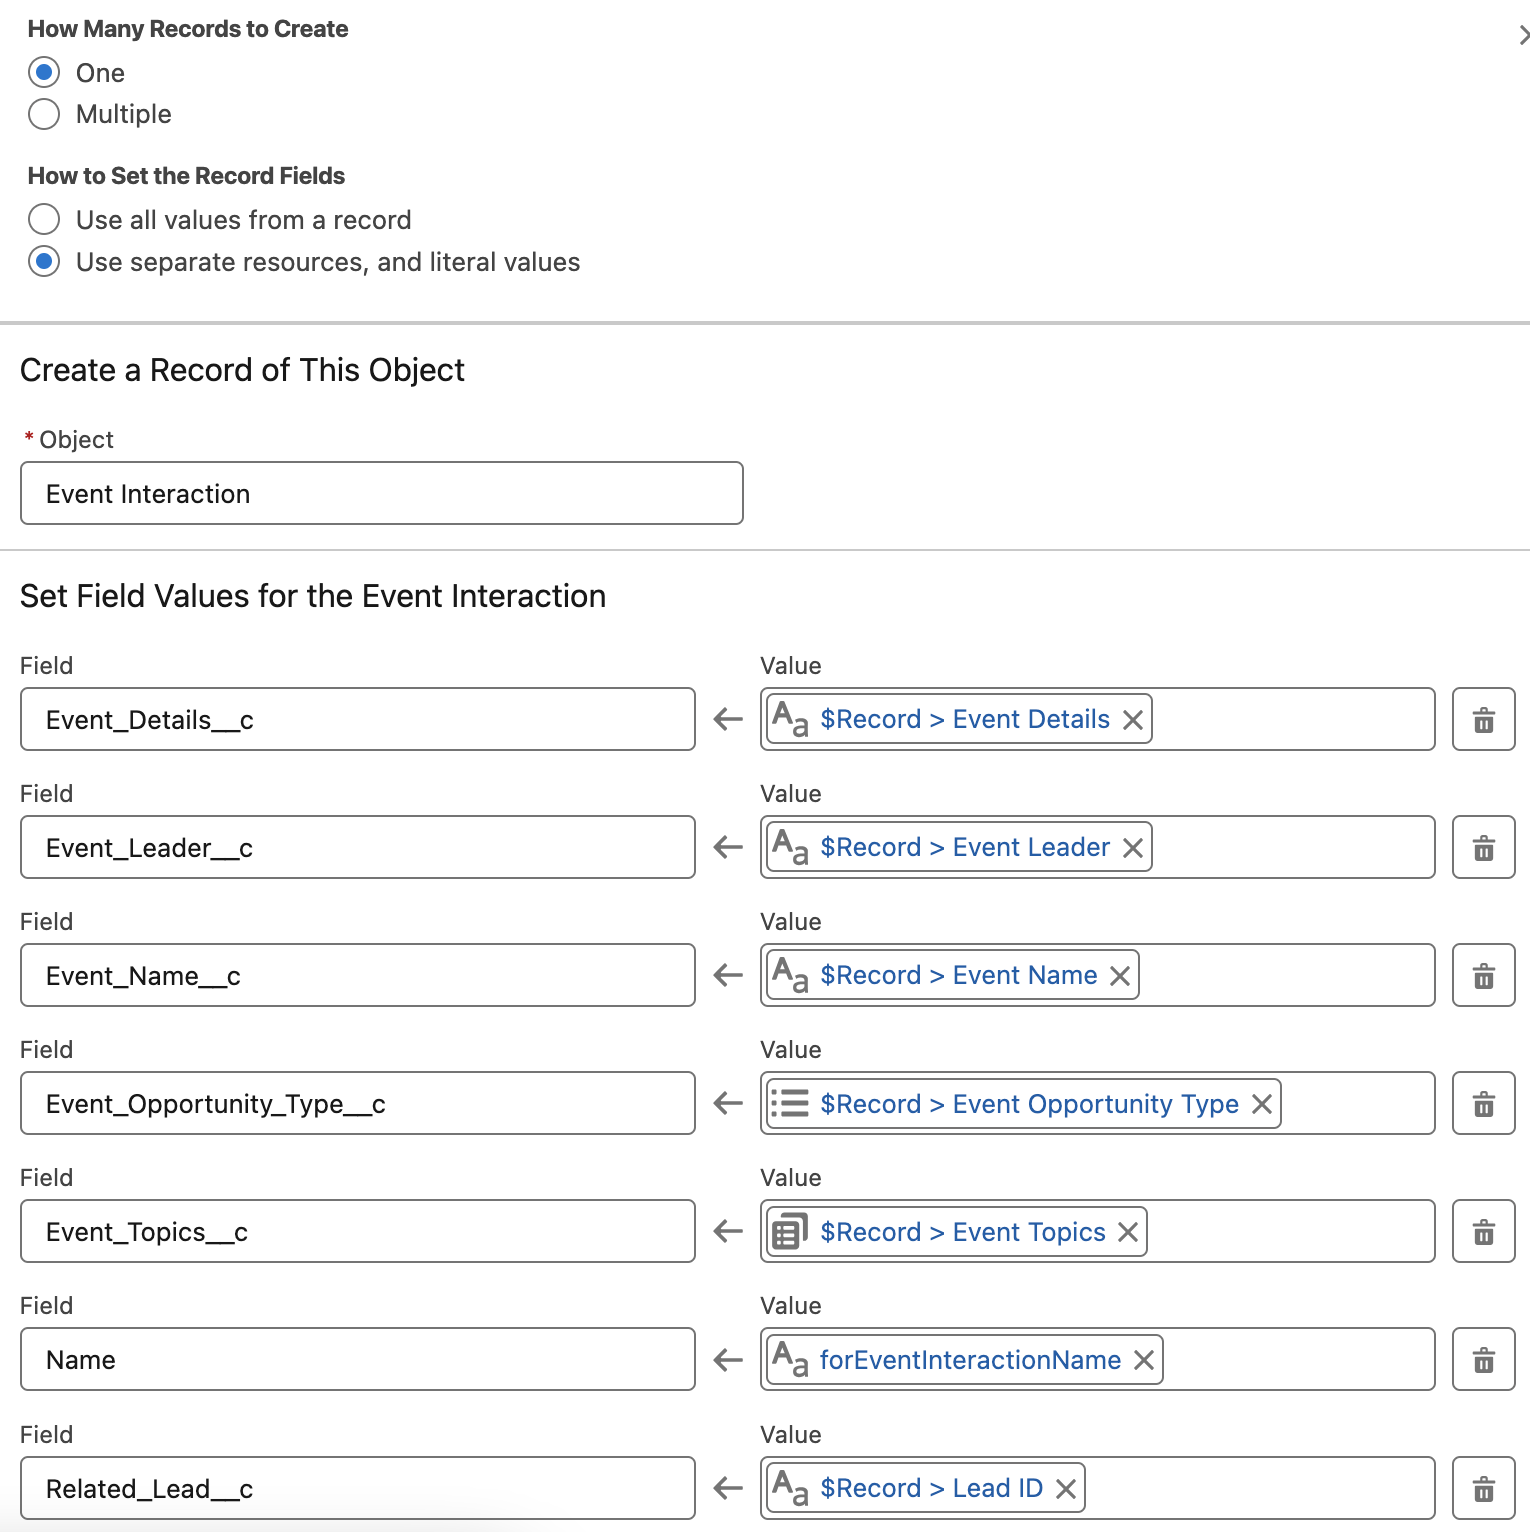
Next, use a Create Records element to create the new Custom Object record and copy the data from the Lead fields. Don’t forget to copy the Lead ID into the Lead Lookup field!

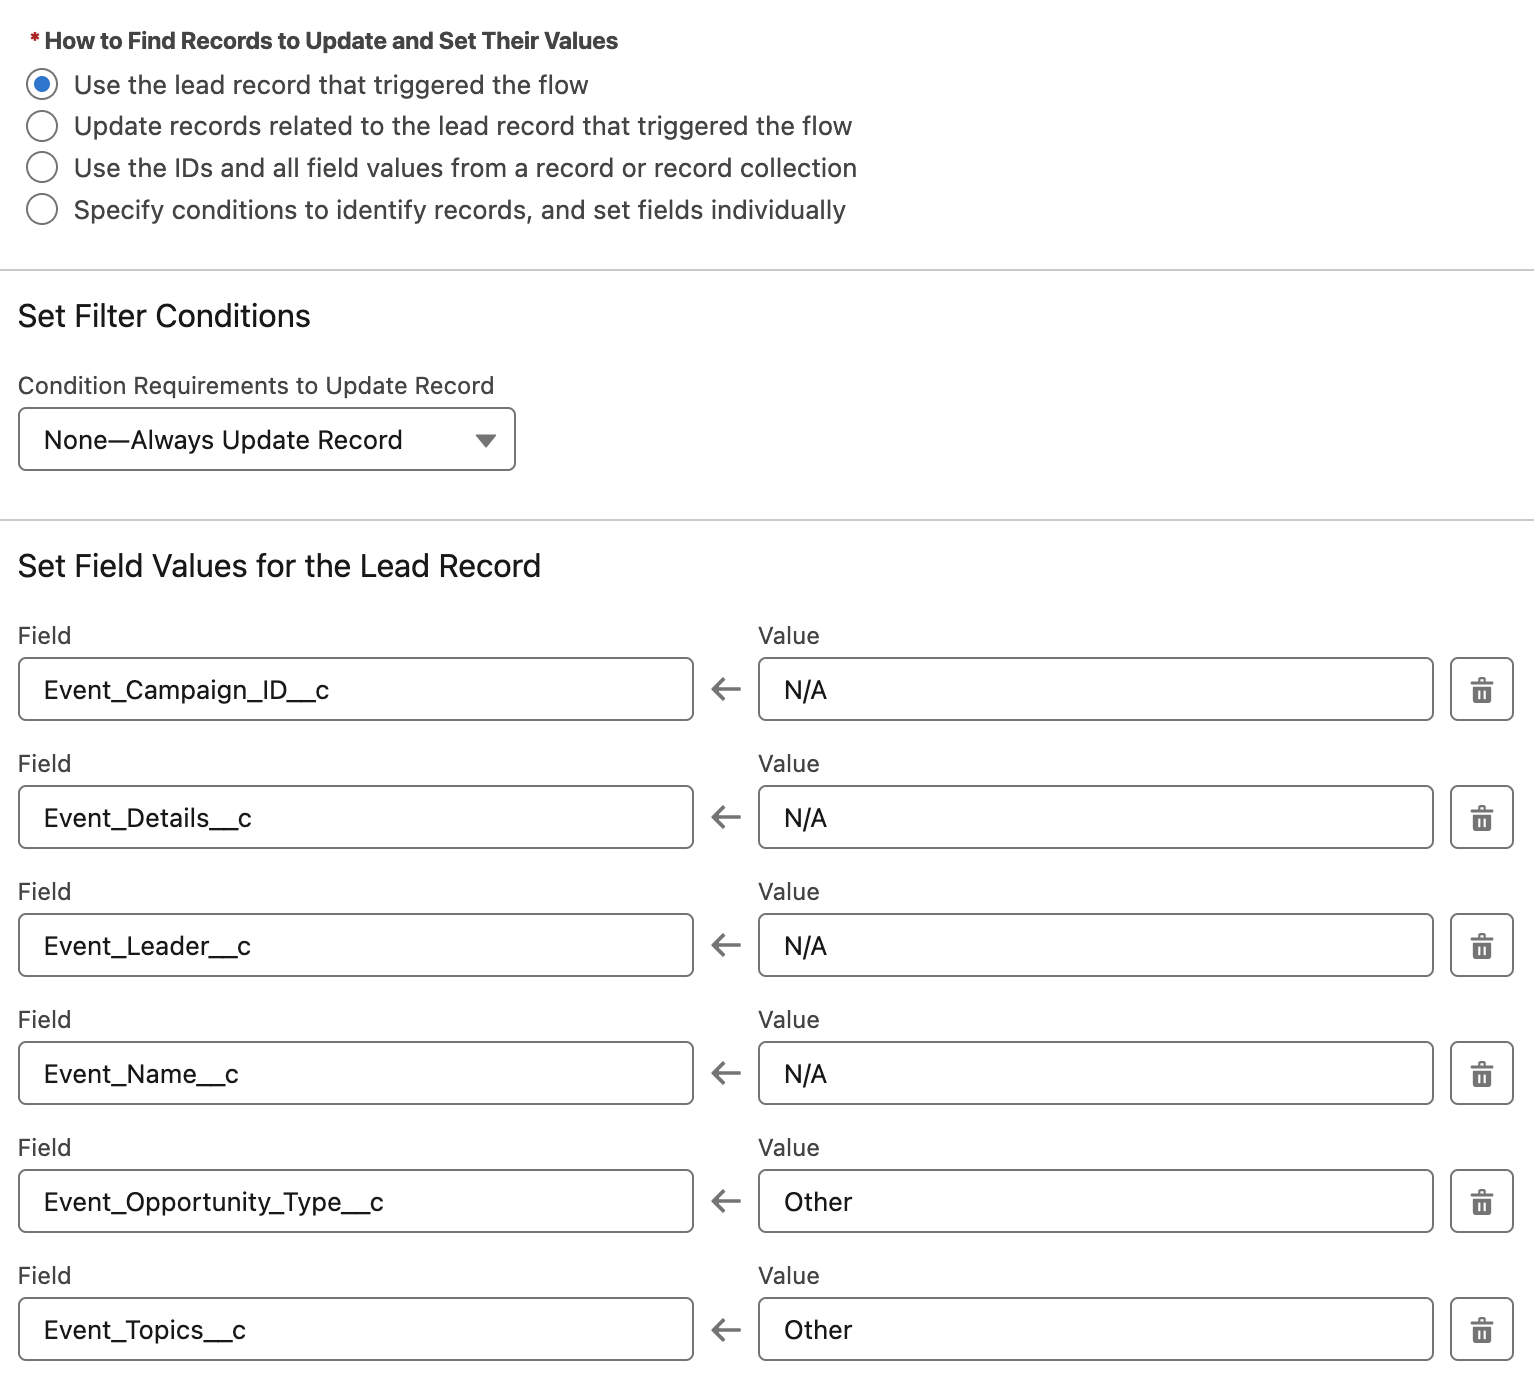
Finally, use an Update Records element to change the Lead’s Event Interaction fields to “N/A” or “Other” so that they are ready to be used for the next Event Interaction. We’re using “N/A” and “Other” rather than clearing out the fields completely to avoid Account Engagement syncing the previous data back into the fields.

Now you just need to test and activate the flow, and Voila! Well, that and also create the same flow for Contacts. 

That’s It?

Yep, that’s it! This isn’t a groundbreaking process, it’s simply taking this process and using it in a new and inventive way. Since creating this process, we’ve found many uses for it in our org and client orgs, such as

  • Automatically creating an opportunity when specific forms are completed.
  • Creating custom objects that Account Engagement doesn’t typically interface with, such as Service Tickets or Cases.
  • Capturing form fills and their current field values at a moment in time for future reference/action.
  • Creating “Sales Inquiry” records rather than Leads and assigning these records to Sales.
  • Creating custom UTM Touchpoint records.

What other uses can you imagine for this process? Let us know in the comments!
It’s here! It’s finally here! It’s the Account Engagement Business Unit Bulk Asset Copy Flow.
Marketing Cloud Account Engagement (f.k.a. Pardot) Business Units have become my niche over the past few years. I love setting them up and standardizing them, but I don’t love copying over assets when configuring a new Business Unit(BU). 

With the Summer ‘23 release, we can now use Salesforce Flow to copy:

  • Custom fields
  • Engagement studio programs
  • Files
  • Custom redirects
  • Email templates
  • Form handlers
  • Layout template
  • Dynamic Content

Note: This blog post was updated on November 2, 2023, to include the three new Assets types that were recently added to the flow!

Access the Account Engagement Business Unit Bulk Asset Copy Flow

During the Summer ‘23 release, your org should have received a new flow called “Account Engagement Bulk Asset Copy Flow.” 

To find this Flow: 

  1. In Salesforce, navigate to Setup > Flow
  2. Select the Account Engagement Bulk Asset Copy Flow
  3. From the Flow Builder, select Run

Set up the Flow

The flow itself is pretty straightforward. It will walk you through selecting your assets and setting the new asset details.

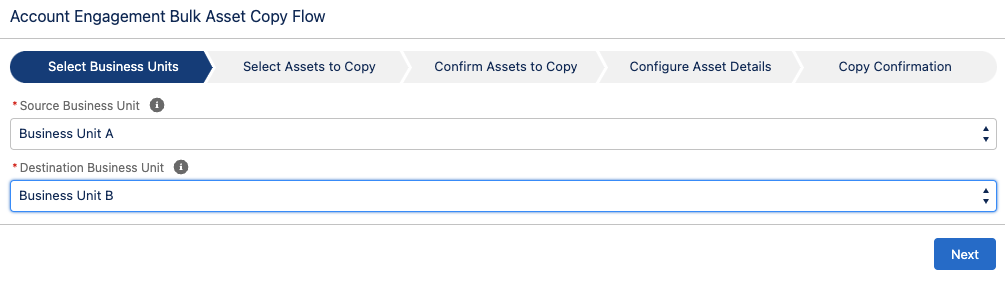
  1. Select your Source and Destination Business Units, select Next
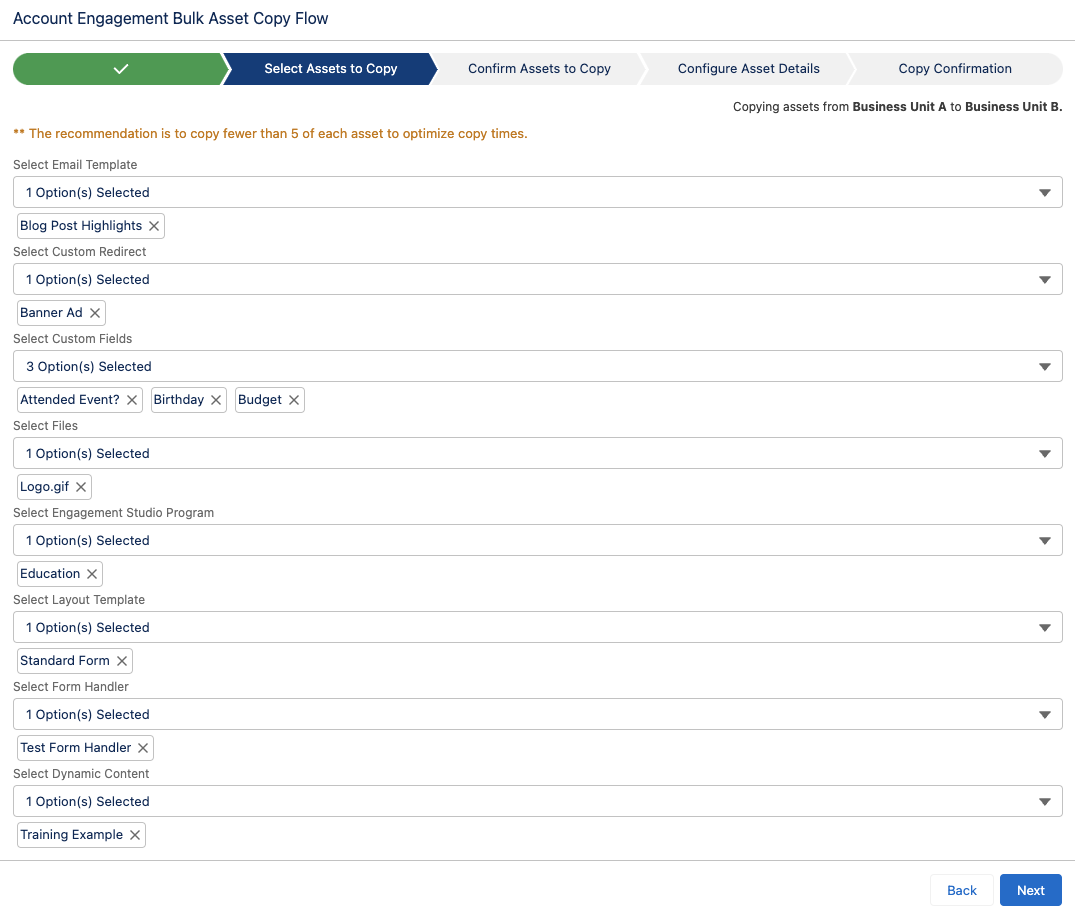
  1. Select the assets to copy, select Next

Note: Keep in mind, all assets selected here will be copied to the same Folder, will be assigned the same Campaign, and use the same tracker domain. You may want to run the Flow multiple times if your new assets need to have different settings. 

  1. Confirm the Assets, select Next
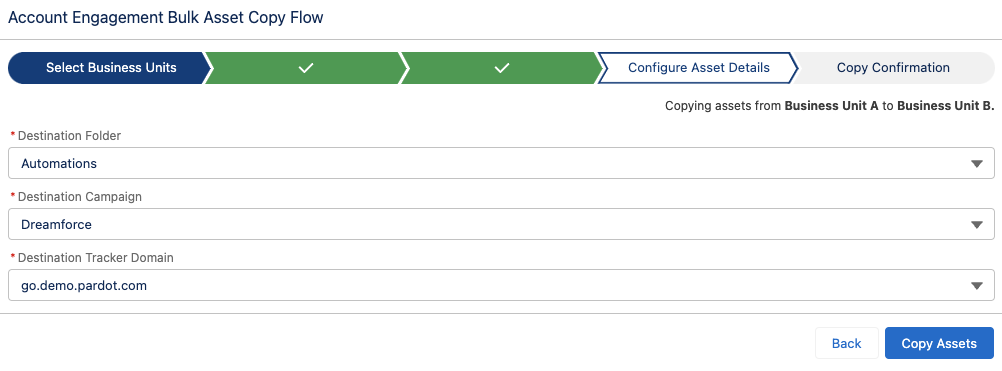
  2. Select your Folder, Campaign, and Tracker Domain for your new assets
  1. Select Copy Assets

Bulk Asset Copy Confirmation Screen

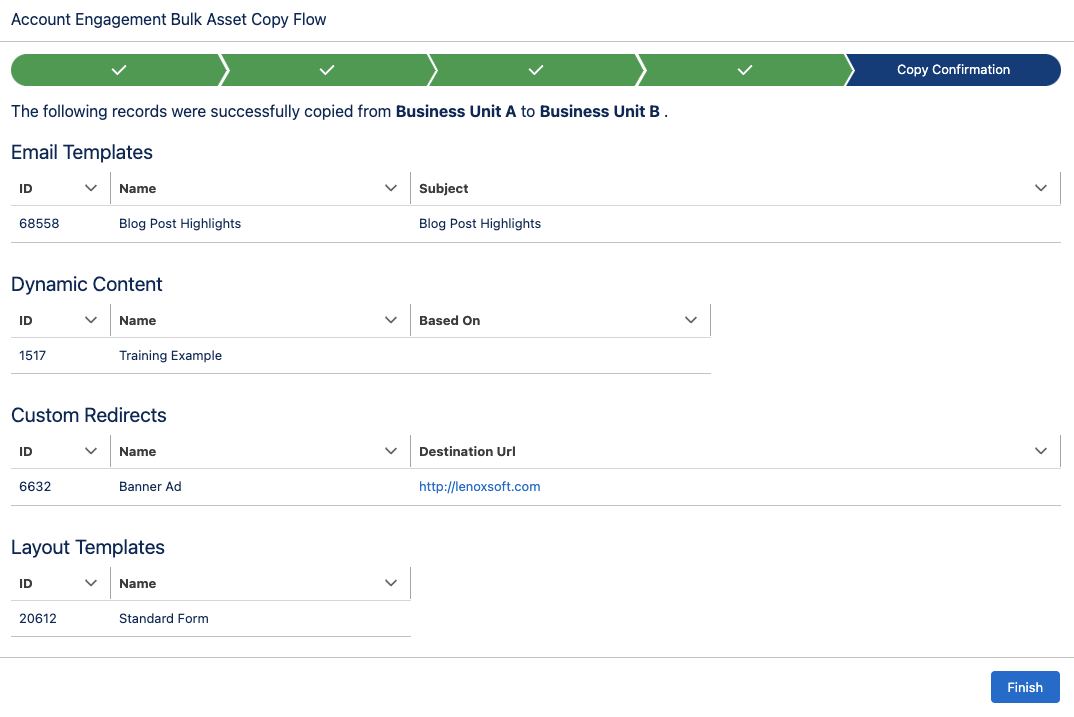
If your action was successful, you will see the list of assets created on the Confirmation screen.

You don’t get an error message if your action was unsuccessful, but your confirmation screen won’t have any/all assets listed.

Considerations for Using Business Unit the Bulk Asset Copy Flow

Since this is a brand new capability for Account Engagement, there are some details and settings that do not come over when copied. I thoroughly tested each asset type and below are the considerations that I found. 

Custom Fields

When you copy custom fields from one Business Unit to another, only the following information comes over

  • Field Name
  • Field API Name
  • Field Type

The field’s mapping to Salesforce, Salesforce sync behavior, predetermined values (for dropdowns, radio buttons, etc.), and optional settings will not be configured.

Email Templates

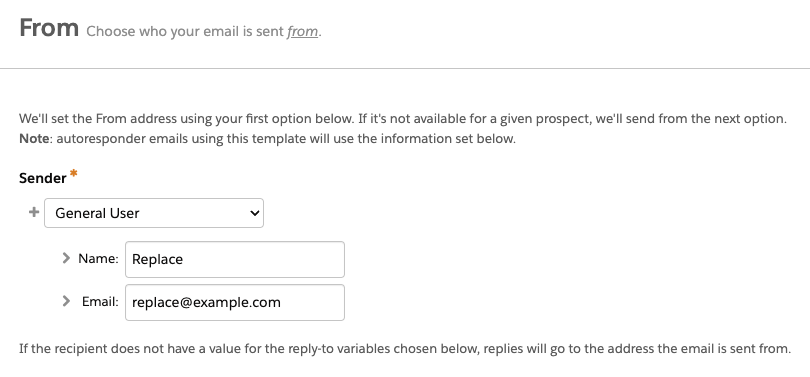
  • When copied, the email sender will be replaced by a General User with the email [email protected]. This applies even if you have a sender hierarchy specified using “Assigned User” and ‘Account Owner.”
  • Email Templates containing Dynamic Content will not copy over.  This is because dynamic content is unique to the Business Unit. Even if you have the same Dynamic Content in each Business Unit, they will have a different asset ID and merge tag. 
  • Watch for email template nuances between BUs. If you copy an email template from Business Unit A to Business Unit B, make changes to Business Unit A’s template, then copy the template from Business Unit A to Business Unit B again, the flow will not update the existing template in Business Unit B. Instead it will create a brand new email template with the updated changes. 

Files

During my testing, I was only able to get image files to copy over view the flow. I tested .pdf, .ics, and .css files with and without Completion actions and was unable to get anything but images to successfully copy. 

Engagement Studio Programs

  • When you copy an Engagement Studio Program (ESP) to a new Business Unit, only the ESP structure is copied. The Recipient List, Suppression lists, Send days/times, and “Allow prospects to enter more than once” settings do not come over and will need to be reconfigured in the new Business Unit.
  • The assets specified in a Trigger or Action node, such as email templates, landing pages, and forms, will need to be reselected in the new ESP. However, the number of wait days specified in the node will copy over. 
  • If an Action node looks at a Prospect field (i.e. Prospect default field “Job Title” is not blank) and that field is in both business units, then the node will be copied to the new ESP with the field and value/settings specified. If the field does not exist in both business units, then the Action node will still be in the ESP but the field and value/settings will need to be reconfigured. 

Custom Redirects

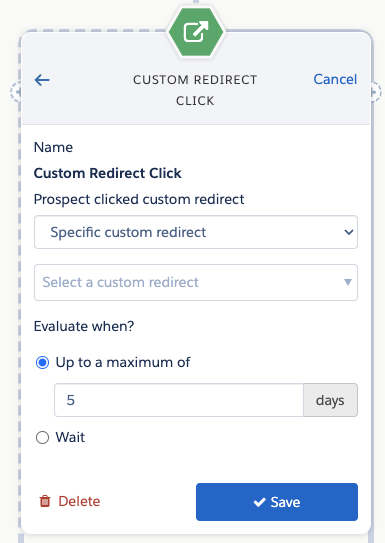
When a Custom Redirect is copied from one Business Unit to another, the redirect’s Completion Actions will not copy over, however, the Google Analytics Parameter values do.

Layout Templates

If you use Dynamic Content within your Layout Templates, keep in mind that the Dynamic Content will not come over when the Layout Template is copied. You can copy the Dynamic Content over as a separate asset, but you will still need to edit the Layout Template in your destination Business Unit to make sure it has the correct Dynamic Content ID. 

Form Handlers

If your Form Handler only uses Default Prospect Fields, then all of the fields will come over when the Form Handler is copied. However, if your Form Handler uses any Custom Prospect Fields, only the “Email” field will be present in the Form Handler Copy. In my testing, this was true even if the Custom Prospect Field was in both Business Units. When copied, the Success Location and Error Location details will copy over to the new asset. Completion Actions do not copy over.

Dynamic Content

If the Dynamic Content depends on a Custom Prospect Field that is not already in the destination Business Unit, the copy will fail. To copy over Dynamic Content that depends on a new custom field:

  1. Run the Bulk Asset Copy Flow to first bring over the Custom Field
  2. Once finished, run the flow again to bring over the Dynamic Content
    • If you try to create both the Custom Field and the Dynamic Content in the same run, it will fail. 

Now it’s even easier to work with Account Engagement Business Units

This new Flow is a huge step toward making Business Units easier to set up and manage. My hope is that the capabilities of this Flow will continue to grow until we can make a near-identical copy of an entire Business Unit. 

What other capabilities would you like to see in this Flow? Let us know in the comments!

Contrary to the opinion of just about everybody in marketing, all your marketing leads are not “Hot” and the sales team is not lazy. The issue is that sales wants marketing to send them the right leads with the right expectations. In this post, we’ll address ways to improve the marketing lead handoff process using Salesforce and Account Engagement (Pardot) so sales and marketing can live in harmony.

The Problems with Marketing Leads

Before we can address the issues that sales teams have with marketing leads, we must first identify them. Below are the most common issues that I’ve encountered as a marketer (20+ years) and as a consultant. While all these issues might not apply to you, I bet more than a few will.

Top Sales Issues with Marketing Leads 

If you have issues that are not included in this list, please share them by dropping a note in the comments!  

Poor Quality/Bad Data

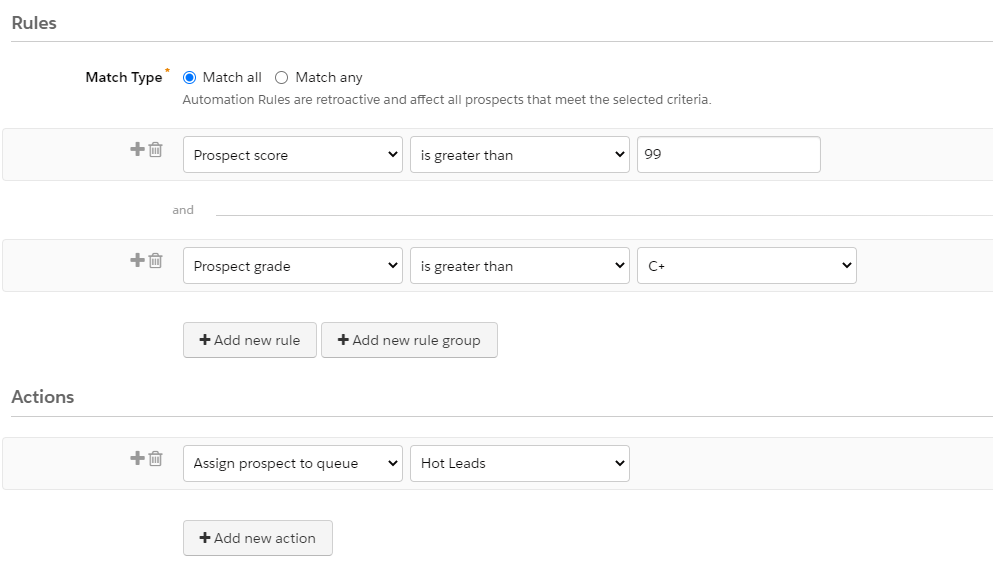
Let’s start with data quality. Marketers have the ability to control what prospects sync from Account Engagement to Salesforce. Most often, this is based on a prospect achieving an agreed upon score & grade threshold. A rule could look something like this.


This rule assigns prospects to the Hot Leads queue when they achieve a score of 100 and a grade of B- or higher. Seems pretty solid?

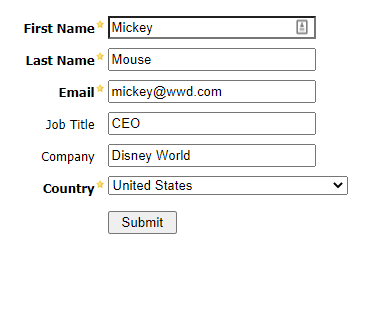
This is a good start, but not perfect. Let’s say that a demo form on your website adds 50 points (in addition to the 50 that included in the default scoring model for a form fill). Let’s also assume that your grading model adds a full letter grade for prospects in the United States and another full letter grade is added based on job titles that include CEO.

If your form was completed with the data below, guess who would be assigned to the Hot Lead queue, synced to Salesforce, and assigned to a member of your sales team? Sending over leads like this is the fastest way to sour your sales team on marketing leads.

Keeping Bad Data Out of Salesforce

The example above is not uncommon and is a step up over blindly assigning all prospects from Account Engagement to a queue, but we can do better.

At Sercante, we use a tool named Prospect Updater for Pardot that was created by our labs team. This tool can be used to fix, enhance, and enrich prospect data before it enters Salesforce. Here’s how we leverage Prospect Updater in our organization.

  1. Visitor fills out a form and a new prospect is created in Pardot.
  2. Prospect updater runs and marks a custom field as “Suspected Spam” or “Not Spam” based on criteria that we defined.
  3. Assignment automation rules run (in Account Engagement) and only match prospects with a value of “Not Spam” – ensuring that “Suspected Spam” records do not enter Salesforce.


This example just scrapes the surface of what Prospect Updated can do.  See more Prospect Updater examples and use cases.

Want to know more about how Prospect Updater keeps spam out of our org? Check out this post.

Unrealistic SLAs/Expectations

I’ll admit that I’ve been guilty of having some unrealistic expectations in the past. Does this sound familiar? You just got back from a week at that huge trade show in Las Vegas with several thousand leads that are gold and need to be called immediately.

The truth is that there is some gold in your pile of leads, but they are not all worthy of sales follow up. So what should you do?

Managing SLAs & Expectations

  1. Agree to what constitutes a Hot Lead first.
  2. Collaborate with sales leadership to agree to follow-up SLAs (Service Level Agreements).
    • Hot Leads – 24 Hours
    • Warm Lead – 3-Days
  3. Understand the volume of lead that the sales team can follow-up on.
    • If thousands of leads meet your Hot Leads criteria and sales can only follow-up on hundreds, your definition needs to be refined or you need more sales people.
  4. Ensure leads are tagged with a priority rating so the proper SLA can be applied.
    • At events, this could be adding a note when you have conversations with prospects.
    • For prospects entering Account Engagement, this could be based on scores, lead sources, or specific form/form handler submissions.

Marketing Leads Are Too Cold/Don’t Know Who We Are

Let’s go back to the trade show example. Your marketing team has done an awesome job of identifying the “must have” swag item and everybody is flocking to your booth to get one. The team is frantically scanning badges and moving to the next eager person in line. Are these leads that should be sent to sales?

Here’s another one. Your marketing team is generating hundreds of leads per week by syndicating content on a third party site. People are gobbling up your content, sales is going to love these leads!

In both scenarios, these leads should not meet your Hot Lead definition (based on these activities alone) and should not be sent to sales for follow up. It’s highly likely that these people don’t even know what your company does. They came by your booth because of the great swag or downloaded a piece of content related to a specific interest. These are prime leads for a nurturing program.

Warming/Education Nurture

Before sending those leads to sales, warm and educate them with Engagement Studio. This is an area where Account Engagement excels — use it! 


When creating your nurture program, keep the following in mind.

  • Prospects showing buying signals should be sent to sales as quickly as possible
  • Prospects don’t need to complete all steps before being sent to sales
  • Not all prospects are ever going to be sent to sales (and that’s OK)
  • Don’t add scores at random just to make prospects “score up” to your hot lead criteria

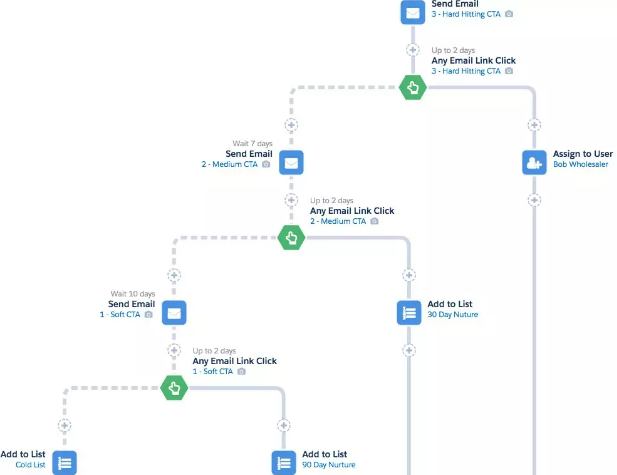
I like the 3-2-1 Campaign recommended by Salesforce. It basically inverts the traditional logic by focusing on hard hitting CTAs first in an effort to identify those with immediate interest and fast tracking the handoff to sales. As an example, your first CTA might be to schedule a demo vs. reading your latest white paper.


Learn more about the 3-2-1 Campaign in the Engagement Studio Best Practices module in Trailhead.

Whether you find the traditional or 3-2-1 Campaign works best for your organization, the point remains that leads need to be warmed before sending your sales teams. Sending cold leads over to sales is a surefire way to create a jaded team. 

No Background Information

This lead is supposed to be hot and I’m supposed to follow-up within 24 hours, but I have no idea why or what they are interested in. Could you imagine following-up with a lead in this situation? How about hundreds of them? That’s how sales feels if you don’t enable them with information. Fortunately, Salesforce and Account Engagement have us covered here too.

Arm Sales with Data

Here’s a list of ways we can provide data to our friends in sales.

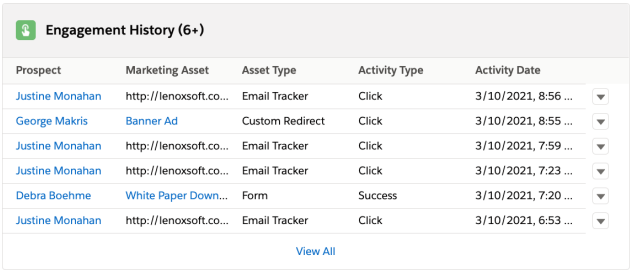
  • Engagement History Related list
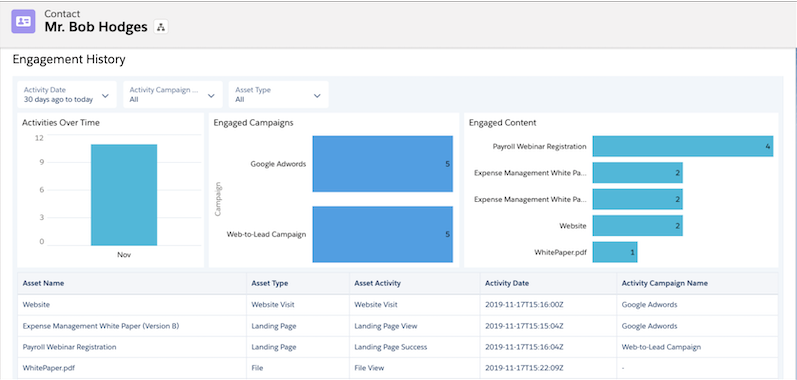
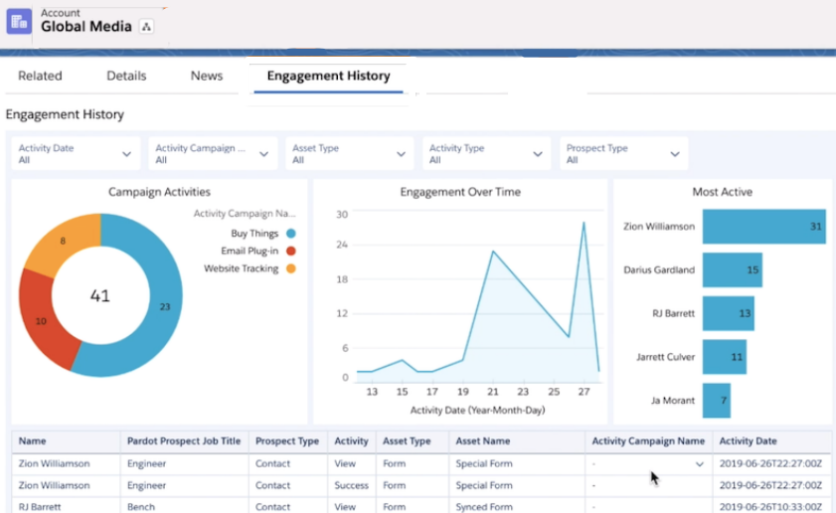
  • Engagement History Dashboards
  • Scoring Categories Related list
  • Custom fields


Let’s look at all of these in a bit more detail.

Engagement History Related Lists 

This displays a feed of a recent engagement from Account Engagement in Salesforce. This list can be added to account, contact, lead, and person account page layouts to provide engagement information for sales and all other users in Salesforce.

Engagement History Dashboards 

These dashboards are powered by CRM Analytics and provide a way for users to see and interact with data on accounts, contacts, leads, and person accounts. These dashboards do require permissions to be granted to users in Salesforce and the number of licenses are limited by your edition.

Scoring Categories Related List 

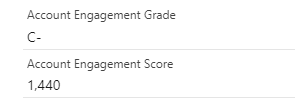
Most organizations add Account Engagement score and grade fields to their page layouts. This is a great way to show sales the total score that leads and contacts have accumulated, but it does not provide any insight into interests. That’s where scoring categories come in.

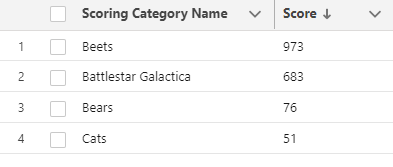
Scoring categories allow you to break down the total score in Account Engagement by categories that you define (up to 50). This allows you to see what that prospect is interested in. Note that scoring categories are only included in Plus, Advanced, and Premium editions of Account Engagement.

Account Engagement Grade and Score (in Salesforce)


Account Engagement Scoring Categories (in Salesforce)

The total score of 1,440 does not help the sales team at all. However, the scoring category provides information on topics of interest (Beets) and topics of little interest (Cats).

Custom Fields 

Custom fields are another great way to share information with your sales team. Fields can be created in Account Engagement and synced to the corresponding fields on contact and lead records. Custom fields can vary from organization-to-organization, but here are a couple that I find useful.

  • Asset/Event Name – Capture the name of the last asset that a prospect downloaded or the name of the most recent event that they registered for/attended.
  • Last Form Completed – Let sales know the name of the last form that a prospect completed. This can be used to customize tasks created in Salesforce too!

Incorrect Lead Assignment

Assignment is always a bit of a sticky one. You can do assignments from Account Engagement, but it’s not something that I would recommend.  Engagement Studio can be used for simple assignments, like assigning leads to a queue, but it’s not intended to do direct assignment to specific sales people based on specific territories. It’s best to leave individual assignments to a tool that’s designed for that purpose.

Popular Lead Routing Tools

When looking at lead routing tools, consider the needs of your organization. Assignment rules in Salesforce are great, but only one assignment rule can be active on the lead object. This can become an issue if you have more complex rule logic. You can reassign leads using lead assignment rules, but it requires flows and invocable actions.

Assignment rules have some limitations, but you also have plenty of options if they can’t support your needs. There are tools that allow you to build easy routing flows using tools that feel a lot like engagement studio and others that allow you to do geographic assignment using maps. Selecting the right tool for your organization is a critical decision. The best leads are not going to generate any revenue if they are sitting in a queue somewhere or have not been assigned at all.

Inability to Provide Feedback

Feedback from sales is an incredibly valuable tool. It helps keep sales happy by letting marketing know what leads they like and what leads they don’t. It also helps marketing know where to spend their budget to maximize their impact.

Remember those content syndication leads that we spoke about earlier? Maybe marketing generated a large number of leads at a low cost per lead, but sales found a large number had bad phone numbers or simply did not meet your ideal customer profile. How impactful could knowing this be to marketing? I bet they would change the spend allocation of their budget in a hurry with this data. The great thing is that this level of reporting is possible with disposition codes.

Lead Status and Disposition Codes

Lead status is used in Salesforce to represent the current status of a lead. Common values include: Open – Not Contacted, Working – Contacted, Closed – Not Converted, and Converted. These let you know the status a lead is in, but not the reason why.


This is a great start, but we want more. This is where adding a disposition code can help. Disposition codes are commonly used in call centers to classify the results of calls. This same logic can be applied to support the lead stage changes and provide additional insight to marketing and the organization as whole.

Once set up, disposition codes are required when moving a lead from one stage to the next. Field dependencies provide a list of relevant disposition codes for each status. In the example below, the user is required to tell you “why” the lead needs to be nurtured when updating the status to Open – Nurture.


Disposition Code Uses

  • Timely indicator of lead quality
  • Tailoring of follow up communications/nurtures
  • Identifying records to suppress from marketing communications
  • Determining records to delete from Account Engagement

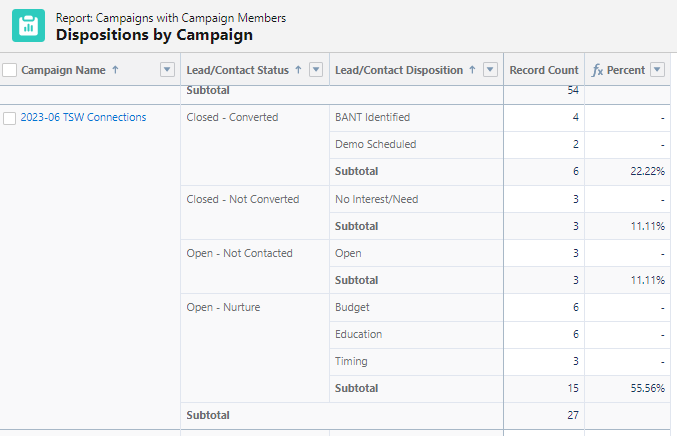
The disposition code field can be used to create reports in Salesforce for increased visibility. These can be a huge asset for marketing when planning how to allocate future budgets. I find reporting on disposition codes at the campaign level to be the most impactful. To do this, formula fields are used on the campaign member object to enable reporting on your custom fields. Check out Jenna Molby’s blog “How to Add Custom Fields to Campaign Members in Salesforce” to learn more. A record-triggered flow is also needed to update the contact status and disposition codes on the contact object then a lead is converted (but that’s a post for another day).

The end result is a really cool report that shows what happened to all the leads that were included in a campaign. Keep in mind that if a person is included in multiple campaigns, the same status and disposition code will display for both.

Here, I can quickly see that 22% of the leads from my 2023-06 TSW Connections campaign were converted to contacts (and why).  I can also see that 56% of the leads need further nurturing (and how they should be nurtured). By syncing the disposition code field to Account Engagement, the values can be used to enter prospects into targeted nurture campaigns based on their needs vs. a generic nurture program. Pretty cool!

Collaboration and Communication are Key

Sales and marketing are really on the same team. Both want to drive sales and both want to be able to show the impact of their efforts. By working together and addressing the issues discussed, you can create an environment where your sales and marketing teams are united and work together towards a set of common goals.

One of the most common assignment needs for Salesforce leads and cases is to circulate these via a round robin assignment process. But assignment in the marketing, sales or any other team for that matter does not necessarily stop at these objects. 

A common way to round-robin assign items is by using an auto number field and formula to create a round robin ID, which can be used in case or lead assignment rules or with other automation tools. 

But, this can sometimes be difficult to maintain when users leave the organization or change roles and responsibilities. It may also fall short when you have other process complexities, like handling holidays and PTO.

What if there was another way to manage the assignment of standard and custom Salesforce objects like leads, tasks, or opportunities? 

This blog will walk you through a custom opportunity Salesforce round-robin process. And what’s even better is that this solution can be used for lots of objects in Salesforce, which do not typically have assignment rules (or do!) 

Create Two New Salesforce Custom Objects
A custom assignment process can be created using multiple components and is intended to be more accessible to manage than other solutions with the help of two new custom objects.

To make the assignment of an object more manageable; we first need to create two custom objects; Assignment Group and Assignment Group Members.

Assignment Group

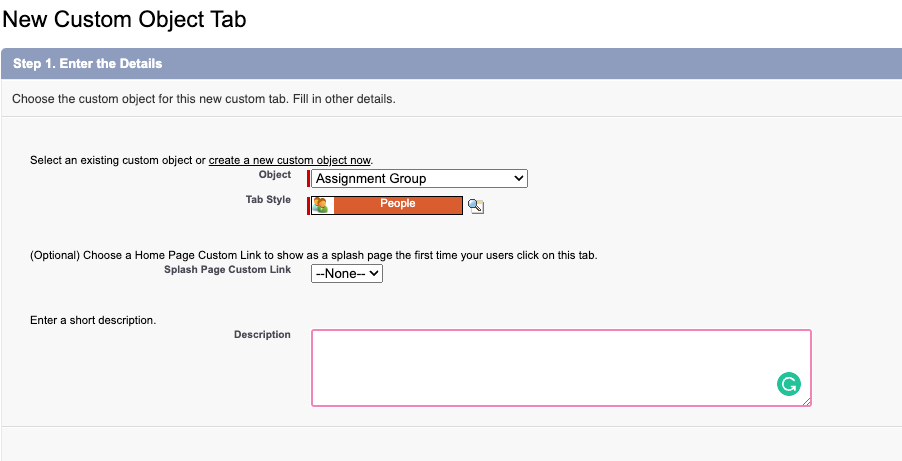
First create a new custom object called “Assignment Group.”

A record of this custom object signifies a group or team that you would like to round robin through to assign specific records (i.e. North America Sales Team). 

Assignment Group Member

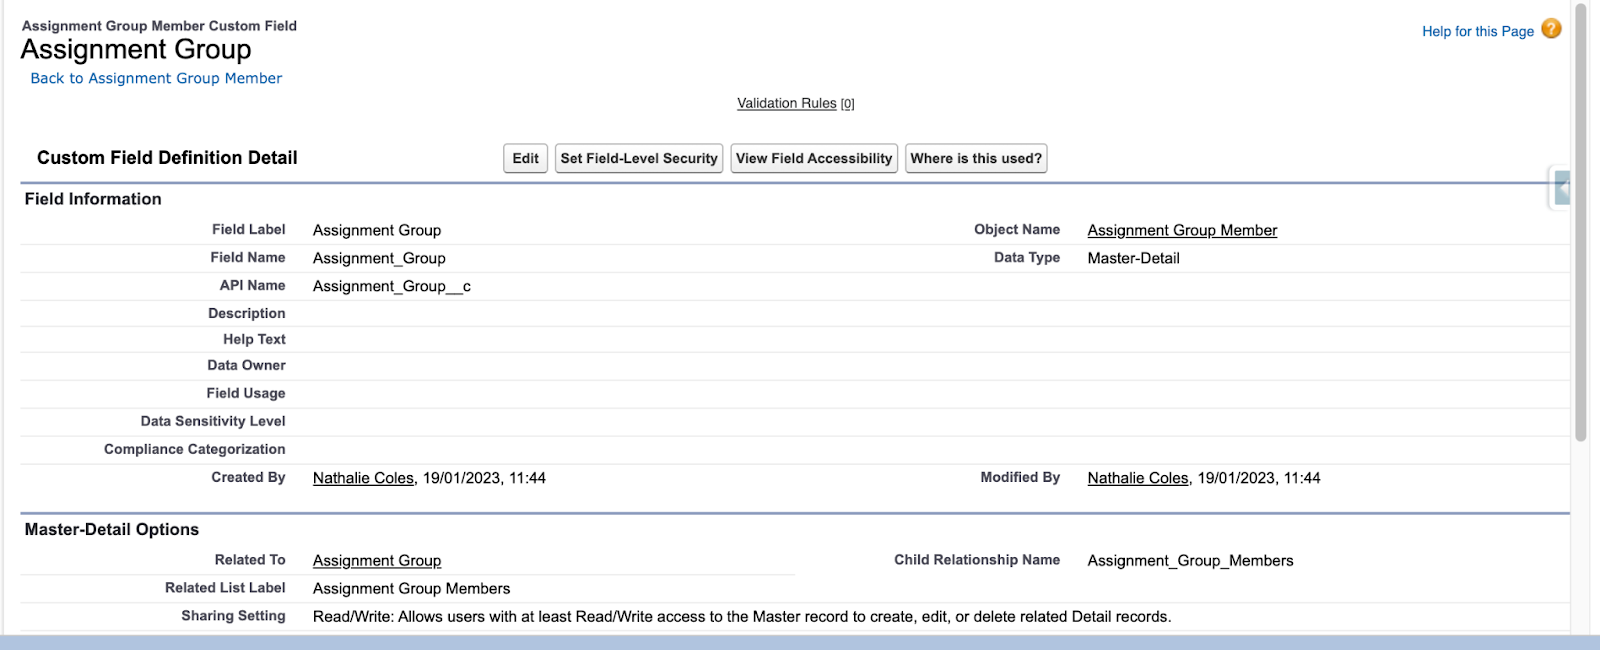
Create a second custom object called “Assignment Group Member” and create a Master-Detail Relationship on this custom object so that this is the detail record in the master detail relationship with Assignment Group. 

Next, add a lookup field to the Assignment Group Member to the User object and the following fields:

  • “Last Assignment Date” : Data Type: Date/Time
  • “Out of Office Start” : Data Type: Date
  • “Out of Office End” : Data Type: Date
  • “Active” : Data Type: Formula
    • IF(
    • Out_of_Office_Start__c <= TODAY() && TODAY() <= Out_of_Office_End__c,
    • FALSE,
    • TRUE)

TODAY()<= Out_of_Office_Start__c )

Create Your Assignment Groups & Members

Now that you have your custom objects built, you can create your Assignment Group Records. You may have one Assignment Group or Multiple; depending on the objects or groups that you like to assign. For example; you may have an Onboarding Assignment Group to Round Robin Onboarding Tasks within the Onboarding team and a Regional Sales Team to distribute opportunities to your Sales Reps in a particular region. 

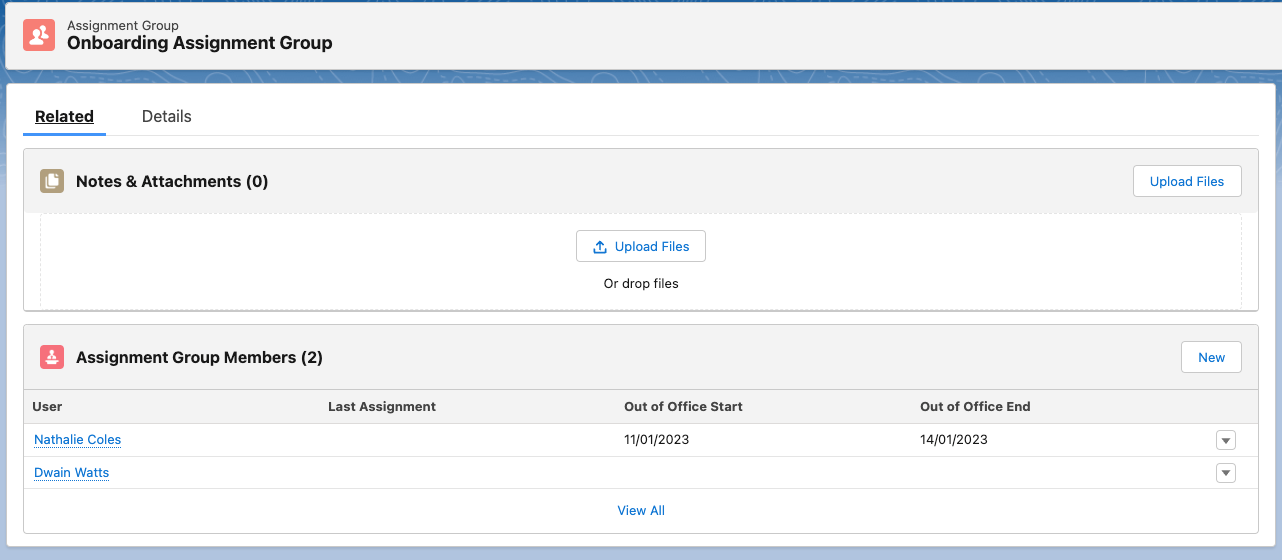
Once the groups have been created; you can add your Group Members. For a user to be part of the assignment queue, they must be part of the Assignment Group with their own Assignment Group Member record.  

Users must be related to the Assignment Group Member Record through the custom lookup field on the object. Additionally, the member will not be assigned records if the custom checkbox of “Active” is false. This checkbox is calculated based on the formula which assesses whether the current date/time is within the Out of Office Start and End dates.

The last assignment date can be manually edited but is filled in automatically within the Round Robin Assignment Flow.

Round Robin Assignment Flow

The final step to facilitate the assignment for a flow that is triggered when the record you are looking to assign is created (in most cases, although this could be triggered when a field is updated).

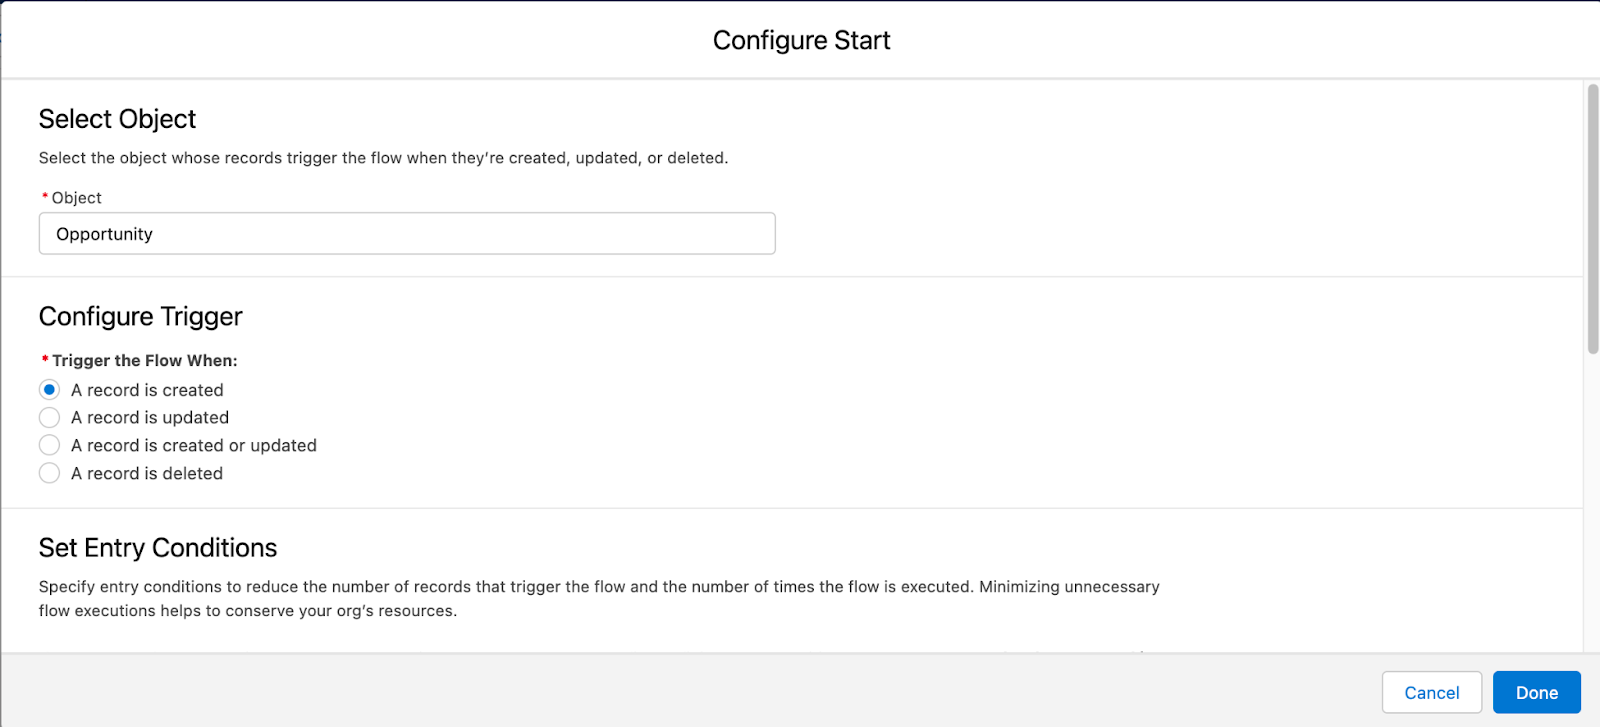
Create a record triggered flow

You can set this up by creating a record triggered flow, and selecting the object you would like this to be triggered on. Set your entry criteria for the flow, whether that is for a task with a certain subject or an opportunity at a certain stage.

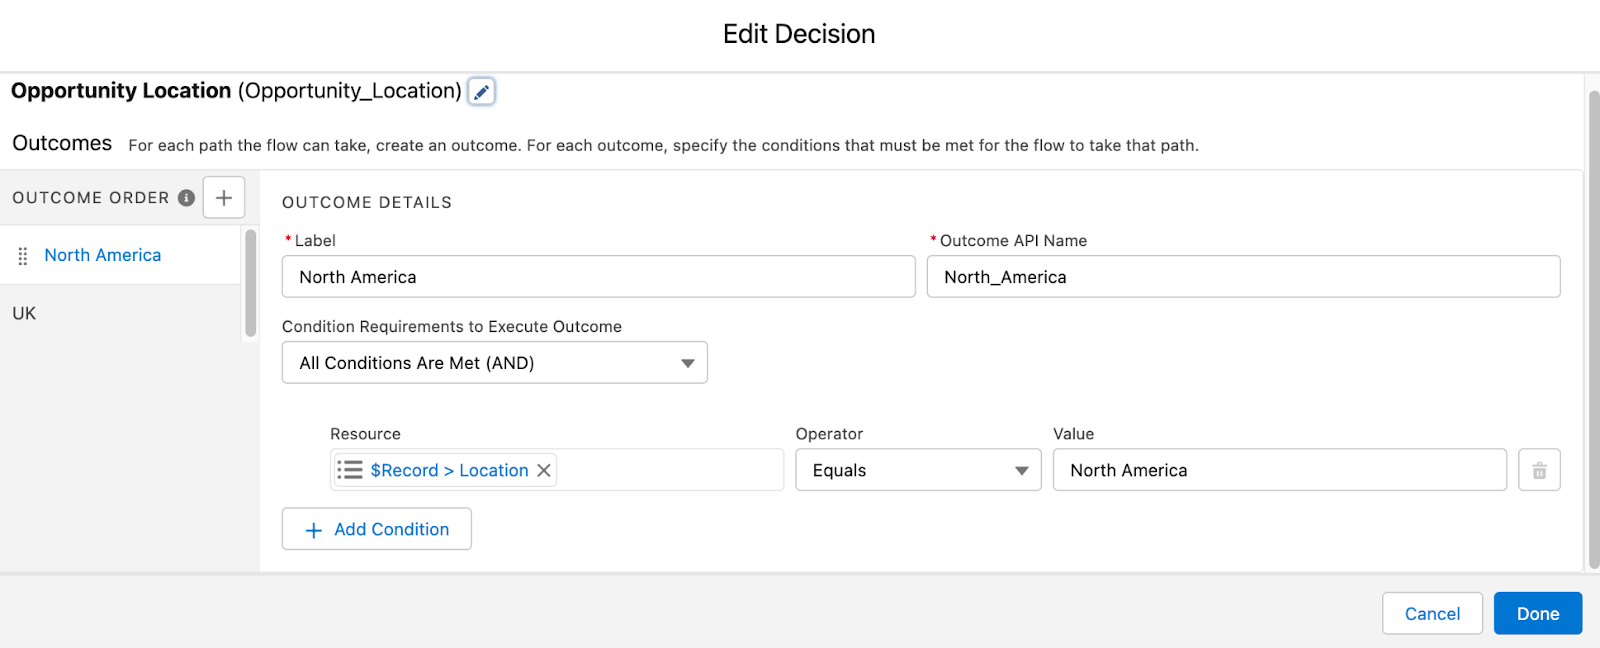
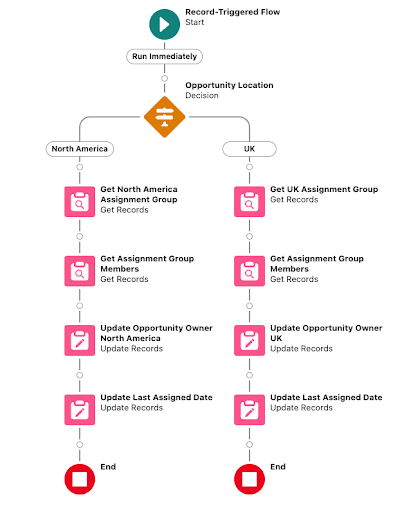
The second element in the flow is a decision element, which you can select by clicking on the plus under the entry criteria. This decision element has been added to decide the team/group to round robin and branch into two paths based on the opportunity location. If you only have one Assignment Group for this object, you can move onto the next stage without adding the decision element.

Add a Get Records element

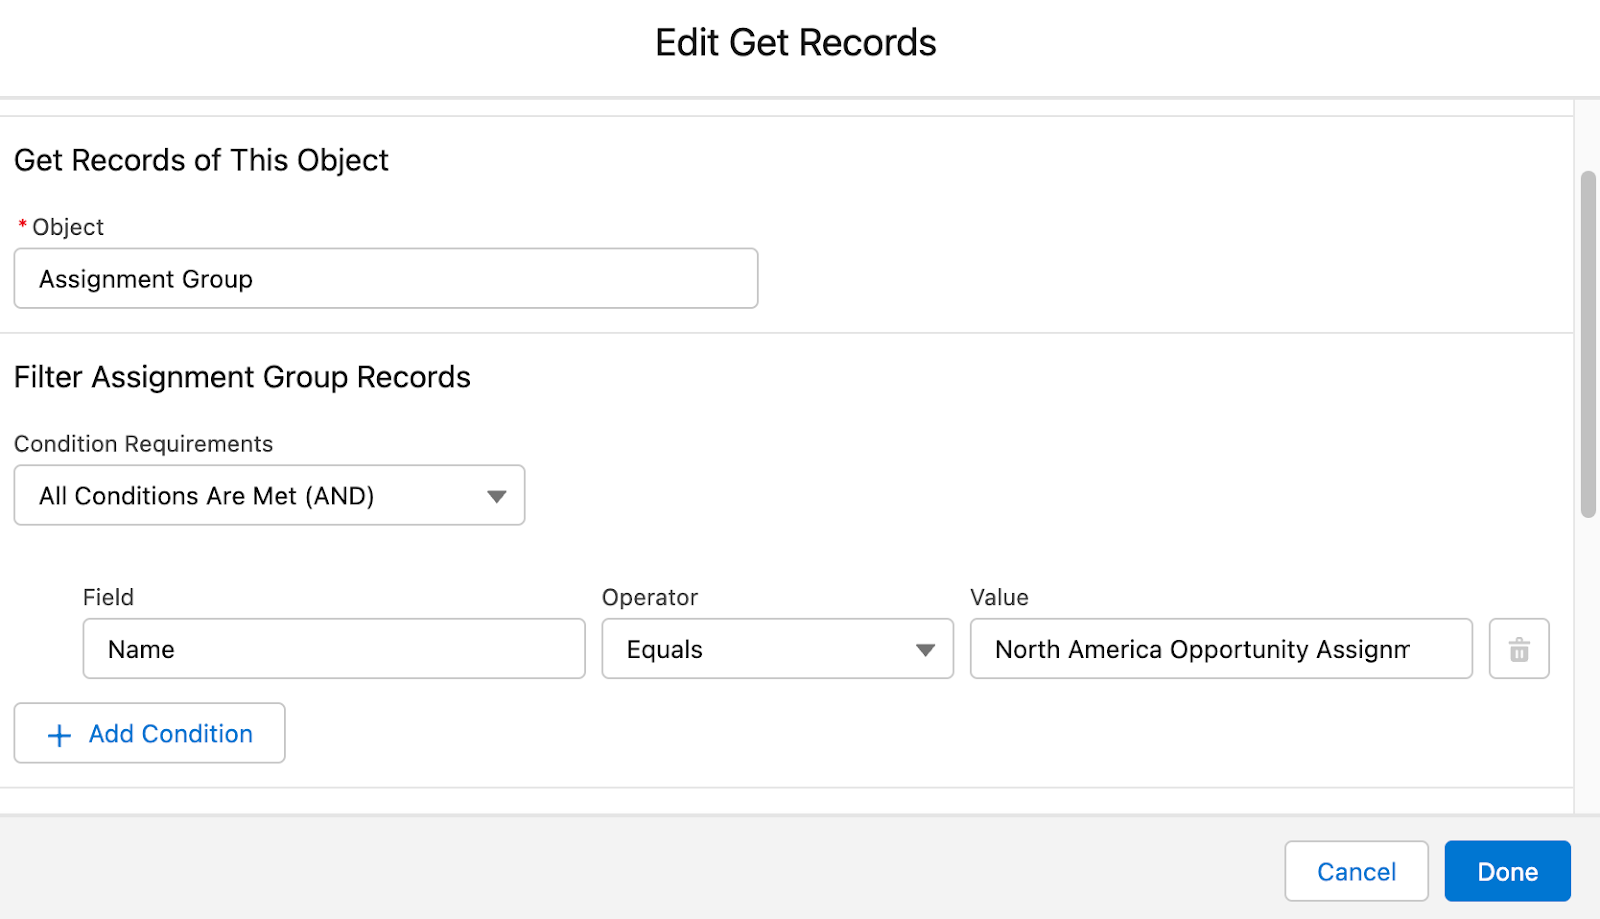
The next step in the flow is to add a Get Records element to find the relevant Opportunity group for the North America path. Add a filter to retrieve the Assignment Group record where the “Name” of the Assignment Group equals the relevant Group name which you would like to retrieve and store the first record only and store all fields.

Add second Get Records element

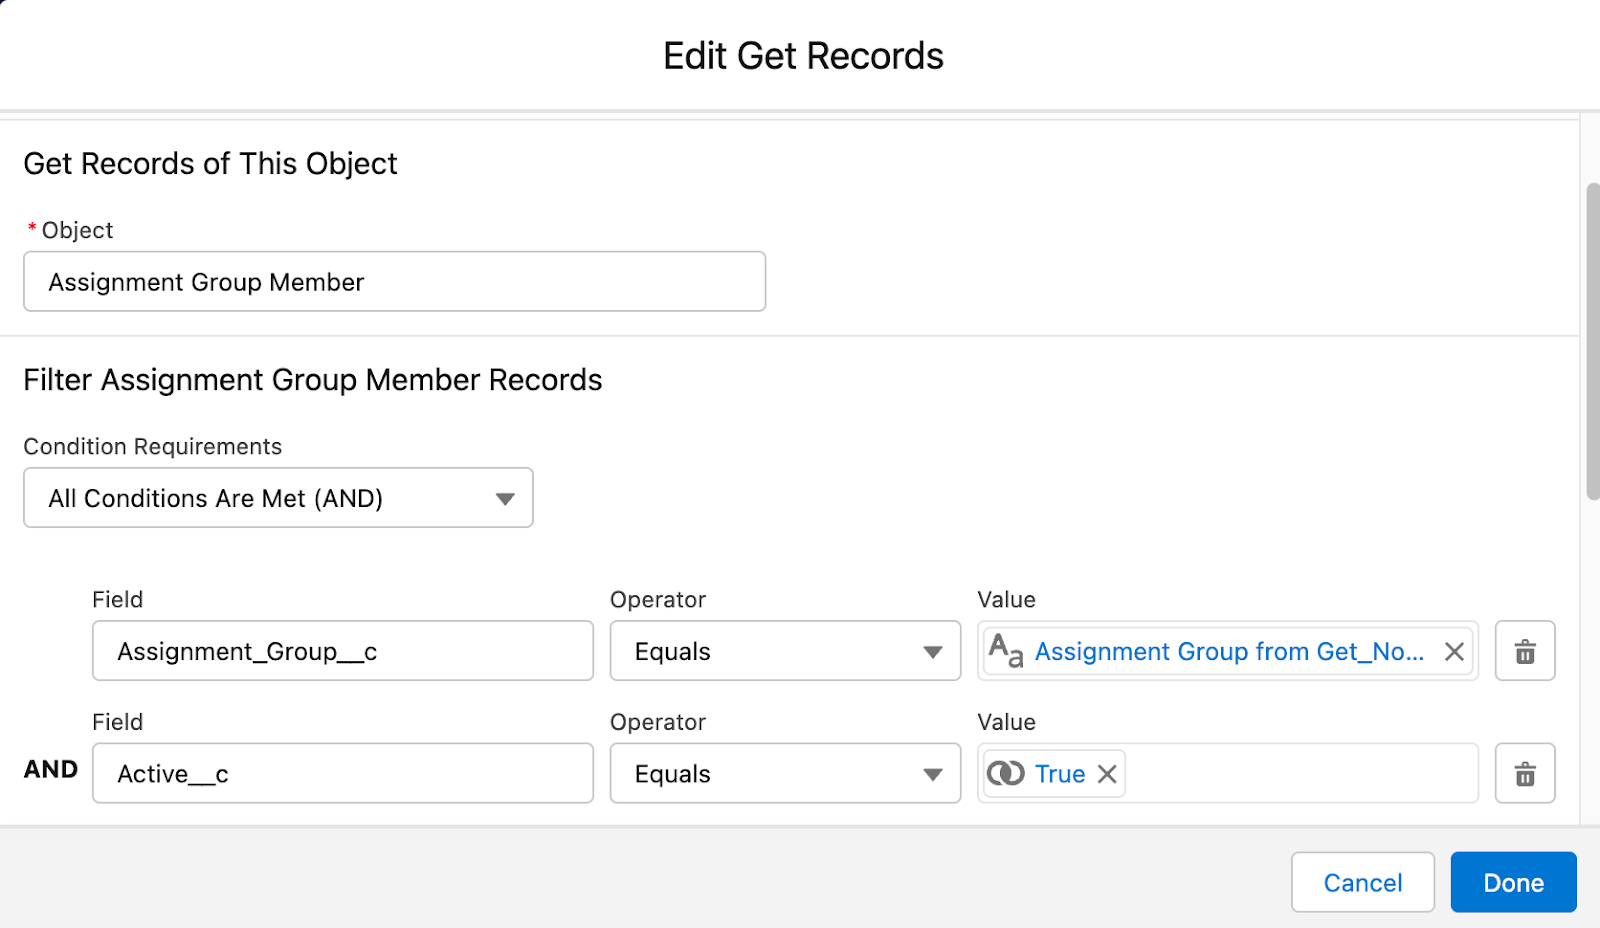
Next, add a second Get Records element after this to retrieve the Assignment Group Members in this assignment group. 

You can do this by selecting the object Assignment Group Member and entering the “Assignment Group” field, with the operator “equals” and the Assignment Group record Id from the previous Get records element. 

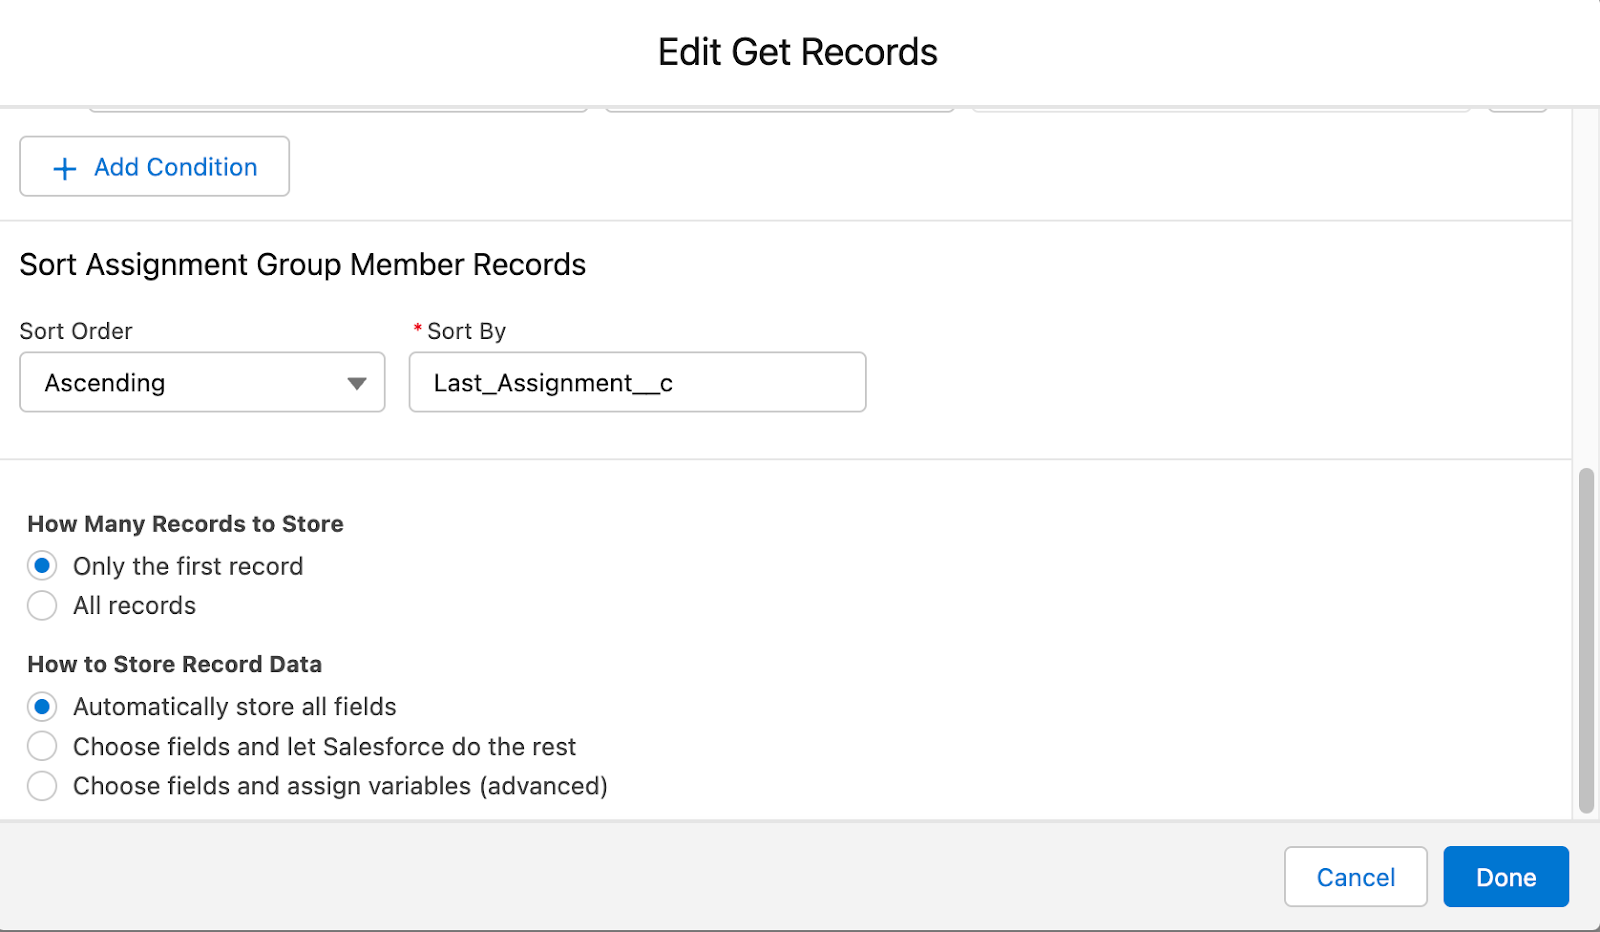
Add an additional filter to only return Assignment Group Members that are active (eliminating any Assignment Group Members on Annual Leave or Unavailable for Assignment).

This time, we will still retrieve the first record, but the sort order is key here to ensure that the round robin works as expected and the oldest recently assigned member is selected. You can do this by setting the sort order as “Ascending” and Sort by as “Last Assignment Date.”

Update the owner of the record

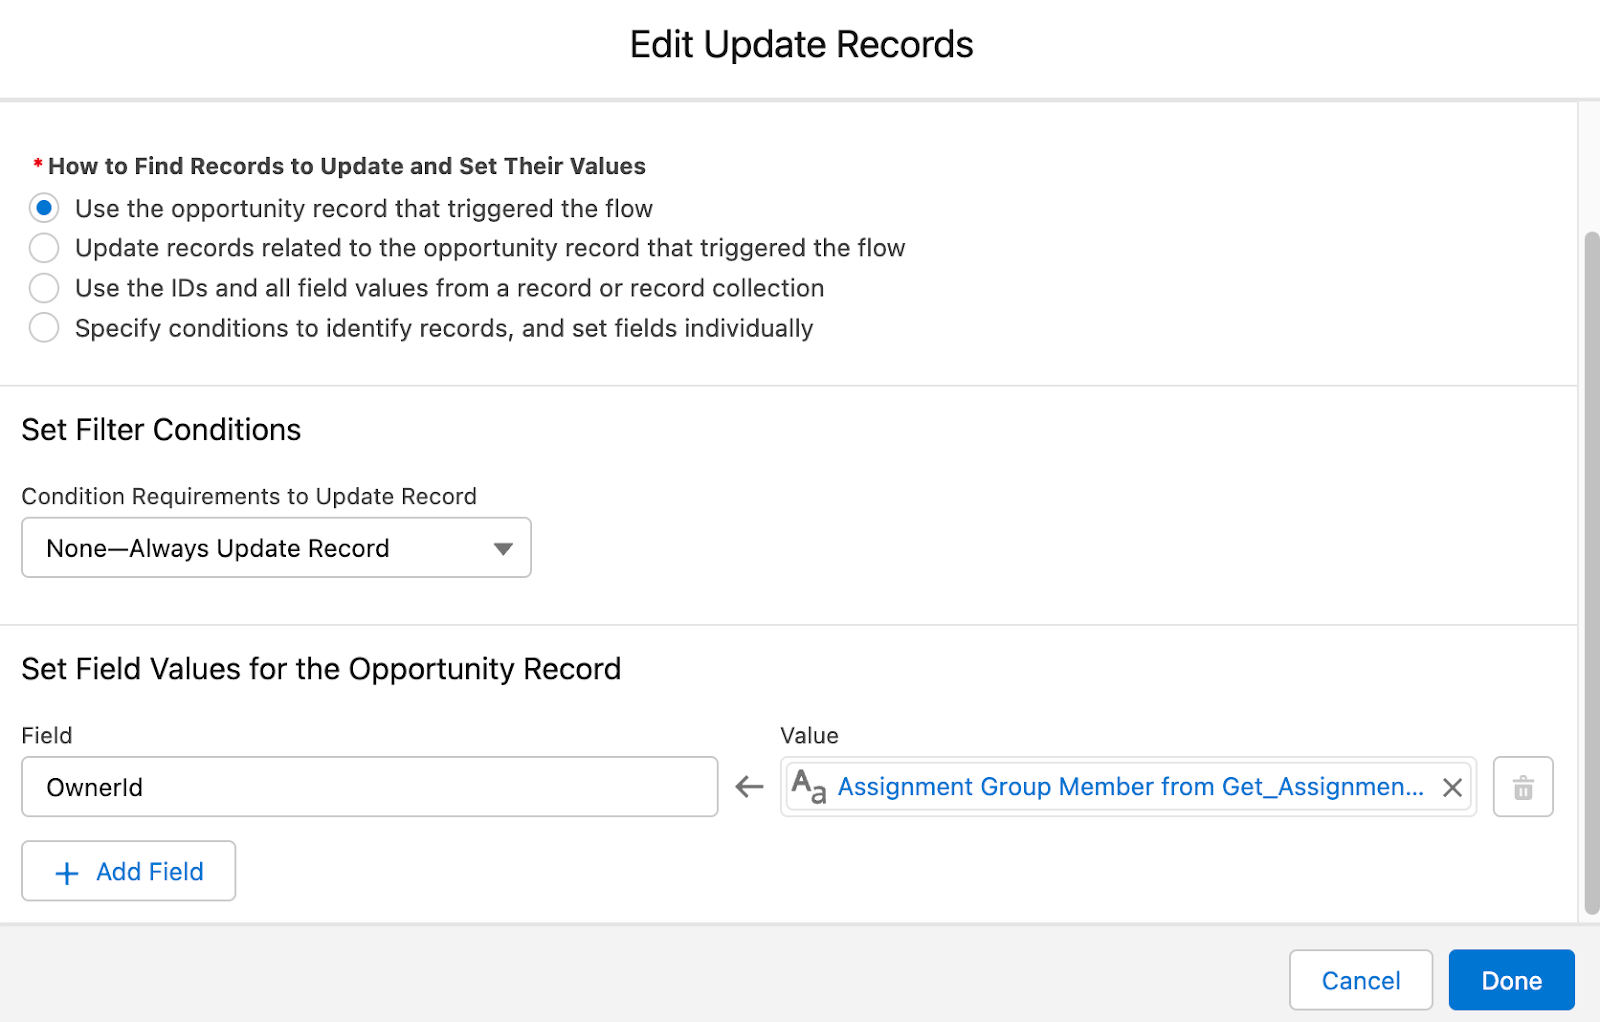
The final steps in this path are to update the owner of the record to be the retrieved user from this Get element and update their Last Assigned Date on their member record.

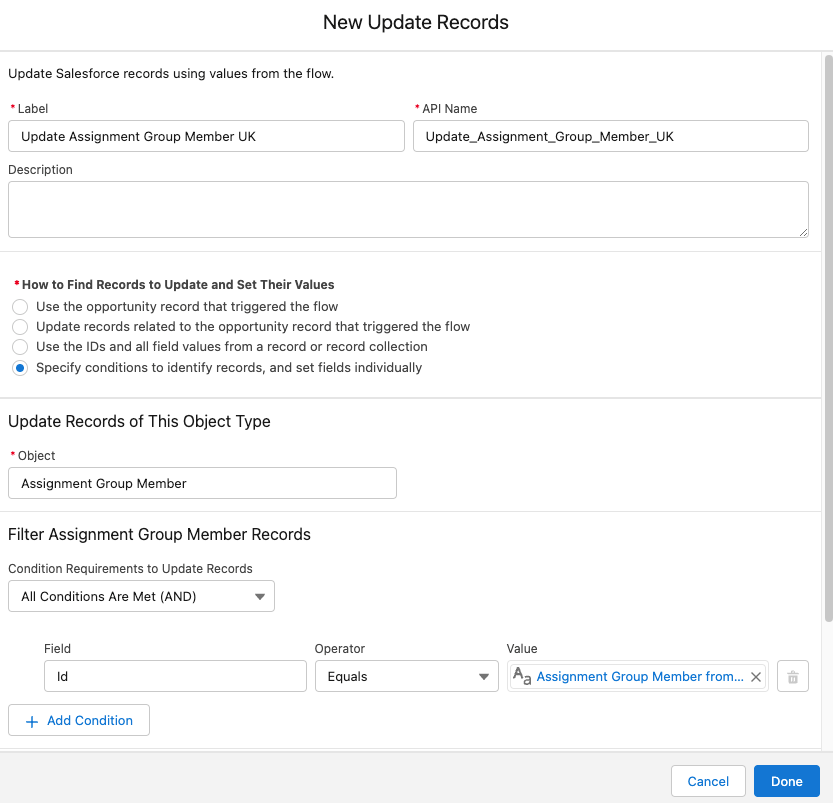
Add an Update Records element to the flow, and select “Use the record that triggered the flow.” Select the relevant field to update — in this case Owner — and select the User from the Get Assignment Group Member User Id element.

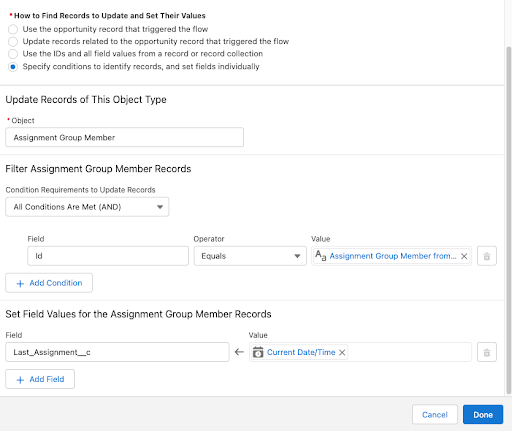
Then, create another Update Related Records element and select “Specify conditions to identify records, and set fields individually.” Select the Assignment Group Member from the objects list and specify the record to update where the “ID” equals the ID from the previous Get Assignment Group Member element. Select the relevant field to update — in this Last Assignment Date — and select Flow> Current Date/Time.

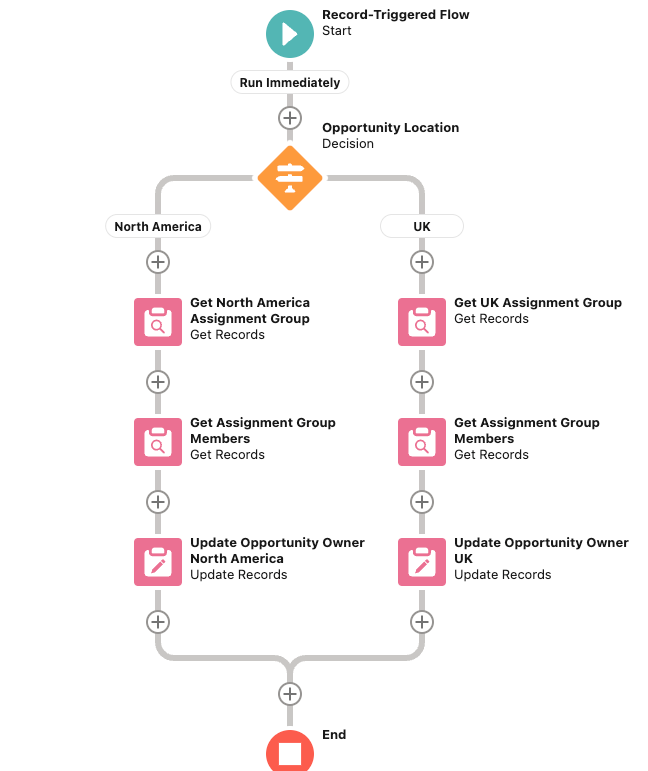
See if your flow looks like this

Repeat the steps on the other decision paths as needed. The flow should look something like this, if you have multiple assignment groups to round robin in the flow. 

Additional Considerations

  • Consider creating a  custom Rollup Summary on the Assignment Group object to record the number of Assignment Group Members in the Assignment Group. You can also filter this to show only active Assignment Group Members.
  • If any changes are made to the name of the Assignment Group record or any additional Assignment Groups created; this must be updated in the Round Robin Assignment Flow.
  • Make sure to debug and test the flow before making this live to make sure that everything works as desired.
  • You can also add in a Send Email Action to the flow or a Custom Notification to notify the user of the assignment at the end of the flow.
  • Ensure that the necessary users have access to the tabs created of the custom object; you could delegate permissions to Team managers to manage the users available to round robin and annual leave.

Great Solution for Complex Salesforce Object Routing Needs

In summary, this solution can help all teams with complex object routing needs or for admins who would like a more manageable solution than other round robin configurations. 

The ability to assign records to users and consider availability in a front end facing way allows records to be actioned in an efficient manner; removing wasted time re-assigning records for users that are on holiday or have left the business. 
If you need further assistance with your business automation needs, feel free to reach out to the Sercante team where we can help you build scalable business solutions.

Lead nurturing programs play a critical role in the sales process. That’s because nurtured leads have a shorter sales cycle and generate more sales-ready leads at a significantly lower cost. Luckily for you, the Marketing Cloud platform has extensive capabilities to create a sophisticated, multi-channel, automated lead nurturing program.

Here are five tips to take your lead nurture program to the next level utilizing the best of breed marketing automation capabilities in Salesforce Marketing Cloud.

Tip 1: Put lead scoring and grading to work

With Marketing Cloud, you have lots of options for lead scoring. 

This is especially true with the Marketing Cloud Account Engagement (Pardot) platform. The lead scoring and grading that comes out of the box has endless capability and flexibility.

Check out this blog post for a deeper dive into lead scoring and grading in Pardot.

But we’re going to focus on lead scoring and grading in Marketing Cloud Engagement here.

Marketing Cloud Engagement (SFMC) Users

If your Marketing Cloud setup doesn’t use the Account Engagement platform, there are other third-party resources that can provide both lead and account ranking scoring.

Third-party lead scoring and grading tools

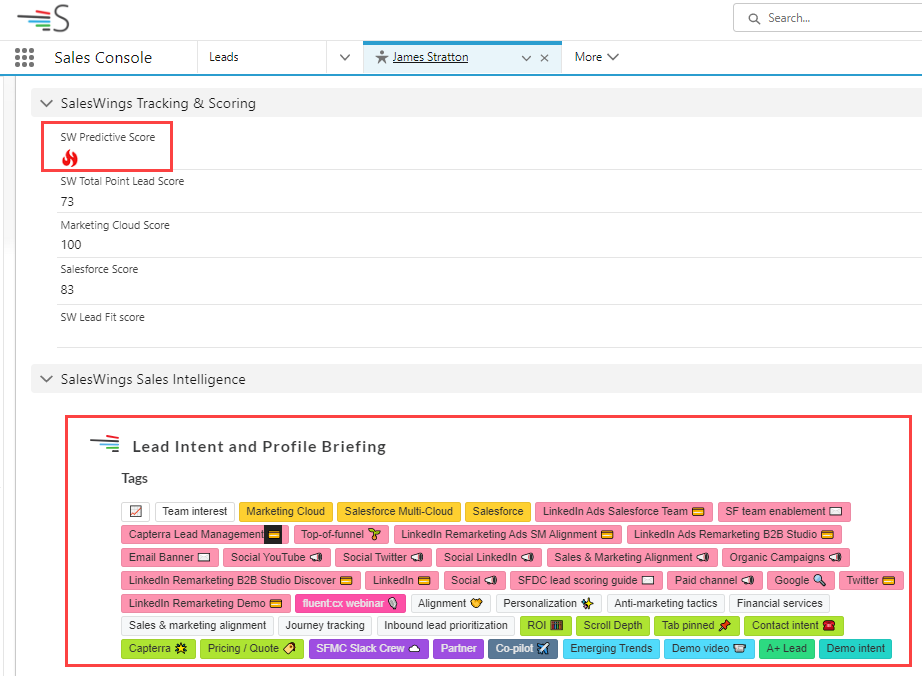
SalesWings provides an easy to install, cost effective solution to deliver real-time lead scoring based on web activity and other factors. Once installed you can visually see a predictive score of Hot, Warm or Cold based on a wide variety of criteria right in the platform.

SalesWings Sales Console

And don’t forget to consider account-based ranking as well. Utilizing platforms like Demandbase you can take the lead ranking to the next level by understanding how that account or company converts. For example, Demandbase can provide key stats like number of engaged people, sales touches all bubbling up to a tier ranking to help add additional color to your ranking system.

Demandbase dashboard

Tip 2: Use CASE function to simplify rankings

This one is for Marketing Cloud Engagement (SFMC) users. If you have multiple scoring variables like a lead and account ranking, utilize the CASE SQL function in your automation to consolidate rankings into one simple rank.

The multiple scoring variables could be generated from third-party platforms like Saleswings/Demandbase or internally through a custom lead/account scoring process.

Take this example below on how you could approach taking the two rankings and determining one combined ranking of Hot, Warm and Cold.

To execute this in Marketing Cloud Engagement Automation Studio, use the CASE function to do the IF/THEN (or in this case WHEN/THEN) to populate the “Lead_Ranking_Simple” field in the Journey data extension with the combined ranking.

If you are not comfortable with SQL check out the DESelect application where you can quickly and easily create this custom relationship without having any SQL knowledge.

 Source: DeSelect

Note: For more information on how to use the CASE statement in a variety of ways, check out Mateusz Dabrowski’s site, which goes into great detail on this function.

Tip 3: Focus on essential lead nurture journey functionality

There are three essential activities or areas of functionality in Journey Builder: 

  1. The entry event
  2. The decision split
  3. Object activity

Focusing on these areas will have the greatest impact on the overall performance and scalability of your automation solutions. 

Note: Read this blog post from Kirsten Schlau for more info about using Journey Builder.

The Entry Event

Here’s a typical lead nurture journey in Marketing Cloud Engagement where you can see these activities in action. Let’s take a closer look at the most important of these three activities, the Entry Event.

The Entry Event functionality determines the list of contacts  who will enter the Journey. It’s the start of any journey and determines the capability of all functions that follow. A poorly set up entry event will limit functionality and cause problems down the road so spend your time to ensure a proper set up.

Let’s take a look at the two most populated entry event types: 

  1. Data Extension
  2. Salesforce Data Entry Event

Data Extension Entry Event is the most commonly used version. In this variation typically a SQL query based automation is running behind the scenes pulling in leads from synchronized data extensions based on a variety of filter criteria across multiple objects.

Advantages

The advantage to using a Data Extension Entry Event is the flexibility and complete customization of the subscriber segments to be pulled into the journey.

Disadvantages

The disadvantage is you are limited by the minimum 15-minute sync timeframe of records from the Salesforce CRM environment. So the fastest you’ll be able to enter in a subscriber based on Salesforce data is once every 15 minutes. Another small disadvantage is this entry event requires your team to be comfortable with SQL and it creates a separate marketing automation asset to support.

Another popular option is the Salesforce Data Entry Event which pulls in any object that has a contact, lead or user to be used as a subscriber for sending.

Advantages

Advantages of this entry event is that it’s pretty close to real time (1-2 minutes). As soon as a lead is created or updated based on the criteria designated, the subscriber will enter the journey. This option is also easier to support as it eliminates the need for the automation solution working in the background.

Disadvantages to this event is that you are limited by the filter settings in this entry event setup. If your filtering criteria involves multiple fields across multiple objects a SQL based automation fed entry event might be the better path.

Tip 4: One-to-one content personalization

Here are three ways to deliver a 1-to-1 customization of your journey content utilizing Content Builder functionality and simple ampscript and HTML coding.

First method – Personalization of subscriber values

In each email send you can populate an unlimited number of data about your subscriber in data extensions. To leverage those data points in the content simply add %% before and after the data point. 

For example to render the first name in the subject line:

Enter in %%FirstName%% right in the subject line block:

Or if you’re not sure what the exact data point is called or the exact format you can use click on the Personalization Icon in your editor toolbar.

Second Method – Dynamic Content Blocks

Utilize out-of-the-box functionality in Content Builder to vary entire sections of content in an email using Dynamic Content Blocks.

In this example, the focus of the email content changes based on the product selected by each lead indicated on the lead record. 

The end user will see custom content in the email:

Dynamic Content Block Example

In Content Builder, first create separate content blocks for each product featuring a photo and copy points. Then drag over a dynamic content block onto your email canvas.

And follow the steps to (1) select a default content to appear and (2) content variations based on the data coming from the lead object. In this case, if the “Product__c” field contains “401K” or “Credit Card Processing,” then the content will change.

Third Method – Custom links

Utilize ampscript and HTML to create custom links that add value to the recipient.

In this example, we’re creating a hot lead notification that will be sent to the owner of the lead. We’re populating this email with all the relevant data points in the data extension using the %% functionality mentioned above. We also have custom links so that when the lead owner clicks on the link it will take them right into the Salesforce CRM environment.

To execute this type of functionality utilize ampscript inside of the email content in the following approach:

  1. Set your Lead ID variable based on the field value in the send data extension.
  2. Use the CONCAT function to pull in the remaining part of the standard Salesforce lead record url.
  3. The first part of the Lead url.
  4. The variable set above.
  5. The last part of the Lead url.

And then to make the link clickable utilize a standard A Tag in HTML combined with the RedirectTo ampscript function.

Tip 5: Notify sales of hot leads in multiple ways ways

Marketing Cloud Engagement has a variety of options to creatively notify sales right in the Salesforce CRM platform through tasks and or sending highly personalized “Hot Lead” emails as mentioned above. 

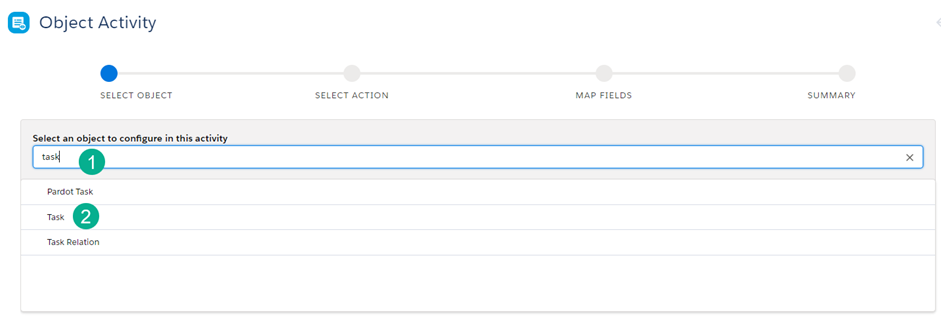
Let’s walk through utilizing the Object Activity in Journey Builder to either create or update records in the Salesforce CRM environment, in this example creating custom tasks.

Select the Object Activity and select the task

(1) Select “Task” in the search and (2) select Task. You’ll want to “Create New” task.

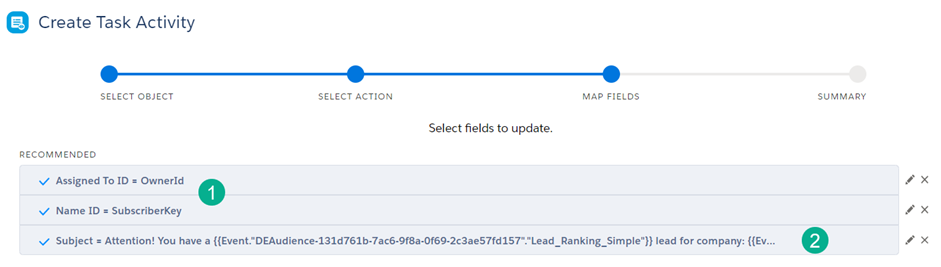
Then (1) Fill in all required fields and utilize the data binding functionality to personalized fields where necessary.

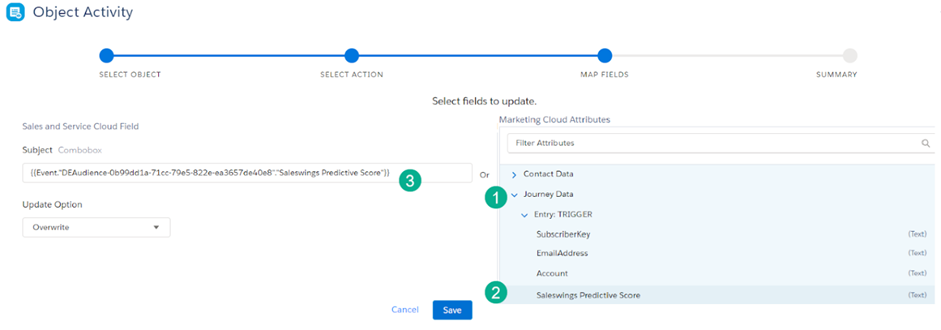
For a higher complexity of field personalization (2) utilize what is called “data binding” in the Journey Builder UI to personalize each task and pull in the lead rank score.

To grab these “data bindings” for any variable to personalize follow these steps:

Step 1. Create your subject line defining the variables that will be brought in to personalize: “Attention!, you have a HOT Rank lead for Company: XYZ”

Step 2. In a separate document like in Notepad, create a template for the subject line identifying each of the variables needed to populate in your variable code.

Step 3. Select the Subject field in the Task.

Step 4. To create the handle bar “data binding” code for the lead score variable (1) Select the Journey Data dropdown, (2) Select the variable and (3) the handle bar code will appear in the subject.

Step 5. Copy the code and paste it into your notepad. Repeat the process for the Company and any other variable to be personalized. 

The syntax in the Notepad should look like the following:

Step 6. Copy this line of code and paste it into the Subject Line space and Save.

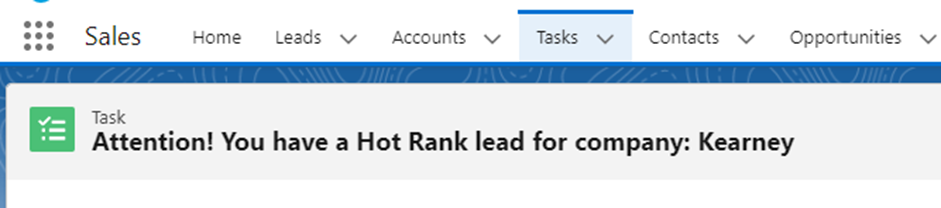
When you generate a task it should look something like this:

Step 7. Paste this syntax into the Subject field to populate a custom 1-to-1 subject that will help the Sales team cut through the clutter in all their tasks. 

Here’s an example of documentation on “data bindings” in this blog article from Rafal Wolsztyniak titled SFMC Tips and Tricks Challenge. You’ll need to scroll through the article as it covers a variety of tips. 

Start Nurturing Leads Like a Salesforce Pro

Hopefully this article has given you a few tips on how to take your lead nurture programs to the next level in the Salesforce Marketing Cloud Engagement platform.

There are limitless possibilities in this platform, and we’re all eager to learn and improve our programs. Please share any discoveries you find as you explore ways to build successful automation solutions for nurturing sales leads.

Pardot automation rules are a great way to set repeatable processes in motion and save yourself from repetitive admin tasks. Most Marketing Cloud Account Engagement (Pardot) users employ automation rules to assign prospects when they are sales ready, send prospects to relevant Salesforce campaigns, assign grading profiles, etc. But there are endless ways to get creative with Pardot automation rules and really take your marketing efforts to the next level. 

Creative Uses for Pardot Automation Rules

Below are some of my favorite creative uses for automation rules, as well as some amazing use cases from the Pardot community!

Tip 1. Take action if a prospect performs a specific combination of activities

Completion actions are a great way to automate based on an activity a prospect does take, but what about automating when a prospect fills out a form but doesn’t request a demo? Or, a favorite for non-profits, visits the donate page but doesn’t make a donation? This is a great opportunity to use an automation rule to find those prospects and send them to an Engagement Studio Program so you can nurture them towards the next step in their journey!

Tip 2. Ensure only invited prospects can register for an event

Courtesy of Martin Farrell, Pardot Administrator

“We use automation rules to ensure only invited prospects are able to register for an event. In this case, if someone completes the registration landing page but is not on our invitee list, they are dropped into an uninvited list, which alerts our Events Coordinator to reach out. Since the landing page completion action added them to the registration list, the automation rule also removes these prospects from said list.”

Tip 3. Split lists for A/B testing

Courtesy of Bill Fetter, Principal and Founder of UnFettered Marketing

“I use 2 automation rules to assign random numbers to prospects based on the first letter of their last name. This gives me an approximate 50/50 split of US last names based on A-K and L-Z. This is especially useful for throttling sends and/or A/B testing.” 

Read more about how Bill accomplishes this in his blog post.

Tip 4. Use tags to customize prospect activity digests

Courtesy of Rebecca Sweetman, Snr Manager, Global Systems & Sales Operations

“We use automation to tag a prospect’s country and then use those tags to be excluded from prospect activity digests (as you can only exclude not include) so teams only have to see their own region’s activity.”

To expand on this great idea a bit, if you are not using prospect activity digests you can customize these for each of your Pardot users. Just navigate to one of your Pardot users and select Edit Preferences. 

Select the “Send daily prospect activity emails (for my prospects)” checkbox and then exclude prospects based on tag, as shown here:

Tip 5. Review active, “CRM Deleted” prospects

Courtesy of Bill Fetter, Principal and Founder of UnFettered Marketing

“Use an automation rule to find prospects who have taken an action within the last 1 day and are marked as “CRM deleted,” then notify someone to review the prospect for possible restoration. 

Normally, what happens here is a lead was deleted in Salesforce and was sent to the Pardot recycle bin. A form fill restores the prospect, but the prior delete action does not allow the prospect to be re-created in Salesforce. This action is normally paired with a second automation rule that uses the “allow deleted lead or contact to re-create in salesforce” action when a tag is added to a record such as “allow CRM recreate.”  

You can of course use the “allow deleted lead or contact to re-create in salesforce” action in a single automation rule, but this action will automatically create a new lead. And sometimes the reason the lead was deleted in the first place is it’s a habitual form spammer that you don’t want continuously re-creating in your org. So the 2-part action with a manual check is more conservative.”

Tip 6. Lower prospect score based on inactivity

A great use of repeating automation rules is to gradually lower the score of prospects who have been inactive for a period of time. This will keep your prospects from looking “sales ready” when they really aren’t engaging with your marketing and sales activities (or may have since left their company). I like to max out this rule at 10x in order to keep any prospects from going into the negatives. 

How do you use Pardot automation rules?

What other creative uses for automation rules do you employ in your org? Let us know in the comments!

No more posts to show