Before the advent of Data Cloud and Customer Data Platforms (CDPs), businesses strived to integrate their data into their CRM to obtain a holistic view. If you’re considering another expansive platform, there’s an excellent interim solution to consider: the Campaign Audience Builder (CAB).
Where to get Campaign Audience Builder
The Campaign Audience Builder is a package on the Salesforce AppExchange developed by Lightblaze. Known for its user-friendly interface, CAB allows you to create audience segments using your Salesforce data, making it an efficient substitute or preliminary step towards a full-scale CDP solution.
Campaign Audience Builder Ease of Use
Campaign Audience Builder has a simple point-and-click interface that allows you to navigate and filter data related to the people you are trying to add to an audience. It simply gets installed alongside your data and has a very short implementation time (I was up and running in 10 minutes).
Once installed, it really is a 3-step process of getting your first audience created and usable:
Define the Criteria: as a techie myself, this was really the fun part. Connecting data and filtering the right records feels natural and familiar.
Generate the Audience: This is basically running the process based on all the work you did in the previous step to see who matches. As always, it’s a great idea to spot-check that some people you expected to appear were successfully matched!
Populate the Campaign: you have your list of people, it is time to put them somewhere that you can act on. This is when you choose which Campaign to use, how often the audience should be evaluated, and if people should be removed should they no longer meet your criteria.
Unlike CDPs and other types of data platforms, which require accommodating complex data relationships and aren’t always user-friendly, CAB offers a seamless alternative.
Advanced Segmentation Features in Campaign Audience Builder
Looking for Contacts that have Closed Won Opportunities with Products in a certain Product Family? Yep, Campaign Audience Builder can do that.
Do you also want to ensure those same people don’t have a Case? Yep, you can do that too.
While not unlimited in its power, there’s no data scenario that you cannot segment with CAB (compared to report builder or segmentation in Account Engagement).
CAB allows you to select either a Lead or Contact as your audience driver and connect it with any related object. After defining your audience, you can populate a Campaign by creating CampaignMember records. CAB also provides controls on how frequently your audience should be evaluated and whether it should clean records that no longer meet your criteria.
With your audience defined, you can now use that information to populate a Campaign by creating CampaignMember records. You have some controls on how often CAB should be building your audience and if it should clean CampaignMember records that no longer meet the criteria.
Integration and Data Security
CAB stands out with its ability to directly publish the audience into Account Engagement (Pardot) into a static list. This feature eliminates the need to clumsily attach data to the Lead/Contact records for list population.
A key feature of CDPs is the ability to “act” on the new audience that you’ve created in downstream systems. While CAB doesn’t really integrate with a bunch of other third-party tools, it can call APEX/Flows (where you can do almost anything integration-wise).
Data security is paramount for Salesforce organizations. Moving data into other systems like data platforms or CDPs can potentially jeopardize these security controls. Since CAB operates within your Salesforce organization, it only accesses the data you can, thereby ensuring data security.
CAB may be the stepping stone you seek
In summary, the Campaign Audience Builder (CAB) offers a user-friendly, efficient, and secure way to handle your Salesforce data. It’s a practical stepping stone if you’re considering a more complex Customer Data Platform (CDP) solution.
With its easy setup, advanced features, and commitment to data security, CAB is a smart choice for businesses looking to maximize their data management and audience segmentation without taking on a full CDP solution just yet.
Thinking about implementing CAB in your org? Contact the team at Sercante to learn more about the tool and how it will work with your overall technology strategy.
Account Engagement (Pardot) Optimizer BETA was released with the Spring ‘23 new features, but it has become “Generally Available” as of the Summer ‘23 release. This new feature promises to help you identify and correct issues that may be negatively affecting your Business Unit’s processing power. In this blog, we’ll dive into everything you need to know to access and use the new Account Engagement Optimizer feature.
Accessing the Account Engagement Optimizer
To access the Optimizer, go to your Account Engagement Settings tab, “Optimizer” will appear as an option on the left-hand menu.
If you are using Default User Roles, only Administrators will have access to the Optimizer. If you are using Custom User Roles, make sure your custom role has the following permissions selected (edit Custom User Roles by going to Account Engagement Settings > User Management > Roles > then selecting the role you’d like to edit).
Admin > View Optimizer
Admin > View and Edit Pending Table Actions
Marketing > View and Delete Automation Rules
Marketing > View and Delete Lists
If you opted into the Beta before the Summer ‘23 release, there is nothing you need to do to continue using the Optimizer. If you did not opt into the Beta, the Optimizer should have auto-enabled when your org was upgraded to Summer ‘23.
Analyzing Your Optimizer Report Results
The Optimizer, with the help of Brandy, will provide one of three statuses for your business unit:
Looking Good: No critical issues to address
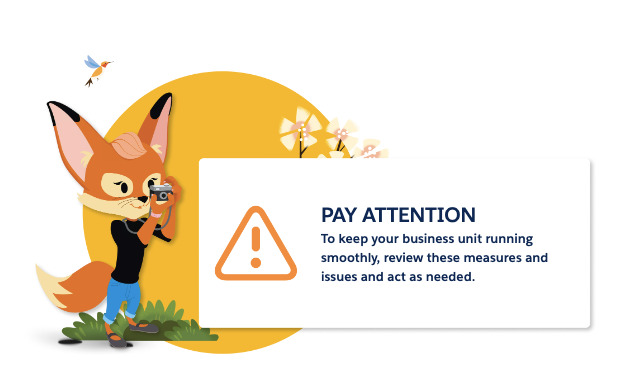
Pay Attention: There are a few recommended actions to improve your business unit
Action Needed: There are critical issues and you should resolve them right away.
Prospect Change Monitor By Feature Chart
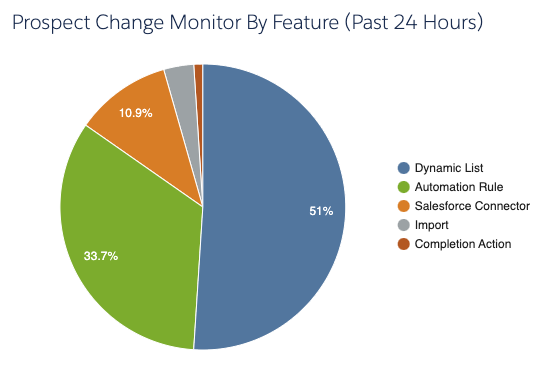
Next to Brandy and your Optimizer Status, you’ll see your Prospect Change Monitor By Feature chart.
This feature shows you which type of automations have made a change to Prospects in the last 24 hours. You can double click on each slice of the pie to drill into exactly which assets are making changes.
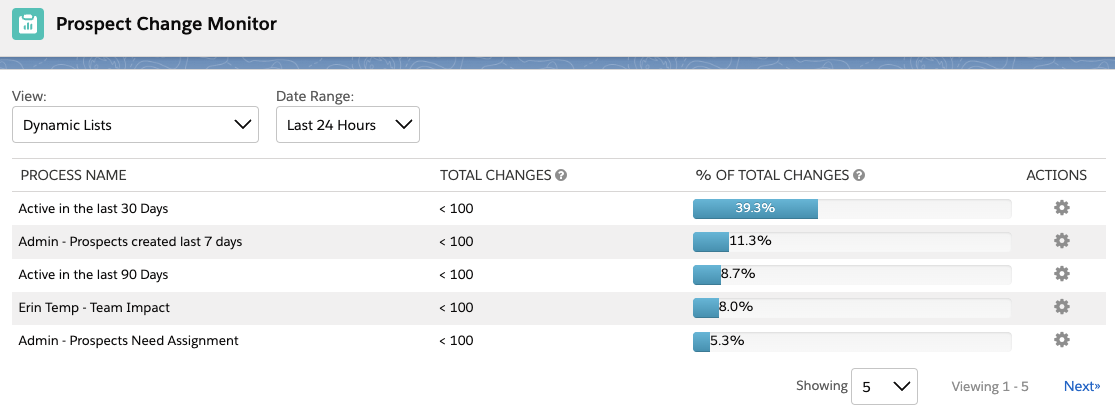
Changing Filter Views
In this view, you can also change your filters to show different date ranges and different views. I like to change my view to “All Processes” and Date Range to “Last 30 Days” to better keep an eye on which automations are running at least every month.
This view can be especially helpful in finding automations that may not have been set up in the most efficient way possible, such as an automation rule that is set to repeat every single day.
Configuration Issues
Next in the Optimizer report is your Configuration Issues. This table will show setup problems that are stopping you from full access to Account Engagement’s features. This can be issues like your sending domain not being verified or prospects being paused for bot-like behavior.
I tried to see if turning off Connected Campaigns would also trigger an issue here, but no dice. Hopefully, Salesforce will provide a list of all configuration issues that are checked in a future release, but in the meantime you can use our implementation checklist to ensure your Business Unit is configured correctly.
Performance Improvement Measures
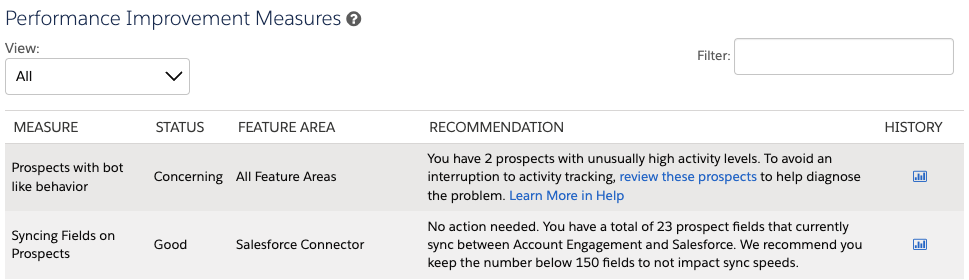
Next is Performance Improvement Measures, this table shows you recommendations that will improve your Business Unit’s processing power. This table defaults to “Actionable Measures,” but you can change this view to “All” to see what else is being monitored.
This table is broken down into five columns:
Measure: What exactly Optimizer is reviewing.
Status: Whether the measure is in Good, Concerning, or Critical standing or if there are actions that can be taken. “Good” statuses will not show when this table is filtered to only show “Actionable Measures.”
Feature Area: Which Account Engagement Features are involved in this measure.
Recommendation: What next steps, if any, should you take. Most insights will also include links to documentation, which I personally love.
History: If there is enough data for this measure, you can select the chart icon to see the measures for the last 8 days. These charts also shed light on what the Optimizer considers good, concerning, or critical.
Maintenance Resources
Finally, you have Maintenance Resources. This section links to a few views and reports that can help your Business Unit run in tip-top shape. This includes 2 views we’re already used to: Inactive Automation Rules and Inactive Dynamic Lists, but also 2 new super useful views:
Table Action Manager: This view allows you to pause, prioritize, and cancel actions currently running in the Business Unit. For example, say you recently kicked off an Automation Rule that will update 3,000 prospects, but you are also running a Dynamic List that is needed for an email send going out in 5 minutes. Now you can prioritize that Dynamic List over the Automation Rule rather than panicking if your Dynamic List is going to complete in time.
Unused Dynamic Lists: This view shows you which Dynamic Lists have a blank Usage table. Now you no longer have to click into each Dynamic List to check if any assets are listed on the “Usage” tab, YAY!
Account Engagement Optimizer is Available Now
Now that Optimizer is available for all orgs, I would highly recommend you check the report at least monthly to keep an eye out for any potential issues. If you have any questions or neat tips about the Optimizer, let us know in the comments! Also, if you’re looking for other ways to improve your Business Unit’s processing power, check out our blog post, “4 Things to Clean in MCAE (Pardot) for Faster Processing Times.”
Contrary to the opinion of just about everybody in marketing, all your marketing leads are not “Hot” and the sales team is not lazy. The issue is that sales wants marketing to send them the right leads with the right expectations. In this post, we’ll address ways to improve the marketing lead handoff process using Salesforce and Account Engagement (Pardot) so sales and marketing can live in harmony.
The Problems with Marketing Leads
Before we can address the issues that sales teams have with marketing leads, we must first identify them. Below are the most common issues that I’ve encountered as a marketer (20+ years) and as a consultant. While all these issues might not apply to you, I bet more than a few will.
If you have issues that are not included in this list, please share them by dropping a note in the comments!
Poor Quality/Bad Data
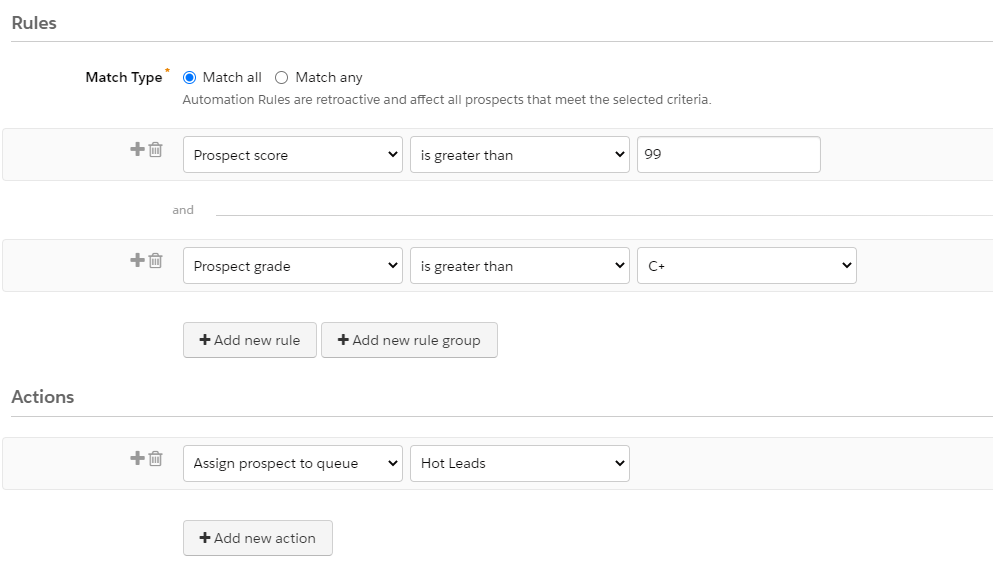
Let’s start with data quality. Marketers have the ability to control what prospects sync from Account Engagement to Salesforce. Most often, this is based on a prospect achieving an agreed upon score & grade threshold. A rule could look something like this.
This rule assigns prospects to the Hot Leads queue when they achieve a score of 100 and a grade of B- or higher. Seems pretty solid?
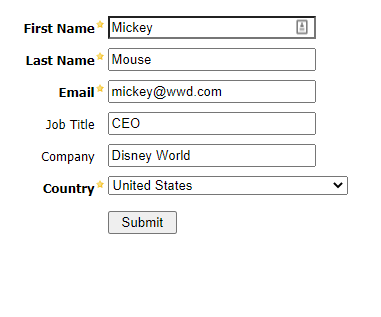
This is a good start, but not perfect. Let’s say that a demo form on your website adds 50 points (in addition to the 50 that included in the default scoring model for a form fill). Let’s also assume that your grading model adds a full letter grade for prospects in the United States and another full letter grade is added based on job titles that include CEO.
If your form was completed with the data below, guess who would be assigned to the Hot Lead queue, synced to Salesforce, and assigned to a member of your sales team? Sending over leads like this is the fastest way to sour your sales team on marketing leads.
Keeping Bad Data Out of Salesforce
The example above is not uncommon and is a step up over blindly assigning all prospects from Account Engagement to a queue, but we can do better.
At Sercante, we use a tool named Prospect Updater for Pardot that was created by our labs team. This tool can be used to fix, enhance, and enrich prospect data before it enters Salesforce. Here’s how we leverage Prospect Updater in our organization.
Visitor fills out a form and a new prospect is created in Pardot.
Prospect updater runs and marks a custom field as “Suspected Spam” or “Not Spam” based on criteria that we defined.
Assignment automation rules run (in Account Engagement) and only match prospects with a value of “Not Spam” – ensuring that “Suspected Spam” records do not enter Salesforce.
Want to know more about how Prospect Updater keeps spam out of our org? Check out this post.
Unrealistic SLAs/Expectations
I’ll admit that I’ve been guilty of having some unrealistic expectations in the past. Does this sound familiar? You just got back from a week at that huge trade show in Las Vegas with several thousand leads that are gold and need to be called immediately.
The truth is that there is some gold in your pile of leads, but they are not all worthy of sales follow up. So what should you do?
Managing SLAs & Expectations
Agree to what constitutes a Hot Lead first.
Collaborate with sales leadership to agree to follow-up SLAs (Service Level Agreements).
Hot Leads – 24 Hours
Warm Lead – 3-Days
Understand the volume of lead that the sales team can follow-up on.
If thousands of leads meet your Hot Leads criteria and sales can only follow-up on hundreds, your definition needs to be refined or you need more sales people.
Ensure leads are tagged with a priority rating so the proper SLA can be applied.
At events, this could be adding a note when you have conversations with prospects.
For prospects entering Account Engagement, this could be based on scores, lead sources, or specific form/form handler submissions.
Marketing Leads Are Too Cold/Don’t Know Who We Are
Let’s go back to the trade show example. Your marketing team has done an awesome job of identifying the “must have” swag item and everybody is flocking to your booth to get one. The team is frantically scanning badges and moving to the next eager person in line. Are these leads that should be sent to sales?
Here’s another one. Your marketing team is generating hundreds of leads per week by syndicating content on a third party site. People are gobbling up your content, sales is going to love these leads!
In both scenarios, these leads should not meet your Hot Lead definition (based on these activities alone) and should not be sent to sales for follow up. It’s highly likely that these people don’t even know what your company does. They came by your booth because of the great swag or downloaded a piece of content related to a specific interest. These are prime leads for a nurturing program.
Warming/Education Nurture
Before sending those leads to sales, warm and educate them with Engagement Studio. This is an area where Account Engagement excels — use it!
When creating your nurture program, keep the following in mind.
Prospects showing buying signals should be sent to sales as quickly as possible
Prospects don’t need to complete all steps before being sent to sales
Not all prospects are ever going to be sent to sales (and that’s OK)
Don’t add scores at random just to make prospects “score up” to your hot lead criteria
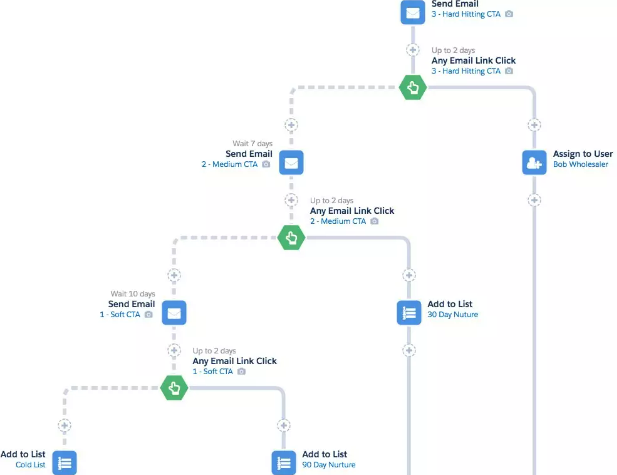
I like the 3-2-1 Campaign recommended by Salesforce. It basically inverts the traditional logic by focusing on hard hitting CTAs first in an effort to identify those with immediate interest and fast tracking the handoff to sales. As an example, your first CTA might be to schedule a demo vs. reading your latest white paper.
Whether you find the traditional or 3-2-1 Campaign works best for your organization, the point remains that leads need to be warmed before sending your sales teams. Sending cold leads over to sales is a surefire way to create a jaded team.
No Background Information
This lead is supposed to be hot and I’m supposed to follow-up within 24 hours, but I have no idea why or what they are interested in. Could you imagine following-up with a lead in this situation? How about hundreds of them? That’s how sales feels if you don’t enable them with information. Fortunately, Salesforce and Account Engagement have us covered here too.
Arm Sales with Data
Here’s a list of ways we can provide data to our friends in sales.
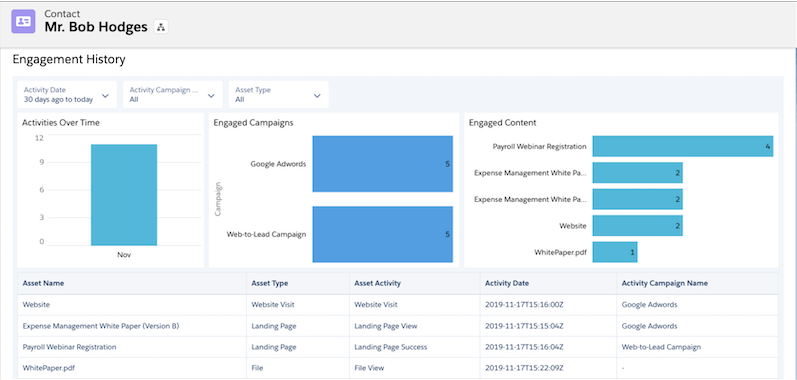
Engagement History Related list
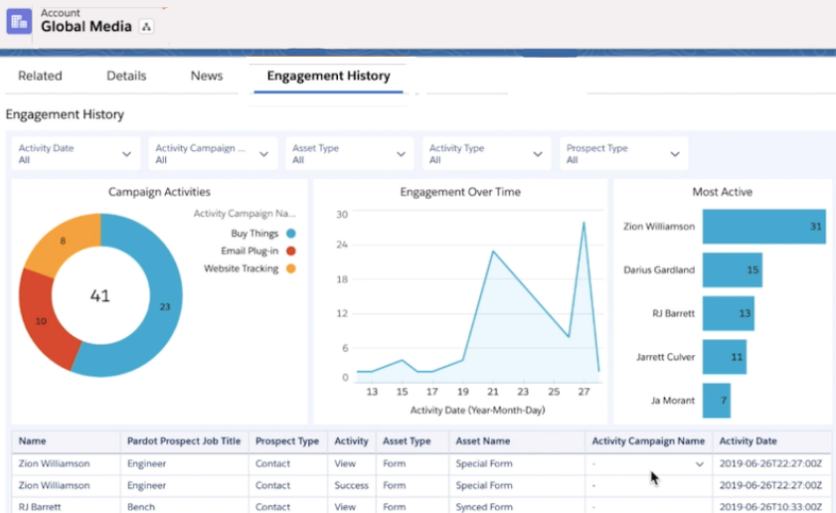
Engagement History Dashboards
Scoring Categories Related list
Custom fields
Let’s look at all of these in a bit more detail.
Engagement History Related Lists
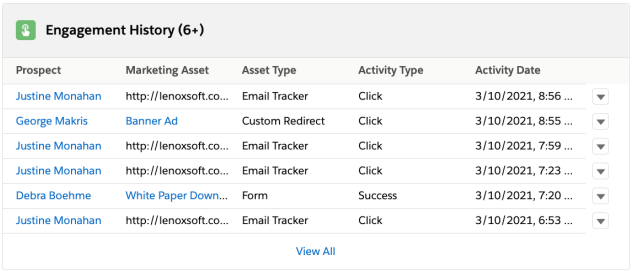
This displays a feed of a recent engagement from Account Engagement in Salesforce. This list can be added to account, contact, lead, and person account page layouts to provide engagement information for sales and all other users in Salesforce.
Engagement History Dashboards
These dashboards are powered by CRM Analytics and provide a way for users to see and interact with data on accounts, contacts, leads, and person accounts. These dashboards do require permissions to be granted to users in Salesforce and the number of licenses are limited by your edition.
Scoring Categories Related List
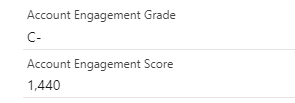
Most organizations add Account Engagement score and grade fields to their page layouts. This is a great way to show sales the total score that leads and contacts have accumulated, but it does not provide any insight into interests. That’s where scoring categories come in.
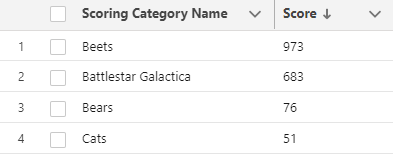
Scoring categories allow you to break down the total score in Account Engagement by categories that you define (up to 50). This allows you to see what that prospect is interested in. Note that scoring categories are only included in Plus, Advanced, and Premium editions of Account Engagement.
Account Engagement Grade and Score (in Salesforce)
Account Engagement Scoring Categories (in Salesforce)
The total score of 1,440 does not help the sales team at all. However, the scoring category provides information on topics of interest (Beets) and topics of little interest (Cats).
Custom Fields
Custom fields are another great way to share information with your sales team. Fields can be created in Account Engagement and synced to the corresponding fields on contact and lead records. Custom fields can vary from organization-to-organization, but here are a couple that I find useful.
Asset/Event Name – Capture the name of the last asset that a prospect downloaded or the name of the most recent event that they registered for/attended.
Last Form Completed – Let sales know the name of the last form that a prospect completed. This can be used to customize tasks created in Salesforce too!
Incorrect Lead Assignment
Assignment is always a bit of a sticky one. You can do assignments from Account Engagement, but it’s not something that I would recommend. Engagement Studio can be used for simple assignments, like assigning leads to a queue, but it’s not intended to do direct assignment to specific sales people based on specific territories. It’s best to leave individual assignments to a tool that’s designed for that purpose.
When looking at lead routing tools, consider the needs of your organization. Assignment rules in Salesforce are great, but only one assignment rule can be active on the lead object. This can become an issue if you have more complex rule logic. You can reassign leads using lead assignment rules, but it requires flows and invocable actions.
Assignment rules have some limitations, but you also have plenty of options if they can’t support your needs. There are tools that allow you to build easy routing flows using tools that feel a lot like engagement studio and others that allow you to do geographic assignment using maps. Selecting the right tool for your organization is a critical decision. The best leads are not going to generate any revenue if they are sitting in a queue somewhere or have not been assigned at all.
Inability to Provide Feedback
Feedback from sales is an incredibly valuable tool. It helps keep sales happy by letting marketing know what leads they like and what leads they don’t. It also helps marketing know where to spend their budget to maximize their impact.
Remember those content syndication leads that we spoke about earlier? Maybe marketing generated a large number of leads at a low cost per lead, but sales found a large number had bad phone numbers or simply did not meet your ideal customer profile. How impactful could knowing this be to marketing? I bet they would change the spend allocation of their budget in a hurry with this data. The great thing is that this level of reporting is possible with disposition codes.
Lead Status and Disposition Codes
Lead status is used in Salesforce to represent the current status of a lead. Common values include: Open – Not Contacted, Working – Contacted, Closed – Not Converted, and Converted. These let you know the status a lead is in, but not the reason why.
This is a great start, but we want more. This is where adding a disposition code can help. Disposition codes are commonly used in call centers to classify the results of calls. This same logic can be applied to support the lead stage changes and provide additional insight to marketing and the organization as whole.
Once set up, disposition codes are required when moving a lead from one stage to the next. Field dependencies provide a list of relevant disposition codes for each status. In the example below, the user is required to tell you “why” the lead needs to be nurtured when updating the status to Open – Nurture.
Disposition Code Uses
Timely indicator of lead quality
Tailoring of follow up communications/nurtures
Identifying records to suppress from marketing communications
Determining records to delete from Account Engagement
The disposition code field can be used to create reports in Salesforce for increased visibility. These can be a huge asset for marketing when planning how to allocate future budgets. I find reporting on disposition codes at the campaign level to be the most impactful. To do this, formula fields are used on the campaign member object to enable reporting on your custom fields. Check out Jenna Molby’s blog “How to Add Custom Fields to Campaign Members in Salesforce” to learn more. A record-triggered flow is also needed to update the contact status and disposition codes on the contact object then a lead is converted (but that’s a post for another day).
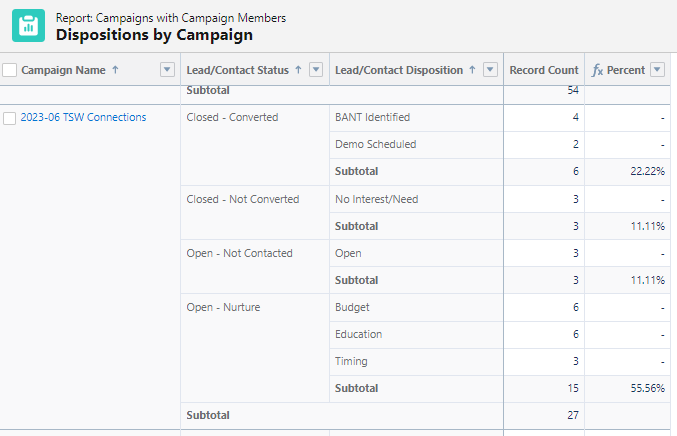
The end result is a really cool report that shows what happened to all the leads that were included in a campaign. Keep in mind that if a person is included in multiple campaigns, the same status and disposition code will display for both.
Here, I can quickly see that 22% of the leads from my 2023-06 TSW Connections campaign were converted to contacts (and why). I can also see that 56% of the leads need further nurturing (and how they should be nurtured). By syncing the disposition code field to Account Engagement, the values can be used to enter prospects into targeted nurture campaigns based on their needs vs. a generic nurture program. Pretty cool!
Collaboration and Communication are Key
Sales and marketing are really on the same team. Both want to drive sales and both want to be able to show the impact of their efforts. By working together and addressing the issues discussed, you can create an environment where your sales and marketing teams are united and work together towards a set of common goals.
As a marketing administrator within Salesforce, it is essential to understand your audiences and create a winning audience segmentation strategy. Without segmenting your audience, you will target the same group of people each time. That can lead to increasing opt-outs, spam, and a direct impact on your sending reputation.
The goal of sending mass emails is to target the right audience so you provide value to the people who are likely to interact with your brand. And that’s exactly what audience segmentation accomplishes.
Use these strategies to segment your audience so you can deliver the right marketing messages to the right groups of people every time — no matter if you’re a Salesforce Marketing Cloud Engagement or Account Engagement user.
Audience Segmentation Strategies for Marketers Who Use Salesforce
Whether you are a Marketing Cloud Engagement (A.K.A. SFMC) Administrator or an Account Engagement (Pardot) Administrator, fundamental principles apply across the board when it comes to audience segmentation.
Below are tactics you can use within Salesforce Marketing Cloud Engagement and Account Engagement.
Who is actively engaging with your brand?
Use web tracking, social, and ads to learn how visitors interact with your brand. You can compile a group of individuals to target based on clicks, form completions, and pages visited.
For example, if you have a visitor who clicks an ad on social media and is taken to your website, where they download the content that you promised them with your ad, you can make the assumption that the visitor is interested in that product.
What preferences do your customers share?
Let’s say you are sending an invitation for an upcoming webinar. Segment your target audience based on previous ad clicks, webinar attendees, or downloaded resources. By building an audience list based on shared preferences, you will see an increase in webinar registrations and attendance.
For example, look at the specific campaigns you’ve launched in the past. Think about how you can categorize the products or services that were the main focus. Maybe you had a marketing campaign to drive awareness about a product that would result in a one-time and low-cost purchase. And you had another campaign advertising a product that requires a high-cost ongoing purchase. The people who engaged with the high-cost product but didn’t necessarily purchase the item may be good candidates for a segmentation list that includes people with bigger budgets to potentially spend.
Who are you actively targeting to attain as a new customer?
If you could create a map of ideal customers, what attributes would they share? Is it a specific set of companies? Perhaps, it’s a specific product or service you can provide them?
Decide on those attributes and build your segmentation strategy and buyer personas. Target this audience and help sales close the deals on your ideal customer.
Which individuals have expressly subscribed to what topics?
Take advantage of your Email Preference Center. You can create targeted campaigns that run on an ongoing basis and continue to nurture your target audience based on their expressed interests.
Ensure that your Email Preference Center offers a variety of targets, including product interests and types of communication. For example, the Sercante Email Preference Center allows email subscribers to sign up for only emails related to the services that interest them, like Salesforce consulting, integrations, or training.
Suppress individuals based on a subset of criteria
Counterintuitive to who you want to target with your email marketing, who do you want to ignore? Considering who you don’t want to receive a message from is as important as who should receive it. There will likely be a default suppression list, including competitors, employees, spam, etc., but you may also want to create specific one-off suppression lists too, such as email frequency or inactive customers.
Account Engagement (Pardot) Audience Segmentation Best Practices
Now that you have a few ideas on strategy, let’s talk about building segmentation within Marketing Cloud Account Engagement (Pardot) . Let’s review the list creation options and the different ways to add Prospects. Keep in mind, there may be times when you use multiple list types for a single send.
Static Prospect Lists
Static lists are controlled by you, the administrator. You set the rules and criteria for who joins and comes off the list. There are several ways to add to a static list, both manual and automated.
Imports
The most common way for building a static list is via prospect imports. When importing, you have the option to import via CRM ID or Email. If the list has existing prospects, you want to import via CRM ID. If they are brand new prospects, use the import via email option.
Within the import wizard, you will be given the option to add to a list via an existing list or by creating a new list. Once complete, review the import report for the total number of prospects created or updated.
Table Actions
Adding a subset of prospects that already exist within Pardot can be done via Table Actions.
To add a subset using Table Actions, follow these steps:
Navigate to your prospect table.
Set your filters, such as view and creation time frame.
Check the boxes of those you want to add to the static list.
Use the table action at the bottom of the table and “Add to List.”
Public Lists
Public Lists can be created as dynamic or static, but most default to static and are controlled by the Email Preference Center. These lists are subscribed to directly by the Prospect. Individual Prospects are able to subscribe and unsubscribe as they see fit based on their preferences.
Completion Actions
The “Add to List” completion action exists on most Pardot assets, including forms, form handlers, files, custom redirects, emails, and page actions. Completion Actions include both standard and conditional and allow you to set specific parameters when adding to a list.
Automation Rules
An automation rule is criteria-based. You can set multiple criteria pertaining to a Prospect by using “Match All” and/or “Match Any” statements. Based on this criteria, you then set an action, such as “Add to list,” which will populate a static list.
The good thing about using an automation rule to populate your static lists is that they are retroactive, so they will collect past and present matches and take action on them.
Dynamic Prospect Lists
Similar to automation rules, dynamic lists are criteria-based. Unlike static lists, these are outside of your control.
Once you set the criteria, the list will automatically add or remove prospects based on that criteria. These lists cannot be manually manipulated.
Campaign Membership
While there are several settings and criteria you can use to create dynamic lists, one of the most popular strategies is to build lists based upon campaign membership. This is especially beneficial when collaborating with sales teams.
If your sales team is adding Leads and Contacts to Salesforce Campaigns, perhaps based on a recent trade show, you can build a dynamic list in Pardot based on that campaign membership.
Marketing Cloud Engagement Segmentation Best Practices
Lastly, let’s look at how to best create segments in Marketing Cloud Engagement. Subscriber data can come from many different sources into Marketing Cloud and can be stored in two ways:
Lists
Data Extensions
Lists
A List is a collection of your subscribers. Lists are best used when you have a small dataset (500,000 or fewer subscribers) that you need to manage quickly and efficiently.
Lists share a format with your All Subscribers table and typically include Email Address, Subscriber Key, Status and any profile attributes you have created in your account.
Creating a List
To create a List:
Navigate to the Subscribers tab within Email Studio.
Within the My Lists folder structure, you can click ‘Create’ at the top right of the page to create a new List, assigning a name, external key, description, and placing the list in any folder you have created.
Once the list is created, it can be populated by manual or automated import.
Groups
A Group is a filtered list. Creating a Group allows you to build a subset of subscribers from a list based on rules or by splitting list subscribers by count or percentage of the total list being filtered.
The rules used to build a Group can be saved as a Data Filter, which can be used to automate the process to refresh membership in your group.
Creating a Group
To create a Group:
Navigate to the Subscribers tab within Email Studio.
Within the My Groups folder structure, you can click ‘Create’ at the top right of the page to create a new group.
Select whether the group you are creating is a Filtered Group or Random Group, then select the source List.
When creating a Filtered Group, drag any attributes or measures from the left side panel to the canvas and define the filter criteria.
To create a Random Group, after selecting Random Group and your source list, click ‘Add Group’ to add as many random splits as needed to get the desired number of random segments.
Once your filters or splits have been properly configured, click ‘Save & Build’ to create and populate your groups.
Once created, unless automated using a data filter, Groups need to be refreshed manually to be up-to-date.
Data Extensions
Data Extensions are more complex than lists and offer greater flexibility in managing contact data. While lists can only contain Subscriber information, Data Extensions are more flexible and can contain relational data.
Data Extensions data can be filtered in a similar fashion to Groups, and can also be combined with or filtered by data in other Data Extensions using SQL activities in Automation Studio.
Creating a Data Extension
Follow these steps to create a data extension:
On the Subscribers tab in Email Studio, select a folder within the Data Extensions folder and then click ‘Create’ at the top right.
Here, you select which type of Data Extension you want to create. Standard Data Extensions require you to define the fields of your Data Extension.
After defining the name and data retention policy for your data extension, you must define the fields in the table, choosing from several data types, including Text, Date, Number, and Boolean. You can also set the length and default value for each field.
Once you have defined all fields needed in your Data Extension, click ‘Create’ to finalize your Data Extension.
This Data Extension can now be populated by manual or automated file imports, API calls, SQL Query activities, or AMPScript.
Filtered and Random data extensions function in much the same way as Groups. Filtered Data Extensions require selection of a source Data Extension, then definition of any filter criteria. Random Data Extensions will produce a number of data extensions of randomly split rows based on the number of splits defined in the setup.
Go forth and segment your audience like a Salesforce marketing pro
Marketing Cloud offers multiple routes to implementing segmentation and audience targeting, regardless of platform. By taking into consideration your audience personas, incorporating key email marketing segmentation strategies, and applying the correct segmentation tools, you will be able to spread brand awareness swiftly. Have any cool stories of marketing segmentation success? Tell us in the comments. Or reach out to the team at Sercante to get help with your audience segmentation strategy.
Thank you to Zachary Norman for contributing to this post!
Salesforce opportunity record pages are great for displaying all of the key information about a particular record. But, what if you need to be working with and updating multiple related records at the same time, without flipping back and forth?
That’s where this hack for displaying account fields on Salesforce opportunity record pages comes into play.
Salesforce Opportunity Record Page Example
Let’s say a sales rep is working on an opportunity, but some of the fields they need to see and update are on the account.
If they only needed to view the information, using custom formula fields on the Opportunity referencing Account fields would have been sufficient. Because they also wanted to update this information while they were on the Opportunity record, an alternative option may be using an Object Specific Action with the Lightning Record Page.
How to Create an Object Specific Action
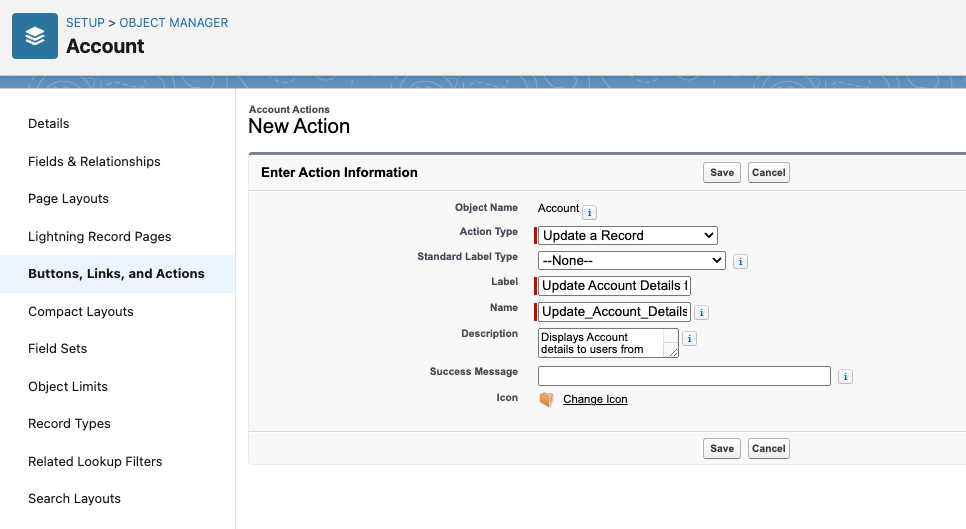
From Setup, go to Object Manager > Account > Buttons, Links, and Actions
Click New Action
For Action Type select Update a Record
For Label, enter a label that is appropriate for this purpose. For example ‘Update Account Details’
Enter a Description outlining the purpose of this action. For example ‘Displays Account details to users from Opportunity record page’
Click Save.
Edit the Action Layout
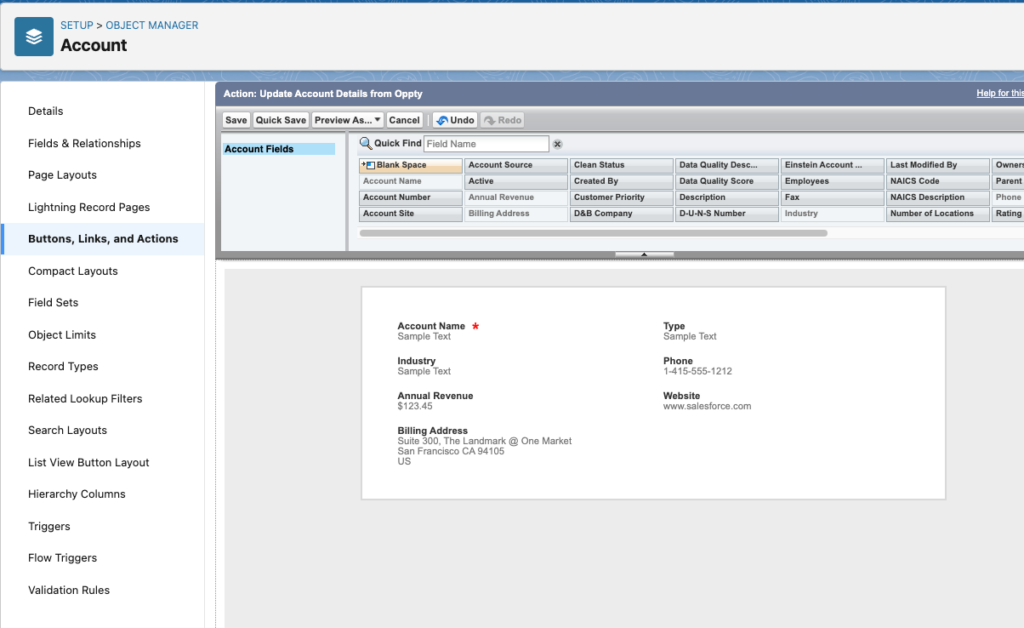
This is the key! This is where we decide what fields to display, and how they will be arranged.
Once you have saved, you will be looking at the Action layout.
Note: you can also access this later from the Action page by clicking on the Edit Layout button.
Just like a page layout, drag and drop the fields that you want to be visible.
Click Save.
Add the Account Action Layout to the Opportunity record page
Now that we have the Action Layout we want, here’s where we connect it to the Opportunity.
From Setup, go to Object Manager > Opportunity > Lightning Record Pages.
Select the Lightning Record Page you want to update.
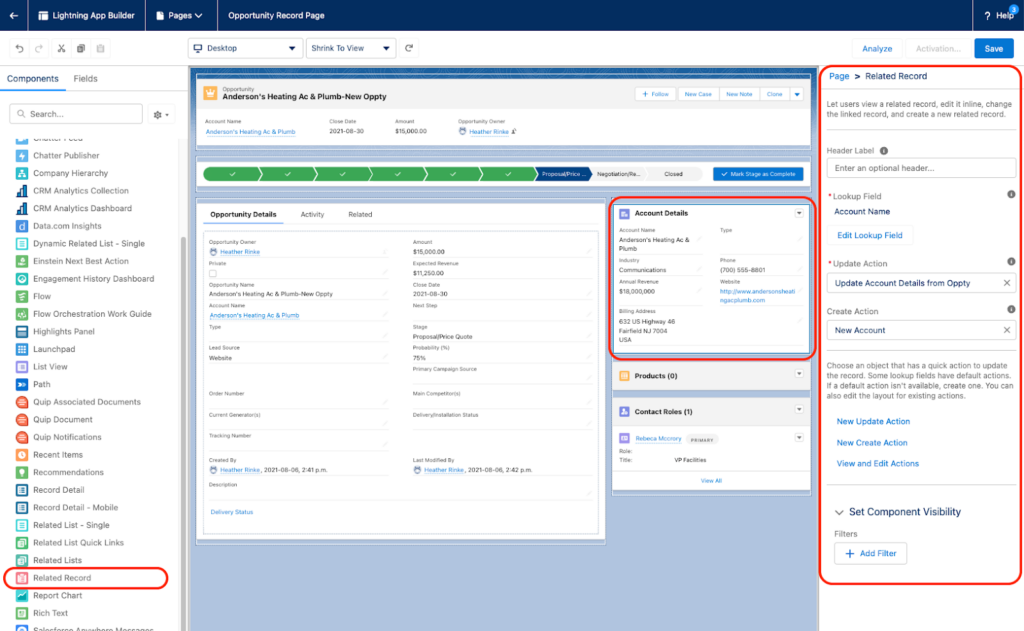
Drag the ‘Related Record’ component where you want it on the page.
In the Related Record settings panel on the right, update the following:
Header Label = the heading that will appear at the top of that layout on the page
Lookup Field = Account
Update Action = the name of the action you created above
Click Save.
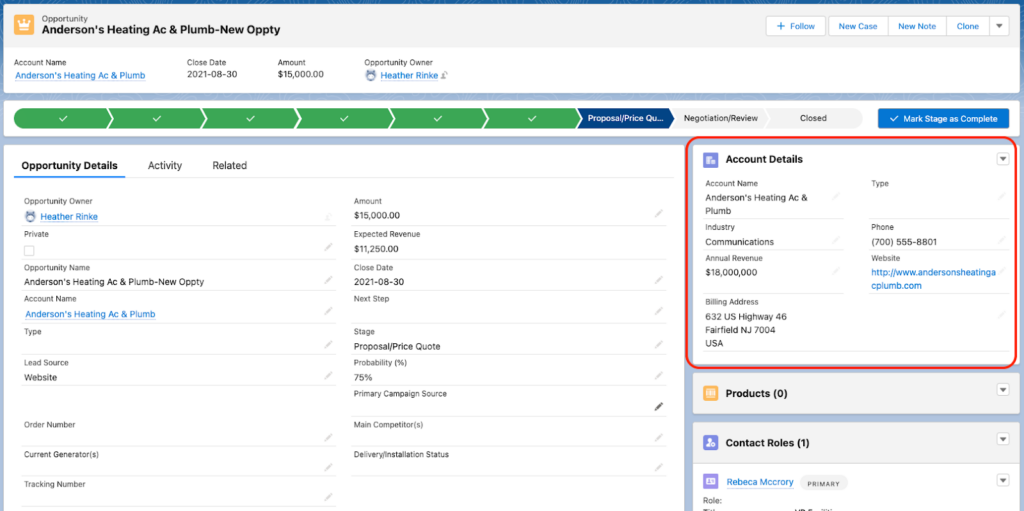
Now when looking at an opportunity, the related Account fields will appear on the Opportunity record page!
Editing Account Fields on the Opportunity Page
Unlike formula fields, these fields can be edited directly from the Opportunity.
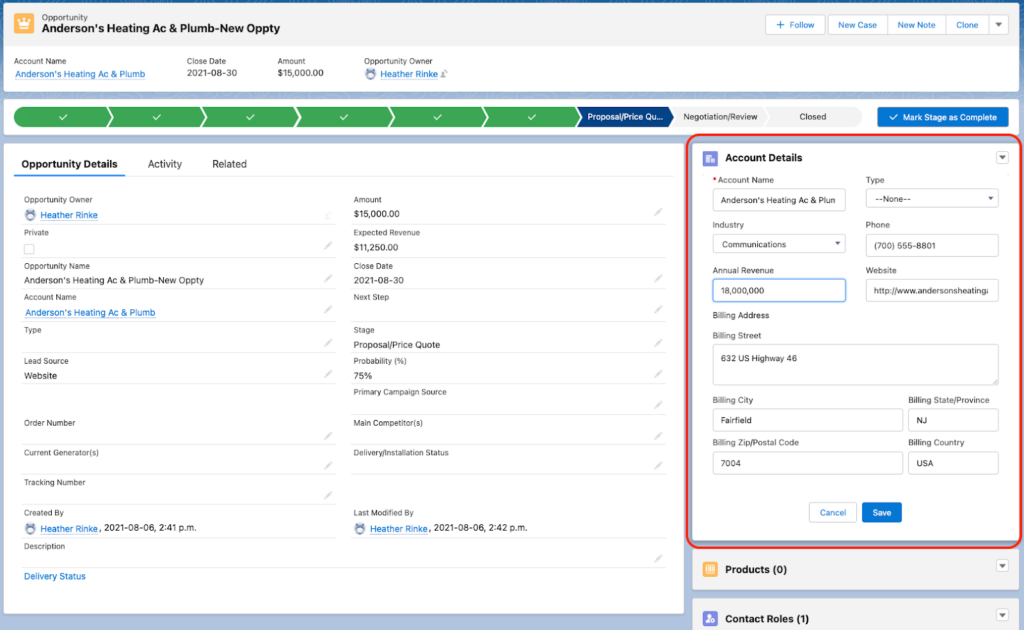
To edit the Account fields, click the pencil icon next to the Account field you want to edit. All of the fields in that section will become editable, and notice that the Opportunity fields are not. When done, click the Save button to save the fields in that section. These fields are edited separately from the Opportunity fields.
Find Key Account Details on the Salesforce Opportunity Record Page
That’s it! Now the sales team can manage the key details on their Account and Opportunity in one place. All with a handy object-specific action layout and the flexibility of a Lightning record page. Want to know how you can use this tip in your overall technology strategy? Reach out to the team at Sercante to start a conversation.
You can also check out these resources for more ways to make work flow between your sales and marketing teams:
So you’ve spent hours gathering requirements, picking datasets and creating the most beautiful report the world has ever seen. And then, while presenting your amazing work to leadership you hear the dreaded “That number looks off”…. And you can’t quite pinpoint why the reporting accuracy is in question.
No one wants to be in that situation. But the good news is there are ways to think ahead and get your report the “cred” it deserves!
A very simple way to get trust in your marketing reporting data is to create a ‘count and amount’ report in each system.
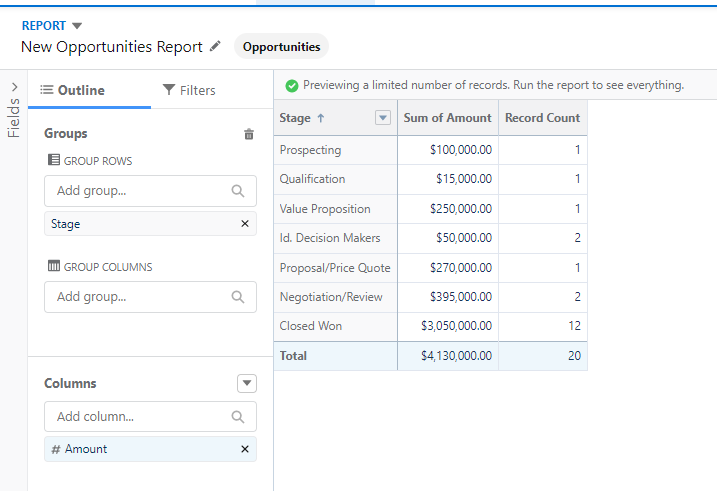
As an example, if I am creating a report in CRM Analytics where I have enriched the Opportunities object, I can create a compare table that has total Opportunity Dollar amount and Total count of opportunity. Then I can create a report in Salesforce reporting with the same criteria.
Why? This allows you to confidently point to “evidence” that the base data is accurate. One bad join can have a huge impact. Better for you to catch it before the consumers of your report do!
2. Understand “known” data differences between systems
Salesforce has some datasets that don’t match perfectly. There are numerous reasons this can occur. Familiarize yourself with these differences! While these differences will differ depending on the source of your data, you want to make sure you understand the why.
Some reasons include:
Date differences between systems
Schedules (vs. real time)
Fiscal Dates vs. Dates
Permissions associated with the Integration User
Use of “archived” prospects for reporting purposes in one system but not the other
Organizations should generally decide what the source of truth is for data when a discrepancy exists. And that source should be defensible in the “data” court of law.
Ok, that’s an exaggeration. But a smart report writer would make sure they know what is considered the “truth” (or develop it) before even starting. If the CEO thinks a manually manipulated Excel spreadsheet has the “real” numbers on it (and refers to them), that could be hard to match. Ultimately, it could undermine your efforts to present new reports.
Getting a clear, accurate and agreed up source of truth is critical. Otherwise, you will spend all your time defending your data. Try to create that source of truth if it doesn’t exist and avoid sources where data is manipulated manually.
4. Check for frivolous connections
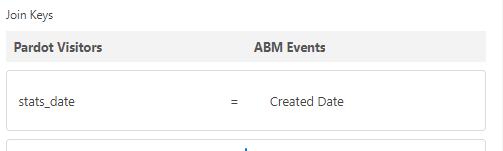
How can your data connections be frivolous? You can connect (Join) opportunities to Leads using the date field, but that doesn’t really make any sense.
Make sure your connections are logical and have the same data type (text, numeric, etc). Look for common IDs as this will be the most accurate. Sometimes names can be used, but since most often unique names are NOT enforced, use with caution.
Bad connections can also make you lose data. Refer back to the “count and amount” section to review how to watch for that. Finally, remember that sometimes you need more than one field connection. For example, in CRM Analytics if you would like to join prospects to campaign members, you need both Lead/ContactID and campaign ID or you will get inaccurate results.
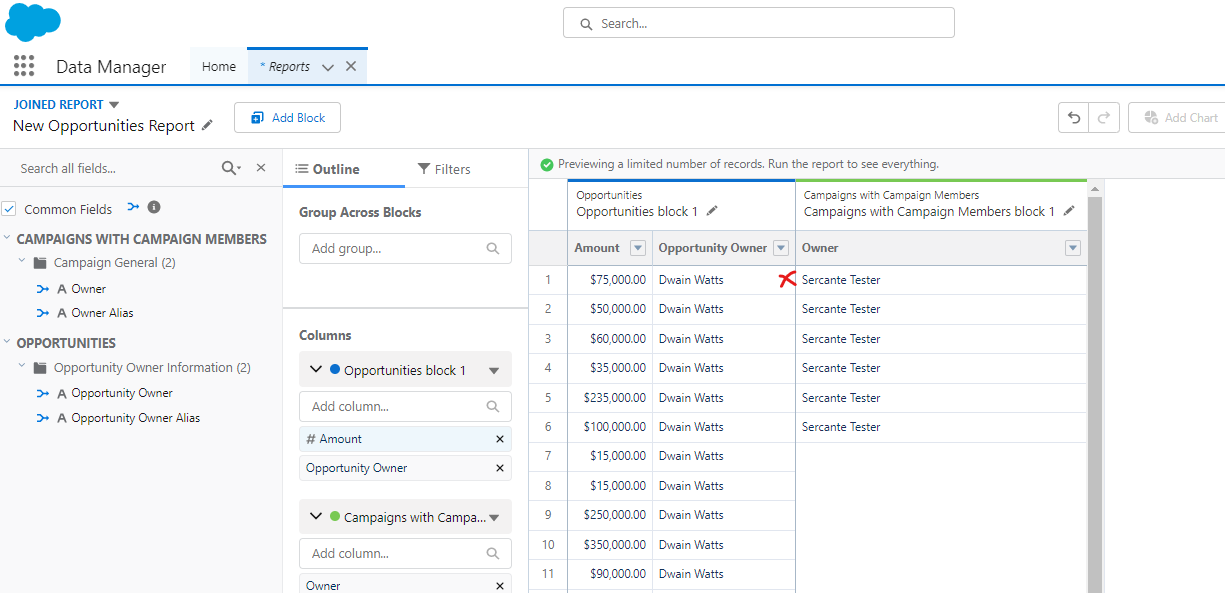
In this Salesforce reporting example, we’ve created a joined report and linked the blocks based on the common field “Owner”. As you can see, the owners can’t really connect the data since one refers to Opportunity owner, and the other to campaign owner.
In the CRM Analytics example, you will get data that matches, but it will have no meaning in the report.
5. Identify processes that fill in key data
Wondering why there are no influence opportunities? You can’t create a report on data that doesn’t exist. As you consider what questions the report will answer for you, consider the process. What changes are needed to make it accurate? Who are the “actors” in the processes that drive the data?
If you are dependent on Salespeople to fill in contact roles to get campaign influence, make sure you have included a task to verify that is being done consistently in your report creation plan. Or consider tools that can automate the processes that will make your reporting accurate and consistent (like Sercante Automated Opportunity Contact Roles).
Often, creating a report is a catalyst to process change as gaps and errors are unearthed.
Reporting accuracy is important, but not easy
You’ve done the work — developed the questions, worked through the KPI’s and now you are ready to create your report. Make sure your reports get the respect they deserve and add the value they should with these five considerations.
Unearthing those process gaps as you work through the steps to ensure accuracy in your Salesforce marketing reporting? Reach out to team Sercante so we can help you build a strong foundation and winning marketing reporting strategy.