
So picture this scenario: Pardot says you can’t email someone. But you want to. So how do you override what the system says so you can send your gosh darn email?
Here’s a standard consultant-y answer for you:
It depends.
It depends on WHY you can’t email people, the age of your Pardot org, and if you’ve done anything to mess with the default behavior of the subscription management fields.
This blog is going to outline currently available default options in new, AMPSEA enabled orgs. I’ve seen plenty of client orgs that do NOT play by these same rules. My best guidance if you’re seeing something in your org that doesn’t match up is play this song, and TEST, TEST, TEST before doing anything crazy.
With that disclaimer out of the way, let’s break this down.
The fields that control mailable status in Pardot & Salesforce
There are three little checkboxes in Salesforce and Pardot that are key here: Email Opt Out, Do Not Email, and Pardot Hard Bounced.
Email Opt Out
This default field is intended to show who has actually opted out of email and unsubscribed. In Pardot, this is labeled “Opted Out.” In Salesforce it’s labeled “Email Opt Out” (API name: HasOptedOutOfEmail.)
These Pardot and Salesforce fields are mapped to each other by default, and are mapped from the Lead to the Contact on record convert by default.
Do Not Email
This default field in Pardot that is intended to be the master list of anyone you can’t email — unsubscribes, people who have hard bounced, and people who have soft bounced 5 or more times.
It does NOT exist in Salesforce by default. But it can be mapped to a Salesforce field.
Pardot Hard Bounced
This is a custom field created in Salesforce by default when you install the Pardot connector. It’s available to pull into reports, list views, and page layouts in Salesforce.
But strangely, it does not show up as a field you can edit or touch in Pardot. When you actually have a hard bounce though, you see these pop up on the prospect record:
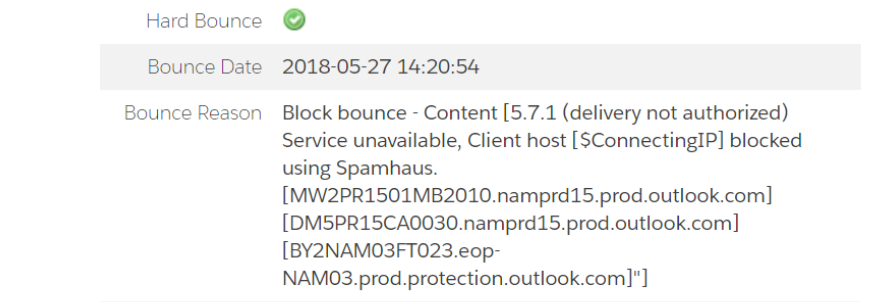
If you try to edit the prospect record to get at these, no dice — MC Hammer style, you can’t touch this.
3 ways to opt people back in who have unsubscribed
The default behavior of Pardot is to err on the side of respecting Opt Outs. If you opt someone back in via Pardot, and Salesforce still has an opt out value, Salesforce will update Pardot to show the prospect as opted out.
This makes sense, conceptually. The person opted out, the system tries to honor that. In practice, this is sometimes problematic because:
- Sales reps love to opt people out and then complain about them not being emailed
- You might import legacy lists with questionable mailing status as “Opted Out,” and can’t email them even if they later re-engage
- A million other random scenarios
But, you have options to work around this.
Option #1: Individually opt people back in both places, super fast
You can opt someone in really quick in Pardot, and then race the connector sync and opt them back in via Salesforce too.
This works okay — but it means only Pardot admins can opt people back in, provided they have access to the Salesforce record in question and can toggle between browser tabs fast.
Option #2: Mass opt people back in with the help of Pardot Support
If you need to opt people back in en masse, you can plead your case to Pardot Support and pinky swear that these people really want emails from you.
If they’re on board, you can unverify your connector, use DataLoader to clear the Opt Outs on the Salesforce side, and get Pardot Support to clear the Opt Outs on the Pardot side.
Not a terrible process, but it does result in some downtime for the connector, which is not ideal.
Option #3: Enable connector setting to overwrite prospect opted out field
As of very recently, there’s a new option available if you edit your Salesforce connector:
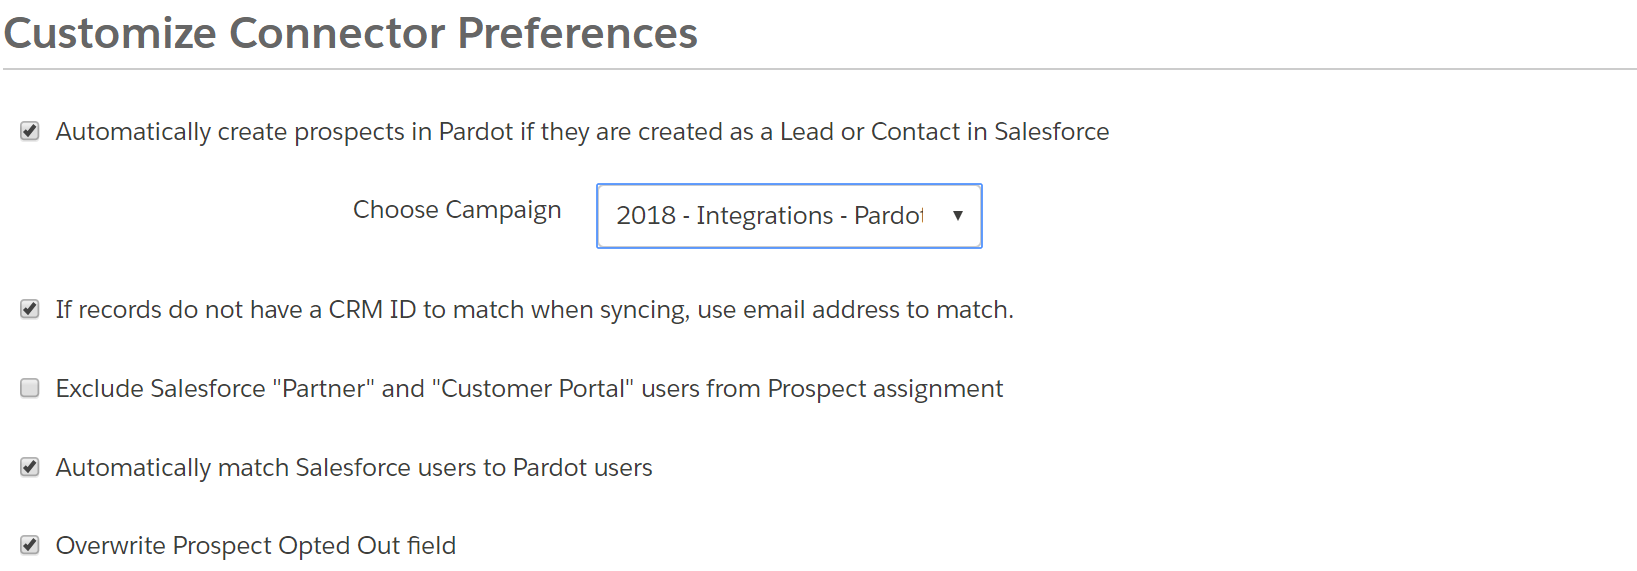
If you check the box, each user can opt in up to 100 people per day.
3 ways to update prospects who are Do Not Email, but NOT unsubscribed
Pardot is also pretty protective of the system generated bounce statuses and the “Do Not Email” field. This makes total sense — if you had a bunch of people bounce out, there are probably bigger changes that you need to make to ensure future successful deliverability.
As mentioned above, the Do Not Email field isn’t even mapped to Salesforce by default. But Pardot Hard Bounced is. If you click in to edit this field, Salesforce will let you “unbounce” a prospect:

…but this effectively does nothing. The field will continue to be unchecked in Salesforce, even after the records sync. But Pardot looks at this and says:
“Nah, bro.”
…and keeps the prospect marked as Do Not Email and Hard Bounced on the Pardot side.
But again, you have options to bend the system to your will, you powerful admin, you.
Option #1: Click “Remove Do Not Email from all Records with this email” on each prospect record
If you go into each bounced or DNE prospect record, you’ll see this link:

Click it, and BOOM, they’re back in biz.
Option #2: Uncheck Do Not Email on each prospect record
Edit the individual prospect in Pardot, uncheck Do Not Email, and save.
You won’t have the ability to edit the Hard Bounced, Hard Bounce Date, or Hard Bounced Reason field — but they will disappear from the prospect record in Pardot. The prospect’s “Pardot Hard Bounced” field in Salesforce will remain checked. But they’re mailable.
Option #3: Change their email address, then change it back
If you edit a prospect’s email address in Pardot or Salesforce, it clears the Hard Bounce and Do Not Email fields.
If a prospect hard bounces, that means the email address was bad, right? So, if the email address changes, then that prospect should be mailable again — which is why the system clears these fields.
You can use this to your advantage if you need to clear the Do Not Email field en masse. Here are the steps:
a. Export the list of bounces you need to opt back in
Be sure to include email address and CRM Lead FID and CRM Contact FID.
b. Add a column called “new email” and add the formula =CONCATENATE([cell where you have email],”.test”)
You’ll end up with something that looks like this:

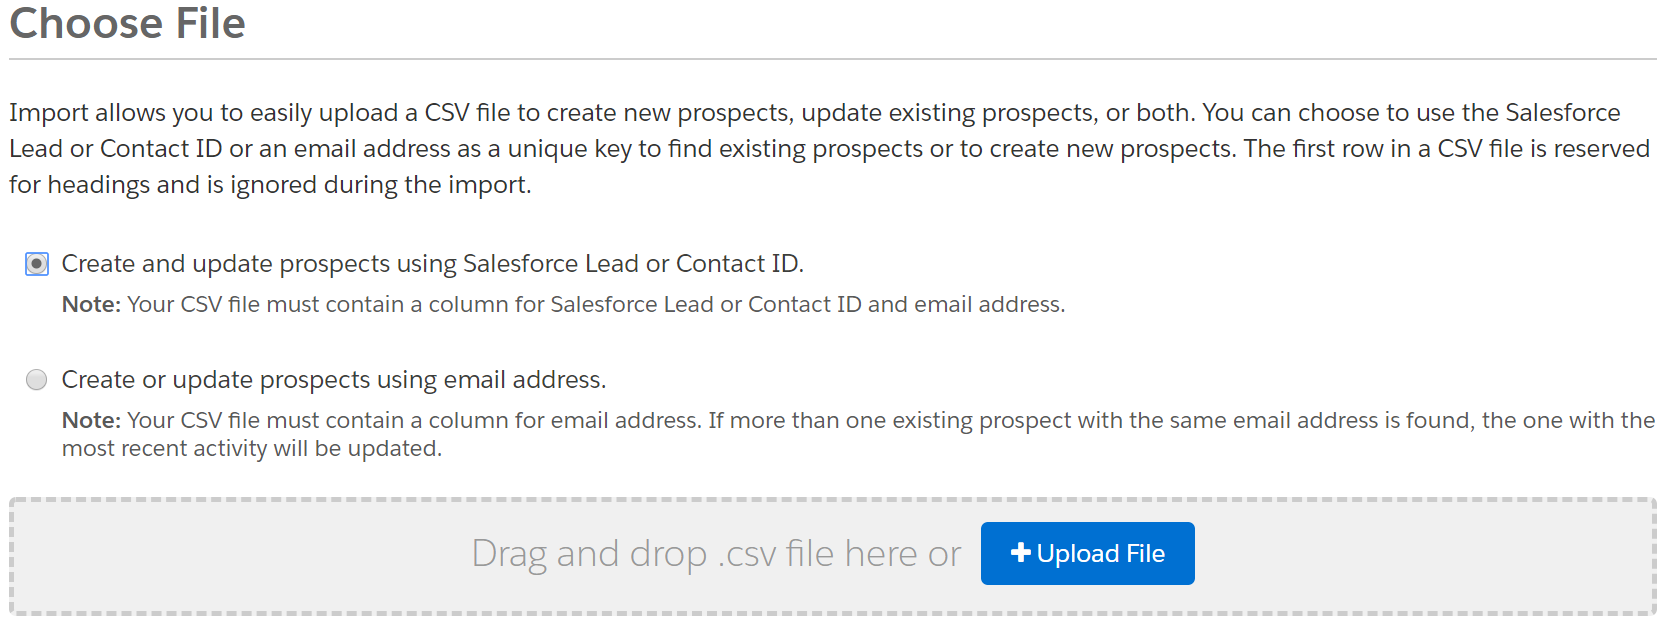
c. Import a CSV to Pardot to overwrite the Prospect’s Email field
In Step 1 of the import wizard, choose to match on CRM ID:
When you get to the field mapping step — map your “New Email” field to “Email” and check the box to overwrite existing data.

d. Import a CSV to Pardot to FIX the prospect’s email field
Let your import do its thing, then spot check a few records. These should now be mailable — woo hoo!
But now you have to fix the email addresses so that they’re actually correct. So re-import your same spreadsheet, and this time map “Email” to “Email,” and tell Pardot to overwrite existing data.
Voila! All set.