
I tend to nerd out when it comes to advanced form styling in Pardot. I get personal satisfaction from taking a form beyond its default “out-of-the-box” capabilities to meet a specific requirement or use case.
Recently a client brought a unique challenge to me that required advanced form styling.
The client in question had a form on their website to collect additional data on Prospects. They had introduced a new field to the form and promptly saw an influx in Connector errors.
The reason?
The field that Pardot synced the data to in Salesforce had a character limit. Prospects that submitted the form had entered too many characters, which resulted in Connector errors.
How we addressed the need to limit characters in a field
If you’ve been in Pardot for any length of time, you’ve likely noticed there isn’t anywhere to set a field character limit in the Form Builder or field settings. So how did we fix this?
The solution is to use a combination of Javascript, CSS and HTML to set a limit on the form level. This way users can’t submit the form if they have too many characters in a specific field.
Check out this live example of limiting characters on a field…
Solution Breakdown: How to set character limits in a Pardot form
Let’s dive into how this works!
A quick note: while the edits we’re about to make involve coding, you do not have to be a coding wizard to make them. I’ll walk you through each step.
In the example above, I have set a 5 character maximum on the Limit field. When the character count is below 5, it displays “under character limit”. When the total is greater than 5, we see a warning message that reads: “# characters over.” Furthermore, it will prevent a user from submitting a form when the total character count has exceeded the limit.
This is all powered by the following:
<script type="text/javascript" src="//ajax.googleapis.com/ajax/libs/jquery/1.10.2/jquery.min.js"></script><script>
    $(document).ready(function() {
        window.pardot.$("p.limit input").after("<p id='limit-text' style='color: #999999; font-weight: normal;'>Under character limit.</p>");

        $('.limit input').on('keyup', function() {

            var charMax = 5;

            var charCount = $(this).val().replace(/\s/g, '').length;
            var charCountOver = charCount - charMax;

            var charUnderLimit = "Under character limit"
            var charOverLimit = charCountOver + " characters over"

            if (charCount <= charMax) {
                window.pardot.$("p.limit").removeClass("error");
                window.pardot.$(".limit-text").remove();
                window.pardot.$("p.submit input").prop('disabled', false);
            } else {
                window.pardot.$("p.limit").addClass("error");
                window.pardot.$("p.submit input").prop('disabled', true);
            }
            if (charCountOver < 1) {
                window.pardot.$("#limit-text").text(charUnderLimit);
            } else {
                window.pardot.$("#limit-text").text(charOverLimit);
            }
        });
    });
</script>
Don’t worry if you’re not a wizard at reading code. I’ll explain how to customize this script and implement on your forms.
Let’s get started!
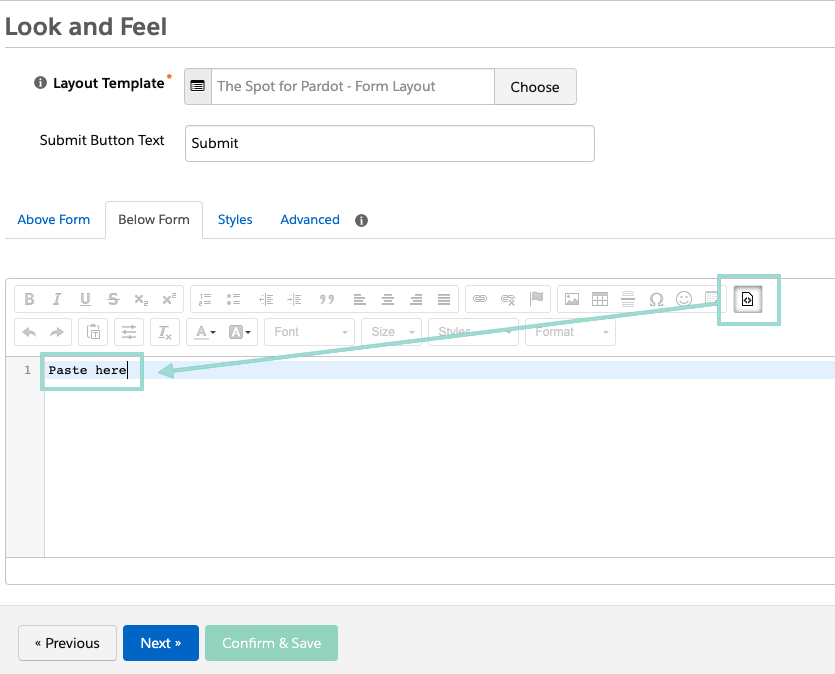
Step 1: Add the code to your Pardot form
- Open the form editor
- Navigate to the ‘Look and Feel’ editor page
- Select the ‘Below Form’ section and click the ‘Source’ icon
- Copy the code from above and paste the code into the editor
Step 2: Adjust the character limits
To increase (or decrease) the character limit, edit the charMax variable. The code below lists shows a limit of 5 characters. In your code, replace the 5 with your desired limit.
Hint: this is typically line 7 in the Pardot editor.
var charMax = 5;Step 3: Add the limit to the Pardot field
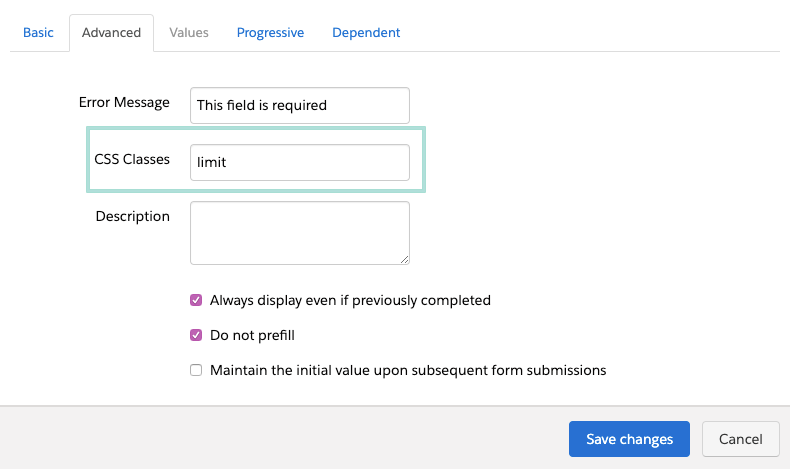
The code is ready to go. The last and most important step is to tell Pardot which field we want to apply the limit to.
- Navigate back to the ‘fields’ page
- Open the edit page for that field
- Click through to the ‘advanced’ settings page
- In the ‘CSS Classes’ field, input “limit”
It’s important your page looks exactly like the screenshot below. Otherwise this will not work.
Step 4: Save and test
The last step is to save all your changes. Now open up your form and start typing in your limited field.
Customizing text & error messages for character limits
There are two additional changes you can make if you want to customize your form even further: the text that’s displayed when the count is under or over the limit. This can be useful if you need to have very specific text surrounding the error.
Optional Update 1: “under the limit” text
To change the text displayed before the limit is hit, change the text that’s between the two quotation marks. (Hint: this is typically line 12)
| var charUnderLimit = “Under character limit” |
Optional Update 2: “over the limit” text
To change the text that’s displayed when a user exceeds the limit, edit the text between the two quotations marks. (hint: this is typically line 13)
| var charOverLimit = charCountOver + ” characters over” |
Once you’ve finalized all the settings above, your form is ready to go. Open it up in a new tab and test out the new limit.
Happy coding!
Allie