Looking for an easier way to migrate email templates as you prepare to move into a Salesforce marketing automation platform (MAP) from a legacy system?
You’ve already decided to migrate to a Salesforce Marketing Cloud Engagement or Marketing Cloud Account Engagement (Pardot). It took countless hours of analysis and planning — involving practically everyone on your marketing team — to get to this point. And it’ll take months more to get it done.
You explored and evaluated several MAPs and selected the ideal one from Salesforce. It’s one that can deliver incredible value for your organization. And it’s the most intelligent decision you could have made.
Or have you?
If your MAP migration happens without a Stensul™ email creation platform added simultaneously to your marketing automation technology stack, this critical initiative will take more time and money than even your sharpest projections suggest.
Here’s how an email creation platform makes migration to a Salesforce MAP faster and more cost effective.
Eliminate the need to recheck or recreate all of your email templates
A Stensul email creation platform lets you reuse your templates regardless of which MAP or email service provider (ESP) you’ve been using. This lets you avoid the cost of paying developers to do that work.
With Stensul, the chance for code to break during the recreation process is zero.
Decrease dependence on external resources for email creation
Because the Stensul email creation platform lets non-technical people create quality, on-brand emails, there’s no need to outsource email creation to an external agency.
If you opt not to handle any email creation, you can still leverage an agency, having them create emails in Stensul in a fraction of the time. With fewer billable hours applied to email creation, you can use the agency for other services — like strategy development.
Even if the agency is miles away from your marketing operation, Stensul gives you visibility into the entire process, at every step for real-time collaboration and instant feedback.
Reduce email creation training time and cost drastically
When your team is exposed to new software and faced with a new, complex system, like a MAP, there’s typically training involved. And lots of it at a hefty cost.
Let’s say the hourly cost rate of a marketer who handles email creation is $100. It generally takes 10 hours to get them comfortable building emails in a new MAP. That’s a minimum of $1,000 per team member.
Now multiply that across your entire team. It will add up fast.
Beyond that, there are inevitable glitches and fumbles when using a new MAP to create emails. When that happens, it’s a bottleneck that causes everything associated with the MAP to grind to a halt. And that’s an additional cost of consequence.
Cut time in half when migrating email to a new MAP
It takes half the time to get marketers up to speed using a new MAP — regardless of brand — when using an email creation platform like Stensul. Consider that most email migrations take two to three months to get set up in a new MAP when Stensul isn’t in place. That makes your return on your investment in the new Salesforce MAP take that much longer, and it will cost more.
If you’re looking to move to a new MAP, like Salesforce Marketing Cloud or Pardot, then consider incorporating a Stensul email creation platform into the process. It will simplify, speed up, and save costs associated with the migration process. What’s more, is it will make email creation far more efficient. Get your copy of “An Introduction to Email Creation Platforms” to learn more.
Salesforce Engage is awesome because it lets marketing teams share content with sales teams. Sales reps can use marketing-approved email templates to contact prospects at the right moment and track the effectiveness of the messages in Salesforce.
In a nutshell, Salesforce Engage allows marketing teams to keep things consistent across divisions. And sales teams deliver powerful content while gaining insights into their hottest prospects. Then, they can magically reach out at the perfect time.
In this blog post, we’ll show you all the things Pardot admin users will want to know about Salesforce Engage and steps to getting sales users started.
Getting Started with Salesforce Engage
So you’ve bought Salesforce Engage licenses, and your sales team is basically begging for access.
(And if they’re not begging for access, here are tips from Celine Newsome to get them more excited about Salesforce Engage.)
Well, let’s get into it!
Before we get started, there are some considerations to keep in mind.
You must have a verified Salesforce-Pardot connection.
Salesforce Engage isn’t supported in sandbox.
Do not add legacy Custom Permissions for Pardot to your Salesforce profiles.
Salesforce Engage users must also be Pardot users.
Click here to check out the official Salesforce Engage implementation guide.
Provisioning Access to Salesforce Engage
Giving users access to Engage is simple. We’ll give access through permission sets, update page layouts, and configure sending settings in Marketing Cloud Account Engagement (Pardot).
1. Give your users the correct permission sets.
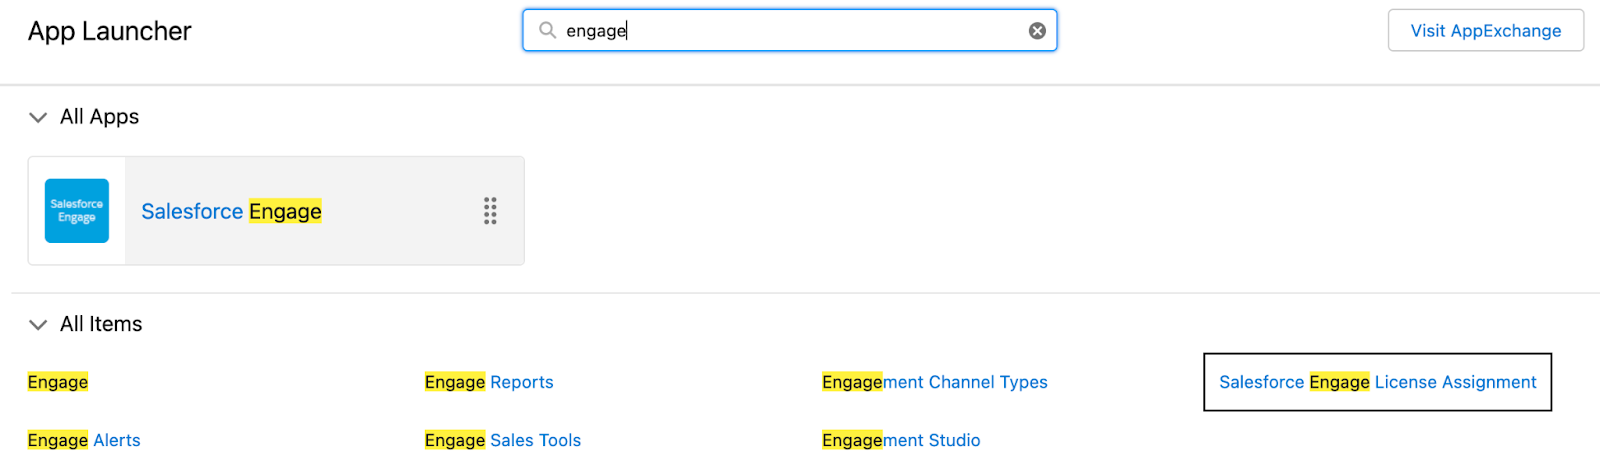
We can assign Engage to users in bulk. First we’ll search the app launcher for Salesforce Engage License Assignment.
We can select users with the CRM User, Sales Cloud User, or Service Cloud User permission set to assign the Salesforce Engage permission set license. Click “Add License(s)” when all users have been selected.
Optional: Users can also attach files to Engage email templates. To unlock this feature, enable Public Links and Set Up Content Deliveries.
2. Customize your page layouts.
There are several buttons that we can add to page layouts to give users access to send Engage emails straight from a List View of the record itself.
The buttons I recommend using are:
Send Engage Email
Add to Nurture List
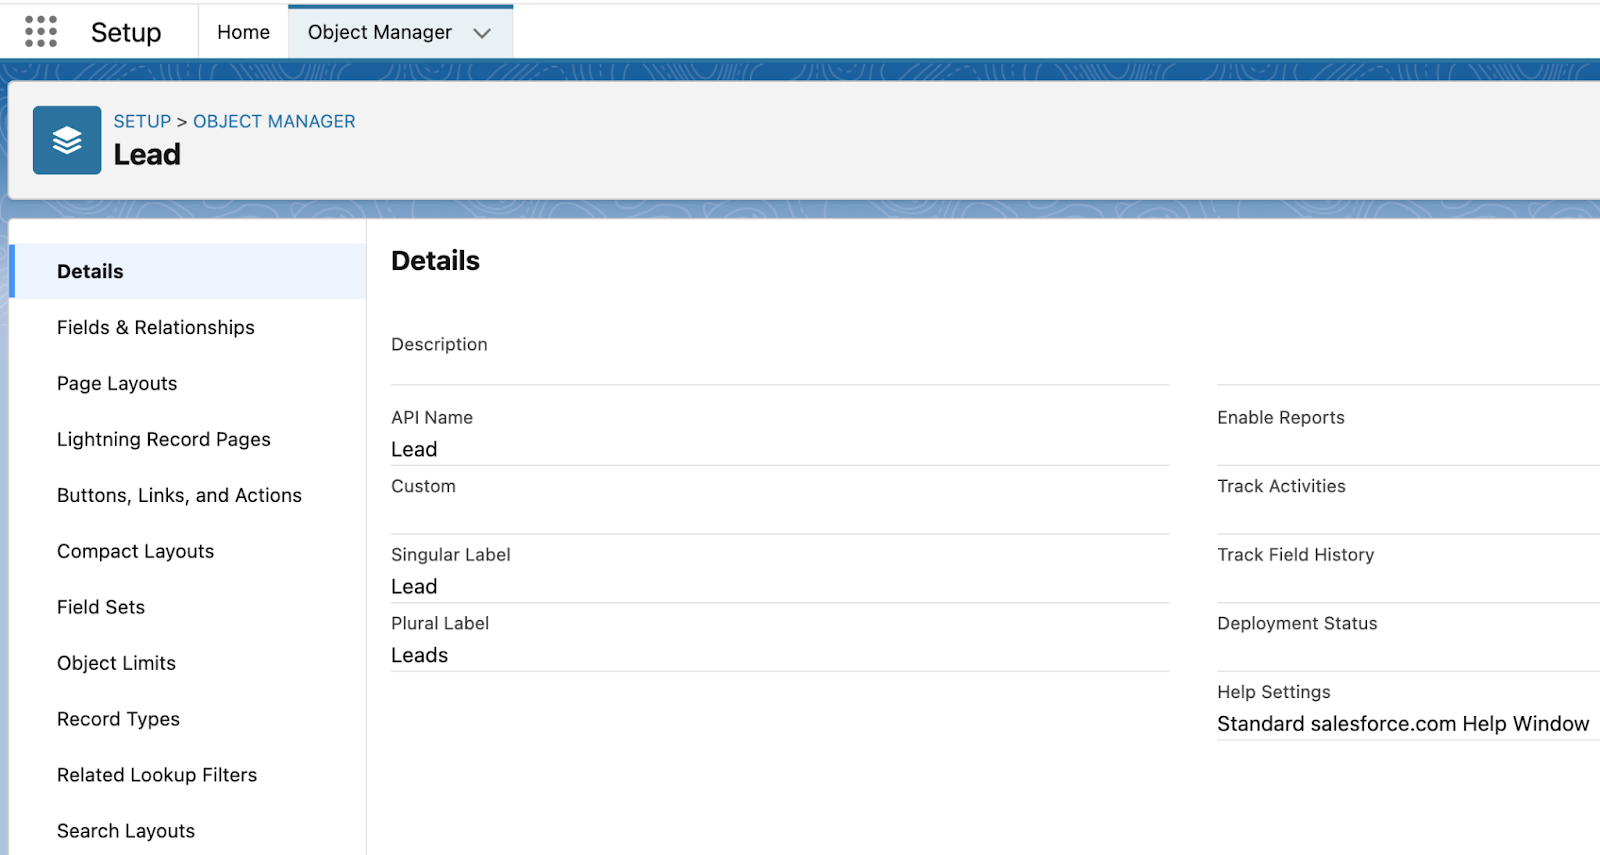
Let’s navigate to Settings and Object Manager. In this example, we’re going to work from the Leads object. These buttons should be added to both Leads and Contacts.
From the Leads page, we will click on Page Layouts. Update all page layouts that your team will send Engage emails from.
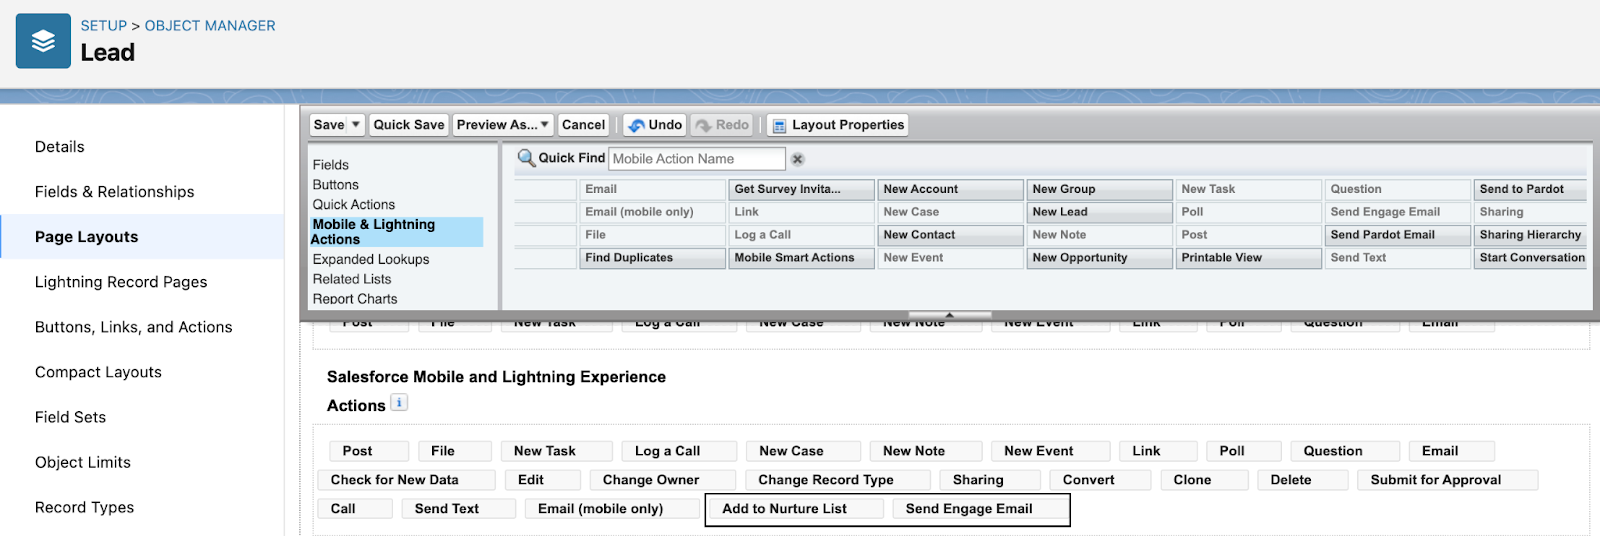
Select Mobile & Lightning Actions. Drag the two buttons onto the page layout.
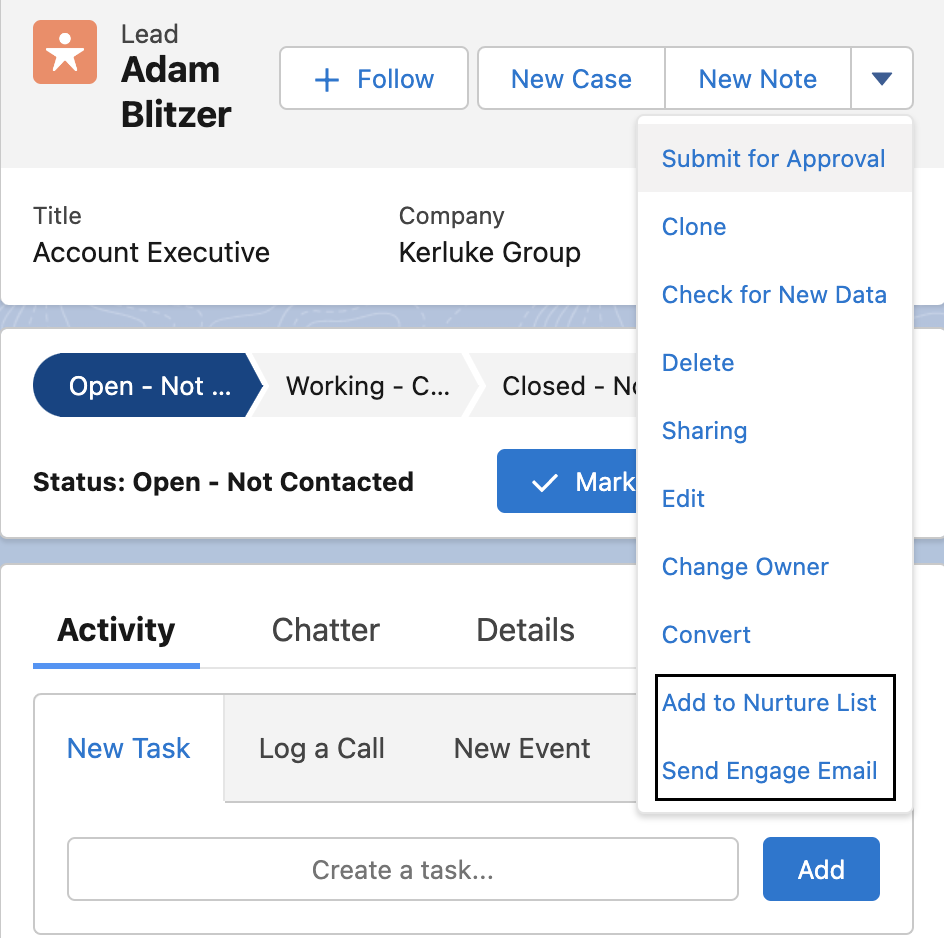
The record page will look similar to the image below.
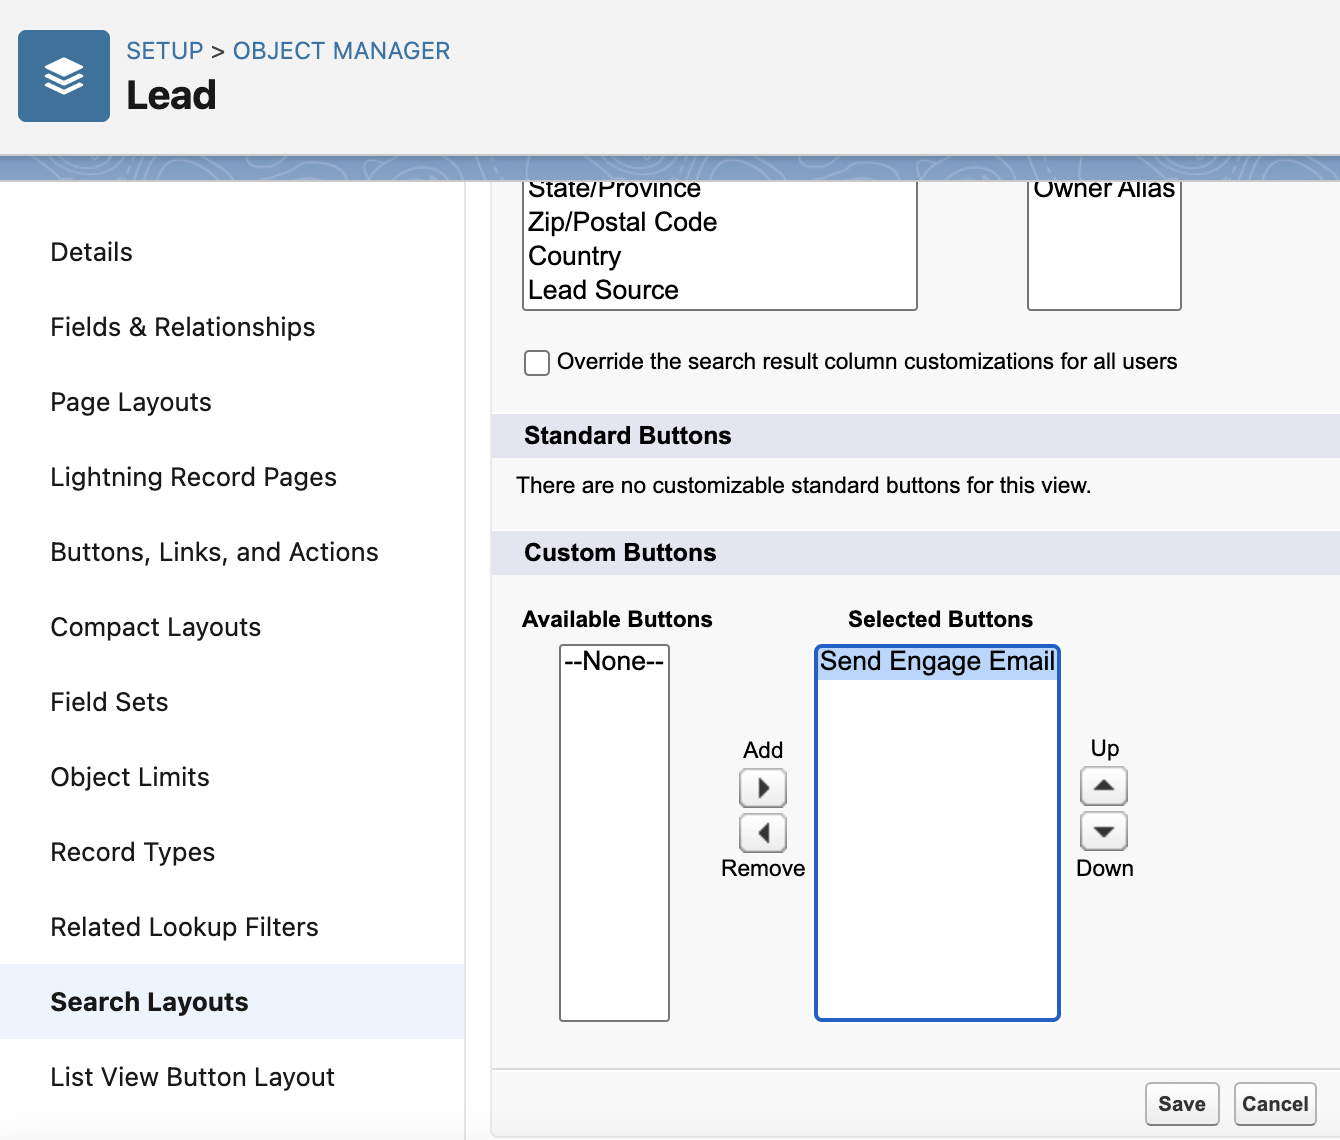
We can also add these buttons to the Search Layout. Doing this will allow users to send Engage Campaigns or 1-to-many emails in Engage. Back on the Leads object in Object Manager, select Search Layouts. Scroll to Custom Button, and select Send Engage Email. Move this to the Selected Buttons table, and click Save.
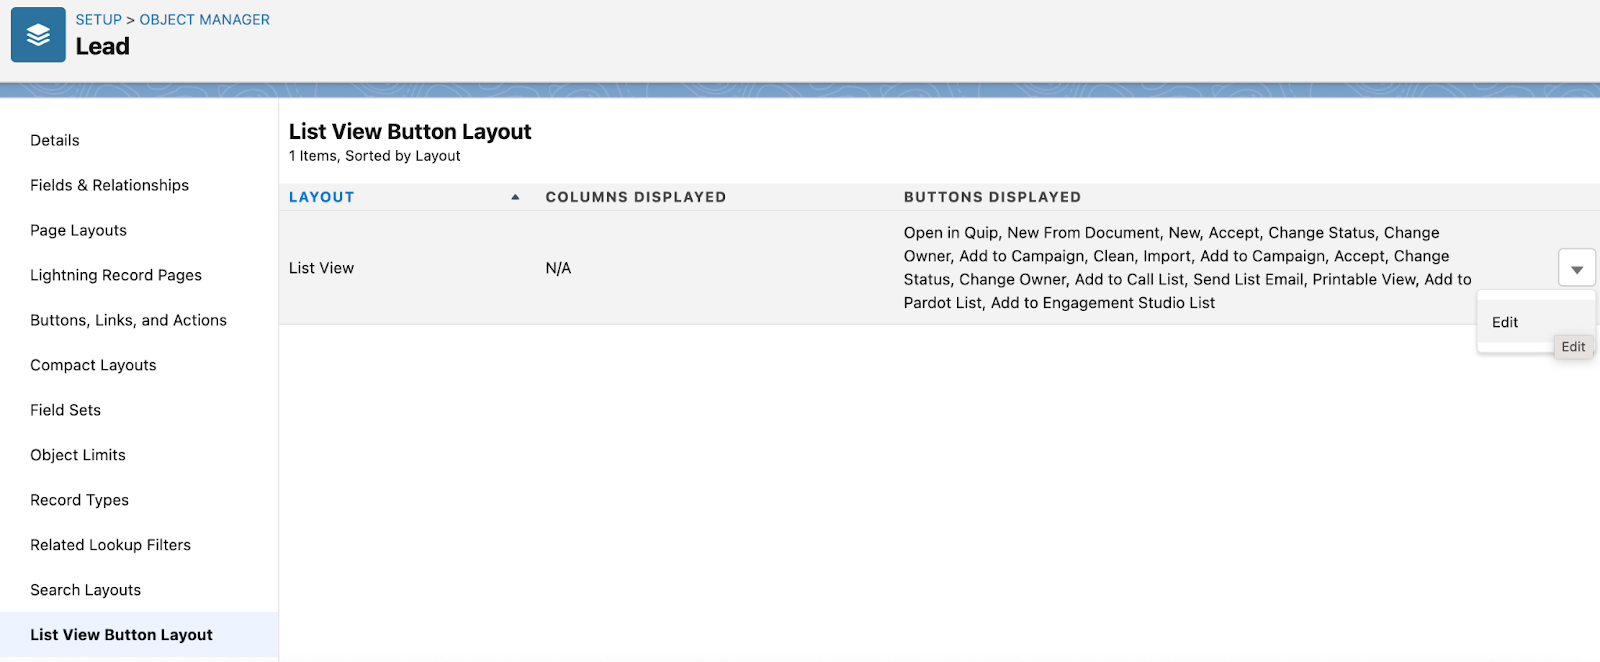
Next click on List View Button Layout in the left-hand navigation bar. Click to edit the buttons displayed.
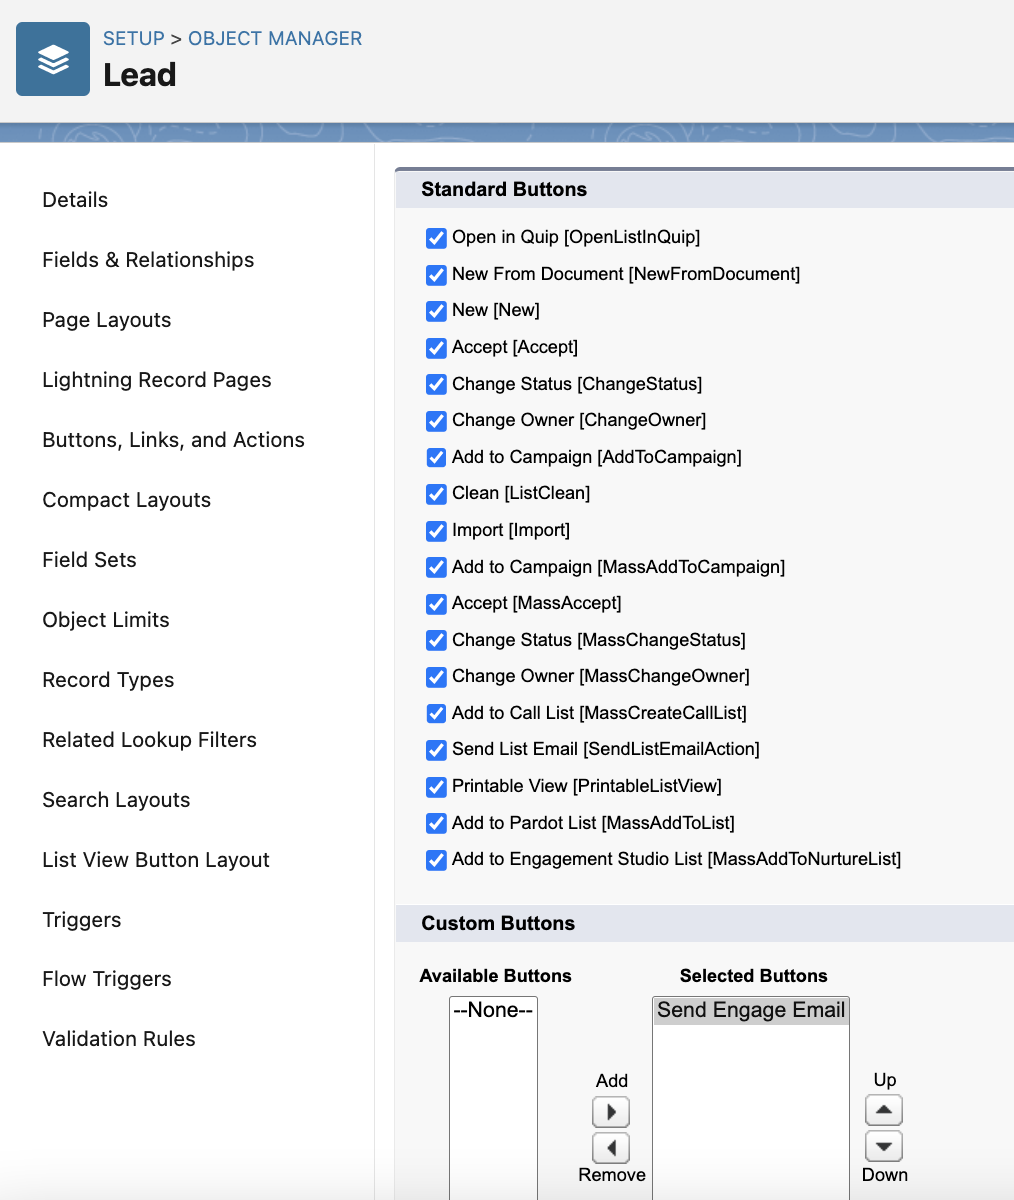
Select or deselect all of the standard buttons you would like to display. Move the Send Engage Email button from Available to Selected. Click Save.
The List View will look something like this.
Now any Salesforce Engage users can send Engage emails from individual records or from a list view.
3. Maintain Salesforce Engage in Pardot
Our job as admins doesn’t stop at providing access. There are also some maintenance tasks we need to follow in Pardot.
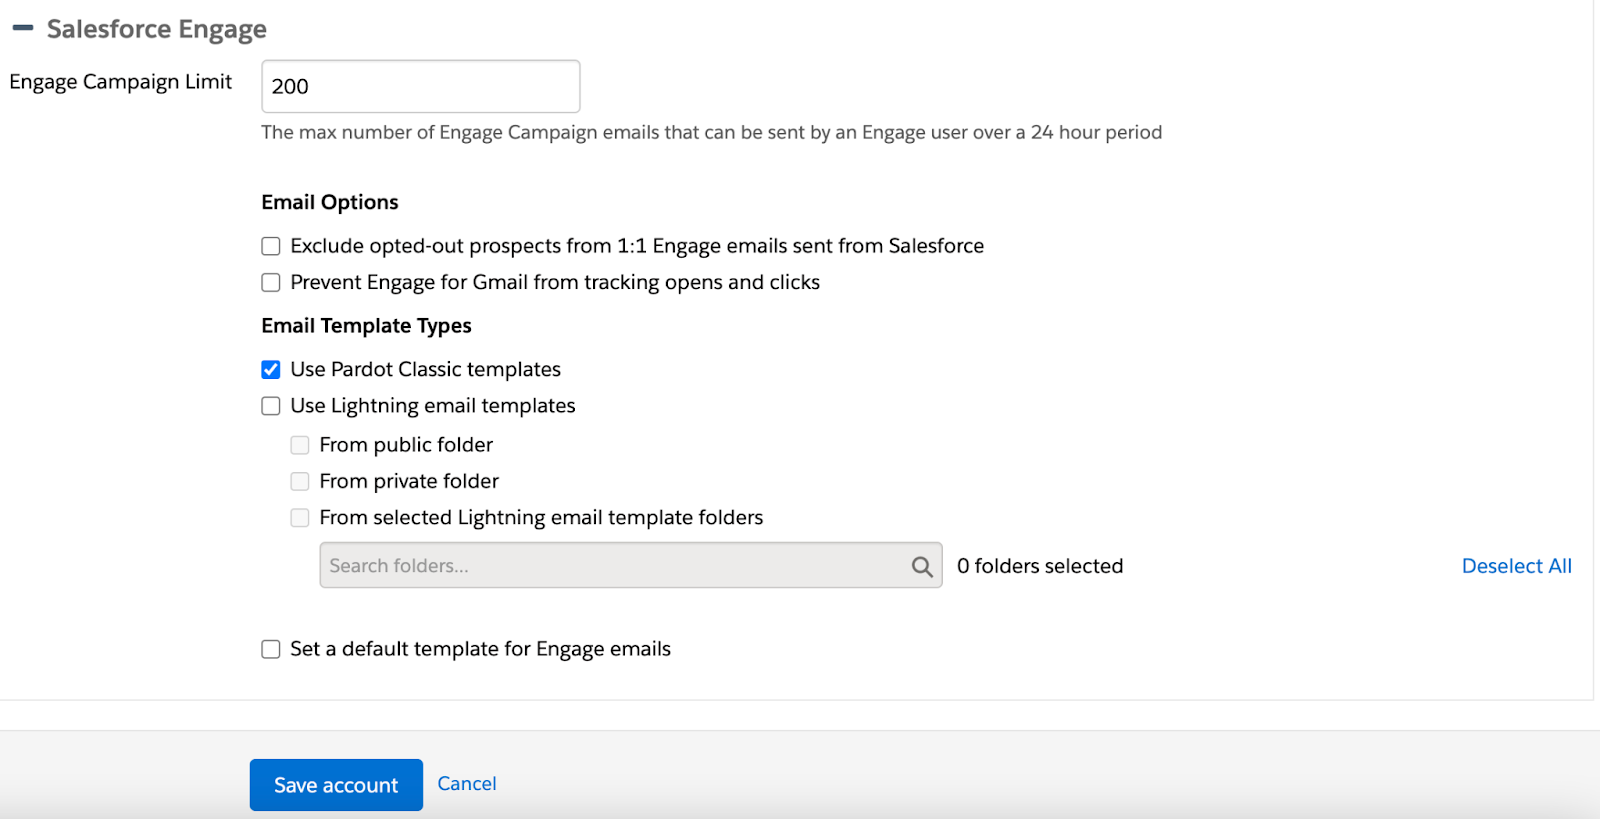
In Pardot Settings, we can manage how many Engage email sends per user can be sent each day as well as how to manage unsubscribes. Click Edit and scroll down to Salesforce Engage. These are the options you will see.
The Engage Campaign Limit is set at 200 by default. This could be any number from 0 to 500. Keep in mind, this is the limit per Engage user and not for all Engage users.
If you are using the Lightning Email Builder in Pardot, you can enable those templates to be used in Engage as well. Setting a default template for Engage emails is highly recommended. This will provide a template for users who do not select one when prompted.
More Pardot Maintenance Tips for Engage
It’s important to keep your email templates well organized in Pardot. Your Pardot organization will reflect in the Engage interface.
One key detail to remember is that any email template published as a 1-to-1 template can be sent through Engage — even if you didn’t want it to be sent. Complete a regular template review to make sure only approved content is available for our Engage users to access.
One last organization tip is to create a folder structure for the Engage templates that works well for Engage users. They will see the folders templates are placed in, and it’s best practice to make them end-user friendly.
Note: Ever accidentally build a list email that you need as a template for Salesforce Engage? Here’s an easy solution for that dilemma from Joanna Rotter.
4. Measure adoption and template performance.
The last step to ensure a successful implementation is reporting. Salesforce Engage has individual reporting for each user and the emails they have sent. Salesforce also offers Engage Team Reports. This is a free managed package that allows users to view Engage performance as a whole based on role hierarchy.
These steps take you through the Engage implementation as a Salesforce/Pardot admin. Once you’ve completed the setup, you’re ready to get going with training and onboarding. Let us know how you did in the comments section. Or drop us a line if you need help!
So, your marketing team has you all set up and ready to access a fancy tool called Salesforce Engage. Now what?
Salesforce Engage is a super powerful way for marketing teams to share marketing-approved templates with sales teams. You can use those email templates to contact prospects at the right moment and track the effectiveness of the messages in Salesforce.
Bridge the gap between sales and marketing teams
In a nutshell, Salesforce Engage allows marketing teams to keep things consistent across divisions. And your team can deliver powerful content while gaining insights into your hottest prospects. Then, you can magically reach out at the perfect time.
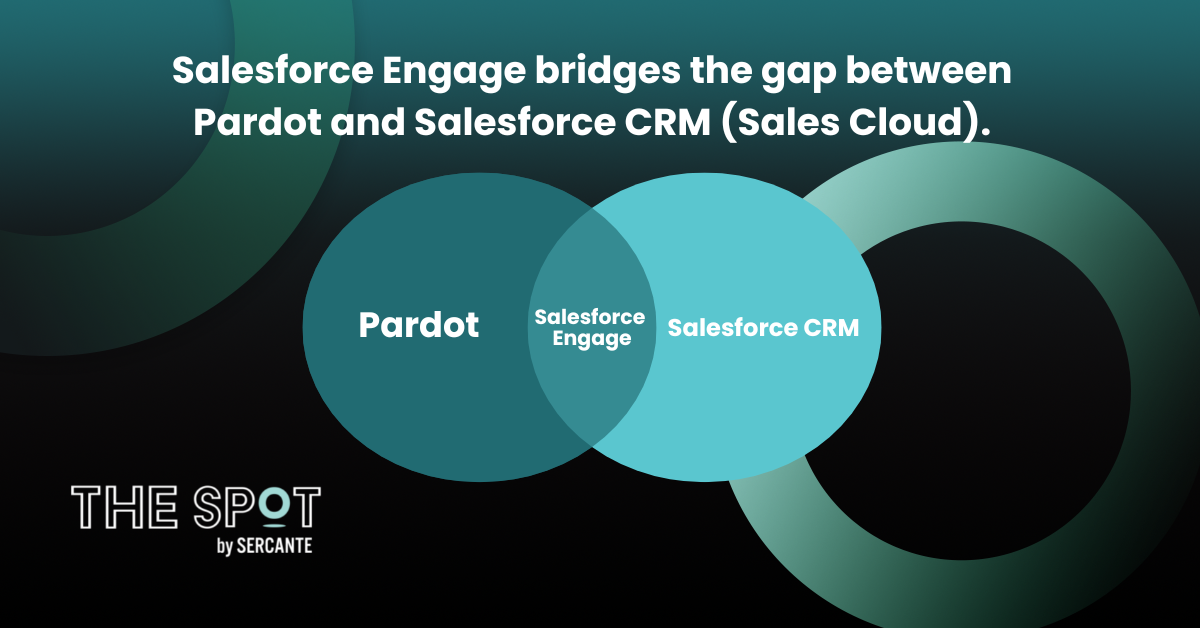
It’s the ultimate tool to unite sales and marketing teams by bridging the gap between Pardot and Salesforce CRM (Sales Cloud).
In this blog post, we’ll show you all the things sales users will want to know about Salesforce Engage as they get started.
Want to know more about Salesforce Engage from a Pardot admin perspective? Check out this blog post.
How does Salesforce Engage work?
Send fully written email templates to your leads and contacts, AND see how they perform. We can send emails to a single record or to multiple recipients at one time.
Let’s break it down.
Sending emails to one Lead or Contact
You’ve just finished a call with Sam at Gidgets & Gadgets Co. They are a high-profile, target account that we are speaking to for the first time. Sam also wants more information on our service offering.
How can we get this information to him?
You guessed it! Using Salesforce Engage.
Navigate to Sam’s record and click Send Engage Email.
From here, we can send him the template that covers the initial follow-up banter and the content he’s looking for. Any link click, file access, and action taken from the email will be tracked and contribute to Sam’s marketing prospect score.
Sending emails to multiple Leads or Contacts
It’s event season, and your marketing department is putting on a huge virtual event to launch a new product offering. It’s bound to bring in mega upsell revenue from accounts eligible for the new product. We can invite all contacts related to those accounts in one Salesforce Engage Campaign.
Select the contacts you would like to invite from the List View table. Click Send Engage Email, and find the invite template that marketing created.
Review the content, and make sure everything looks great. Click Send, and your invites are complete.
Salesforce Engage Reporting
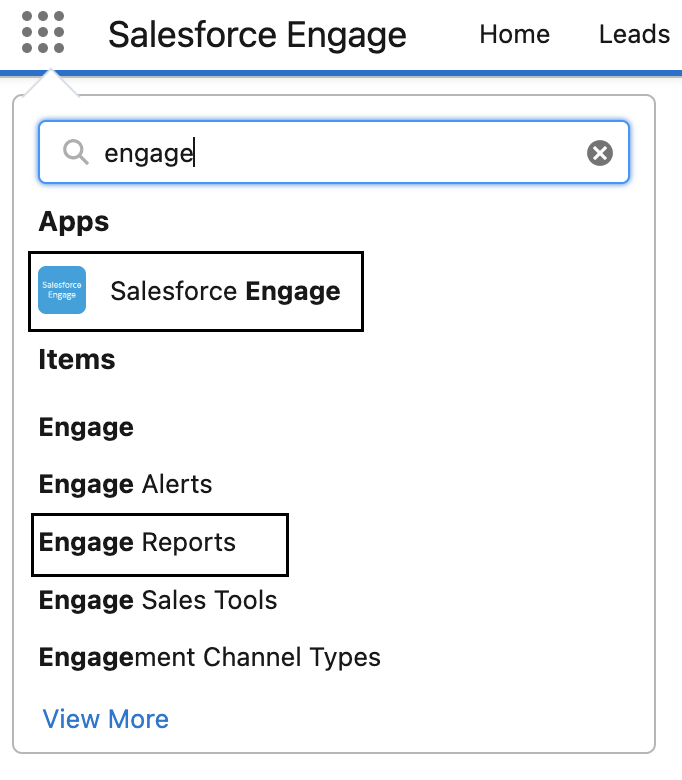
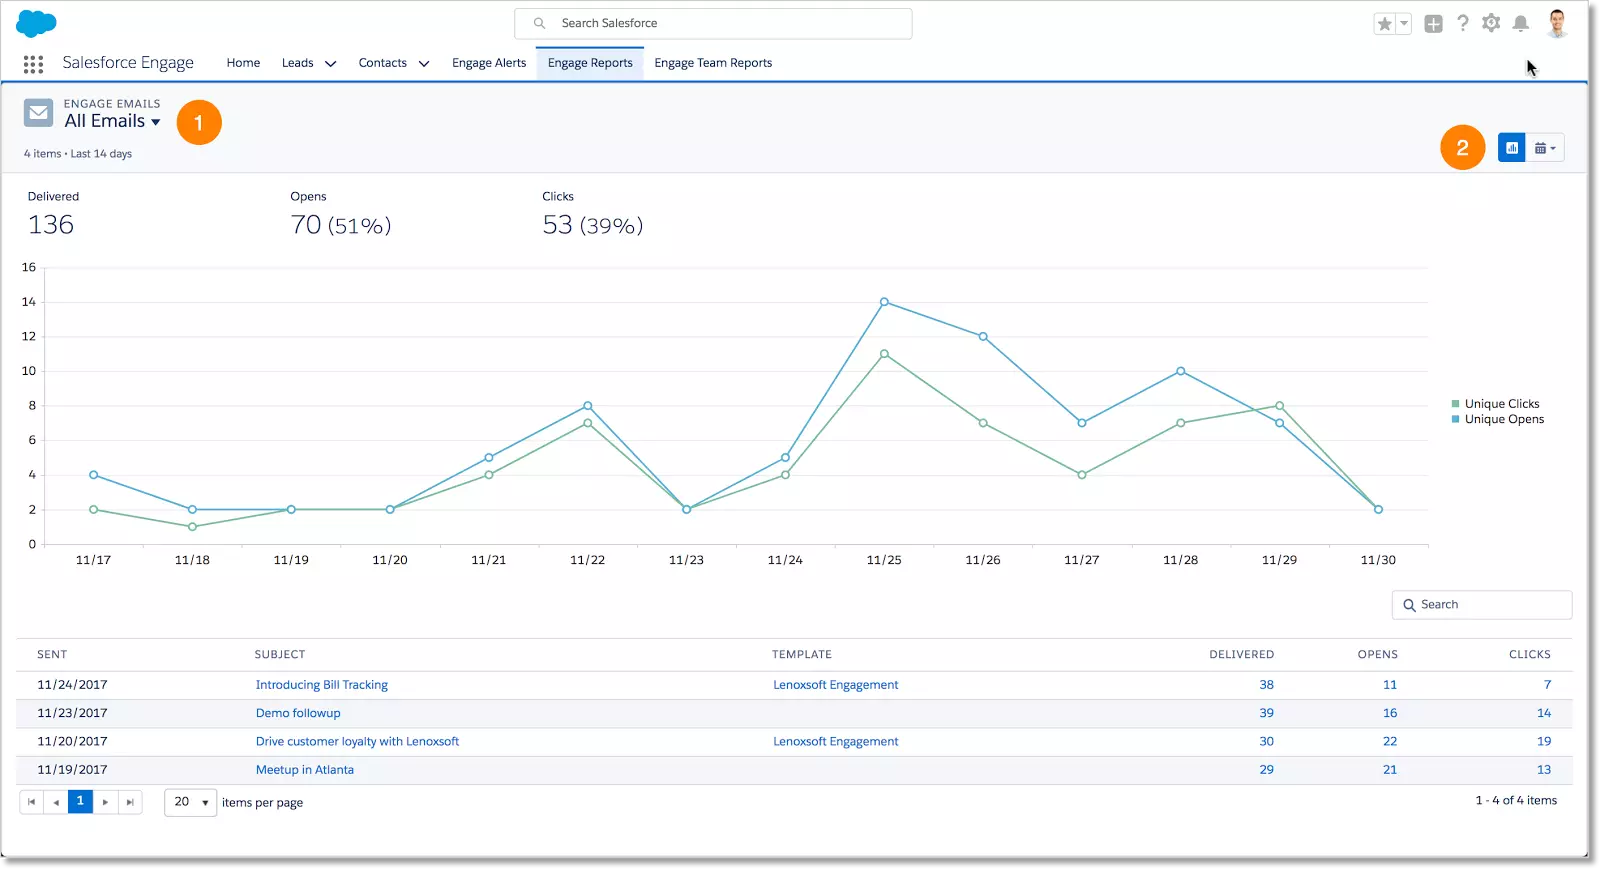
Salesforce Engage also allows you to report on email templates sent. To view these metrics, navigate Engage Reports in the App Launcher or from the Salesforce Engage app.
These reports will show you the email templates sent, how many opens, and how many clicks each template received. We can customize the date range to view the data.
Now that you’ve got the basics, let’s cover some best practice steps to get the most out of Engage.
Use List Views
List Views can be created on all Salesforce objects. They are a great way to filter records for Engage Campaigns. Any time you want to email a list of records with specific criteria, create a List View.
Preview Emails
Before you click Send, always preview your email content. In Engage, you have the option to preview the email as the recipient. This will minimize any awkward chats around missing information, oddly placed characters, incorrect contact information, etc.
Don’t Be Creepy
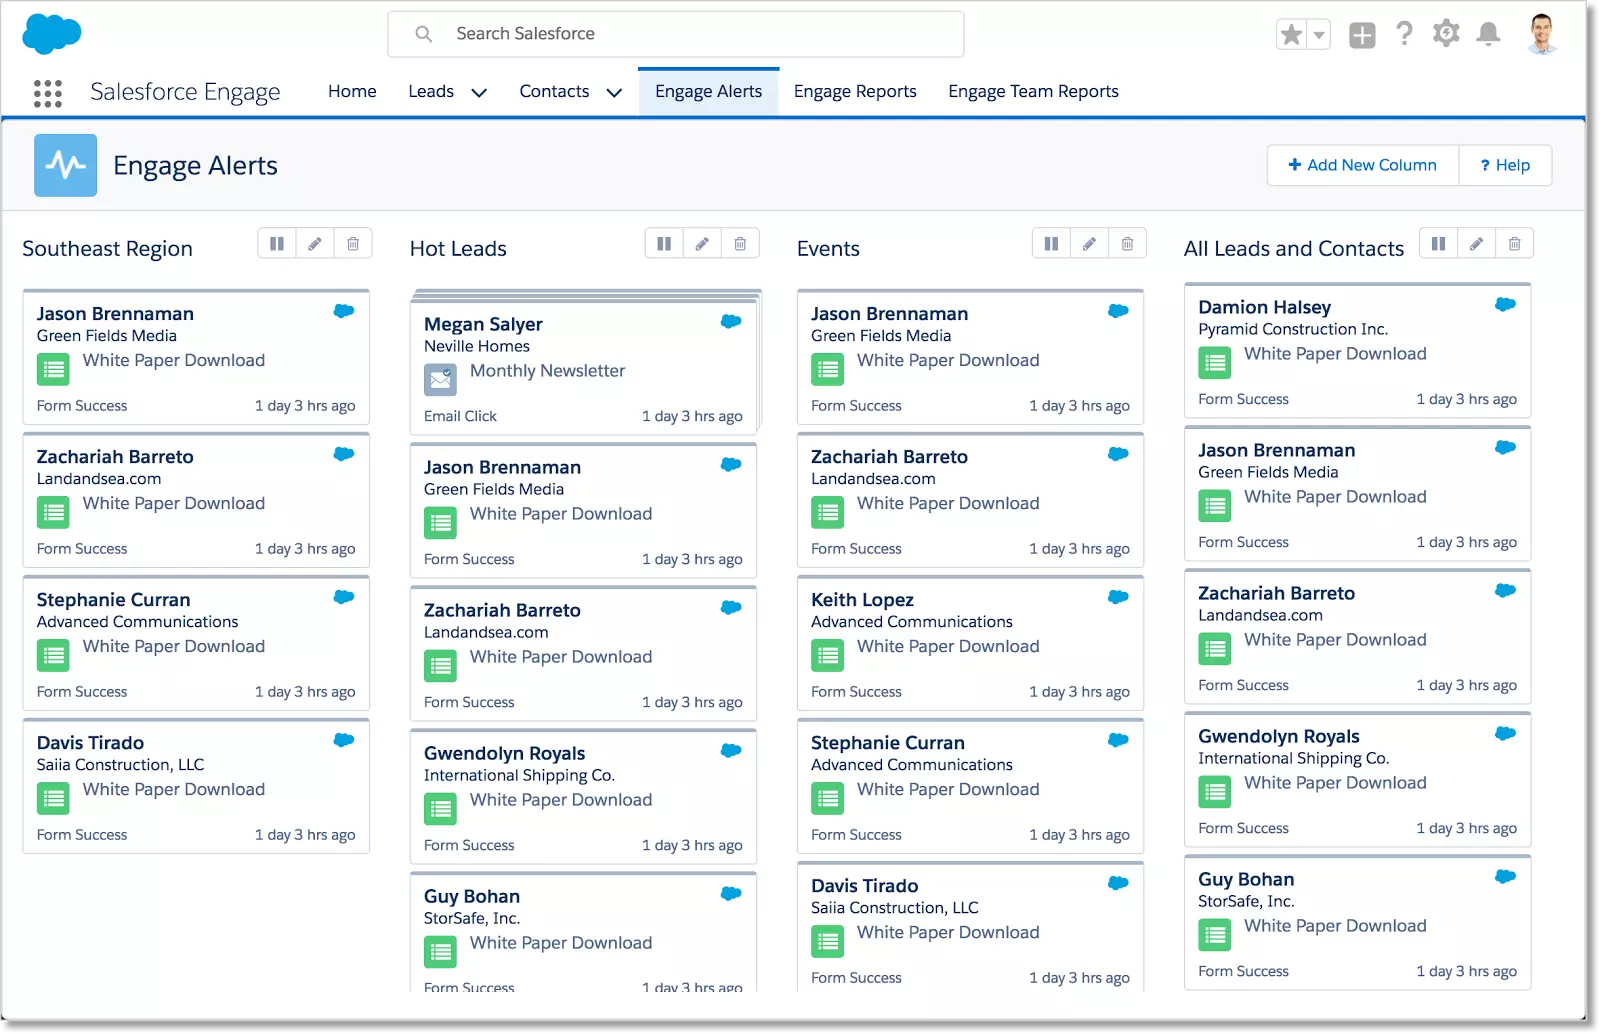
Engage has a feature named Engage Alerts. Engage Alerts is a real-time service that informs you about the prospect activity you might be interested in. It matches prospects based on filter criteria and displays them in a card-based filter view. This is a great way to know what is relevant and interesting to prospects as well as who is engaged.
Use this information wisely! It is against best practice advice to open any conversation (verbal and written) with “I see you were looking at several of our white papers.”
Find additional tips for sales users in Engage in this article.
Sales & Marketing Teams are Stronger Together
We tend to think of Salesforce Engage as a sales tool. While that is true, it is also an opportunity for marketing and sales teams to collaborate. The marketing team is able to get a glimpse into the sales day-to-day, and the sales team gets the chance to participate in the marketing nurture cycle.
Salesforce Engage is best used to templatize emails we would typically type over and over, day after day. By using Engage, you’ll be able to reduce your follow-up times and close more deals.
Need help getting started with Salesforce Engage? Drop us a line so we can chat about it.
Marketing and sales teams have a lot on their plates. Marketing is focused on generating interest and qualifying leads, and the Sales team is focused on closing deals and securing business.
Both teams benefit from working together to make sure they are focused on the right people at the right time, by streamlining the handoff and ensuring data quality every step of the way. To help with this, marketers have the power of Marketing Cloud/Pardot automation tools, which can tackle a lot of work.
But when it comes to more advanced data wizardry and support for unique processes and actions like related record creation, marketers have another powerful tool that can help.
Enter — Salesforce Flow!
Wait, what is Salesforce Flow?
Salesforce Flow is a powerful declarative automation tool that can be used to automate complex business processes without developer skills. Flows let you build customized user experiences and can save time by making sure the right actions are completed at the right time.
And, because they are declarative (relying on clicks, rather than code), Salesforce Flows are easier to manage than a developed (e.g. Apex) solution.
Flow is the future for Salesforce declarative automation
Sound familiar? You may have heard Salesforce Flow discussed a lot in the community recently. For one thing, Salesforce has really gone all-in with enhancements to Flow that let you do way more than ever before.
Not to mention, Salesforce has announced plans to sunset Workflow Rules and Process Builder, two of its legacy automation tools. For this reason, you should use flow for new process automation, and companies should consider migrating existing (and relevant) processes to Flow.
Sounds cool, right? Now you’re probably wondering, how do I learn more about Flow?
We’ve got you! Here is a high-level overview on the basics around Salesforce Flow.
Marketing Uses of Flow
Now that you know a little more about flows and how they work, it’s time to explore how marketing teams can use Flow.
Below are just a few ideas, but the possibilities are endless!
Guiding a rep through a outbound calling “wizard” with branded messaging
Initial customer onboarding steps when an opportunity closes
Automating field values based on another field
Automating Lead Conversion (with the help of Apex)
Setting the Marketing Data Sharing field value to control when Leads/Contacts sync to Pardot and, if using multiple Pardot Business Units, which Business Unit they sync to
Flow Building Basics
This section covers what you need to know when building a flow.
Background process that runs at a specified time and frequency (daily, weekly, or one-time)
How they are launched:
Launched Independently, based on set time and entry conditions
Use Cases:
Create or update records in batches
Delete obsolete data periodically
Send email alert to Marketing if Lead is hasn’t been actioned by Sales
Autolaunched Flows
When to use Autolaunched Flows:
An automated process that is triggered by another process, like another flow, process builder, Apex or API.
Good for situations when you have a repeatable set of tasks that may be called by more than one process (called a subflow).
How they are launched:
From another process
Examples:
Error handling subflows, like having a more user-friendly message that appears if you experience an error.
A utility flow that handles task creation for different record triggered events
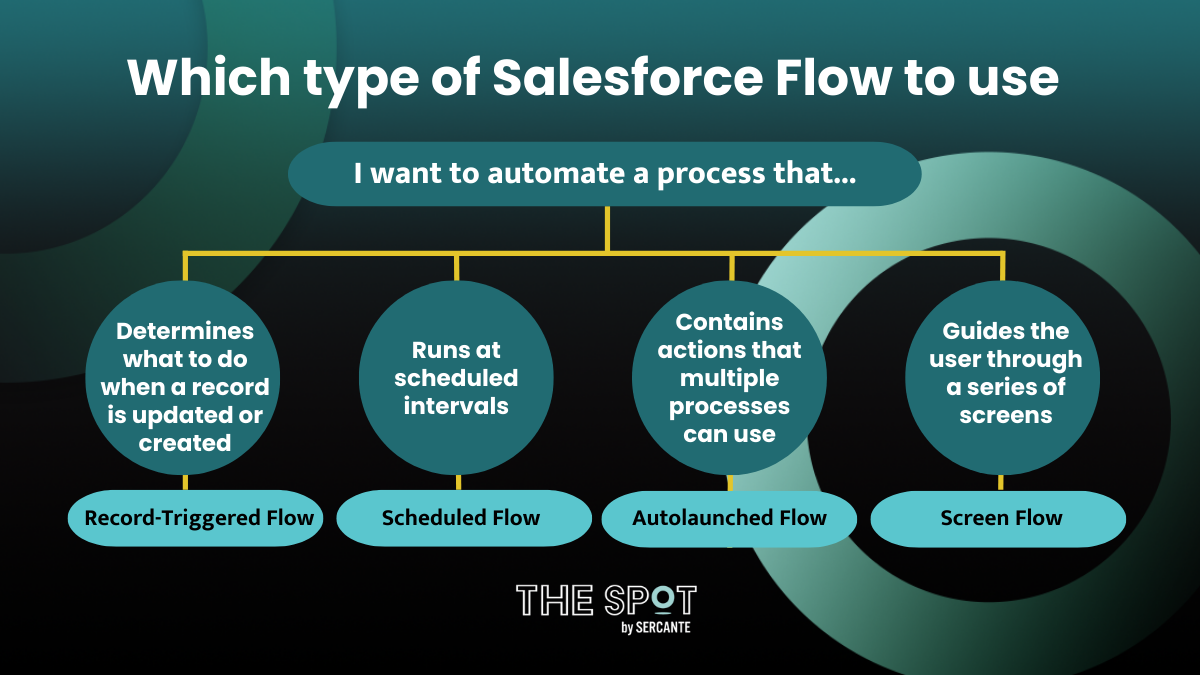
This handy chart can help to determine which type of flow to use:
Building Salesforce Flows
Ok, so now we know the types of flows we can build. Now let’s take a closer look at what goes into building them.
Flow Builder
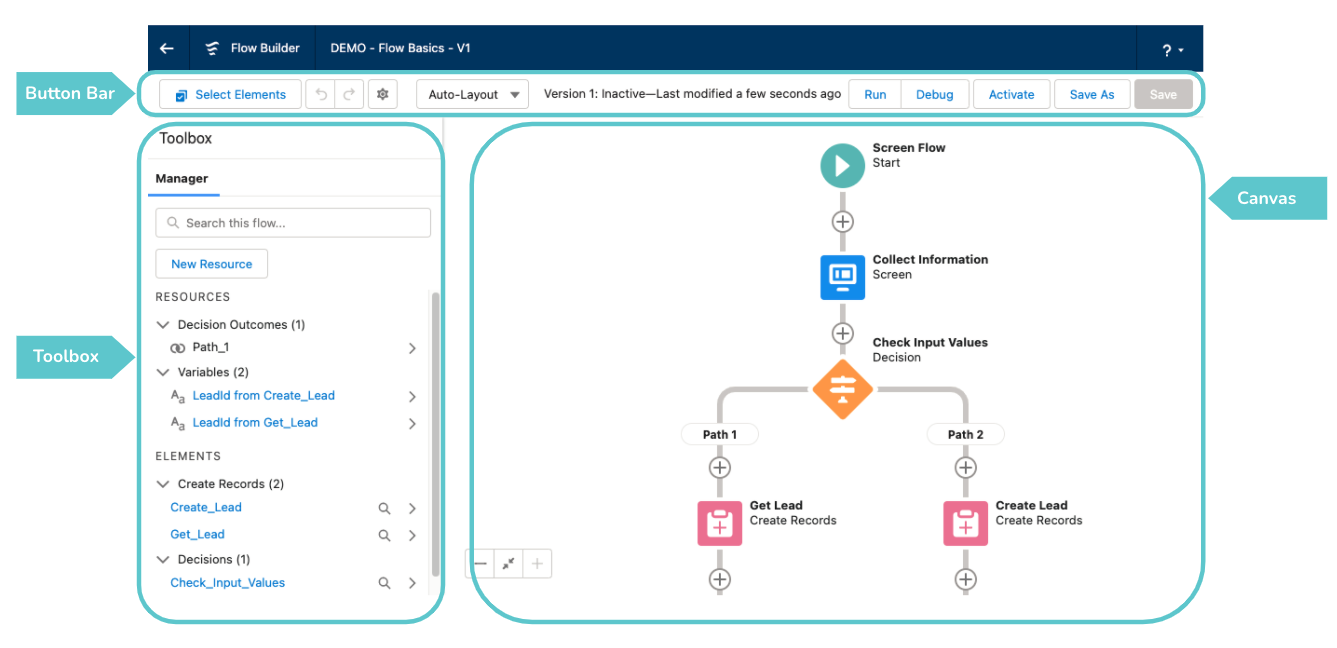
Flow Builder is the place where you build and test your flows. There are three key areas in the builder:
The Toolbox is where you create and manage all of the elements and resources that go into your flow. More on that shortly.
The Canvas is where you build your flow by adding elements using the (+) tool.
The Button Bar at the top lets you view flow information, and test/debug, save and activate your flow.
Flow Building Blocks
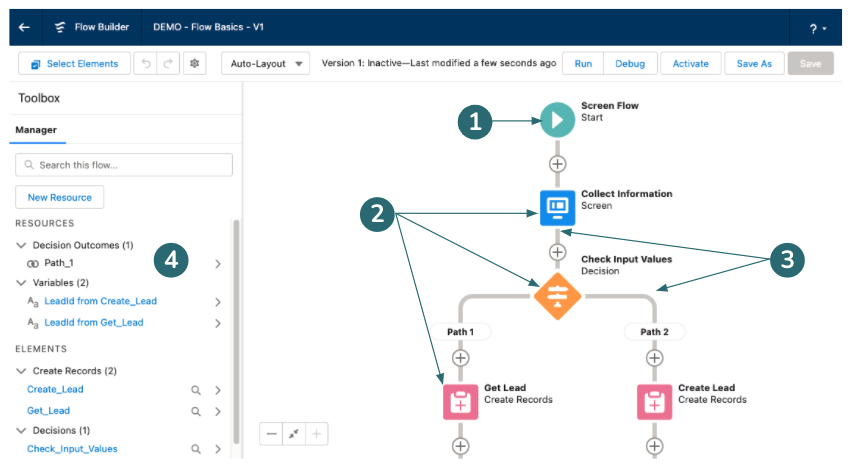
The main building blocks for building Salesforce flows are:
(1) Start – This is where you decide how and when the flow is going to start! Options are dependent on the type of flow — most relevant for Record Triggered or Scheduled flow types — but this can be very important to making sure the flow starts when it should.
(2) Elements – These are what you add to the Canvas to build out your flow. While the full list can be found here, several common elements include:
Get Records
Create or Update Records
Decisions
Actions
Loops
(3) Connectors – These define the path a flow will take, and which element to execute next.
(4) Resources – These are the pieces that store information that are used by Elements throughout the flow. Examples of these are variables that store field values, formulas or choice sets.
Tips on Building and Updating Salesforce Flows
Copying/Pasting Elements – You can duplicate elements which can be a time saver if you need a similar element somewhere else in the flow. Simply click on the element and select Copy Element, then click the (+) in the place where you want to paste the copy, and click Paste Copied Elements.
Extending Flows – Using the components available on the AppExchange and UnofficialSF.
Save often – While building a flow it’s a good idea to Save your flow often so you don’t lose any work. You can perform a quick save on Flows that haven’t been activated instead of having to save as another version.
Be sure to activate when ready! – Once you’re ready to run the flow live, remember to activate it.
Opening existing Flows – Clicking on the flow name on the Flows page will open the Active flow. If you have saved a new version of the flow but haven’t activated it, you need to go into View Details (click the arrow to the right of the flow in the list view) to view and open the newer inactive version.
Once you’ve built your flow it’s important to debug and test your flow to make sure it’s running the way it’s expected to.
When you have tested and are happy with the results, then you can deploy to production. If you’re using a changeset to deploy, make sure you activate the flow in your production environment!
Where to learn more about Flow
This article is just the tip of the iceberg of flow related content. There are A TON of great resources out there.
Your team finally has approval to connect Salesforce & HubSpot. Soon you will have all the data you’ve wanted to perfect your nurtures and segmentation!
But before you can access that sweet treasure trove of data each system is hoarding, you have to build the bridge between them. The gap between the two can be daunting and look like a far distance to leap across at first. And if you jump too soon, you might fall way in over your head.
Thankfully we’ve got some gear to make that first trek across safer.
Check your equipment before connecting Salesforce & HubSpot
Salesforce Sales Cloud and HubSpot have a unique way of communicating with each other. There are a lot of moving pieces with any type of Salesforce integration, so it is important to check your available tools and make sure you understand how to use each of them.
Sales Cloud and HubSpot Object Connections
HubSpot uses different names for common Sales Cloud objects. For one, Salesforce fields are called “properties” in HubSpot. But HubSpot also has “objects” that work the same as they do in Salesforce.
On a normal integration, HubSpot automatically connects its 3 main objects with the 4 heavy hitters in Sales Cloud.
Salesforce Object
HubSpot Object
Lead Contacts
Contacts
Account
Company
Opportunity
Deals
One big important thing to note is Leads and Contacts in Salesforce are connected to the same 1 object in HubSpot — Contacts. You will be able to map fields from both Contacts and Leads to a single HubSpot property.
When you set up your bridge between the two sets of data, you can select whether a new Contact in HubSpot creates a new Lead or Contact in Salesforce. This lets you continue your normal lead generation strategy, just with leads coming in from a new source.
There are additional object connections you may make, though it may require some extra work inside of Sales Cloud. The Activities object will let you track the activities a HubSpot contact has done, such as submitting a HubSpot form or clicking on a HubSpot email, back into Salesforce. You also have the option to sync custom objects from Salesforce with HubSpot.
Field Mappings
HubSpot and Salesforce disagree on one important thing. While Sales Cloud uses “fields” to display values and content about a contact, lead, account, or opportunity, HubSpot calls the same thing a “property” in its own system.
HubSpot properties are the basis for almost all automation in HubSpot, and they work almost the same way as fields do in Sales Cloud. You can set a property to be a text value, a numerical value, a picklist, etc just like you can create fields inside of Salesforce.
Each property can then be mapped to an individual field inside of the Salesforce object. Only Company properties can be synced with Account fields, for example. For Contact properties, these can be synced with either Lead or Contact fields.
But what is the great “source of truth” — two systems of data are talking to each other, but who has the authority to make a change to a record? Well when you set your field mappings, you can choose which system has the authority over each field.
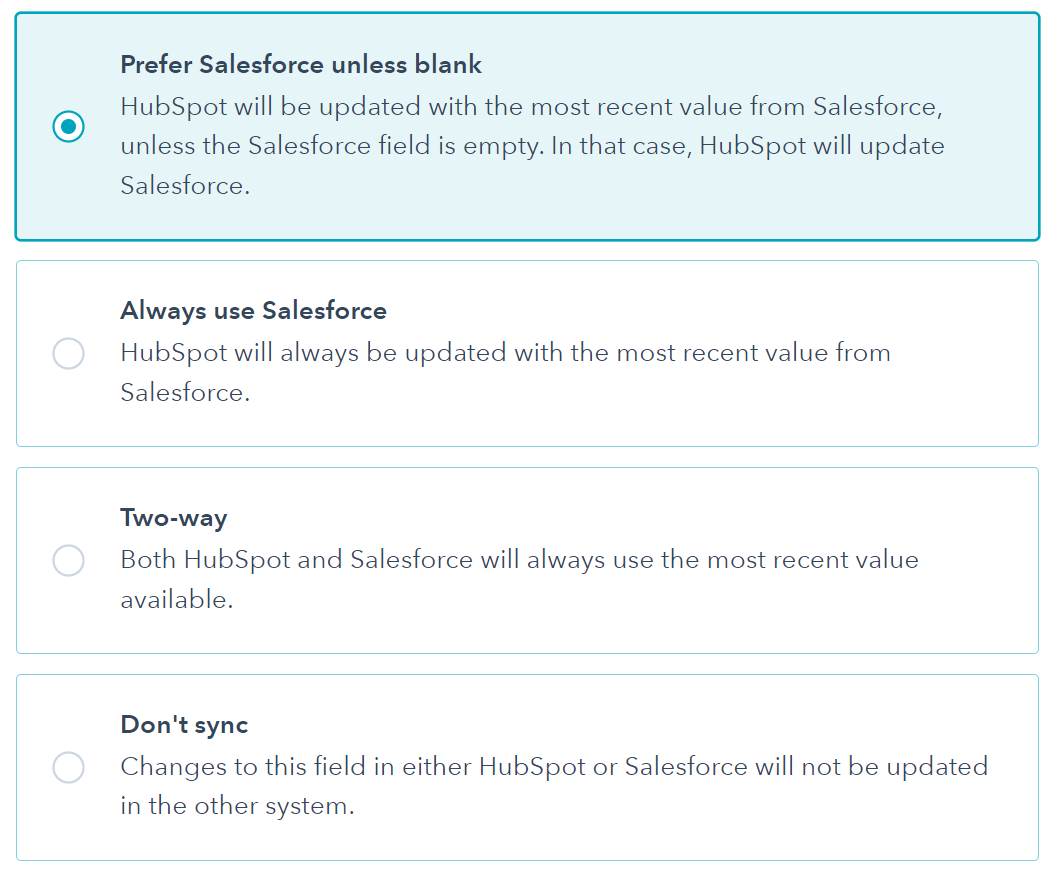
With each individual property, you are given 4 options on how the data should go if there is a conflict between what’s in a Salesforce field and the corresponding HubSpot property:
Prefer Salesforce unless blank Salesforce is the Source of Truth, unless the Salesforce field happens to be blank. Then HubSpot will write its own value into this field in Salesforce. From there, it will only update the field if the value is updated in Salesforce.
Always use Salesforce Salesforce stays the Source of Truth no matter what. Even if the value is blank in Salesforce, HubSpot will not write its own value into that field.
Two-way Both systems act as the Source of Truth. This revolves entirely around which system had the most recently updated value — if a property was updated in HubSpot 1 day ago, and the Salesforce field has not been updated in 1 week, HubSpot will write its value into the Salesforce field.
Don’t sync HubSpot and Salesforce will not talk about this field at all. If one value changes in Salesforce or HubSpot, the other system will not be notified or updated.
Salesforce & HubSpot integration limitations to be aware of
You will also need certain privileges in Salesforce to complete this bridge. Generally, having the Salesforce admin role or the HubSpot Integration Permissions set covers all the bases. But make sure you have access to the following abilities in Salesforce:
API enabled
View Setup and Configuration enabled
Modify All on any objects (accounts, campaigns, contacts, leads, or opportunities) that you would like to sync to HubSpot
Have the Modify Metadata permission (to view data in the HubSpot Visualforce window on Salesforce lead and/or contact records). This is only required if you want to use the Visualforce window, and sync deals to HubSpot.
Now that you’ve checked and understand your tool set, you might want to get Salesforce and HubSpot talking right away. But it’s important to take a breather. Once the two start communicating, they will talk all the time and major changes to one may no longer be possible.
Do a Salesforce Field Audit
Comb through the fields in the 4 major objects in Salesforce that will talk to HubSpot. Make sure that you keep track of the following information for each field:
Field Name
Field Type (text, number, formula, etc.)
Any picklist values
Once you have gone through the field audit for your Salesforce objects, now create properties in HubSpot that match all of the fields you want to make the two data powerhouses talk about. The property type needs to match the type of field in Salesforce. Picklist values will also need to match to prevent any sync errors.
Free template alert!
We’ve set up a handy spreadsheet template to get you started! (click ‘Make a copy’ and share to your own drive)
Connect Custom Objects
One great part of Salesforce is that you can highly customize it. HubSpot understands that flexibility is key, and thus has a way to connect custom objects your team may use.
HubSpot only allows for up to 10 custom objects to be synced though, so prioritize which objects are most needed for marketing if you must choose between several options — even if it feels like picking a favorite child.
Focus on the custom objects that your HubSpot user team will need the most. Do they need to know customer support case numbers? If not, maybe keep a custom Service app unconnected.
Be sure to do an audit of fields for any custom objects you will be syncing as well!
Now you’re ready to go
Integrations can be tricky. The giant opening between your two systems can feel quite cavernous. But as long as you take a moment to inspect your gear and know the basics of the two systems, you will be more than prepared to bridge the gap between Salesforce and HubSpot.
Reach out to us if you have any questions or share your experience preparing for the Salesforce and Hubspot integration in the comments section below.
The power of Marketing Cloud Account Engagement (Pardot) is really in its capacity to leverage data coming in from Salesforce and Pardot to create tailored experiences of all types for the end audience.
But what happens when this automation doesn’t work how we intend to use it? This is particularly concerning when it comes to email.
Follow along with this blog to learn a few tricks you can use to test your Pardot org for possible email mishaps and prevent them before they happen.
Solution #1: Validate your Salesforce & Pardot User Mappings
The first solution for avoiding email sending fails is to validate your user mappings. Doing so will help you avoid awkward email segmentation and user notification issues.
It is important to know that if Salesforce Users are not mapped into Pardot, then you will not be able to leverage their relationship with Leads/Contacts in Pardot.
Mapping a User to Pardot DOES NOT give them access — you need permission sets and other configurations for that to happen. This is often the main reason why Users are not mapped.
The remainder of this blog will reference the User object. If this does not 100% line up with your process within Pardot, neither will the rest of what we will cover.
How to validate Salesforce and Pardot user mappings
Here are some ways to validate if all your users are mapped:
In Salesforce, create a report of active Users.
In Salesforce, compare which Users actually manage Leads/Contacts and review their profiles.
In Pardot, go to the Pardot settings tab in your navigation, then head over to the Pardot Connector Settings tab and review your Salesforce profile to Pardot role mappings.
If you have any missing, this is the time to add them.
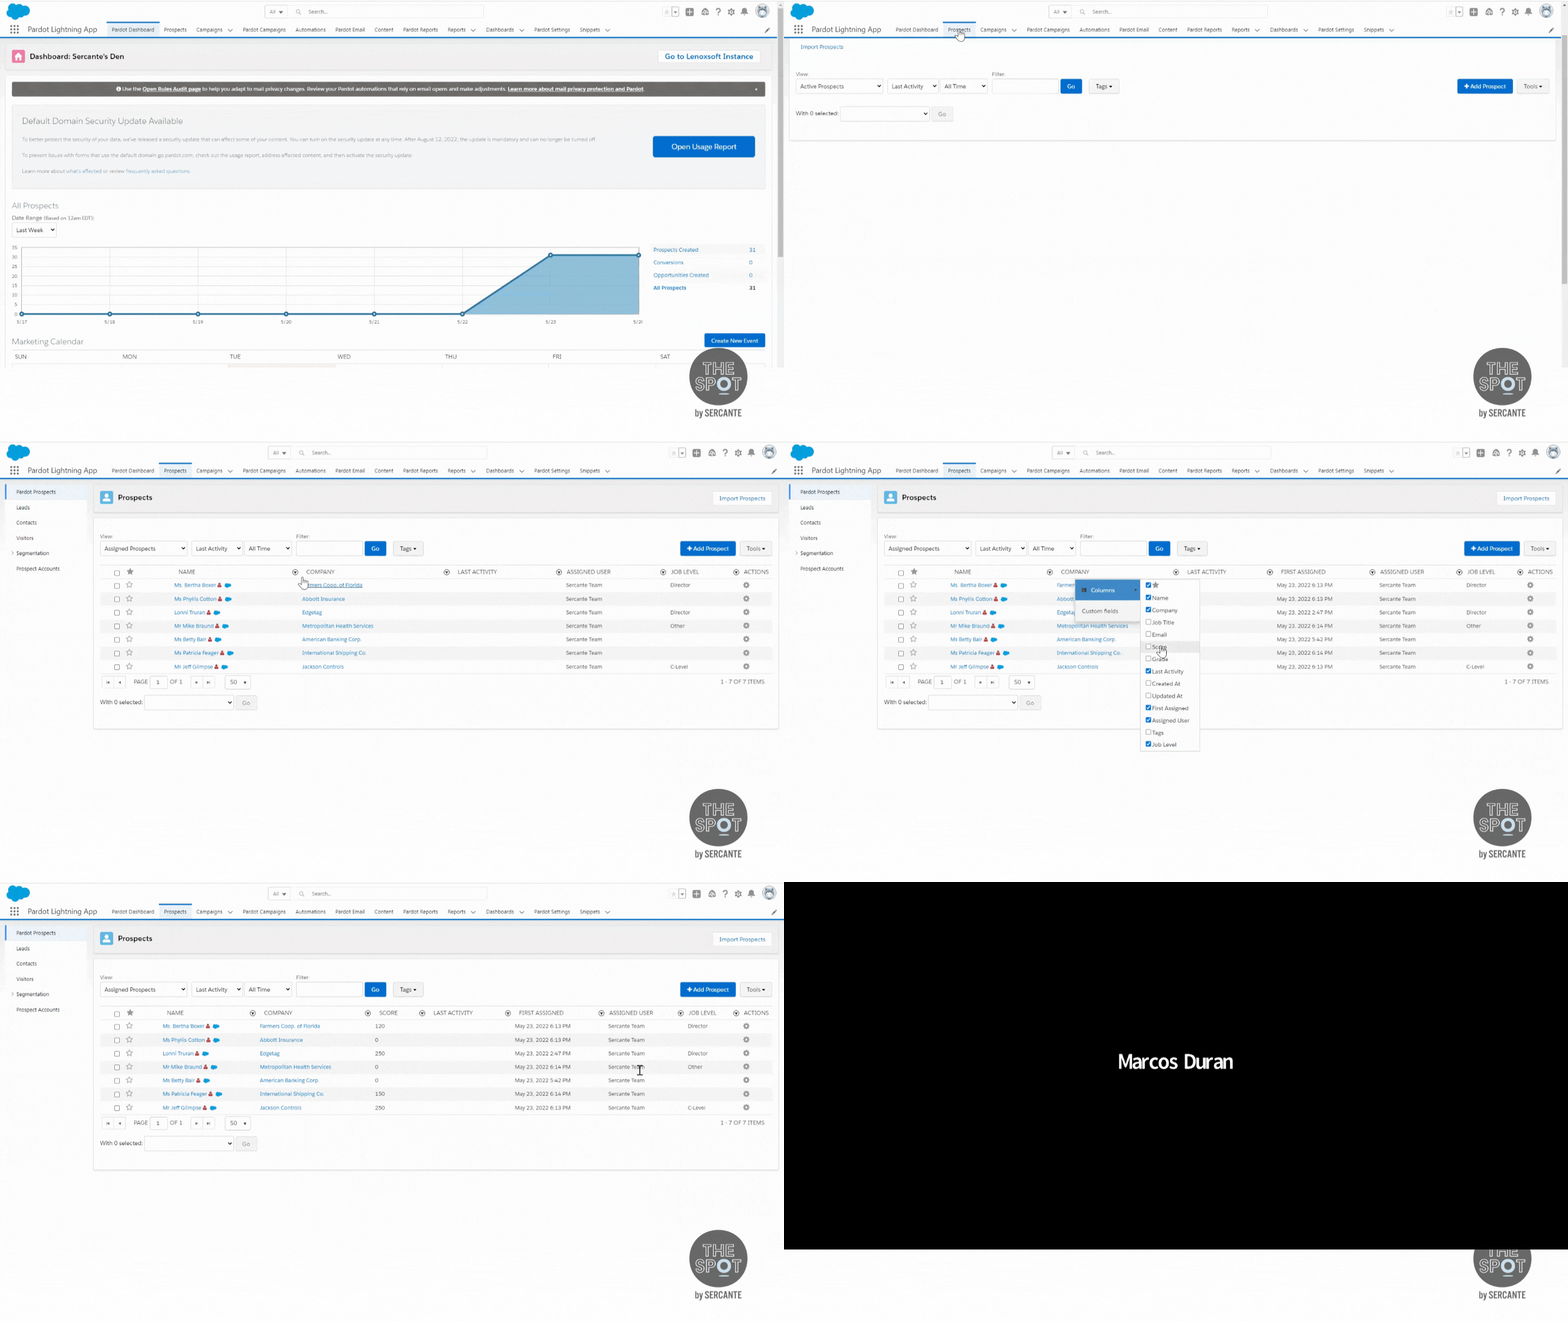
In Pardot, go to the Prospects tab in your navigation, and select the Unassigned Prospects filter on the filter dropdown.
If you see any with blue Salesforce clouds, that means the Prospect may be assigned in Salesforce but the mapping is not clear in Pardot.
Click on any records you found and open the record up in Salesforce. Then, make a list of who the owner is.
Compare this list to the report of Active Users. If there are any missing, they may be deactivated.
In Salesforce, update any records that reference deactivated Users to the appropriate User. This would trigger a sync event and update the record.
In Salesforce, go to Marketing Setup and for your business unit/account, click on the Manage Users button and add any missing users to the appropriate section to sync over to Pardot.
In Pardot, update the Prospect database view to include Assign User and keep the Unassigned Prospect filter to see if you are missing any.
You may need to click the Sync With CRM button on the Prospect page to get it to sync.
The result of mapping all your Users is having Pardot and Salesforce be in sync in addition to being able to leverage this datapoint for segmentation. It also allows you to provide the appropriate person with email or Slack notifications.
Solution #2: Create an identity user for your Pardot email sender backup
Previously we covered how to use and experiment with email sender types for emails that are sent from Pardot. If you are not familiar with email sender types, then go read that post and come back after you do. We’ll wait.
Dynamic versus static email user sender types
We would like to put these User sender options into two buckets: Dynamic and static.
Dynamic are options such as Assigned User, Account Owner, or any custom options for the sender information that changed based on the relationship the User has to the Prospect.
Static are options such as General or Specific User options for the sender information that is the same for all Prospects who get the email. No relationship needed between User and Prospect
All the options “pull” data from the User information setup in Salesforce that is then pulled into Pardot.
One of the biggest pitfalls that can happen here is when you use dynamic sender options. If a Prospect does not have an assigned user or account owner, then you have to have a backup sender. Pardot enforces this by making you add an alternative sender.
Many times you will have a default general User you manually add over and over again — such as [email protected] or [email protected]. This leaves room for error and cannot be used in automations, like completion actions, to notify this email address from form submissions, for example.
How to create a Salesforce Identity License User for your Pardot email sender backup
Did you know you can save yourself from headaches caused by human error by turning this email into an Identity User?
The result is an Identity User that can be used as a backup specific User and also for notifications in completion actions throughout the system.
Identity Users can be used for Single Sign-On or Pardot-centric purposes. However, you cannot assign to an Identity User. For more details on identity licenses, check out this Salesforce resource.
Solution #3: Update user records and check token types for email sender signatures
When you get ready to build your emails, you may want to include sales rep signatures in the email body.
Here are the fields you have access to inject into your emails from the User object:
First Name
Last Name
Full Name
Email
Job Title
Phone
URL
ID
Signature
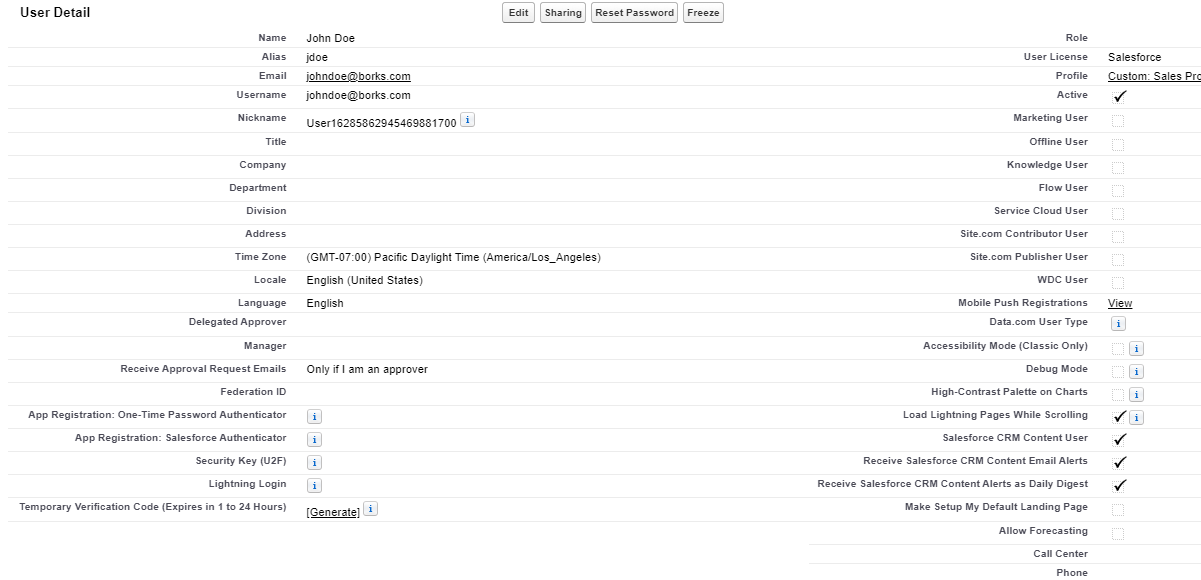
All of these details are managed in Salesforce under the User Settings (view Solution #1 above). If these are not filled out, then the row where you have the Handlebars Merge Language (HML) tag on your email will be awkwardly blank.
To resolve this, simply update the User record. Seems easy enough, right?
You are correct!
However, let me call out a common mistake we see when using these HML tokens — there are two different sets of tokens.
Tokens: Sender versus Owner
The owner fields pull directly from the Assigned User, which is one person for the Lead/Contact.
The sender fields pull directly from who you choose as a Sender User on the email. This can be an Account Owner, an Identity User, or a custom CRM user lookup.
Note: Depending on the scenario, you may want to use one over the other. But we use the Sender tokens to play it safe.
Lastly, we would like to note that general Users do not have titles, phones, signatures, or additional URLs. For best results, use an Identity User and make sure you fill in those fields. This will result in a more consistent experience for everyone.
As always, test your tokens!
Solution #4: Create a company-wide backup to avoid blank prospect data when you use queues
One of the main use cases for queues is to help with Lead assignments and send the Prospect to Pardot. If you are using queues for these cases, then there is one thing you have to know.
Queues do not have job titles, companies, or “people” names.
You may be thinking…
Yes, that is correct. So what’s your point?
Well, if you are sending emails on behalf of assigned users, for example, technically Prospects owned by a queue are owned — but not by a person.
This means when you send emails out trying to use “dynamic” sender options, you may not be actually showing a signature or other details in your emails when queues are involved.
How to avoid email awkwardness caused by having Prospects owned queues
For these scenarios where you know you may have Prospects owned by queues we recommend two options:
Option 1: Ensure your backup Sender is a specific User (try an Identity User). Do not use a general User if you are adding signatures to your email copy.
This is what the final syntax looked like for the default in the event John Doe (User) didn’t have a phone number: we added a general corporate number.
{{#if Sender.Phone}}Contact us at {{Sender.Phone}}{{else}}Contact us at 1800 – Sercante{{/if}}
You can use this format to create syntax for other fields you need on your email signatures.
The end result is having a customizable backup for User or organization-specific details to make sure no one sees missing data or has a less than favorable experience.
Solution #5: Set global and default field values as a backup when you use HML in emails
Finally, we come to mail merge fields. We have all seen use cases of subject lines not rendering and showing as {Recipient.FirstName}} because someone forgot to add the extra “curly bracket” that you didn’t notice was missing earlier in this sentence or forgot to test altogether.
Here are some of the more common HML options used in an email:
First Name
Company Name
Job Title
City
View Online
Email Preferences Center
Unsubscribe Page
For a list of all the out-of-the-box mail merge fields click here.
How to set global and default field values as a backup when you use HML in emails
If a Prospect does not have data on a field and you use mail merges (HML), it will be displayed as a blank.
We have two options to solve this issue:
Set a global field value. If you do this, anywhere where the field is used will display the same text IF there is no existing data.
Set a default value on the email template using HML. If you do this, the default text will only work for this one email template, but you can customize it across any email template (check out solution #4). However, if you selected the global field value option, this solution isn’t going to work.
Take action now to avoid awkward marketing email fails later
In the end, you have less awkward endings in your sentences and more customized messaging you can leverage to wow your audience(s) by taking these precautionary steps. Pardot can provide many tools to improve your email marketing. But your data flow has to be working properly to take full advantage of everything it has to offer.
The key thing we would love for you to walk away with is, in the words of our colleague Mike Creuzer, to remember to “test all the things”!
Feel free to contact us if you have any questions about how to improve your useability of Pardot.