Category

Pro Tips

In our wonderful digital world, it’s becoming increasingly difficult to track offline events and interactions with marketing and sales efforts. People still love sending gifts in the mail to foster relationships and interacting face to face at networking events to generate sales. But how do we prove it to our marketing and sales bosses? 

Luckily, an easy-to-create visual barcode had a huge comeback over the last couple years, and we can use that to our advantage to help track events and offline campaigns. 

Enter — The humble QR code.
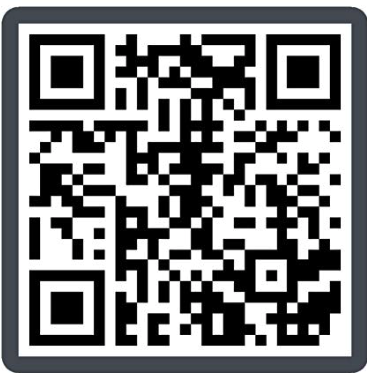
Let’s Check Out Some QR Code Use Cases for Tracking Offline Events!

Here are use case examples for times when you’ll want traditional marketing tactics to lead your prospects to your digital marketing assets:

  • Tabletop cards at your event that lead to a landing page with an interest form
  • Postcards included with mailed swag gifts customers get when they set up their next quarterly planning call
    • Plus, we can track the mailed package without worrying about implementing a third-party tool by reviewing the custom redirect access. 
  • Flyers distributed to prospective clients with product specific landing pages
    • Plus, we can measure that the effectiveness of the flyer copy through the custom redirect accesses and page views.
  • Company business cards or badges with your email address or LinkedIn URL
    • Trust us, this works! We create custom badges for our teams at events like Connections and Dreamforce so they don’t have to carry around a bunch of business cards. Instead, they have the printed badge with the QR code and a digital image of the badge in their phone photos for quick scanning.

tracking offline events with QR codes

Let’s Get Building!

But first, here is some background on how the process works and the Marketing Cloud Account Engagement (Pardot) tool we are going to use.

Custom Redirects

This is how we connect the QR code scan to our Salesforce campaigns. Marketing Cloud Account Engagement (Pardot) custom redirects are a base functionality to help track link clicks.

  • They allow you to track any link on your website or a third-party site
  • Clicks show up as an Activity on the Prospect record
  • Google Analytics can be integrated easily
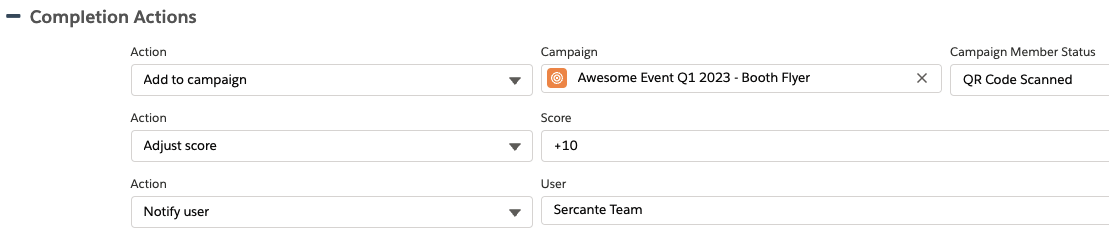
  • Completion Actions can be added to link clicks
    • Note: Completion Actions will only fire for known prospects

Additional Resources on Custom Redirects

Choosing the Right Automation Tool in Pardot

And of Course, QR Generators

The main consideration for your QR code generator is if you want built-in historical tracking of which codes were created, for what, and when or if you want to stay organized on your own. In most cases, the free generators will meet your needs —  just make sure you write down what you’ve activated for your campaigns or save the QR code image to your campaign asset folder.

Steps to Track QR Codes in Account Engagement (Pardot)

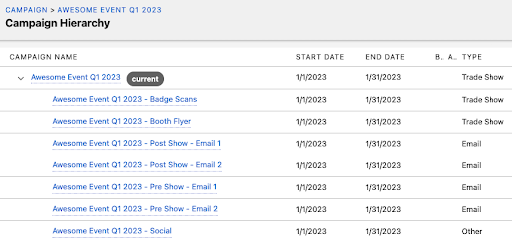
  1. Create a Salesforce campaign for each tactic/event you want to track.
    • Keep a parent/child hierarchy for reporting.
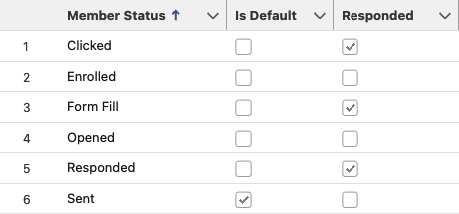
  1. Set up applicable member statuses.
    • Examples – clicked, attended, scanned, form fill, booth visit, ad view, etc.
    • Try to stay in the same tense and across your campaigns for reporting.
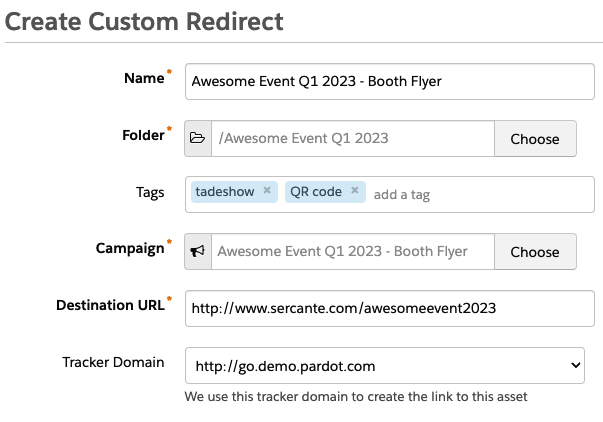
  1. Create a Pardot/Account Engagement custom redirect for each of the pages.
    • Lightning: Content > Custom Redirects
    • Classic: Marketing > Content > Custom Redirects
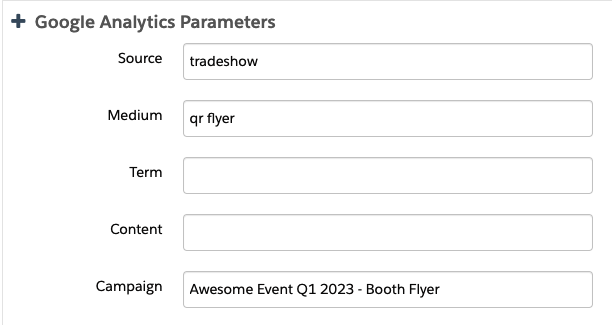
  1. Add the UTM values to the Google Analytics Parameters at the bottom of the custom redirects page.
    • Be consistent with this setup for reporting. 
    • See more about UTM parameters and how you can use them in your marketing efforts in the section below.
  1. Add completion actions at the bottom of the custom redirects page.

OR

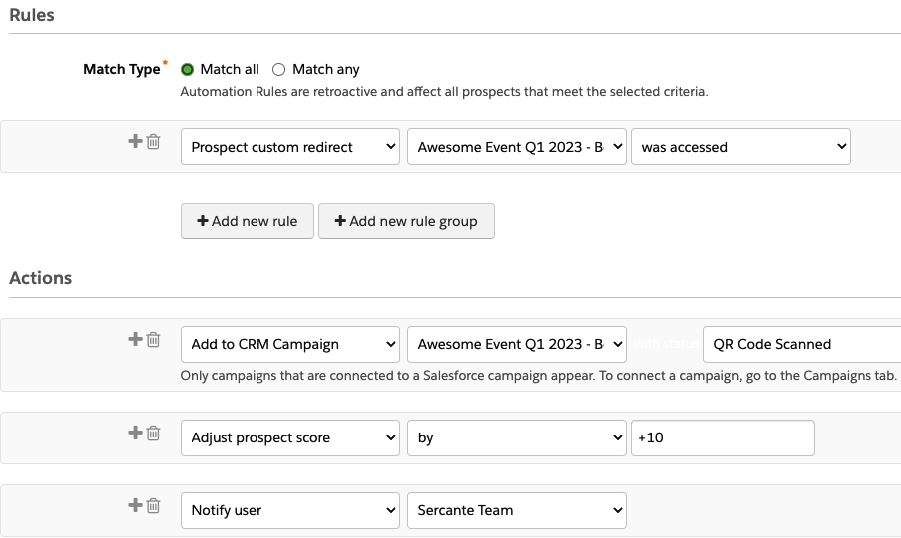
Create an automation rule to run based on custom redirect and/or campaign/form fill criteria.

  • Keep in mind – if the device scanning the QR code isn’t cookied as a known Pardot/Account Engagement prospect, your custom redirect completion actions will not fire. Using an automation rule will solve this problem, as it will run once the criteria is met as soon as the cookied device becomes a ‘known’ prospect.
  1. Add to list
  2. Add to campaign with member status
  3. Increase score/grade
  4. Notify marketing/sales
  5. Send autoresponder email


  1. Create a vanity URL for your custom redirect to use near the QR code in print/digital.
    • Keep it short or memorable so people can type it easily.
  2. Use the new custom redirect URL in the QR code generator
    • Depending on the generator you use, you can pre-fill form information/variables from the scan
  3. Add the QR code image the print/digital flyer
  4. Test, test, and more testing before you go live
  • Note: You can make adjustments to the custom redirect destination URL post creation without impacting the live custom redirect vanity, long URL, or QR code.

Let’s Take Offline Event Tracking To The Next Level!

Salesforce Flows & Pardot

With Flow Actions for Pardot! A free app on the Salesforce AppExchange.

Instead of creating your custom redirects one at a time for each channel and event, you can speed up that process considerably by using this tool plus the Marketing Cloud Account Engagement (Pardot) API. Flow Actions for Pardot brings the power of Pardot custom redirects into a screenflow on the campaign object in Salesforce. This enables you to create them all at once per campaign, making for a more streamlined and efficient process that follows the same structure across the marketing and sales teams.

Watch this video to learn more about how Flow Actions for Pardot works:

Consider UTM Parameters

If you already have a UTM (Urchin Tracking Module) parameter strategy in place, custom redirects can be a great complement to your campaign tracking abilities. 

The Google Analytics Parameter section of the custom redirect acts as an built-in UTM builder. Instead of supplementing the end of your URL with the UTM parameters manually, the custom redirect tracked URL will have it already built in if filled out. 

We recommend using Pardot custom redirects and UTM parameters together if you are trying to track engagement, while automating the triggered responses and flows.

Using traditional UTMs on their own will capture useful data in Google Analytics, but it can be difficult to sync that valuable data back to Salesforce and Pardot. For those who are more advanced when it comes to Salesforce flows, you can automate the capture of UTM data to custom fields or an object and the completion action sections of the process. Otherwise, it is probably easiest to automate within Pardot using customer redirects and automation rules.

Additional Resources on UTMs

Ready to Start QR Code-ing to Track Offline Events?

QR codes have been around for quite some time and we’re seeing a big resurgence of them recently. That’s because it’s a great way for anyone with a mobile device to interact with your company’s digital marketing. And you can take it a step further by tracking all of your efforts through custom redirects in Marketing Cloud Account Engagement (Pardot) and campaigns in Salesforce. 

How do you use custom redirects or QR codes in your business? And what other methods are you using to track offline events? Let us know in the comments or reach out to team Sercante for help with your marketing attribution strategy.


Imagine this — your marketing team is generating more leads than ever before. And at the same time, you’re facing a reduction in sales team staff. 

Sounds impossible to overcome, right? 

With the best tools, like Marketing Cloud Account Engagement (Pardot), and a winning lead prioritization strategy, you can tackle these obstacles head-on and turn them into opportunities for success. 

As a marketing consultant who has worked with numerous sales teams, I understand the challenges that can arise with lead prioritization and management. Let me tell you, there’s nothing more exhilarating than overcoming those challenges! 

Here are five lead prioritization strategies lean sales teams can follow to maximize their impact.

Lead Prioritization Strategy #1. Rank Your Leads with Scoring and Grading

One of the most effective ways to prioritize your leads is through scoring and grading criteria. By setting up a system that assigns points based on the level of engagement demonstrated by each lead, you can quickly identify those with the highest potential for conversion. 

For example, a lead who has visited your website multiple times, downloaded whitepapers, and attended webinars may be given a higher score than one who has only filled out a form. In addition to assigning scores, you can also use grading criteria to evaluate the overall quality of a lead based on factors such as company size, industry, and location.

Lead Prioritization Strategy #2. Fast-Track Urgent Leads with Qualifying Questions

Another strategy to prioritize your leads is by adding a qualifying question to your lead capture forms. This can help fast track leads that are urgent or ready to close, while the remaining leads can be put into a lead nurture campaign that includes emails from your sales staff to keep them engaged and interested. 

For example, a qualifying question could ask whether the lead is actively seeking a solution for their problem or if they are just researching their options. By segmenting your leads based on their level of intent, you can ensure that your sales team is focusing their efforts on those with the greatest potential for conversion.

Lead Prioritization Strategy #3. Automate Lead Follow-Up with Autoresponders

Setting up autoresponders is another strategy to keep your leads engaged and ensure that they don’t fall through the cracks. Autoresponders are automated emails that are triggered by specific actions, such as filling out a form or downloading a whitepaper. 

Layer in a custom redirect behind a CTA button to track which converts the most.  These emails can acknowledge and thank leads for their interest, and provide them with additional information and resources to keep them engaged. 

Lead Prioritization Strategy #4. Qualify and Prioritize Leads with Chatbot Technology

Another tool to consider when managing the influx of leads is through chatbot technology. Chatbots are automated messaging platforms that can be integrated into your website or messaging apps to provide immediate responses to leads and qualify them before transferring them to your sales team.

 By using chatbots, you can provide a personalized experience for your leads, answering their questions and guiding them through the sales process, all while gathering important information about their needs and preferences. 

This can help reduce the workload on your sales team by providing a pre-qualified lead before they even reach out. Furthermore, chatbots can operate 24/7, allowing you to capture leads even when your sales team is not available. With the help of chatbot technology, you can improve your lead generation efforts and ensure that your sales team is focusing on the most promising opportunities.

Lead Prioritization Strategy #5. Maximize Lead Contact with a BDR Agency

If your sales team is still struggling to keep up with the volume of leads, you may want to consider using a Business Development Representative (BDR) agency to handle initial contact with leads and prioritize the most promising ones to send to your sales team. A BDR agency can help ensure that each lead is contacted promptly and that priority ones are directed to your sales team for follow-up.

Use Strategies That Focus on the Hottest Leads

We all know managing the influx of leads can be a challenge, but with the right strategies and tools, you can streamline your team’s efforts and focus on the most promising leads. Marketing Cloud Account Engagement (Pardot) offers several features that can help you score and grade leads, add qualifying questions to form and set up autoresponders. You might even consider outsourcing a BDR agency if necessary. 

By prioritizing and automating effectively, you can maximize your sales team’s productivity, convert more leads, and save money by cutting out ineffective practices. 
Need help building your lead prioritization strategy? Drop us a line to chat about it.

Email marketers swim in constant data. While analytics often inform decision making, the flip side of that coin means your competitors also use data to do the same. To truly ensure campaigns remain fully optimized for engagement, conversions, and ROI, you need to look beyond the simple email metrics everyone tracks.

Simple statistics such as open and unsubscribe rates definitely have their place, but a deeper dive into what’s impactful and what needs improvement gives you and your teams the understanding necessary to drive effective marketing campaigns.

In this post, we look at two other advanced analytics you can use to further refine content. Then, we’ll dive into two ultra-advanced analytics that may be harder to source but offer practical, personalized insights on an individual subscriber level.

Email Metric 1: Complaint Rate

Unsubscribes tend to indicate when recipients find messages irrelevant, but when contacts mark content as spam it indicates major antagonism against your content. Measuring the complaint rate, or the percentage of times recipients mark your outbound emails as spam, ensures your team has a grasp on when content has become dangerously misaligned from consumer expectations.

Nearly half of all emails sent get classified as spam, so to hit the inbox marketers need to know how to differentiate between content subscribers will find valuable or irrelevant.

What Makes Spam Indications Unique?

Spam designations happen for many reasons, but some of the most common stem from a disconnect between the marketer and contact.

  • The recipient cannot easily find a way to unsubscribe (e.g., the link is in small font or a similar color to the background)
  • There is no option to unsubscribe (e.g., emails from sales reps marked as spam will affect the entire company domain)
  • Marketers do not respect unsubscribe requests and continue to send unwanted communications
  • Oversaturated contacts opt to skip an unsubscribe attempt and directly mark a message as spam

While some of these may not necessarily result from marketing decisions, the unique danger of spam designations rather than regular unsubscribes affect every team’s future campaigns. High spam rates discredit a brand and more importantly cause future emails to go straight to spam folders.

Overcoming Poor Email Deliverability

Marketers must keep the complaint rate low to maintain a good sender reputation and to avoid email providers marking content as spam. Email marketers generally accept a complaint rate of less than 0.1 percent, while a rate above 0.5 percent often indicates issues with email content or list quality.

To avoid this, marketers can take several steps to reduce complaint rates and boost deliverability. Here are some best practices to consider.

  • Permission-based email lists: Only source subscribers who have given explicit permission to receive emails through a confirmed opt-in process. Avoid buying email lists, as these often contain contacts who haven’t opted in to receive emails from your organization.
  • Segmented email lists: Personalizing email lists based on subscriber behavior, demographics, or interests provides recipients with relevant content they are more likely to engage with, reducing the likelihood of spam designations while boosting conversion rates.
  • Engaging subject lines and content: A/B test and experiment with email subject lines that accurately describe the content of the email while ensuring the content doesn’t mislead or come off as overly promotional. Engaging content typically includes useful tips, exclusive discounts/promotions, or relevant industry insights.
  • Professional designs and mobile-optimized emails: Seeing as how the majority of emails are now opened on mobile devices and younger consumers prefer mobile shopping and user experiences, brands need to give the right first impression with clean-looking emails optimized for mobile as well as desktop engagements.
  • Include an easy-to-find unsubscribe link: Sometimes it’s better to cut your losses rather than risk long-term damage. Make it easy for contacts to opt out with a noticeable unsubscribe link in the footer of emails, otherwise you incentivize spam designations. The good news – if you follow the above steps, the risk of unsubscribes is low.

Be sure to consistently monitor campaigns after the fact for further insights. When you do encounter feedback such as spam complaints, unsubscribes, and email replies, respond in a timely and professional manner to not only build trust with subscribers but also spot any developing issues.

Email Metric 2: Event Lag

In a utopia, subscribers receive communications and immediately convert. Unfortunately, that rarely does happen, so marketers need to investigate whenever a delay between send time, open, and click happens. Event lag, which measures the time between these milestones, provides marketers with insights into content effectiveness.

You can easily measure event lag: just subtract the time at which a contact took the desired action (e.g., link click, website purchase) from when the email was sent. For campaigns across time zones, adjust expectations to account for the difference. You can also swap conversion time for open time(s). With this data, you can understand whether content prompts immediate action or leaves an email wasting away in subscriber inboxes.

According to a Campaign Monitor study, the median click-to-open rate, which tracks how many subscribers who opened an email went on to click a link, across all industries clocks in at around 10.5 percent. Campaigns that perform below this benchmark should make good candidates for further speculation into event lag and supplemental analysis.

Creating More Actionable Emails

Improving subscriber response times is crucial to optimal engagement, conversions, and customer satisfaction. Here are some tips to improve response times in your marketing emails.

  • Scrutinize your offers: Event lag times vary depending on the type of desired action. For example, consumers often take longer purchasing high-ticket products compared to low-cost items or requests. Therefore, if lengthy event lag times hold back your campaigns, switch up your calls-to-action to encourage easier conversions. For example, a B2B SaaS company can lower the stakes of their email CTA by switching from a demo request to a product page that lets recipients make decisions at their own pace.
  • Adjust timing: Sometimes event lag stems from an easily determined source — timing. If you find most emails to certain geographies have extended lag times, then since the content clearly gets clicks, adjusting to more palatable local send times could be the necessary fix.
  • Automated emails: Implementing automated follow-up email campaigns to welcome new subscribers, encourage action on abandoned carts, or send personalized behavior-based recommendations take advantage of recent positive engagements to foster immediate action.
  • Segmented email lists and content: Again, sending personalized emails based on subscriber behavior (for example, see above) or preferences creates more relevant experiences, improving response time.

Ultimately, the most important factor is to track and analyze your event lag data regularly, using that information to optimize your email campaigns over time to improve engagement and conversions.

Now that we’ve established advanced metrics to determine who is most/least engaged, let’s take a look at how to apply insights to your most radical subscribers.

Email Metric 3: Most-Engaged Subscribers

Every brand loves their MVPs, but are you doing enough to truly maximize the value they bring to your organization?

The Pareto Principle notes roughly 80 percent of sales come from just 20 percent of customers. Knowing this, maximizing loyalty and upsell opportunities among your most-engaged subscribers becomes crucial for marketers.

How to Recognize

To determine which subscribers have the highest brand loyalty, aggregate the following metrics.

  • Open Rates: The subscribers who consistently open your emails clearly find value in the content you send. Look at how often contacts open emails (and when they don’t) at an individual level to gain future segmentation insights.
  • Click-Through Rates: Use a similar approach for click-through statistics. Subscribers who consistently follow calls-to-action trust your brand.
  • Conversion Rates: Identify the subscribers who consistently take the desired actions of your emails. You can further segment contacts based on what actions they take post-click (e.g., those who purchase a certain product).

Create a scoring system out of these metrics that ranks subscribers based on their level of engagement. To do so, assign a score to each metric, add up the scores for each subscriber, then rank subscribers based on their total score. Going forward, target the most-engaged subscribers with personalized content or special offers to encourage continued engagement.

Priming for Further Action

Once you’ve determined your most-engaged subscribers, foster further conversions and long-term brand loyalty with the following strategies.

  • Personalized content: Segment your most engaged subscribers and personalize your content to cater to their specific desires. Effective segmentations pull data from past purchase history, browsing behavior, and engagement to create more relevant content that drives repeat conversions.
  • Exclusive offers and promotions: Reward your most-engaged subscribers with exclusive offers and promotions, including early access to sales, discounts, or freebies. These can even become personalized, such as promos for birthdays or anniversaries.
  • Ask for feedback: Use your most-engaged subscribers as a focus group to gather feedback on new products or services, website updates, or other business initiatives. This feedback from your best revenue stream identifies pain points and areas to improve, and fixing these shortcomings minimize the risk of churning your other subscribers.
  • Encourage social sharing: Take advantage of strong brand loyalty to encourage word-of-mouth sharing through social media or conversations with friends and family. These campaigns expand your reach and help attract new subscribers who are likely to engage in a similar manner.

Engagement is a two-way street, so ensure you continue to engage your brand’s most loyal followers with creative and personalized communications. In the long run, these customers become your organization’s foundation.

Email Metric 4: Least-Engaged Subscribers

Finding ways to elicit just an open from your least-engaged subscribers, on the other hand, fills marketers with migraines. These contacts have high event lag (or no engagement at all) and are at high risk to increase your complaint rate.

Knowing this, marketers must discern when to retarget low-engaged subscribers and when to remove them from lists altogether. With email deliverability and brand reputation at stake, list quality trumps quantity.

Improving relationships with your least engaged subscribers is a tall task, but several strategies can reset the relationship.

  • Segmented email lists: Notice a theme? Build audience segmentations based on engagement levels, and use this info to create campaigns that target your least-engaged subscribers. Use data such as their past purchase history or browsing behavior to create personalized messages tailored to these groups’ interests that resonate and drive conversions.
  • Re-opt-in campaigns: A re-opt-in campaign involves sending an email asking if identified subscribers still want to receive your emails and allowing them to confirm their subscription. This measure helps clean up email database and ensures you only target subscribers interested in hearing from you.
  • Evaluate email frequency: If you’re sending too many emails to your least engaged subscribers, they may tune out or unsubscribe. If you see high unsubscribe or complaint rates, evaluate how to reduce email frequency, reprioritize campaigns, or change the timing of email sends to see if engagement levels improve.
  • Prioritize: Multiple teams sending multiple email campaigns to the same contacts in theory increase the likelihood of conversion, but in practice it leads to marketing fatigue and high unsubscribe rates. Develop a system for campaign prioritization to ensure subscribers do not disengage due to an overwhelming amount of messages.
  • Incentives and promos: For true holdouts, consider offering incentives such as personalized discounts or freebies to rekindle interest in your brand and increase the chances of future engagement.
  • Different types of content: Try experimenting with different types of content, such as videos, interactive quizzes, or infographics, to see what resonates with your least-engaged subscribers. This keeps your content fresh and encourages continual engagement.

Overall, re-engaging with your least engaged subscribers in email marketing can take time and effort, but by focusing on personalized content, segmentation, and incentives, you can increase the chances of them engaging more with your brand over time.

Final Thoughts

As with all things email marketing, knowing how each subscriber interacts with your messages informs how to best continue each relationship. To really understand who is at risk for dis-engagement, monitor in-depth trends like complaint rate and event lag, so you have an accurate and fresh view of which campaigns resonate and which ones alienate.


It all starts with audience segmentation. If you feel your emails lack the personalization that drives action and conversions, learn how DESelect Segment empowers marketers of all technical abilities to create complex, personalized audiences in half the time.

The surest way to get a reaction from any Salesforce Admin is to mention multi-select picklists. They are notoriously hard to report on and can be challenging at times. However, there are times when more than one value is needed. 

Multi-select picklists can also cause quite a few issues for Marketing Cloud Account Engagement (Pardot) Admins. In this guide, we’ll discuss the proper way to create, sync, and update multi-select picklists in Account Engagement.

Field Types and Compatibility

Field types between Salesforce and Account Engagement don’t always behave the same way. Before we address how to work with multi-select picklists, we first need to understand field types and compatibility.

Account Engagement

  • Checkbox – Allows a prospect to select multiple options from a list of values.
  • Dropdown – Prospects can select a single value from a picklist.
  • Multi-Select – Prospects can select multiple values from a picklist.
  • Radio Button – Allows a prospect to select a single option from a list of values.

For more information, see the complete list of Account Engagement Prospect Field Types.

Salesforce

  • Checkbox – A single select field that is used to indicate true or false.
  • Picklist – Allows users to select a single value from a defined list.
  • Picklist (Multi-select) – Allows users to select multiple values from a defined list.

For more information, see the complete list of Salesforce Custom Field Types.

The first thing to note is that checkboxes are multi-select in Account Engagement, but not Salesforce. This can lead to issues when syncing to a checkbox field in Salesforce. To avoid issues, set your field type to radio button in Account Engagement when syncing to a Salesforce checkbox (for more information see – Mapping Pardot checkbox fields to Salesforce checkbox fields).


The next thing that you’ll notice is that Account Engagement has two fields that allow users to select multiple values – checkbox and multi-select. So what’s the difference and how should each be used? I’m glad you asked.

  • Checkbox – Select this option if you are creating a form in Account Engagement and you would like all values to be shown as individual boxes where prospects can check one or many.
  • Multi-Select – Select this option if you are creating a form in Account Engagement and would like the values displayed in a picklist where the user can select one or many options. 

Salesforce and Account Engagement Field Compatibility 

Salesforce Field TypeAccount Engagement Field TypeCompatible
CheckboxCheckbox❌
CheckboxDropdown❌
CheckboxMulti-Select❌
CheckboxRadio Button✔
PicklistCheckbox❌
PicklistDropdown✔
PicklistMulti-Select❌
PicklistRadio Button✔
Picklist (Multi-Select)Checkbox✔
Picklist (Multi-Select)Dropdown❌
Picklist (Multi-Select)Multi-Select✔
Picklist (Multi-Select)Radio Button❌

Account Engagement Custom Fields

Now that we are all on the same page related to fields and compatibility, it’s now time to create our custom fields in Account Engagement to hold the data. You have options when creating custom fields, so it’s important to consider the data in Salesforce and how you would like the information displayed on your Account Engagement forms before creating your field.

Option #1 – Checkbox

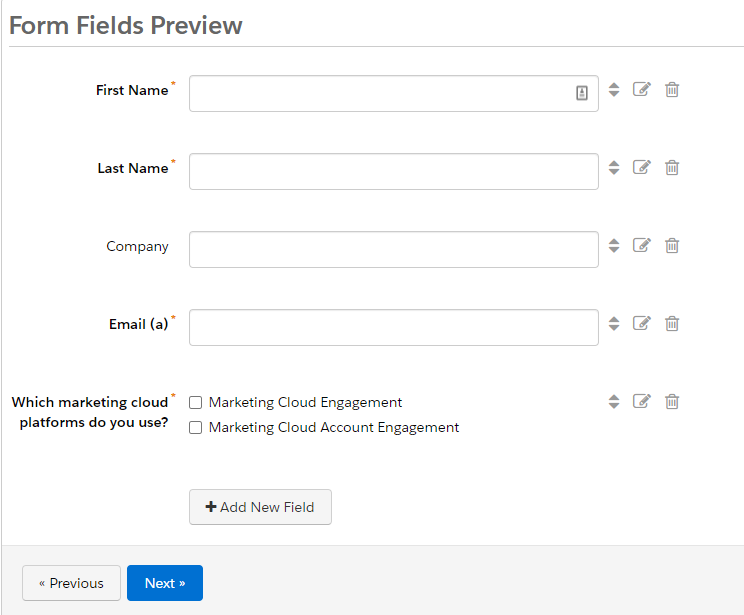
If the multi-select picklist in Salesforce has a small number of values (less than 5) and you would like all options visible to prospects when they view your form, checkbox is the field type for you.

Example Form with Checkbox Field Type 

Example Form with Checkbox Field Type

Option #2 – Multi-Select

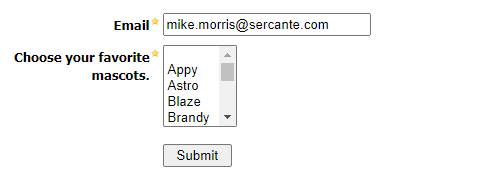
If the multi-select picklist in Salesforce has a large number of values and displaying all on a form would not be practical, multi-select is the way to go.

Example Form with Multi-Select Field Type

Example Form with Multi-Select Field Type

Additional Field Options & Considerations

Regardless of the field type selected, there are a few options that I would highly encourage you to consider.

Options that Should Always be Selected 

  • Keep this field’s type and possible values (for dropdowns, radio buttons, checkboxes) in sync with the CRM.
  • Use pre-defined values (for checkboxes, radio buttons, drop downs, and multi-selects).

Record and Display Multiple Responses 

The “Record and display multiple responses (useful for fields that are set to always be displayed like reporting issues)” box is not as clear cut as the other options mentioned above. Its use is really tied to how you are using the field and what data should be retained. 

  • Selected
    • Initial selections will be recorded in Account Engagement upon initial form completion and synced to Salesforce.
    • If form is completed again and new values are selected, they will be added to the prospect record in Account Engagement (and will sync to Salesforce). 
    • Values that were deselected during the second submission will still be included in the prospect record in Account Engagement and would also be visible in Salesforce. Essentially, the original selections from the initial form submission will be retained – even if they are not selected during the second form submission.
  • Not Selected
    • Initial selections will be recorded in Pardot.
    • If form is completed again and new values are selected, they will be added to the prospect record in Account Engagement (and will sync to Salesforce). 
    • Values that were deselected during the second submission will be REMOVED from the prospect record in Account Engagement and would NOT be visible in Salesforce after the records sync. 

Account Engagement Forms

We’re getting there! Now that we have decided how we want the multi-select picklist options to display on our form and we’ve created the custom field in Account Engagement, it’s time to build our form.  For this exercise, I’m going to assume that you are familiar with creating a form. If you need a quick refresher, check out the Create a Form article from Salesforce.

Forms with Checkboxes

The process of adding a checkbox field to a form is pretty straightforward. Simply click the +Add New Field button once you reach the “Fields” tab and configure the field. Be sure to set the type to Checkbox and make sure to click the Load Default Data button.

Check the “required” box if you would like the field to be required. You can also select the “Always display even if previously completed” option on the “Advanced” tab, if you would like the field to always display.

multi-select picklist info


After configuring, your form preview will look like the example below. Finish the form wizard for completing the additional tabs (Look and Feel, Completion Actions, Confirm & Save) and your form will be ready for use.

form fields preview multi-select picklist

Form with Multi-Select Picklists

The process for creating a form using a multi-select field is very similar to the process for creating one for a checkbox. The only real difference is the “Type” of field that you’ll select.

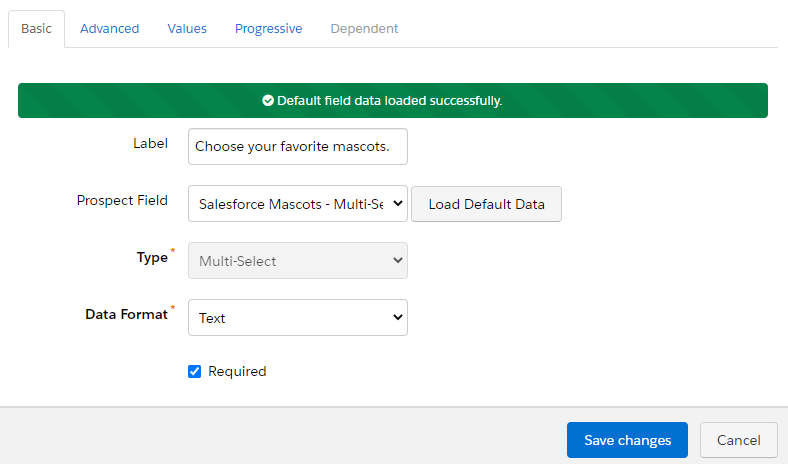
Very quickly, you’ll notice that there is not a multi-select option in the “Type” list. This can be confusing, but is not an issue. When configuring the form, set the checkbox type.

The magic will happen when you click the Load Default Data button. This will pull in the data from the multi-select field that you previously created and update the type selection to Multi-Select.

Form with Multi-Select Picklists


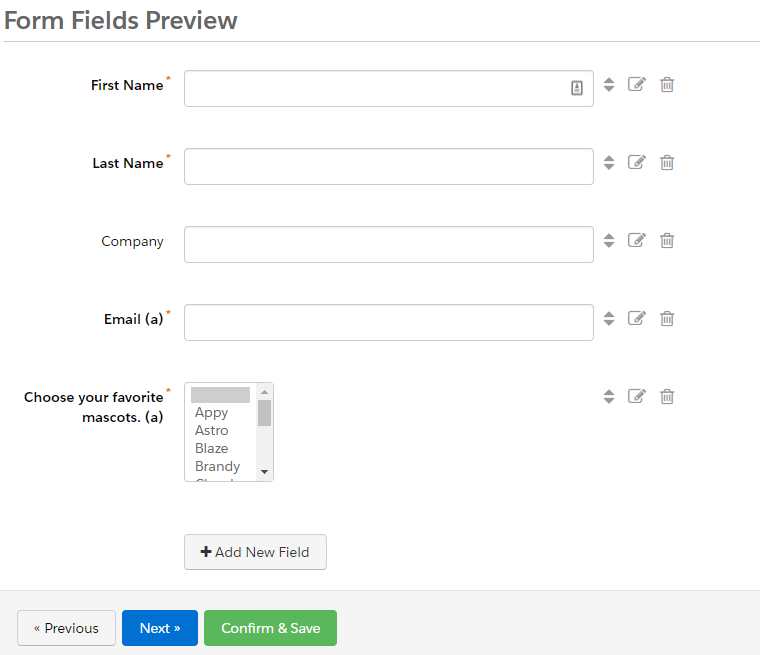
After configuring, your form preview will look like the example below. Finish the form wizard for completing the additional tabs (Look and Feel, Completion Actions, Confirm & Save) and your multi-select form will be ready for use.

Form fields preview

Importing Multi-Select Picklist Values 

When importing data into a multi-select field in Account Engagement, you must first decide on the desired action. Do you want to overwrite the current selections or do you want to add new selections to the existing data? This is a big one as it will determine if you should select the Record and display multiple responses (useful for fields that are set to always be displayed like reporting issues) option when creating your field. 

Import – Record and Display Multiple Responses NOT Selected

In this scenario, the Record and display multiple responses (useful for fields that are set to always be displayed like reporting issues) is not selected for either of my custom fields in Account Engagement.

After completing both forms, my initial selections were recorded in Account Engagement and synced to Salesforce.


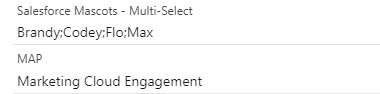
The data below was then imported into Pardot. The “overwrite existing data” option was selected for the MAP field, but not not the Mascot field upon import.


The result is that the MAP field was updated to Marketing Cloud Engagement, but no changes were made to the Mascot field. This makes sense as we opted to overwrite the data in the MAP field when we imported. Since we did not overwrite the Mascot data, the initial values were retained.

Import – Record and Display Multiple Responses Selected

In this scenario, the Record and display multiple responses (useful for fields that are set to always be displayed like reporting issues) IS selected for both of my custom fields in Account Engagement.

After completing both forms, my initial selections were recorded in Account Engagement and synced to Salesforce.

The data below was then imported into Pardot. The “overwrite existing data” option was selected for the MAP field, but not not the Mascot field upon import.


The result is that the MAP field was updated to Marketing Cloud Engagement and that the additional values of Flo and Brandy were added into the Mascot field. This is exactly what we would expect. We told Account Engagement to overwrite the data in the MAP field so it did. Since we did not select “overwrite” for the Mascot field and the field was configured to record and display multiple responses, the new values were appended to the existing.

salesforce mascots - multi-select picklist values

Updating Multi-Select Picklist Values 

When using automation rules to change data in multi-select picklist fields, you must first decide on the desired action – just like you did for list imports. Checking (or not checking) the Record and display multiple responses (useful for fields that are set to always be displayed like reporting issues) option when creating the field will impact the results in Account Engagement and Salesforce.

Automation Rule – Record and Display Multiple Responses NOT Selected

In this scenario, the Record and display multiple responses (useful for fields that are set to always be displayed like reporting issues) is not selected for either of my custom fields in Account Engagement. The values have also been reset to the values below as the starting point. We will now create automation rules to update the values. 

Salesforce mascots multi-select picklist

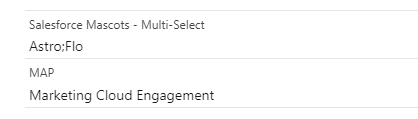
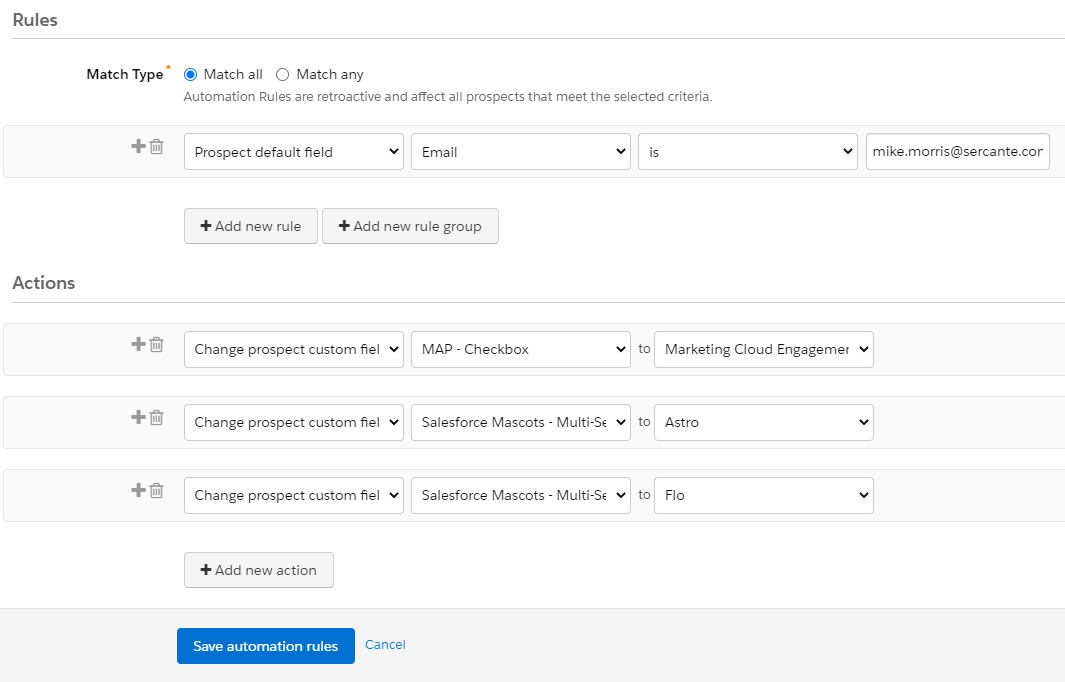
For this exercise, I’m going to assume that you are familiar with creating automation rules. If you need a quick refresher, check out the Create an Automation Rule article from Salesforce. The automation rule below contains actions to update the MAP field to “Marketing Cloud Engagement” and the Mascot field to “Astro” and “Flo”. Let’s run and record our results.

Multi-Select Picklists

The result is that both fields were updated based on the actions included in the automation rule. This is the expected behavior based on the field configuration. The automation rule told Account Engagement to change the field values and that’s exactly what it did. 

Form with Multi-Select Picklists 3


Automation Rule – Record and Display Multiple Responses Selected

In this scenario, the Record and display multiple responses (useful for fields that are set to always be displayed like reporting issues) IS selected for both of my custom fields in Account Engagement.

The values have also been reset to the default values below.

Form with Multi-Select Picklists 2

We’re now going to recreate the exact same automation rule as we did earlier. As a reminder, the rule contains actions to update the MAP field to “Marketing Cloud Engagement” and the Mascot field to “Astro” and “Flo”. What do you think will happen this time?

Form with Multi-Select Picklists

If you said that both MAP fields would be selected and that the Mascot field would contain all four of our fiends (Astro, Codey, Flo, and Max), you would be correct. Since our fields are now configured to record multiple responses, the new values were added and the original values were retained.   

Parting Words 

In this guide, we tested a lot of situations that can result when working with multi-select picklists in Account Engagement to help add clarity to how these fields work. The decisions that you make related to how data should display on forms and the data that you would like to retain are two critical questions that must be addressed at the beginning of your project. These decisions will determine how your fields are created in Account Engagement and the data that will ultimately end up in Salesforce. 

Further Reading

Questions?

Contact the Sercante team for help.

Salesforce Marketing Cloud Personalization (Interaction Studio) is a fantastic platform to add to your marketing toolset. But starting a Marketing Cloud implementation can be daunting, especially when it is as complex as Personalization. 

The following sections of this article will detail the implementation approaches available, provide indicative timelines and outline example use cases. However, if  you’re wanting to understand a little more about what the tool can offer, you can check out my last article – Salesforce Marketing Cloud Personalization (Interaction Studio): A Beginner’s Guide. 

SFMC Personalization Implementation Methods

With any platform like SFMC Personalization, which promises Real-Time Personalization and AI Recommendations, it’s easy to get carried away with what it can offer. However, the key takeaway from this article is that you should focus on what you and your company can achieve, which is particularly important given the tricky interdependencies you’ll face when implementing Personalization.

In a nutshell, the approaches vary from minimal viable product (MVP), where the goal is to implement a baseline as quickly as possible and then build upon it in future iterations, all the way to future-state implementation (FSI), where you depend on use cases to drive large-scale transformation. There is also a halfway house approach of implementing an As-Is, for those who may sit between the two methods above. 

Marketing Cloud Personalization Discovery Questions

Thankfully, understanding which method may suit your needs can be easily identified by answering a few simple discovery questions — as laid out by Salesforce in their Implementation of Marketing Cloud Personalization Trailhead. 

These helpful questions allow you to ascertain which method will best suit your needs, including: 

  • How often does your company change its website? 
  • Do you have easy access to developer resources? 
  • Are you migrating from an existing tool? 
  • Do other platforms need to be integrated? 

What you’ll find is: 

  1. MVP is great for companies making constant changes to their website, have easy access to developers, and are not migrating from an existing personalization platform. In other words, it’s a viable method for those who are perhaps new to real-time personalization. 
  2. As-Is is great for companies that don’t have immediate access to developers, are looking to migrate from one tool to another and have a few live personalization campaigns ready to migrate. 
  3. FSI is the preferred option for companies that less frequently change their website, have limited access to developers, are looking to integrate Personalization with multiple clouds (Marketing, Sales or Service), and have external data sources that need to be integrated. 

Marketing Cloud Personalization Implementation Roadmap

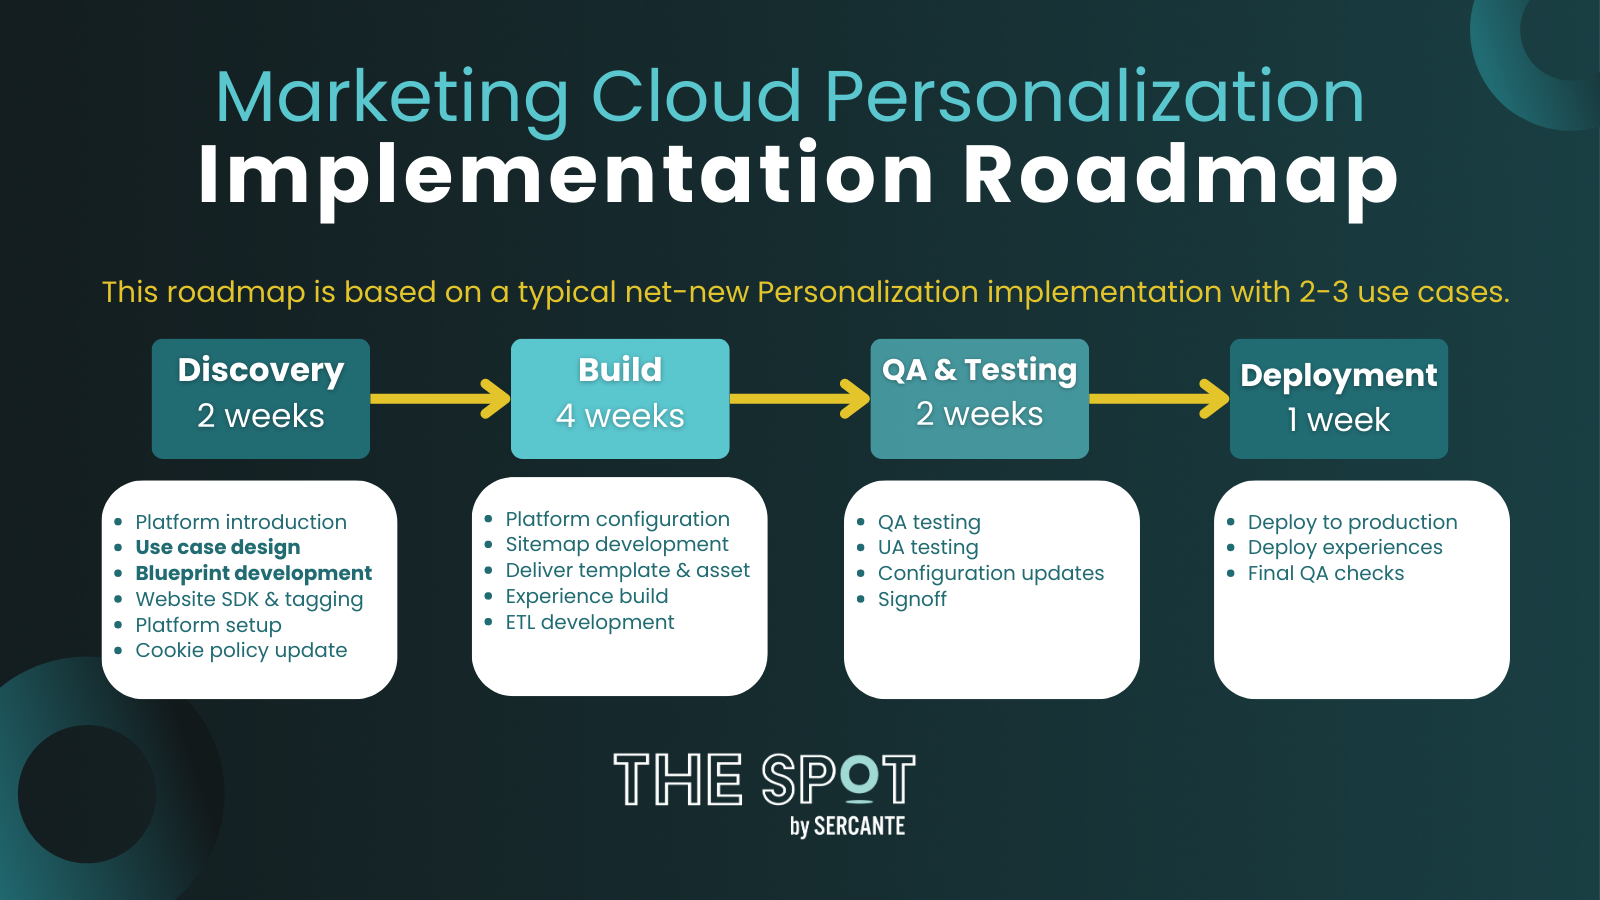
Obviously, the implementation roadmap will vary depending on the scope of your project and the implementation approach you’ve decided to use. However, there are some key milestones that will occur in all implementations, as shown in the diagram below, which is based on a typical net-new Personalization implementation with 2-3 use cases. 

Roadmap Diagram

From the diagram above, the two key milestones I’d pay the most attention to are the Use Case Discovery and the Blueprint Development. 

Regardless of the implementation method, defining a handful of clear and precise use cases before beginning the build is key to ensuring success. As mentioned, it’s easy to get caught up with the wide range of functionality Personalization offers. That’s why understanding the desired outcome is the most effective way of running a successful implementation and ensuring your company gets the most out of the platform. I’ll go on to share a few examples of good use cases later on. 

The blueprint document goes hand-in-hand with the sitemap — which is debatably the most crucial part of Personalization. The blueprint helps define which page categories exist, which triggers exist on those pages, what data can be scraped and where it can be scraped from (i.e. DOM vs Data-Layer) for each visit. 

Thankfully, to aid with your implementation, the Salesforce Partner Portal can provide a useful template that helps capture all of the information necessary to create your sitemap, and for implementing Personalization. The template covers everything from page types and content zones to events and attributes, and most importantly, where they can be found on your website to make it easier for the developers building the sitemap.  

Use Cases

Without sounding like a broken record, use cases can make or break a Personalization implementation. During my first implementation of Personalization, the goal I was given was to deliver Real-Time Web Personalization aka Personalization. 

There were no clear KPIs, the website was static and there was nothing to encourage returning visitors, and it made any experiences based on previous visits practically void. The end result was that our very expensive personalization engine sat on the shelf until we revisited the drawing board. 

Defining Your Use Cases

In order to avoid making my mistake, don’t be afraid to get granular with your use cases. Once established, it’s easier to build on top of existing use cases with future iterations. So really think about the following aspects when defining your use cases:

  1. Objective – What is it you’re trying to achieve with your personalization? Is it to increase the value per order? Or perhaps to encourage more users to download your app?
  2. KPIs – How are you going to measure the success of your personalization? Is it based on the number of successful completions? What percentage increase in order value would be considered successful? 
  3. Approach – Once you know what you’re trying to achieve, you then need to consider the approach. Is it based on visitors from a particular source (Rule-Based) or is it based on trending products (Recipe-based)?
  4. Measurement Approach – There’s no point in creating a personalized experience if there is no control to measure success. Consider what an adequate sample might look like and how long the campaign might last. 
  5. Channels – Is this going to be a web- or mobile-led campaign? 

There’s no right or wrong answer for use cases and it completely depends on your company’s objectives. But for a typical net-new implementation, 2-3 concise use cases similar to the ones below is a good starting point. 

Use Case Definition Example

Use Case ApproachChannelsKPIMeasurement Approach
Encourage users to complete the onboarding applicationRules BasedWeb, EmailNo. clicks on CTA, no. applications started, no. applications completed50% personalized, 50% control
Encourage mobile app downloadsRules BasedWeb, Mobile App, EmailNo. clicks on CTA, no. app downloads50% personalized, 50% control

Once you’ve defined your use cases, keep referring back to them throughout the implementation and when developing your blueprint. The use cases will help keep your implementation focused on the end goal, and help your developers build a sitemap that will be fit for purpose. 

Planning is Key to a Successful SFMC Personalization Implementation

As you’ve probably gathered by now, successfully implementing Personalization is closely linked with planning. Defining clear and concise use cases as well as developing an accurate and detailed blueprint, both of which are milestones during the Discovery Phase, are imperative for a smooth implementation. This is true regardless of your chosen implementation method.  

As final food for thought, don’t forget to consider your implementation team. Being the tool that it is, Personalization implementations often begin in the marketing department as it’s the marketers who want real-time personalization capabilities. However, even large marketing teams with wide-ranging skill sets will not be able to deliver Personalization alone. 

The Personalization Sitemap will require JavaScript developers. Building ETLs will require support from data architects. CRM integration will require CRM administrators. And creating experiences, although there are ready-made templates, may also require HTML and CSS experts. So, consider including wider teams early on in the implementation. 

Not only will this help to ensure that those resources are available to support and understand the ask, but it may also help to define use cases that are more relevant and that are also technically viable.

Need help filling the gaps on your team through your Salesforce Marketing Cloud Personalization implementation? Reach out to team Sercante to get their experts on the case.

In today’s international and digital business landscape, modern marketers often coordinate messaging and strategy across multiple countries or regions. Luckily, Marketing Cloud Account Engagement (Pardot) is an ideal tool to support those types of global marketing strategies. That’s because it enables marketers to find a balance between global coordination and initiatives that reflect the challenges and regulations of local markets. 

Here are functions and customizations in Marketing Cloud Account Engagement that support an international marketing strategy.

Crossing Language Barriers

One of the most important considerations for an international marketing strategy is delivering high-quality, localized content that doesn’t provide any barriers to engagement through the local language.

Enable international users in a single Marketing Cloud Account Engagement instance

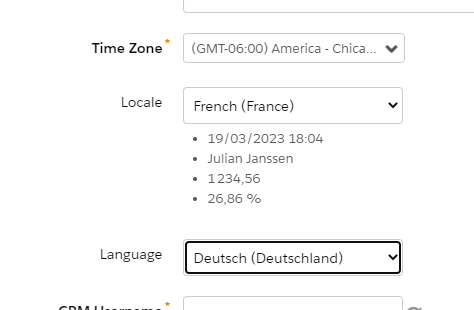
Administrators and individual users within Account Engagement can control the time zone, language and data formats in which the user interface (UI) is displayed. 

Languages and locales currently support:

  • English
  • Japanese
  • German
  • Spanish
  • French

This can be configured by an Account Engagement admin upon creating a user record. Go to Account Engagement Setting > User Management Users. 

Individual users can control their language and locale settings under Account Engagement Settings > Account Engagement > My Profile.

Marketing Asset Creation

While the user interface is limited to languages supported by Salesforce, all marketing assets in Account Engagement can be developed and customized in any language. For the most part, this just involves typing/inserting content in the language desired, but the following points detail areas where advanced customization is necessary to change the display language.

Form error message

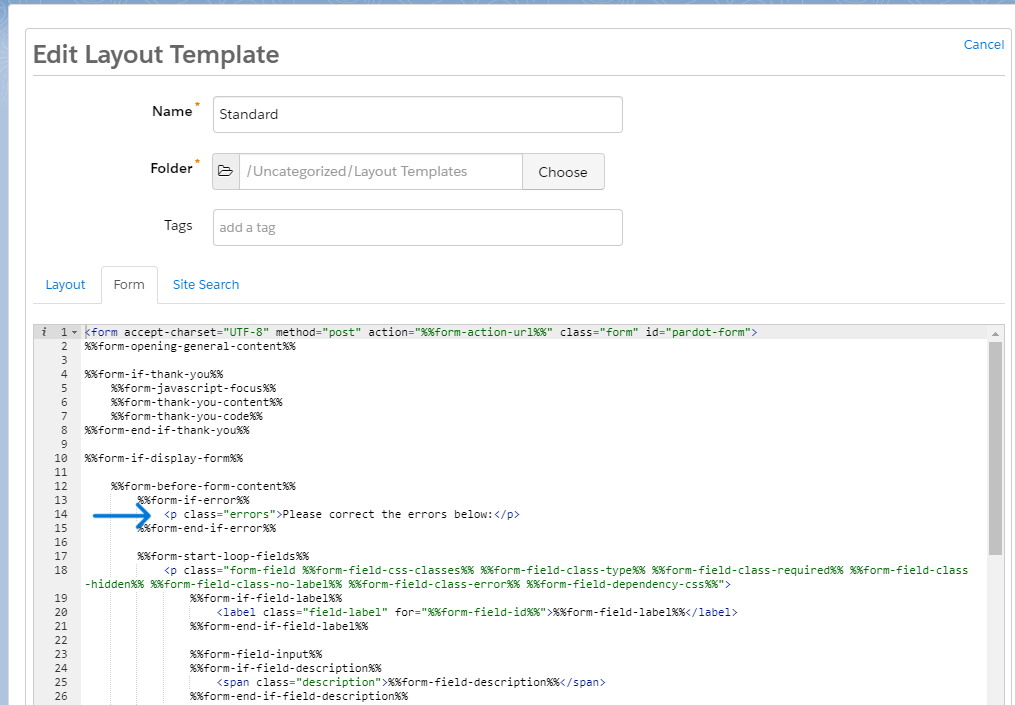
The native form error message for lacking required fields in Account Engagement displays in English by default “Please correct the errors below.” This cannot be customized within the form creation wizard, but instead must be customized within the layout template. 

To update, navigate to the layout template used by the form (Content > Layout Templates). Navigate to the form tab and replace the message after %%form-if-error%% with the desired text. 

The structure may not exactly match the included screenshot if you are using a layout template that significantly differs from the default. Use this reference for Layout Template Form Code to determine what components may need to be updated.

Encoding special characters

You may encounter situations in which characters display incorrectly when importing data to Account Engagement. To ensure all characters display correctly, you have to use UTF-8 encoding. 

Always confirm any exported data is edited and saved using UTF-8 encoding to ensure data is not improperly overwritten. To edit data with UTF-8 encoding in Excel, for example:

  1. Export CSV data from Account Engagement
  2. Navigate to Data > From Text (Get External Data) in Excel
  3. Select the CSV export, and chose “Delimited” and File Origin > “Unicode (UTF-8),” then “Comma” to open the data with correct forming in Excel

Any custom layout templates developed for Account Engagement landing pages should also be sure to use UTF-8 encoding. Set the below meta tag in the <head> section of the layout template so any special characters render correctly.

<meta http-equiv=”Content-Type” content=”text/html; charset=utf-8”>

Unsubscribe and Email Preference Center Pages

Account Engagement only allows for one global unsubscribe page, which can limit the feasibility of supporting multiple languages or unique messaging on the page. However, the suggested way to allow recipients to manage communication preferences is the email preference center (EPC) feature, which enables recipients to choose specific segments they would like to be included or excluded from, in addition to universally unsubscribing. 

Multiple EPCs can be set up under Account Engagement Email > Preferences Page, so customization to language and included distribution lists can be made per language. 

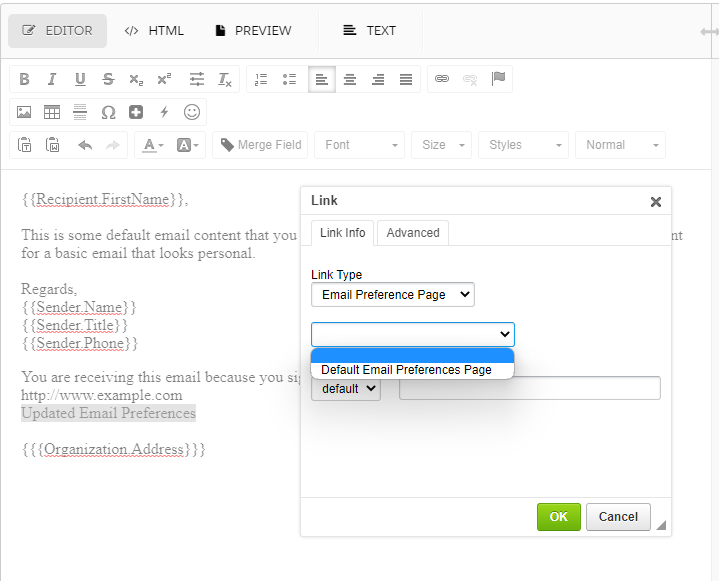
To  ensure the correct email preference center is included in different language emails, insert a link, choose “Email Preference Page,” and choose from the list of available pages. 

Learn about other customizations that can be made to Pardot unsubscribe and email preference pages.

“Not you?”/Form Reset Link

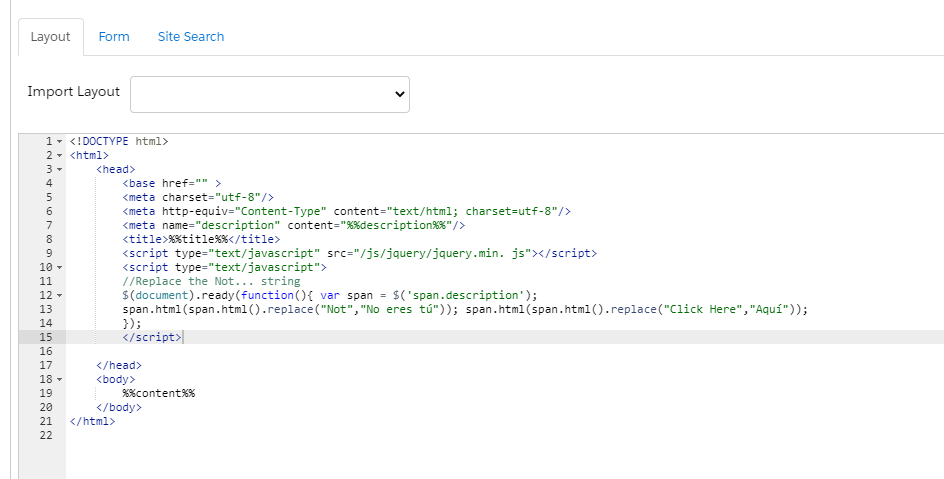
In the form creation wizard, under 3. Look and Feel > Advanced, is a handy setting to enable a link that allows viewers to reset Account Engagement pre-population and dynamic form functions, in case it is pre-populated with the wrong information (which may be the case due to shared devices, etc.) However, similar to the form required field error message discussed above, this only renders in English by default, in the format “Not Name? Click here.”

To resolve, creating another form layout template update is required. Insert the following script between the opening and closing <head> tag in the “layout” tab of the desired layout template.

<script type="text/javascript" src="/js/jquery/jquery.min. js"></script>

<script type="text/javascript">

//Replace the Not... string

$(document).ready(function(){ var span = $('span.description');

span.html(span.html().replace("Not","Desired Replacement for Not")); span.html(span.html().replace("Click Here","Desired Replacement for Click Here"));

});

</script>

International Privacy and Data Management

With growing international business, also comes managing compliance with the various data protection and privacy laws in place across your target markets. It’s important to consult with your company’s legal counsel to ensure understanding of the regulations across various jurisdictions. Fortunately, Account Engagement includes a variety of features to enable and enforce compliant data collection and protection. 

Tracking Cookies

Account Engagement uses a combination of third and first party cookies to track visitor web behavior and build a profile of data on prospects in your database. To customize how cookies behave and allow visitors to opt-out of tracking, you can:

  • Enable first-party cookies and disable third-party cookies under Account Engagement Settings > Account Settings
  • Honor “Do Not Track (DNT)”  headers under by enabling under Account Engagement Settings > Account Settings
  • Customize Account Engagement cookie duration via Account Engagement Settings > Account Settings
  • Display a banner requesting tracking opt-in in some or all countries via Account Engagement Settings > Domain Management > Edit Tracking Opt-in Preferences
  • Utilize the Tracking and Consent API to integrate with other systems and create custom solutions

Communication Preferences

Many regulations require that explicit and informed consent be collected before a recipient can be emailed marketing materials, as well allow recipients to revoke that consent at any time. Some industries also require detailed records of communications sent. Account Engagement enables this via:

Additional permission-based marketing resources: 

Data Security

Data stored in Account Engagement is kept securely to meet international data processing regulations, along with strict user login requirements. 

Here is documentation from Salesforce on these practices:

Other Resources from The Spot on Managing Global Compliance

What’s Next 

Need help finding the right mix of Account Engagement solutions to meet your localization and compliance requirements? Reach out to the team at Sercante to get help customizing features and content in your org and enable your global team. And leave us a comment below to let us know any tips or tricks you’ve picked up for managing international teams with Account Engagement!

No more posts to show