Hey there! So, I wanted to chat with you about something that can be a bit tricky but super important in the world of marketing: capturing UTM parameters.
You know those little bits of code you see at the end of URLs? They help marketers track where their website traffic is coming from and measure the success of their campaigns.
Well, capturing and using UTM parameters can sometimes be a real challenge — especially when you’re dealing with UTM capture on Marketing Cloud Account Engagement (Pardot) landing pages.
But don’t worry. we’ve got your back!
In this post, we’ll cover four ways to use UTMs for capturing the first and last touchpoints on Account Engagement landing pages. If you’re also looking for information on capturing UTM parameters in Salesforce, then check out this post.
4 methods for capturing UTM parameters on landing pages
Let’s dive into four different ways you can script your way to capturing first and last touch UTM parameters on Account Engagement landing pages. This solution works even if the form fields don’t match the UTM exactly or if you need to use cookies.
Trust me, it’s not as complicated as it sounds!
1. Map the URL to hidden form fields
Option 1 is all about handling those pesky form field variations. Imagine the form fields on your Pardot landing page don’t exactly match the UTM parameters. No worries!
With some JavaScript magic, you can extract the UTM values from the URL and map them to the right hidden form fields. It’s like connecting the dots, making sure you capture those first and last touch UTM parameters accurately.
See example and steps to setting this up in the video below.
2. Store UTM values in a session cookie
Now, let’s talk about Option 2. Sometimes you need session-based tracking, and that’s where scripting with session cookies comes in.
Using JavaScript, you can grab the UTM values from the URL and store them in a session cookie.
This cookie will keep the UTM data available as the user navigates through different Pardot landing pages. You can then map these UTM values to hidden form fields, ensuring you capture the first and last touch UTM parameters consistently during the session.
See example and steps to setting this up in the video below.
3. Pass UTM parameters to forms embedded in iFrames
Option 3 is for web landing pages that have an Account Engagement (Pardot) iFrame. Here, you can use scripting to set a cookie value that passes the UTM parameter to the iFrame.
JavaScript to the rescue again — it helps you extract the UTM values from the URL and store them in a cookie. The Pardot iFrame can then grab the cookie value and fill in the hidden form fields.
Voilà! You’ve captured the first and last touch UTM parameters and can use them in Pardot form submissions.
See example and steps to setting this up in the video below.
4. Capture UTM parameters across multiple website visits
Last but not least, Option 4 involves persistent cookies and hidden form fields. If you want to capture UTM parameters across multiple sessions or visits, this is the way to go. With some clever scripting using JavaScript, you can store the UTM values in a persistent cookie.
So, even if your visitors come back later, the cookie remembers the UTM data. When they submit a form, the hidden form fields get populated with the UTM values, ensuring you capture the first and last touch UTM parameters consistently.
Get instructions for this method in this blog post.
Go forth and track all the things through UTM capture
So, my friend, there you have it! These four scripting paths will help you capture first and last touch UTM parameters on Account Engagement landing pages like a pro. Whether you’re dealing with form field variations, session-based tracking, iframes, or multiple visits, these options have got you covered. You’ll be able to gather accurate UTM data for analyzing your campaigns and making data-driven marketing decisions within Pardot.
Now go ahead and rock those UTM captures with confidence! Not sure what to do with the information you’re tracking? Reach out to the team at Sercante for help building a marketing campaign strategy that gets results.
Marketing Cloud Account Engagement (Pardot) offers the opportunity for marketers to give their sales team the information they’ll want, notifications worth paying attention to, and truly actionable insights about their prospects.
But it’s not always easy to get people excited about new software — especially when it involves learning a new process or procedure.
When I became an accidental admin of Account Engagement in 2015, it took me a while to dig into the underutilized features that make it a great platform. But once I did, I learned how to provide sales with useful, actionable data.
In this post, I’ll share the big things that have helped to get sales teams excited about Account Engagement so they can be more productive with marketing leads.
Show all that Account Engagement goodness in Salesforce — where your sales folks can see it
Your sales and leadership teams are probably not using Account Engagement. But that’s where the marketing team is getting work done, like sending email campaigns, building engagement studio journeys, and reviewing prospect engagement.
However, since Account Engagement is baked into the entire Salesforce ecosystem, there are a lot of ways to bridge the gap between the two systems and offer visibility into everything Account Engagement is doing.
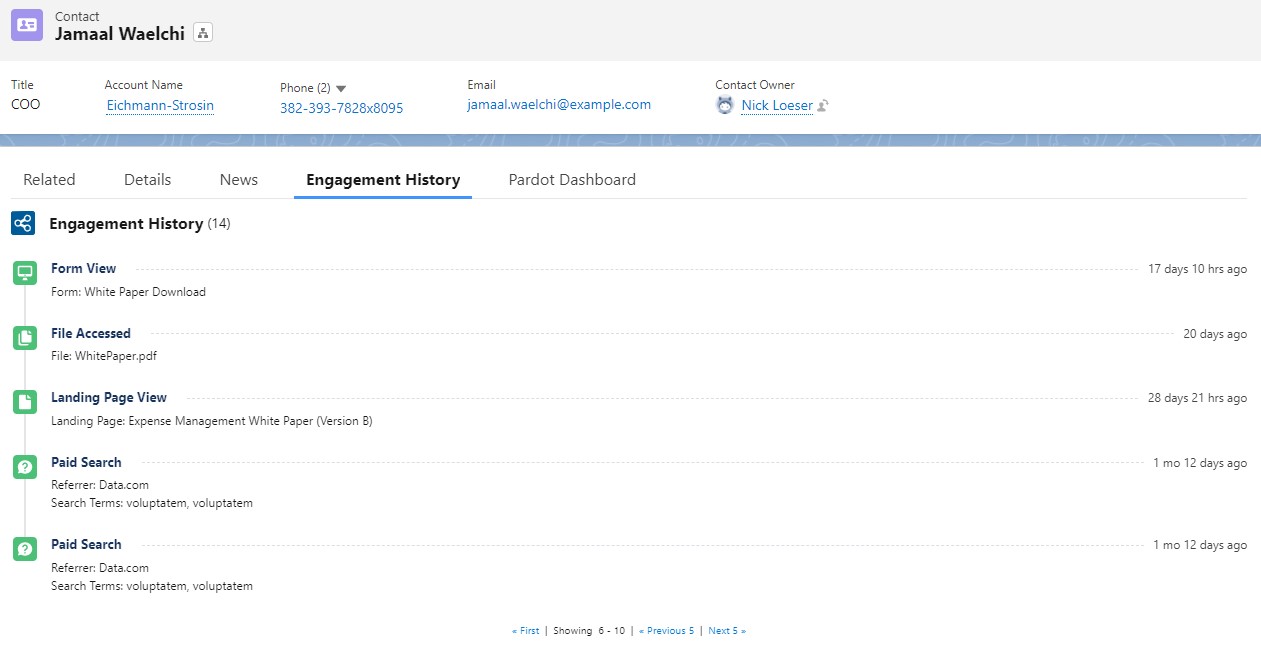
Add Engagement History to Contact Page Layout
If I had a dime for every client I met who didn’t have Engagement History added to their Contact page layout, I would have at least enough money for a mocha latte at Starbucks. But I cannot imagine a scenario where you wouldn’t want this information in Salesforce for everyone to see.
Adding the Engagement History component to your Lightning record page is super-simple and will provide a log of all activities your trackable prospects are doing. For example, the component shows emails they are opening or clicking, landing pages they’re visiting, PDFs they’ve downloaded from your site and all the pages on your domain they have visited.
Your Salesforce administrator can easily edit the Contact record page in Lightning Builder and drag the Engagement History component onto the page.
The sales team is going to love this intelligence because it offers them insights into their prospects that they wouldn’t normally have. Furthermore, they’ll know simply by reviewing the history whether or not their prospects are opening marketing emails and what their level of engagement is.
A couple of caveats
Only prospects that are cookied will show engagement history. They must be a prospect that has clicked on an email or previously filled out a Pardot form to be cookied and trackable.
Oftentimes emails may show opened or even clicked multiple times. Spam protection software can send a message pack to the sender (Pardot) that an email has been opened or clicked, even if it hasn’t been, which can be confusing.
Bonus Tip!
I love Page Actions, which allow you to designate specific pages on your website that trigger an automated action when a cookied prospect visits that page (for example, Add prospect to a list if they visit this particular product page).
In addition, there is a checkbox on the Page Action that indicates it’s a Priority Page. By checking this box when setting up a Page Action your page will actually show up in the prospect’s Engagement History with the specific page they visited. So, for example, if you created a Page Action for your pricing page and marked it as a Priority Page, when a prospect visited that page it would be very easy for your sales folks to see that on the prospect’s history.
Don’t forget to connect your campaigns
With the introduction of connected campaigns a few years ago, Account Engagement now syncs relevant email engagement data directly into Salesforce.
There’s no need for leadership or other stakeholders to ask the marketing team how an email campaign or landing page is doing — that data is available right in Salesforce.
Similar to the Engagement History component, this needs to be added to the campaign Lightning record page.
A couple of caveats
Users will need the Marketing permission checkbox on their profile to be checked to access Campaigns.
Emails and landing pages must be associated with the campaign in Account Engagement for the data to flow into the connected Salesforce Campaign.
Bonus Tip!
Use Campaign Hierarchy to your advantage. On the dashboard you can view just the parent campaign results, or click the toggle to view the child campaigns as well. For example, you may have one main campaign for a Spring Campaign, then create and assign a child campaign to each email wave, or separate landing page.
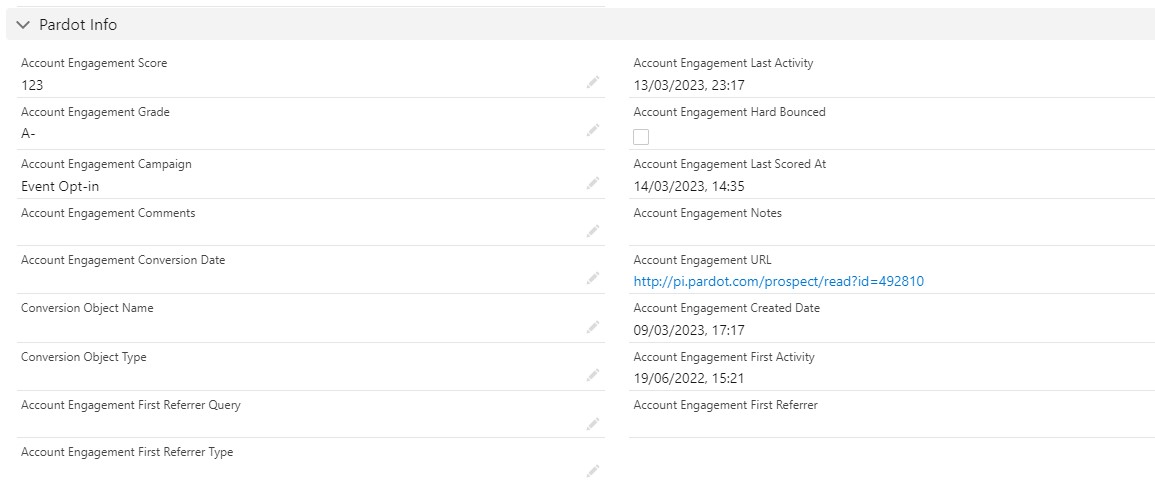
Let’s add the Account Engagement fields, too
Not everything Account Engagement related can be added with a component. We’ll need to add some fields to the page layouts as well.
I recommend adding a new Section to the Details area of the Contact page layout. Drag in the Account Engagement fields you wish to display.
At a bare minimum, let’s give your team:
Score: Your team will love the Score because it’s an implicit indicator of the level of interest a prospect has in you. It will help guide the sales folks in their prospecting efforts.
Grade: Not all organizations have this setup, if you don’t start here to learn about why it’s worth the time and effort.
Last Activity: This gives you a good idea of how long it’s been since a prospect has opened/clicked on an email or visited your website.
Created Date: This is different from the contact’s create date. This is when Pardot first created the prospect record.
Finally, I like to include the Hard Bounce field so that the sales team is aware if they have a prospect with a bad email address. This will usually prompt them to check to see if they have the correct email on the record, or if the contact has left the company.
Salesforce reports your team will love
It’s nice to have all of the fields and components in Salesforce where your team can easily access them, but let’s talk a bit about reports too. There’s some cool stuff you can do with Salesforce reporting to keep your sales team wanting more.
Account based marketing (ABM) reports
Instead of looking at the engagement of a single prospect, why not look at the entire account to see how engaged they are as a whole?
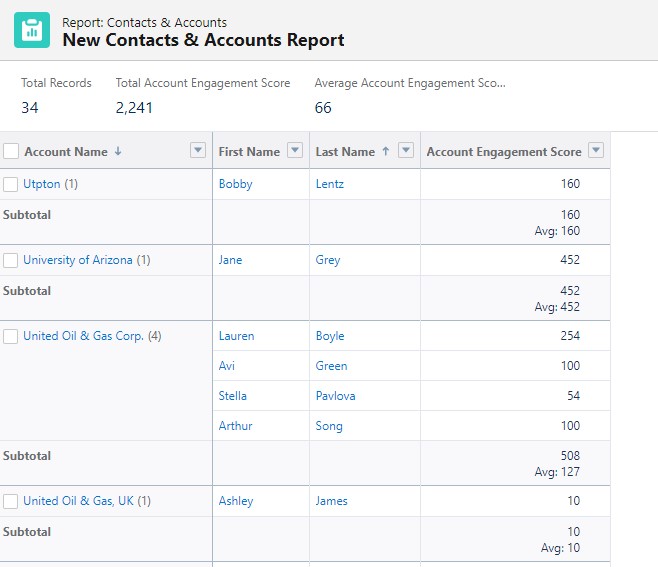
Let’s create a report that will summarize our accounts and give us the Sum and Average of all of the contacts that belong to the given account.
Create a new Contact & Account report. Apply any filters you need.
The report layout should include the contact’s name, Account Engagement Score and whatever other fields you need.
Under Group Rows, add Account Name to add a grouping by Account.
On the Account Engagement Score field, click the down arrow to expand the field options in the layout
Hover over Summarize and check Sum and Average.
Save and Run your new report!
Recently active and highly engaged prospects report
The purpose of this report is to help sales folks identify prospects that are highly engaged and recently active. It creates a call sheet of sorts for your sales team.
To create this report, simply build a normal Contact & Account report but include the fields Account Engagement Last Activity and Score.
You can then filter and/or sort the report to see the most recently active prospects with the highest engagement. I used this type of report to keep an active list of prospects that sales people could call on when they had spare time.
Note: Your users may already receive a similar report from Account Engagement called their daily prospect activity report. To find out, go to Account Engagement Settings > User Management > Users and click on a user. Then select Edit Preferences in the top right to see what emails they’re subscribed to.
Final thoughts
Hopefully you have found a couple of tidbits you’re ready to implement in your own org. One of the reasons I absolutely love this topic is because I know as a marketer it’s important to prove your value to the organization as a whole. I spent a large portion of my career learning to work with sales teams and leadership to provide them the insights they needed to succeed.
It wasn’t always easy but good synergy between your sales and marketing teams is essential and will pay dividends. A good relationship includes transparency and Account Engagement offers that through excellent native integration with Salesforce.
Looking to break down silos and build a stronger relationship between your sales and marketing teams? Contact the team at Sercante to start a conversation and learn about solutions we’ve built and the possibilities that exist.
Account Engagement (Pardot) Optimizer BETA was released with the Spring ‘23 new features, but it has become “Generally Available” as of the Summer ‘23 release. This new feature promises to help you identify and correct issues that may be negatively affecting your Business Unit’s processing power. In this blog, we’ll dive into everything you need to know to access and use the new Account Engagement Optimizer feature.
Accessing the Account Engagement Optimizer
To access the Optimizer, go to your Account Engagement Settings tab, “Optimizer” will appear as an option on the left-hand menu.
If you are using Default User Roles, only Administrators will have access to the Optimizer. If you are using Custom User Roles, make sure your custom role has the following permissions selected (edit Custom User Roles by going to Account Engagement Settings > User Management > Roles > then selecting the role you’d like to edit).
Admin > View Optimizer
Admin > View and Edit Pending Table Actions
Marketing > View and Delete Automation Rules
Marketing > View and Delete Lists
If you opted into the Beta before the Summer ‘23 release, there is nothing you need to do to continue using the Optimizer. If you did not opt into the Beta, the Optimizer should have auto-enabled when your org was upgraded to Summer ‘23.
Analyzing Your Optimizer Report Results
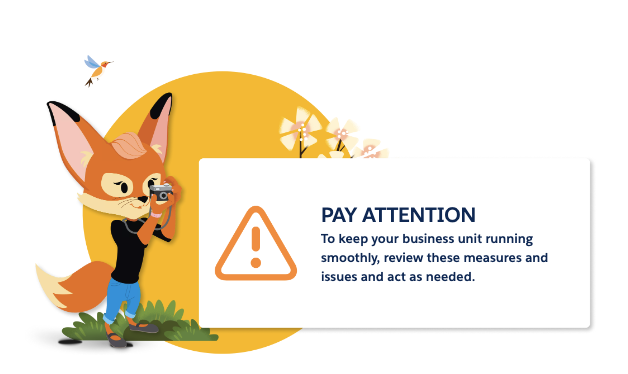
The Optimizer, with the help of Brandy, will provide one of three statuses for your business unit:
Looking Good: No critical issues to address
Pay Attention: There are a few recommended actions to improve your business unit
Action Needed: There are critical issues and you should resolve them right away.
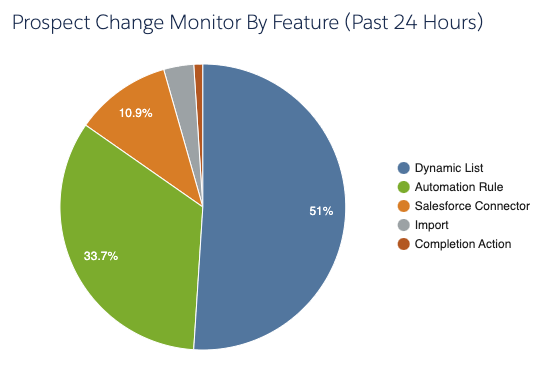
Prospect Change Monitor By Feature Chart
Next to Brandy and your Optimizer Status, you’ll see your Prospect Change Monitor By Feature chart.
This feature shows you which type of automations have made a change to Prospects in the last 24 hours. You can double click on each slice of the pie to drill into exactly which assets are making changes.
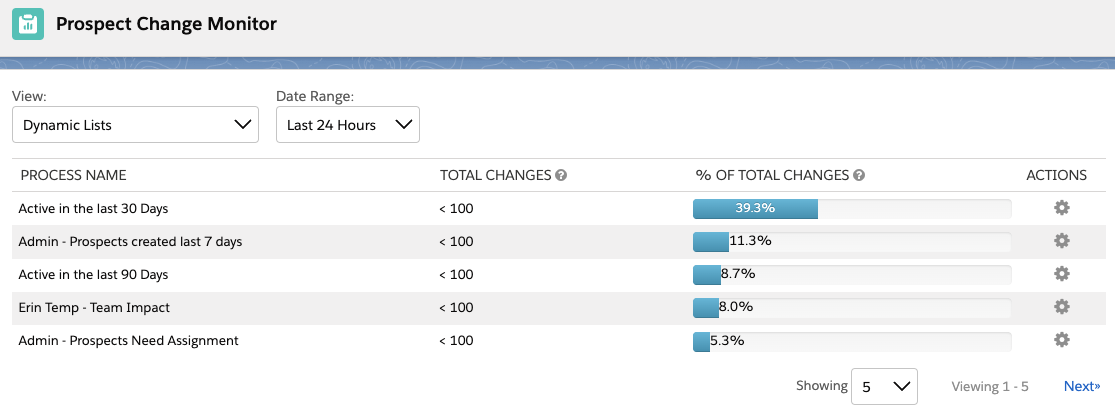
Changing Filter Views
In this view, you can also change your filters to show different date ranges and different views. I like to change my view to “All Processes” and Date Range to “Last 30 Days” to better keep an eye on which automations are running at least every month.
This view can be especially helpful in finding automations that may not have been set up in the most efficient way possible, such as an automation rule that is set to repeat every single day.
Configuration Issues
Next in the Optimizer report is your Configuration Issues. This table will show setup problems that are stopping you from full access to Account Engagement’s features. This can be issues like your sending domain not being verified or prospects being paused for bot-like behavior.
I tried to see if turning off Connected Campaigns would also trigger an issue here, but no dice. Hopefully, Salesforce will provide a list of all configuration issues that are checked in a future release, but in the meantime you can use our implementation checklist to ensure your Business Unit is configured correctly.
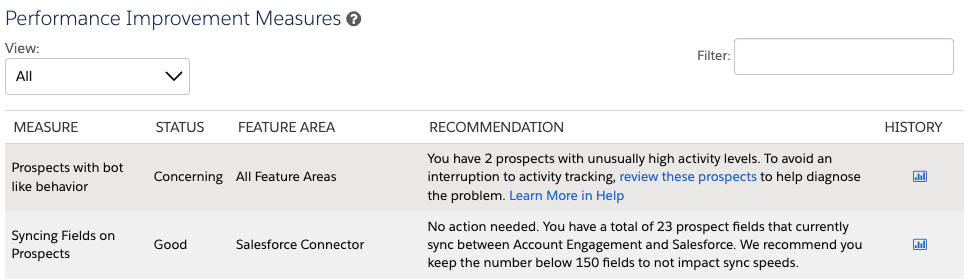
Performance Improvement Measures
Next is Performance Improvement Measures, this table shows you recommendations that will improve your Business Unit’s processing power. This table defaults to “Actionable Measures,” but you can change this view to “All” to see what else is being monitored.
This table is broken down into five columns:
Measure: What exactly Optimizer is reviewing.
Status: Whether the measure is in Good, Concerning, or Critical standing or if there are actions that can be taken. “Good” statuses will not show when this table is filtered to only show “Actionable Measures.”
Feature Area: Which Account Engagement Features are involved in this measure.
Recommendation: What next steps, if any, should you take. Most insights will also include links to documentation, which I personally love.
History: If there is enough data for this measure, you can select the chart icon to see the measures for the last 8 days. These charts also shed light on what the Optimizer considers good, concerning, or critical.
Maintenance Resources
Finally, you have Maintenance Resources. This section links to a few views and reports that can help your Business Unit run in tip-top shape. This includes 2 views we’re already used to: Inactive Automation Rules and Inactive Dynamic Lists, but also 2 new super useful views:
Table Action Manager: This view allows you to pause, prioritize, and cancel actions currently running in the Business Unit. For example, say you recently kicked off an Automation Rule that will update 3,000 prospects, but you are also running a Dynamic List that is needed for an email send going out in 5 minutes. Now you can prioritize that Dynamic List over the Automation Rule rather than panicking if your Dynamic List is going to complete in time.
Unused Dynamic Lists: This view shows you which Dynamic Lists have a blank Usage table. Now you no longer have to click into each Dynamic List to check if any assets are listed on the “Usage” tab, YAY!
Account Engagement Optimizer is Available Now
Now that Optimizer is available for all orgs, I would highly recommend you check the report at least monthly to keep an eye out for any potential issues. If you have any questions or neat tips about the Optimizer, let us know in the comments! Also, if you’re looking for other ways to improve your Business Unit’s processing power, check out our blog post, “4 Things to Clean in MCAE (Pardot) for Faster Processing Times.”
Contrary to the opinion of just about everybody in marketing, all your marketing leads are not “Hot” and the sales team is not lazy. The issue is that sales wants marketing to send them the right leads with the right expectations. In this post, we’ll address ways to improve the marketing lead handoff process using Salesforce and Account Engagement (Pardot) so sales and marketing can live in harmony.
The Problems with Marketing Leads
Before we can address the issues that sales teams have with marketing leads, we must first identify them. Below are the most common issues that I’ve encountered as a marketer (20+ years) and as a consultant. While all these issues might not apply to you, I bet more than a few will.
If you have issues that are not included in this list, please share them by dropping a note in the comments!
Poor Quality/Bad Data
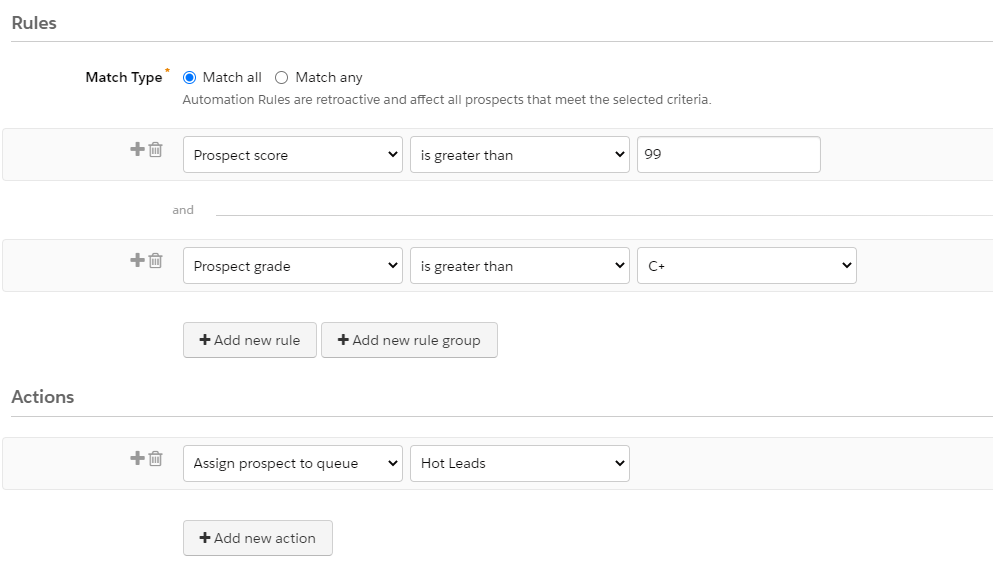
Let’s start with data quality. Marketers have the ability to control what prospects sync from Account Engagement to Salesforce. Most often, this is based on a prospect achieving an agreed upon score & grade threshold. A rule could look something like this.
This rule assigns prospects to the Hot Leads queue when they achieve a score of 100 and a grade of B- or higher. Seems pretty solid?
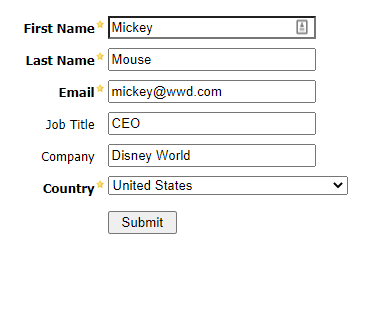
This is a good start, but not perfect. Let’s say that a demo form on your website adds 50 points (in addition to the 50 that included in the default scoring model for a form fill). Let’s also assume that your grading model adds a full letter grade for prospects in the United States and another full letter grade is added based on job titles that include CEO.
If your form was completed with the data below, guess who would be assigned to the Hot Lead queue, synced to Salesforce, and assigned to a member of your sales team? Sending over leads like this is the fastest way to sour your sales team on marketing leads.
Keeping Bad Data Out of Salesforce
The example above is not uncommon and is a step up over blindly assigning all prospects from Account Engagement to a queue, but we can do better.
At Sercante, we use a tool named Prospect Updater for Pardot that was created by our labs team. This tool can be used to fix, enhance, and enrich prospect data before it enters Salesforce. Here’s how we leverage Prospect Updater in our organization.
Visitor fills out a form and a new prospect is created in Pardot.
Prospect updater runs and marks a custom field as “Suspected Spam” or “Not Spam” based on criteria that we defined.
Assignment automation rules run (in Account Engagement) and only match prospects with a value of “Not Spam” – ensuring that “Suspected Spam” records do not enter Salesforce.
Want to know more about how Prospect Updater keeps spam out of our org? Check out this post.
Unrealistic SLAs/Expectations
I’ll admit that I’ve been guilty of having some unrealistic expectations in the past. Does this sound familiar? You just got back from a week at that huge trade show in Las Vegas with several thousand leads that are gold and need to be called immediately.
The truth is that there is some gold in your pile of leads, but they are not all worthy of sales follow up. So what should you do?
Managing SLAs & Expectations
Agree to what constitutes a Hot Lead first.
Collaborate with sales leadership to agree to follow-up SLAs (Service Level Agreements).
Hot Leads – 24 Hours
Warm Lead – 3-Days
Understand the volume of lead that the sales team can follow-up on.
If thousands of leads meet your Hot Leads criteria and sales can only follow-up on hundreds, your definition needs to be refined or you need more sales people.
Ensure leads are tagged with a priority rating so the proper SLA can be applied.
At events, this could be adding a note when you have conversations with prospects.
For prospects entering Account Engagement, this could be based on scores, lead sources, or specific form/form handler submissions.
Marketing Leads Are Too Cold/Don’t Know Who We Are
Let’s go back to the trade show example. Your marketing team has done an awesome job of identifying the “must have” swag item and everybody is flocking to your booth to get one. The team is frantically scanning badges and moving to the next eager person in line. Are these leads that should be sent to sales?
Here’s another one. Your marketing team is generating hundreds of leads per week by syndicating content on a third party site. People are gobbling up your content, sales is going to love these leads!
In both scenarios, these leads should not meet your Hot Lead definition (based on these activities alone) and should not be sent to sales for follow up. It’s highly likely that these people don’t even know what your company does. They came by your booth because of the great swag or downloaded a piece of content related to a specific interest. These are prime leads for a nurturing program.
Warming/Education Nurture
Before sending those leads to sales, warm and educate them with Engagement Studio. This is an area where Account Engagement excels — use it!
When creating your nurture program, keep the following in mind.
Prospects showing buying signals should be sent to sales as quickly as possible
Prospects don’t need to complete all steps before being sent to sales
Not all prospects are ever going to be sent to sales (and that’s OK)
Don’t add scores at random just to make prospects “score up” to your hot lead criteria
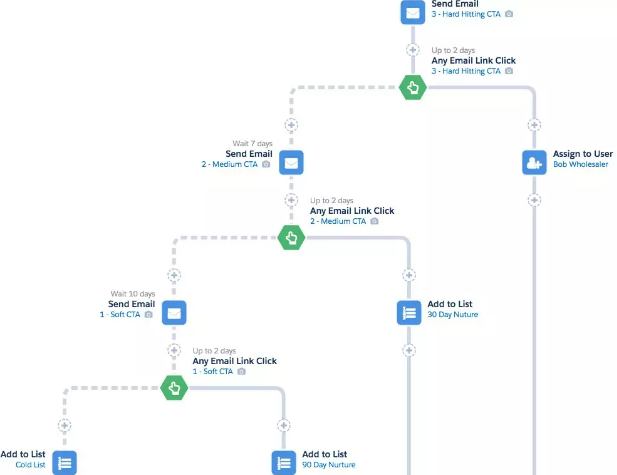
I like the 3-2-1 Campaign recommended by Salesforce. It basically inverts the traditional logic by focusing on hard hitting CTAs first in an effort to identify those with immediate interest and fast tracking the handoff to sales. As an example, your first CTA might be to schedule a demo vs. reading your latest white paper.
Whether you find the traditional or 3-2-1 Campaign works best for your organization, the point remains that leads need to be warmed before sending your sales teams. Sending cold leads over to sales is a surefire way to create a jaded team.
No Background Information
This lead is supposed to be hot and I’m supposed to follow-up within 24 hours, but I have no idea why or what they are interested in. Could you imagine following-up with a lead in this situation? How about hundreds of them? That’s how sales feels if you don’t enable them with information. Fortunately, Salesforce and Account Engagement have us covered here too.
Arm Sales with Data
Here’s a list of ways we can provide data to our friends in sales.
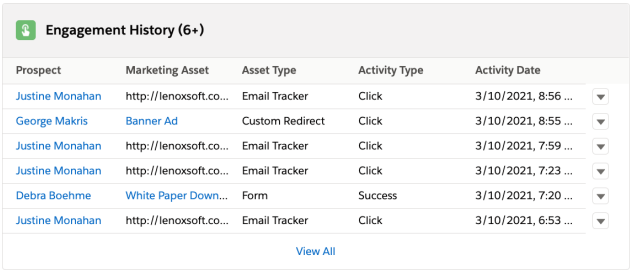
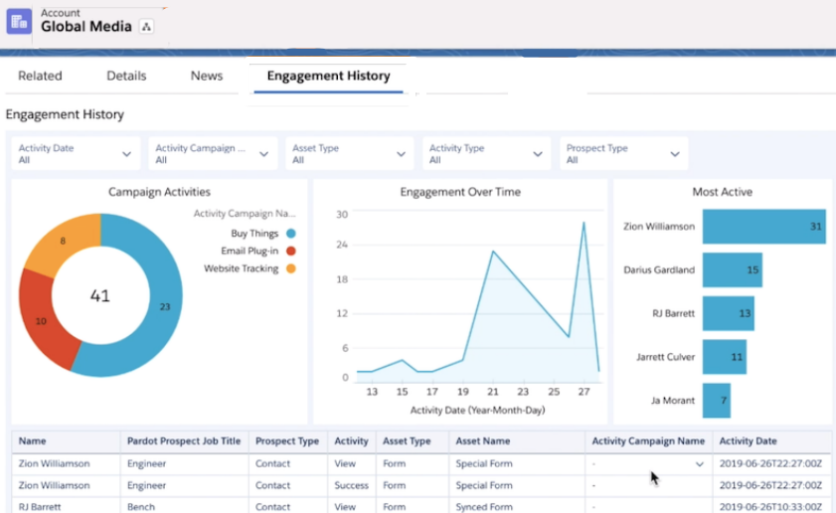
Engagement History Related list
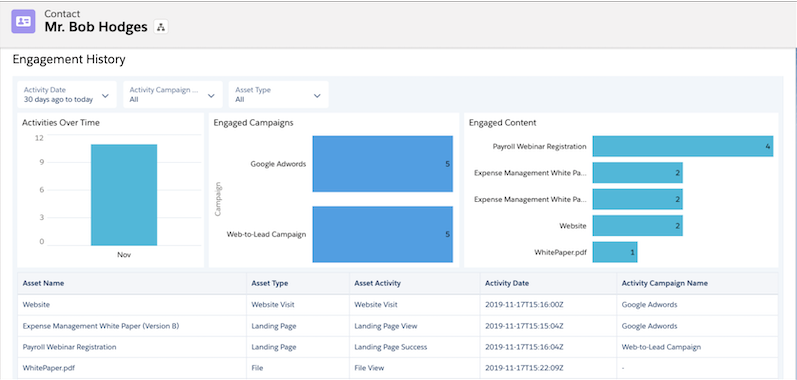
Engagement History Dashboards
Scoring Categories Related list
Custom fields
Let’s look at all of these in a bit more detail.
Engagement History Related Lists
This displays a feed of a recent engagement from Account Engagement in Salesforce. This list can be added to account, contact, lead, and person account page layouts to provide engagement information for sales and all other users in Salesforce.
Engagement History Dashboards
These dashboards are powered by CRM Analytics and provide a way for users to see and interact with data on accounts, contacts, leads, and person accounts. These dashboards do require permissions to be granted to users in Salesforce and the number of licenses are limited by your edition.
Scoring Categories Related List
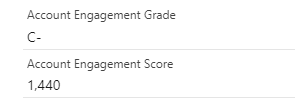
Most organizations add Account Engagement score and grade fields to their page layouts. This is a great way to show sales the total score that leads and contacts have accumulated, but it does not provide any insight into interests. That’s where scoring categories come in.
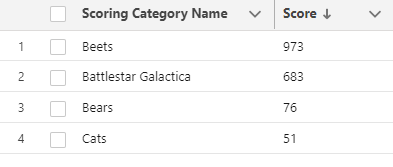
Scoring categories allow you to break down the total score in Account Engagement by categories that you define (up to 50). This allows you to see what that prospect is interested in. Note that scoring categories are only included in Plus, Advanced, and Premium editions of Account Engagement.
Account Engagement Grade and Score (in Salesforce)
Account Engagement Scoring Categories (in Salesforce)
The total score of 1,440 does not help the sales team at all. However, the scoring category provides information on topics of interest (Beets) and topics of little interest (Cats).
Custom Fields
Custom fields are another great way to share information with your sales team. Fields can be created in Account Engagement and synced to the corresponding fields on contact and lead records. Custom fields can vary from organization-to-organization, but here are a couple that I find useful.
Asset/Event Name – Capture the name of the last asset that a prospect downloaded or the name of the most recent event that they registered for/attended.
Last Form Completed – Let sales know the name of the last form that a prospect completed. This can be used to customize tasks created in Salesforce too!
Incorrect Lead Assignment
Assignment is always a bit of a sticky one. You can do assignments from Account Engagement, but it’s not something that I would recommend. Engagement Studio can be used for simple assignments, like assigning leads to a queue, but it’s not intended to do direct assignment to specific sales people based on specific territories. It’s best to leave individual assignments to a tool that’s designed for that purpose.
When looking at lead routing tools, consider the needs of your organization. Assignment rules in Salesforce are great, but only one assignment rule can be active on the lead object. This can become an issue if you have more complex rule logic. You can reassign leads using lead assignment rules, but it requires flows and invocable actions.
Assignment rules have some limitations, but you also have plenty of options if they can’t support your needs. There are tools that allow you to build easy routing flows using tools that feel a lot like engagement studio and others that allow you to do geographic assignment using maps. Selecting the right tool for your organization is a critical decision. The best leads are not going to generate any revenue if they are sitting in a queue somewhere or have not been assigned at all.
Inability to Provide Feedback
Feedback from sales is an incredibly valuable tool. It helps keep sales happy by letting marketing know what leads they like and what leads they don’t. It also helps marketing know where to spend their budget to maximize their impact.
Remember those content syndication leads that we spoke about earlier? Maybe marketing generated a large number of leads at a low cost per lead, but sales found a large number had bad phone numbers or simply did not meet your ideal customer profile. How impactful could knowing this be to marketing? I bet they would change the spend allocation of their budget in a hurry with this data. The great thing is that this level of reporting is possible with disposition codes.
Lead Status and Disposition Codes
Lead status is used in Salesforce to represent the current status of a lead. Common values include: Open – Not Contacted, Working – Contacted, Closed – Not Converted, and Converted. These let you know the status a lead is in, but not the reason why.
This is a great start, but we want more. This is where adding a disposition code can help. Disposition codes are commonly used in call centers to classify the results of calls. This same logic can be applied to support the lead stage changes and provide additional insight to marketing and the organization as whole.
Once set up, disposition codes are required when moving a lead from one stage to the next. Field dependencies provide a list of relevant disposition codes for each status. In the example below, the user is required to tell you “why” the lead needs to be nurtured when updating the status to Open – Nurture.
Disposition Code Uses
Timely indicator of lead quality
Tailoring of follow up communications/nurtures
Identifying records to suppress from marketing communications
Determining records to delete from Account Engagement
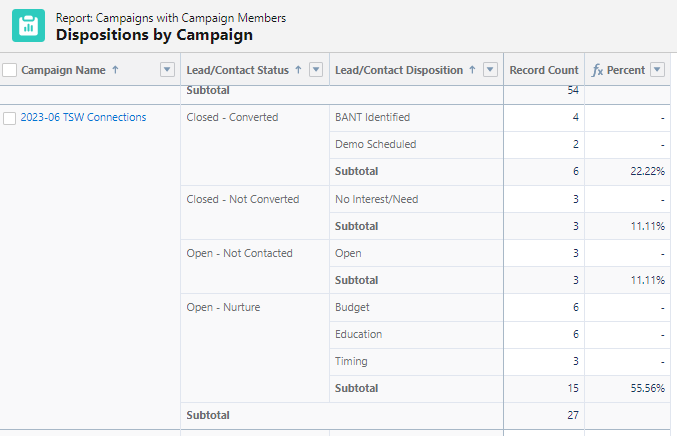
The disposition code field can be used to create reports in Salesforce for increased visibility. These can be a huge asset for marketing when planning how to allocate future budgets. I find reporting on disposition codes at the campaign level to be the most impactful. To do this, formula fields are used on the campaign member object to enable reporting on your custom fields. Check out Jenna Molby’s blog “How to Add Custom Fields to Campaign Members in Salesforce” to learn more. A record-triggered flow is also needed to update the contact status and disposition codes on the contact object then a lead is converted (but that’s a post for another day).
The end result is a really cool report that shows what happened to all the leads that were included in a campaign. Keep in mind that if a person is included in multiple campaigns, the same status and disposition code will display for both.
Here, I can quickly see that 22% of the leads from my 2023-06 TSW Connections campaign were converted to contacts (and why). I can also see that 56% of the leads need further nurturing (and how they should be nurtured). By syncing the disposition code field to Account Engagement, the values can be used to enter prospects into targeted nurture campaigns based on their needs vs. a generic nurture program. Pretty cool!
Collaboration and Communication are Key
Sales and marketing are really on the same team. Both want to drive sales and both want to be able to show the impact of their efforts. By working together and addressing the issues discussed, you can create an environment where your sales and marketing teams are united and work together towards a set of common goals.
So you’ve spent hours gathering requirements, picking datasets and creating the most beautiful report the world has ever seen. And then, while presenting your amazing work to leadership you hear the dreaded “That number looks off”…. And you can’t quite pinpoint why the reporting accuracy is in question.
No one wants to be in that situation. But the good news is there are ways to think ahead and get your report the “cred” it deserves!
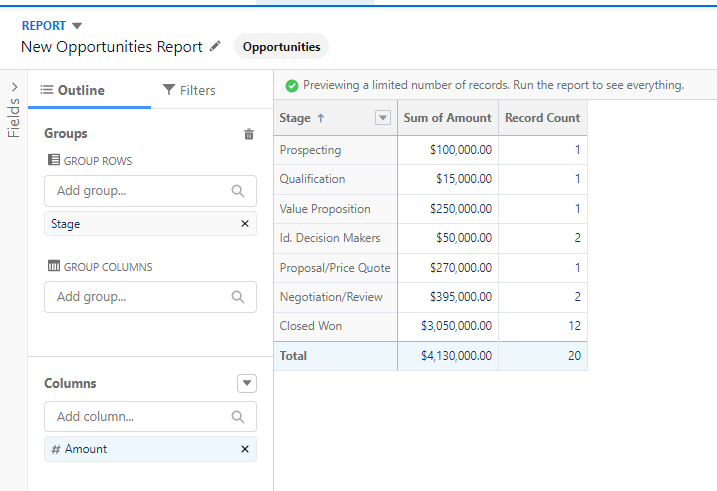
A very simple way to get trust in your marketing reporting data is to create a ‘count and amount’ report in each system.
As an example, if I am creating a report in CRM Analytics where I have enriched the Opportunities object, I can create a compare table that has total Opportunity Dollar amount and Total count of opportunity. Then I can create a report in Salesforce reporting with the same criteria.
Why? This allows you to confidently point to “evidence” that the base data is accurate. One bad join can have a huge impact. Better for you to catch it before the consumers of your report do!
2. Understand “known” data differences between systems
Salesforce has some datasets that don’t match perfectly. There are numerous reasons this can occur. Familiarize yourself with these differences! While these differences will differ depending on the source of your data, you want to make sure you understand the why.
Some reasons include:
Date differences between systems
Schedules (vs. real time)
Fiscal Dates vs. Dates
Permissions associated with the Integration User
Use of “archived” prospects for reporting purposes in one system but not the other
Organizations should generally decide what the source of truth is for data when a discrepancy exists. And that source should be defensible in the “data” court of law.
Ok, that’s an exaggeration. But a smart report writer would make sure they know what is considered the “truth” (or develop it) before even starting. If the CEO thinks a manually manipulated Excel spreadsheet has the “real” numbers on it (and refers to them), that could be hard to match. Ultimately, it could undermine your efforts to present new reports.
Getting a clear, accurate and agreed up source of truth is critical. Otherwise, you will spend all your time defending your data. Try to create that source of truth if it doesn’t exist and avoid sources where data is manipulated manually.
4. Check for frivolous connections
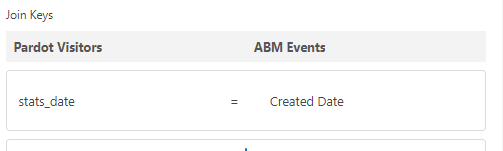
How can your data connections be frivolous? You can connect (Join) opportunities to Leads using the date field, but that doesn’t really make any sense.
Make sure your connections are logical and have the same data type (text, numeric, etc). Look for common IDs as this will be the most accurate. Sometimes names can be used, but since most often unique names are NOT enforced, use with caution.
Bad connections can also make you lose data. Refer back to the “count and amount” section to review how to watch for that. Finally, remember that sometimes you need more than one field connection. For example, in CRM Analytics if you would like to join prospects to campaign members, you need both Lead/ContactID and campaign ID or you will get inaccurate results.
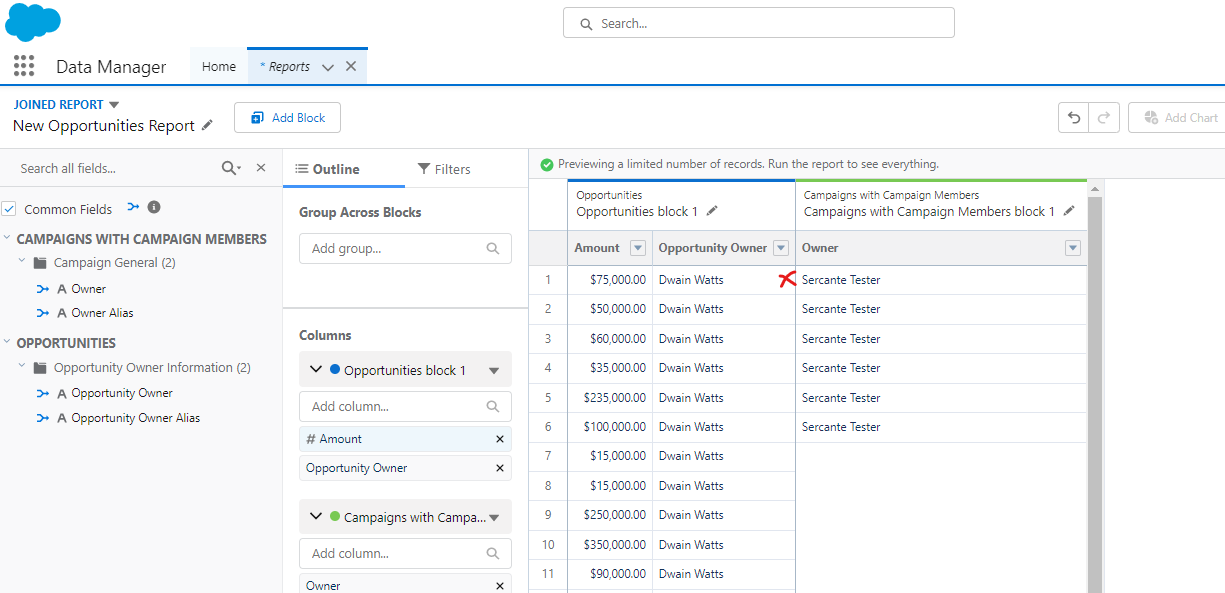
In this Salesforce reporting example, we’ve created a joined report and linked the blocks based on the common field “Owner”. As you can see, the owners can’t really connect the data since one refers to Opportunity owner, and the other to campaign owner.
In the CRM Analytics example, you will get data that matches, but it will have no meaning in the report.
5. Identify processes that fill in key data
Wondering why there are no influence opportunities? You can’t create a report on data that doesn’t exist. As you consider what questions the report will answer for you, consider the process. What changes are needed to make it accurate? Who are the “actors” in the processes that drive the data?
If you are dependent on Salespeople to fill in contact roles to get campaign influence, make sure you have included a task to verify that is being done consistently in your report creation plan. Or consider tools that can automate the processes that will make your reporting accurate and consistent (like Sercante Automated Opportunity Contact Roles).
Often, creating a report is a catalyst to process change as gaps and errors are unearthed.
Reporting accuracy is important, but not easy
You’ve done the work — developed the questions, worked through the KPI’s and now you are ready to create your report. Make sure your reports get the respect they deserve and add the value they should with these five considerations.
Unearthing those process gaps as you work through the steps to ensure accuracy in your Salesforce marketing reporting? Reach out to team Sercante so we can help you build a strong foundation and winning marketing reporting strategy.
In our wonderful digital world, it’s becoming increasingly difficult to track offline events and interactions with marketing and sales efforts. People still love sending gifts in the mail to foster relationships and interacting face to face at networking events to generate sales. But how do we prove it to our marketing and sales bosses?
Luckily, an easy-to-create visual barcode had a huge comeback over the last couple years, and we can use that to our advantage to help track events and offline campaigns.
Enter — The humble QR code.
Let’s Check Out Some QR Code Use Cases for Tracking Offline Events!
Here are use case examples for times when you’ll want traditional marketing tactics to lead your prospects to your digital marketing assets:
Tabletop cards at your event that lead to a landing page with an interest form
Postcards included with mailed swag gifts customers get when they set up their next quarterly planning call
Plus, we can track the mailed package without worrying about implementing a third-party tool by reviewing the custom redirect access.
Flyers distributed to prospective clients with product specific landing pages
Plus, we can measure that the effectiveness of the flyer copy through the custom redirect accesses and page views.
Company business cards or badges with your email address or LinkedIn URL
Trust us, this works! We create custom badges for our teams at events like Connections and Dreamforce so they don’t have to carry around a bunch of business cards. Instead, they have the printed badge with the QR code and a digital image of the badge in their phone photos for quick scanning.
Let’s Get Building!
But first, here is some background on how the process works and the Marketing Cloud Account Engagement (Pardot) tool we are going to use.
The main consideration for your QR code generator is if you want built-in historical tracking of which codes were created, for what, and when or if you want to stay organized on your own. In most cases, the free generators will meet your needs — just make sure you write down what you’ve activated for your campaigns or save the QR code image to your campaign asset folder.
Steps to Track QR Codes in Account Engagement (Pardot)
Create a Salesforce campaign for each tactic/event you want to track.
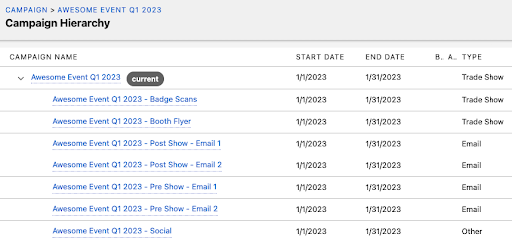
Keep a parent/child hierarchy for reporting.
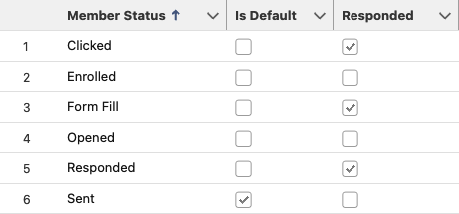
Set up applicable member statuses.
Examples – clicked, attended, scanned, form fill, booth visit, ad view, etc.
Try to stay in the same tense and across your campaigns for reporting.
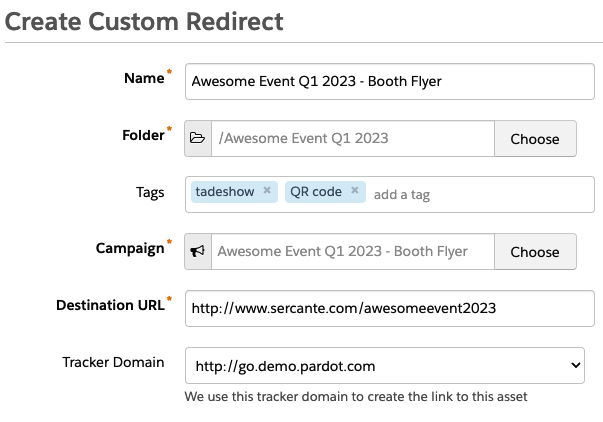
Create a Pardot/Account Engagement custom redirect for each of the pages.
Lightning: Content > Custom Redirects
Classic: Marketing > Content > Custom Redirects
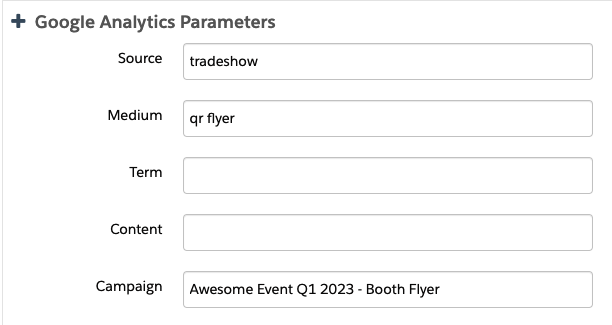
Add the UTM values to the Google Analytics Parameters at the bottom of the custom redirects page.
Be consistent with this setup for reporting.
See more about UTM parameters and how you can use them in your marketing efforts in the section below.
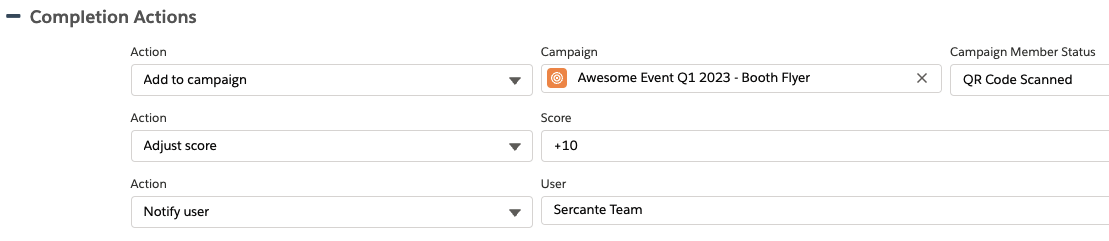
Add completion actions at the bottom of the custom redirects page.
OR
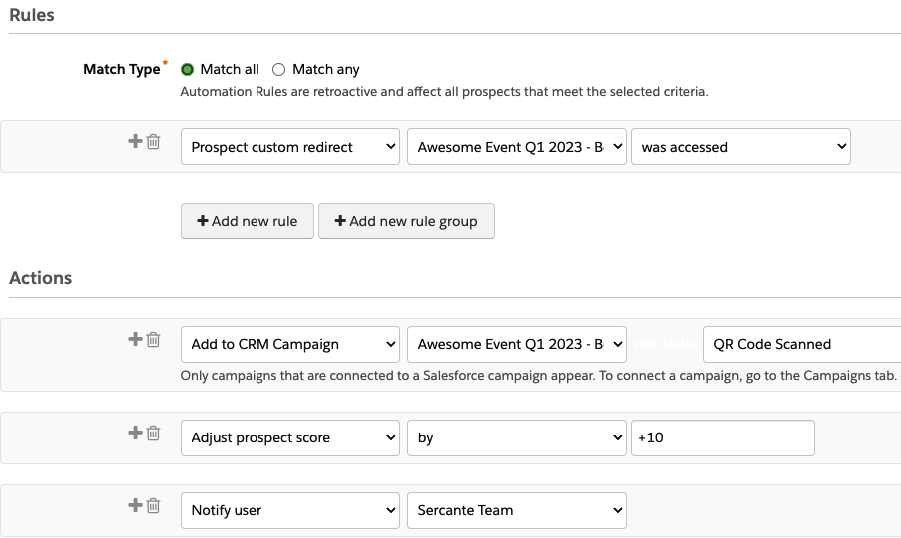
Create an automation rule to run based on custom redirect and/or campaign/form fill criteria.
Keep in mind – if the device scanning the QR code isn’t cookied as a known Pardot/Account Engagement prospect, your custom redirect completion actions will not fire. Using an automation rule will solve this problem, as it will run once the criteria is met as soon as the cookied device becomes a ‘known’ prospect.
Add to list
Add to campaign with member status
Increase score/grade
Notify marketing/sales
Send autoresponder email
Create a vanity URL for your custom redirect to use near the QR code in print/digital.
Keep it short or memorable so people can type it easily.
Use the new custom redirect URL in the QR code generator
Depending on the generator you use, you can pre-fill form information/variables from the scan
Add the QR code image the print/digital flyer
Test, test, and more testing before you go live
Note: You can make adjustments to the custom redirect destination URL post creation without impacting the live custom redirect vanity, long URL, or QR code.
Let’s Take Offline Event Tracking To The Next Level!
Instead of creating your custom redirects one at a time for each channel and event, you can speed up that process considerably by using this tool plus the Marketing Cloud Account Engagement (Pardot) API. Flow Actions for Pardot brings the power of Pardot custom redirects into a screenflow on the campaign object in Salesforce. This enables you to create them all at once per campaign, making for a more streamlined and efficient process that follows the same structure across the marketing and sales teams.
Watch this video to learn more about how Flow Actions for Pardot works:
Consider UTM Parameters
If you already have a UTM (Urchin Tracking Module) parameter strategy in place, custom redirects can be a great complement to your campaign tracking abilities.
The Google Analytics Parameter section of the custom redirect acts as an built-in UTM builder. Instead of supplementing the end of your URL with the UTM parameters manually, the custom redirect tracked URL will have it already built in if filled out.
We recommend using Pardot custom redirects and UTM parameters together if you are trying to track engagement, while automating the triggered responses and flows.
Using traditional UTMs on their own will capture useful data in Google Analytics, but it can be difficult to sync that valuable data back to Salesforce and Pardot. For those who are more advanced when it comes to Salesforce flows, you can automate the capture of UTM data to custom fields or an object and the completion action sections of the process. Otherwise, it is probably easiest to automate within Pardot using customer redirects and automation rules.
Ready to Start QR Code-ing to Track Offline Events?
QR codes have been around for quite some time and we’re seeing a big resurgence of them recently. That’s because it’s a great way for anyone with a mobile device to interact with your company’s digital marketing. And you can take it a step further by tracking all of your efforts through custom redirects in Marketing Cloud Account Engagement (Pardot) and campaigns in Salesforce.
How do you use custom redirects or QR codes in your business? And what other methods are you using to track offline events? Let us know in the comments or reach out to team Sercante for help with your marketing attribution strategy.