Category

Strategy

GDPR, CPRA, the end of third-party cookies: data privacy is a hot topic among digital marketers, but it’s not just advertisers who should be worried. If your marketing strategy’s success is founded on clicks and email open rates, the data privacy landscape of the future could be an unpleasant awakening. 

Data privacy tools can impact your email strategy in a number of key ways:

The good news is that Marketing Cloud Account Engagement (Pardot) offers out-of-the-box tools that can support email marketers through some of these changes. Let’s take a look at the options.

View Email Clients in a Send Report

If part of reporting on your email successes relies on email open rates, the first tool Account Engagement offers that you will want to utilize is the “Email Clients” report. 

Found as a tab in a Sent Email report, this tool will give a breakdown of all email clients your recipients are using, including how many are using Apple Mail Privacy Protection and/or Outlook:
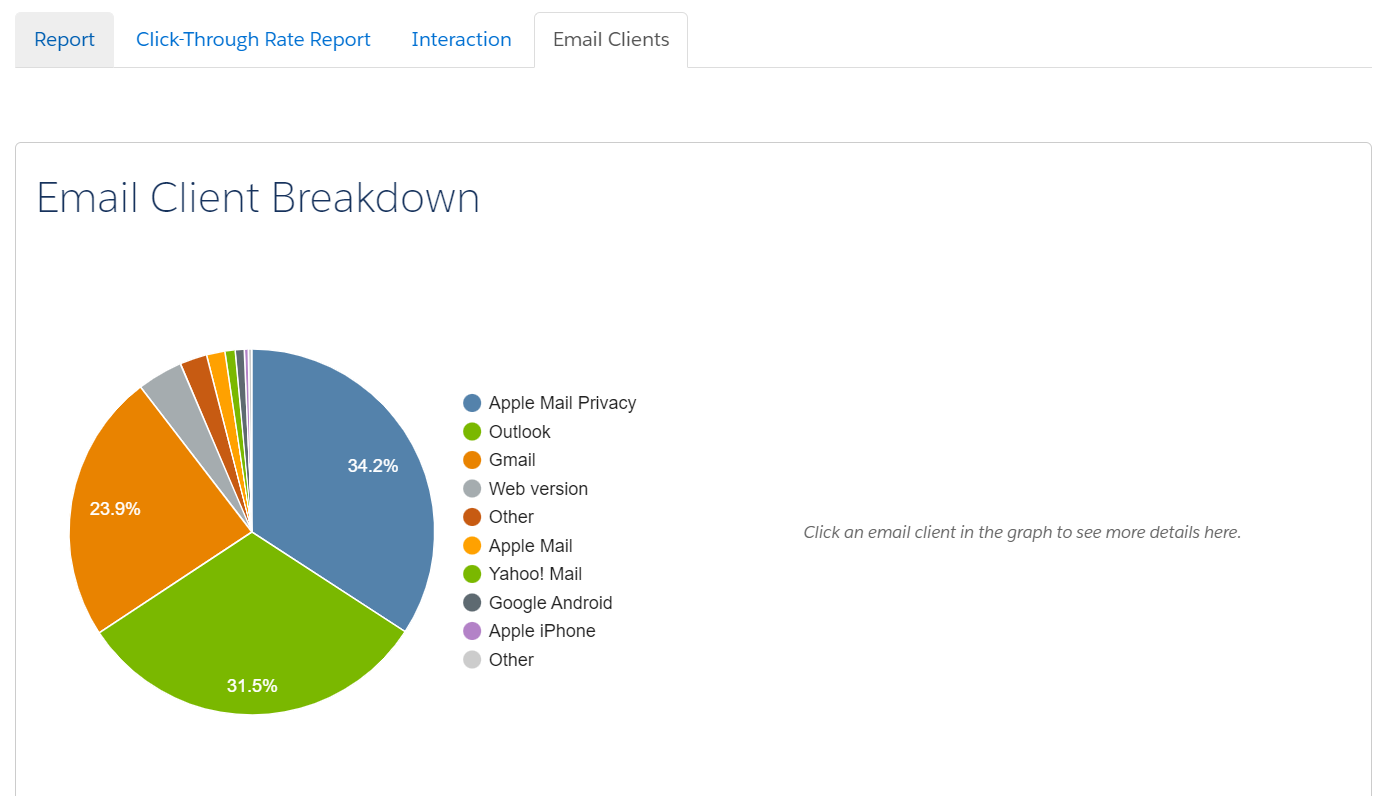
Viewing this report will give you a sense of how reliable your email open rate metrics actually are. For example, if you have a high percentage of recipients leveraging Apple Mail Privacy in your report, that is a signal that your email open rates will likely be artificially higher than they should be. That’s because Apple MPP is pre-opening every email sent and “hiding” true opens from marketing tools like Account Engagement — thus, a person could show as an open even if they have not actually opened your email.

Email Open Rate Considerations for Outlook Users

On the other side of this is Outlook. If you’re a B2B marketer, you likely have a sizable chunk of recipients opening your emails on Outlook. 

This isn’t new, but you may not have known that an email “open” is recorded when a pixel is triggered — often in the form of an image pixel. This means that if a recipient doesn’t download images and doesn’t click on a link, their open will likely not be captured. If you’re sending long-form emails with lots of relevant information and few links to click through, you could be missing the actual impact of that email if you’re only looking at open rates. 

Email Open Rate Considerations for DuckDuckGo Users

Not pictured here is the impact of something like DuckDuckGo’s inbox that, like its browser counterpart, is designed to “hide” things like email opens or link clicks from marketers. 

As consumers continue to search for ways to keep their user data private from marketers, we can expect inbox providers to allow for greater user-based controls like this. Those tools are just one more reason to consider moving away from reporting on email opens at all. 

Automations and Email Open Rates

If your email client reports are indicating a big impact in your open rate credibility, your next step needs to be an assessment of your Engagement Studios, Automation Rules, and Dynamic Lists that are using email opens. Fortunately, Account Engagement has an out-of-the-box tool for this as well!

In Account Engagement, navigate to “Reports,” then “Marketing Assets,” then “Automations.” You should see “Open Rules Audit” as a selection. Opening that report will pull a quick calculation of where your account is using email opens to trigger an action, like branching in an Engagement Studio, adding a person to a Dynamic List (see examples in this post), or triggering an Automation Rule if they “open” an email:
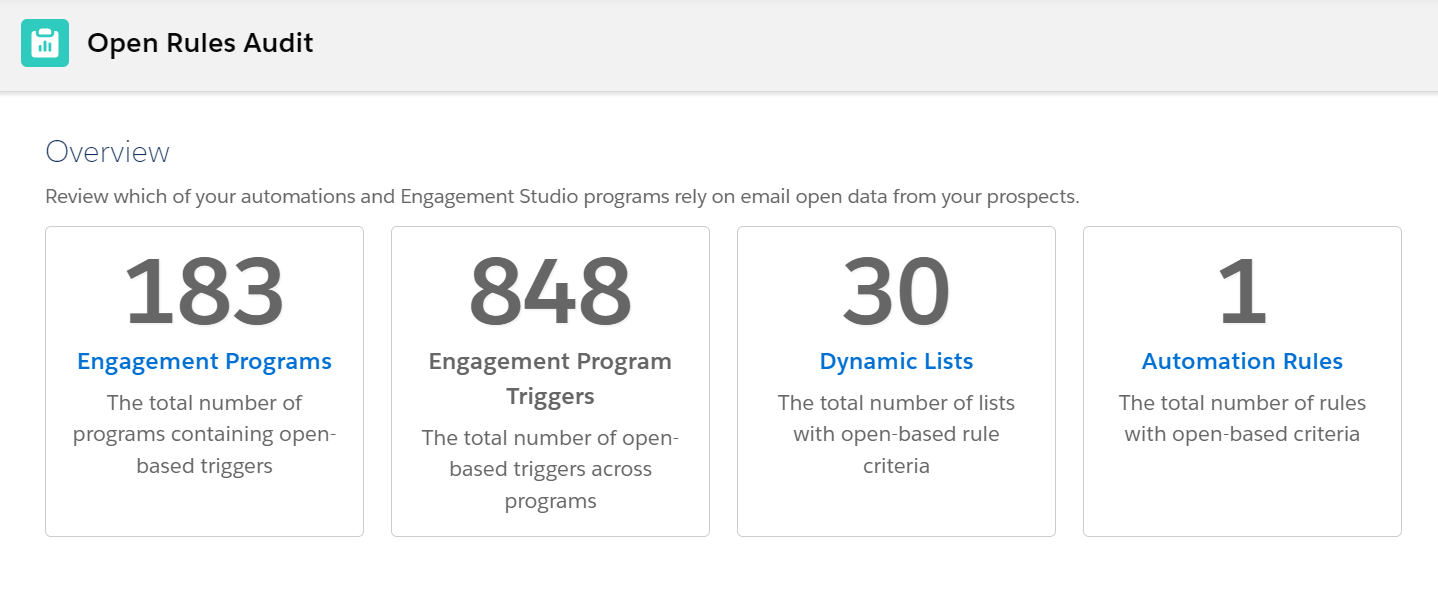
Keep in mind that not all of these will be active, so you will still have to do a bit of discovery on what needs to be edited and what should be simply archived. However, if you have multiple people creating assets and campaigns in your Account Engagement account, this report is a great resource for determining who should be involved in updating your automations with other engagement metrics (like clicks). 

Taking Extra Steps: Evaluating Bot Clicks in Email Opens

If you’re also triggering automations off email clicks, this is a good opportunity to check your recipient lists for email security tools. These tools will pre-click every link in an email before delivering it to the recipient, who may then also click the links that are most interesting to them. 

You may have noticed this show up in your email reports or in a prospect report, where it might look like a recipient clicked every link in your email — including your social media links and privacy policies — in under a minute. Impressive, if it were true!

Custom Redirect Solution for Catching Bot Clicks

Some industries appear to be more likely than others to use these, so the impact can be tricky to determine without a little bit of work on your end. Fortunately, using Account Engagement, you can use custom redirect links to lessen the impact. 

First, be sure that you have Visitor Filters in place under Admin > Automation Settings > Visitor Filters. This is a great place to start, and it will filter out most engagement from a number of security tools. 

Second, you can use a Custom Redirect link and hide it in your email templates. That way, if it gets clicked, you know that only a bot could click and and you know which recipients are impacted. Then you can filter them out of automations that use email clicks. 

You can use something simple as your hidden link — just make sure the image is small (one pixel by one pixel is fine) and is the same color as your background.

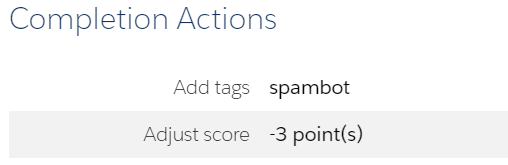
You can also use this strategy to decrease your scores for anyone who clicks on the link or add a tag that helps you understand your account-wide impact:
Adapting What You Report on Email Marketing

So if you can’t leverage email opens to determine if your recipients are interested in your email content, what can you report on? This is where Account Engagement’s integration to Salesforce is so great. 

You can report on website or landing page visits via Google Analytics, pull in interest from campaign members in Salesforce, or even look at your email report Interaction tab to see what percentage skimmed, read, or glanced at your emails. 

Importantly, the time has come to look beyond opens as a success metric — and Account Engagement can help you get there.


Prospect inactivity tells us just as much about a prospect as their activity does. An inactive prospect has a lower interest level and less openness to learn more about your organization than prospects who are active.  

In this blog, we will address what makes a Prospect inactive vs. active, how inactive Prospects can impact your organization, and ways to clean up your database. 

Inactive Prospects in Account Engagement vs. Active Prospects

Inactive Prospects exist in every instance of Account Engagement, but what makes a Prospect inactive? I can tell you what doesn’t change their status to active. 

The following Prospect activities will NOT change a Prospect status from Inactive to Active:

  • Email Sends
  • Email Opens
  • Email Bounces
  • Opportunity Creation

So what does change a Prospect’s status from inactive to active? 

These are the activity indicators we’re looking for:

  • Form Submission
  • Page Visits
  • Link Clicks

Inactive Prospects can also be Prospects who are classified as “Active” but have not taken any action (i.e. form submission, page visit, or link click) in a predetermined amount of time (i.e., 6 months or 1 year). The timeline should be well thought out and considered by the marketing team. You should also adjust accordingly if needed based on the typical time it takes for the sales process to reach completion.

The Impact of Inactive Prospects

Housing inactive prospects in your org can have detrimental results to your instance if not consistently maintained. A couple of big reasons include deliverability and spam complaints, but there are more. See the full list of potential risks below.

Email Deliverability

When speaking to email deliverability, we are assessing the likelihood your email will reach its intended inbox without bouncing or being marked as spam. Prospects who have not opened any emails for a period of time or perhaps have abandoned their mailbox will be sent to spam or bounce This directly impacts your organization’s deliverability.

Furthermore, in alignment with the Account Engagement permission-based marketing policy, emails that are below 90% deliverability may trigger the Account Engagement deliverability team to check with you on your account performance and potentially freeze it.

Diluted Marketing Metrics

By sending emails to inactive Prospects, you are potentially receiving inaccurate metrics on your email performance. If you include inactive Prospects among active Prospects in your campaigns, you are skewing your open, click-through, and conversion rates by bringing them down. This leads to inaccurate portrayal of your campaign’s success.

Paid Prospects

Did you know that you pay for your Prospects? Account Engagement is set up in a way that you pay for your Mailable Prospects. Keep in mind that an inactive Prospect is not necessarily and unmailable Prospect. You can have a multitude of inactive and disengaged Prospects sitting in your account that you are paying for. Cleaning them out allows for more room for highly engaged Prospects to filter in.

Spam Reports

When we reference spam, we are referring to sender reputation, specifically how healthy your IP address is seen by target inboxes. Email services such as Google or Outlook use algorithms to filter out emails as they come in. Senders who have received consistent positive engagements, such as opens and clicks, are accepted without issues. However, senders who have been marked by negative interactions, such as deletion without opens or marking as spam, are automatically filtered into the spam folder, impacting the health of your sending IP address. This ultimately could lead to your IP address being blacklisted.

How to Maintain a Healthy Database

Now that you are aware of the impact inactive Prospects can have on your organization, let’s review ways to manage a healthy Account Engagement database

To begin, this clean up process should be done quarterly or on a routine basis as you see fit. And as a friendly reminder, any Prospect you delete goes to the Recycle Bin and can be pulled out at any time.

Use Dynamic Lists

Build a series of Dynamic Lists using a specific set of criteria to collect Inactive Prospects and then mass delete them via a Table Action, sending them to the recycle bin. 

Such lists may include:

  • Prospect has been emailed at least 1x in the last 90 days AND Prospect time last activity days ago is greater than 90 days. Again, you can set how many days feels best for your organization. You can also build multiple Dynamic Lists based on a variety of time limits.
  • Prospect has been emailed at least 1x in the last 90 days AND Prospect time last activity days ago is greater than 90 days AND Prospect score is below 100. Same thing here, customize the numbers to fit what is best for your organization.

Remove Junk Data

Any test emails you’ve created or spam Prospects who have filled out Forms are also taking up prime real estate in your mailable database. We recommend cleaning out any junk data that is not actively used for testing purposes. 

Read this blog for a complete list of Dynamic List criteria.

Create a Re-engagement Program

After cleaning up your database you may still have Inactive Prospects that you believe are still marketable.

Now, it’s time to enter Engagement Studio. Build a re-engagement program that targets Inactive Prospects in an attempt to nurture them. Anyone who still does not engage by the end of the program, can also be removed from your database. SalesforceBen offers a “Sunset Program” for this exact situation.

Shift your focus to from inactive prospects to active ones

Remember, Prospect inactivity tells us a lot about someone’s interest level in your organization. By being aware of what characteristics represent an Inactive Prospect, being aware of how that can affect your database, and taking actions to clean it up, you will see continued growth.

Need help making hard decisions about inactive prospects? That’s what we’re here for. Reach out to the team at Sercante for help navigating your prospect cleanup and re-engagement efforts.

The introduction of Hyperforce is one of those revolutionary milestones for Salesforce customers. That’s because migrating to Hyperforce is going to give Salesforce customers options when it comes to storing their Salesforce data.

If you’re a Salesforce customer, then you likely store Salesforce data in one of the company’s massive data storage centers. With Hyperforce, Salesforce customers can store their data in public cloud storage centers.

This is huge for companies that operate globally as well as ones in highly regulated industries like financial services and healthcare. That’s because it’ll be easier to store data locally and comply with regulations surrounding data storage in countries around the world.

What is Hyperforce?

First introduced in 2020, Salesforce reimagined its platform architecture for the public cloud with the introduction of Hyperforce. It’s code-based rather than hardware-focused infrastructure that allows more agility within the platform. 

The Customer 360 platform can live on top of Hyperforce, and Salesforce customers will store their data in public clouds like Amazon Web Services (AWS), Google Cloud, and Microsoft Azure, inside onsite servers, or within Salesforce data storage warehouses.

Migrating to Hyperforce

So, why is Salesforce having all customers move to Hyperforce? Well, for one thing, it’s a modernization of the platform to meet changing data demands. 

Salesforce will continue to maintain data warehouses they own to use when needed, but moving data to public cloud infrastructure is the most logical way forward. Imagine having better compliance capabilities, top-notch security, ultimate agility, and the power to scale up like a superhero. 

 Salesforce is all about respecting your privacy, too. So with Hyperforce, they’ve got your back.

  • Worldwide Wonders with Data: Hyperforce is like your personal travel agent for data. Go global while keeping control over where it hangs out — that’s a win-win for you and your customers.
  • Scaling Superpowers: With Hyperforce, growth is more than a dream — it’s a reality. Flexibility and sustainability are your new BFFs.
  • Fort Knox Security: Locking things up tight is Hyperforce’s jam. We’re talking about security measures that make your data sleep soundly, including encryption and zero-trust principles.
  • Privacy Party: Hyperforce comes with its own set of privacy standards, giving you the reins and a spotlight on your customers’ data.
  • Agile Adventures: Who needs downtime? Not us! Hyperforce keeps the party going with seamless releases, environments for testing and development, and an easy-peasy AWS connection.

How do I know it’s time for me to migrate to Hyperforce?

Currently, there is no publicly available migration schedule for Hyperforce, Salesforce is ‘regularly moving customers to balance our workload and modernize our systems.’

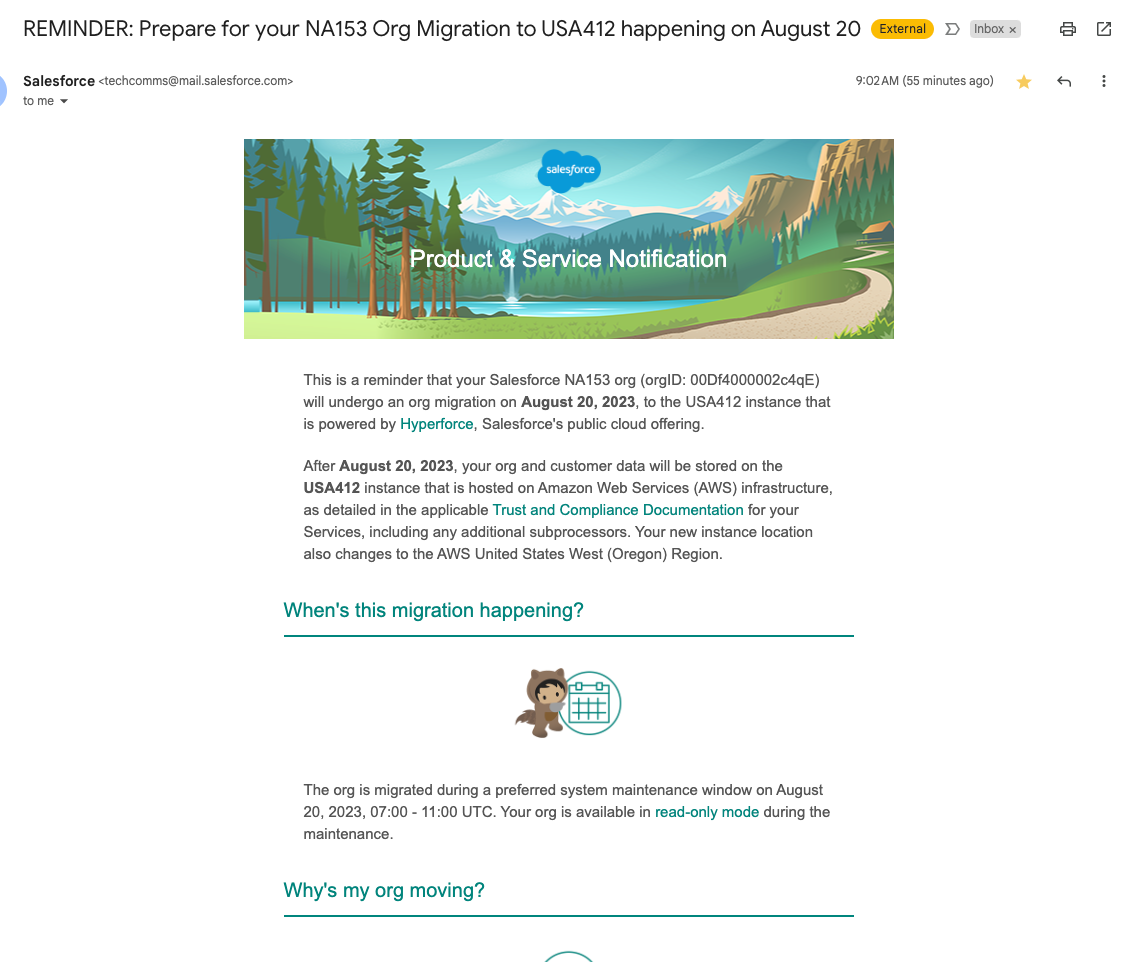
Admins of orgs scheduled to migrate will be notified via a Salesforce Product and Service notification, approximately two months and then one month before their migration date. In the meantime, you can check in with your account team to find out when you can expect to receive a notification that it’s time to migrate to Hyperforce.

Below is an example of the product notification Salesforce customers receive:


Learn more about Products & Services Notifications

If you’re notified that you are being migrated but the timeline is inconvenient for your team, you can contact your Salesforce account team (according to this FAQ article).

How to prepare for Hyperforce Migration?

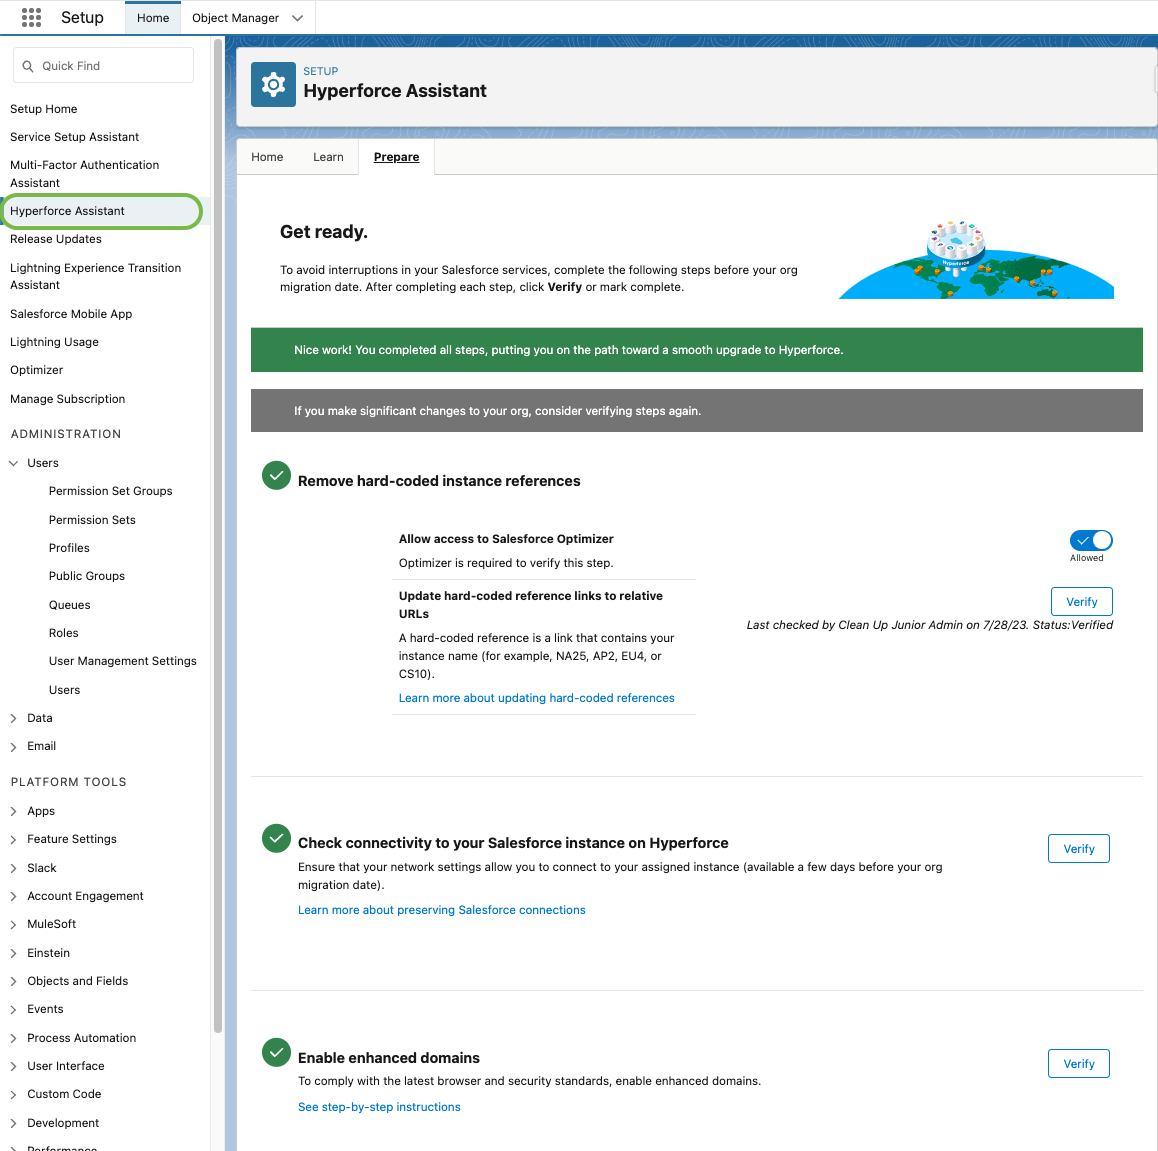
Salesforce has implemented the Hyperforce Assistant in Setup to guide you through your upgrade. The Assistant has all of the latest information and checklist to prepare for the migration. 


For additional information, see the section What can customers do to ensure a smooth upgrade to Hyperforce? in the Hyperforce FAQ article. You can also request a trial org from your account team so you can test your setup and troubleshoot before you make the switch.

Get ready for to migrate to Hyperforce

It’s a matter of time before all orgs are migrated to Hyperforce. So in the meantime, start to think about how data storage location may affect your Salesforce org. For example, the move may affect endpoint things like Single Sign On, OAuth and JSON Web Tokens (JWT). 

Reach out to the team at Sercante to evaluate your data architecture and business goals to see how the migration to Hyperforce may affect your Salesforce org.

Adobe’s Marketo and Marketing Cloud Account Engagement (f.k.a. Pardot) are two of the most common marketing automation platforms I’ve worked with in my career as a marketer. When migrating from Marketo to Account Engagement, there is a lot to keep in mind to make sure you:

  1. Transform marketing processes to properly work in the new system.
  2. Are aware of how features differ between the systems.
  3. Keep the migration running smoothly.

Now, both Account Engagement and Marketo have their pros and cons. And this blog isn’t to convince you one is better than the other (I’d probably be a little too biased in the matter). This post is designed to guide those who are migrating from Marketo to Account Engagement to ensure your migration goes as smoothly as possible. 

Things to be mindful of when migrating from Marketo to Account Engagement

These are the main considerations to make during a Marketo to Account Engagement migration.

Difference in the Email field

One big difference between Marketo and Account Engagement is how each platform treats the “Email” field. 

In Marketo, the email field can be blank and it can also be an invalid value (i.e. “[email protected] – only send newsletters”). 

In Account Engagement, the email field is required, always, there are no workarounds that I have found. The email value also needs to have the correct format, so you can’t enter spaces or just text without an “@” and “.”. These restrictions help protect your deliverability rate and ensure only accurately formatted data is entered. 

Account Engagement also restricts role based emails from being imported or emailed to protect your account’s sending reputation. These are emails that may go to a distribution group rather than one person, so it makes opt-in consent murky (i.e. Sales@, Marketing@, info@ etc.). Account Engagement does allow you to lift this restriction, but you will need to open a support ticket to do so.

Firing when a Field Is Changed

Marketo automations have the ability to fire when a prospect’s field is changed. So, if a prospect’s job title is updated, you might run them through a process that sets the correct Job Role. Account Engagement only works with what the field value is at any current moment. 

You can see a field’s previous value in the Audit table, but you can’t fire an automation off of this activity. Within Account Engagement, you can work around this by having your automations repeat on a regular basis or by creating a date field and using a Salesforce flow to stamp the date everytime the field changes. 

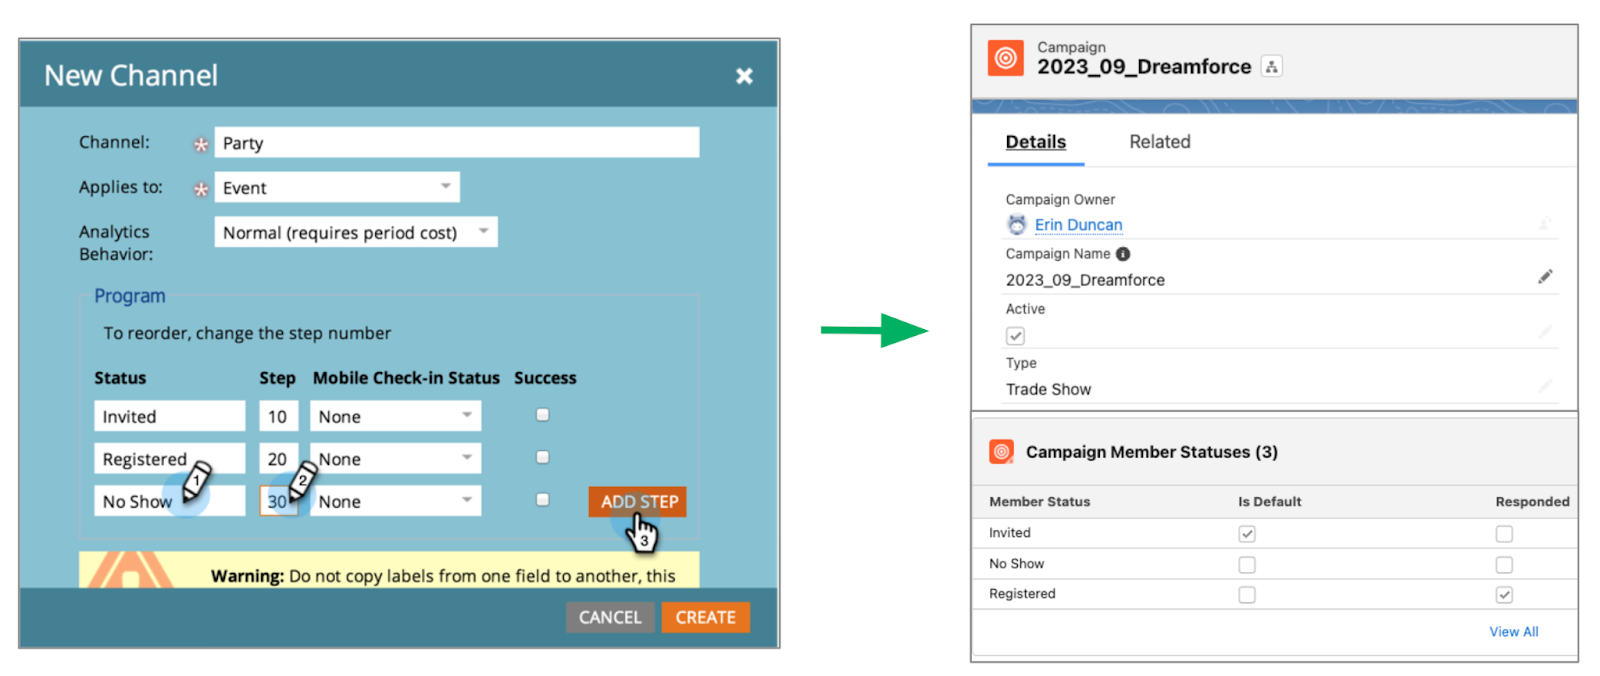
Program Statuses versus Campaign Member Statuses

Marketo has ‘Programs’ for marketing initiatives such as events, nurtures, emails, etc. These programs have statues that designate where the prospect is within the program. This mirrors how Account Engagement uses campaigns and campaign member statuses

Campaign member statuses can be used in the same way as Marketo program statuses, you’ll just want to make sure your users understand this change in process.

Lead Qualification

Marketo focuses solely on scores in three different scoring categories:

  • Behavior Scoring is implicit, it’s based off of the person’s interactions with your marketing resources or your website.
  • Demographic Scoring is explicit, it’s based on other observable information such as Job Title/ Role, Company Size, and Industry.
  • Negative Scoring is also implicit, it’s based on what the person doesn’t do and reduces their score based on inactivity.
    • This can be replicated in Account Engagement with Score decay.

When migrating your Prospects from Marketo to Account Engagement, you may want them to start with their Marketo Behavior Score as their Account Engagement Score. If so, make sure you include the score in your import file for Account Engagement. 

Forms

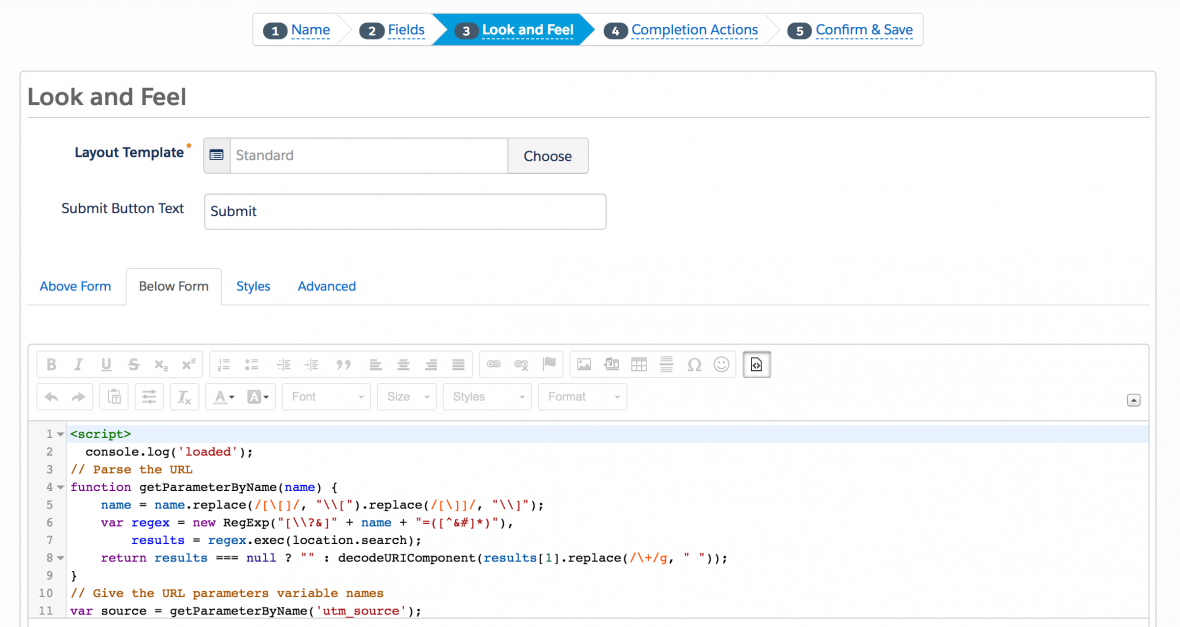
Marketo has a variety of built in options to support advanced operations, such as inserting text in the middle of the form, in form calculations, or multiple redirects depending on form values. Account Engagement relies on Javascript for these advanced configurations. 

Custom JavaScript can be placed within your Account Engagement forms under the Look and Feel tab, in the Below Form section.

Our blog posts on Using JavaScript to Enhance Your Forms and Creating Multi-Language Forms, as well as Karin Tracy’s MarDreamin’ presentation on Customizing Pardot Form Behavior with JavaScript will help you get started. 

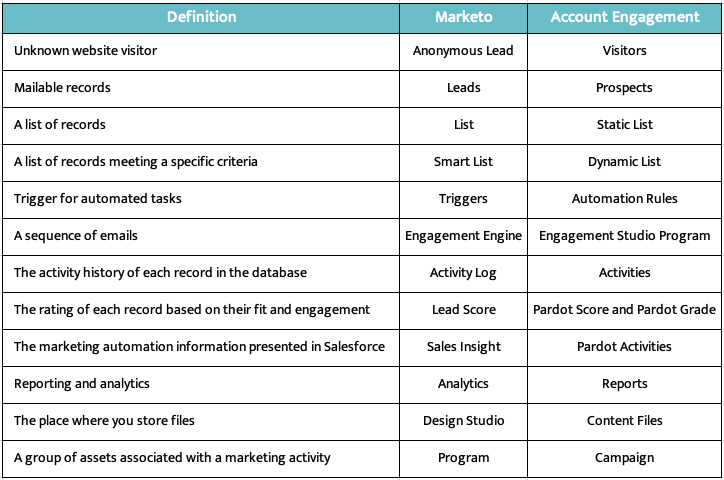
Marketo and Account Engagement Terminology Differences

Below is a quick guide to the terminology differences between the two systems. Make sure your users have this guide early to avoid confusion and frustration during your migration!

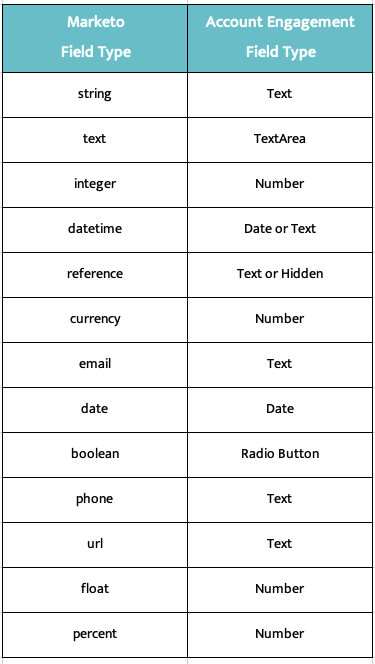
Marketo and Account Engagement Field Types

Account Engagement and Marketo field types are a bit different, but the below table will guide you when creating your new fields in Account Engagement.

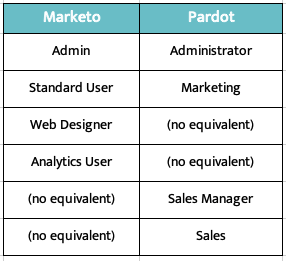
Marketo and Account Engagement User Roles

User Roles also differ between the two systems. Account Engagement’s Premium and Advanced editions provide the ability to use default user roles or create Custom User Roles so you can create a role with the exact permission needed.

Additional Tips

Marketo has restrictions on exports, typically 500MB per day. So plan accordingly, and keep in mind that you may not be able to export all your Marketo prospects in one day!

Account Engagement Automation Rule and Dynamic List criteria is limited to about 250 characters per rule (factoring in separator and spaces), while Marketo is limited to 5,000 characters. Creuz Your Data can help you split up your rule criteria into 250 character chunks, or Prospect Updater can help you circumvent this limitation entirely. 

Time to dig into your migration

Now you’re ready to tackle your Marketo to Account Engagement migration with confidence! For even more tips for your migration, check out our Getting Real About Marketing Automation Platform Migration Projects blog post. And reach out to the team at Sercante to start a conversation about your platform migration and how it fits into your overall marketing strategy.

The Salesforce Summer ’23 release includes many changes to the platform, like the ones we’re seeing with Account Engagement that include the ability to copy marketing assets between business units. However, the thing we’re going to talk about in this blog post are two new features that (hopefully) help you simplify user access management for the Salesforce platform.

First, we’re going to quickly go over the new User Access Policies (Beta) feature and then we’ll talk about setting field-level security in permission sets.

Salesforce User Access Policies (Beta)

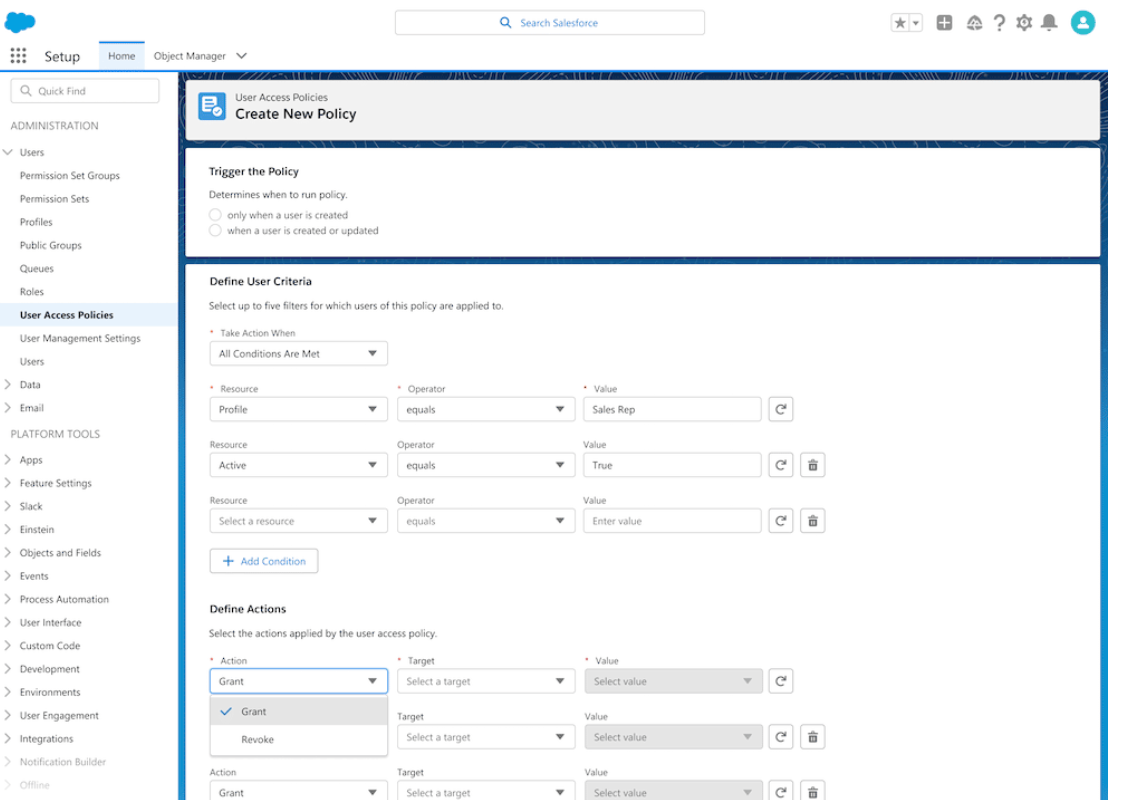
User access policies are a new feature that allows you to control user access based on criteria such as user roles profile, or other user fields. For example, we can give users different access to the same data, depending on their role in the organization or their department.

Users can be assigned to permission set licenses, permission sets, permission set groups, package licenses, queues, and groups using user access policies.

User Access Policies are broken down into two types, Manual User Access Policies and Active User Access Policies. 

Manual User Policies

Manual User Access Policies are one-time processes to grant or revoke bulk access for designated users. What this means is that you can identify users by using filters and modify, add, or remove access that you define in the policy itself. 

Example: You’re migrating permissions for a group of users from profiles to permission sets. You would create filters to identify the users assigned to the profile, then create actions in the user policy to assign permission sets and permission set groups. 

Active User Policies

Active User Access Policies automatically grant or revoke user access. An active user access policy runs in the background and is triggered by an event like a created or updated user record. 

Example: You can have an active policy set to assign a series of permission sets permission set licenses and groups to a user when they are created and have the Sales Manager role, or grant/revoke assignments to an existing user who’s been updated with this role. 

Sounds like a flow if you ask me…

Ok, that’s cool Jason. So how do I get to it? 

  • Go to Setup > Quick Find “User Management Settings” then enable User Access Policies (Beta). 
  • Then, Quick Find “User Access Policies” to create or manage user access policies.

Considerations before enabling User Access Policies

A couple of things to be aware of before you go and enable this setting in your org:

  1. Each org is limited to 20 access policies in total. 
  2. This feature is in Beta and is subject to change without notice. Be sure to watch future Salesforce releases to find out when this will be made Generally Available (GA).

Set Field-Level Security for a Field on Permission Sets Instead of Profiles (Generally Available)

In the past, field-level security could only be set on profiles which, even with the Enhanced Profile User interface, could be extremely tedious. However, in the Summer ’23 release, you can now set field-level security on permission sets when creating a new custom field. 

What does this mean? 

When creating a field you would normally have a step that would have you pick which profiles have access to view or edit.. 

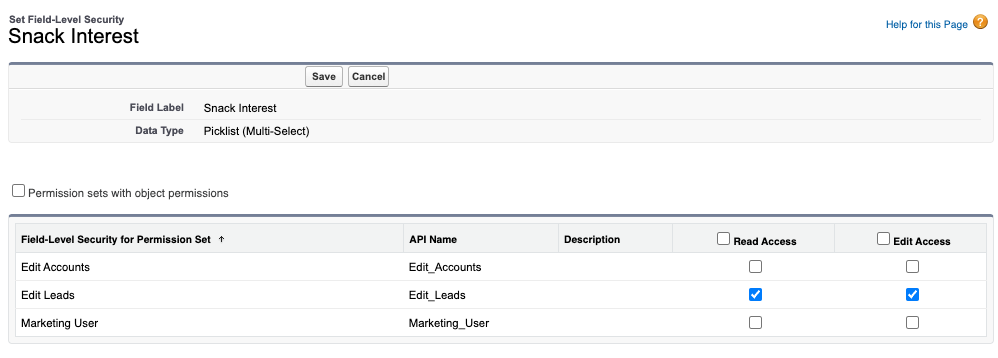
Now, once the Set Field Level Security for a Field on Permission Sets feature is enabled, this step (Profiles step) is replaced with something that looks like this screenshot:

This was originally a beta feature in Spring ’23 but is now Generally Available in Summer ’23

How do you enable it? 

  • Go to Setup>Users>User Management Settings, then Enable Field Level Security for Permission Sets During Field Creation.

Considerations for the Set Field Level Security for a Field on Permission Sets feature

Things to keep in mind when enabling Field Level Security for Permission Sets During Field Creation:

  • Enabling this setting will remove the profile list from view when setting or changing field level security at the profile level. 
  • When you set or change field-level security for a field on permission sets, you can view by permission sets with object permissions, or by all permission sets. 

Streamlining Salesforce user management today and beyond

Cool stuff, but how is this going to affect me now and in the future? 

These changes are all part of Salesforce’s master plan to streamline User Management to make it less tedious, less challenging, and less time-consuming so we can spend more time taking the dog for a walk or enjoying the awesome Pacific Northwest Summers. 

Eventually, we will see Salesforce sunset Profiles and move solely to controlling record access via permission sets as outlined in this Salesforce Admins Article.  

If you would like to know more about the future of User Management I encourage you to check out this awesome blog by Cheryl Feldman and the Awesome Admin team over at Salesforce. And reach out to Sercante when you’re ready to talk about how these changes fit in with your overall marketing and technology operations strategy.

Hey there! So, I wanted to chat with you about something that can be a bit tricky but super important in the world of marketing: capturing UTM parameters. 

You know those little bits of code you see at the end of URLs? They help marketers track where their website traffic is coming from and measure the success of their campaigns. 

Well, capturing and using UTM parameters can sometimes be a real challenge — especially when you’re dealing with UTM capture on Marketing Cloud Account Engagement (Pardot) landing pages. 

But don’t worry. we’ve got your back!

In this post, we’ll cover four ways to use UTMs for capturing the first and last touchpoints on Account Engagement landing pages. If you’re also looking for information on capturing UTM parameters in Salesforce, then check out this post.

4 methods for capturing UTM parameters on landing pages

Let’s dive into four different ways you can script your way to capturing first and last touch UTM parameters on Account Engagement landing pages. This solution works even if the form fields don’t match the UTM exactly or if you need to use cookies

Trust me, it’s not as complicated as it sounds!

1. Map the URL to hidden form fields

Option 1 is all about handling those pesky form field variations. Imagine the form fields on your Pardot landing page don’t exactly match the UTM parameters. No worries! 

With some JavaScript magic, you can extract the UTM values from the URL and map them to the right hidden form fields. It’s like connecting the dots, making sure you capture those first and last touch UTM parameters accurately.

See example and steps to setting this up in the video below.

2. Store UTM values in a session cookie

Now, let’s talk about Option 2. Sometimes you need session-based tracking, and that’s where scripting with session cookies comes in. 

Using JavaScript, you can grab the UTM values from the URL and store them in a session cookie. 

This cookie will keep the UTM data available as the user navigates through different Pardot landing pages. You can then map these UTM values to hidden form fields, ensuring you capture the first and last touch UTM parameters consistently during the session.

See example and steps to setting this up in the video below.

3. Pass UTM parameters to forms embedded in iFrames

Option 3 is for web landing pages that have an Account Engagement (Pardot) iFrame. Here, you can use scripting to set a cookie value that passes the UTM parameter to the iFrame. 

JavaScript to the rescue again — it helps you extract the UTM values from the URL and store them in a cookie. The Pardot iFrame can then grab the cookie value and fill in the hidden form fields. 

Voilà! You’ve captured the first and last touch UTM parameters and can use them in Pardot form submissions.

See example and steps to setting this up in the video below.

4. Capture UTM parameters across multiple website visits

Last but not least, Option 4 involves persistent cookies and hidden form fields. If you want to capture UTM parameters across multiple sessions or visits, this is the way to go. With some clever scripting using JavaScript, you can store the UTM values in a persistent cookie. 

So, even if your visitors come back later, the cookie remembers the UTM data. When they submit a form, the hidden form fields get populated with the UTM values, ensuring you capture the first and last touch UTM parameters consistently.

Get instructions for this method in this blog post.

Go forth and track all the things through UTM capture

So, my friend, there you have it! These four scripting paths will help you capture first and last touch UTM parameters on Account Engagement landing pages like a pro. Whether you’re dealing with form field variations, session-based tracking, iframes, or multiple visits, these options have got you covered. You’ll be able to gather accurate UTM data for analyzing your campaigns and making data-driven marketing decisions within Pardot.

Now go ahead and rock those UTM captures with confidence!
Not sure what to do with the information you’re tracking? Reach out to the team at Sercante for help building a marketing campaign strategy that gets results.

No more posts to show