If you run virtual or in-person events, including an ‘add to calendar’ link in your emails and landing pages can be a great way to ensure your guests actually show up. While there is currently no feature in Pardot to create ‘add to calendar’ links within the editor, there are two options to add them yourself. The first option is to create the files manually and link to them within your Pardot assets. The second option is to use a tool to generate the links, files and buttons for you. In this post, I’ll show you how to use each one of these options to create ‘add to calendar’ functionality within your Pardot emails and landing pages.
Choose which calendars to target
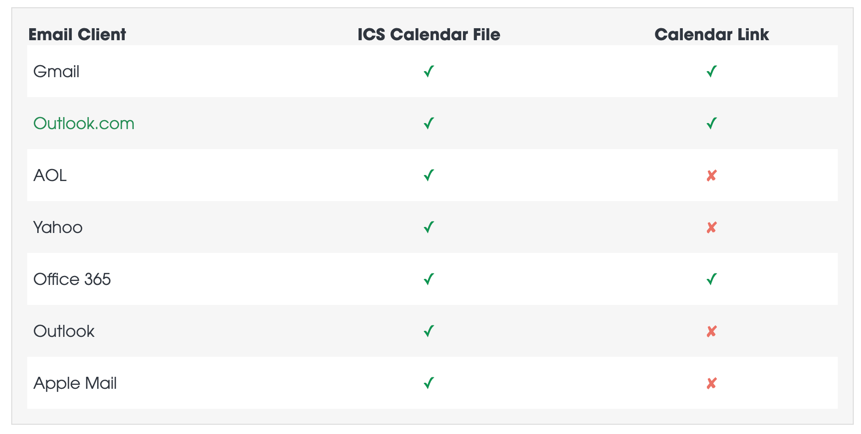
There are two common calendar file types; a calendar link and a calendar (ICS) file. The first step is to figure out which calendars you want to target. That way, you know what files need to be generated to add them to your Pardot email or landing page.
Here’s the breakdown of which email client accepts which ‘add to calendar’ method.
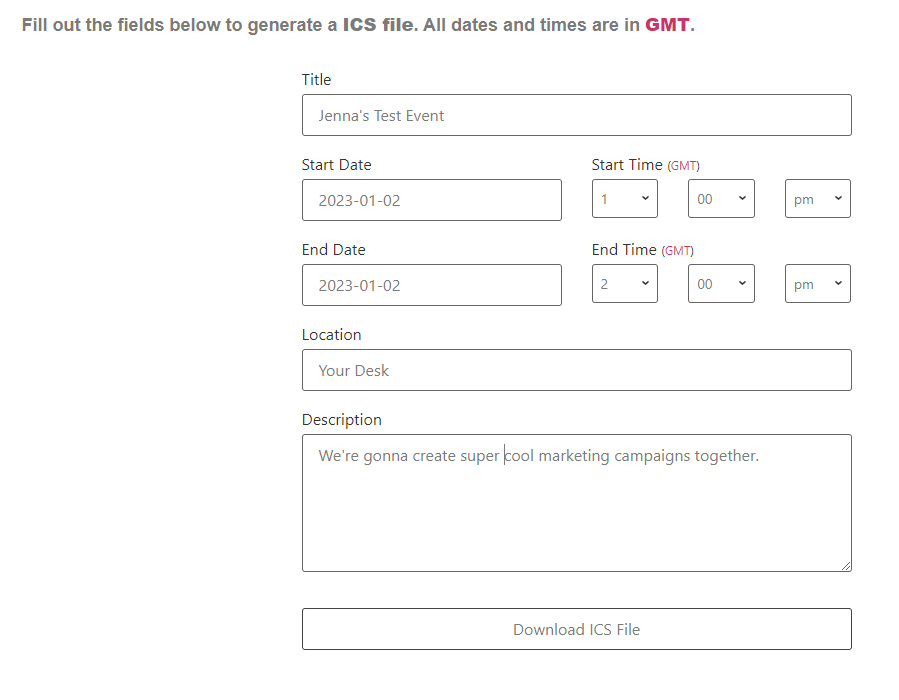
Enter the information for your event, select the email client you want to target and add the link to your email or landing page.
This is an example from the ICS calendar link generator.
Upload the calendar link to Pardot
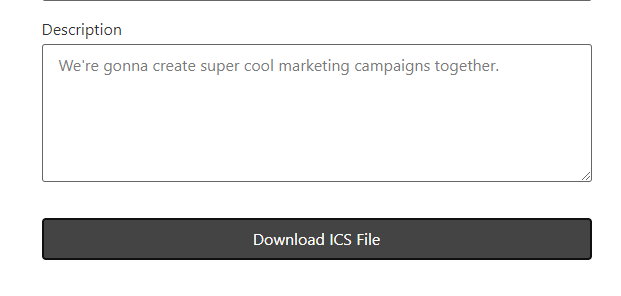
If you want to target an email client that supports ICS files, you will need to generate the file and upload it into Pardot. Using the same generator, click on the download ICS button to download the file. Upload the file into Pardot (Marketing > Content > Files).
Link to the ICS file within your Pardot landing page or Pardot email.
Example
Here’s an example of a button that will work within an email and a landing page.
The second option is to use a tool that will create the files, links and buttons for you. My favourite tool is the AddEvent.com, which has a free ‘hobby plan’ that will allow you to generate up to 50 calendar links a month. With this method, the ICS file is hosted for you, so you don’t need to upload any files into Pardot.
Email example
Here’s an example of what an ‘add to calendar’ button looks like in an email.
Add event to calendar
Landing page example
Here’s an example of what an ‘add to calendar’ button looks like on a landing page.
If you are up for a challenge, you can try to show/hide different calendar links based on what email client the prospect is using. Find out more in this article by Litmus.
Your website is one of your most important demand generation assets and a blog is a great way to increase your online presence by making you more visible on Google. It’s also a great way to bring prospects into your database to expand the top of your funnel.
In this tutorial, I’ll show you how to set up your blog with a Marketing Cloud Account Engagement (Pardot) form, how to create a blog welcome email, and tips to automate blog digest emails.
How do you want your blog readers to subscribe?
There are many ways you can get your readers to subscribe to your blog. Some companies use a popup form when you visit a blog post, which has proven to be effective and other companies make it more subtle. Here are some different methods which will give you inspiration on how you should add the form to your blog.
Example 1: In a sidebar
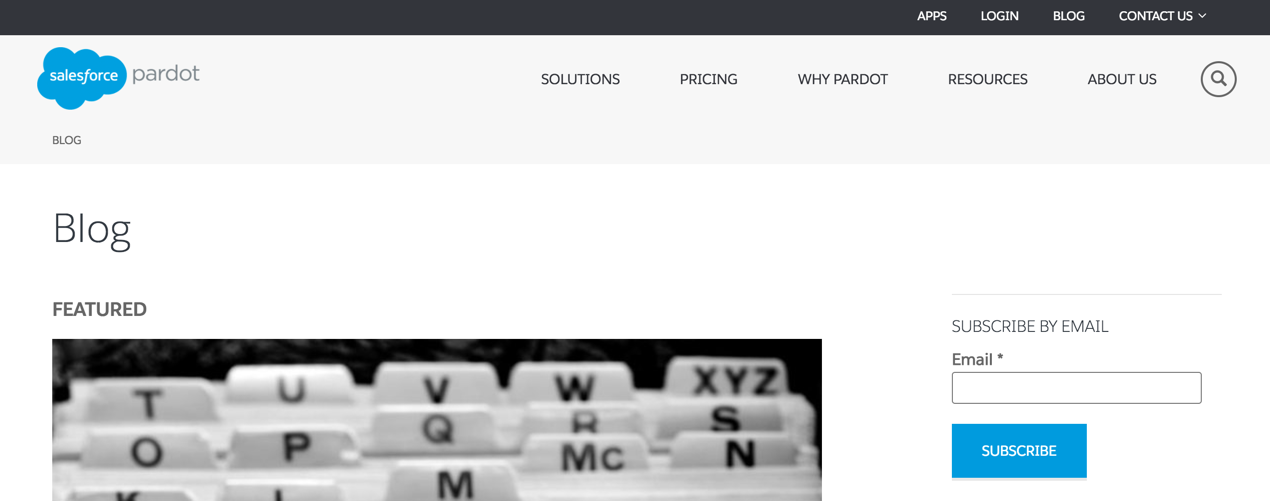
Pardot lets you subscribe to their blog by entering in your email address in the sidebar.
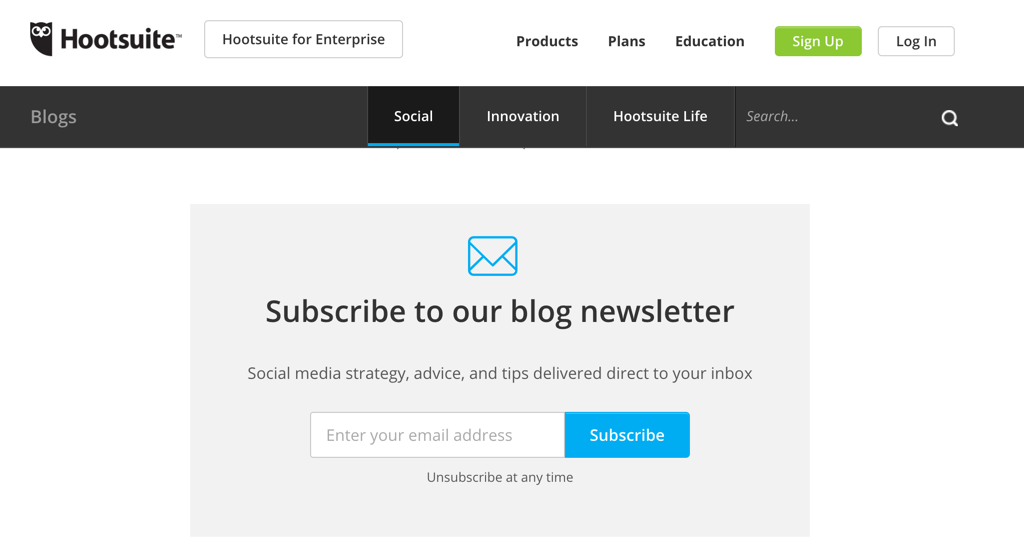
Example 2: At the end of each blog
Hootsuite adds their blog subscription form to the bottom of each blog post. They also only ask for your email address and have some nice icons, so it’s clear what you’re signing up for.
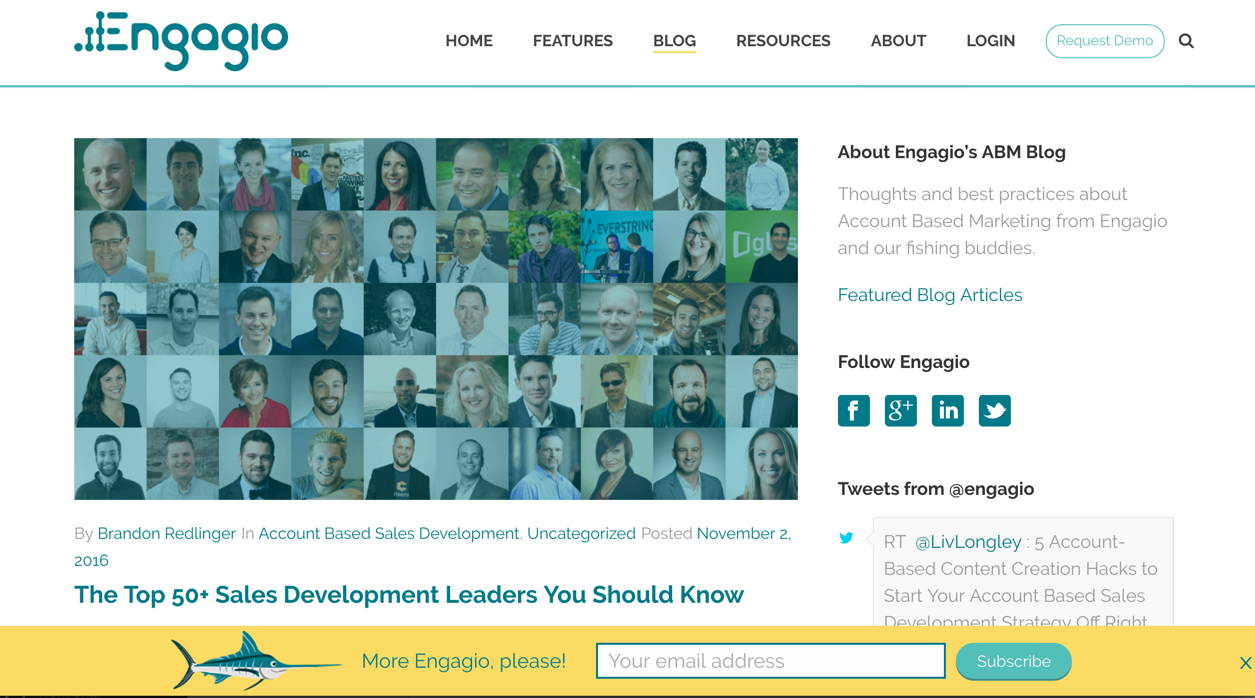
Example 3: In the footer
Engagio has a “sticky footer” at the bottom of their blog page, as well as on each blog post to get readers to subscribe. The bold yellow color also draws your attention to the subscription form without being too invasive and they provide you with a close button to hide the form.
Example 4: With an automation
Asana uses a subscription form that slides out at the bottom when you scroll down about 80%. I like how the animation captures the attention of the readers and how they incorporate Facebook and Twitter buttons beneath the email sign up.
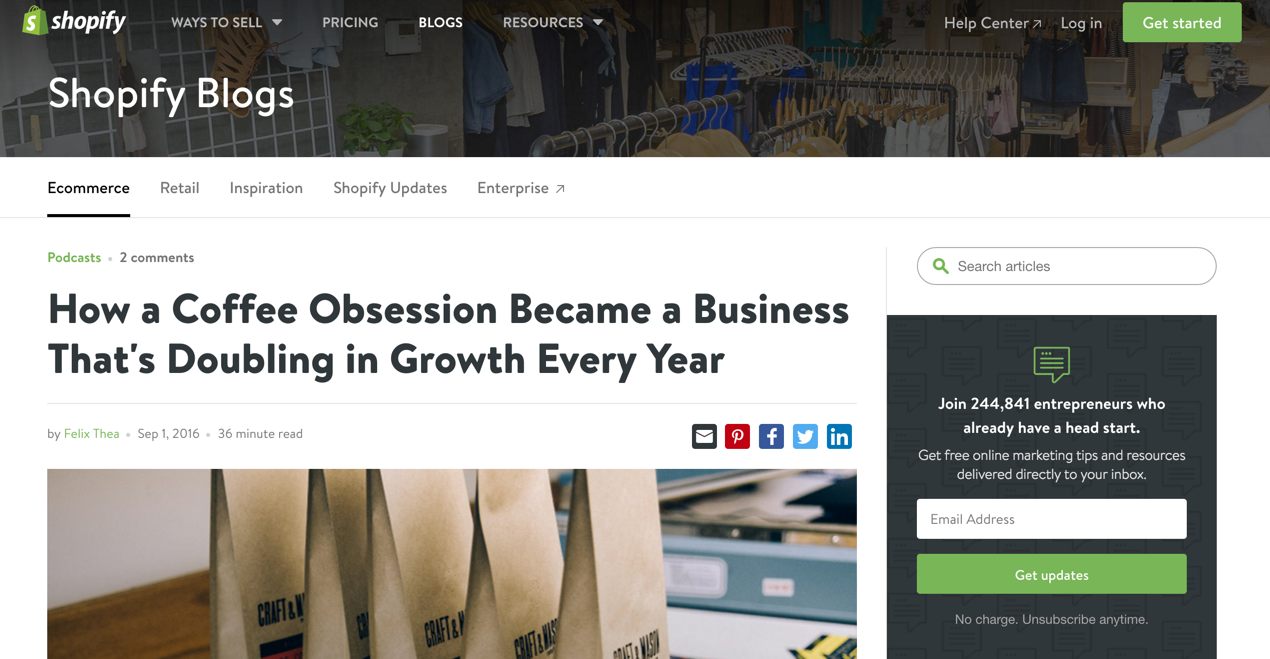
Example 5: In multiple spots
Shopify uses two slightly different methods for capturing their blog subscribers. When you visit their main blog page you can subscribe right from their header.
They also have a subscription form in the sidebar of each post. I like that they include some social proof in the subscription form in the sidebar and it’s clear what I can expect them to send me if I give them my email address.
What fields should you capture?
Standard fields
The shorter the form the more likely you will get your readers to subscribe to your blog. Most blogs only ask for an email address, but some also will ask you for your first and last name for more personalized blog digest emails.
Hidden fields
Your standard source fields should be on your blog subscription form, just like every Pardot form you create.
If you opt to have a subscription form on every blog post, I also like to add hidden fields for blog post title and blog post category. With my blog, for example, I have a subscription form at the bottom of each post and I use custom code in WordPress to automatically populate the hidden fields with the post title and post category. This way I can pull reports in Pardot to see what type of content is generating more blog subscribers and what posts have generated the most blog subscribers.
Here’s an example of populating hidden fields with WordPress blog information. Note: This method is only possible while using Pardot Form Handlers.
Now that I’ve given you some examples of what form fields to include in your form and some methods for blog subscription forms, it’s time to show you how to build it out in Pardot.
Pardot Form Handlers vs. Pardot Form embed
There are some advantages and disadvantages for each form method. Embedded Pardot forms allow you to update the form directly in the Pardot form editor and the changes are live on your site as soon as you save the form. However, they also are embedded on your site using an iFrame, which means that certain functionality might not be available. Pardot form handlers are much more flexible and allow you to use your own HTML code to send data to Pardot.
When integrating your blog with Pardot the best form method to use, in my opinion, is Pardot form handlers, for a couple of reasons:
Changes don’t need to be made to the blog form regularly
It’s easier to have the form match your website/blog
Many blogging platforms have plugins you can use for blog subscription forms that will work well with Pardot form handlers
Create a campaign dedicated to blog subscribers
Create a campaign to attribute your blog as a lead source for any new subscribers. Your form and new subscribers should be assigned to the campaign in Pardot and/or Salesforce, depending on your lead attribution processes.
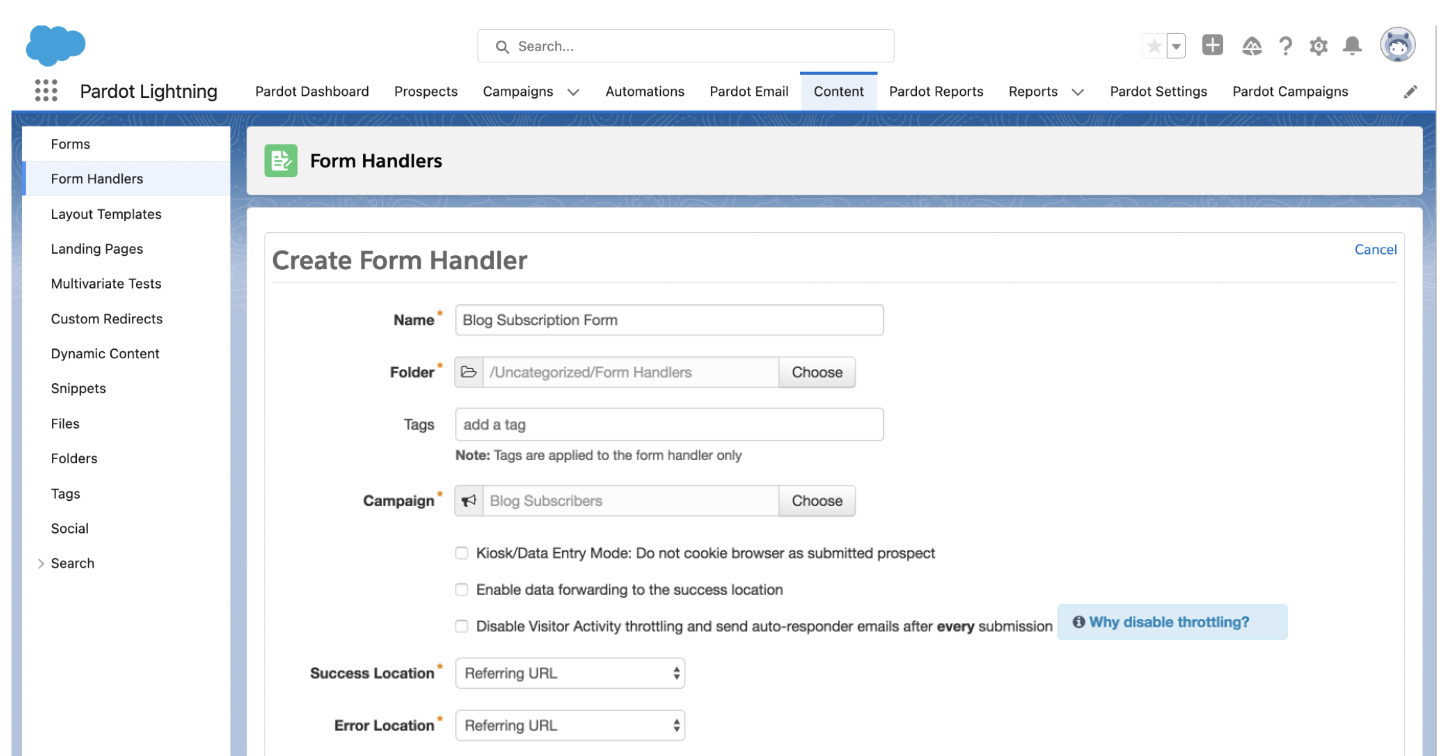
Create a Pardot Form or a Form Handler
In this tutorial, I will be using a Pardot form handler. You can also use a regular Pardot form if you prefer.
Create a Pardot form handler with a descriptive name. I called mine “Blog Subscription Form.” Select your new campaign, map the fields that you want to add to the form and click save. Note: Completion Actions and some other settings will be updated later on.
Add the form to your blog
There are many tools that allow you to add forms to your blog, but it depends what platform you use. Here’s a list of some popular plugins that will help you add your Pardot form to your blog.
PopUp Domination can be used to create a popup subscription form on your blog. You can use any HTML you want, which means it will work perfectly with your Pardot form handler.
Sumo is another option that will work on any type of blog platform. They also offer many different ways to display the subscription form on your blog.
While I’m a big fan of these tools, if you have a developer available the best option is to get them to implement your Pardot form on your blog using custom code. Depending on the method you choose it should be pretty easy for a developer to implement your form and it means you don’t have to pay a monthly subscription fee for using these tools.
Create a Thank You page
The next step is to create a Thank You page that the form will direct to when someone subscribes to the blog. I recommend that you create it on your website (instead of a Pardot landing page), to ensure it has the same look as your blog.
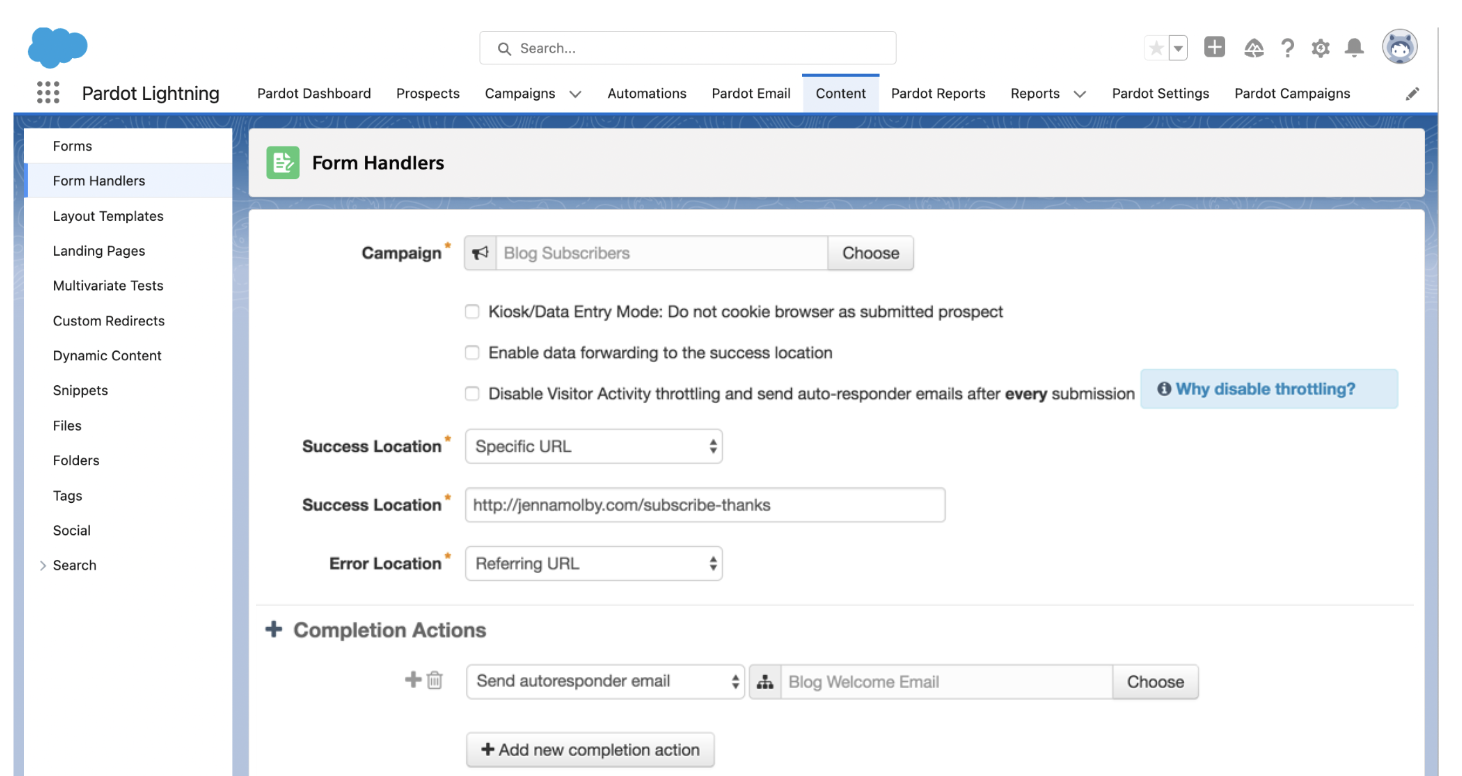
Once your Thank You page is created, copy and paste the URL into the Success location in the Pardot form handler.
Create a blog welcome email
A blog welcome email is a great way to promote more of your blog content. Choose a couple of your popular posts or create a digest of curated content your readers might be interested in.
When a reader subscribes to my blog, I send them a welcome email with some of my top Pardot blog posts. Click here to see what it looks like (and feel free to copy and paste the HTML to create your own welcome email).
Once you have your blog welcome email created add a completion action to your Pardot form to send an autoresponder email.
Emailing subscribers: Automated vs. Manual
Now that your form is set up on your site and your welcome email is ready, it’s time to figure out how you’re going to send notification emails when there’s a new blog post. There are two ways you can send out blog posts:
Automatically using a third-party application, or
Manually, since Pardot doesn’t have an RSS feed integration.
For my blog, I send out all my blog digest emails manually, since I like to have control over what’s sent. However, I only post about once or twice a week, so it’s pretty manageable.
Automated blog posts using Feed Otter
If you opt to go with the automated route, Feed Otter provides a full RSS integration with Pardot. You can quickly build, schedule, and email your blog subscribers notifying them of a new post, a weekly digest, or a monthly newsletter.
Manual blog post emails
Manual blog post emails require you to create an email each time there is a new blog post, or if you post a lot during the week, you can do a digest of all the new posts, once a week. It can be time-consuming, but if you have a good email template setup and a defined process the whole thing doesn’t take very long. If you’re going to go the manual route, here are some tips:
Create a simple, one-column email template, so you don’t have to spend time messing with formatting. This is the template I use for my blog posts.
Create an email that you can copy each time you need to send a blog email. This will contain all the settings (from address, list, etc.) you need to send the blog email.
Questions?
Send me a tweet @jennamolby or leave a comment below.
Note: This post was originally written in November 2016 and updated January 2023.
Recently, I was challenged with creating a landing page for event registration using Marketing Cloud Account Engagement (Pardot). The event had 15+ roundtable sessions in the morning (within 2-time slots) and an option to register for the afternoon session (keynote, happy hour etc). Here’s a sneak peek into how I built it along with some code if you want to try building something similar for your next event.
Before we get into the details, here’s a high-level breakdown of how the page works.
A user clicks on the ‘register’ button to sign up for a roundtable, the roundtable name is populated in a hidden form field.
A user clicks on the ‘register’ button to sign up for the conference, a hidden form field is set to TRUE
A user then enters their information into a form. The data is sent to Pardot using a form handler.
Users who signed up for at least one roundtable are sent a Pardot email that contains a “thanks for registering” message, the name(s) of the selected roundtable(s) and a calendar invite.
Users who didn’t sign up for any roundtables, but signed up to attend the conference, are sent a “thank you” email with a calendar invite.
Pardot Setup
Field Creation
First, I needed to create a couple of new fields in Pardot:
Roundtable Name 1: This field will contain the name of the roundtable the attendee selects for the first time slot.
Roundtable Name 2: This field will contain the name of the roundtable the attendee selects for the second time slot.
Registered For Conference: This field is a checkbox (true or false) which will indicate that the attendee has selected to attend the conference.
Form Handler Setup
I opted to use a form handler instead of a Pardot form, so I could easily customize my form.
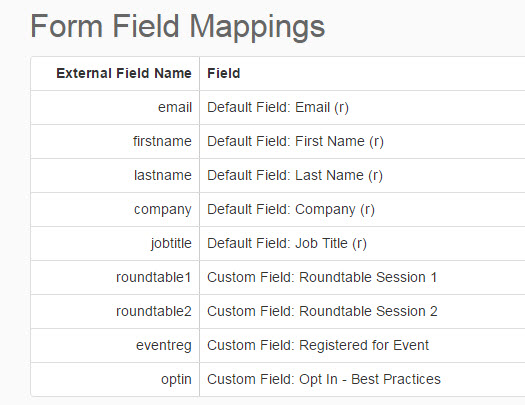
Field Mappings
I added all the standard fields to the form handler (first name, last name, company name, job title, opt-in, and email address). I also added the 3 new custom fields (roundtable name 1, roundtable name 2, registered for conference) and marked them as not required since the attendee doesn’t have to go to all 3 events.
Completion Actions
I added 2 completion actions, the first one is to sync the prospect to an SFDC campaign with the status of “registered”, the second completion action is to send me an email alert when someone registers. The email notification helped me easily determine which roundtables are most popular.
Thanks for registering email confirmation
I created 2 ‘thanks for registering emails’ and set them up to be sent via an automation rule.
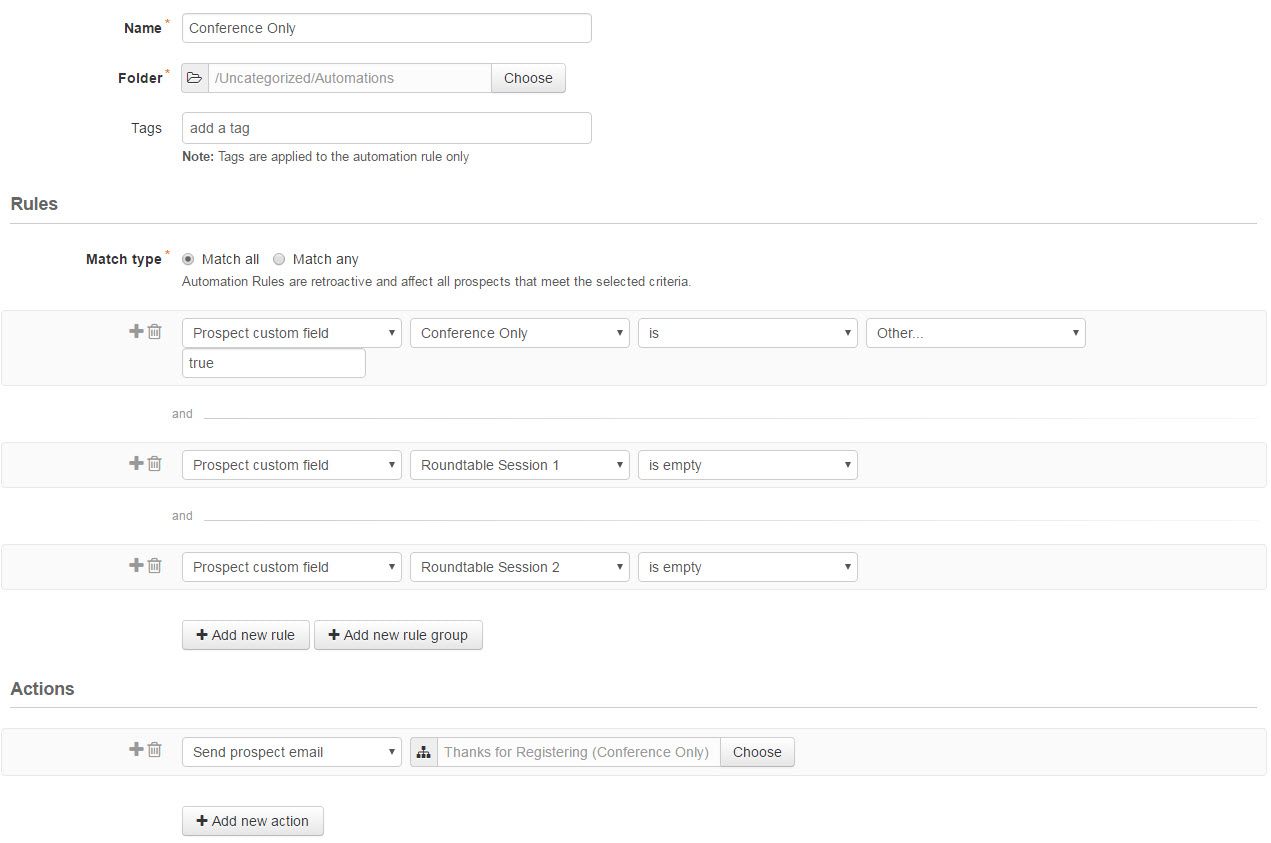
Conference Only: This email is sent out to everyone who didn’t select to participate in any of the roundtables.
Roundtables: This email is sent out to everyone who registered for at least one roundtable session.
Conference Only Email
The conference only email was pretty simple. It contained a thank you message along with calendar invites.
The email was sent using an automation rule that checks if “conference only” is true and if both roundtable fields are empty.
Roundtable Email
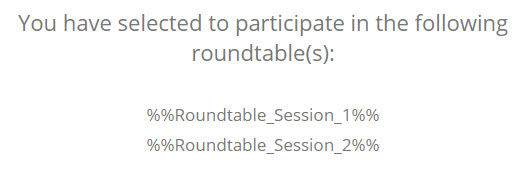
The roundtable email contains a thank you message as well as the name(s) of the roundtables the user has selected to attend. The names of the roundtables are dynamically added to the email using a variable tag.
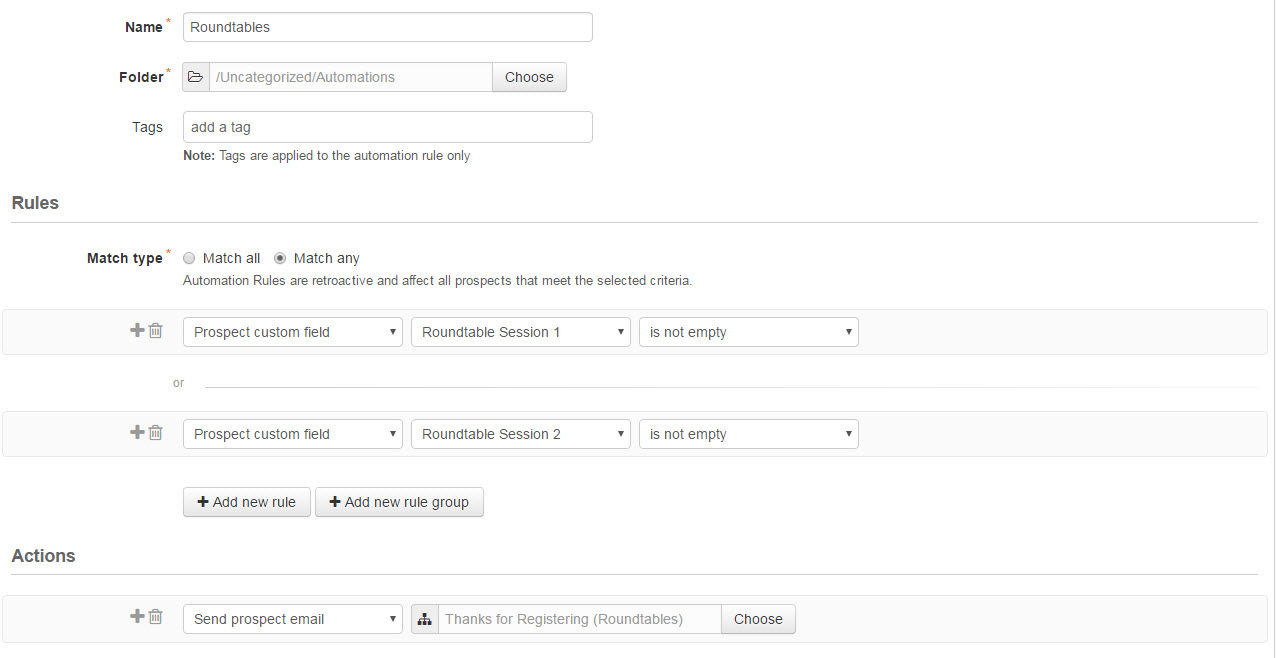
The email was sent using an automation rule that checks if the roundtable 1 field is not empty OR the roundtable 2 field is not empty.
Building the Landing Page
Building the landing page was the difficult part. I didn’t want to include the roundtable names in a drop down menu in a form, so I came up with the idea to make the registration process like a shopping cart.
I used Bootstrap as my framework for the landing page and used Bootstrap Panels for a clean way to display the roundtable names and descriptions.
<div class="panel panel-default">
    <div class="panel-heading">
      <h3 class="panel-title"><span class="rountable-name">Session 1</span></h3>
    </div>
    <div class="panel-body">
      <div class="row">
        <div class="col-md-9">
          Pellentesque tempus aliquet nisi in sollicitudin. Aliquam tempor ligula vel mattis cursus. Cras lacus est, facilisis feugiat rhoncus ac, condimentum a ex. Aliquam elementum, nisi non dapibus dapibus, neque mi mattis libero, nec mattis tortor elit ut sapien. Donec nisi nulla, feugiat non dignissim aliquet, efficitur eget lorem. Proin id pellentesque ante.
        </div>
        <div class="col-md-3 btn-row">
            <a href="#" class="btn btn-register btn-select">Select</a>
        </div>
      </div>
    </div>
  </div>
Since there were 2 time slots for the roundtables, I wrapped each of the sections in a DIV with a class of first-session and second-session.
<div class="sessions first-session">
  <div class="panel panel-default">
    <div class="panel-heading">
      <h3 class="panel-title"><span class="rountable-name">Session 1</span></h3>
    </div>
    <div class="panel-body">
      <div class="row">
        <div class="col-md-9">
          Pellentesque tempus aliquet nisi in sollicitudin. Aliquam tempor ligula vel mattis cursus. Cras lacus est, facilisis feugiat rhoncus ac, condimentum a ex. Aliquam elementum, nisi non dapibus dapibus, neque mi mattis libero, nec mattis tortor elit ut sapien. Donec nisi nulla, feugiat non dignissim aliquet, efficitur eget lorem. Proin id pellentesque ante.
        </div>
        <div class="col-md-3 btn-row">
            <a href="#" class="btn btn-register btn-select">Select</a>
        </div>
      </div>

    </div>
  </div>
  <div class="panel panel-default">
    <div class="panel-heading">
      <h3 class="panel-title"><span class="rountable-name">Session 2</span></h3>
    </div>
    <div class="panel-body">
 	<div class="row">
        <div class="col-md-9">
     	Lorem ipsum dolor sit amet, consectetur adipiscing elit. Maecenas lacinia, dolor scelerisque commodo sodales, augue lectus luctus turpis, id pharetra mauris libero at urna. Vestibulum in magna aliquam, interdum diam eu, pretium odio. Curabitur a porta metus, eget porttitor nibh. Maecenas porta condimentum lacus, in bibendum augue euismod sit amet.
        </div>
        <div class="col-md-3 btn-row">
            <a href="#" class="btn btn-register btn-select">Select</a>
        </div>
      </div>

    </div>
  </div>
  <div class="panel panel-default">
    <div class="panel-heading">
      <h3 class="panel-title"><span class="rountable-name">Session 3</span></h3>
    </div>
    <div class="panel-body">
 	<div class="row">
        <div class="col-md-9">
          Phasellus nec neque scelerisque, semper odio a, fringilla leo. Sed cursus lectus non purus cursus tempus. Cras eu blandit lectus. Proin sodales justo et felis consectetur, sed ultrices nibh imperdiet. Vestibulum ante ipsum primis in faucibus orci luctus et ultrices posuere cubilia Curae; Sed aliquam congue feugiat. Nam elit orci, congue et maximus sed, commodo quis arcu. Suspendisse iaculis eros viverra consectetur pretium.
        </div>
        <div class="col-md-3 btn-row">
            <a href="#" class="btn btn-register btn-select">Select</a>
        </div>
      </div>

    </div>
  </div>
  <div class="panel panel-default">
    <div class="panel-heading">
      <h3 class="panel-title"><span class="rountable-name">Session 4</span></h3>
    </div>
    <div class="panel-body">
      <div class="row">
        <div class="col-md-9">
          Cras sapien leo, sodales vitae congue quis, semper ac ligula. Integer molestie fermentum suscipit. Cum sociis natoque penatibus et magnis dis parturient montes, nascetur ridiculus mus. Nulla odio ligula, aliquam eget leo eget, sollicitudin fringilla ante.
        </div>
        <div class="col-md-3 btn-row">
            <a href="#" class="btn btn-register btn-select">Select</a>
        </div>
      </div>
    </div>
  </div>
</div>
Sticking with the ‘add to shopping cart’ feel, I wanted to add a “your agenda” section to the bottom left corner of the page that populates based on the sessions you select. This can be done using my slide out lead generation form with a couple modifications.
Finally, I added the form to the bottom of the page, which uses a Pardot form handler and hidden fields for roundtable name and conference registration.
I created a new landing page in Account Engagement to host the registration page. All the CSS, JavaScript and Bootstrap files were also uploaded in Account Engagement to keep everything in one place.
<!DOCTYPE html PUBLIC "-//W3C//DTD HTML 4.0 Transitional//EN" "http://www.w3.org/TR/REC-html40/loose.dtd">
<html>
<head>
<meta charset="utf-8">
<meta content="IE=edge" http-equiv="X-UA-Compatible"><meta content="width=device-width, initial-scale=1" name="viewport">
<link rel="shortcut icon" href="https://jennamolby.com/wp-content/uploads/2015/10/favicon.ico" />
<!-- The above 3 meta tags *must* come first in the head; any other head content must come *after* these tags -->
<title>Pardot Event Registration Inspiration</title>
<!-- Bootstrap -->
<link href="bootstrap.min.css" rel="stylesheet">
<link href="pardot-registration-inspiration-styles.css" rel="stylesheet">
<!-- HTML5 shim and Respond.js for IE8 support of HTML5 elements and media queries --><!--[if lt IE 9]>
<script src="https://oss.maxcdn.com/html5shiv/3.7.2/html5shiv.min.js"></script>
<script src="https://oss.maxcdn.com/respond/1.4.2/respond.min.js"></script>
<![endif]-->
</head>
<body>
<div class="header">
<div class="container">
<div class="row">
<div class="col-sm-12 text-center">
Example Pardot Registration Page
</div>
</div>
</div>
</div>
<div class="container">
<div class="row">
<div class="col-md-9 centered-columns">
<h2> 9:00am - 10:00am</h2>
<div class="sessions first-session">
<div class="panel panel-default">
<div class="panel-heading">
<h3 class="panel-title"><span class="rountable-name">Session 1</span></h3>
</div>
<div class="panel-body">
<div class="row">
<div class="col-md-9">
Pellentesque tempus aliquet nisi in sollicitudin. Aliquam tempor ligula vel mattis cursus. Cras lacus est, facilisis feugiat rhoncus ac, condimentum a ex. Aliquam elementum, nisi non dapibus dapibus, neque mi mattis libero, nec mattis tortor elit ut sapien. Donec nisi nulla, feugiat non dignissim aliquet, efficitur eget lorem. Proin id pellentesque ante.
</div>
<div class="col-md-3 btn-row">
<a href="#" class="btn btn-register btn-select">Select</a>
</div>
</div>
</div>
</div>
<div class="panel panel-default">
<div class="panel-heading">
<h3 class="panel-title"><span class="rountable-name">Session 2</span></h3>
</div>
<div class="panel-body">
<div class="row">
<div class="col-md-9">
Lorem ipsum dolor sit amet, consectetur adipiscing elit. Maecenas lacinia, dolor scelerisque commodo sodales, augue lectus luctus turpis, id pharetra mauris libero at urna. Vestibulum in magna aliquam, interdum diam eu, pretium odio. Curabitur a porta metus, eget porttitor nibh. Maecenas porta condimentum lacus, in bibendum augue euismod sit amet.
</div>
<div class="col-md-3 btn-row">
<a href="#" class="btn btn-register btn-select">Select</a>
</div>
</div>
</div>
</div>
<div class="panel panel-default">
<div class="panel-heading">
<h3 class="panel-title"><span class="rountable-name">Session 3</span></h3>
</div>
<div class="panel-body">
<div class="row">
<div class="col-md-9">
Phasellus nec neque scelerisque, semper odio a, fringilla leo. Sed cursus lectus non purus cursus tempus. Cras eu blandit lectus. Proin sodales justo et felis consectetur, sed ultrices nibh imperdiet. Vestibulum ante ipsum primis in faucibus orci luctus et ultrices posuere cubilia Curae; Sed aliquam congue feugiat. Nam elit orci, congue et maximus sed, commodo quis arcu. Suspendisse iaculis eros viverra consectetur pretium.
</div>
<div class="col-md-3 btn-row">
<a href="#" class="btn btn-register btn-select">Select</a>
</div>
</div>
</div>
</div>
<div class="panel panel-default">
<div class="panel-heading">
<h3 class="panel-title"><span class="rountable-name">Session 4</span></h3>
</div>
<div class="panel-body">
<div class="row">
<div class="col-md-9">
Cras sapien leo, sodales vitae congue quis, semper ac ligula. Integer molestie fermentum suscipit. Cum sociis natoque penatibus et magnis dis parturient montes, nascetur ridiculus mus. Nulla odio ligula, aliquam eget leo eget, sollicitudin fringilla ante.
</div>
<div class="col-md-3 btn-row">
<a href="#" class="btn btn-register btn-select">Select</a>
</div>
</div>
</div>
</div>
</div>
<h2>11:00am - Noon</h2>
<div class="sessions second-session">
<div class="panel panel-default">
<div class="panel-heading">
<h3 class="panel-title"><span class="rountable-name">Session 5</span></h3>
</div>
<div class="panel-body">
<div class="row">
<div class="col-md-9">
Donec aliquet arcu at risus consequat mollis. Morbi suscipit ipsum commodo posuere faucibus. Mauris dui lacus, accumsan sed sollicitudin eget, placerat a velit.
</div>
<div class="col-md-3 btn-row">
<a href="#" class="btn btn-register btn-select">Select</a>
</div>
</div>
</div>
</div>
<div class="panel panel-default">
<div class="panel-heading">
<h3 class="panel-title">Session 6</h3>
</div>
<div class="panel-body">
<div class="row">
<div class="col-md-9">
Nam congue quam non elementum placerat. Vivamus egestas, ante sed imperdiet fermentum, tortor libero fermentum magna, nec bibendum mauris lacus vitae ante. Donec eu leo volutpat, consectetur libero eu, porttitor dui. Mauris nec ornare ligula. Morbi et massa viverra, malesuada velit id, faucibus metus. Duis consequat tincidunt blandit.
</div>
<div class="col-md-3 btn-row">
<a href="#" class="btn btn-register btn-select">Select</a>
</div>
</div>
</div>
</div>
<div class="panel panel-default">
<div class="panel-heading">
<h3 class="panel-title"><span class="rountable-name">Session 7</span></h3>
</div>
<div class="panel-body">
<div class="row">
<div class="col-md-9">
Sed turpis nisl, efficitur pharetra hendrerit ac, gravida id mi. Duis elementum velit nec risus aliquet congue et non dolor.
</div>
<div class="col-md-3 btn-row">
<a href="#" class="btn btn-register btn-select">Select</a>
</div>
</div>
</div>
</div>
</div>
<div class="slideout-form">
  <div class="slideoutform-header">
    <h3>Your Agenda</h3>
    <div class="close">X</div>
  </div>
  <div class="slideout-content">
      <div class="session-name-1"></div>
      <div class="session-name-2"></div>
      <div class="text-center">
      <a href="#registration" class="btn btn-white">Register</a>
      </div>
  </div>
</div>
<h2 style="background-color:#49c5c8;">Register</h2>
<div class="sessions conf" id="registration">
<div class="panel panel-default">
<form action="" method="post" id="regForm">
<div class="row">
<div class="col-sm-6">
<label>First Name <span class="required">*</span></label>
<input class="form-control" name="firstname" required/>
</div>
<div class="col-sm-6">
<label>Last Name <span class="required">*</span></label>
<input class="form-control" name="lastname" required/>
</div>
</div>
<div class="row">
<div class="col-sm-6">
<label>Email Address <span class="required">*</span></label>
<input class="form-control" name="email" required/>
</div>
<div class="col-sm-6">
<label>Company <span class="required">*</span></label>
<input class="form-control" name="company" required/>
</div>
</div>
<div class="row">
<div class="col-sm-6">
<label>Job Title <span class="required">*</span></label>
<input class="form-control" name="jobtitle" required/>
</div>
</div>
<div class="row">
<div class="col-md-12 optin-container">
<input type="checkbox" name="optin" /> Opt-in to receive communications from Sample Company including exclusive event invites, product and company updates and more
</div>
</div>
<input type="hidden" name="session1" />
<input type="hidden" name="session2" />
<input type="hidden" name="tractionforcereg" />
<div class="footer-reg text-center">
<input type="submit" class="btn btn-register btn-large" value="Register" />
</div>
<div class="required required-msg">
</div>
</form>
</div>
</div>
</div>
</div>
</div>
</div>
<script src="http://code.jquery.com/jquery-latest.min.js" type="text/javascript"></script>
<script src="pardot-registration-inspiration.js" type="text/javascript"></script>
</body>
</html>
Creating a Salesforce marketing dashboard is an effective way to see how you are doing against your marketing targets. What channels are most effective for generating pipeline? How many leads did we generate this month compared to last month? In this post, I’ll share some example marketing dashboard components and some tips and tricks for creating dashboards in Salesforce.
Hot Tip: Check out this blog post to learn more about choosing a Salesforce marketing reporting tool.
Salesforce Marketing Dashboard Tips & tricks
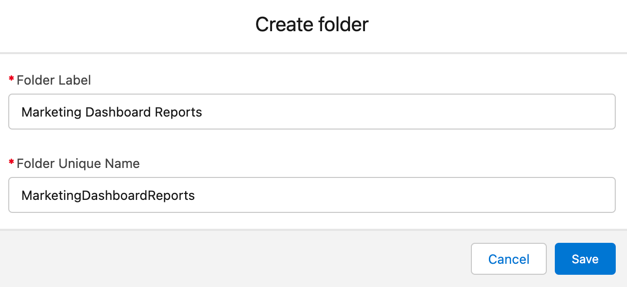
Create a reports folder for your dashboard reports
Anyone accessing your dashboard also needs access to the underlying reports. Creating a separate folder for your reports allows you to easily control who has access to them. And (bonus!) it’s easier to find your reports when you are creating your dashboard.
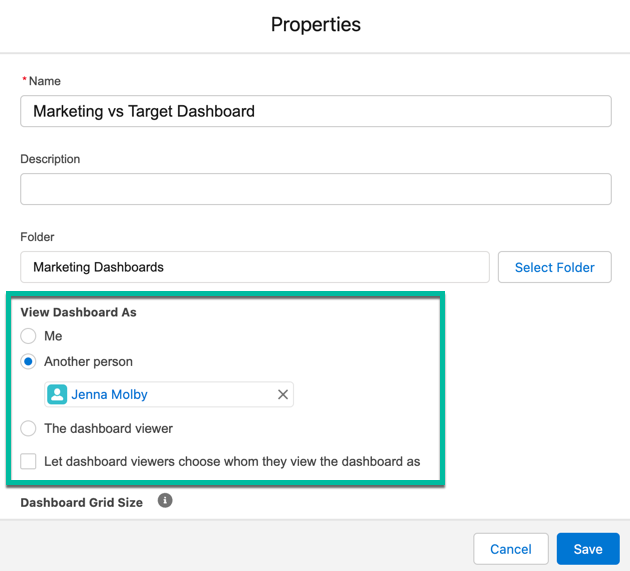
Choose your dashboard running user wisely
Each dashboard has a running user, whose security settings determine which data to display in a dashboard. If the running user is a specific user, all dashboard viewers see data based on the security settings of that user—regardless of their own personal security settings. For this reason, you’ll want to choose the running user wisely, so as not to open up too much visibility.
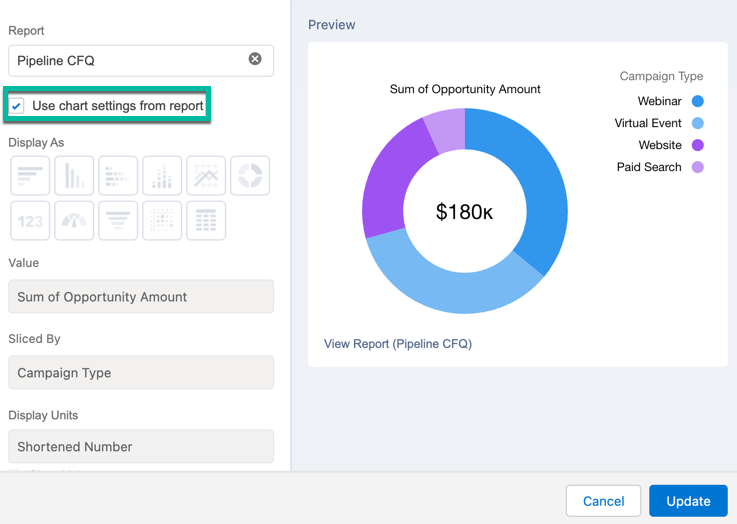
Add a chart directly to your report
Adding a chart directly within your report can speed up your dashboard setup time, especially if you are going to use the same report on multiple dashboards. It is also helpful if you are going to share the report directly instead of the dashboard.
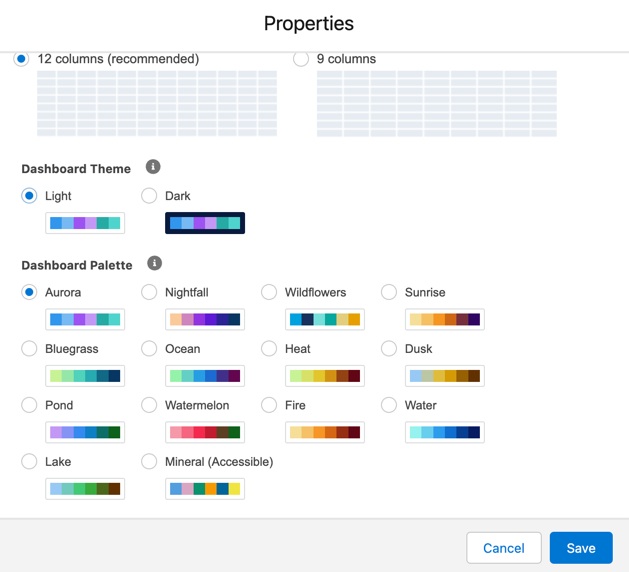
Change your dashboard palette
Give your dashboard a fresh new look by changing the dashboard palette. There are 14 themes available in both light and dark mode.
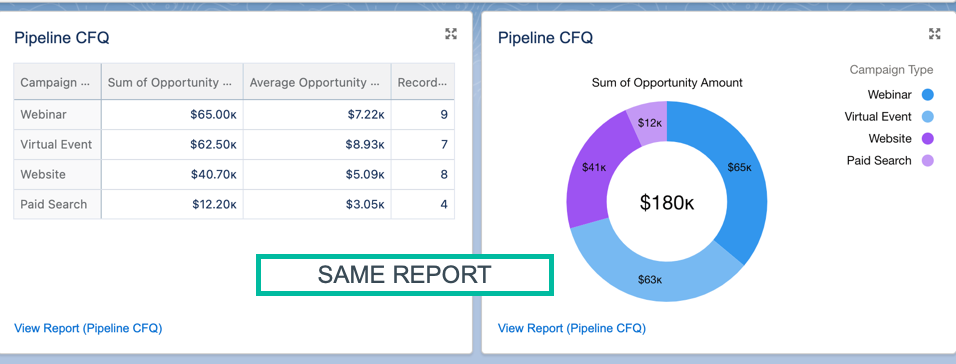
Resuse reports within your dashboard
The same report can be used many times within your dashboard. This is a great way to visualize the same data in different ways without creating multiple reports.
Example Dashboard Components
Let’s dive into some examples of what type of reports you might want to add to your dashboard. In these examples, I’m specifically looking at the pipeline and revenue marketing has generated. To pull these reports, I have the primary campaign source field populated on the opportunity and I use the campaigns with influenced opportunties report type. Your setup might be differ depending on how you associate marketing campaigns with opportunities.
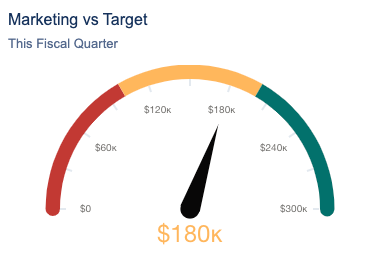
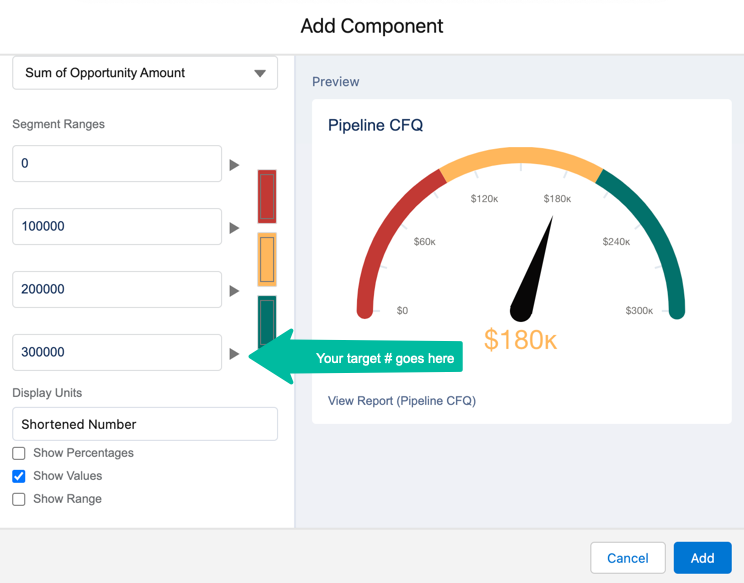
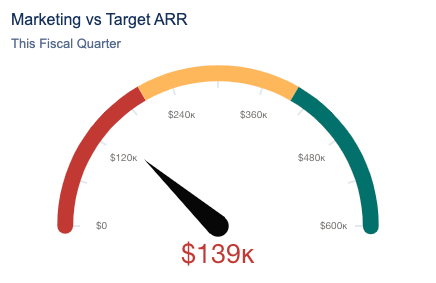
Marketing vs Target
What this reports answers: How are we tracking against our pipeline target?
Report setup
Report type: Campaigns with Influenced Opportunties
Filters: Show me all opportunities CREATED this fiscal quarter
Grouped by: Create date
Dashboard component setup
Chart type: Gauge
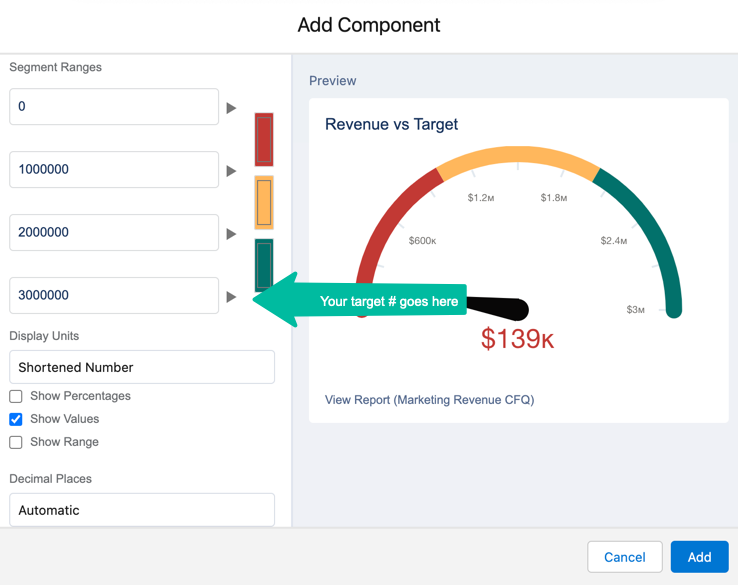
Closed won revenue
What this reports answers: How much marketing generated pipeline has been closed-won?
Report setup
Report type: Campaigns with Influenced Opportunties
Filters: Show me all opportunities CLOSED this fiscal quarter
Grouped by: Close date
Dashboard component setup
Chart type: Gauge
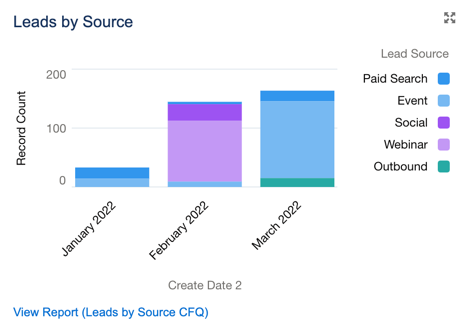
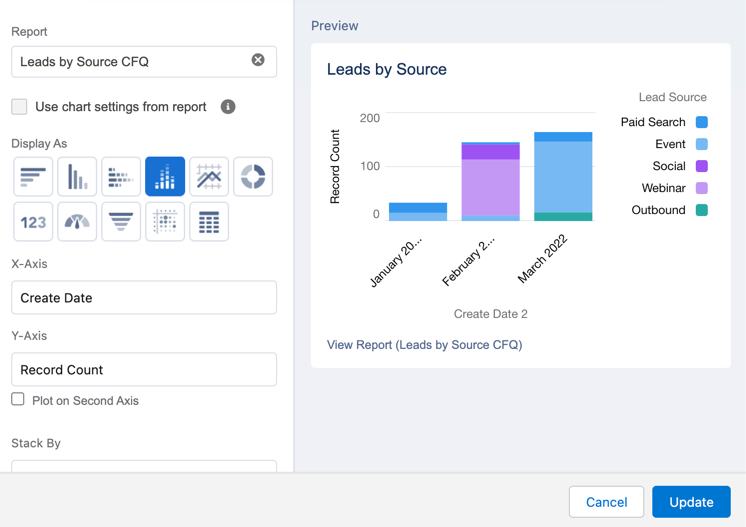
Leads created by source
What this reports answers: What are our top lead sources this quarter by month?
Report setup
Report type: Leads
Filters: Show me all leads created in the last fiscal quarter
Grouped by: Create date and lead source
Dashboard component setup
Chart type: Stacked vertical bar chart
X-axis: Create date
Y-axis: Record count
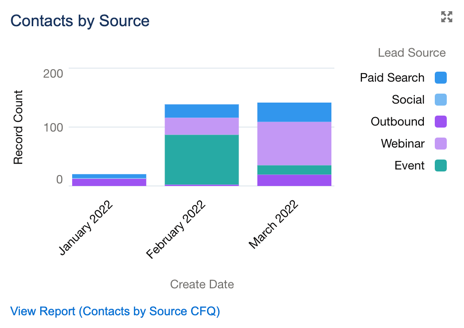
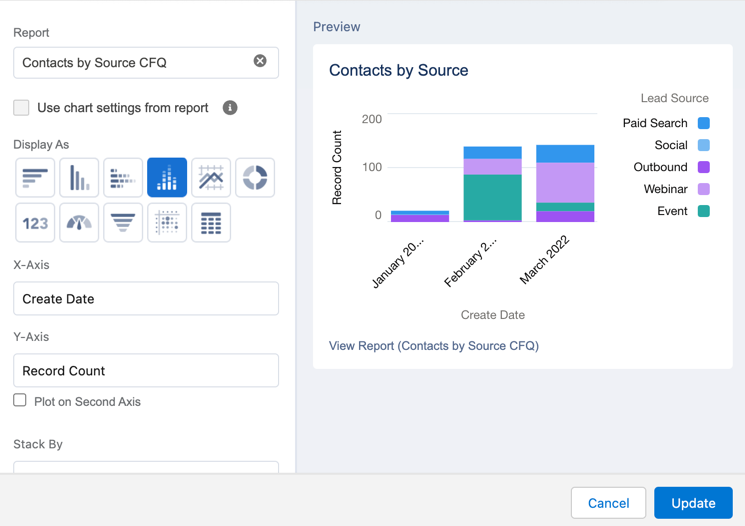
Contacts created by source
What this reports answers: What are our top contact sources this quarter by month?
Report setup
Report type: Contacts and Accounts
Filters: Show me all accounts created in the last fiscal quarter
Grouped by: Create date and lead source
Dashboard component setup
Chart type: Stacked vertical bar chart
X-axis: Create date
Y-axis: Record count
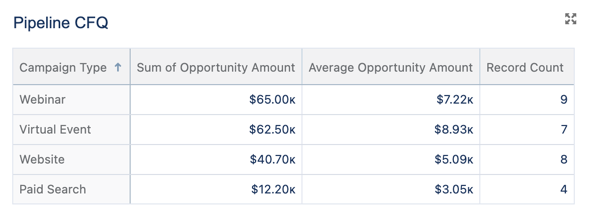
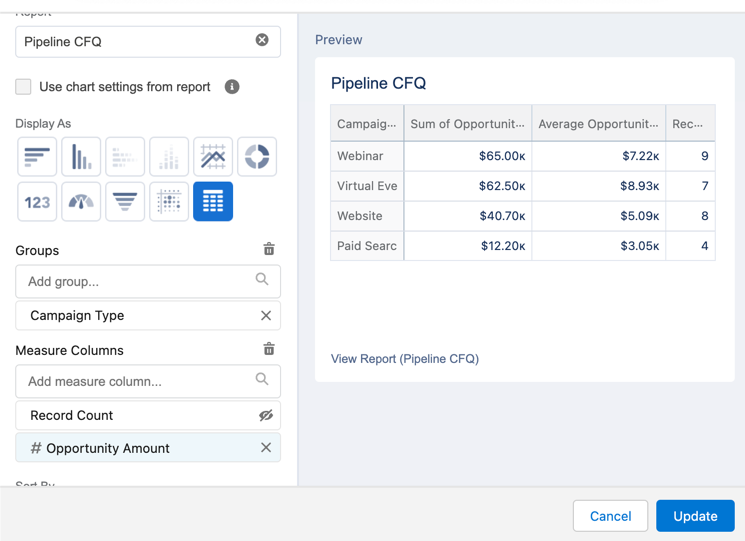
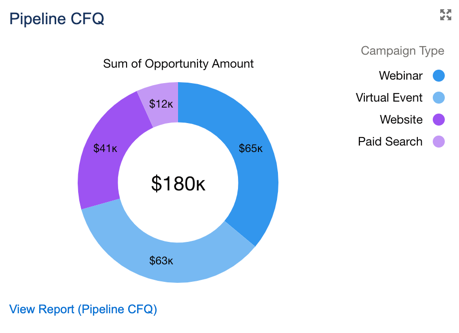
Pipeline by source
What this reports answers: What are the top marketing channels for generating pipeline?
Report setup
Report type: Campaigns with influenced opportunities
Filters: show me all campaigns where created date (opportunity) is this fiscal quarter
Grouped by: Campaign type
Columns: Opportunity amount summarized by sum and average
Dashboard component setup
Table component
Chart type: Lightning table
Grouped by: Campaign type
Measure: Opportunity amount (summarize by sum and average amount)
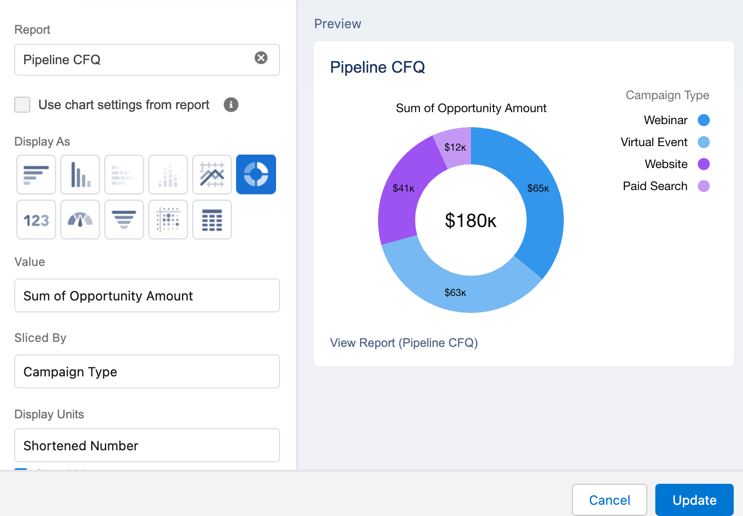
Donut component
Chart type: Donut
Marketing qualified leads (MQLs)
If you want to learn how to display MQL reports within your dashboard, check out this blog post.
Pardot lead assignment routing can trip up even the most experienced sales and marketing teams.
There are so many different ways to assign your prospects within Marketing Cloud Account Engagement (Pardot). Whether you want to manually assign prospects or utilize automation rules or completion actions to assign prospects based on their activity or information, the options can seem overwhelming.
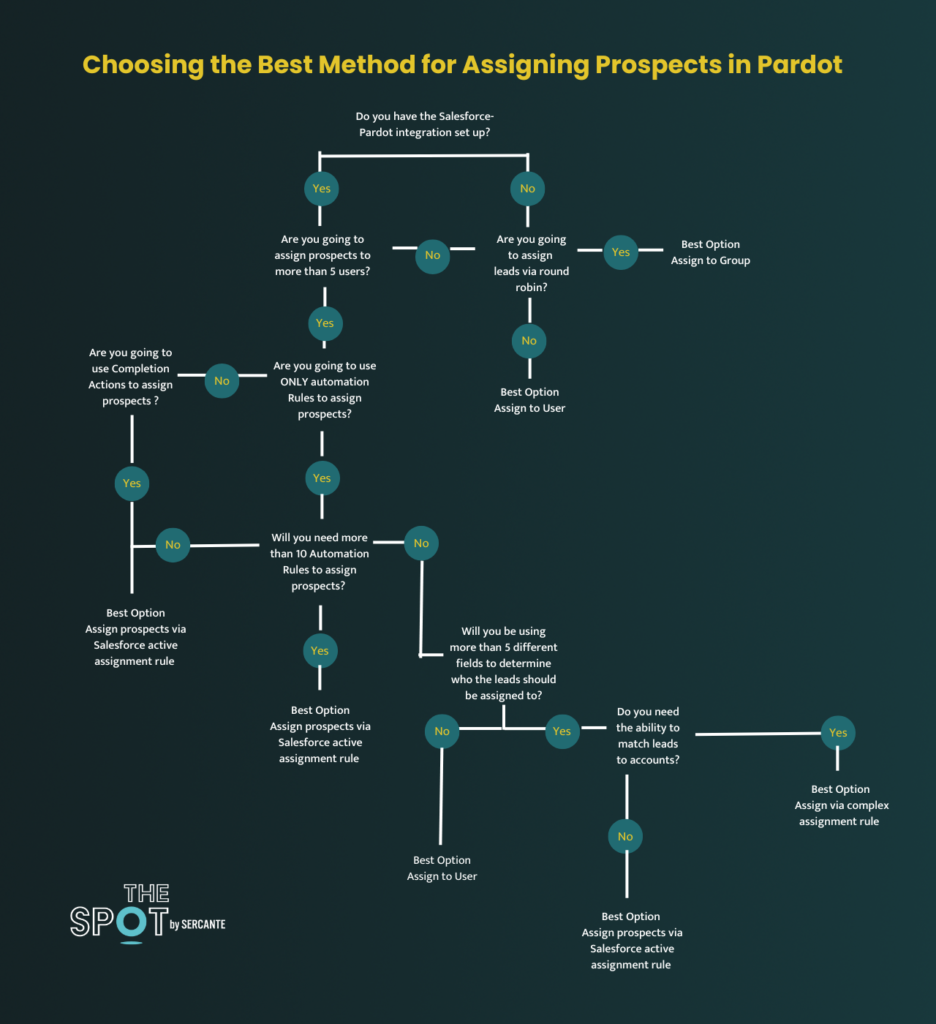
In this post, I’ll dive into 6 different ways to manage lead assignment in Pardot and how to determine what the best option is for you. After all, cultivating interest, inspiring action, and responding to people who raise their hands is why we’re here, right?
Six Pardot Lead Routing Methods
Choosing the right lead management strategy and tools to automate the process is challenging, but it’s super important. Read on to understand what you should know to make the right choice for your organization.
There are multiple ways to assign new leads in Pardot ranging from manual assignments to complex and automated assignments based on lead criteria or activity.
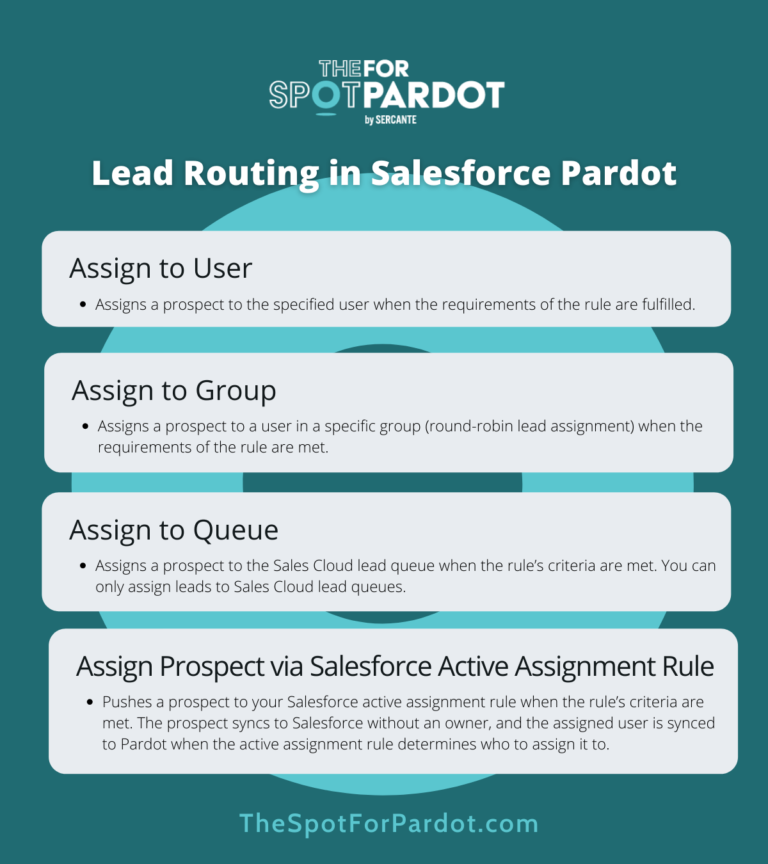
Assign to User
Assign Prospect Via Salesforce Active Assignment Rule
Assign to Group
Assign to Queue in Salesforce
Assignment via Prospect list actions
Assign via advanced lead assignment rules in Salesforce
1. Assign to User
Assigns a prospect to the specified user when the requirements of the rule are fulfilled.
How to use it
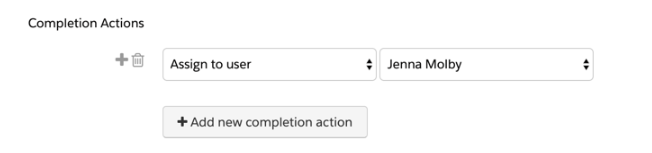
Completion Action:
Assign to user can be set up as a completion action for your forms, form handlers, files, custom redirects, emails and page actions, by selecting “Assign to user” and selecting the user’s name from the dropdown
Automation Rule:
Assign prospect to user can be set up as an action within an Automation Rule. This is a great way to assign leads if you have criteria the lead needs to meet before assigning the prospect to Sales.
For example, if you want to only assign leads to sales that meet a certain scoring threshold, use an automation rule.
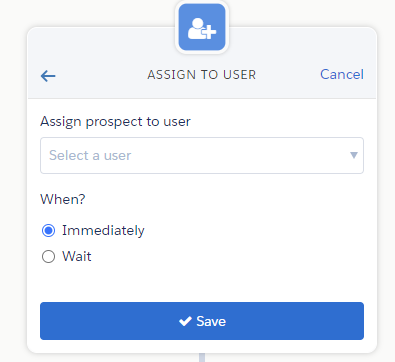
Engagement Studio Program:
Assign to user can also be set up as an action with an Engagement Studio Program, by selecting add element > action > assign to user.
Why this is a good method
Things to consider
Great if you don’t have many usersCan be used without the Salesforce integration
Assignment actions don’t reassign prospects who have an ownerDifficult to manage if you have many usersDifficult to figure out where the “assign to user” action is being used within your Pardot assets
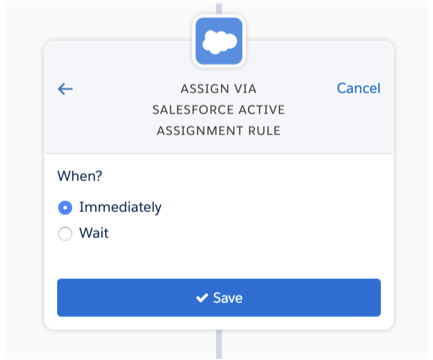
2. Assign Prospect via Salesforce Active Assignment Rule
Pushes a prospect to your Salesforce active assignment rule when the rule’s criteria are met (see more information on this process below). The prospect syncs to Salesforce without an owner.
The assigned user is synced to Pardot when the active assignment rule determines who to assign it to.
First, you will need an active lead assignment rule setup in Salesforce. This should include all the criteria for your lead assignment as well as a default user to assign the lead to if the lead does not meet any of the criteria.
Completion Action:
Assign via active Salesforce assignment rules can be set up as a completion action for your forms, form handlers, files, custom redirects, emails and page actions, by selecting “Assign prospect via Salesforce active assignment rule”.
Automation Rule:
Assign prospect via the Salesforce active assignment rule can be set up as an action within an Automation Rule.
Engagement Studio Program
Assign prospect via Salesforce active assignment rule can also be set up as an action with an Engagement Program, by selecting add element > action > assign prospect via Salesforce active assignment rule.
Why this is a good method
Things to consider
All lead assignment is set up in one placeNo need to update completion actions or automation rules in Pardot if you have an assignment update actionAssignment can be based off complex criteria and based on any lead field within SalesforceGreat if you have many Sales reps who should receive leads
You must have the Salesforce integration set upAny users assigned to a lead in Salesforce need to have a corresponding Pardot user to track ownership correctly in PardotRequires the “View Setup and Configuration” permission in Salesforce in order to make assignment updates
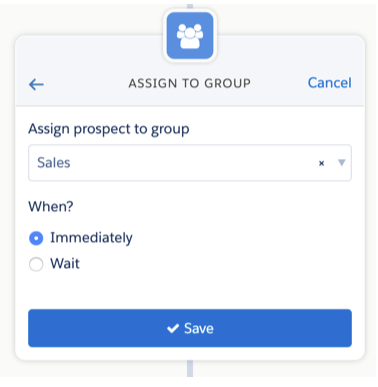
3. Assign to Group
Assigns a prospect to a user in a specific group (round robin lead assignment) when the requirements of the rule are met.
How to use it
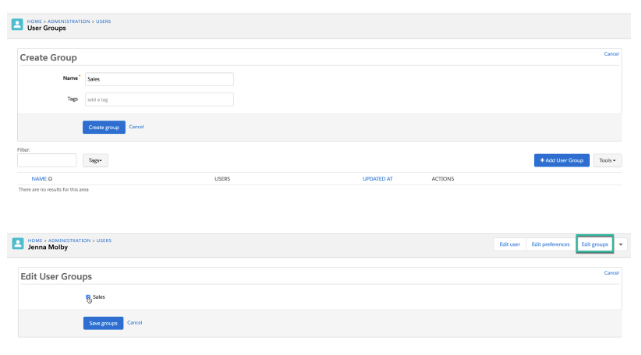
First, create a group in Pardot (Admin > User Management > Groups > Add User Group).
Navigate to the user you should belong to the group (Admin > User Management > Users) and click Edit Groups. Select the group to add the user.
Completion Action:
Assign to user can be set up as a completion action for your forms, form handlers, files, custom redirects, emails and page actions, by selecting “Assign to group” and selecting the user’s name from the dropdown
Automation Rule:
Assign prospect to user in group can be set up as an action within an Automation Rule.
Engagement Studio Program:
Assign to group can also be set up as an action with an Engagement Program, by selecting add element > action > assign prospect to group.
Why this is a good method
Things to consider
Allows for round-robin lead assignmentCan be used without the Salesforce integrationGreat if you don’t have many users to assign prospects to
Difficult to manage if you have many usersDifficult to figure out where the “assign to user” action is being used within your Pardot assetsProspects must be assigned via round-robin, unless you create groups with only one user
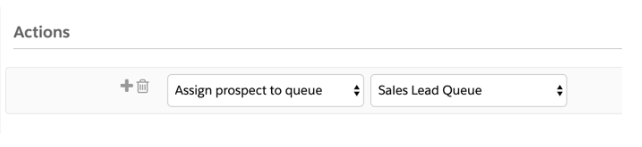
4. Assign to Queue in Salesforce
Assigns a prospect to the Sales Cloud lead queue when the rule’s criteria are met. Prospects assigned to a queue are considered assigned to an owner and aren’t reassigned. You can assign only leads to Sales Cloud lead queues.
How to use it
First, you must have a lead queue set up in Salesforce.
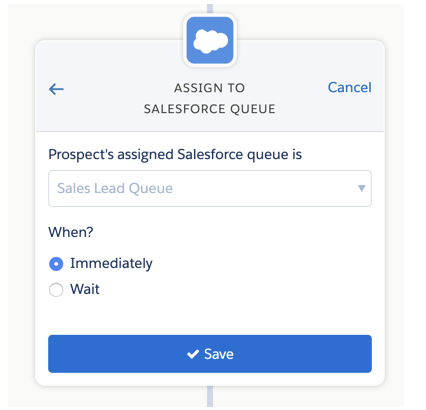
Automation Rule:
Assign to queue can be set up as an action within an Automation Rule.
Engagement Studio Program:
Assign to a queue can also be set up as an action with an Engagement Program, by selecting add element > action > assign to Salesforce queue.
Why this is a good method
Things to consider
Queue members can jump in to take ownership of any record in a queueEasy to prioritize, distribute, and assign records to teams who share workloads
This action can not be used if your connector is set up for Pardot to syncs to contacts instead of leadsYou can assign only leads to Salesforce lead queuesDoes not assign prospects to specific owners
5. Assignment via Prospect list actions
Prospects can be assigned to a User or Group via prospect list actions.
How to use it
Navigate to the prospect table, select the prospects you want to assign and select one of the options from the drop down menu.
Why this is a good method
Things to consider
Good for one-off lead assignmentWill re-assign prospects who are already assigned
Not automated, has to be updated manually
6. Assign via advanced lead assignment rules in Salesforce
If you have more complex business rules, assigning leads via an app on the Salesforce AppExchange might be a good option. Most apps offer a visual way to view lead assignment rules and some advanced functionality, including auto-merging duplicate leads and lead to account matching.
Great if you have many users and complex assignment rulesVisual view of lead assignment rulesAbility to assign leads via round robinCan automatically match leads to accountsCan filter records by advanced criteria (using fields from the leads or matched account)Automatically can convert leads from a matched account into a contactAuto-merge duplicate leads
Most apps on the AppExchange come at an additional costIt is another application to manageNot ideal if you have a small sales team or straightforward assignment rules.
Lead routing in Salesforce
Here are some additional ways Sales Cloud handles lead routing.
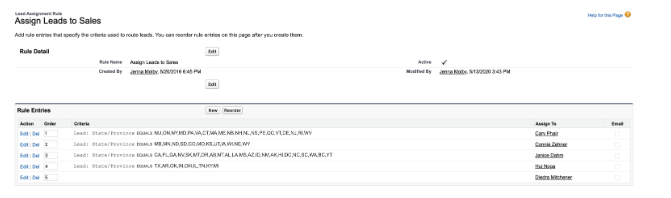
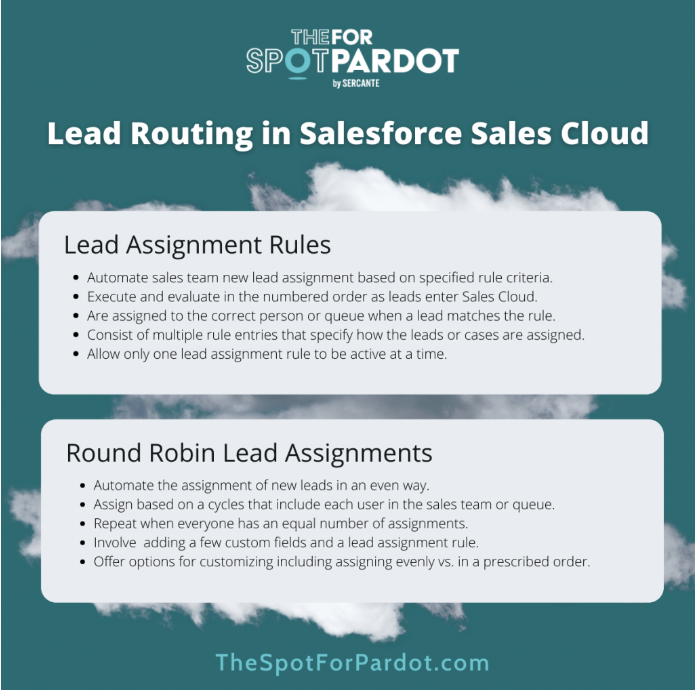
Lead assignment rules
In Sales Cloud, you can set up lead assignment rules to automate the assignment of new leads to your sales team or queues based on the specified rule criteria.
The rules will execute and evaluate in the numbered order as leads enter Sales Cloud. Each lead assignment rule consists of multiple rule entries that specify exactly how the leads or cases are assigned. When a lead matches the rule, it will be assigned to the correct person or queue. Only one lead assignment rule can be active at a time.
Third-party tools enable you to create complex lead routing rules that go beyond out-of-the-box Salesforce and Pardot lead routing features. Different tools serve specific purposes that may be the right fit depending on what you’re trying to accomplish.
Here are the most common ones.
LeanData
LeanData is a native Salesforce lead matching and routing platform that is easy to use and customize with their visual drag-and-drop interface functionality and complex rule building.
Hot Tip: You can read our full guide to implementing LeanData in this blog post.
RingLead
RingLead is a native Salesforce lead routing, data normalization, enrichment, and duplicate managing platform.
Validity
DemandTools from Validity is a data management platform to help with importing, assigning, standardizing, manipulating, and the deduplication of your Salesforce data quickly.
Feel the Relief of Knowing Your Leads Are In Good Hands
Think you’re a Pardot lead routing pro now? Still have no idea where to start? Either way, tell us about it in the comments! And reach out to Sercante when you need Pardot consultant expertise for extra help and customization.
If you’re new to using Salesforce campaigns, then this blog post is the perfect starting point. Use these 5 tips to make your life easier as you dip your toe into using Salesforce campaigns.
Even seasoned Salesforce pros may find a gem they haven’t seen before.
Tip #1: View the unique count of records in a report
Want to know how many accounts or companies attended an event, webinar or interacted with a marketing campaign? The “show unique count” option within Salesforce reports can be enabled to view this information.
How it works
While editing a report in the report builder, find the column for which you want to count unique values.
Click Show More | Show Unique Count.
Click Save.
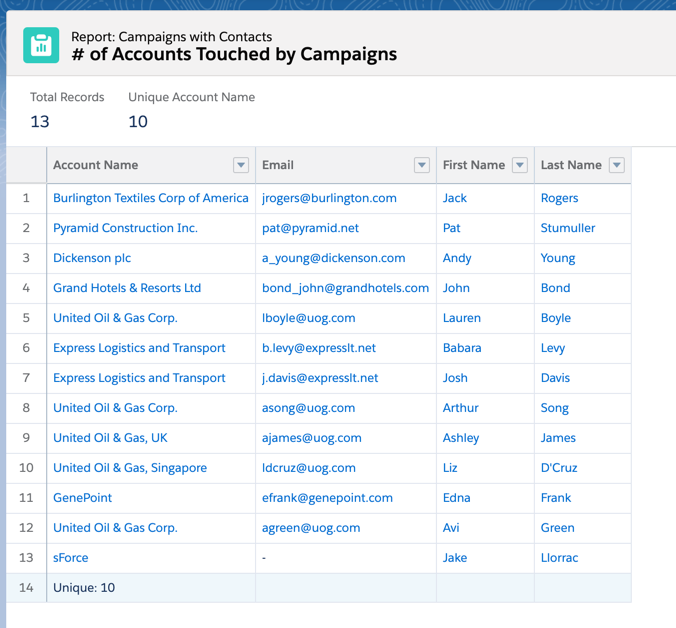
A count of unique values appears as a grand total for the whole report and as a subtotal for each group.
Each report support up to 3 unique counts.
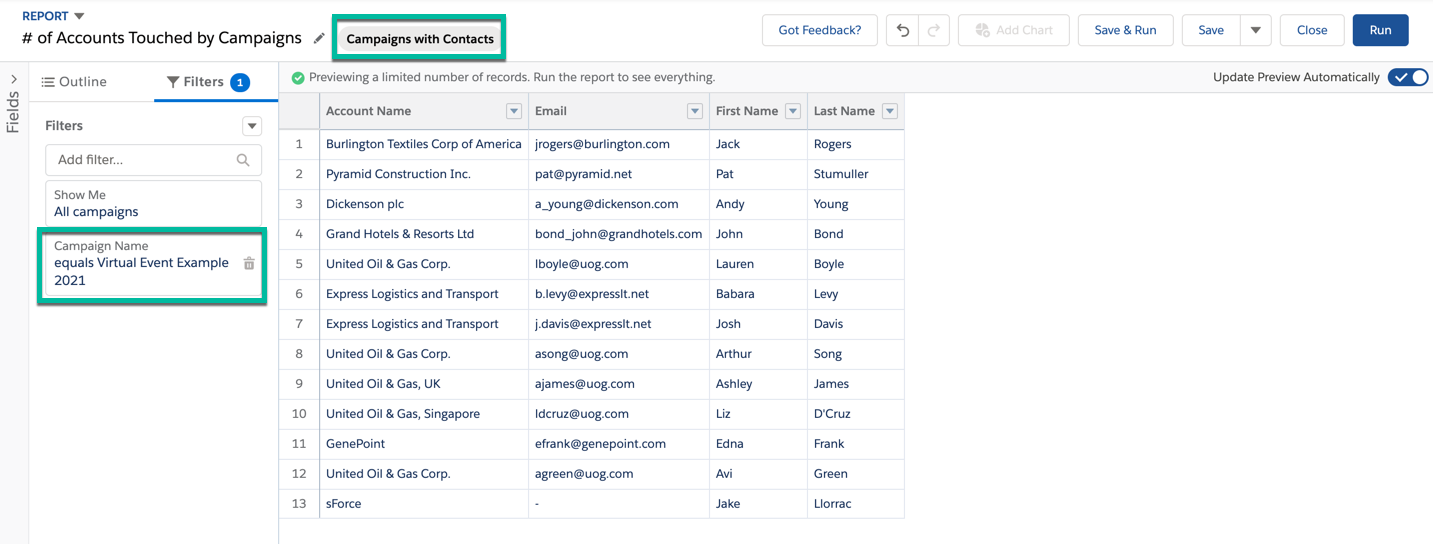
Example: Campaigns with contacts report
This example shows the unique count of the accounts touched by a specific marketing campaign.
The report is using the “campaigns with contacts” report type and has a filter for campaign name equals (the virtual event campaign).
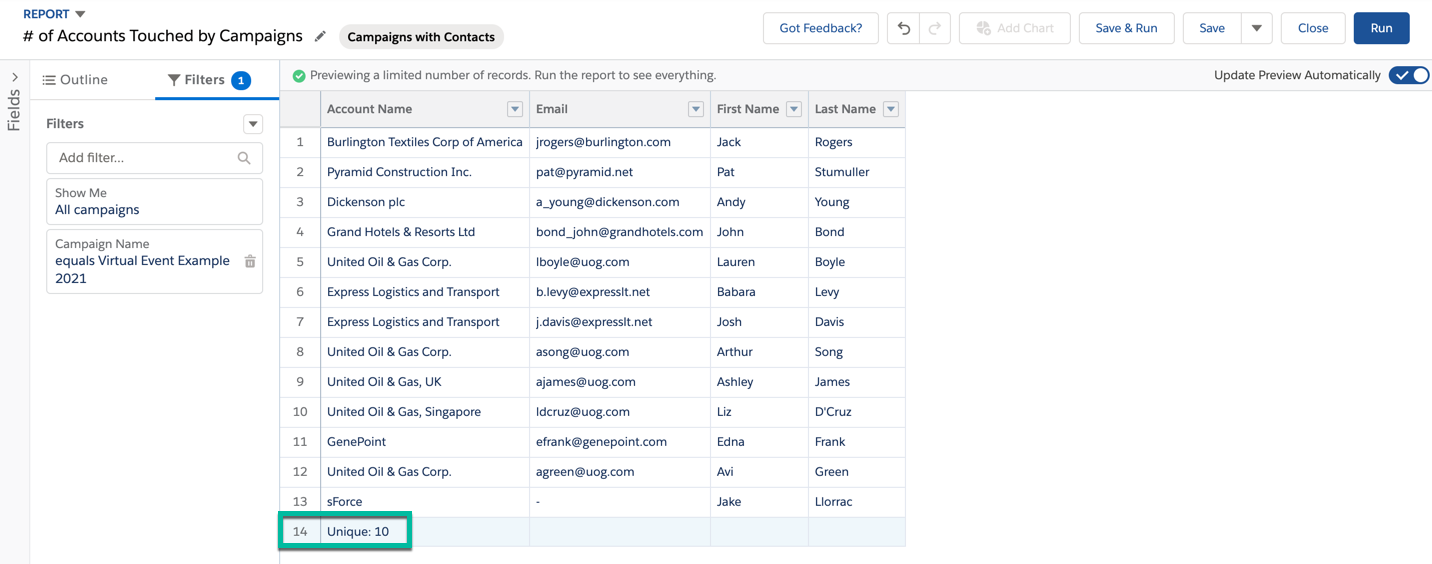
The unique count for account can be pulled by selecting the show unique count option for the account column.
Running the report allows you to see the total number of records (the number of contacts) and the unique account count (the number of accounts that were touched by the campaign).
Tip #2: Add custom fields to campaign members
The campaign member object in Salesforce represents the association between a campaign and a lead or a contact. While some standard lead and contact fields are available for the campaign member object, if you want to view or pull a report for custom fields, you will need to create a new field.
How it works
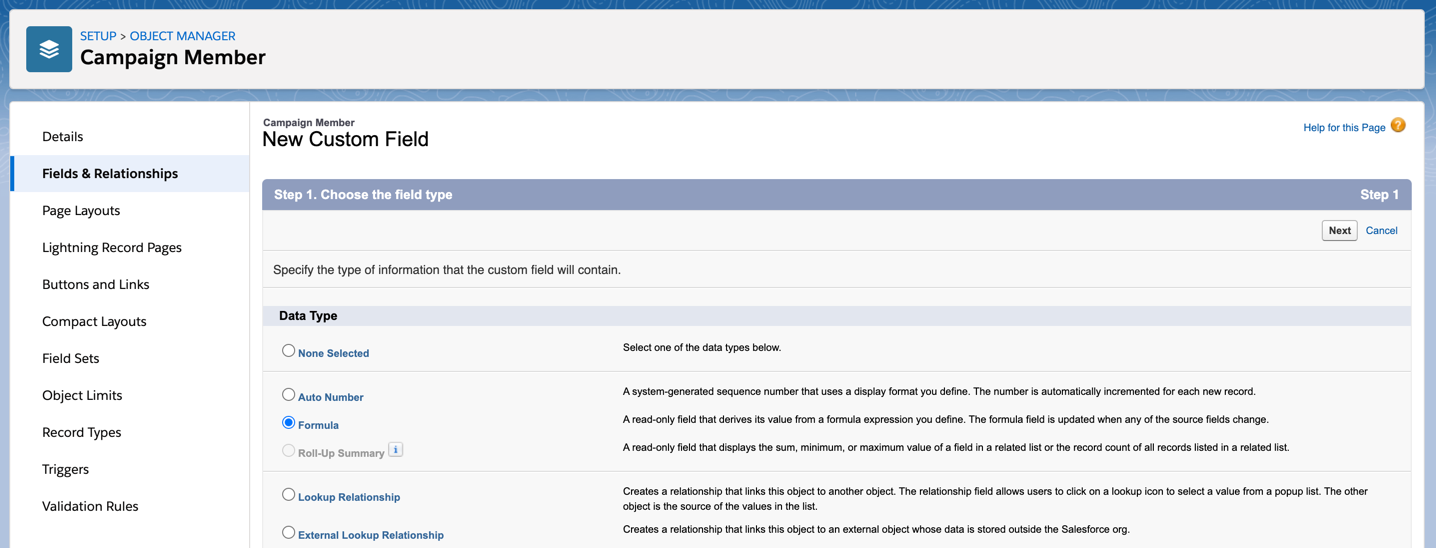
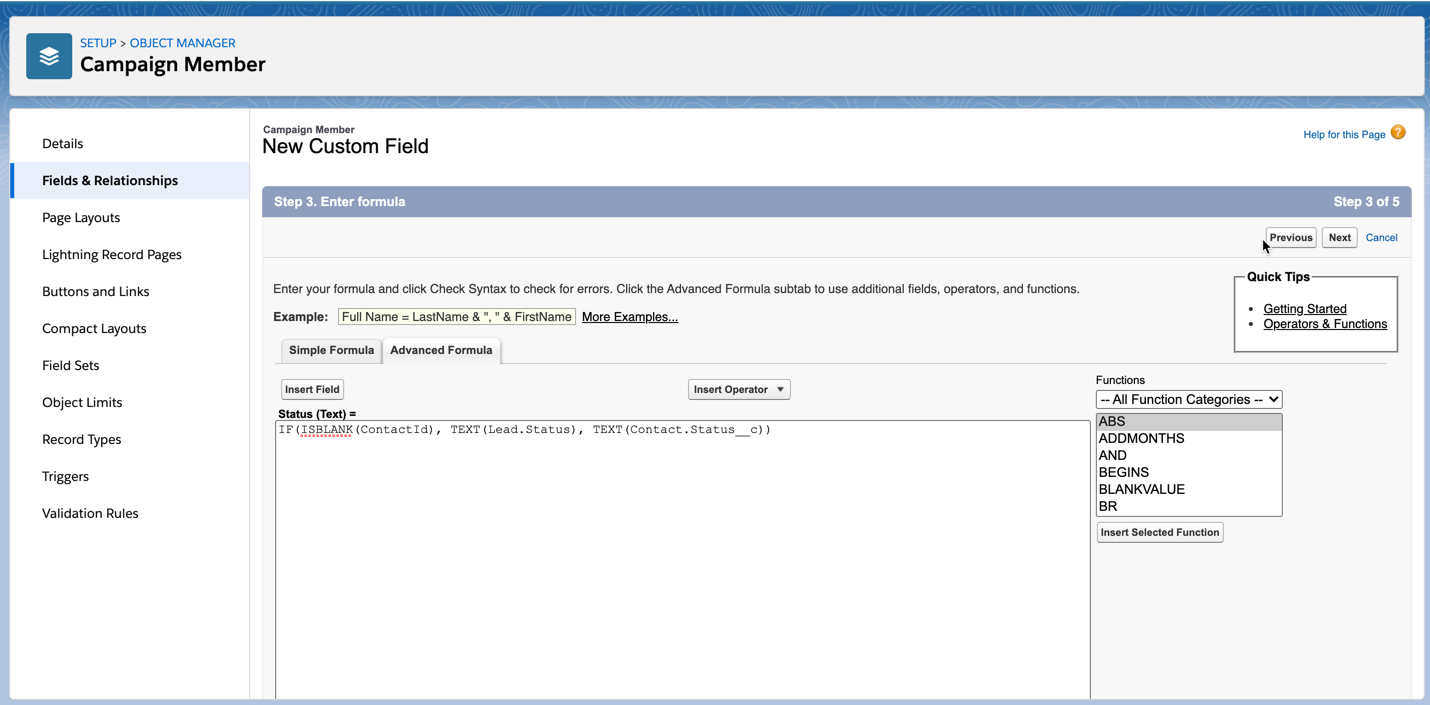
Create a formula field on the campaign member object that will check if the campaign member is a Lead or a Contact and populate the field with the custom field value.
Navigate to the campaign member object within the object manager and create a new formula field.
If your lead and contact fields are picklists, use this syntax for the formula.
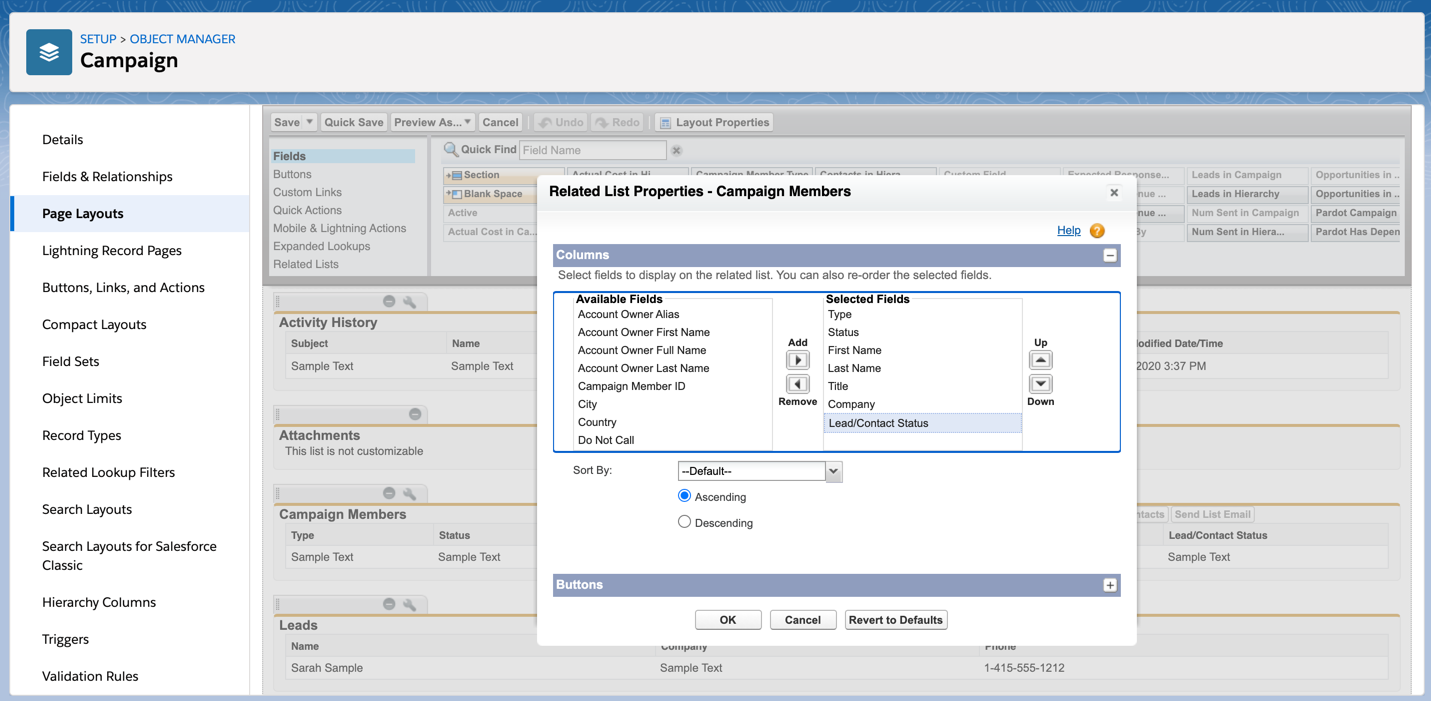
You can add the new custom field to the campaign member related list by navigating to the campaign object in the campaign manager and selecting your page layout. Scroll to the campaign member related list and click on the wrench icon to select your fields.
Now the custom field displays in the related list for campaign members.
Tip #3: Create a campaigns calendar (without installing an app)
Did you know you can create a calendar based on any custom object in Salesforce – without using an app? Yes, this applies to the campaigns object as well. While there are a couple of limitations to using this feature, it’s a great way to get a view of all your campaigns in a campaign view without purchasing an app from the Salesforce App Exchange.
How it works
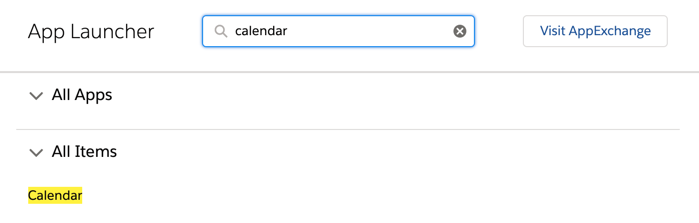
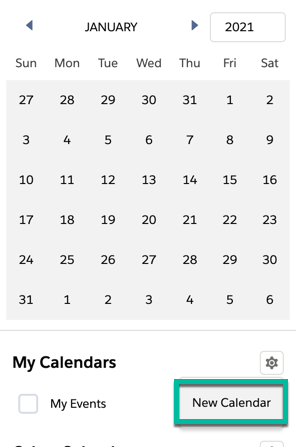
Search for “Calendar” in the App Launcher to find the calendar app.
Under My Calendars, click on the gear icon to create a new calendar.
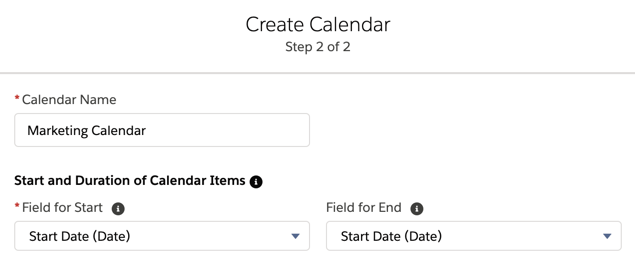
Select the Campaign object from the drop-down and click next.
Give your calendar a name and select the start date (required) and the end date (optional). You can use the standard Salesforce campaign fields for the start date and end date, or you can select a custom field. For example, if you have a “go live” date field, you can use that as your start date instead.
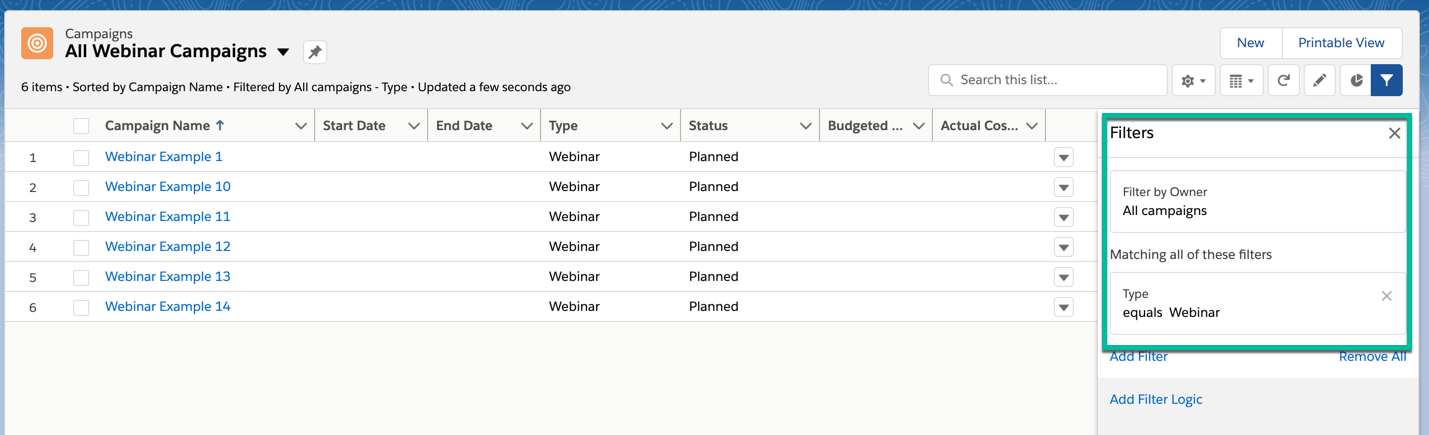
You also have the option to add a filter to your calendar. The filter has to be a list view using the campaign object. For example, if you want to have a separate campaign calendar for webinars only, this is what your list view would look like.
Here’s what my calendar looks like:
Click on the gear icon next to your calendar name to change the colour of the campaigns displayed in the calendar.
Hover over the campaign name within the calendar to view more information about the campaign.
Limitations
There is one big limitation when it comes to using this feature… the calendar can not be made shareable without using the API. If you want to use this feature, each user will need to create their own calendar. With that being said, there is an idea open to allow sharing via the UI.
If you are looking for more robust calendar functionality, take a look at these apps on the Salesforce AppExchange.
Tip #4: How to automatically create campaign member status values
When a new campaign is created in Salesforce, there are two default member status values: “Sent” and “Responded”. For the majority of your campaigns, you will want to get more granular with your campaign member statuses than the default values. To do this, there are a couple of options:
Create the statuses manually when you create a new Salesforcecampaign.
One of my favourite Lightning features is customizing the campaign page using the Lightning App Builder. The drag-and-drop App Builder allows you to add tabs, reports and instructions to your page.
How to customize your campaign page
To customize your campaign page, navigate to one of your Salesforce campaigns, click on the gear icon, and click on edit page. This will take you to the Lightning Page Builder.
Note: Editing the page will overwrite the existing page. You might want to create a new custom record page instead of overwriting an existing page.


